I. Введение в вокальные пресеты Studio One

A. Сила вокальных пресетов в Studio One
Studio One произвела революцию в области музыкального производства, и ключевым элементом этой трансформации является использование вокальных пресетов. Эти пресеты — это не просто простые фильтры; это сложные конфигурации, которые улучшают качество записи вокала в Studio One. Используя эти пресеты, артисты и продюсеры могут применять сложные техники звукоинженерии, которые ранее были доступны только профессиональным студиям. Влияние этих вокальных пресетов в Studio One глубоко, предлагая уровень полировки и совершенства вокальных дорожек, который может повысить общее качество любого музыкального проекта.
B. Преимущества использования вокальных пресетов
Преимущества использования вокальных пресетов в Studio One многочисленны. Во-первых, они обеспечивают значительную экономию времени. С пресетами длительный процесс ручной настройки эквалайзеров, компрессоров и других эффектов сводится к нескольким простым кликам. Эта эффективность бесценна, особенно при работе в сжатые сроки или при управлении несколькими проектами. Кроме того, эти пресеты обеспечивают стабильное качество звука. Независимо от того, работаете ли вы над одной дорожкой или целым альбомом, использование вокальных пресетов гарантирует единый тон и качество во всех ваших проектах. Более того, их универсальность в различных жанрах, от рэпа до R&B, делает их незаменимым инструментом в арсенале любого современного музыкального продюсера.
C. Обзор статьи
Эта статья посвящена тому, как установить вокальные пресеты в Studio One. Мы подробно рассмотрим шаги, необходимые для интеграции этих мощных инструментов в вашу установку Studio One, что повысит ваши возможности в производстве музыки. Кроме того, мы выделим эксклюзивные вокальные пресеты, доступные на bchillmusic.com, которые разработаны для удобства использования и совместимы с широким спектром жанров. Независимо от того, являетесь ли вы опытным продюсером или только начинаете, это руководство обеспечит вас знаниями для эффективного использования вокальных пресетов Studio One, поднимая ваше музыкальное производство на новый уровень.
II. Подготовка к установке

A. Системные требования и настройка Studio One
Перед установкой вокальных пресетов и шаблонов в Studio One важно убедиться, что ваша система соответствует необходимым требованиям для оптимальной работы. Ключевые моменты включают:
-
Совместимость с операционной системой: Проверьте, что ваша операционная система совместима с версией Studio One, которую вы используете. Studio One регулярно обновляется, поэтому важно иметь относительно современную ОС.
-
Процессор и ОЗУ: Мощный процессор и достаточный объем оперативной памяти (не менее 4 ГБ, хотя рекомендуется 8 ГБ и более) необходимы для плавной работы, особенно при работе со сложными проектами с множеством дорожек и эффектов.
-
Место на диске: Убедитесь, что у вас достаточно места не только для Studio One, но и для дополнительных плагинов, пресетов и файлов проектов.
-
Установка Studio One: Если Studio One еще не установлен, скачайте и установите его с официального сайта PreSonus. После установки откройте Studio One и ознакомьтесь с его интерфейсом, особенно с разделами, где управляются пресеты и шаблоны.
B. Понимание вокальных пресетов и шаблонов
Вокальные цепочки пресетов Studio One играют важную роль в оптимизации музыкального производства:
-
Вокальные пресеты: Это предварительно настроенные параметры обработки вокала, предназначенные для быстрого и эффективного улучшения вокальных дорожек. Обычно они включают комбинацию эквалайзера, компрессии, реверберации и других эффектов, адаптированных для достижения профессионального звучания вокала.
-
Шаблоны для записи: Шаблоны — это заранее настроенные проектные файлы с предустановленными дорожками, эффектами и настройками микширования. Они обеспечивают структурированную отправную точку для новых проектов, экономя время и обеспечивая единообразие в ваших продукциях.
C. Поиск пресетов и шаблонов
Поиск качественных вокальных пресетов и шаблонов для записи — ключевой шаг в улучшении вашего опыта работы с Studio One:
-
Встроенные опции Studio One: Studio One поставляется с набором встроенных пресетов и шаблонов, которые являются отличной отправной точкой для начинающих.
-
Онлайн-маркеты и сообщества: Сайты, такие как bchillmusic.com, предлагают широкий выбор эксклюзивных ресурсов для Studio One. В их числе вокальные пресеты и шаблоны для записи с использованием стандартных плагинов, подходящие для различных жанров, таких как рэп и R&B. Такие ресурсы особенно полезны для тех, кто ищет готовые к использованию профессиональные инструменты для своих проектов в Studio One.
-
Поставщики третьих сторон: Многие профессиональные звукоинженеры и компании по производству музыки предлагают индивидуальные пресеты и шаблоны для Studio One. Обязательно приобретайте их у проверенных поставщиков, чтобы гарантировать качество и совместимость.
Подготовив систему и поняв, где найти нужные инструменты, вы на правильном пути к улучшению вашего рабочего процесса музыкального производства в Studio One.
III. Пошаговый процесс установки

A. Установка вокальных пресетов в Studio One
Чтобы установить вокальные пресеты в Studio One, выполните следующие подробные шаги:
-
Найдите загруженные пресеты: После загрузки вокальных пресетов, обычно в форматах .preset или .fxp, найдите их на вашем компьютере.
-
Откройте Studio One: Запустите Studio One и откройте проект, в котором хотите использовать вокальные пресеты.
-
Доступ к панели эффектов: В вашем проекте выберите дорожку, на которую хотите применить вокальный пресет. Затем откройте панель эффектов на этой дорожке.
-
Импорт пресета: В панели эффектов найдите плагин, для которого у вас есть пресет. Нажмите на плагин, чтобы открыть его интерфейс. Найдите опцию для импорта, загрузки или открытия пресета в интерфейсе плагина. Перейдите к месту, где вы сохранили загруженный вокальный пресет, выберите его и откройте.
-
Примените и настройте пресет: После загрузки пресет настроит параметры плагина в соответствии с конфигурацией пресета. Вы можете дополнительно изменить эти настройки, чтобы они соответствовали конкретным требованиям вашей вокальной дорожки.
B. Настройка шаблонов записи
Установка и использование вокального шаблона Studio One может значительно улучшить ваш рабочий процесс:
-
Найдите файл шаблона: Найдите загруженный файл шаблона записи, который должен иметь расширение .song.
-
Откройте Studio One: Запустите Studio One и перейдите в «Файл» > «Открыть». Перейдите к месту расположения загруженного файла шаблона.
-
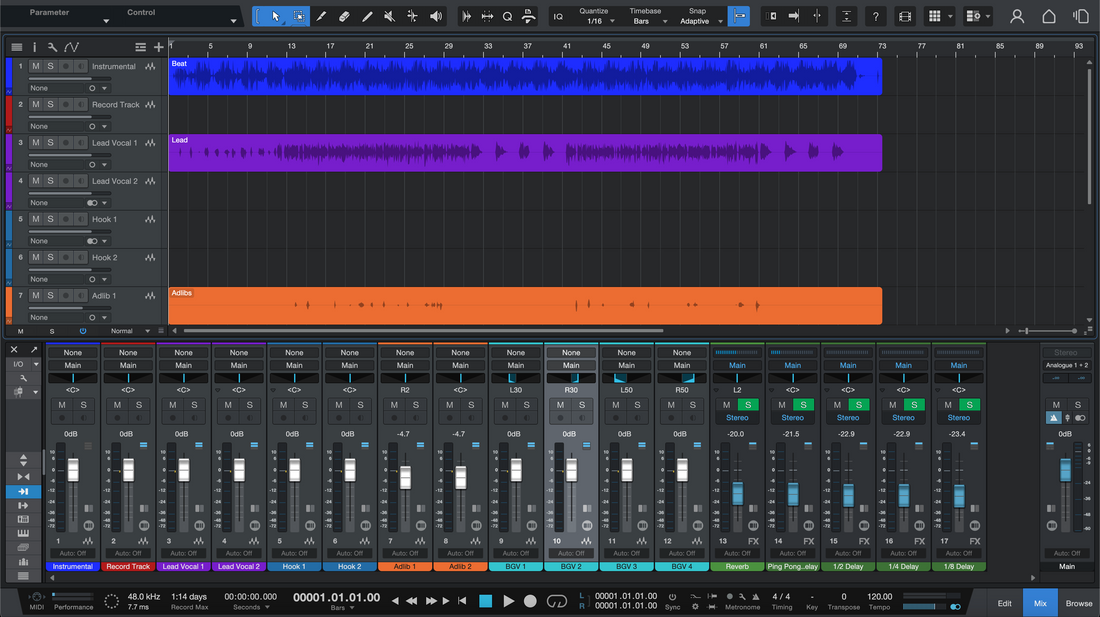
Использование шаблона: Выберите файл шаблона и откройте его. Studio One загрузит шаблон как новый проект. Теперь вы можете начать запись или добавлять дорожки в этот шаблон.
- Выделение удобных для пользователя шаблонов: Для начинающих или тех, кто ищет простоту использования, рассмотрите студийный шаблон записи с предустановленными плагинами, доступный на bchillmusic.com. Эти шаблоны разработаны быть простыми и особенно подходят для жанров, таких как рэп и R&B.
C. Настройка для личного использования
Персонализация пресетов и шаблонов гарантирует их соответствие вашему уникальному творческому видению:
-
Настройка параметров пресета: После применения вокального пресета вы можете захотеть точно настроить его параметры. Экспериментируйте с параметрами, чтобы подобрать тон и стиль вашей вокальной дорожки.
-
Изменение макета шаблона: Не стесняйтесь добавлять новые дорожки, удалять ненужные или перестраивать существующий макет шаблона, чтобы лучше соответствовать вашему рабочему процессу.
-
Сохранение пользовательских версий: после внесения изменений в пресет или шаблон сохраните его как новую версию. Таким образом, вы сможете создать коллекцию персонализированных пресетов и шаблонов для разных проектов и задач.
Следуя этим шагам, вы сможете эффективно устанавливать и настраивать вокальные пресеты и шаблоны для записи Studio One, адаптируя их под ваши конкретные требования и улучшая процесс музыкального производства.
IV. Максимизация вашего опыта работы с Studio One

A. Эффективное использование пресетов и шаблонов
Интеграция вокальных пресетов Studio One 5 и шаблонов для записи в ваши проекты Studio One может значительно повысить качество и эффективность вашего музыкального производства. Вот как максимально использовать эти инструменты:
-
Стратегическое применение: используйте вокальные пресеты как отправную точку для ваших вокальных дорожек. Применяйте их, а затем настраивайте в соответствии с конкретными потребностями каждого трека, учитывая жанр, стиль вокала и желаемый конечный результат.
-
Последовательность между проектами: используйте шаблоны для поддержания единой настройки и рабочего процесса во всех ваших проектах. Это особенно полезно, если вы работаете над альбомом или серией связанных треков, так как обеспечивает единое качество и ощущение звучания.
-
Эффективный рабочий процесс: шаблоны могут оптимизировать ваш рабочий процесс, позволяя сосредоточиться больше на творческих аспектах музыкального производства. С заранее настроенной конфигурацией вы можете сразу приступать к записи и микшированию, экономя ценное время.
B. Продвинутые методы настройки
Чтобы действительно сделать пресеты и шаблоны своими, рассмотрите эти продвинутые методы настройки:
-
Наложение эффектов: не бойтесь накладывать дополнительные эффекты поверх ваших вокальных пресетов. Это может добавить глубину и характер вашим вокалам, создавая уникальное звучание.
-
Изменение структуры шаблона: не стесняйтесь перестраивать структуру ваших шаблонов. Добавляйте новые дорожки, удаляйте ненужные или меняйте маршрутизацию, чтобы лучше соответствовать вашему рабочему процессу.
-
Создание гибридных шаблонов: комбинируйте элементы из разных шаблонов, чтобы создать гибрид, идеально подходящий вашим потребностям. Это может включать объединение ударной дорожки из одного шаблона с вокальной цепочкой другого.
C. Финальные рекомендации
Эксперименты — ключ к поиску вашего уникального звучания и рабочего процесса в Studio One. Пробуйте разные пресеты и шаблоны, чтобы понять, что подходит именно вам. Не бойтесь модифицировать и смешивать их, чтобы создать что-то, что действительно отражает ваше художественное видение.
Для широкого спектра высококачественных ресурсов Studio One рассмотрите возможность просмотра большего количества наших пресетов и шаблонов на bchillmusic.com. На сайте представлен ассортимент вокальных пресетов и шаблонов для записи, включая те, которые используют стандартные плагины, подходящие для различных стилей и жанров. Эти ресурсы могут стать ценным дополнением к вашему набору инструментов для музыкального производства, помогая поднять ваши проекты Studio One на профессиональный уровень.


