


Kayıt şablonları, parçaları, yönlendirmeleri, renkleri, dönüşleri ve temel zincirleri tek seferde yükleyerek oturumları hızlandırır. Bu rehber, şablon dosyalarının nasıl kurulacağını, hızlı erişim için nasıl düzenleneceğini, varsayılan setin nasıl ayarlanacağını ve yaygın hatalardan nasıl kaçınılacağını gösterir. Sonunda temiz bir tarayıcı, güvenilir girişler ve her oturuma uygun bir şablon portföyü elde edeceksiniz.
I. Kayıt şablonunun ne olduğu (ve neden önemli olduğu)
Kayıt şablonu, kayıt için hazır parçalara sahip kaydedilmiş bir Ableton Live Set (.als) veya paketlenmiş bir projedir (.alp). Giriş yönlendirmesi, parça grupları, dönüş efektleri, tıklama tercihleri ve de-esser veya kulaklık filtreleri gibi yardımcı cihazlar içerebilir. Şablonlar tekrarlayan kurulumları ortadan kaldırır ve sanatçılar kayıt yapmaya hazır olduğunda zihninizi korur.
- Tutarlılık: her oturum aynı yönlendirme ve kazanç aşamasıyla başlar.
- Hız: kulaklık mikslerini yeniden oluşturma veya kayıt-kol mantığı yok.
- Kalite: örnekleme hızı, gecikme veya eksik efektlerle daha az hata.
II. Dosya türleri ve bulundukları yerler
.als, bir Live Set'tir. Normal bir proje gibi açılır. Şablon olarak kaydederseniz, Tarayıcıdaki Şablonlar alanında görünür (Live 11/12).
.alp, bir Live Paketi'dir. Üzerine çift tıkladığınızda, Live bunu bir klasöre açar. İçinde genellikle bir .als ve Varlıklar (Örnekler, Ön ayarlar vb.) bulursunuz.
User Library, kişisel içerik konumunuzdur. Özel Şablonları, ön ayarları ve klipleri buraya koyabilir ve yan panelden göz atabilirsiniz.
Places, herhangi bir sürücüden klasör ekleyebileceğiniz ve dosyaları taşımadan içeriklerine erişebileceğiniz Tarayıcı bölümüdür.
III. Ön yükleme kontrol listesi (hızlı)
- Live 11 veya Live 12 kurulmuş ve güncellenmiş.
- Paketleri açmak için yeterli disk alanı.
- Ses arayüzü seçili ve çalışıyor (Tercihler → Ses).
- Bir şablon eklentilere referans veriyorsa, yüklü ve etkin olduklarından emin olun (Tercihler → Eklentiler; Yeniden Tara).
- Kullanıcı Kitaplığı konumunuzu bilin (Tercihler → Kitaplık).
IV. Şablonları yüklemenin üç yolu (uygun olanı seçin)
Aşağıdaki yöntemlerin herhangi birini kullanabilirsiniz. Karıştırmak ve eşleştirmek güvenlidir.
Yöntem A — Klasörü Yerler'e ekle (değişiklik yapmaz)
- Live'ı açın. Tarayıcıda, Yerler → Klasör Ekle… tıklayın.
- Şablon setinizi (.als) veya paketinizi (.alp) içeren klasörü seçin.
- Klasörünüz kenar çubuğunda görünür. Göz atmak için tıklayın. Açmak için .als dosyasına çift tıklayın; veya önce açmak için .alp dosyasına çift tıklayın.
- İsteğe bağlı: sete sağ tıklayın ve Canlı Seti Şablon Olarak Kaydet seçeneğini seçerek Şablonlar alanınıza ekleyin.
Bu harika çünkü: orijinal indirmenizi korur; dosyaları taşımadan hızlıca güncelleyebilir veya yeniden indirebilirsiniz.
Yöntem B — Kullanıcı Kitaplığı içinde sakla (taşınabilir)
- Kullanıcı Kitaplığı yolunuzu bulun (Tercihler → Kitaplık).
- Finder/Explorer'da bir klasör oluşturun:
Kullanıcı Kitaplığı/Şablonlar/Kayıt. - .als şablonunu oraya kopyalayın. Live'da, Tarayıcıyı açın ve Kullanıcı Kitaplığı → Şablonlar → Kayıt içine girin.
- Sete sağ tıklayın → Canlı Seti Şablon Olarak Kaydet (Live 11/12) eğer isterseniz Şablonlar listesine eklemek için.
Bu harika çünkü: bir dizin geri gidebilir ve özel içeriği birlikte tutabilirsiniz.
Yöntem C — Live Paketi (.alp) açma
- .alp dosyasına çift tıklayın. Live, açılacak yeri sorar; bir müzik proje klasörü veya Kullanıcı Kütüphanenizi seçin.
- Paket açıldıktan sonra, yeni klasör içindeki .als dosyasını açın. Girişleri, cihazları ve dönüşleri gözden geçirin.
- Beğendiyseniz, Dosya → Live Seti Şablon Olarak Kaydet ile Şablonlara ekleyin.
Bu neden harika: paketler, setle birlikte taşınan örnekler, raflar ve makrolar içerebilir.
V. Bunu varsayılan Setiniz yapın (iki seçenek)
Live'ı doğrudan kayıt hazır bir düzenle açabilirsiniz.
- Seçenek 1: Şablonlar (Live 11/12). Bitmiş .als dosyanızı açın, sonra Dosya → Live Seti Şablon Olarak Kaydet seçin. Adını “Vocal Record – 48k” veya benzeri koyun. Tarayıcı → Şablonlar içinde sağ tıklayıp varsayılan yapabilir veya oturum başlatırken seçebilirsiniz.
- Seçenek 2: Eski varsayılan Set. Bazı sürümler Dosya → Geçerli Seti Varsayılan Olarak Kaydet sunar. Bu, sahne arkasında varsayılan bir şablon oluşturur. Her seferinde aynı düzeni istediğinizde kullanın.
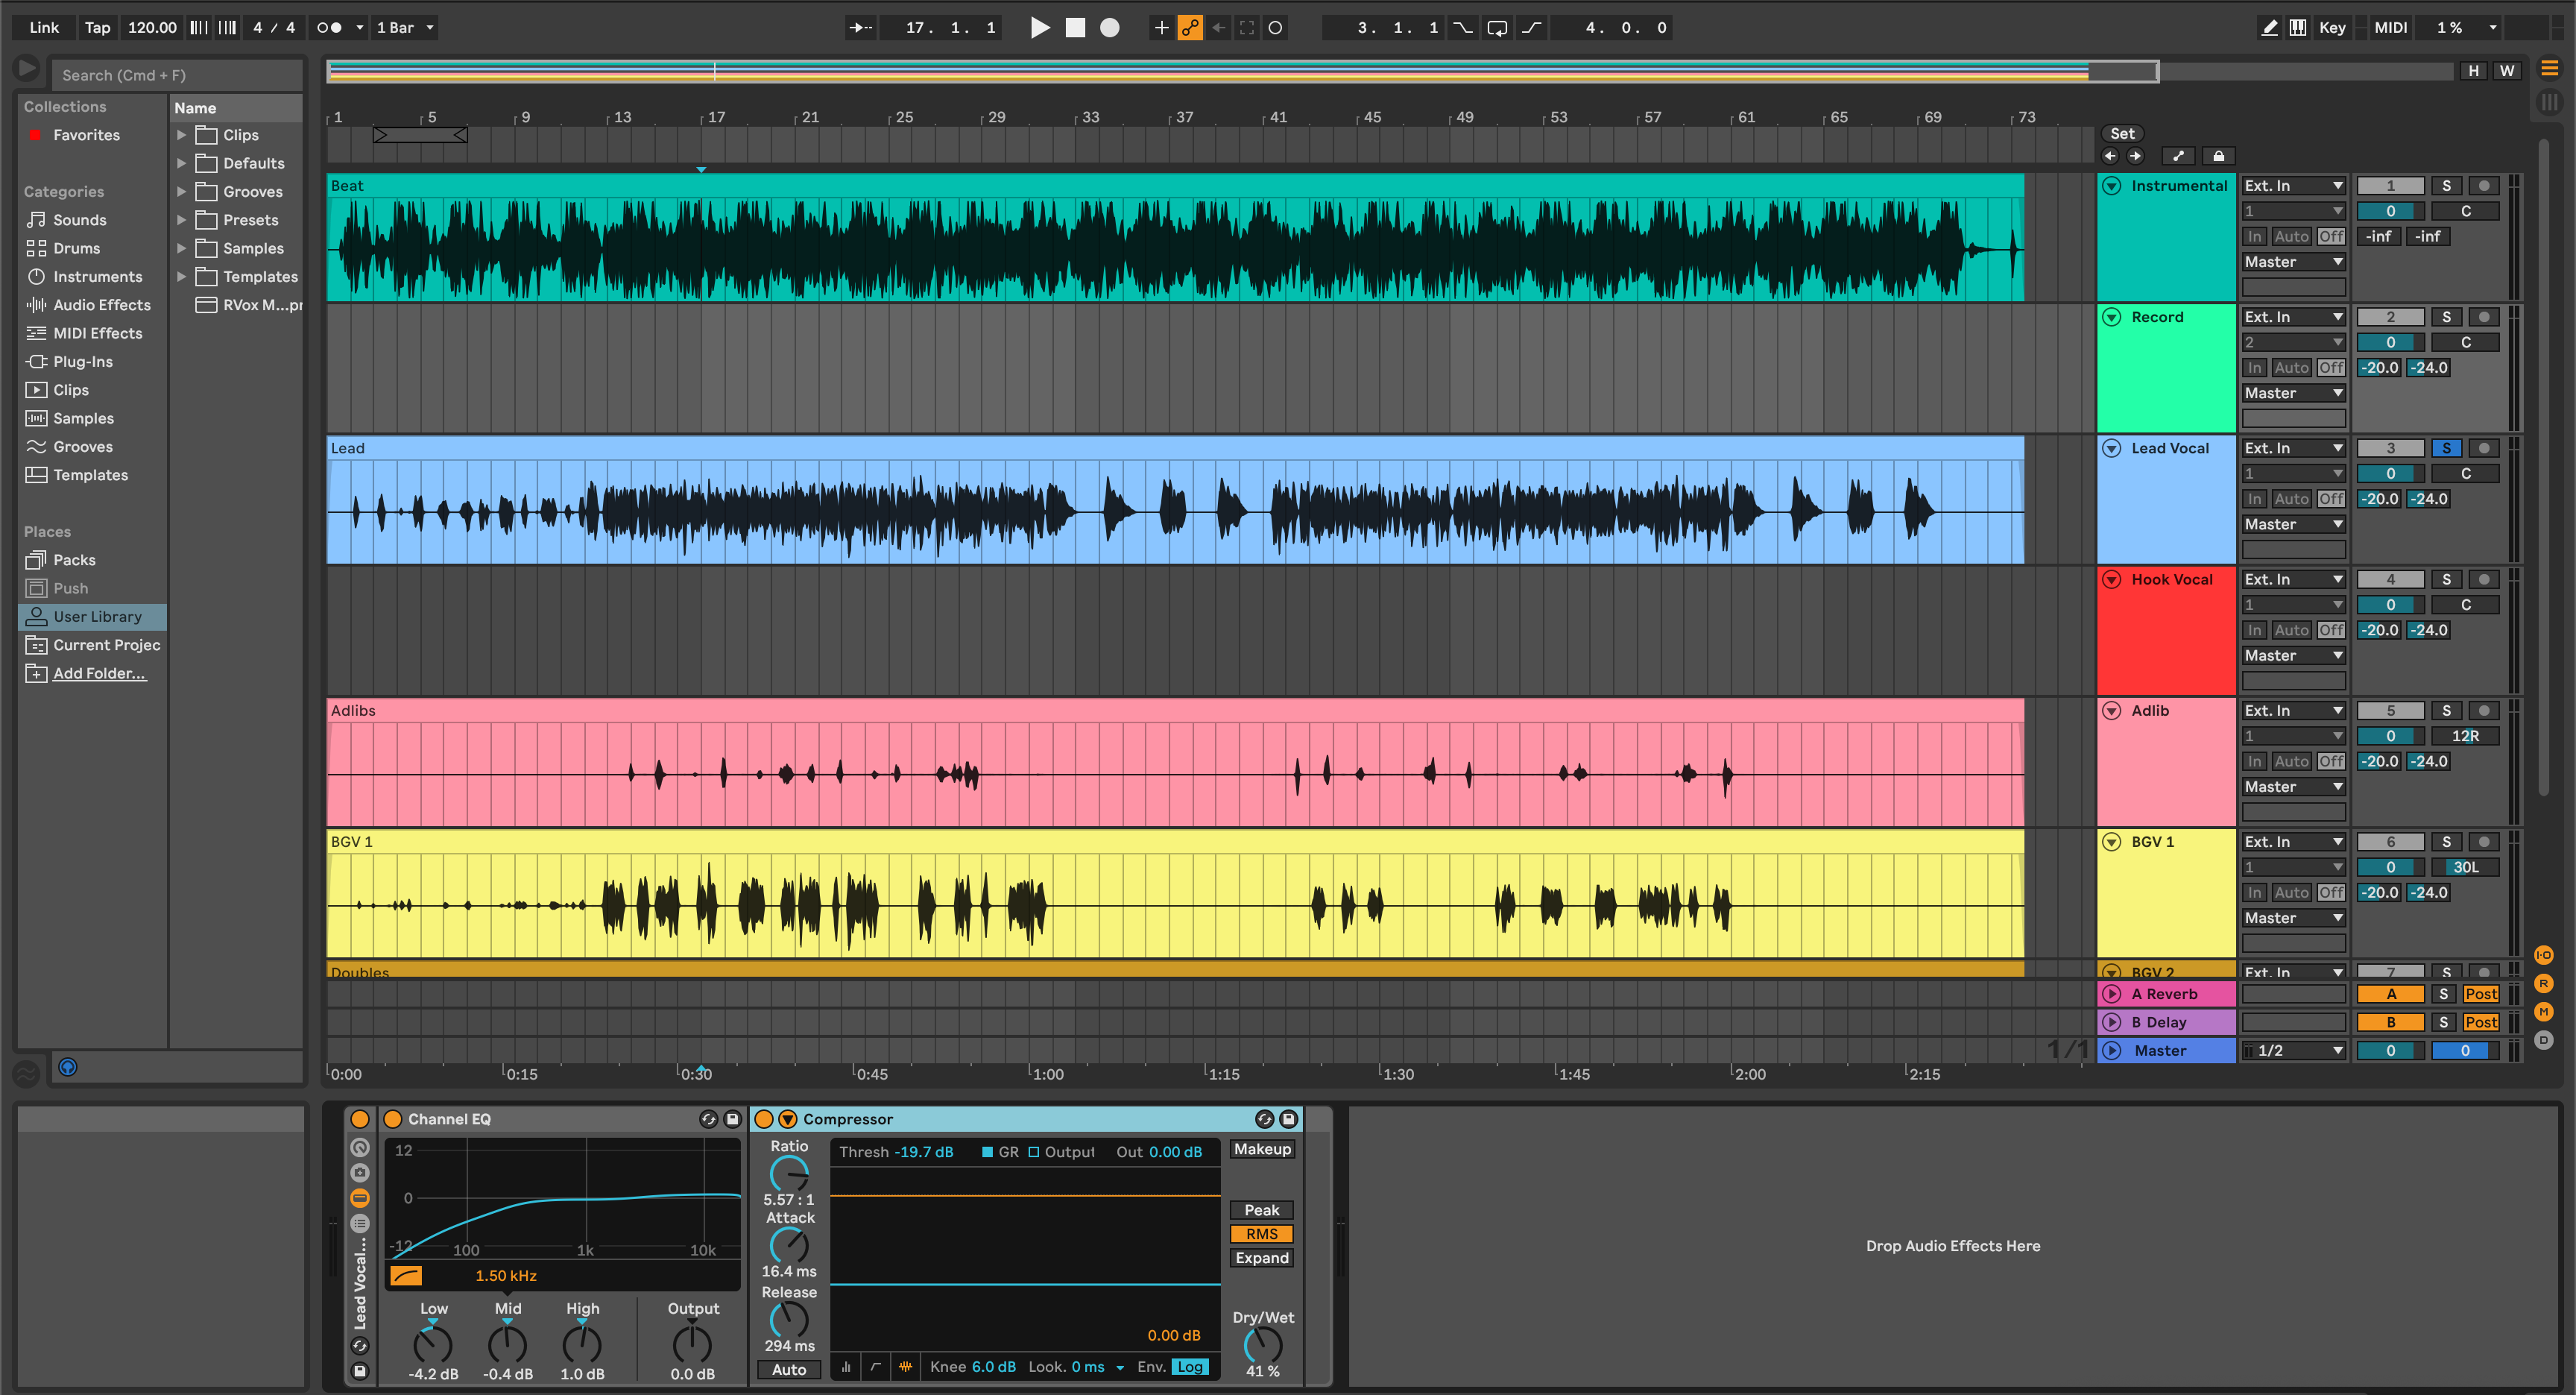
VI. İyi bir vokal kayıt şablonunda neler olmalı
Şablonlar farklıdır, ancak iyi olanlar yapıyı paylaşır. Özelleştirirken bunu bir plan olarak kullanın.
- Girişler etiketli: Lead Mic (mono), Talkback (mono), Gitar DI, Klavyeler vb.
- Kayıt-aktif mantığı: Lead kanalı önceden aktif; talkback, özel bir yönlendirme yoluyla dışa aktarımda sessize alınır.
- Dönüş kanalları: Kısa Oda, Slap Delay, Tempo Echo, “Telefon” band-geçiş filtresi. Hepsi filtrelenmiş (HPF/LPF) ve kazanç ayarlı.
- Gruplar: Lead, Doubles, Ad-libs; ayrıca hafif yapıştırıcı ve son de-ess içeren bir Vokal Grup bus'u.
- Tıklama/Sayma: Ön-çalma etkin; temiz bounce için sadece Cue'ya tıklayın, Master'a değil.
- İşaretleyiciler veya Konumlandırıcılar: Hızlı vuruşlar ve döngü kayıtları için Kıta/Kanca bölümleri etiketlenmiş.
- Renk kodlaması: projeler arasında aynı palet, böylece gözler parçaları hızlıca bulur.
VII. İşletim Sistemi notları ve pratik dosya yönetimi
Yollar sistem ve sürüme göre değişir, bu yüzden Gerçek Kaynak olarak Tercihler'den Kullanıcı Kütüphanesi yolunu kullanın. Birkaç alışkanlık, oturumların taşınabilir kalmasına yardımcı olur.
- Şablonları kalabalık bulut klasörlerinin dışında tutun. Bulut senkronizasyonu kullanıyorsanız, eksik medya olmaması için “Samples” klasörünü kısmi senkronizasyondan hariç tutun.
- Teslimde toplayın. Arşivlemeden veya paylaşmadan önce, Dosya → Tümünü Topla ve Kaydet kullanarak dış örnekler ve ön ayarların projeyle birlikte gitmesini sağlayın.
-
Sürüm etiketleri. Şablonlara
_48kveya_44kson ekini ekleyin, yeniden örnekleme sürprizlerini önlemek için. - Yedekler. Kullanıcı Kitaplığınızı haftalık yedekleyin. Şablonlar, raflar ve kullanıcı ön ayarlarını içerir.
VIII. İlk kullanım rehberi (boş halden 5 dakikada kayıt yapmaya)
- Şablonu açın. Live'ı başlatın → Şablonlar → “Vocal Record – 48k” seçin.
- Arayüzü seçin. Tercihler → Ses → cihazınızı seçin; izleme için tamponu (128–256 örnek) ayarlayın.
- Mikrofonu yönlendirin. Lead parçada doğru giriş kanalını seçin; donanım izleme tercihinize göre Monitörü Otomatik veya İç olarak ayarlayın.
- Seviyeleri kontrol edin. Konuşurken ortalama −18 ila −12 dBFS hedefleyin; projeksiyon yaparken zirveler yaklaşık −8 dBFS olsun.
- Kulaklık karışımı. Odaya ve Slap'e biraz gönderim yapın; şarkıcının kendinden emin olmasını sağlayın ama boğulmasın.
- Sayım ve tempo. Proje BPM'sini ayarlayın ve 1 bar sayımını etkinleştirin. Tıklamanın sadece Cue'ya gittiğini doğrulayın.
- Döngü ve kayıt. Bir ifadeye Locators ayarlayın. Kayıtlar için Düzenleme kayıtlarını veya Oturum kliplerini kullanın.
- Yeni proje olarak kaydedin. Hemen Farklı Kaydet… ile yeni bir şarkı klasörü oluşturun, böylece kayıtlar şablon dosyanızı kirletmez.
IX. Bir şablon portföyü düzenleyin (birden fazla tür ve mikrofon)
Bir büyük dosya yerine birkaç odaklanmış şablon tutun. İsimlendirme hafızaya ve aramaya yardımcı olur.
- Mikrofona göre: “U87_Vocal_Record_48k”, “SM7B_Rap_44k”. EQ rafları ve HPF noktaları farklı olabilir.
- Türüne göre: “Rap Dry_Quick Punch”, “R&B Airy_Plate+Echo”, “Pop Stack_Hook Wide”.
- Vokaliste göre: baş harfler ve aralık etiketleri (örneğin, “AR_bright_sop” ve “JT_dark_bar”).
- Oturum türüne göre: “Podcast_DualMic_Gate”, “Dubs_2-Track_BeatDuck”.
Her şablonun içinde, mik mesafesi, tipik HPF ve kulaklık gönderim miktarlarıyla Notlar klibini Düzenleme veya Oturumda sabitleyin. Gelecekteki siz, şimdiki size teşekkür edecek.
X. Cihaz zincirleri ve raflarla şablon kullanımı
Şablonlar, tekrarlanabilir vokal zincirleriyle en güçlüdür. Kendi raflarınızı oluşturabilir veya seçilmiş seçeneklerden başlayıp zevkinize göre ayarlayabilirsiniz. Hızlı, kanıtlanmış ve doğrudan Ableton'a entegre bir temel isterseniz, Ableton vokal ön ayarlarına göz atın ve ardından eşik değerlerini, de-ess bantlarını ve FX gönderimlerini odanıza ve mikrofonunuza göre ince ayar yapın.
Favori raflarınızı Kullanıcı Kitaplığı altında Presets → Audio Effects Rack içinde saklayın. Yeni şablonlara sürükleyerek tonunuzun projeler arasında tutarlı olmasını sağlayın.
XI. Sorun giderme (belirti → hızlı çözüm)
- Şablon açılıyor ama kanallar “Audio From: Ext. In 1/2” gösteriyor, 3/4 lazım. Arayüzünüzü seçtikten sonra girişleri güncelleyip bir kopya kaydedin; o kopyayı Şablon olarak ayarlayın.
- “Plug-in bulunamadı.” Preferences → Plug-Ins → VST3'ü (ve macOS'ta AU'yu) etkinleştirin. Rescan tıklayın. Şablon, sahip olmadığınız üçüncü taraf bir eklenti kullanıyorsa, stok bir cihazla değiştirip yeniden kaydedin.
- Kuru izleme artı çiftlenmiş, gecikmeli sinyal. Donanım ve yazılım izlemeyi birlikte duyuyorsunuz. Arayüz izlemeyi yönetiyorsa, kanalda Monitor'u Kapalı yapın veya donanım izleme yolunu sessize alın.
- Kayıt sırasında tıklamalar. Buffer'ı biraz artırın (256–512) veya kayıt yaparken ağır look-ahead cihazlarını devre dışı bırakın. Daha sonra yazdırın.
- Açtıktan sonra yanlış örnekleme hızı. Arayüz panelinizi kontrol edin; projedeki hızı Live'da Şablon etiketiyle eşleştirin (örneğin, 48 kHz).
- Dışa aktarmada tıklama var. Metronomun sadece Cue'ya yönlendirildiğinden ve Master'a gitmediğinden emin olun. “Click Print” kanalının kayıt modunda olmadığını kontrol edin.
- Sürücüler taşındıktan sonra medya çevrimdışı. File → Manage Files → Locate veya Tümünü Yeniden Topla ve Kaydet kullanarak varlıkları gömün.
XII. Şablon ileri kullanıcıları için verimlilik eklentileri
- Return makroları. Return kanallarında hızlı “Vox Space,” “Throw” ve “Phone” düğmeleri için bir Makro rafı eşleyin. Kayıt sırasında şarkıcıları motive edin.
- Sahne tabanlı kayıtlar. Session View'da, önceden sayımlı Verse, Hook, Bridge sahneleri oluşturun. Varyasyonları hızlıca başlatın ve yakalayın.
- Yeniden örnekleme bounce kanalı. Girişi Resampling olarak ayarlanmış “Print” adlı bir ses kanalı oluşturun. Bu, dışa aktarmadan geri bildirim için anlık taslaklar yapar.
- Talkback yönetimi. Talkback'i sadece Cue'ya yönlendirin, hafifçe kapılı (gated) yapın ve yönlendirme grupları kullanarak Master/dışa aktarımlardan hariç tutun.
- Kontrol listesi klibi. “Pre-Take Checklist” adlı bir MIDI klibi, metin notlarıyla birlikte tutun: buffer, tempo, Cue'ya tıklama, kulaklık gönderimleri, kayıt klasörü yolu.
XIII. Örnek: şarkıcı-rapçi hibrit şablonu oluşturma
İşte farklı sanatçılara uyarlayabileceğiniz basit bir düzen:
- Lead Vox (mono) → HPF ~90 Hz, hafif kompresyon, geniş de-ess; Room ve Slap'e gönderimler.
- Boost Lines (mono) → biraz daha yüksek HPF; daha fazla de-ess; Lead'in altında −6 ila −9 dB arasında gizlenmiş.
- Ad-libs (mono, bölüm bazında panlanmış) → bant sınırlı; ara sıra telefon FX; Room'dan daha fazla Slap.
- Vocal Group → nazik yapıştırıcı kompresör; son de-ess; kayıt sırasında kapalı limiter.
- Beat Bus → isteğe bağlı dinamik EQ düşüşü 2–4 kHz aralığında, Vocal Group'tan tetiklenir.
- Returns → Room (0.6–0.9 s), Slap (90–110 ms mono), Tempo Echo (noktalı sekizlik düşük geri bildirim), Phone (300 Hz–3 kHz).
- Print parça (Yeniden örnekleme) hızlı kaba kayıtlar için.
XIV. Sıkça sorulan sorular
Şablonlar tam olarak aynı eklentileri gerektirir mi?
Hayır. Herhangi bir üçüncü taraf işleme için stok cihazları yerine koyabilirsiniz. Özelleştirilmiş versiyonunuzu yeni bir Şablon olarak kaydedin.
Şablonları saklamak için en iyi yer neresi?
Ya Kullanıcı Kitaplığında (taşınabilir ve yedekli) ya da Places'a eklenmiş özel bir klasör olarak. Her ikisi de geçerlidir; bir sistem seçin ve tutarlı kalın.
Birden fazla varsayılan set tutabilir miyim?
Live birden fazla Şablonu destekler. Birini varsayılan olarak ayarlayabilir veya her seferinde Şablon tarayıcısından seçebilirsiniz.
Bir şablonu işbirlikçiyle nasıl paylaşırım?
Collect All and Save kullanın, proje klasörünü zipleyin ve paylaşın. Alıcı bunu Places'a ekler veya Kullanıcı Kitaplığına içe aktarır.
Vokaller için ön ayar rafları kurmak hakkında ne düşünüyorsunuz?
Ön ayar rafları Kullanıcı Kitaplığında Presets → Audio Effects Rack altında bulunur. Raflara özel rehberli kurulum süreci için, Ableton vokal ön ayarlarının nasıl kurulacağı konulu adım adım makaleye bakın.
XV. Özet: bir kere oluştur, sonsuza dek daha hızlı kaydet
Şablonlar sürtünmeyi ortadan kaldırır, böylece performansla tamamen meşgul kalabilirsiniz. Bunları Places veya Kullanıcı Kitaplığınıza kurun, gerektiğinde varsayılan ayarlayın ve mikrofonlarınıza ve türlerinize uygun küçük bir kitaplık tutun. Bunları tutarlı zincirlerle—stok veya küratörlü—eşleştirin ve herhangi bir oturuma girip, parçayı kayda hazırlayıp, güvenle kayıt yapabilirsiniz.
Eğer doğrudan şablonunuza entegre olan ve kararları hızlandıran cilalı bir başlangıç zinciri istiyorsanız, Ableton kayıt şablonumuzu keşfedin, ardından eşik değerlerini, de-ess bantlarını ve FX gönderimlerini sesinize ve odanıza uyacak şekilde ince ayar yapın.


