


iZotope Ozone 母带预设
使用我们现成的母带处理预设,简化您的工作流程。

行业积分

西区布吉

Shontelle

贾伦·本顿

DJ Tunez

沃瑞

Caskey

Rittz

尼娅·赖利

尤吉

Q 帕克
关于 工程师

关于工程师
你好!我是Byron Hill,一名拥有超过15年经验的专业音乐制作人和混音工程师,常驻于乔治亚州亚特兰大。我曾与全球数千名客户合作,涵盖各种音乐风格——从独立艺术家到大型唱片公司的艺人。我的作品包括与Westside Boogie、Vory、Shontelle、DJ Tunez、Jarren Benton和Ritz的合作,以及与创作者和品牌如Daryl Mayes、SeanDoesMagic和Chubbies Clothing的项目。
多年来,我培养出了一双打造人声链条的敏锐耳朵,能够呈现出干净、平衡且专业的声音——无论是哪种风格或数字音频工作站(DAW)。本合集中的每个预设都秉持同一目标:帮助你更快进步,提升音质,并以清晰、自信和目的性赋予你的声音生命。
聆听我们的作品
节奏蓝调
之前
之后
说唱
之前
之后
流行
之前
之后
灵魂
之前
之后
岩石
之前
之后
拉丁语
之前
之后

iZotope Ozone 母带预设:解析与功能介绍
介绍 — 使用 iZotope Ozone 的现代母带大师
当你进入唱片的最终阶段,目标很简单:一个干净、平衡、准备发布的母带,能够从耳机到俱乐部音响都能良好呈现。iZotope Ozone 的母带链条为你提供可靠的起点,让你更自信、更快速地完成,无论你偏好熟悉的 Ozone 9/10 工作流程,还是最新的 Ozone 11 模块。
每条链条都专注于可预测的增益分级、恰当的音色塑造和透明的响度。可用作单曲的快速收尾,或作为 EP 中一致的基线——然后根据你的声音、风格和混音进行调整。
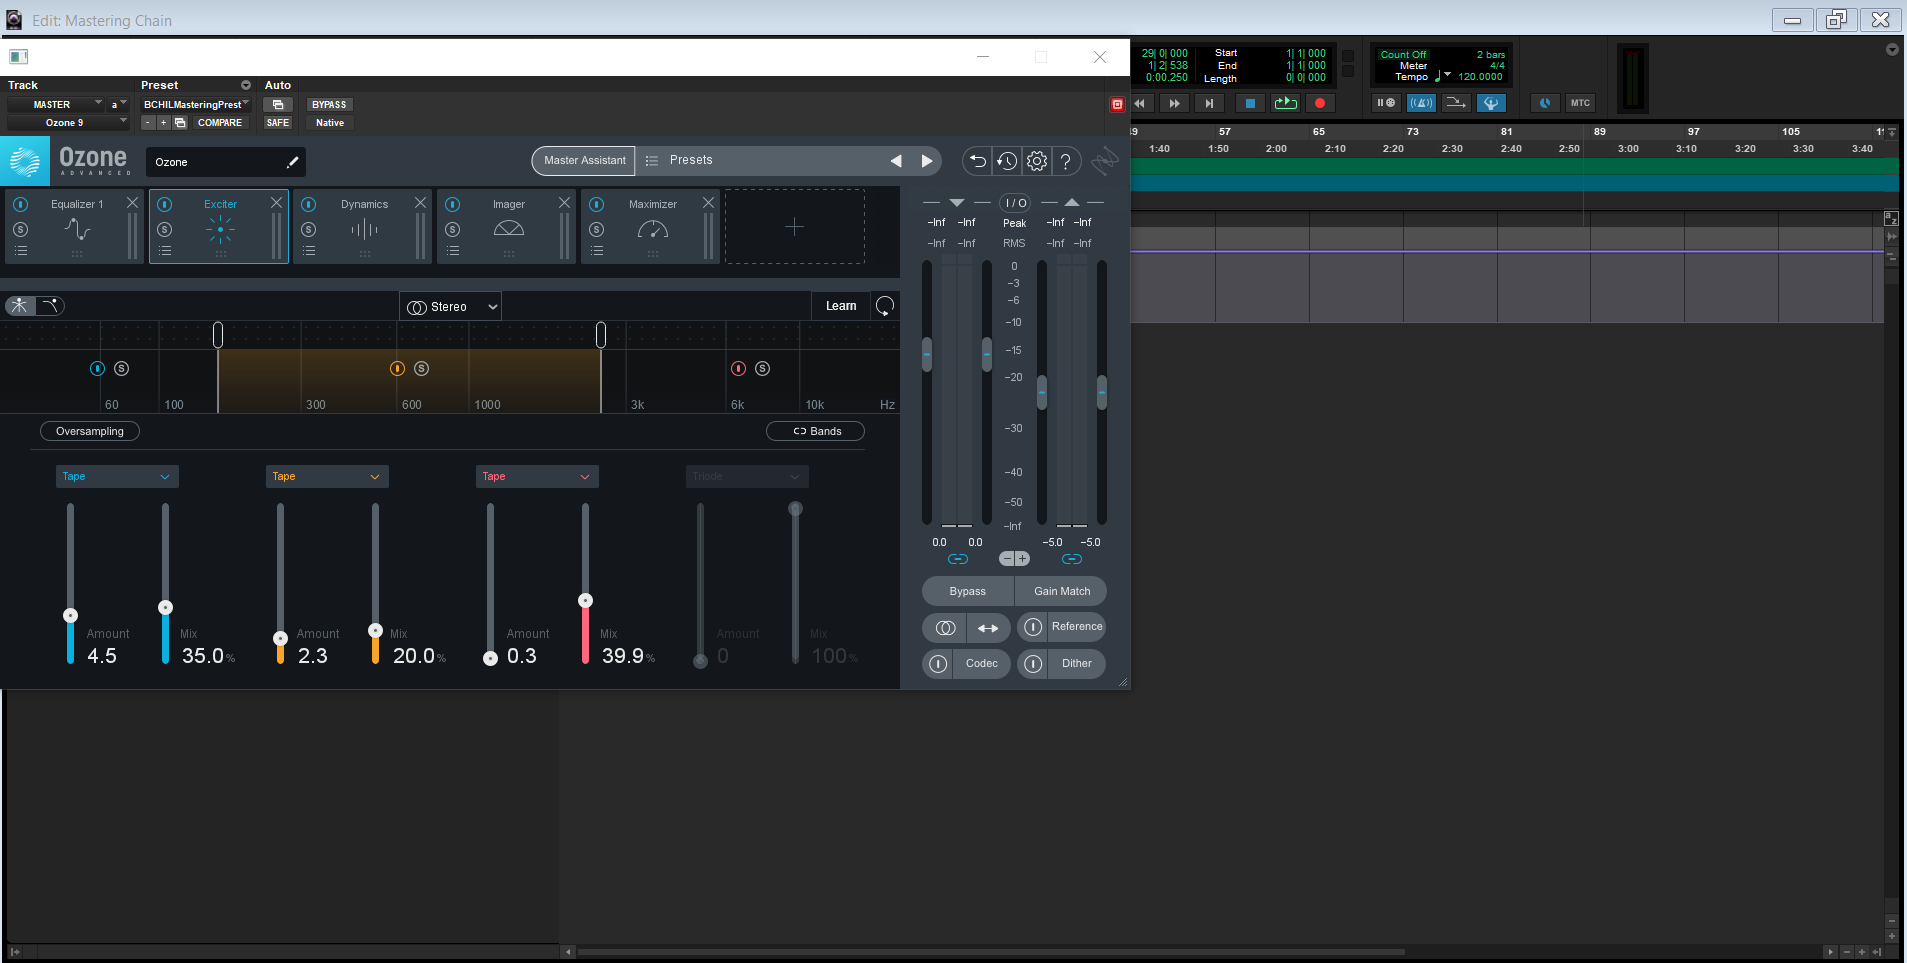
Ozone 母带链条的实际作用
Ozone 的“预设”不仅仅是单一效果。它是一个有序的模块序列,协同工作:校正均衡和共振控制,保留瞬态的动态控制,恰到好处的增强,成像,以及达到现代响度而不刺耳的限制器。一个典型的链条可能包括:
- 均衡器 / 稳定器:压缩前的细微音色平衡和共振管理。
- 动态处理(宽带或多频段):温和且富有音乐感地控制峰值和中低频积累。
- 激励器:并行或按频段添加谐波,提升存在感而无嘶嘶声或杂质。
- 成像器:按频段调整宽度和单声道保护,确保良好兼容性。
- 最大化器(真实峰值):透明响度控制,抑制采样间峰值。
- 实用工具:人声/低音/鼓的平衡微调和低频聚焦,打造更紧凑的低音。
Ozone 11 亮点——映射到这些链条
Ozone 11 增加了实用的升级,能够无缝融入现代母带处理流程。在链条末端(就在限制器之前)使用增强清晰度的润色,以提升可懂度和分离度。当没有分轨时,对立体声混音中的关键元素进行有针对性的调整。更精确地塑造冲击力与主体感的平衡,并依靠辅助平衡为人声在整体混音中找到合适的音乐空间。如果你使用的是 Ozone 9–10,同样的音乐操作依然适用;你只需使用最接近的模块对应。
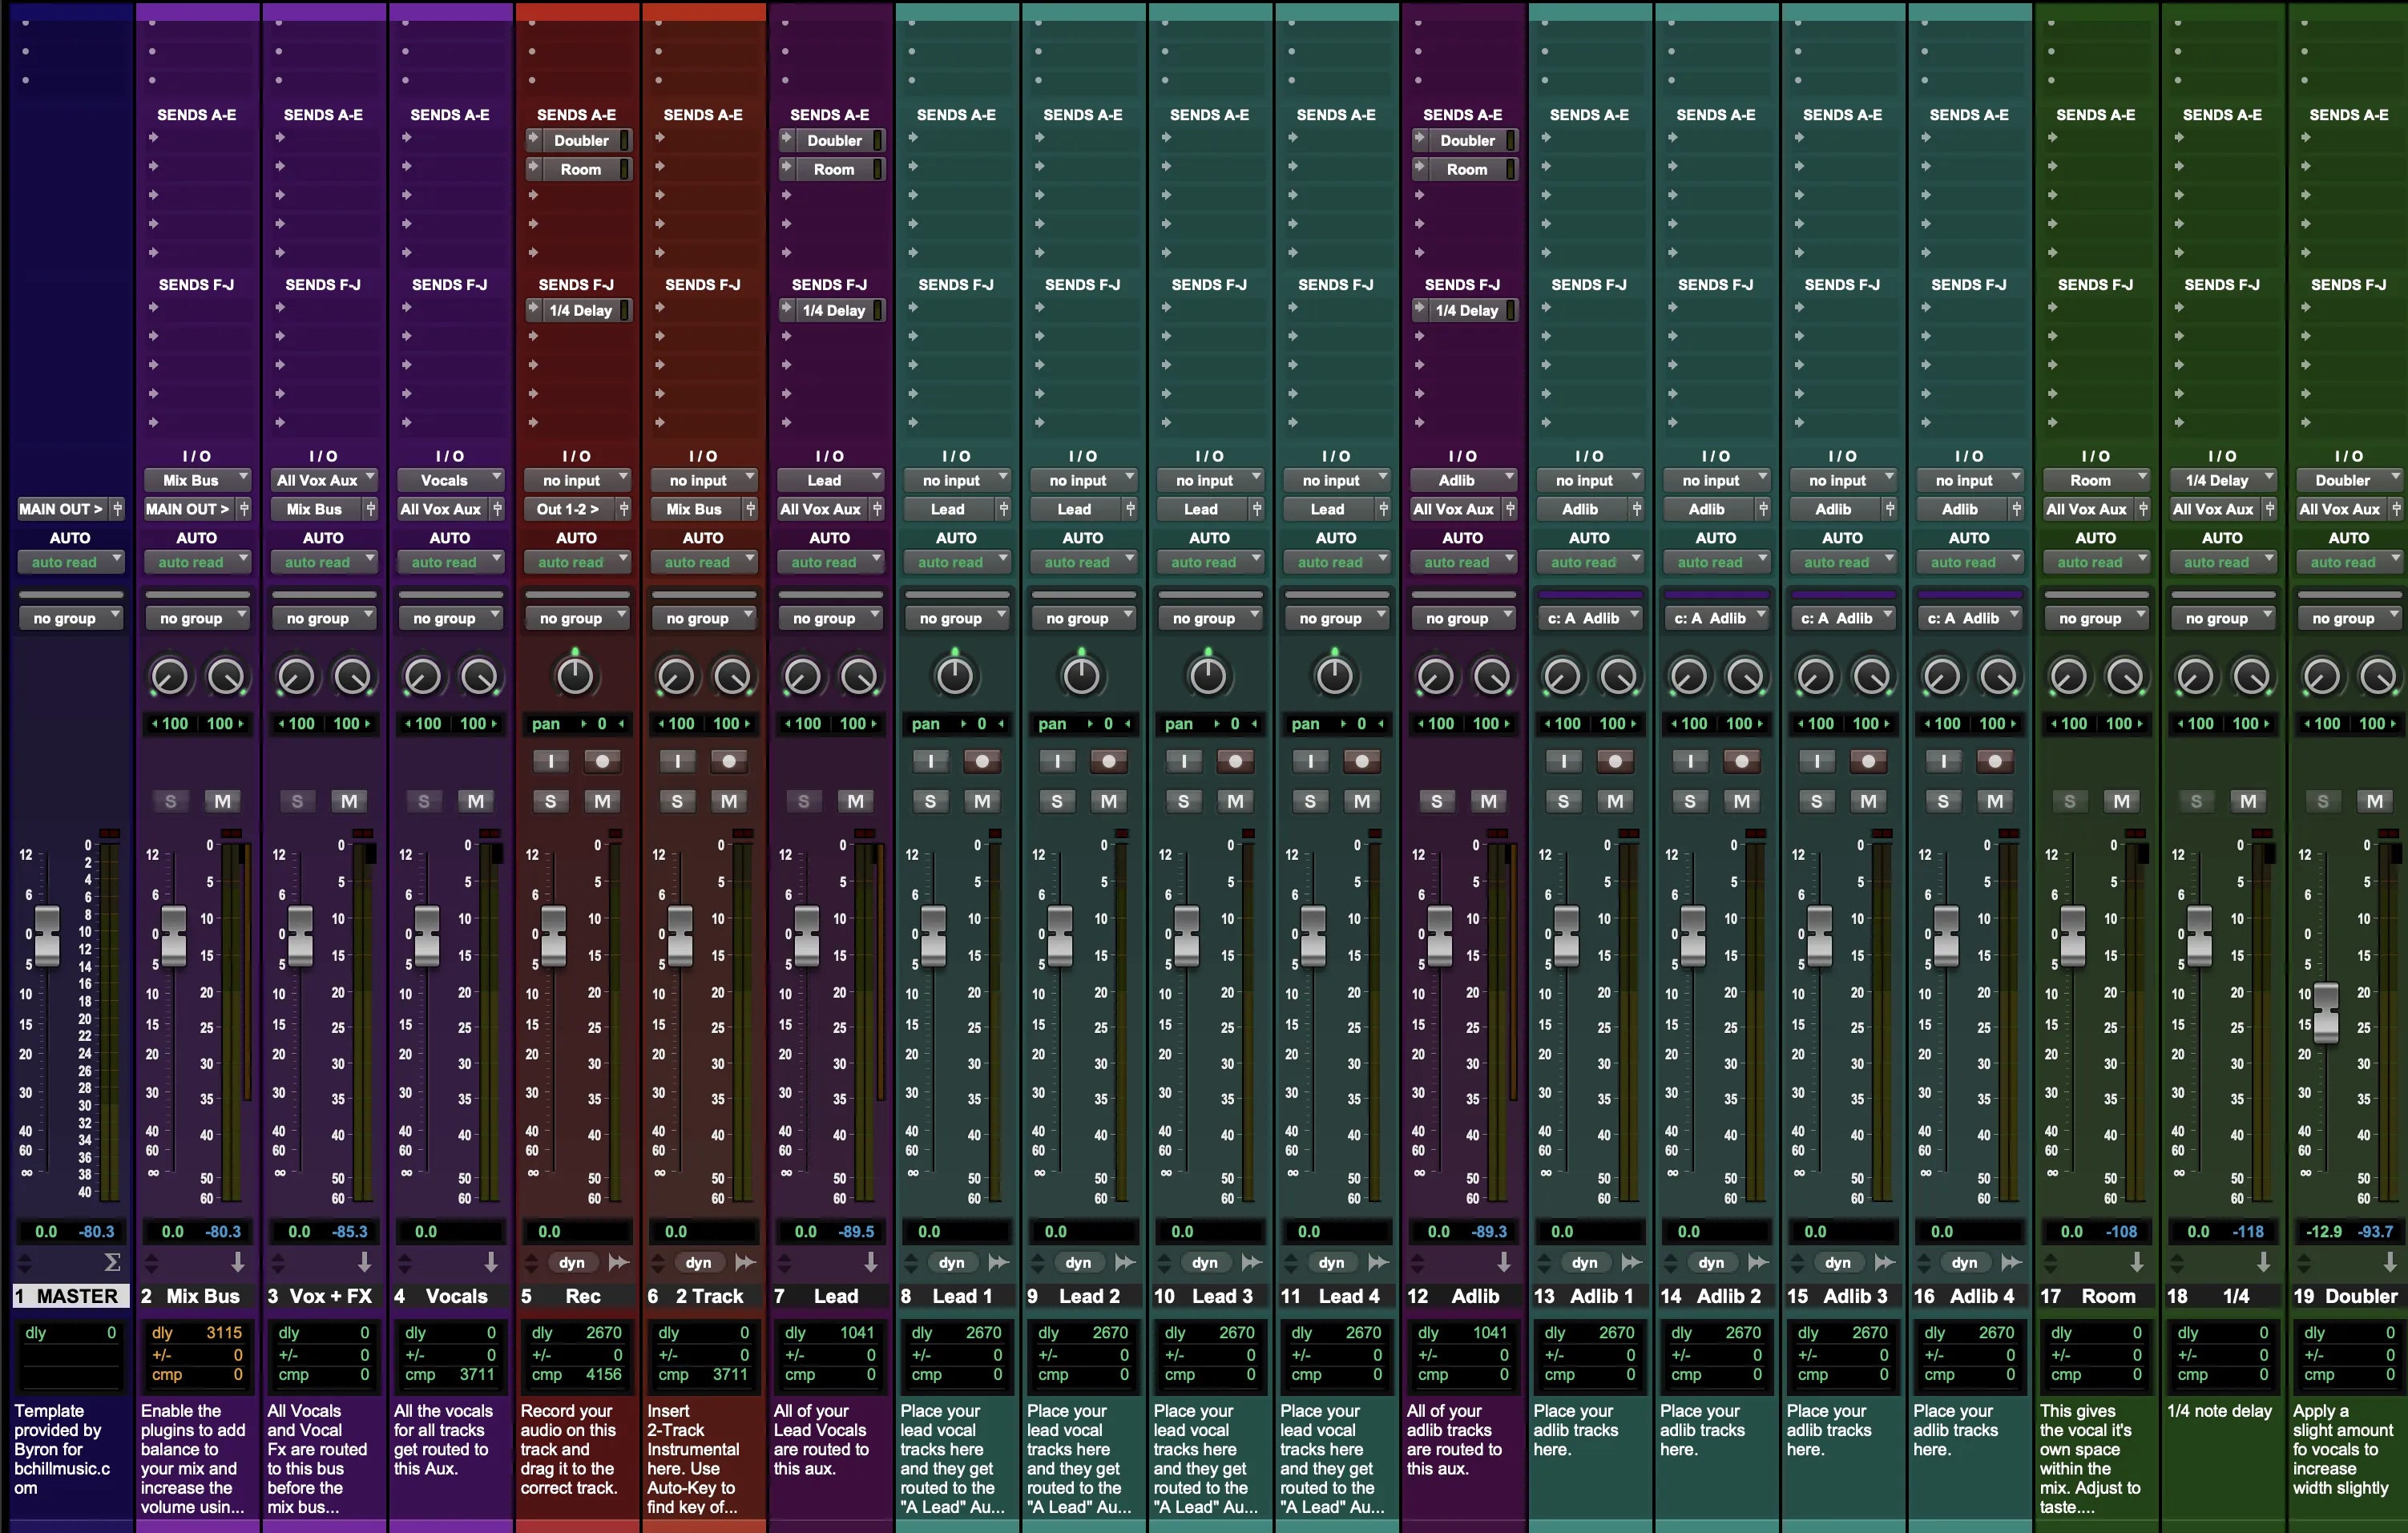
安装与快速入门(任意DAW,插件或独立版)
- 在母带总线加载Ozone(或打开独立应用)。混音留3–6 dB余量——避免Ozone前削波。
- 打开预设浏览器,加载最适合你歌曲氛围的链条(干净/中性、明亮流行、有力说唱等)。
- 将最大化器放在最后,开启真实峰值限制。开始时保守;在匹配响度下比较,避免“更响”影响判断。
- 按部分微调:设定低频重点,优化2–5 kHz存在感,调整立体声宽度。对立体声混音中的小幅电平修正,使用聚焦平衡而非重新混音。
- 导出参考母带并与几个参考进行电平匹配。通过小幅调整反复迭代——1–2 dB的调整效果显著。
风格预设(快速起点)
说唱 / Trap(冲击力 + 清晰度)
- 低频:收紧次低频能量,使踢鼓和贝斯清晰可辨;均衡削减保持窄带,避免踢鼓空洞。
- 存在感:适度提升上中频以增强清晰度;用温和的自适应控制抑制刺耳峰值。
- 宽度:保持100 Hz以下接近单声道;适度拓宽2–8 kHz以打开混音而不模糊主声部。
- 限制器:追求健康的峰值因子;避免持续的砖墙限制破坏瞬态。
R&B / 灵魂乐(顺滑 + 亲密)
- 音色:宽频段均衡架和细微共振控制;避免窄带空气提升以免夸大齿音。
- 动态:第一压缩阶段采用较慢的时序;第二阶段轻度压缩以增强粘合感。
- 清晰度:在链条后期添加最终分离,营造人声周围空间而不增加额外“光泽”。
流行(明亮 + 竞争力)
- 激励器:分频处理——增加上中频激励,同时保持最高八度平滑。
- 成像器:谨慎拓宽高中频,保护单声道低频;保持侧边恢复保守。
- 限制器:使用真实峰值限制并设定谨慎的上限;A/B测试时务必进行电平匹配。
EDM / 器乐(冲击力 + 宽度)
- 瞬态与延音:强调鼓击的瞬态,同时保留合成器的延音主体。
- 低频:理清踢鼓与贝斯的互动;用分频激励保持能量感而不刺耳。
- 限制器:注意下落时的泵感——降低阈值,用得体的上游动态恢复电平。
创作歌手 / 原声(自然且亲密)
- 音色平衡:细微且富有音乐感的调整;自适应平滑处理共振,避免“均衡器声音”。
- 声像:细微扩宽;保持低频居中稳固,突出吉他和人声。
- 响度:优先保证余量而非单纯追求音量,以保留深度和细节。
故障排除与快速修复
- 刺耳的副歌:减少上中频激励1–2分贝,添加小幅动态均衡凹陷,针对峰值触发。
- 低中频浑浊:在200–350 Hz附近做窄带削减;用聚焦低频控制收紧低音。
- 立体声图像平淡:在1–2 kHz以上的频段稍微增加宽度;保持扩展细微,避免相位模糊。
- 限制后人声被掩盖:微调人声存在感或用聚焦再平衡调整几分贝,而不是推高整体限制器。
- 泵感限制器:降低阈值,让上游动态处理1–2分贝;然后重新调整最大化器的电平。
工作流程技巧(保持母带一致性)
- 提前参考:先将音量匹配到目标,再调整音色——不要反过来。
- 保存歌曲专属变体:保留明亮 / 中性 / 柔和版本,方便在项目中快速切换风格。
- 使用聚焦平衡进行微调:对立体声混音中的人声、鼓或贝斯做细微调整——避免在母带阶段“重新混音”。
- 打印备选版本:提供主版本、伴奏版和演出版;一致的链条让备选版本制作轻松无忧。
下一步去哪里
想让专业人士为你的最终混音把关吗?查看我们的母带处理服务。也在搭建你的录音流程?探索人声预设或录音模板,加快前期制作,让母带处理成为简单且富有音乐感的收尾。