


Новости
Как установить вокальные пресеты Bitwig Studio (Windows, macOS, Linux)
Вокальные пресеты Bitwig Studio — это готовые цепочки устройств (с удалёнными контролами), которые одним кликом загружают эквалайзер, компрессию, де-эссинг, окраску и пространство. В этом руководстве показаны три надёжных способа установки, как организовать пресеты для быстрого поиска и как адаптировать цепочки под ваш микрофон и жанр. Вы также получите чёткую карту устранения неполадок, чтобы ваша первая сессия сразу заработала. Если хотите получить отточенный старт перед настройкой, изучите современные вокальные пресеты и затем подстройте пороги и посылы под свой голос. I. Что такое «вокальный пресет» Bitwig на самом деле В Bitwig пресет — это сохранённое устройство или цепочка, обычно Audio FX chain с удалёнными контролами (макросами). Файлы обычно имеют расширение .bwpreset. Вокальный пресет может включать: Стандартные устройства (EQ+, Dynamics, De-esser, Saturator, Delay+, Reverb), организованные в цепочку или контейнер (например, FX Layer/Selector). Удалённые контролы, настроенные на полезные диапазоны (Input Trim, De-Ess, Body, Presence, Air, Comp, FX Blend, Width). Опциональные сторонние плагины (VST3/CLAP); если отсутствуют, слот отображается как недоступный до установки. Пресеты можно загружать из My Library, любой папки, добавленной в Library Locations, или перетаскивать из файлового менеджера ОС. Когда цепочка вам понравится, сохраните её в библиотеку и пометьте, чтобы её можно было быстро найти в песнях. II. Контрольный список перед установкой (сделать один раз) Контрольный список перед установкой Обновите Bitwig Studio до последней стабильной версии. Знайте, где находится My Library (см. Settings → Locations). Если пресет ссылается на сторонние плагины, сначала установите и просканируйте их (VST3/CLAP). Освободите немного места на диске для распаковки загрузок. Создайте тестовый проект с одной аудиодорожкой под названием «Lead Vox». III. Три способа установки вокальных пресетов Bitwig Метод A — перетащите и отпустите один .bwpreset (самый быстрый) Распакуйте загрузку и найдите .bwpreset файл (или папка с пресетами). Откройте Bitwig и ваш тестовый проект. Выберите вокальную дорожку. Перетащите .bwpreset из Finder/Explorer в панель устройства или Браузер. Цепочка загружается мгновенно с удалённым управлением. Нажмите на имя пресета и выберите Сохранить пресет (или кликните правой кнопкой → Сохранить пресет), чтобы сохранить его в вашей библиотеке под своим именем. Используйте это, когда хотите быстро прослушать или сохранить только несколько избранных. Метод B — Добавьте всю папку в Расположения библиотеки (без разрушения) Распакуйте ваш пакет в постоянное место (например, Documents/USER/Bitwig/Vocal Presets/). В Bitwig откройте Настройки → Расположения и нажмите Добавить расположение… в разделе Расположения библиотеки. Выберите распакованную папку. Bitwig индексирует её; вы увидите её в Браузере в разделе Расположения библиотеки. Откройте папку в Браузере, прослушайте и перетащите любой пресет на вашу дорожку. Используйте это, когда хотите, чтобы папка производителя всегда отображалась в Браузере без перемещения файлов в Мою библиотеку. Метод C — Копирование в Мою библиотеку (портативно, с поиском, с резервным копированием) Откройте Настройки → Расположения и запомните путь к Моей библиотеке (это ваша папка с пользовательскими пресетами). В Finder/Explorer откройте эту папку, затем Предустановки (создайте, если отсутствует). Необязательно: создайте подпапку, например USER/Vocals. Скопируйте файлы .bwpreset в эту папку. Вернитесь в Bitwig — пресеты появятся в разделе Моя библиотека и будут полностью доступны для поиска по имени/тегу. Используйте это, когда хотите иметь все избранное в одном месте с резервной копией (отлично для переноса на новый компьютер). IV. Где что находится (быстрая справка) Предмет Расширение Расположен в Примечания Вокальный пресет (устройство/цепочка) .bwpreset Моя библиотека или расположения библиотек Отображается в браузере; перетащите на дорожку для загрузки. Проект / Шаблон .bwproject Любая выбранная вами папка Сохраните стартовый проект с рэками, возвратами и Remote Controls. Пакеты контента — Менеджер пакетов Не требуется для пресетов сторонних производителей, но полезно для стандартных FX и сэмплов. V. Первичная загрузка: маршрутизация, мониторинг и установка уровня Настройте микрофон. Установите вход аудиодорожки на канал вашего интерфейса; при необходимости включите мониторинг. Загрузите пресет. Перетащите его на дорожку. Убедитесь, что появились Remote Controls (на странице 1 должны быть Trim, Comp, De-Ess, Presence, Air, FX). Уровень входного сигнала. Пойте на уровне исполнения; стремитесь к сырым пикам около −12 до −8 дБFS до цепочки. Проверка задержки. Если отслеживание кажется запоздалым, используйте «Lite»-версию (или обходите длинные глаголы) во время записи; включите полную обработку при микшировании. Запишите проход длительностью 10–20 с и переключайте цепочку A/B, чтобы подтвердить улучшение без резкости. VI. Сделайте пресет своим (небольшие изменения, которые работают) Trim: нормализуйте вход, чтобы первый компрессор работал в своей оптимальной зоне. De-Ess: цель — «мягко-яркий», не глухой. Настраивайте по наушникам больше, чем по приборам. Body: добавьте тепла около 120–200 Гц; следите за «коробочным» 250–350 Гц. Presence: крошечный, широкий подъём около 3–4 кГц, только если дикция скрывается. Air: микро-подъём на 10–12 кГц после успокоения S-звуков. FX Blend: слэп 90–120 мс для характера; яркая короткая пластина (0.7–1.0 с) с предзадержкой 20–50 мс для подъёма. Держите куплеты суше; открывайте припевы. VII. Безопасная «первая цепочка» внутри Bitwig (стандартные устройства) EQ+: высокопроход 80–100 Гц; сглаживание 250–350 Гц, если кабина звучит гулко; опциональный узкий провал около 1 кГц, если носовой звук. Динамика (Comp A): 2:1–3:1; атака 10–30 мс; релиз 80–160 мс; 3–5 дБ GR на фразах для формирования транзиентов. Де-эссер: широкополосный около 6–8 кГц; настраивается на слух через наушники. Динамика (Comp B): более быстрый захватчик (1–2 дБ GR) для стабилизации посылов. Сатурация (низкий микс): плотность в стиле триода/ленты; согласование выхода. Presence polish (EQ+): +0.5–1 дБ широкополосно около 3–4 кГц, только если нужно; микро-воздушный шельф после де-эссера. Delay+ & Reverb: слэп 90–110 мс, фильтр 150 Гц–6 кГц; короткий поп-пластина/зал 0.7–1.0 с с предзадержкой 20–50 мс. Фильтруйте возвраты. Обверните цепочку в FX Layer, если хотите параллельные дорожки «Air» или «Color» с выделенным микс-макросом. VIII. Организуйте и помечайте, чтобы быстро находить нужное Именование: Ведущий — Чистый поп, Ведущий — Воздушный R&B, Рэп — Панч, Гармония — Wide Soft, Ad-Lib — Телефон. Теги: задавайте сценарий использования, атмосферу и микрофон (например, Lead, Clean, SM7B). Теги делают Браузер инструментом мышечной памяти. Страницы Remote Controls: страница 1 = тон/динамика; страница 2 = FX; страница 3 = ремонт. Держите 8 ручек на странице аккуратно. Коллекции: выделяйте звёздочкой/избранным свои основные три, а не тридцать. Скорость побеждает беспорядок. IX. Шаблоны: начинайте каждую сессию готовыми Создайте дорожки Lead Vox (с вашим пресетом), Doubles L/R (с более высоким HPF, усиленным де-эссингом, заглушенные), Harmonies (темнее, шире) и Ad-libs. Добавьте два возврата: A = Slap, B = Plate. Установите разумные значения по умолчанию. Сохраните как Шаблон (File → Save as Template). В следующий раз выбирайте его из New from Template. X. Настройки по ролям (лид, дубли, гармонии, адлиб) Лид: моно, плотный центр; избегайте расширителей. Пусть ширину несут FX и вспомогательные дорожки. Дубли: выше высокочастотный фильтр, чем у лида; чуть сильнее де-эссинг; заглушайте на 6–9 дБ ниже; микропанорамирование влево/вправо; без расширения в стиле хора, которое сжимается в моно. Гармонии: больше фильтруйте низкие средние; небольшой подъём на 5 кГц добавит блеска без резкости лида. Адлиб: узкая полоса, панорамирование по секциям, короткие броски на переходах; держите их вне дорожки лида. XI. С двухдорожечными битами и яркими хэтами Вырезайте, не боритесь: попробуйте динамический спад на 2–4 кГц на инструментале (с ключом от вокала), чтобы согласные выделялись только при необходимости. Управление басом: если слоги тонут под хвостами 808, слегка поднимите низкочастотный фильтр на долю такта в диапазоне 120–180 Гц во время вокальных фраз — делайте это аккуратно. Комфорт верхнего диапазона: фильтруйте Delay+/Reverb возвраты; если хэты звучат холодно, избегайте больших воздушных подъёмов на лидирующем инструменте. XII. Устранение неполадок (проблема → целенаправленное решение) Пресет не отображается в Браузере. Убедитесь, что вы поместили его в My Library или добавили папку в Library Locations. Обновите Браузер; при необходимости перезапустите Bitwig. «Отсутствует устройство» или пустой слот. Сторонний плагин не установлен или не просканирован. Установите, включите и просканируйте плагины заново; загрузите пресет. Макросы ничего не делают. Откройте цепочку и проверьте сопоставление Remote Controls. Переназначьте параметр, установите полезные диапазоны, затем сохраните пресет заново. Цепочка звучит резковато в наушниках. Немного увеличьте де-эссинг; уменьшите любой подъём воздуха на 0,5 дБ; примените низкочастотный фильтр на возвратах около 6–7 кГц. Задержка при записи. Отключите длинные реверберации и тяжёлые устройства с предсказанием; записывайте с легкой цепочкой и включайте полировку позже. Уровни прыгают между пресетами. Сравнивайте с выравниванием уровней; добавьте Utility или используйте регулировки выхода устройства для честного A/B сравнения. Пресеты отсутствуют после обновления/переноса. Проверьте путь к Моя библиотека в Настройки → Расположения. Если вы сменили компьютер, скопируйте папку библиотеки в тот же путь. XIII. Резервное копирование и миграция Резервное копирование сейчас: скопируйте папку Моя библиотека в облако или на внешний носитель. Перенос на новый компьютер: установите Bitwig и плагины; установите тот же путь Моя библиотека; вставьте свои пресеты; перезапустите. Поделиться пресетом: кликните правой кнопкой → Показать в Finder/Explorer, отправьте .bwpreset вместе с заметкой, перечисляющей сторонние устройства. XIV. Быстрые адаптеры жанров Рэп/Трэп: немного более медленный релиз на Comp A для отскока; добавьте моно slap для остроты; держите пластины короткими в куплетах. Поп/R&B: мягкий воздух после де-эссинга; Delay+ точечная восьмая с даункингом; plate ride +1 дБ в припеве. Певец-песенник: уменьшите FX и сатурацию; более тесное помещение для интимности; сосредоточьтесь на четкой дикции, а не на яркости. XV. Узнайте больше о пресетах (мышление и рабочий процесс) Пресеты — это не раскраски по номерам, а тщательно подобранные отправные точки. Знание, когда резать, когда сжимать и как отмечать любимые, помогает сессиям оставаться быстрыми и последовательными. Для краткого введения, хорошо сочетающегося с этим руководством по установке, смотрите объяснение на что такое вокальные пресеты и как их использовать, не звуча при этом шаблонно. XVI. Краткое руководство по быстрой установке Распакуйте архив. Быстрый тест: перетащите .bwpreset на вашу вокальную дорожку. Если вам нравится, Сохраните пресет. Держите порядок: либо добавьте папку в Настройки → Расположения, либо скопируйте пресеты в Моя библиотека. Установите пики входа примерно на −12 до −8 дБFS, слегка отрегулируйте Remote Controls и сохраните свою личную версию. Создайте простой шаблон с дорожками Lead/Doubles/Harmonies и двумя возвратами (Slap, Plate), чтобы каждая новая песня начиналась готовой к работе. С чистой установкой, умными тегами и одним надежным шаблоном Bitwig Studio становится быстрым и повторяемым пространством для вокала. Вы будете тратить меньше времени на поиск цепочек и больше времени на запись дублей, которые хорошо звучат на телефонах, наушниках и в больших помещениях.
Узнать больше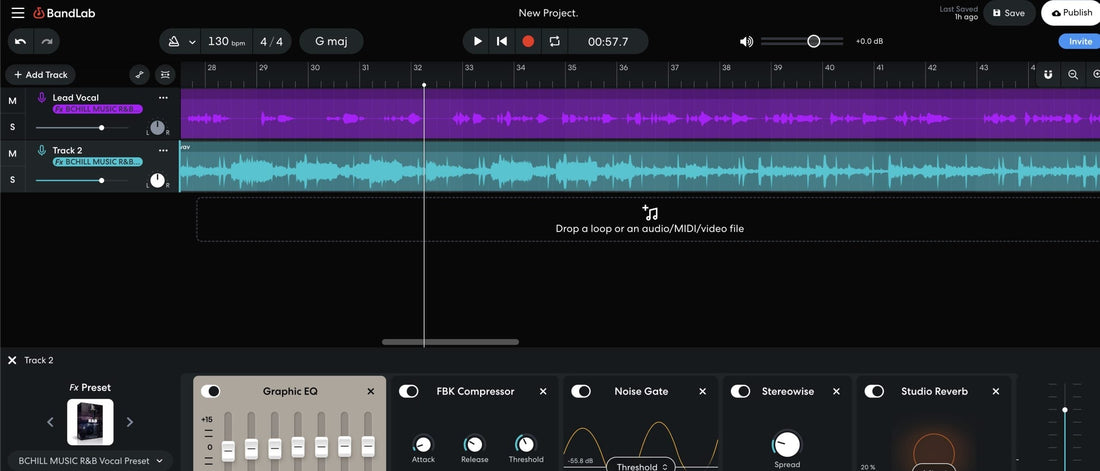
Как установить вокальные пресеты BandLab (мобильное приложение и веб)
Вокальные пресеты BandLab — это сохранённые цепочки эффектов, которые загружают эквалайзер, компрессию, де-эссинг и пространство одним движением. В этом руководстве показаны три способа установки, работающие на iOS/Android и в веб-редакторе Mix: добавление пресета через ссылку для обмена, форк шаблона с сохранением цепочки или воссоздание предоставленной цепочки и сохранение её как своей. Вы также узнаете об организации, цепочке для начинающих, целевых уровнях усиления и быстрых исправлениях. Если вы хотите готовые цепочки, которые открываются за секунды, просмотрите полный набор вокальных пресетов BandLab и выберите звук, который подходит вашему стилю. I. Что такое «вокальный пресет BandLab» на самом деле Внутри BandLab вокальный пресет — это цепочка эффектов дорожки, сохранённая для повторного использования. Одна цепочка может включать настройки эквалайзера, один или два компрессора, де-эссер, сатурацию/эксайтер и эффекты времени. Когда вы сохраняете эту цепочку как пресет, она появляется в разделе Мои пресеты, чтобы любой проект мог загрузить её мгновенно. Портативность по дизайну: Пресеты хранятся в вашем аккаунте BandLab и перемещаются между телефоном и браузером. Только встроенные эффекты: Всё работает внутри BandLab — никаких сторонних плагинов для установки. Длина цепочки: Вы можете складывать несколько эффектов в одном пресете (ограничения BandLab зависят от плана; держите цепочки эффективными для низкой задержки на мобильных устройствах). II. Перед установкой: быстрая проверка готовности Контрольный список перед установкой Обновите приложение BandLab (iOS/Android) или используйте актуальный браузер для веб-редактора. Войдите в один и тот же аккаунт на телефоне и в вебе, чтобы пресеты синхронизировались. Освободите несколько сотен МБ памяти, если планируете скачать стемы или тестовые шаблоны. Подготовьте тестовый проект: одна аудиодорожка с названием «Lead Vox». III. Три способа установки (выберите тот, который предоставляет ваш пакет) A) Предустановленная ссылка → «Добавить в Мои пресеты» (самый быстрый способ) Нажмите или кликните ссылку для совместного использования пресета, предоставленную с вашим пакетом. Выберите Открыть в BandLab. Если появится запрос, выберите Открыть Studio. BandLab добавляет цепочку эффектов в Мои пресеты. Откройте проект, выберите вокальный трек, нажмите +Fx (мобильный) или Эффекты (веб), и вы увидите её в Мои пресеты. Загрузите и пойте. Почему это здорово: установка в один клик; без ручной сборки. Работает на мобильных и в вебе. B) Форк шаблона → Сохранить рэк (универсально) Откройте шаблон/проект по ссылке из вашего пакета пресетов и нажмите Fork. В редакторе микса выберите вокальный трек и откройте цепочку эффектов. Нажмите имя пресета (на мобильном) или используйте меню пресетов (веб) и выберите Сохранить или Сохранить как новый пресет. Дайте понятное имя (например, «Lead — Clean Pop (BL)»). Откройте свой проект и загрузите сохранённый пресет из Мои пресеты. Почему это здорово: гарантированное соответствие маршрутизации и порядку поставщика; легко пересохранять с вашими настройками. C) Ручная сборка → Сохранить как ваш пресет (работает с листами параметров) Откройте ваш проект и выберите вокальный трек. Добавляйте эффекты в порядке, указанном в паке (пример ниже), и установите начальные значения. Спойте тестовую фразу и настройте пороги/фильтры на слух (см. раздел VII). Сохраните цепочку под понятным именем в Мои пресеты. Почему это здорово: полный контроль; вы поймёте каждый этап и сможете быстро исправлять проблемы. IV. Шаги установки на мобильные устройства (iOS/Android) Откройте вашу песню → нажмите на вокальный трек → нажмите +Fx, чтобы открыть библиотеку эффектов. Чтобы загрузить добавленный вами пресет: проведите до Мои пресеты → выберите ваш пресет. Чтобы сохранить цепочку: после добавления эффектов и настройки нажмите меню пресетов и выберите Сохранить. Дайте ей имя, которое удобно сортировать (см. советы по именованию ниже). Запишите 10–20 секунд на уровне исполнения и отрегулируйте вход так, чтобы сырые пики были около −12 до −8 дБFS до обработки. V. Шаги установки через веб (браузер) Откройте проект в редакторе микса → выберите вокальный трек. Нажмите Эффекты (внизу слева). В браузере можно искать, просматривать категории или открыть Мои пресеты. Загрузите свой пресет. Чтобы сохранить цепочку, используйте меню пресетов в ряде → Сохранить пресет. Запишите короткий тестовый дубль. Если задержка кажется высокой, записывайте с минимальной цепочкой (эквалайзер → лёгкий компрессор → де-эссинг) и добавляйте полировку позже. VI. Организация, которая экономит время Папки плоские; используйте имена, которые сортируются: Lead — Clean, Lead — Airy, Rap — Punch, R&B — Smooth, Ad-Lib — Phone, Harmony — Wide. Один макропресет на роль: держите отдельные пресеты для лид-вокала, дублей, гармоний, ад-либов. Это предотвращает чрезмерный де-эссинг дублей или излишнее осветление гармоний. Теги версий: добавляйте дату или тег микрофона, если это полезно (например, (SM7B), (NT1)). VII. Безопасная «первая цепочка» для BandLab (стандартные эффекты, лёгкое применение) Используйте этот порядок как отправную точку, затем сохраните как свой пресет. Делайте небольшие изменения; пусть основную работу выполняют исполнение и аранжировка. Фильтр высоких частот / эквалайзер: уберите гул; начните около 80–100 Гц для большинства голосов. Сгладьте 250–350 Гц, если кабина звучит гулко. Если носовой, сделайте небольшой спад около ~1 кГц. Компрессор 1 (формирование): мягкое соотношение (2:1–3:1); атака 10–30 мс; среднее время релиза. Цель — 3–5 дБ на фразах, чтобы согласные «дышали». Де-эссинг: широкая полоса около 6–8 кГц; уменьшайте, пока наушники не перестанут жаловаться, затем остановитесь. Компрессор 2 (безопасность): быстрее для ловли пиков (1–2 дБ). Это стабилизирует уровни посылов. Полировка присутствия: если дикция всё ещё скрыта, добавьте +0,5–1 дБ в районе 3–4 кГц (широкая полоса). Лёгкое поднятие воздуха (10–12 кГц) только после успокоения сибилянтов. Возвраты эффектов: слэпбэк 90–120 мс (фильтр 150 Гц–6 кГц), короткий пластинчатый или комнатный реверб (0,6–1,0 с) с предзадержкой 20–50 мс. Держите куплеты суше; немного откройте припев. Совет: Для дублей используйте более высокий фильтр высоких частот, чуть больше де-эссинга и опустите уровень на 6–9 дБ ниже лидирующего голоса. Панорамируйте дубли влево/вправо; оставьте дополнительную ширину для гармоний и возвратов. VIII. Установка и настройка по жанру (примеры) После установки пресета эти небольшие изменения адаптируют его к песне — без необходимости перестраивать. Рэп / Трэп: держите средние частоты чистыми, чтобы слова выделялись. На инструментале сделайте небольшой вырез, ориентированный на вокал, около 2–4 кГц, когда голос звучит. Добавьте короткий слэп для настроения; избегайте длинных пластин в плотных куплетах. R&B / Поп: делайте упор на гладкие высокие частоты. Осветляйте после деэссера; немного повышайте задержку в припеве; держите куплеты интимными с ранними отражениями и меньшими посылами. Гармонии: фильтруйте низкие средние более агрессивно; небольшой подъем на 5 кГц добавит блеска без усиления звуков "С". IX. Запись и мониторинг, которые работают Целевые уровни усиления: отслеживайте сырые пики около −12 до −8 дБFS. Стабильный вход лучше сильной компрессии. План по задержке: если пресет тяжелый, дублируйте дорожку; держите легкую цепочку "Cue" для записи и цепочку "Mix" для воспроизведения. Здоровые сравнения: выравнивайте уровни при тестировании пресетов. Громче почти всегда звучит "лучше". Проверка в моно: ваш лид должен оставаться четким на динамике телефона; ширину добавляйте в дубли и эффекты, а не в центральный инсертер. X. Устранение неполадок (проблема → целенаправленное решение) Я не вижу пресет после перехода по ссылке. Убедитесь, что вы открыли его, будучи вошедшим в BandLab, затем проверьте Мои пресеты в браузере эффектов. Если у вас несколько аккаунтов, повторите, войдя в нужный аккаунт. “Fork” сработал, но я не могу загрузить его в другом месте. Откройте форкнутую песню, загрузите эффекты вокальной дорожки и Сохраните как новый пресет. Он появится в разделе Мои пресеты для всех проектов. Мобильный звук отличается от веб-версии. Убедитесь, что используется одно и то же имя пресета и уровень входа. Избегайте двойного наложения эффектов, загружая пресет дважды на одной дорожке. Резкие звуки "С" после повышения яркости. Пересмотрите порог деэссера; уменьшите воздушный срез примерно на 0,5 дБ; низкочастотный фильтр для задержек/пластин около 6–7 кГц. Вокал теряется под битом. Понизьте посылы эффектов в плотных тактах; слегка увеличьте присутствие; если возможно, уменьшите 2–4 кГц на инструментале, пока вокал звучит. Хор ощущается тонким с дублирующими дорожками. Ослабьте высокочастотный фильтр дублей на несколько Гц; добавьте +1 дБ в диапазоне 160–200 Гц (широко) на дублях; держите их на 6–9 дБ ниже лидирующей дорожки. Щелчки или задержки при записи. Используйте более простую цепочку записи; закройте фоновые приложения; уменьшите количество одновременных эффектов на других дорожках. XI. Сохраняйте один раз, используйте вечно Однокликовые вызовы: после выбора пресета для вашего голоса, сохраните его снова под личным именем (например, Lead — Clean (ВашеИмя)). Семейство пресетов: создавайте небольшие варианты: Lead — Clean, Lead — Air+, Lead — Smooth. Каждый должен переключаться за секунды для A/B сравнения. Шаблонные сессии: сохраняйте стартовую песню с помеченными дорожками (Lead, Doubles, Harmonies, Ad-libs) и посылами (Slap, Plate). Загружайте ваши пресеты на каждую дорожку и сохраняйте как шаблон. XII. Пример: вручную восстановить популярную цепочку (если в вашем пакете есть настройки) Вот универсальная, удобная для перевода цепочка, которую вы можете воссоздать с помощью стандартных эффектов BandLab и сохранить как пресет. Делайте небольшие изменения; всегда сравнивайте A/B. EQ: HPF по вкусу; широкое снижение −1 до −2 дБ на 250–350 Гц, если звук коробочный; опциональный узкий спад около 1 кГц, если носовой. Comp A: 2:1–3:1; атака ~20 мс; релиз ~120 мс; 3–5 дБ снижения усиления на фразах. De-Ess: широкополосный ~6–8 кГц; настраивайте на слух в наушниках. Comp B: быстрее, ловит пики 1–2 дБ для стабильности. Полировка: микрошелф 10–12 кГц только если ваш микрофон тёмный, и только после де-эссинга. FX: моно slap 90–110 мс; темповое эхо 1/8 или точечная восьмая с низкой обратной связью (duck, если есть); короткий plate 0.7–1.0 с с предзадержкой 20–50 мс; фильтруйте возвраты. XIII. Специфические советы для BandLab, которые сохраняют миксы чистыми Используйте меньше, но лучше: мобильные процессоры ценят лёгкие цепочки; вы получите меньшую задержку и меньше сбоев. Пресеты для каждой роли: Lead, Doubles и Harmonies требуют разных точек высоких частот и уровней де-эссинга. Автоматизируйте FX, а не уровень: увеличивайте отправки slap/plate на 1–2 дБ в хуке, а не только громкость. Проверка на наушниках: де-эссинг и фильтры возврата настраиваются больше по наушникам, чем по колонкам. XIV. Узнайте больше (навыки для BandLab) После установки и сохранения пресета практикуйтесь в балансировке с реальными битами и настраивайте движение по времени, которое звучит современно. Этот пошаговый гид показывает практическую работу с карвингом, выбором задержек и подъёмом хуков внутри одной платформы: микс рэп-вокала на BandLab. XV. Краткое руководство по быстрой установке Откройте ссылку на общий пресет от производителя → добавьте в Мои пресеты, или форкните шаблон и сохраните рэк, или воссоздайте цепочку и сохраните её. Загрузите на вокальную дорожку (мобильное: +Fx; веб: Effects), спойте тест длиной 10–20 секунд и установите вход так, чтобы сырые пики были около −12 до −8 дБFS. Настройте де-эссинг, пороги и фильтры возврата; сохраните свою личную версию. Создайте простой шаблон с помеченными дорожками и двумя возвратами (Slap, Plate). Начинайте каждую новую песню с него. С чистой установкой и одним умным шаблоном BandLab становится быстрым и повторяемым вокальным рабочим процессом. Добавьте несколько пресетов для конкретных ролей, делайте небольшие изменения, и ваши записи будут хорошо звучать на телефонах, наушниках и больших системах.
Узнать больше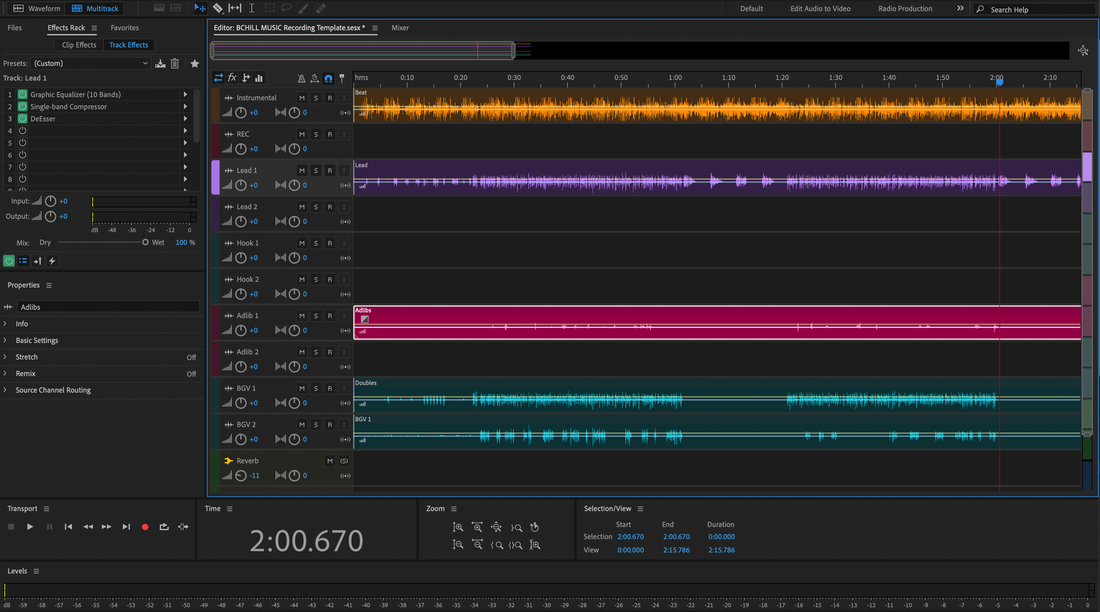
Как установить голосовые пресеты Adobe Audition (быстро, безопасно, пошагово)
Вокальные пресеты Adobe Audition — это сохранённые цепочки эффектов, которые загружают эквалайзер, компрессию, де-эссинг, сатурацию, задержки и реверберацию одним кликом. В этом руководстве показаны три безопасных способа установки, как настроить микрофон, где на диске хранятся пресеты и как сохранить свои собственные версии — чтобы ваша первая сессия загружалась с готовой цепочкой эффектов, а не с пустым набором. Если вы предпочитаете готовые цепочки, которые сразу звучат хорошо на наушниках, в машине и в клубе, просмотрите отобранные вокальные пресеты Adobe Audition и адаптируйте их под свой голос за считанные минуты. I. Что такое "вокальные пресеты" в Audition В Audition вокальный пресет обычно представляет собой цепочку Рэка эффектов, сохранённую в пользовательских настройках. Пакеты также могут поставляться в виде шаблонов сессий, чтобы вы могли открыть мультидорожечную сессию с готовой вокальной дорожкой. При установке вы встретите несколько распространённых форматов: Цепочки рэков, сохранённые в пользовательских настройках Audition (нет отдельного файла на пресет; они хранятся внутри файла настроек). Шаблоны сессий (.sesx), которые включают вокальную дорожку; вы открываете их, затем сохраняете рэк как свой пресет. Избранное (макросы) включают некоторые создатели; полезно для пакетных действий, реже для полных вокальных цепочек. II. Контрольный список перед установкой (сделайте один раз) Контрольный список перед установкой Обновите Audition до последней крупной версии. Запомните вход вашего аудиоустройства (микрофонный предусилитель или канал интерфейса). Если пресет использует сторонние плагины, сначала установите и активируйте их. Откройте Эффекты → Менеджер аудио плагинов и выполните сканирование, чтобы Audition обнаружил новые плагины. Закройте все ресурсоёмкие приложения, чтобы освободить ЦПУ во время тестирования задержки. III. Три метода установки (выберите один) Метод A — Откройте шаблон, затем сохраните рэк (самый безопасный и универсальный) Распакуйте скачанный архив. Если вы видите шаблон .sesx, дважды щелкните, чтобы открыть его в Audition. В Мультидорожечном режиме выберите вокальную дорожку. Рэк эффектов покажет всю цепочку. Нажмите меню пресетов рэка и выберите Сохранить пресет рэка…. Дайте ему понятное имя (например, «Pop Lead — Smooth Air»). Откройте новую сессию и убедитесь, что пресет появился в списке пресетов рэка. Почему выбрать этот способ: вы не трогаете системные файлы; просто добавляете цепочку в свой личный список рэков. Метод B — Установка в настройки Audition (сложнее, но быстрее после освоения) Некоторые пакеты содержат готовые к слиянию настройки. Всегда делайте резервную копию перед изменениями. Резервное копирование настроек: В Audition перейдите в Справка → Показать файлы журнала, затем перейдите на одну папку выше в папку с настройками Audition. Скопируйте всю папку в безопасное место (это сохранит ваши пресеты и избранное). Заменить или объединить: Если пакет содержит полный файл настроек для пресетов рэка, следуйте его инструкции. Быстрый способ — заменить EffectPresets.xml (Windows: %APPDATA%\Adobe\Audition\version\; macOS: ~/Library/Preferences/Adobe/Audition/version/) на предоставленный после создания резервной копии. Продвинутые пользователи могут открыть оба файла и объединить блоки пресетов. Перезапустите Audition. Новые имена рэков должны появиться в меню пресетов. Почему выбрать этот способ: мгновенный доступ, если вы умеете делать резервные копии и восстанавливать настройки. Метод C — загрузка отдельного файла цепочки из пакета (если предоставлен) Распакуйте пакет. Если вы видите папку «Rack Presets» или «Audition Presets» с инструкциями по установке, откройте её. Выбрав вокальную дорожку, откройте меню рэка и используйте опцию Загрузить/Импортировать, если она есть (зависит от версии). Если нет, используйте метод A или B. После загрузки используйте Сохранить пресет рэка…, чтобы сохранить его под своим именем. Почему выбрать этот способ: быстро, если пакет создан для вашей точной версии Audition и предоставляет точку входа для импорта. IV. Где хранятся ваши пресеты (и как их найти) Audition хранит пользовательские пресеты рэка в одном файле настроек в скрытой папке с настройками. Типичные пути: Окна — %APPDATA%\Adobe\Audition\version\EffectPresets.xml macOS — ~/Library/Preferences/Adobe/Audition/version/EffectPresets.xml Самый быстрый способ найти: Справка → Показать файлы журнала → поднимитесь на одну папку выше, чтобы попасть в каталог настроек с вашими файлами пресетов. Сделайте резервную копию этой папки перед изменениями или переносом на другой компьютер. V. Первоначальная настройка: маршрутизация, мониторинг и тестирование Создайте дорожку. В Multitrack добавьте Аудио дорожку и выберите вход вашего интерфейса в разделе Track Input. Загрузите ваш рэк. Выберите установленный пресет рэка из меню пресетов Effects Rack. Установите уровень входного сигнала. Говорите/пойте на уровне выступления; стремитесь к сырым пикам около −12 до −8 dBFS до обработки. Проверьте задержку. Если мониторинг кажется запоздалым, уменьшите буфер в настройках аудиоустройства. Для сложных цепочек увеличьте буфер при слежении без эффектов и мониторьте через более легкую очередь. Запишите тестовую фразу и переключайте кнопку обхода A/B, чтобы убедиться, что обработка помогает, а не скрывает дикцию. VI. Сделайте предустановку своей (умные настройки, которые работают) Любая хорошая цепочка должна реагировать на небольшие, решительные изменения. Начните здесь: Input trim: выравнивайте уровень между разными микрофонами или изменениями расстояния без сильного сжатия компрессором. De-ess: стремитесь к «мягкому яркому» звучанию, а не к глухому. Остановитесь, когда наушники перестанут жаловаться. Body: заполните 120–200 Гц для тепла; избегайте 250–350 Гц, которые создают мутность и мешают гитарам/пэдам. Presence: небольшой, широкий подъём около 3–4 кГц, если дикция скрыта; убирайте, если тарелки/хай-хэты загромождают. Air: добавляйте 10–12 кГц только после того, как звуки S успокоятся; 0.5–1 дБ — это много. Посылы FX: держите куплеты суше; раскрывайте припев, регулируя реверберацию/эхо на 1–2 дБ, а не удваивая каждую строку. VII. Цепочки только из стандартных плагинов против сторонних (чего ожидать) Цепочки только из стандартных плагинов загружаются на любом компьютере с установленным Audition. Они эффективны по CPU, надежны и отлично подходят для совместной работы. Цепочки сторонних разработчиков могут добавить характер, но требуют одинаковых плагинов и версий на каждом компьютере. Если плагин отсутствует, Audition пропустит этот этап — всегда проверяйте с помощью A/B теста. VIII. Организуйте свою библиотеку, чтобы быстро находить нужное Предустановки помогают только если вы можете вызвать их за секунды. Используйте схему именования, которая сортирует по использованию и настроению: Ведущий — Чистый поп, Ведущий — Воздушный R&B, Ведущий — Агрессивный рэп Гармония — Wide Soft, Гармония — Dark Pad Ad-Lib — Phone Band, Ad-Lib — Throw Echo Сохраните несколько предустановок дорожек (меню заголовка дорожки → сохранить), чтобы вокальная дорожка открывалась с вашей цепочкой, цветом и преднастроенными посылами. IX. Шаблоны рабочего процесса, которые помогают содержать сессии в порядке Двухдорожечная запись: Запишите чистую дорожку (dry) и вторую «принт» дорожку с включённым регом. Заглушите одну для мониторинга, другую оставьте для безопасности. Возвратные эффекты: Размещайте временные эффекты (пластина, эхо) на возвратах Bus/Send. Вы будете автоматизировать посылы вместо управления множеством вставок. Маркеры разделов: Используйте маркеры (Куплет/Предприпев/Припев), чтобы компиляция и автоматизация оставались организованными. Заметки к версии: Сохраняйте небольшие заметки в панели Маркеров/Метаданных, чтобы коллеги знали, какой пресет и настройки вы использовали. X. Устранение неполадок (проблема → целенаправленное решение) Пресет отображается, но звучит неполно. Отсутствует или отключён указанный плагин. Установите/включите его в Effects → Audio Plug-In Manager и выполните повторное сканирование. После установки нет новых пресетов. Вы заменили неправильную папку версии. Убедитесь в точном каталоге версии (например, 24.0 против 23.0). Перезапустите Audition после изменений. Избранное исчезло или сбросилось. Восстановите резервную копию папки с настройками. Избегайте смешивания файлов из разных основных версий без полной резервной копии. Слишком ярко/резко. Уменьшите воздушный срез и слегка увеличьте де-эссинг. Отфильтруйте реверберацию/эхо в районе 6–8 кГц. Звук слишком глухой/коробочный. Аккуратно уберите 250–350 Гц; поднимите присутствие на 0,5–1 дБ; проверьте, не маскирует ли инструментальный звук диапазон 2–4 кГц. Щелчки/пропуски при мониторинге. Увеличьте буфер или заморозьте ресурсоёмкие дорожки. Используйте более лёгкий трекинговый рег и переключайтесь на полную цепочку для микширования. Сессия открывается с сообщением «Отсутствуют медиа/настройки». Храните пресеты и сессии на одном диске или восстановите из резервной копии настроек перед открытием старых проектов. XI. Миграция и резервное копирование (обеспечьте будущее вашей настройки) Сделайте резервную копию сейчас: Скопируйте всю папку с настройками Audition (пути в разделе IV) в облако или на USB-накопитель. Новый компьютер: Сначала установите Audition и плагины, затем вставьте папку с настройками в тот же путь (закройте Audition во время этого). Новая версия Audition: Запустите один раз, чтобы создать новую папку, закройте программу, затем выборочно скопируйте EffectPresets.xml из папки старой версии в новую (сделайте резервную копию). XII. Быстрый демо: создайте сессию «готовую для певца» за 5 минут Создайте мультидорожечную сессию с частотой дискретизации вашего трека (44,1 кГц для музыки, если только видео не требует 48 кГц). Добавьте дорожку Lead Vox → загрузите установленный пресет рега → установите вход → включите запись. Добавьте два посыла: A = Slap (90–120 мс) и B = Plate (0.7–1.0 с с предзадержкой 20–40 мс). Отфильтруйте возвраты для сохранения ясности. Запишите куплет и припев. Поднимайте посылы на 1–2 дБ в припеве; автоматизируйте снижение в быстрых партиях. Сохраните дорожку как пресет и сессию как шаблон для следующей песни. XIII. FAQ (быстрые ответы) Нужен ли мне именно тот микрофон, который указан в объявлении пресета? Нет. Рассматривайте пресеты как отправные точки. Настраивайте вход/усиление, де-эссинг, тело и присутствие под ваш микрофон и голос. Могу ли я поделиться своей пользовательской стойкой с коллегой? Да — экспортируйте всю папку с настройками или отправьте шаблон сессии, включающий стойку. Убедитесь, что у них одинаковые плагины, если ваша цепочка использует сторонние эффекты. Можно ли импортировать только одну стойку, не заменяя мой файл? Да — откройте прилагаемый .sesx с цепочкой, затем используйте Сохранить пресет стойки… в своей библиотеке (Метод A). Где включить плагины, чтобы Audition их обнаружил? Эффекты → Менеджер аудио плагинов. Включите VST3 (и AU на macOS), установите папки для сканирования и повторно сканируйте. XIV. После установки: чистая передача и сдача файлов Когда ваша вокальная цепочка работает, печать чистых файлов упрощает совместную работу. Если ваш проект переходит в другую DAW для сведения, этот подробный гид о том, как экспортировать стемы из Adobe Audition, поможет подготовить согласованные файлы, которые откроются в любой программе. XV. Краткое руководство по быстрой установке (для копирования) Распакуйте архив. Самый безопасный способ: откройте прилагаемый .sesx, затем выберите Сохранить пресет стойки…. Самый быстрый способ: сделайте резервную копию папки с настройками, замените или объедините EffectPresets.xml, перезапустите Audition. Сканируйте плагины, установите пики входа около −12 до −8 дБFS и сделайте небольшие изменения тона. Сохраните пресет дорожки и шаблон сессии, чтобы использовать цепочку для каждой песни. Теперь у вас есть повторяемый, простой способ устанавливать и настраивать цепочки в Audition. Создайте одну надежную отправную точку, сохраните её с понятными именами, и вы будете работать быстрее с каждой сессией.
Узнать больше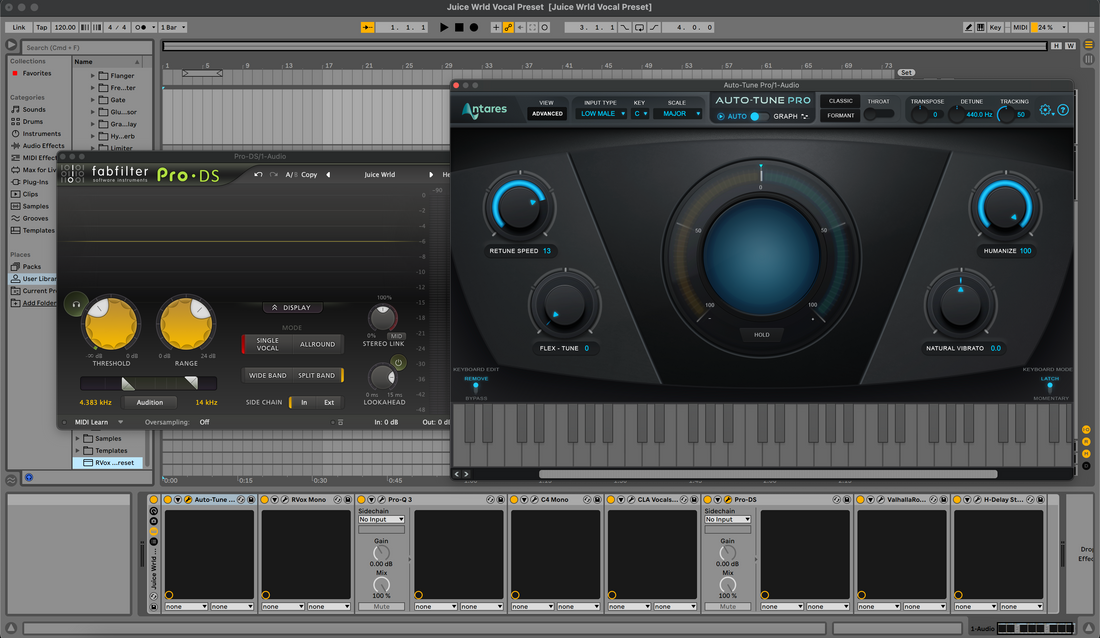
Как установить пресеты вокала Ableton (Live 11 и 12)
Ableton vocal presets — это готовые наборы эффектов и цепочки, которые вы можете загрузить за секунды для профессионального звучания вокала. В этом руководстве показаны три надежных способа установки, как организовать вашу библиотеку, а также как загружать и настраивать пресеты под ваш голос. Вы также узнаете быстрые решения распространенных проблем, чтобы ваши наборы работали с первого раза. I. Что на самом деле представляют собой "Ableton vocal presets" В Ableton Live «вокальный пресет» обычно представляет собой Audio Effect Rack, сохранённый как .adg (Ableton Device Group). Некоторые наборы также включают: .adv — пресет устройства (для одного стандартного эффекта). .als — Ableton Set, содержащий предварительно настроенную вокальную дорожку или шаблон сессии. Папки с документацией, демо-аудио или изображениями. Рэки могут использовать только стандартные эффекты или смесь стандартных и сторонних плагинов. Если пресет ссылается на плагины, которых у вас нет, Live показывает заполнитель, пока плагин не будет установлен и просканирован. II. Перед началом: краткие требования Контрольный список перед установкой Установлен и обновлен Live 11 или Live 12. Достаточно места на диске для распаковки набора пресетов. Сторонние плагины (если требуются пресетом) установлены и лицензированы. В Live → Настройки > Плагины включите используемые форматы (VST3 и, на macOS, AU), затем Пересканируйте. Знайте, где находится ваша Пользовательская библиотека (Настройки → Библиотека). III. Три способа установки вокальных пресетов Ableton Метод A — Перетаскивание одного пресета (самый быстрый) Распакуйте скачанный архив. Сохраняйте структуру папок. Откройте Live. Создайте пустую Аудио дорожку. Перетащите .adg (или .als template) из Finder/Explorer прямо на дорожку. Live загружает рэк мгновенно. Макросы появляются в верхней части цепочки устройств. Чтобы сохранить его в вашей библиотеке для последующего использования, нажмите на значок дискеты на рэке и выберите понятное имя (например, "Pop Lead – Smooth Air"). Когда использовать: для быстрого прослушивания пресетов или хранения лишь нескольких избранных. Метод B — Добавление всей папки в Places (без изменений) Распакуйте ваш пакет пресетов в постоянное место (например, Documents/BCHILL/Vocal Presets/Ableton/). В Live Browser кликните правой кнопкой мыши в разделе Places и выберите Add Folder…. Выберите распакованную папку. Live индексирует её, и она остаётся видимой в Браузере. Откройте папку в Браузере и перетащите любой .adg на вашу вокальную дорожку для загрузки. Когда использовать: если вы хотите хранить паки организованно в одном месте без копирования файлов в User Library. Метод C — Копирование в User Library (портативно и доступно для поиска) Перейдите в Live → Preferences → Library и обратите внимание на User Library Location. Откройте эту папку в Finder/Explorer. Перейдите к Presets/Audio Effects/Audio Effect Rack/. Если папок нет, создайте их. Скопируйте ваши .adg файлы (или папки с пресетами) в подпапку с именем производителя (например, Audio Effect Rack/BCHILL/). Вернувшись в Live, нажмите Rescan (Настройки → Библиотека) или кликните по маленькой иконке обновления в Браузере, если она отображается. Найдите свои пресеты в разделе User Library в Браузере и перетащите для загрузки. Когда использовать: если вы хотите, чтобы всё было доступно для поиска в одном месте, включено в резервные копии и легко переносилось. IV. Требования к плагинам (если ваш рэк использует сторонние FX) Многие вокальные рэки включают компрессоры, эквалайзеры или сатураторы от сторонних разработчиков. Установите точные форматы плагинов, поддерживаемые Live на вашей системе, затем выполните повторное сканирование: Windows: VST3 в C:\Program Files\Common Files\VST3 (по умолчанию). Некоторые старые пути VST2 могут существовать, но рекомендуется VST3. macOS: VST3 в /Library/Audio/Plug-Ins/VST3; AU в /Library/Audio/Plug-Ins/Components. В Live откройте Preferences → Plug-Ins, включите используемые форматы и нажмите Rescan. Если Live всё ещё не видит плагин, перезапустите Live после установки плагина и менеджера лицензий. V. Организуйте ваши вокальные рэки так, чтобы вы действительно ими пользовались Пресеты экономят время только если вы можете быстро их найти. Попробуйте такую структуру: User Library → Presets → Audio Effect Rack → BCHILL Подпапки по назначению: Lead, Ad-Lib, Harmony, Rap, Podcast, Repair. Переименовывайте пресеты с практичными префиксами, чтобы Браузер сортировал их удобно, например, Lead – Clean Pop, Lead – Airy R&B, Rap – Punchy, Harmony – Wide Soft. Используйте цветовые теги Collections Live для «Избранных», «Rap» или «Clean» для ускорения поиска между проектами. VI. Загрузка, маршрутизация и запись с пресетом Создайте аудиодорожку и установите Audio From на ваш микрофон/вход интерфейса (например, Ext In 1). Включите запись для мониторинга. Перетащите ваш рэк на дорожку. Макросы появятся сверху. Установите правильный уровень входного сигнала. Стремитесь к пикам около −12 до −8 дБFS до рэка. Используйте предусилитель интерфейса, а не лимитер. Настраивайте макросы (Tone, Body, Air, De-Ess, Comp, Width, FX) во время речи или пения в контексте. Опционально: запись vs. мониторинг. Если хотите чистый дубль, мониторьте через рэк, но записывайте сухой сигнал, разместив рэк на Return дорожке и используя Send по вкусу, или записывайте на вторую аудиодорожку, получающую сигнал с выхода обработанной дорожки. VII. Сохраните один раз, используйте вечно Сохраните рэк с вашими предпочтительными настройками макросов: нажмите на иконку дискеты на рэке. Сохраните пресет дорожки: кликните правой кнопкой по заголовку дорожки → Сохранить как стандартную аудиодорожку (чтобы каждая новая аудиодорожка имела вашу цепочку), или перетащите дорожку в Браузер для сохранения повторно используемого пресета дорожки. Сохраните шаблон проекта: Файл → Сохранить Live Set как шаблон (Live 12) или сохраните «стартовый» сет с рэками, возвратами и маркерами. VIII. Настройка макросов: маленькие движения, большие результаты Макросы упрощают установку. Вот безопасный стартовый подход: Input Trim: подберите под ваш микрофон; настройте так, чтобы средние фразы мягко запускали компрессию. De-Ess: увеличивайте, пока шипящие не станут мягче в наушниках, затем остановитесь. Body: добавьте достаточно тепла (120–200 Гц), чтобы ощущалось полнота без мутности. Presence: если дикция теряется, немного сдвиньте макрос 2.5–4 кГц; избегайте пиков. Air: слегка поднимите 10–12 кГц после стабилизации де-эссера. FX Blend: короткий слэп и пластина для объёма; держите куплеты суше и откройте припев. IX. Типы файлов Ableton и где они находятся (быстрая справка) Предмет Расширение Типичное расположение Примечания Audio Effect Rack .adg User Library → Presets → Audio Effect Rack Основной формат для вокальных рэков с макросами. Пресет устройства .adv User Library → Presets → <Device> Настройки одного устройства (например, EQ Eight). Live Set / Шаблон .als Проекты / Шаблоны Завершённые сессии с треками и маршрутизацией. Упаковка .alp Дважды щелкните для установки Открывает установщик внутри Live. X. Создайте проект «готовый для певца» за пять минут Два аудиотрека: Лид (с рэйком) и Safety (сухой вход, запись обоих включена). Два реверба: A = Slap (90–120 мс, с фильтром), B = Plate (0.7–1.0 с, предзадержка 20–40 мс). Маркеры: Установите локаторы для куплета, пре-хука и хука, чтобы ускорить запись и компиляцию. Настройка: Если вы используете плагин изменения тона на лид-вокале, установите тональность/масштаб и умеренную скорость для куплетов. Шаблон: Сохраните как шаблон, чтобы завтрашняя сессия начиналась за секунды. XI. Устранение неполадок (проблема → целевое решение) Пресет загружается, но показывает «Отсутствует плагин». Установите точный плагин и включите его формат в Настройки → Плагины. Нажмите Повторное сканирование. При необходимости перезапустите Live. Ничего не меняется при настройке макросов. Возможно, вы загрузили пресет устройства .adv вместо рэйка, или макросы рэйка не сопоставлены. Откройте рэйк и проверьте сопоставления макросов; сохраните снова. При мониторинге слышны щелчки. Немного увеличьте размер буфера (Настройки → Аудио). Закройте другие приложения. Используйте варианты рэйка с меньшей нагрузкой на ЦП, если они есть. Слишком ярко/резко. Уменьшите макросы Air/Presence и немного увеличьте De-Ess. Проверьте, не усиливает ли ваша компенсация на наушниках/эквалайзер высокие частоты. Слишком глухо в миксе. Добавьте 0.5–1 дБ Presence и небольшой подъём Air после контроля S-звуков. Проверьте, не маскирует ли ритм диапазон 2–4 кГц; при необходимости сделайте мягкое динамическое углубление в этом диапазоне на инструментале. Прыжки уровня между пресетами. Сравнивайте, подгоняя выходные уровни. Используйте финальный этап утилиты/лимитера в цепочке устройства для выравнивания уровней при A/B тестах. «Это устройство недоступно» после переноса на другой компьютер. Переустановите плагины на новом устройстве, включите форматы и выполните повторное сканирование. Храните вашу пользовательскую библиотеку на синхронизируемом диске, чтобы рэйки и имена перемещались вместе с вами. XII. Безопасные целевые уровни усиления при записи с пресетами Держите исходные пики на уровне примерно от −12 до −8 дBFS до обработки. После рэйка оставьте небольшой запас по уровню. Избегайте жесткого лимитера на главном микс-басе во время записи; он скрывает проблемы. Громкость регулируется позже, при мастеринге микса. XIII. Часто задаваемые вопросы Нужен ли мне именно тот микрофон, который указан в пресете?Нет. Пресеты — это отправные точки. Используйте Input Trim и макросы Body/Presence, чтобы подстроить тон вашего микрофона. Будут ли пресеты работать, если у меня только стандартные эффекты Ableton?Да — если рюкзак только из стандартных средств. Если нужны сторонние плагины, Live покажет заполнители, пока эти плагины не будут установлены. Где находится Пользовательская библиотека?Настройки → Библиотека показывает путь. Вы можете переместить её (например, на облачный диск) и указать Live новое расположение. Могу ли я использовать рюкзаки на возвратном треке?Абсолютно. Разместите «рюкзак реверберации/задержки» на возвратном треке и контролируйте уровни посылов с вашей вокальной дорожки. Это сохраняет вашу записанную дорожку чище. Как сделать резервную копию пресетов?Сделайте резервную копию папки Пользовательская библиотека и любых внешних папок, добавленных в Места. Это сохранит ваши рюкзаки, имена и теги. XIV. Узнайте больше и следующие шаги Хотите помощь в выборе стилей перед настройкой? Это тщательно подобранное руководство рассказывает о сильных сторонах и случаях использования: Руководство по вокальным пресетам Ableton. После установки и организации ваших рюкзаков, потратьте время на пение через несколько любимых и сохраните свои версии с настройками макросов, которые подходят именно вашему голосу. XV. Краткое руководство по быстрой установке (для копирования) Распакуйте скачанный архив. Быстрый тест: перетащите .adg на аудиодорожку для загрузки. Держите всё в порядке: либо Добавьте папку… в Места, либо скопируйте .adg в Пользовательская библиотека → Пресеты → Аудиоэффектный рюкзак. Включите VST3/AU в Настройки → Плагины и Пересканировать, если используются сторонние эффекты. Установите пики входа на −12 до −8 дБFS, аккуратно настраивайте макросы и сохраните свою версию. С чистой установкой и аккуратной библиотекой вокальные пресеты становятся творческим сокращением, а не игрой в угадайку. Создайте один надежный рабочий процесс сейчас, и вы будете работать быстрее на каждой сессии.
Узнать больше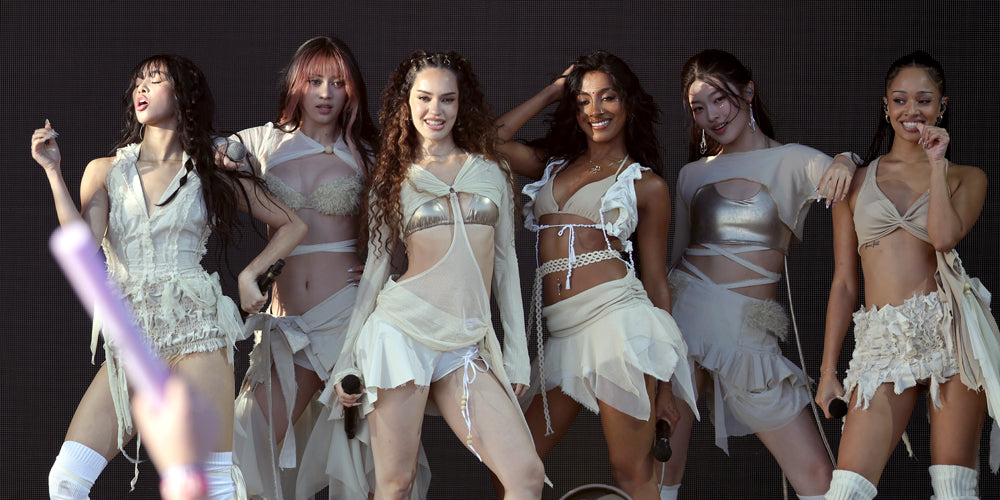
Вокалы в стиле KATSEYE: блеск, групповые стеки и подъём
Вибрация KATSEYE — глянцевый поп с точностью: чёткие ведущие, синхронизированные слои и эффекты, движущиеся в ритме. Ваша цель — уверенный центральный образ, который остаётся плавным, в то время как гармонии и дубли расширяют припев. I. Фирменный звук: яркий фокус, шелковистый воздух, хореографированная ширина Эстетика находится между глобальным попом и танцевальной музыкой. Согласные слышны при низкой громкости. Воздух присутствует, но никогда не холодный. Низкие средние частоты остаются стройными, чтобы синтезаторные хуки и бас-бочки дышали. Размер создаётся за счёт стэков и временных движений, а не за счёт усиленного верхнего диапазона ведущего. Дорожка присутствия: 2.8–4.2 кГц придаёт чёткость произношению. Формируйте её широкой деэссингом, чтобы звуки "С" оставались мягкими. Воздушное окно: небольшой подъём 10–12 кГц только после стабилизации сибилянтов. Основной диапазон: 120–180 Гц для авторитета; убирайте 250–350 Гц для устранения мутности под паддингами. Имиджинг: ведущий — моно-настоящий; ширина создаётся дублями, гармониями и возвратами эффектов. II. Выбор захвата, который сохраняет микс Расположение микрофона. 15–20 см за поп-фильтром. Установите капсулу чуть выше линии губ и наклоните на 10–20° в сторону, если микрофон яркий. Это смягчает звуки "С" и уменьшает взрывные согласные до обработки. Уровень входа. Записывайте сырые пики около −12 до −8 дБFS. Избегайте сильной компрессии на входе; сохраняйте форму транзиентов для последующего контроля. Стратегия дублей. Запишите уверенный основной вокал для куплетов и чуть более выраженный проход для припевов. Запишите точные дубли с акцентом на слова, высокие/низкие гармонии и шепотный слой, который можно усилить в припеве. Помечайте дубли по роли и секции для быстрой компиляции. Портативные рабочие процессы. Если вы микшируете в наушниках между сессиями, эти советы по микшированию в наушниках помогут вам откалибровать решения и избежать чрезмерной яркости. III. Карта аранжировки для поп с несколькими вокалистами Проектируйте дорожки так, чтобы можно было масштабировать от плотных куплетов до аренных припевов без потери ясности. Ведущий A / Ведущий B — чередующиеся секции или тембры для поддержания интереса; оба подаются в один и тот же Vocal Bus для полировки. Дубли (L/R) — ультра-плотные унисоны на целевых словах; микропанорамирование. Гармонии (высокие/низкие) — только хор или подъём перед припевом; фильтрованные низкие средние для ясности. Unison Stack — 3–4 голоса на ключевом слове; опустите низко и широко для энергии толпы. Ad-libs A/B — короткие реплики и ответы; узкополосные, чтобы не мешать лидирующему голосу. Texture/Whisper — воздушный слой для подъема; высоко-пропущенный и с ограничением полосы. Vocal Bus — мягкая связка + общий де-эссинг; без сильной компрессии на шине. Beat Bus + Sub Rail — синты/ударные на одном, 808/саб на другом для контроля столкновений. IV. Цепочка лидирующего голоса: сияние без резкости Используйте маленькие, музыкальные шаги, которые складываются чисто. Пусть автоматизация и наслаивание создают драйв. Контроль высоты тона. Установите тональность/масштаб. Припевы могут идти быстрее; куплеты требуют умеренной скорости. Сохраняйте форманты и используйте humanize/transition для естественных гласных. Субтрактивный эквалайзер. HPF ~80–100 Гц. Для мутности кабины сделайте провал 250–350 Гц широкой полосой (−1 до −2 дБ). Если носовой звук, мягкий вырез около ~1 кГц — только если вы его слышите. Компрессор A (форма). 2:1–3:1, атака 15–35 мс, релиз 80–160 мс или авто. Цель — 3–5 дБ гейн редукции на фразах, чтобы согласные ударяли, а затем успокаивались. Де-эссер (широкий). Начинайте с 6–8 кГц; используйте широкую полосу. Настраивайте по наушникам, а не по метрам. Избегайте «шипящих» артефактов. Окраска (низкий микс). Лента/трансформатор/триод на 5–10% смешивания для связности; подгоняйте выход, чтобы громкость не влияла на выбор. Компрессор B (безопасность). Быстрое срабатывание, ловящее пики 1–2 дБ. Это стабилизирует посылы и сохраняет центр образа чётким. Полировка эквалайзера. Если дикция всё ещё скрыта, добавьте +0,5–1 дБ на 3–4 кГц (широкая полоса). Добавьте крошечный шельф на 10–12 кГц только после де-эссинга. V. Архитектура хора: слои, которые ощущаются как один голос Дубли. Два очень плотных унисона на выбранных слогах. HPF немного выше, чем у лидирующего голоса; чуть сильнее де-эссинг; опустите на 6–9 дБ ниже. Микропанорамируйте влево/вправо для ширины без артефактов хора. Пара октав. Если припев требует мгновенного подъема, добавьте октаву сверху на низком уровне. Фильтруйте низкие средние частоты сильно и сохраняйте воздушность мягкой, чтобы она мерцала без шипения. Терции и квинты. Классические движения поп-гармонии. Панорамируйте их шире, чем дубли; держите их чуть темнее лидирующего голоса, чтобы избежать резкости. Толпа унисона. Три или четыре голоса на последнем слове припева. Высокий фильтр и приглушение низких частот. Это звучит как энергия аудитории, не загромождая текст. Слой текстуры. Проход шёпота может добавить «дорогой» блеск. Высокий фильтр около 250–300 Гц, низкий фильтр около 10 кГц, и усиливайте только в припеве. VI. Дизайн движения: время и пространство, танцующие с грувом Моно-хлопок для непосредственности. 90–120 мс; фильтруйте возврат около 150 Гц–6 кГц. Автоматизируйте небольшие подъёмы на входных словах и сильных долях. Темповое эхо. 1/8 или точечная восьмая с низкой обратной связью. Добавьте сайдчейн-дакинг от ведущего, чтобы повторы расцветали в паузах. Панорамируйте случайные броски в противоположную сторону от гармонии для движения. Поп-пластина или маленький зал. 0,7–1,0 с с предзадержкой 20–50 мс. Куплеты держите суше, а припев открывайте на 1–2 дБ посылом, а не более длинным затуханием. Стереодисциплина. Сохраняйте цепочку вставок ведущего моно-настоящей. Распределяйте ширину на гармониях и возвратах эффектов; это защищает фокус на тексте и моно-перевод. Микродвижение. Мягкий автопан на импровизациях или текстуре с частотой такта добавляет жизни без размазывания. Ведущий остаётся фиксированным. VII. Сосуществование битов: синты, хлопки и саб Окно присутствия на Beat Bus. Используйте вокально-зависимый динамический эквалайзер, чтобы слегка понизить 2–4 кГц во время исполнения; быстро отпускайте, чтобы припевы и синтезаторные риффы восстанавливались между строками. Управление сабом. Если слоги исчезают под хвостами 808, примените ключевой низкочастотный срез на 120–180 Гц на саб-рейле во время вокальных фраз. Двигайте параметры аккуратно, чтобы избежать пульсации. Комфорт верхних частот. Если тарелки или яркие падовые звуки шипят, попробуйте узкий M/S-дип около 9–10 кГц только на сторонах; яркость центра сохраняется для разборчивости. Проверка моно. Ведущий должен быть слышен на динамике телефона. Распределяйте ширину на поддерживающих партиях; никогда не расширяйте центральный вставной канал. VIII. Хореография автоматизации для групповой энергии Ведущие проходы. ±0,5–1 дБ на сильных долях; небольшие подъёмы на входах припева; уменьшайте на 0,3–0,7 дБ между фразами, чтобы дать возможность импровизациям засиять. Перемещения порога де-эссера. Ослабьте на 1–2 дБ на тёмных линиях; ужесточайте на ярких гласных. Сохраняйте настройки для каждой секции. Тональные нарастания. Кратковременное широкое усиление на +0,5 дБ около 3,5 кГц на одном слове может выделить смысл, не повышая общую яркость. Сцены насыщения. Добавьте на 3–5% больше окраски в финальном припеве; уменьшайте для шёпотных куплетов. Эффектные проходы. Поднимайте хлопки на словах в начале такта; режьте во время скороговорок. Запускайте длинные броски только на переходах между секциями или в финальных тегах припева. IX. Быстрые исправления: проблема → целенаправленное движение С-шки звучат напряжённо. Расширьте диапазон де-эссера; понизьте любой воздушный срез на 0,5 дБ; задержка низкочастотного фильтра возвращается к ~6–7 кГц. Хук звучит тонко. Ослабьте HPF у дублей на несколько Гц; добавьте +1 дБ на 160–200 Гц (широко) на дублях; поднимайте гармонии +0.5 дБ только в припеве. Ад-либы загромождают лид. Автоматизируйте спад −1 до −2 дБ на Ad-lib Bus, когда говорит лид; сузьте их полосу; укоротите релизы. Слишком яркие наушники. Уменьшите посыл на пласт на 1 дБ; срежьте узкий диапазон 9–10 кГц на FX возвратах; подтвердите, что де-эсс не запаздывает. Бит маскирует дикцию. Уточните вырез 2–4 кГц на Beat Bus; проверьте быстрое отпускание, чтобы синт-хуки выделялись между слогами. Артефакты ретюнинга на длинных гласных. Медленная скорость; увеличьте humanize/переход; сохраняйте форманты. X. Две цепочки для быстрого включения (копировать, настраивать, сдавать) Путь только со стандартными плагинами (любой крупный DAW) Коррекция тона: ключ/шкала; хуки быстрее, куплеты умеренно; форманты включены; humanize активирован. Эквалайзер: HPF 90 Гц; широкий спад −1 до −2 дБ на 250–350 Гц, если звучит коробочно; узкий вырез около 1 кГц только если носовой. Компрессор A: 2:1–3:1; атака ~20 мс; релиз ~120 мс; 3–5 дБ GR на фразах. Де-эсс: широкополосный на 6–8 кГц; настроен на наушниках. Сатурация: лёгкая лента/трансформатор на низком миксе; выход согласован. Компрессор B: быстрее, ловит пики 1–2 дБ для стабильных посылов. Полировка эквалайзера: микро подъём 10–12 кГц только после де-эссинга, если микрофон тёмный. Sends: моно slap 90–110 мс; задержка 1/8 или точечная восьмая с дакингом; короткий яркий пласт/зал для подъёма хука. Сторонний эффект (пример) Auto-Tune/Melodyne по секциям; сохраняйте форманты; смягчайте переходы для естественных слайдов. Динамический эквалайзер (в стиле Pro-Q): HPF; динамический вырез на 250–300 Гц при появлении «цветения» в кабинете; опциональный узкий вырез около 1 кГц. Опто-компрессор (в стиле LA-2A) для плавного тела; подгонка выхода. Контроль резонанса (в стиле Soothe) слегка в диапазоне 4–8 кГц, если звучит резковато. Компрессор в стиле 1176 для быстрого захвата пиков (1–2 дБ GR). Air EQ (в стиле Maag) микро +0.5–1 дБ на 10–12 кГц при необходимости. FX: EchoBoy slap + точечная восьмая; яркий поп-пласт или маленький зал; медленный авто-пан на текстуре для блеска припева. XI. Доставка и версии: пройдите QC с первой загрузки Во время микса. Держите пики около −3 дБFS; избегайте кирпичной огранки на микс-басе. Контроль истинных пиков относится к финальной стадии. Набор версий. Экспортируйте стерео WAV, 24-бит с частотой сессии. Запишите выровненные альтернативы с такта 1 с хвостами: Main, Clean, Instrumental, A Cappella, TV Track (всё кроме лид-вокала). Чётко называйте файлы, чтобы редакторы и хореографы могли быстро ориентироваться в партиях. Финализация. Чтобы выровнять громкость, тон и безопасность между сэмплами во всех версиях, закажите мастеринг синглов и альбомов для поп-релизов и избегайте отказов в последний момент. XII. Итог: точность, которая всё ещё ощущается человеческой Смешивания в стиле KATSEYE — это контроль и азарт: яркие лиды, которые остаются плавными, синхронизированные стеки, открывающие пространство, и движение, следующее за ритмом. Держите центр честным, размещайте ширину в поддерживающих партиях и позволяйте автоматизации продавать линию. Когда нужен партнёр для совместного управления балансами, райдами и подготовкой стемов во время творчества, опирайтесь на услуги микширования вокала поп-групп — и уверенно ведите песни к релизу.
Узнать больше
Вокал в стиле Арианы Гранде: легкость перышка и кинематографический блеск
Фирменный стиль Арианы — невесомая ясность: воздушный, но детализированный звук, гладкий сверху и просторный в припеве. Ведущий голос остаётся монофоническим и чистым, в то время как стеки и эффекты создают широкую «кинематографическую» рамку. Это руководство показывает выбор захвата, архитектуру стека, мягкую цепочку управления, дизайн пространства, сосуществование ритма, автоматизацию и финальную обработку. Хотите быстро начать? Загрузите современные пресеты для поп-вокала, а затем настройте пороги, атаку/релиз и посылы для вашего микрофона и фразировки. I. Фирменная палитра: легкое прикосновение, настоящий фокус Думайте об интимных куплетах, которые звучат близко к микрофону, затем о светящихся припевов. Согласные должны быть слышны при низкой громкости без пиков. Воздух должен быть шелковистым, а не ледяным. Низкие средние частоты остаются стройными, чтобы падсы, клавиши и сайдчейн-бас дышали вокруг голоса. Полоса присутствия: плавная ясность в диапазоне ~2.8–4.2 кГц, управляемая широким де-эссингом. Воздушное окно: сдержанное поднятие 10–12 кГц после успокоения сибилянтов; без хрупкого распыления. Полоса тела: сфокусирована на 120–180 Гц; удерживайте 250–350 Гц от помутнения под синтезаторными подложками. Имиджинг: лид по центру; ширина достигается за счет дублей, гармоний, шепотов и ревербераций. II. Решения по захвату: воздушно без шипения Расположение микрофона. 15–20 см за поп-фильтром. Поместите капсулу чуть выше линии губ и наклоните на 10–20° в сторону, если микрофон яркий; так вы усмирите сибилянты и взрывные согласные до обработки. Уровень входа. Отслеживайте сырые пики около −12 до −8 дБFS. Избегайте сильной компрессии на входе — детали транзиентов помогут миксу звучать живо. Дубли и роли. Записывайте разговорный основной вокал для куплетов, чуть более проекционный проход для припевов, плотные дубли, ориентированные на слова, и мягкие высокие/низкие гармонии. Добавьте слой шепота для блеска припева и редкие «искры» в головном голосе или фальцете. Маркируйте дубли по ролям/частям для быстрой компиляции. Стратегия ретюнинга. Куплеты предпочитают умеренную скорость с сохранением формант и сглаживанием переходов длинных гласных для естественности. Припевы могут быть плотнее; избегайте явных артефактов, если это не творческий замысел. III. Архитектура стека: бархатистая ширина, воспринимаемая как один голос Создавайте размер за счет текстур, а не только уровня. Держите центр чистым; пусть поддерживающие партии несут ширину и блеск. Lead — основное повествование; здесь живут ритм и движение тона. Doubles (L/R) — ультра-плотные унисоны на концах фраз и ключевых словах; микро-панорамирование. Harmonies (Hi/Lo) — мягче и немного темнее лидирующего голоса; шире, чем даблы. Whisper/Texture — очень высоко-пропущенный и ограниченный по полосе; поднимается только в припеве. Ad-libs (A/B) — короткие вздохи, флипы и звонок/ответ; узкополосные, чтобы они никогда не заглушали лид. Vocal Bus — легкий глюк + общий де-эссинг; избегайте сильной компрессии на шине, которая сглаживает эмоции. Beat Bus + Sub Rail — один путь для инструментала, один для 808/низких частот для управления коллизиями. IV. Цепочка управления лидом: глянец без жала Используйте маленькие, музыкальные шаги, которые чисто складываются. Пусть автоматизация создаёт драму, а не нагромождение обработки. Контроль тона. Установите ключ/шкалу. Куплеты умеренные; припевы быстрее. Сохраняйте форманты; включайте humanize/transition для естественных слайдов. Субтрактивный эквалайзер. HPF ~80–100 Гц; для мутности в будке — широкое погружение 250–350 Гц (−1 до −2 дБ). Если носовой оттенок, мягкий вырез около ~1 кГц, только если нужно. Компрессор A (форма). 2:1–3:1, атака 15–35 мс, релиз 80–160 мс или авто. Цельтесь в 3–5 дБ GR на фразах, чтобы согласные звучали чётко, а затем оседали. Де-эссер (широкий). Начинайте с 6–8 кГц; используйте широкую полосу, настраиваемую по наушникам, а не по метрам. Делайте «С» мягко-яркими, никогда не шипящими. Окраска (низкий микс). Лента/трансформатор/триод на 5–10% смешивания для связности; подгоняйте выход, чтобы громкость не вводила в заблуждение. Компрессор B (безопасность). Быстрое срабатывание, ловящее пики 1–2 дБ, чтобы стабилизировать посылы и удерживать центр образа. Полировочный эквалайзер. Если дикция всё ещё скрыта, +0.5–1 дБ около 3–4 кГц (широко). Добавьте крошечный шельф 10–12 кГц после де-эссинга, если микрофон глуховат. V. Дизайн пространства: пластины с блеском и карманные эхо Ранние отражения для интимности. Короткая моно-комната (0.4–0.7 с) с предзадержкой 20–40 мс. Возвраты с HPF/LPF, чтобы они воспринимались как воздух, а не шипение или грязь. Слэп для непосредственности. Моно слэп 90–120 мс; фильтр ~150 Гц–6 кГц. Автоматизируйте небольшие усиления на входных словах и уменьшайте во время скороговорок. Темповое эхо. 1/8 или точечная восьмая с низкой обратной связью. Сайдчейн-дакинг от лид-вокала, чтобы повторы расцветали только в паузах. Панорамируйте случайные броски в противоположную сторону от гармонии для плавного движения. Пластина с блеском. Яркая, короткая пластина (0.7–1.0 с) с предзадержкой 20–50 мс. Держите куплеты суше; дайте припеву раскрыться, регулируя посыл/затухание на 1–2 дБ, а не переходя к более длинному ревербу. Стереодисциплина. Держите цепочку вставок лид-вокала моно-настоящей. Ширину размещайте в гармониях и FX-возвратах; это сохраняет фокус на тексте и моно-переводимость. VI. Работа с поп/трэп-битами: падсы, хэты и сайдчейн-бас Окно присутствия (Beat Bus). Вставьте динамический эквалайзер, ключевой по вокалу, который слегка снижает 2–4 кГц во время исполнения; быстро отпускайте, чтобы синтезаторные риффы восстанавливались между слогами. Сосуществование низких частот. Если слоги пропадают под сабом или сайдчейн-басом, примените ключевое по вокалу снижение низких частот на 120–180 Гц на саб-рейле во время вокальных фраз. Делайте движения небольшими, чтобы не было слышно качания. Комфорт верхних частот. Если тарелки или воздушные падсы шипят, попробуйте узкое M/S-погружение около 9–10 кГц только на боках; сохраняйте яркость в центре для разборчивости. Двухдорожечные сценарии. Когда бит — это стереофайл, вырезайте перекрытия, а не усиливайте голос. Этот пошаговый гайд по сведению вокала с двухдорожечным битом показывает практические методы вырезания средних частот, которые сохраняют блеск без резкости. VII. Микроавтоматизация, которая продает фразу Регулировки уровней. ±0.5–1 дБ на сильных долях; микроподъемы (0.3–0.7 дБ) на пиках мелизм и окончаниях фраз. Движения порога де-эссинга. Ослабьте на 1–2 дБ на темных гласных; ужесточайте для ярких слогов; автоматизируйте по разделам. Тональные нарастания. Кратковременное широкое повышение +0.5 дБ около 3.5 кГц на одном слове может выделить смысл без увеличения общей яркости. Сцены сатурации. Добавьте 3–5% больше цвета в финальном хуке для восприятия энергии; уменьшите в шепчущих куплетах. Хореография FX. Повышайте slap на входах тактов; режьте во время плотных согласных. Запускайте длинные броски только на переходах или финальных тегах. Предпочитаете сосредоточиться на исполнении, пока кто-то регулирует балансы и готовит стемы? Закажите поп-микширование у инженеров онлайн и сохраняйте творческий импульс при постоянстве перевода. VIII. Устранение неполадок: быстрые действия, сохраняющие блеск С-звуки кажутся резкими в наушниках. Расширьте полосу де-эссинга; уменьшите любой воздушный шелф на 0,5 дБ; низкочастотные задержки возвратов около 6–7 кГц. Звук хука тонкий, несмотря на дубли. Ослабьте HPF дублей на несколько Гц; добавьте +1 дБ на 160–200 Гц (широко) на дублях; поднимайте гармонии +0.5 дБ только в хоре. Шипение слоя шепота. Сузьте его полосу пропускания и уменьшите воздушный срез; используйте крошечный транзиентный шейпер для сохранения четкости без дополнительной верхней части. Бит маскирует дикцию. Уточните вырез 2–4 кГц на Beat Bus; проверьте быстрый релиз, чтобы хуки восстанавливались мгновенно. Артефакты ретюнинга на длинных гласных. Медленная скорость; увеличьте humanize/переход; подтвердите сохранение формант. Коллапс телефонного динамика. Держите ведущий моно-сильным; переносите ширину в гармонии и возвраты; избегайте расширителей на центральном инсерте. IX. Две цепочки, готовые к настройке Путь только со стандартными плагинами (любой крупный DAW) Коррекция тона: тональность/масштаб; куплеты умеренно, хуки быстрее; форманты включены; humanize активирован. EQ: HPF 90 Гц; широкий −1 до −2 дБ на 250–350 Гц если звучит коробочно; опциональный узкий вырез около 1 кГц если носовой. Компрессор A: 2:1–3:1; атака ~20 мс; релиз ~120 мс; 3–5 дБ GR на фразах. Де-эссинг: широкополосный 6–8 кГц; настраивайте по наушникам, а не по метрам. Сатурация: лёгкая лента/трансформатор на низком миксе; выход согласован. Comp B: быстрее, ловит пики 1–2 дБ; стабильные посылы. Полировка: микро-шейв на 10–12 кГц только после де-эссинга, если микрофон темный. Sends: моно комната 0.4–0.7 с; slap 90–110 мс; задержка 1/8 или точечная восьмая с дакингом; короткий шимерный реверб для цветения хука. Сторонний эффект (пример) Auto-Tune/Melodyne по секциям; сохранение формант; смягчение переходов для легато. Динамический эквалайзер (в стиле Pro-Q): HPF; динамический вырез на 250–300 Гц при появлении «цветения» в кабинете; опциональный узкий вырез около 1 кГц. Опто-компрессор (в стиле LA-2A) для плавного тела; согласованный выход. Контроль резонанса (в стиле Soothe) слегка в диапазоне 4–8 кГц, если звучит резковато. Компрессор в стиле 1176 для быстрого захвата пиков (1–2 дБ GR). Air EQ (в стиле Maag) микро +0,5–1 дБ на 10–12 кГц при необходимости. FX: EchoBoy slap + точечная восьмая; яркий ревербератор; опциональный параллельный хор с низким уровнем для цветения. X. Доставка и версии: проходите проверки с первого раза Во время микса. Оставляйте запас по уровню; целевые пики микса около −3 dBFS. Избегайте brickwall лимитирования на микс-басе. dBFS — цифровая шкала, где 0 — клиппинг; LUFS оценивает воспринимаемую громкость и служит для сравнения версий, а не для целей микширования; true peak (dBTP) оценивает межсемпловые пики — держите финальные мастера безопасно ниже 0 dBTP. Набор версий. Печатайте стерео WAV, 24-бит с частотой сессии. Экспортируйте выровненные альтернативы с такта 1 с хвостами: Main, Clean, Instrumental, A Cappella и TV Track. Для безопасности платформы и согласованного тона между версиями завершите мастерингом, готовым к чартах. XI. Финальная нота: легкая, насыщенная и контролируемая План Арианы — элегантность: мягкий воздух, плавная дикция и хоровая основа, которая кажется огромной без резкости. Сохраняйте честность центра, вырезайте наложения вместо усиления яркости и хореографируйте небольшие движения рельефа и FX, которые служат мелодии. Когда сроки поджимают или аранжировки становятся плотными, сотрудничество с опытными слушателями обеспечивает предсказуемую полировку и сохранение творческого фокуса.
Узнать больше
Вокал в стиле JENNIE: шикарный укус и глянцевая ширина
Вокальная идентичность JENNIE сочетает уверенный поп-тон с чёткой рэп-фразировкой и лёгким дыхательным блеском. Ваша цель — монотонный соло-вокал, который остаётся гладким сверху, с наслоениями и эффектами, которые раскрываются в элегантную ширину на припеве. Это руководство проходит через выборы захвата, архитектуру наслоений, лёгкую цепочку контроля, дизайн движения, сосуществование с битом, автоматизацию и доставку. I. Фирменная палитра: шикарное присутствие, мягкий воздух, ширина, готовая к сцене Думайте о современном K-pop/urban pop: разборчивый на низкой громкости, никогда резкий; воздушный, но не ледяной; сдержанные низкие средние, чтобы синтезаторные хуки, кики и бас с сайдчейном дышали вокруг голоса. Центр изображения остаётся стабильным; ощущение «большого» создаётся слоями и тщательно скоординированными возвратами. Полоса присутствия: плавные 2.8–4.2 кГц для чёткости произношения, регулируемые широким деэссингом. Окно воздуха: сдержанное поднятие 10–12 кГц только после успокоения сибилянтов. Основной диапазон: аккуратные 120–180 Гц; избегайте мутности 250–350 Гц под паддами и яркими гитарами. Имиджинг: ведущий остаётся моно-настоящим; ширина живёт в двойниках, гармониях, разговорных вставках и FX-возвратах. II. План захвата: двуязычная чёткость без резкости Расположение микрофона. 15–20 см за поп-фильтром. Поместите капсулу чуть выше линии губ; наклоните на 10–20° вне оси, если ваш микрофон яркий. Это смягчает звуки S/Z и «ш» перед обработкой. Уровень входа. Записывайте сырые пики около −12 до −8 дБFS, чтобы транзиенты сохранились. Избегайте сильной компрессии на входе; сохраняйте форму для микса. Дубли и роли. Записывайте уверенный основной вокал для куплетов, чуть более выраженный проход для припевов, чёткие двойники, ориентированные на слова, и чистые высокие/низкие гармонии. Захватывайте короткие разговорные фразы и шёпоты для текстуры ад-либа. Помечайте дубли по роли/секции, чтобы компиляция и риды проходили быстро. Стратегия ретюнинга. Поп-хуки допускают более быструю скорость; разговорные линии и рэп-фразы предпочитают умеренные настройки. Сохраняйте форманты и включайте humanize/transition для естественного перемещения гласных. III. Карта аранжировки для K-pop куплета/рэпа/припева Проектируйте дорожки так, чтобы песня масштабировалась от плотных куплетов к панорамным припевам без потери фокуса. Lead A — основное повествование (гибрид пения и рэпа); здесь живо управление и движение тона. Lead B — альтернативный тембр или передача секции; идентичная цепочка для постоянной полировки. Даблы (L/R) — ультра-плотные унисоны на ключевых словах и концах строк; микро-панорамирование. Гармонии (высокие/низкие) — подъём в припеве и пред-припеве; чуть темнее лида; шире, чем даблы. Whisper/Texture — очень высокочастотный фильтр, узкая полоса; поднимается только в припеве для «дорогого» воздуха. Ad-libs A/B — короткие вставки, ответы и речевые теги; ограниченная полоса пропускания, чтобы они не заглушали лид. Vocal Bus — мягкое склеивание и общий де-эссер; избегайте сильной компрессии на шине, которая сглаживает эмоции. Beat Bus + Sub Rail — один для синтов/барабанов, другой для 808/низких частот, чтобы хирургически решать коллизии. IV. Цепочка управления лидом: сияние без жала Маленькие, музыкальные шаги, которые аккуратно складываются. Пусть автоматизация создаёт драму, а не наложение процессоров. Контроль высоты тона. Установлен ключ/масштаб. Хуки чуть быстрее; куплеты умеренные. Сохраняйте форманты; включайте humanize/transition для плавных мелизм и слайдов. Субтрактивный эквалайзер. HPF около 80–100 Гц. Для тумана в кабинке — широкое понижение 250–350 Гц (−1 до −2 дБ). Если носовой звук — мягкий вырез около ~1 кГц, только если слышите. Компрессор A (форма). 2:1–3:1, атака 15–35 мс, релиз 80–160 мс или авто. Цель — 3–5 дБ GR на фразах, чтобы согласные ударяли и восстанавливались. Де-эссер (широкий). Начинается примерно с 6–8 кГц; широкая полоса; настраивайте по наушникам, а не по метрам. Делайте «С» мягкими и яркими, но не шипящими. Цвет (низкая смесь). Лента/трансформатор/триод на 5–10% для сплочённости; выход согласован, чтобы громкость не вводила в заблуждение. Компрессор B (безопасность). Быстрее срабатывает, ловит пики 1–2 дБ; стабилизирует посылы и удерживает центральный образ. Полировка эквалайзера. Если дикция всё ещё скрыта, +0,5–1 дБ в районе 3–4 кГц (широкая). Добавьте небольшой shelf на 10–12 кГц только после де-эссинга. V. Хореография стека: чистое сияние, воспринимаемое как единое целое Дубли. Два ультра-плотных унисона на целевых слогах. HPF чуть выше, чем у лида; чуть больше де-эссинга; приглушение на 6–9 дБ ниже. Микропанорамирование влево/вправо для ширины, сохраняющейся в моно. Гармонии. Одна выше/одна ниже для подъёма припева. Делайте их чуть темнее лида и панорамируйте шире дублей. Микроусиление +0,5–1 дБ около 5 кГц на гармониях добавляет блеск без усиления сибилянтов. Слой шёпота. Высокий фильтр около 250–300 Гц; низкий фильтр около 10 кГц. Поднимайте только в хуках для блеска без увеличения уровня. Тег хуков/толпа. Тихий унисонный стек (3–4 голоса) на последнем слове хука придаёт энергию «аудитории». Высокий фильтр и глубокое приглушение. Рэп-интерлоки. Для быстрых строк скопируйте входной согласный лида на дублирующую дорожку на низком уровне; это восстанавливает ударность растянутых гласных без дополнительного эквалайзера. VI. Движение и пространство: карманные эхо, пластины с шиммером, движения камеры Моно хлопок. 90–120 мс для непосредственности; фильтруйте возврат примерно 150 Гц–6 кГц. Автоматизируйте небольшие подъёмы на словах в начале такта и снижайте во время скороговорок. Темповое эхо. 1/8 или точечная восьмая с низкой обратной связью. Добавьте сайдчейн-дакинг от лида, чтобы повторы расцветали только в паузах. Панорамируйте редкие броски в противоположную сторону от гармонии или ад-либа для плавного движения. Пластина с шимером или плотный зал. 0,7–1,0 с с предзадержкой 20–50 мс. Держите куплеты суше; открывайте припев, регулируя посыл/затухание на 1–2 дБ вместо переключения на гораздо более длинный реверб. Стереодисциплина. Держите вставку лида моно-настоящей. Ширину добавляйте гармониям и возвратам. Это сохраняет фокус на тексте и перевод для телефонных динамиков. VII. Сосуществование бита: яркие синты, хлопки и субхвосты Окно присутствия (Beat Bus). Вставьте вокально-ключевой динамический эквалайзер, который слегка снижает 2–4 кГц, пока говорит лид; быстро отпускайте, чтобы риффы восстанавливались между слогами. Уважение к низким частотам. Если слоги теряются под хвостами 808 или сайдчейн-басом, примените ключевой низкочастотный спад на 120–180 Гц на Sub Rail во время вокальных фраз. Действуйте аккуратно, чтобы избежать накачки. Комфорт верхних частот. Если хай-хэты/тарелки кажутся ледяными, попробуйте узкий M/S срез около 9–10 кГц только на боках; сохраняйте яркость центра для дикции. Сценарии с двумя дорожками. Когда инструментал только в стерео, вырезайте перекрытия вместо усиления лида. Этот разбор микширования вокала поверх 2-дорожечного бита показывает практическое вырезание средних частот и стратегию дорожек, которые сохраняют блеск без резкости. VIII. Микроавтоматизация и правки, которые придают характер Управление лидом. ±0,5–1 дБ на сильных долях; подъёмы 0,3–0,7 дБ на входах хуков и концах фраз. Сдвиг порога де-эссинга. Ослабьте на 1–2 дБ для тёмных гласных; ужесточьте для ярких слогов; автоматизируйте по секциям. Нарастание тона. Кратковременное усиление на +0,5 дБ в районе 3,5 кГц на одном слове выделяет смысл, не повышая общую яркость. Сцены сатурации. Добавьте 3–5% цвета в финальном припеве; уменьшите для дыхательных куплетов. Хореография ад-либ. Чередуйте левый/правый по секциям; сузьте их полосу пропускания; поднимайте на 0,5–1 дБ в переходах. Копия согласных. Если длинный гласный смягчил атаку, вставьте четкую согласную из близкого дубля на низком уровне, чтобы восстановить разборчивость. Предпочитаете, чтобы соавтор управлял балансами и готовил стемы, пока вы сосредоточены на исполнении и визуале? Закажите миксинг K-pop песен для совместного управления стемами, автоматизацией и переводом между динамиками. IX. Устранение неполадок: быстрые исправления С-звуки кажутся резкими в наушниках. Расширьте полосу де-эссинга; уменьшите любой воздушный шелф на 0,5 дБ; низкочастотные задержки возвратов около 6–7 кГц. Звук хука тонкий, несмотря на дубли. Ослабьте HPF дублей на несколько Гц; +1 дБ на 160–200 Гц (широко) на дублях; поднимайте гармонии +0,5 дБ только в припеве. Шипение слоя шепота. Сузьте его полосу пропускания; уменьшите воздушный шелф; крошечный транзиентный шейпер сохраняет четкость без дополнительной верхушки. Бит маскирует дикцию. Уточните ключевое падение 2–4 кГц на Beat Bus; проверьте быстрое отпускание, чтобы синт-хуки восстанавливались мгновенно. Артефакты ретюнинга на длинных гласных. Медленная скорость; увеличьте humanize/переход; подтвердите сохранение формант. Коллапс телефонного динамика. Держите ведущий вокал моно-сильным; переносите ширину в стеки и возвраты; избегайте расширителей на центральном инсерте. X. Два рецепта цепочек (копировать, настраивать, доставлять) Путь только со стандартными плагинами (любой крупный DAW) Коррекция тона: тональность/масштаб; куплеты умеренно, хуки быстрее; форманты включены; humanize активирован. EQ: HPF 90 Гц; широкий −1 до −2 дБ на 250–350 Гц если звучит коробочно; опциональный узкий вырез около 1 кГц если носовой. Компрессор A: 2:1–3:1; атака ~20 мс; релиз ~120 мс; 3–5 дБ GR на фразах. Де-эссинг: широкополосный на 6–8 кГц; настраивайте по наушникам, а не по метрам. Сатурация: лёгкая лента/трансформатор на низком миксе; выход согласован. Компрессор B: быстрее, ловит пики 1–2 дБ; стабилизирует посылы и центральный образ. Полировка: микрошелф 10–12 кГц только после де-эссинга, если микрофон темный. Sends: моно slap 90–110 мс; задержка 1/8 или точечная восьмая с дакингом; короткий поп-пластина/зал для расцвета хука. Сторонний эффект (пример) Auto-Tune/Melodyne по секциям; сохраняйте форманты; смягчайте переходы для естественных слайдов. Динамический эквалайзер (в стиле Pro-Q): HPF; динамический вырез на 250–300 Гц при появлении «цветения» в кабинете; опциональный узкий вырез около 1 кГц. Опто-компрессор (в стиле LA-2A) для плавного тела; тщательно подберите выход. Контроль резонанса (в стиле Soothe) слегка в диапазоне 4–8 кГц, если звучит резковато. Компрессор в стиле 1176 для быстрого захвата пиков (1–2 дБ GR). Air EQ (в стиле Maag) микро +0,5–1 дБ на 10–12 кГц при необходимости. FX: EchoBoy slap + точечная восьмая; яркий ревербератор; опциональный медленный автопан на шепот/текстурном шине для блеска хора. XI. Доставка и версии: проходите проверки при первой загрузке Во время микса. Держите пики около −3 dBFS; избегайте кирпичной огранки на микс-басе. dBFS — цифровой запас по уровню; LUFS оценивает воспринимаемую громкость — можно сравнивать версии, но избегайте гонки за числом в процессе микса; true peak (dBTP) оценивает межсемпловые пики — держите финальные мастера безопасно ниже 0 dBTP. Набор версий. Экспортируйте стерео WAV, 24-бит с частотой сессии. Печатайте выровненные альтернативы с такта 1 с хвостами: Main, Clean, Instrumental, A Cappella и TV Track (все, кроме ведущего вокала). Для согласованного тона и безопасности платформы между версиями завершите глобальным стриминговым мастерином. XII. Заключение: элегантный укус, контролируемое свечение Смешивания в стиле JENNIE — это точность, которая при этом ощущается человечной — уверенная дикция, мягкий яркий воздух, плотные дубли и движение, следующее за грувом. Сохраняйте центр честным, вырезайте наложения вместо усиления яркости и хореографируйте небольшие риды и FX-сигналы, которые служат мелодии. Когда сроки поджимают или аранжировки становятся плотными, надежный партнер обеспечивает предсказуемую полировку, пока вы остаетесь креативными.
Узнать больше
Вокал в стиле Эддисон Рэй: глянцевый поп с укусом и подъёмом
Поп-звук Addison Rae чистый, запоминающийся и готовый к камере. Ведущие партии звучат ярко и уверенно, с наслоениями, которые раскрывают припев без резкости. Это руководство описывает приёмы записи, структуру сессии, лёгкую цепочку обработки, движущиеся эффекты, сосуществование с битом, автоматизацию и финальную подачу. Хотите быстрый старт перед настройкой на слух? Загрузите современные вокальные пресеты и точно настройте пороги, атаку/релиз и уровни посылов на микрофон и фразы. I. Звуковая цель: глянцевая уверенность без резкости Мы стремимся к поп-вокалу, который звучит на переднем плане и хорошо передаётся на телефонах, наушниках и в клубах. Согласные чётко слышны даже на низкой громкости. Воздух звучит мягко, а не холодно. Низкие средние частоты остаются лёгкими, чтобы синтезаторные хуки и бас-бочки не заглушали голос. Полоса присутствия: плавные 2.8–4.2 кГц для чёткости произношения, регулируемые широким деэссингом. Окно воздуха: сдержанное поднятие 10–12 кГц только после успокоения сибилянтов. Полоса тела: аккуратные 120–180 Гц для авторитета; избегайте мутности в диапазоне 250–350 Гц. Имиджинг: ведущий вокал остаётся монофоническим; ширина создаётся дублями, гармониями и эффектами возврата. II. Запись и подготовка: ярко, но без резкости Положение микрофона. 15–20 см за поп-фильтром. Разместите капсулу чуть выше линии губ; наклоните на 10–20° в сторону, если ваш микрофон звучит ярко. Это смягчает звуки S и уменьшает взрывные согласные до обработки. Уровень. Записывайте сырые пики примерно на уровне −12 до −8 дБFS. Оставьте компрессию для микса, чтобы сохранить форму транзиентов. Дубли и роли. Записывайте разговорный основной вокал для куплетов и более чёткий, слегка более выраженный проход для припевов. Записывайте чёткие дубли с точным попаданием в слова, простые высокие/низкие гармонии и мягкий шёпотный слой, который можно использовать в припевах. Помечайте дубли по ролям и разделам, чтобы быстро собирать композицию. Стратегия ретюнинга. Припевы могут иметь более быструю скорость; куплеты предпочитают умеренные настройки. Сохраняйте форманты и включайте humanize/transition, чтобы длинные гласные звучали естественно. III. Сетка сессии: дорожки для готовых к хореографии слоёв Проектируйте расположение так, чтобы размер создавался частями, а не чрезмерным эквалайзером на лидере. Lead — основное повествование; здесь живут ритм и движение тона. Doubles (L/R) — ультра-плотные унисоны на ключевых словах; микро-панорамирование. Harmonies (Hi/Lo) — подъём хора; темнее лидера; шире дублей. Whisper/Texture — очень высокочастотный фильтр, ограниченный по полосе; только в припевах. Ad-libs (A/B) — короткие выкрики, вздохи и флипы; узкополосные, чтобы избежать наложений. Vocal Bus — лёгкий клей + общий де-эссинг; избегайте сильной компрессии на шине. Beat Bus + Sub Rail — один для синтов/барабанов, другой для 808/низких частот, чтобы решить коллизии. IV. Схема ведущей цепи: острота, блеск, контроль Используйте маленькие, музыкальные шаги, которые чисто складываются. Пусть автоматизация и аранжировка несут волнение. Контроль высоты тона. Установите тональность/масштаб. Куплеты умеренные; припевы быстрее. Сохраняйте форманты; включайте humanize/transition для естественных переходов. Субтрактивный эквалайзер. ВЧ-фильтр ~80–100 Гц. Если появляется мутность в кабинете, вырежьте 250–350 Гц широкой полосой (−1 до −2 дБ). Если носовой звук, мягкий вырез около ~1 кГц только при необходимости. Компрессор A (форма). 2:1–3:1, атака 15–35 мс, релиз 80–160 мс или авто. Цель 3–5 дБ GR на фразах, чтобы согласные звучали, затем стабилизировались. Широкий де-эссер. Начинайте с 6–8 кГц с широкой полосой; настраивайте по наушникам, а не по метрам. Держите S мягкими и яркими, никогда не шипящими. Цвет (низкий микс). Лента/трансформатор/триод на 5–10% смешивания для связности; подберите выход, чтобы уровень не вводил в заблуждение. Компрессор B (безопасность). Быстрое срабатывание, ловящее пики 1–2 дБ для стабилизации посылов и удержания центрального образа. Полировка эквалайзера. Если дикция всё ещё скрыта, +0,5–1 дБ в районе 3–4 кГц (широкая). Добавьте небольшой shelf на 10–12 кГц только после де-эссинга. V. Архитектура хора: слои, сверкающие как один Дубли. Два ультра-плотных унисона на целевых слогах. HPF чуть выше, чем у лидера; чуть сильнее де-эссинг; приглушите на 6–9 дБ ниже. Микропанорамирование L/R для ширины без размазывания моно. Гармонии. Одна выше и одна ниже для подъема. Держите их чуть темнее лидера и панорамируйте шире, чем дубли. Маленький подъем на 5 кГц (0,5–1 дБ) на гармониях может добавить блеска, оставляя лид гладким. Слой шепота. Высокий фильтр около 250–300 Гц и низкий фильтр около 10 кГц. Поднимайте только в припеве; добавляет «дорогой» воздух без громкости. Тег хука. Рассмотрите низкоуровневый унисон толпы (3–4 голоса) на последнем слове. Высокий фильтр и глубокое приглушение для энергии в стиле аудитории. VI. Движение и пространство: клубная энергия, ноль смыва Монохлопок. 90–120 мс для непосредственности; фильтруйте возврат примерно 150 Гц–6 кГц. Автоматизируйте небольшие подъемы на входных словах. Темповое эхо. 1/8 или точечная восьмая с низкой обратной связью. Сайдчейн-дактируйте от лидера, чтобы повторы расцветали только в паузах. Панорамируйте случайные броски в противоположную сторону от гармонии для движения. Поп-пластина. Яркая, короткая пластина (0,7–1,0 с) с предзадержкой 20–50 мс. Держите куплеты плотнее; открывайте припев, регулируя посыл/затухание на 1–2 дБ вместо переключения на более длинный реверб. Стереодисциплина. Держите цепочку вставок лидера моно-настоящей. Добавляйте ширину в гармонии и FX-ретурны; это сохраняет фокус на тексте и моно-переводимость. VII. Сосуществование битов: синт-хуки, хлопки и саб-хвосты Окно присутствия (Beat Bus). Используйте вокально-ключевой динамический эквалайзер, чтобы слегка снизить 2–4 кГц во время исполнения; быстро отпускайте, чтобы синтезаторные риффы восстанавливались между строками. Управление сабом. Если слоги исчезают под хвостами 808, примените ключевой низкочастотный срез на 120–180 Гц на саб-рейле во время вокальных фраз. Двигайте параметры аккуратно, чтобы избежать пульсации. Комфорт верхних частот. Если тарелки или воздушные падсы шипят, попробуйте узкий M/S спад около 9–10 кГц на сторонах; сохраняйте яркость центра для дикции. Двухдорожечные биты. Вырезайте перекрытия вместо усиления лидера. Небольшие, ключевые провалы в среднем диапазоне на инструментале сохраняют ясность без истончения музыки. VIII. Микроавтоматизация: движение, которое можно почувствовать Ведущие ряды. ±0,5–1 дБ на сильных долях; подъемы 0,3–0,7 дБ на входах хуков и окончаниях фраз. Сдвиги порога де-эссинга. Ослабьте на 1–2 дБ на более темных строках; ужесточите на ярких гласных. Тональные нарастания. Кратковременное усиление +0,5 дБ в районе 3,5 кГц на одном слове выделяет смысл, не повышая общую яркость. Сцены насыщения. Добавьте на 3–5% больше цвета в финальном припеве для восприятия энергии; уменьшайте для шепчущих куплетов. Хореография FX. Подъемный хлопок на словах при входе в бар; срезать во время скороговорок; оставлять длинные броски для переходов и финальных тегов. Предпочитаете сосредоточиться на исполнении, пока инженер управляет балансами и готовит стемы? Закажите профессиональные услуги микширования для совместного управления стемами, автоматизацией и трансляцией на разных колонках. IX. Устранение неполадок: быстрые исправления С-шипения резкие. Расширьте полосу де-эссинга; уменьшите воздушный срез на 0,5 дБ; низкочастотный задержанный возврат около 6–7 кГц. Звук хука тонкий. Ослабьте HPF дублей на несколько Гц; добавьте +1 дБ на 160–200 Гц (широко) на дублях; управляйте гармониями +0,5 дБ только в припеве. Шипение слоя шепота. Сузьте его полосу пропускания и подрежьте воздушный срез; используйте крошечный транзиентный шейпер для чёткости. Бит маскирует дикцию. Уточните вырез 2–4 кГц на Beat Bus; проверьте быстрый релиз, чтобы хуки восстанавливались мгновенно. Артефакты ретюнинга на длинных гласных. Медленная скорость; увеличьте humanize/переход; подтвердите сохранение формант. Коллапс телефонного динамика. Держите ведущий моно-сильным; переносите ширину в гармонии и возвраты; избегайте расширителей на центральном инсерте. X. Два рецепта цепочек (копировать, настраивать, доставлять) Путь только со стандартными плагинами (любой крупный DAW) Коррекция тона: тональность/масштаб; куплеты умеренно, хуки быстрее; форманты включены; humanize активирован. EQ: HPF 90 Гц; широкий −1 до −2 дБ на 250–350 Гц если звучит коробочно; опциональный узкий вырез около 1 кГц если носовой. Компрессор A: 2:1–3:1; атака ~20 мс; релиз ~120 мс; 3–5 дБ GR на фразах. Де-эссинг: широкая полоса около 6–8 кГц; настраивается по наушникам. Сатурация: лёгкая лента/трансформатор на низком миксе; выход согласован. Comp B: быстрее, ловит пики 1–2 дБ; стабильные посылы. Полировка: микро-шейв на 10–12 кГц только после де-эссинга, если микрофон темный. Sends: моно slap 90–110 мс; задержка 1/8 или точечная восьмая с дакингом; короткий яркий пластинчатый реверб для расцвета хука. Сторонний эффект (пример) Auto-Tune/Melodyne по секциям; сохраняйте форманты; смягчайте переходы для естественных слайдов. Динамический эквалайзер (в стиле Pro-Q): HPF; динамический вырез на 250–300 Гц при появлении «цветения» в кабинете; опциональный узкий вырез около 1 кГц. Опто-компрессор (в стиле LA-2A) для плавного тела; согласованный выход. Контроль резонанса (в стиле Soothe) слегка в диапазоне 4–8 кГц, если звучит резковато. Компрессор в стиле 1176 для быстрого захвата пиков (1–2 дБ GR). Air EQ (в стиле Maag) микро +0,5–1 дБ на 10–12 кГц при необходимости. FX: EchoBoy slap + точечная восьмая; яркий поп-пластинчатый реверб; медленный авто-пан на текстуре для блеска припева. XI. Доставка и версии: проходите проверки при первой загрузке Во время микса. Держите пики около −3 dBFS; избегайте кирпичной лимитации на микс-басе. dBFS — цифровой запас; LUFS оценивает воспринимаемую громкость и помогает сравнивать версии; true peak (dBTP) оценивает межсэмпловые пики — держите финальные мастера безопасно ниже 0 dBTP. Набор версий. Экспортируйте стерео WAV, 24-бит с частотой сессии. Запишите выровненные альтернативы с такта 1 с хвостами: Main, Clean, Instrumental, A Cappella и TV Track. Для аккуратной передачи перед мастерином используйте этот практичный чеклист предподготовки для выявления распространённых ошибок. Финальный этап. Чтобы согласовать тон, громкость и безопасность между сэмплами во всех версиях, закажите услуги мастеринга, ориентированные на требования стриминга с сохранением ударности. XII. Итог: запоминающийся, чистый, уверенный Смешивания в стиле Addison Rae кажутся свежими и фотогеничными — ведущие партии, шелковистые слои и движение, следующее за ритмом. Сохраняйте центр честным, размещайте ширину в поддерживающих частях и позволяйте небольшим ридам продавать линию. Когда сроки поджимают или аранжировки становятся плотными, совместная работа над балансами и стемами сохраняет качество предсказуемым, пока вы остаетесь креативными.
Узнать больше
Вокал в стиле Эда Ширана: естественная интимность и подъём
Записи Эда Ширана сочетают интимность гостиной с масштабными припевами стадиона. Ведущий вокал звучит близко и честно, слои расширяются без размытия, а акустические инструменты дышат вокруг голоса. Это руководство описывает захват, организацию сессии, дизайн цепочки, пространство, автоматизацию и доставку, чтобы ваш вокал оставался человечным на расстоянии куплета и раскрывался широко в припеве. I. Цель звучания: разговорный центр, расцвет припева Мы хотим монофонический плотный центр с мягким воздухом, контролируемой сибилянтностью и теплым нижним мидом. Куплеты ощущаются интимно — как будто певец на шаг ближе к микрофону. Припевы приобретают ширину и подъём за счёт дублей и гармоний, а не за счёт усиленной яркости. Полоса присутствия: мягкая ясность в диапазоне 2.5–4 кГц; избегайте резких усилений. Воздушное окно: сдержанная полка 10–12 кГц только после успокоения сибилянтов. Полоса тела: поддерживающие 120–200 Гц; не допускайте, чтобы 250–350 Гц становились мутными из-за гитар. Имиджинг: ведущий вокал остается в центре и стабилен; размер создается слоями и возвратами. II. План записи: мягкие края, чистая дикция Положение микрофона. 15–20 см за поп-фильтром. Разместите капсулу чуть выше линии губ и под углом 10–20° вне оси, если ваш микрофон яркий. Это уменьшает S-края и взрывные звуки до обработки. Целевые уровни. Записывайте сырые пики около −12 до −8 дБFS, чтобы транзиенты сохранялись. Избегайте сильной компрессии на входе; позвольте динамике во время микширования формировать ощущение. Стратегия записи. Запишите «разговорный» основной трек для куплетов и чуть более выраженный проход для припевов. Запишите точные дубли, ориентированные на слова, высокие/низкие гармонии для подъема припева и дыхательный шепот, если песня склоняется к поп-стилю. Компрессия и усиление клипа. Создайте один чистый композит для ведущего вокала. Уменьшите громкие взрывные звуки с помощью усиления клипа до компрессии. Сохраняйте музыкальные вдохи; затухайте только отвлекающие вздохи. Здоровый звук комнаты. Маленькое, контролируемое пространство лучше просторного. Для быстрой проверки студийной настройки, которая помогает передать запись, ознакомьтесь с этим руководством по домашней вокальной студии. III. Раскладка сессии: дорожки, масштабируемые от куплета к припеву Организуйте по функциям, чтобы добавить масштаб без потери фокуса. Ведущий — основное повествование; здесь акцент на вокале и эквалайзере. Дубли (L/R) — плотные унисоны на выбранных словах/концах строк; микропанорамирование. Гармонии (высокие/низкие) — мягче и шире, чем дубли; отфильтрованы низкие средние. Шёпот/текстура — воздушный слой для припевов; очень высоко пропущенный и узкополосный. Ад-либы — со вкусом размещённые, не постоянные; больше в бриджах или финальном припеве. Шина вокала — лёгкий клей + общий де-эссер, чтобы слои звучали как один голос. Шина гитары — переборы/щипки; мягкое M/S формирование пространства вокруг вокала. Шина битов/клавиш + саб-рейл — клавиши/пэды и отдельный низкочастотный рейл для приглушения конфликтов. IV. Основная цепочка: естественная полировка, отсутствие резкости Маленькие шаги хорошо накапливаются. Пусть автоматизация и аранжировки ведут эмоцию. Контроль высоты тона. Установите тональность/масштаб. Куплеты предпочитают умеренную скорость с сохранёнными формантами; припевы могут быть чуть плотнее. Используйте humanize/transition для естественных гласных. Субтрактивный эквалайзер. HPF 70–100 Гц по необходимости. Если появляется «помутнение» в кабинете, уменьшите 250–350 Гц широкой полосой (−1 до −2 дБ). Смягчите носовой оттенок узким вырезом около ~1 кГц только при необходимости. Компрессор A (форма). 2:1–3:1; атака 20–40 мс; релиз 80–170 мс или авто. Цельтесь в 3–5 дБ на фразах, чтобы согласные оставались чёткими без сдавливания. Широкий де-эссер. Начинайте примерно с 6–8 кГц с широкой полосой; настраивайте по наушникам. Делайте S мягкими; избегайте «шепелявости». Цвет (низкий микс). Лента/трансформатор или мягкий триод на 5–10% смешивания для связности. Подгоняйте выход, чтобы «громче» не вводило в заблуждение. Компрессор B (безопасность). Быстрое срабатывание, ловящее пики 1–2 дБ для стабилизации посылов и центрирования образа. Полировка эквалайзером. Если дикция всё ещё скрыта, добавьте +0,5–1 дБ на 3–4 кГц (широкая). Добавляйте небольшой шельф на 10–12 кГц только после стабилизации сибилянтов. V. Искусство слоёв: дубли, гармонии и текстура Дубли. Используйте выборочно — на концах строк или ключевых словах. HPF немного выше, чем у ведущего; чуть больше де-эссинга; опустите на 6–9 дБ ниже. Микропанорамирование L/R для ширины без артефактов хора. Гармонии. Одна сверху, одна снизу для припевов. Панорамируйте шире, чем дубли, и сильнее фильтруйте низкие средние, чтобы центр оставался чистым. Небольшой подъём на 5 кГц (0,5–1 дБ) на гармониях добавит блеска без резкости лида. Шёпот/Текстура. Очень высокочастотный фильтр (например, 250–300 Гц) и ограничение полосы. Поднимайте только в припеве для возбуждения без увеличения громкости. Выборы для бриджа/аутро. Рассмотрите одну центральную гармонию или сложенный октавный слой, чтобы развить арку без повышения общего уровня. VI. Дизайн пространства: интимность, раскрывающаяся в хуке Ранние отражения для близости. Короткая моно-комната (0,4–0,7 с) с предзадержкой 20–40 мс. Возвраты с ВЧ/НЧ фильтрами, чтобы звучали как воздух, а не грязь или шипение. Слэп для объёма. Моно слэп 90–120 мс; фильтр ~150 Гц–6 кГц. Автоматизируйте посыл вверх на вступительных словах, вниз во время плотных согласных. Темповое эхо. 1/8 или точечная восьмая с низкой обратной связью. Сайдчейн-дакинг от лида, чтобы повторы расцветали в паузах. Панорамируйте случайные броски в противоположную сторону от гармонии для движения. Поп-пластина или маленький зал. Время затухания 0,7–1,0 с с предзадержкой 20–50 мс. Куплеты держите плотнее; припев пусть немного раскрывается, регулируя посыл/затухание вместо переключения на более длинный реверб. Стереодисциплина. Держите цепочку вставок лид-вокала преимущественно моно. Ширину размещайте в гармониях и FX-возвратах; это сохраняет фокус на тексте и моно-перевод на телефонах. VII. Жизнь с акустикой, лупами и низкими частотами Сосуществование гитары. На гитарной шине попробуйте мягкую M/S-форму: небольшой спад средних частот около 2–3 кГц при звучании вокала (ключевой динамический эквалайзер) и подъём боков около 5–8 кГц для блеска вне центра. Клавиши и падсы. Если клавиши заглушают лид, поднимите высокочастотный фильтр возврата падса и примените ключевой спад 2–4 кГц на шине клавиш, чтобы дикция оставалась чёткой. Управление сабом. Если слоги пропадают под басовыми нотами или хвостами кика, применяйте ключевой низкочастотный срез на 120–180 Гц на саб-рейле во время вокальных фраз. Делайте движения аккуратно, чтобы избежать качания. Слои лупов. Если используете зацикленную перкуссию, вырежьте небольшой вырез 3–5 кГц в лупе, когда звучит голос, чтобы шум палочек не мешал согласным. VIII. Микроавтоматизация: маленькие регулировки, большие эмоции Регулировка уровней. ±0,5–1 дБ на сильных долях; поднимайте фразы в конце пред-припева на 0,3–0,7 дБ, чтобы подготовить припев. Сдвиги порога де-эссера. Ослабьте на 1–2 дБ в тёмных местах; ужесточайте на ярких гласных. Подъёмы эквалайзера. Кратковременный широкий подъём на +0,5 дБ около 3,5 кГц на одном слове может выделить текст без увеличения общей яркости. Цветовое оформление. Добавьте на 3–5% больше насыщенности в финальном хуке для ощущения энергии; уменьшайте её в близких куплетах. Хореография FX. Усиливайте слэп на вступительных словах, уменьшайте во время скороговорок; длинные броски оставляйте только для переходов. Предпочитаете сосредоточиться на написании и исполнении, пока человек-партнер занимается балансом, автоматизацией и подготовкой стемов? Закажите услуги сведения акустического попа и сохраняйте импульс, обеспечивая согласованность звучания на разных колонках. IX. Устранение неполадок: проблема → целенаправленное действие Согласные "С" кажутся резкими. Расширьте диапазон де-эссинга; понизьте воздушный шейв на 0.5 дБ; низкочастотный фильтр задержек около 6–7 кГц. Наушники звучат тонко. Добавьте мягкий широкий +0.5 дБ на 150–180 Гц на ведущем; убедитесь, что дакинг на Sub Rail не чрезмерен. Ширина хора размывает текст. Держите ведущий вставку моно; расширяйте ширину в гармониях/возвратах; сократите предзадержку ревербератора на 10 мс. Гитары маскируют дикцию. Уточните вырез 2–4 кГц на шине Guitar/Keys; проверьте быстрый релиз, чтобы инструменты восстанавливались между слогами. Коррекция артефактов на долгих гласных. Медленная скорость; увеличьте параметр humanize/transition; убедитесь, что форманты сохранены. Взрывные согласные. Уменьшите громкость всплеска; немного поднимите HPF на слове; проверьте расстояние до поп-фильтра. X. Две цепочки, готовые к настройке Путь только со стандартными плагинами (любой крупный DAW) Коррекция тона: ключ/гамма; куплеты умеренно, хуки плотнее; форманты включены; humanize активирован. EQ: HPF 80–90 Гц; широкий спад −1 до −2 дБ на 250–350 Гц если звучит коробочно; опциональный узкий вырез около 1 кГц если носовой. Компрессор A: 2:1–3:1; атака ~25 мс; релиз ~120 мс; ~3–5 дБ GR на фразах. Де-эссинг: широкополосный 6–8 кГц; настраивайте по наушникам, а не по метрам. Сатурация: лёгкая лента/трансформатор на низком миксе; выход согласован. Компрессор B: быстрее, ловит пики 1–2 дБ для стабилизации отправок FX. Полировка: микро-шейв на 10–12 кГц только после де-эссинга, если микрофон темный. Sends: моно комната 0.4–0.7 с; slap 90–110 мс; задержка 1/8 или точечная восьмая с дакингом; короткий ревербератор для хорусного расцвета. Сторонний эффект (пример) Auto-Tune/Melodyne по секциям; сохранение формант; смягчение переходов для легато. Динамический эквалайзер (в стиле Pro-Q): HPF; динамический вырез на 250–300 Гц при появлении «цветения» в кабинете; опциональный узкий вырез около 1 кГц. Опто-компрессор (в стиле LA-2A) для тела/сустейна; тщательно подберите выход. Контроль резонанса (в стиле Soothe) легкий в диапазоне 4–8 кГц по необходимости. Компрессор в стиле 1176 для быстрого захвата пиков (1–2 дБ GR). Air EQ (в стиле Maag) микро +0,5–1 дБ на 10–12 кГц при необходимости. FX: EchoBoy slap + точечная восьмая; яркий ревербератор; опциональный зал с хорусом на низком уровне для расцвета. XI. Доставка и версии: проходите проверки при первой загрузке Во время сведения. Оставляйте запас по уровню; целевой пик микса около −3 dBFS. Избегайте кирпичной лимитации на микс-басе; межсемпловая безопасность должна быть в конце. Глоссарий (кратко). dBFS — цифровой уровень, где 0 означает клиппинг. LUFS оценивает воспринимаемую громкость — используйте его для сравнения версий, а не для гонки за числом в процессе сведения. True peak (dBTP) фиксирует межсемпловые пики; держите финальные мастера ниже 0 dBTP. Набор версий. Печатайте стерео WAV, 24-бит с частотой сессии. Экспортируйте выровненные альтернативы с такта 1 с хвостами: Main, Clean, Instrumental, A Cappella и TV Track. Для готовой к платформам громкости и согласованного тона между версиями завершите мастерингом для акустического попа. XII. Итог: сначала человек, потом полировка План Эда Ширана — это повествование в человеческом масштабе, которое расцветает на хуке. Сохраняйте центр честным, позволяйте гармониям и возвратам создавать масштаб, а инструменты добавляйте только тогда, когда тексту нужно пространство. С дисциплинированной цепочкой и небольшой музыкальной автоматизацией ваш микс звучит одинаково хорошо на телефонах, наушниках и в больших залах. Когда вы хотите, чтобы опытные уши помогали управлять балансом и движением, пока вы продолжаете творить, опирайтесь на надежные услуги сведения для певцов и авторов песен и выпускайте стабильно сильные релизы.
Узнать больше
Настройте вокал в стиле Халида (воздух, теплота и пространство)
Вокальная эстетика Khalid интимна и открыта: мягкие края, плавная яркость и тёплый центр, который парит над современным R&B и поп-битами. Ваша цель — монотонный солидный ведущий вокал с нежным воздухом, поддерживающими дубли и широкими гармониями, которые расцветают в припеве — никогда ледяной, никогда коробочный. I. Палитра звука: тёплое ядро, шелковистый верх, расслабленное присутствие Этот звук живёт между интимностью певца-песенника и полировкой радиопопа. Согласные слышны при низкой громкости; сибилянты гладкие; тело присутствует без грязи. Думайте «близкий разговор» в куплетах и «открытый холм» в припеве. Полоса присутствия: фокус на ясности в районе 2,5–4 кГц, сформированной широкой деэссингом, чтобы яркость не становилась резкой. Воздушное окно: сдержанная полка 10–12 кГц только после успокоения звуков S; стремитесь к шелковистости, а не к искристому распылению. Тело диапазона: 120–200 Гц для груди; управляйте 250–350 Гц, чтобы избежать мутности, особенно под подложками и гитарами. Имиджинг: центрируйте ведущий вокал; ширина — в гармониях, шёпотах и возвратах эффектов. II. Захват движений, которые сохраняют микс Положение микрофона. 15–20 см за поп-фильтром; капсюль чуть выше линии губ, под углом 10–20° вне оси, если ваш микрофон яркий. Это смягчает звуки S и укрощает взрывные согласные до обработки. Уровень входа. Записывайте сырые пики около −12 до −8 дБFS. Держите фронтенд чистым — без сильной компрессии на входе. Вам нужна детализация транзиентов для последующего контроля. Планирование дублей. Запишите честный основной проход. Добавьте более мягкий «дыхательный» слой для куплетов, если текст требует, и более полный «проецируемый» проход для припевов. Запишите низкие и высокие гармонии, а также редкие фальцетные подложки. Помечайте дубли по роли и разделу, чтобы компиляция была быстрой. Стратегия перенастройки. Куплеты предпочитают умеренную скорость с сохранёнными формантами и гуманизацией/переходами для естественных гласных. Припевы могут быть чуть плотнее. Избегайте явных артефактов, если это не стилистика. III. Архитектура слоёв для мягкого широкого попа/R&B Создавайте размер с намерением, а не только за счёт уровня. Чёткая карта сохраняет центр честным, а припев — эпичным. Ведущий — основное повествование; здесь акцент на вокале и эквалайзере. Даблы (L/R) — плотные унисоны на выбранных слогах и концах строк; микро-панорамирование. Гармонии (высокие/низкие) — шире, чем даблы; мягче и чуть темнее, чтобы лид оставался более шелковистым. Фальцет/пэд — воздушная текстура для предхора/хора; с ограничением полосы, медленная атака при необходимости. Ад-либы (A/B) — сдержанные фразы, вдохи и гудки для импульса. Вокальный бас — лёгкая склейка и общий де-эссинг; избегайте сильной компрессии баса, которая сглаживает динамику. Бит-бас + саб-рейл — один для инструментального тела, другой для 808/низких частот, чтобы быстро решать конфликты. IV. Цепочка контроля: плавная ясность без резкости Маленькие, музыкальные шаги, которые чисто наслаиваются. Пусть автоматизация создаёт драму. Контроль высоты тона. Установите тональность/масштаб; куплеты умеренные, припевы чуть быстрее; форманты включены; гуманизация/переходы для легато-слайдов. Субтрактивный эквалайзер. HPF 70–100 Гц (в зависимости от контекста). Для мутности в кабинете — вырежьте 250–350 Гц широко (−1 до −2 дБ). Если носовой звук — аккуратно вырежьте около 1 кГц. Компрессор A (форма). 2:1–3:1; атака 20–40 мс; релиз 80–170 мс или авто. Цель 3–5 дБ на фразах, чтобы согласные дышали, затем усаживались. Де-эссер (широкий). Начинайте с 6–8 кГц с широкой полосой; настраивайте по наушникам. Сохраняйте «мягко-яркие» С, а не тусклые. Цвет (низкий микс). Лента/трансформатор/триод на 5–10% смешивания для связности. Совместите выход, чтобы увеличение уровня не влияло на выбор. Компрессор B (безопасность). Быстрое срабатывание, ловящее пики 1–2 дБ для стабилизации FX-посылов и удержания центра в хорах. Польский эквалайзер. Если дикция всё ещё скрыта, добавьте +0,5–1 дБ около 3–4 кГц (широкая). Добавьте крошечный шельф 10–12 кГц только после де-эссинга. V. Рецепты пространства: просторный поп без реверберационного супа Ранние отражения для близости. Короткая моно комната (0,4–0,7 с) с предзадержкой 20–40 мс создаёт ощущение «лицом к лицу». HPF/LPF на возвратах, чтобы они воспринимались как воздух, а не грязь или шипение. Хлопок для интимности. Моно хлопок 80–120 мс; фильтр ~150 Гц–6 кГц. Автоматизируйте небольшой подъём посыла на входных словах и уменьшайте его во время плотных согласных. Темповое эхо для подъёма. 1/8 или точечная восьмая с низкой обратной связью. Сайдчейн-дакинг от лидирующего голоса, чтобы повторы расцветали в паузах. Панорамируйте случайные выбросы в противоположную сторону от гармонии, чтобы добавить движения без размазывания. Цветение хора. Яркая, короткая пластина (0,7–1,0 с) или небольшой зал с предзадержкой 20–50 мс. Оставьте больше затухания для хоров; держите куплеты плотными и разговорными. Размещение ширины. Сохраняйте цепочку вставок лид-вокала моно. Добавляйте стерео ширину на гармонии и возвраты эффектов; это защищает фокус на тексте и моно-перевод. VI. Сосуществование битов: синт-пады, гитары и мягкий 808 Окно присутствия на Beat Bus. Используйте вокально-ключевой динамический эквалайзер для лёгкого выреза 2–4 кГц, пока лид говорит; быстро отпускайте, чтобы гитары/синты восстанавливались между строками. Уважение к низким частотам. Если слова теряются под басовыми хвостами, примените ключевой низкочастотный срез на 120–180 Гц на Sub Rail во время вокальных фраз. Делайте движения аккуратно, чтобы избежать качания. Комфорт верхних частот. Если тарелки или шум струн кажутся холодными, попробуйте узкий M/S вырез на 9–10 кГц на сторонах; сохраняйте яркость центра для разборчивости. Проверка звучания на телефоне. Лид должен быть моно-сильным. Добавляйте «воздух» в возвраты и падсы, а не в центральную вставку. VII. Сцены автоматизации, передающие эмоции Управление уровнем. ±0.5–1 дБ на сильных долях; небольшие подъёмы в конце фраз, чтобы переносить линии через длительные аккорды. Изменения порога де-эссера. Ослабляйте на 1–2 дБ на тёмных словах; усиливайте на ярких гласных; автоматизируйте по секциям. Цветовое оформление сцены. Повышайте насыщенность на несколько процентов в припеве для добавления плотности; уменьшайте её в шёпотных куплетах. Хореография эффектов. Эффекты на риторических вопросах; более длинные броски только на переходах между секциями; продлите затухание пластины на +0.2–0.4 с для финального расцвета припева. Склейка на шине. На вокальной шине 1–2 дБ компрессии с медленным атакой и средним отпусканием помогут слоям двигаться как одно целое, но при этом дышать. Если вы хотите, чтобы человек-партнёр занимался ридами, балансом и подготовкой стемов, пока вы сосредоточены на написании песен и выступлении, закажите совместную поддержку микширования и поддерживайте высокий темп. VIII. Устранение неполадок: быстрые исправления Согласные «С» звучат резковато. Расширьте диапазон де-эссера; уменьшите воздушный подъём на 0.5 дБ; примените низкочастотную задержку возвратов около 6–7 кГц. На наушниках звук тонкий. Добавьте мягкое широкое повышение +0.5 дБ в диапазоне 150–180 Гц на лид-вокале; убедитесь, что приглушение Sub Rail не чрезмерно. Ширина хора размывает текст. Сохраняйте вставку лид-вокала моно; перенесите ширину в гармонии и возвраты; сократите предзадержку пластины на 10 мс. Гитары маскируют присутствие. Уточните вырез 2–4 кГц на Beat Bus; проверьте быстрое отпускание, чтобы гитары появлялись между слогами. Коррекция артефактов на долгих гласных. Медленная скорость; увеличьте параметр humanize/transition; убедитесь, что форманты сохранены. Взрывные согласные P/B. Уменьшите громкость взрыва; немного поднимите HPF для этого слова; проверьте расстояние до поп-фильтра. IX. Две цепочки, которые вы можете использовать уже сегодня Путь только со стандартными плагинами (любой крупный DAW) Коррекция тона: ключ/масштаб; умеренно в куплетах, чуть быстрее в припеве; форманты включены; humanize активирован. EQ: HPF 80–90 Гц; широкий спад −1 до −2 дБ на 250–350 Гц если звучит коробочно; опциональный узкий вырез около 1 кГц если носовой. Компрессор A: 2:1–3:1; атака 25 мс; релиз 120 мс; 3–5 дБ GR на фразах. Де-эссинг: широкий диапазон на 6–8 кГц; настраивается по наушникам, а не по метрам. Сатурация: лёгкая лента/трансформатор на низком миксе; выход согласован. Компрессор B: быстрее, ловит пики 1–2 дБ для стабилизации отправок FX. Полировка: микро-полка на 10–12 кГц только после де-эссинга, если микрофон звучит глухо. Отправки: моно комната 0,4–0,7 с; slap 90–110 мс; 1/8 или пунктирная восьмая с приглушением; короткий ревербератор для подъема хора. Сторонний эффект (пример) Auto-Tune/Melodyne по секциям; сохранение формант; смягчение переходов для легато. Динамический эквалайзер в стиле FabFilter: HPF; динамический вырез на 250–300 Гц при появлении «цветения» в кабинете; опциональный узкий вырез около 1 кГц. Опто-компрессор (в стиле LA-2A) для тела/подъема; аккуратно подберите выход. Контроль резонанса (в стиле Soothe) легкий в диапазоне 4–8 кГц по необходимости. Компрессор в стиле 1176 для ловли пиков (быстрый релиз); 1–2 дБ GR. Air EQ (в стиле Maag) микро +0,5–1 дБ на 10–12 кГц при необходимости. FX: EchoBoy slap + пунктирная восьмая; яркий ревербератор; опционально параллельный зал с только хором на −12 дБ для расширения. X. Доставка и передача: плавный процесс до релиза Во время микса. Держите пики около −3 дБFS; избегайте кирпичной огранки на микс-басе. Безопасность истинных пиков и конкурентная громкость — на финальном этапе. Набор версий. Печатайте стерео WAV, 24-бит с частотой сессии. Экспортируйте выровненные альтернативы с такта 1 с хвостами: Main, Clean, Instrumental, A Cappella и TV Track. Финализация. Чтобы согласовать тон и громкость между версиями и обеспечить платформобезопасные истинные пики, завершите мастерингом, готовым к релизу для синглов. XI. Заключительная заметка: мягкая сила, большое полотно План Халида — спокойная уверенность: теплый центр с шелковистым воздухом, небольшие ритмические движения, которые ощущаются естественно, и ширина хора, открывающая пространство, не отвлекая внимания. Обрабатывайте умеренно, создавайте пространство в бите только когда это нужно для текста, и пусть гармонии берут на себя основную нагрузку по объему.
Узнать больше
Как сводить вокал как Ava Max (Pop Shine & Anthem Hooks)
Звук Ava Max яркий, уверенный и гимнический. Лид-вокал находится впереди с шелковистым воздухом, стеки раскрываются широко, а хуки кажутся больше жизни без резкости. Это руководство покажет, как захватить этот тон, расставить слои, построить чистую цепочку и сформировать пространство, которое поднимает припевы. Для быстрого старта прослушайте современные пресеты поп-вокала, а затем точно настройте пороги, времена атаки и уровни посылов для вашего голоса и микрофона. I. Целевой профиль: блеск, контроль и подъем Поп-вокалам нужна ясность на низкой громкости и драйв на высокой. Согласные должны быть разборчивы в наушниках. Воздух должен ощущаться глянцевым, а не хрупким. Низкие средние частоты остаются стройными, чтобы синты и бас-бочки дышали. Ваш центральный образ в монофоническом режиме устойчив; размер создают гармонии, дубли и эффекты с задержкой — а не расширение лид-вокала. Полоса присутствия: 2.8–4.2 кГц для дикции; сглаживайте широким де-эссингом. Окно воздуха: подъем 10–12 кГц после успокоения сибилянтов; держите его тонким. Полоса тела: 120–180 Гц добавляет авторитет; избегайте мутности в 250–350 Гц. Подъем хука: ширина и мерцание появляются только в припеве; куплеты остаются более плотными и сухими. II. Рецепт записи: яркий поп без резкости Расположение микрофона. 15–20 см за поп-фильтром; установите капсулу чуть выше линии губ и под углом 10–20° вне оси, если ваш микрофон яркий. Это смягчает звуки "С" и укрощает взрывные согласные до того, как они попадут в цепочку. Уровень входа. Записывайте сырые пики около −12 до −8 дБFS. Оставьте компрессию для микса; форма транзиентов важна. Дубли и компиляция. Запишите уверенный основной дубль. Записывайте точные дубли только для ключевых слов. Добавьте два прохода гармоний (один сверху, один снизу) для хуков, а также слой шепота для текстуры, если он подходит песне. Помечайте дубли по ролям, чтобы редактирование было быстрым. Стратегия ретюнинга. Хуки могут иметь более быструю скорость; куплеты выигрывают от умеренных настроек с сохранением формант и сглаживанием переходов/очеловечиванием длинных гласных. III. Карта сессии: дорожки для поп-стеков и подъема Настройте дорожки так, чтобы вы могли намеренно наращивать размер, а не случайно. Ведущий — центральное исполнение; фокус автоматизации. Дубли (лево/право) — плотные унисоны на выбранных слогах; микропанорамирование. Гармонии (высокие/низкие) — мягче и шире, чем дубли; отфильтрованы низкие средние. Whisper/Texture — дыхательный слой для припевов; с высокочастотным фильтром и ограничением полосы. Ad-libs (A/B) — короткие фразы, ответы и линии подъёма. Vocal Bus — лёгкое склеивание и общий де-эссинг. Beat Bus + Sub Rail — для формирования синтов/барабанов и контроля 808/низких частот. IV. Основная цепочка: блеск без жала Используйте минимальные, музыкальные движения. Пусть слои и риды создают драму. Контроль тона. Установите тональность/масштаб; куплеты умеренные, хуки быстрее; сохраняйте форманты; включите humanize/transition, чтобы слайды звучали естественно. Субтрактивный эквалайзер. ВЧ-фильтр ~80–100 Гц. Если будка добавляет «коробочный» звук, уменьшите 250–350 Гц широко (−1 до −2 дБ). Если носовой оттенок, узкий вырез около 1 кГц. Усиления оставьте на конец. Компрессор A (форма). 2:1–3:1, атака 15–35 мс, релиз 80–160 мс или авто. Цель — 3–5 дБ сжатия на фразах; дайте согласным дышать. Де-эссер (широкий). Начинайте с 6–8 кГц; настройте диапазон по тому, что слышите в наушниках. Избегайте «шепелявых» артефактов. Окраска (низкий микс). Лента/трансформатор/триод на 5–10% смешивания для плотности. Согласуйте выход, чтобы громкость не влияла на выбор. Компрессор B (безопасность). Быстрое срабатывание, ловит пики 1–2 дБ; стабилизирует посылы и поддерживает устойчивое центральное изображение. Полировка эквалайзером. Если дикция всё ещё скрыта, +0,5–1 дБ на 3–4 кГц (широкая). Добавьте крошечный шельф на 10–12 кГц только после де-эссинга. V. Архитектура хука: октавные стопки, шепоты и подъёмы Дубли. Используйте на целевых словах или в конце строк. ВЧ-фильтр немного выше, чем у ведущего; добавьте чуть больше де-эссинга; опустите на 6–9 дБ. Микропанорамирование влево/вправо для ширины без артефактов хора. Гармонии. Запишите одну выше и одну ниже. Панорамируйте шире, чем дубли. Отфильтруйте низкие средние частоты, чтобы сохранить чистоту микса. Нежное повышение на 5 кГц (0,5–1 дБ) на гармониях может добавить блеска, оставляя ведущий голос гладким. Слой шепота. Очень высокочастотный фильтр (например, 250–300 Гц) с небольшим воздушным подъемом; поднимайте его только в припеве, чтобы добавить волнения без увеличения громкости. Подъемные линии. Короткие адлиб или вдохи, которые подталкивают к крючку. Держите их узкополосными и панорамированными в стороны, чтобы они не конкурировали с ведущим. VI. Дизайн пространства: радиополировка без размытия Моно-хлопок. 90–120 мс для непосредственности; фильтруйте возврат примерно 150 Гц–6 кГц. Автоматизируйте небольшой подъем посылки на словах в начале такта. Темповое эхо. 1/8 или точечная восьмая с низкой обратной связью. Добавьте сайдчейн-дакинг от ведущего, чтобы повторы расцветали в паузах. Панорамируйте случайные броски в противоположную сторону от гармонии для интереса. Поп-пластина. Яркая, короткая пластина (0,7–1,0 с) с предзадержкой 20–50 мс. Всегда применяйте HPF/LPF на возвратах. Держите куплеты суше, а припев чуть открытым. Стерео без размазывания. Если нужна дополнительная ширина в припеве, добавляйте ее на гармонии и реверберационные возвраты, а не на ведущий трек. Главный голос должен оставаться моно-сильным. VII. Жизнь с яркими синтезаторами и жесткими бочками Окно присутствия. На Beat Bus вставьте динамический эквалайзер, ключевой от ведущего вокала, чтобы слегка понизить 2–4 кГц во время исполнения; быстро отпускайте, чтобы синтезаторные крючки восстанавливались между фразами. Бочка и бас. Если слоги теряются под низкочастотными хвостами, примените ключевой низкочастотный срез на 120–180 Гц на Sub Rail, когда вокал активен. Движения должны быть тонкими, чтобы избежать качания. Верхний шум. Для ослепления тарелок/хэта попробуйте узкий M/S вырез около 9–10 кГц только на сторонах; сохраняйте яркость центра для разборчивости. Моно-проверка. Убедитесь, что ведущий вокал остается плотным при сведении в моно. Ширина должна исходить из стэков и эффектов, а не из центрального канала. VIII. Микроавтоматизация: полировка, которая продает крючок Вокальные подъемы. ±0,5–1 дБ на сильных долях; поднимайте фразы в конце пред-припева на 0,3–0,7 дБ, чтобы обозначить крючок. Смещение порога де-эссинга. Ослабьте на 1–2 дБ на темных словах; ужесточите для ярких гласных. Подъемы эквалайзера. Кратковременный широкий подъем +0,5 дБ около 3,5 кГц на одном слове может выделить смысл, не увеличивая общую яркость. Сцены насыщения. Немного больше окраски на дубли, чем на ведущем вокале, чтобы сохранить центр чистым. Хореография эффектов. Повышайте хлопок на входных словах; убирайте его во время плотных согласных; длинные броски оставляйте для переходов между частями. IX. Быстрая карта устранения неполадок С-шипения резкие. Расширьте диапазон де-эссинга; понизьте воздушный срез на 0,5 дБ; задержка низкочастотного фильтра возвращается к 6–7 кГц. Крючок звучит тихо. Немного ослабьте HPF у дублирующих дорожек на несколько Гц; добавьте +1 дБ в диапазоне 160–200 Гц (широко) на дубли; поднимайте гармонии на +0,5 дБ только в припеве. Шепчущий слой шипит. Сузьте его полосу пропускания еще больше и добавьте небольшой транзиентный шейпер, чтобы сохранить форму без лишних верхних частот. Бит заглушает лид. Уточните вырез 2–4 кГц на Beat Bus; проверьте короткое время релиза, чтобы синты отскакивали между слогами. Ретюнинг звучит роботизированно в куплетах. Медленная скорость; увеличьте гуманизацию; подтвердите сохранение формант. Звук в наушниках тонкий. Добавьте очень мягкий широкий подъем +0.5 дБ на 150–170 Гц на лид; убедитесь, что Sub Rail не слишком приглушает. X. Две цепочки, готовые к настройке Путь только со стандартными плагинами (любой крупный DAW) Коррекция тона: ключ/гамма; куплеты умеренно, хуки быстрее; гуманизация; форманты включены. Эквалайзер: HPF 90 Гц; широкий спад −1 до −2 дБ на 250–350 Гц, если звучит коробочно; узкий вырез около 1 кГц, если носовой. Компрессор A: 2:1–3:1; атака ~20 мс; релиз ~120 мс; 3–5 дБ GR на фразах. Де-эссинг: широкая полоса около 6–8 кГц; настраивается по наушникам. Сатурация: лёгкая лента/трансформатор на низком миксе; выход согласован. Компрессор B: быстрее, ловит пики 1–2 дБ; поддерживает стабильность посылов. Полировочный шельф: микро-подъем 10–12 кГц только после де-эссинга, если микрофон темный. Sends: моно slap 90–110 мс; задержка 1/8 или точечная восьмая с дакингом; короткий яркий ревербератор для подъема хука. Сторонний эффект (пример) Auto-Tune/Melodyne по секциям; форманты сохранены. Динамический эквалайзер (в стиле Pro-Q): HPF; динамический вырез на 250–300 Гц при появлении «цветения» в кабинете; опциональный узкий вырез около 1 кГц. Опто-компрессор (в стиле LA-2A) для плавного тела; выход согласован. Контроль резонансов (в стиле Soothe) лёгкий в диапазоне 4–8 кГц, только если звучит резковато. Компрессор в стиле 1176 для быстрого захвата пиков (1–2 дБ GR). Air EQ (в стиле Maag) микро +0.5–1 дБ на 10–12 кГц при необходимости. FX: EchoBoy slap + точечная восьмая; яркий маленький ревербератор; опциональная шепчущая шина с полосовым фильтром и медленным авто-паном для текстуры припева. XI. Доставка и версии: пройдите QC с первой загрузки Во время микса. Оставляйте запас по громкости. Держите пики микса около −3 dBFS; избегайте brickwall лимитирования на микс-басе. Безопасность по true-peak достигается на финальном этапе. Список для печати. Стерео WAV, 24-бит, с частотой сессии. Экспортируйте выровненные альтернативы с такта 1 с хвостами: Main, Clean, Instrumental, A Cappella и TV Track. Если вы сотрудничаете с пользователями Logic, это руководство по экспорту стемов из Logic Pro обеспечит последовательность и скорость передачи. Финализация. Чтобы зафиксировать громкость, тон и безопасность платформы во всех версиях, завершите работу радио- и стриминговым поп-мастерингом. XII. Заключительное слово: ярко, смело и контролируемо План Ava Max — современная поп-уверенность: блеск в верхних частотах, чистые низкие средние и припевы, которые раскрываются широко, не теряя центра. Обрабатывайте умеренно, добавляйте ширину в стеки и эффекты, и хореографируйте небольшие ридсы, которые продают каждую строчку. Если вам нужен надежный партнер для формирования балансов и автоматизации, пока вы сосредоточены на написании песен и выступлениях, закажите поп-миксинг, готовый к чартах и выпускайте записи быстрее и с постоянным качеством.
Узнать больше
Как сводить вокал как Lil Tecca (мелодичная ясность и ритмичность)
Миксы Lil Tecca кажутся невесомыми и запоминающимися: яркие, но плавные, ритмично точные и с приоритетом мелодии. Ведущий голос остаётся лёгким в низких средних, стеки шелковистые, а эффекты танцуют с сеткой хай-хэта. Это руководство показывает, как поймать этот тон, организовать стеки, построить мягкую цепочку и вписать голос в блестящие двухдорожечные биты. I. Цель звука: глянцевая мелодия с пульсом Думайте о «рэпе с поп-наклоном», который хорошо звучит в наушниках и в машинах. Согласные чёткие, без резкости. Низкие средние частоты лёгкие, чтобы бит дышал. Воздух присутствует, но не холодный. Центр устойчив, ширина живёт в гармониях и изящных ад-либах. Дорожка присутствия: 2.8–4 кГц для разборчивости, сглаженная широкой деэссингом. Окно воздуха: тонкое поднятие 10–12 кГц только после успокоения звуков S. Полоса тела: плотные 120–180 Гц; избегайте мутности 250–350 Гц. Движение: хлопки/эхо в темпе, выровненные по паттернам хэта, а не длинным реверберациям. II. Решения при записи, которые окупаются позже Расположение микрофона. 15–20 см за поп-фильтром, капсюль чуть выше линии губ для смягчения взрывных согласных. Для ярких микрофонов угол 10–20° вне оси. Уровень записи. Пики дорожки около −12 до −8 дБFS. Без сильной компрессии на входе — сохраняйте форму транзиентов для контроля микса. Дубли и компиляция. Сначала основная мелодия; затем дубли на выбранных фразах (не на каждой строке). Записывайте лёгкие гармонии (одна выше, одна ниже) и добавляйте ад-либы для динамики. Уменьшайте уровень клиппинга больших P/B всплесков перед динамической обработкой. Стратегия ретюнинга. Поп-мелодичный стиль требует более быстрого ретюнинга на хуках, умеренного в куплетах. Сохраняйте форманты; используйте humanize/transition, чтобы длинные гласные звучали естественно. III. Расположение сессии: дорожки для чистого наложения Организуйте так, чтобы можно было быстро работать без излишней обработки. Ведущий голос — основная мелодия; здесь сосредоточены риды и эквализация. Дубли (L/R) — плотные унисоны на выбранных словах для объёма. Гармонии (Hi/Lo) — мягче, чем дубли; шире панорамирование. Ад-либы (A/B) — короткие фразы, шепоты или выкрики; обрабатываются как ритмические элементы. Вокальный бас — мягкое склеивание и общий де-эссинг, чтобы стэки звучали как один голос. Бит-бас + саб-рейл — один для инструментала, другой для 808/низких частот, чтобы решить конфликты. IV. Схема цепи: легкая полировка, отсутствие грязи Используйте небольшие движения, которые хорошо складываются. Пусть автоматизация и аранжировка делают основную работу. Контроль высоты тона. Установлены тональность/масштаб; припевы быстрее, куплеты умеренные; форманты сохранены; включена гуманизация. Субтрактивный эквалайзер. HPF около 80–100 Гц (в зависимости от контекста). Если кабина добавляет «коробочный» звук, сделайте широкое понижение 250–350 Гц (−1 до −2 дБ). Если носовой звук, узкий вырез около 1 кГц. Усиления оставьте на потом. Компрессор A (формирование). 2:1–3:1, атака 15–30 мс, релиз 80–160 мс или авто. Цель — снижение на 3–5 дБ на фразах, чтобы согласные дышали. Широкий де-эссер. Начинайте с 6–8 кГц с широкой полосой. Настраивайте по наушникам, а не по метрам. Сохраняйте естественность звука "С". Окраска (низкий микс). Лента/трансформатор/триод с 5–10% смешивания для связности. Совместите выход, чтобы избежать эффекта «громче значит лучше». Компрессор B (защита). Быстрое срабатывание, ловящее пики 1–2 дБ для стабилизации FX-сигналов и удержания лидирующего голоса. Финальный эквалайзер (опционально). +0,5–1 дБ около 3–4 кГц (широкая полоса) только если дикция всё ещё скрыта; маленький шельф 10–12 кГц после де-эссинга при необходимости. V. Стэки и ад-либы: размер без мутности Дубли. Запишите два очень плотных унисона на ключевых словах. HPF немного выше, чем у лидирующего голоса, больше де-эссинга и опустите уровень на 6–9 дБ. Для ширины используйте микро-панораму влево/вправо; избегайте хоровой модуляции, которая сжимается в моно. Гармонии. Держите их мягкими и воздушными. Панорамируйте шире, чем дубли, и более агрессивно фильтруйте низкие средние частоты. Подъем 0,5–1 дБ около 5 кГц на гармониях помогает добавить блеска, не делая лидирующий голос резким. Ад-либы. Обрабатывайте как перкуссию. Сузьте полосу пропускания (например, HPF 200 Гц, LPF 8–10 кГц), панорамируйте поочередно по секциям и автоматизируйте подъемы 0,5–1 дБ на тактовых линиях. Суше в куплетах, чуть ярче в припевы. VI. Время и пространство: FX в кармане, которые движутся в такт Хлопок для настроения. Моно хлопок 90–120 мс добавляет присутствие без мутности. Отфильтруйте возврат примерно 150 Гц–6 кГц. Темповое эхо. 1/8 или точечная восьмая с низкой обратной связью. Сайдчейн-дакинг от лидирующего голоса, чтобы повторы расцветали в паузах. Панорамируйте случайные выбросы в противоположную сторону от ад-либа, который их вызвал. Комната/пластина. Короткая яркая пластина или небольшая комната (0,6–1,0 с) с предзадержкой 20–50 мс. Всегда возвраты с HPF/LPF. Куплеты в стиле Tecca предпочитают сухость; дайте припевам немного открыться. Автоматическое движение. Мягкий автопан на гармонических падсах или импровизациях с медленной скоростью (например, один такт) для добавления движения без отвлечения. VII. Работа с двухдорожечными битами (и яркими хэтами) Окно присутствия. На Beat Bus используйте вокально-ключевой динамический эквалайзер, чтобы слегка снизить 2–4 кГц во время речи ведущего. Бит занимает это пространство между фразами. Сосуществование 808. Если слоги теряются под басом, добавьте ключевой низкочастотный спад на 120–180 Гц на Sub Rail, когда активен вокал. Действуйте аккуратно, чтобы избежать слышимого пульсирования. Хэты и всплески тарелок. Если верхние частоты конкурируют с воздушностью, попробуйте узкий M/S спад около 9–10 кГц только на сторонах; центр останется ярким для разборчивости. Проверка моно. Сохраняйте ведущий вокал монофоничным. Ширину размещайте в даблах, гармониях и эффектах. Ваш хор должен звучать на телефоне без потери мелодии. VIII. Микроавтоматизация: маленькие движения, большой блеск Управление громкостью. ±0,5–1 дБ на сильных долях; поднимайте концовки фраз на 0,3–0,7 дБ, чтобы подчеркнуть хуки. Порог де-эссера. Расслабьте на 1–2 дБ на темных фразах; ужесточайте на ярких гласных. Хореография эффектов. Повышайте слап на входных словах, снижайте во время плотных согласных; длинные задержки запускайте только на переходах между секциями. Сцены сатурации. Немного больше окраски на даблах, чем на ведущем вокале, чтобы сохранить центр чистым. Гармоническое склеивание. Немного компрессии на шине вокала (1–2 дБ, медленное атака, средний релиз) помогает сделать слои единым целым. Если ваша сессия становится плотной и вы предпочитаете помощника для управления ридами, балансами и подготовкой стемов, закажите онлайн микширование, чтобы сосредоточиться на написании и исполнении. IX. Быстрая карта устранения неполадок Сибилянты звучат остро. Расширьте полосу де-эссера; уменьшите воздушный shelf на 0,5 дБ; низкочастотный фильтр задержки верните к ~6–7 кГц. Хук кажется маленьким с даблами. Ослабьте HPF даблов на несколько герц; добавьте +1 дБ в диапазоне 160–200 Гц (широкая полоса) на даблах; смешайте 10–20% параллельного тепла. Импровизации загромождают ведущий вокал. Автоматизируйте спад на −1 до −2 дБ на шине импровизаций, когда говорит ведущий; сузьте их полосу пропускания. Ведущий вокал звучит тонко на телефонах. Добавьте мягкое широкое повышение на +0,5 дБ в диапазоне 150–180 Гц на ведущем вокале; проверьте, что Beat Bus не вырезает слишком много в этой области. Ретюн звучит роботизированно в куплетах. Немного замедлите скорость; увеличьте параметр humanize; убедитесь, что форманты сохранены. Бит борется с мелодией. Усильте ключевой спад на 2–4 кГц; сократите обратную связь задержки, чтобы эхо не накладывалось на вокальную партию. X. Две цепочки, готовые к настройке Только стандартные плагины (любая популярная DAW) Коррекция тона: ключ/шкала; хуки быстро, куплеты умеренно; форманты включены; humanize активирован. Эквалайзер: HPF 90 Гц; −1 до −2 дБ широким вырезом на 250–350 Гц, если звучит «коробочно»; опциональный узкий вырез около 1 кГц, если носовой тембр. Компрессор A: 2:1–3:1; атака 20 мс; релиз 120 мс; 3–5 дБ гейн редукшн на фразах. Де-эсс: широкий диапазон 6–8 кГц, настраивается по наушникам. Сатурация: лёгкая лента/трансформатор на низком миксе; выход согласован. Компрессор B: быстрее, ловит пики 1–2 дБ; стабильные сенды. Полировка: микро-шельф на 10–12 кГц, только если нужно после де-эссинга. Сенды: slap 90–110 мс; задержка 1/8 или dotted-eighth с дакингом; короткий яркий ревербератор/комната для подъёма хука. Сторонний эффект (пример) Auto-Tune/Melodyne настроены по секциям; форманты сохранены. Динамический эквалайзер в стиле FabFilter: HPF; динамический вырез на 250–300 Гц при появлении «бум» в кабинете; опциональный узкий вырез около 1 кГц. Опто-компрессор (в стиле LA-2A) для тела; согласованный выход. Контроль резонансов (в стиле Soothe) лёгкий в диапазоне 4–8 кГц, только если звучит резковато. Компрессор в стиле 1176 для быстрого захвата пиков (1–2 дБ GR). Air EQ (в стиле Maag) микро +0,5–1 дБ на 10–12 кГц, если микрофон тёмный. FX: EchoBoy slap + dotted-eighth; яркий маленький ревербератор; тонкий автопан на гармонических паддах. XI. Доставка и версии: чистая передача Во время микса. Оставляйте запас по громкости; избегайте кирпичной лимитации. Держите пики микса около −3 dBFS; контроль истинных пиков — задача мастеринга. Печатный список. Стерео WAV, 24-бит, с частотой сессии. Экспортируйте выровненные альтернативы с такта 1 с хвостами: Main, Clean, Instrumental, A Cappella и TV Track. Если готовите коллаборацию и нужно быстро отправить мультитреки, этот гайд по экспорту стемов из Pro Tools поможет сохранить последовательность передачи. Финальный этап. Для единого звучания между версиями и безопасных пиков на платформах закажите мастеринг синглов и EP — один проход, который выравнивает громкость, ограничивает истинные пики и проверяет моно/стерео трансляцию. XII. Итог: лёгкое прикосновение, сильные хуки Рецепт Lil Tecca — мелодичная лёгкость с точным ритмом. Держите ведущий голос стройным и чистым, добавляйте ширину в стеки и ад-либы, а эффекты хореографируйте по сетке хэта. Небольшая корректирующая эквализация, мягкая компрессия и умная автоматизация помогут вашей вокальной партии звучать на любом динамике. Если хотите партнёра для балансировки во время создания, воспользуйтесь онлайн-миксингом и выпускайте песни быстрее и увереннее.
Узнать больше