


I Adobe Audition är en ”vokalförinställning” en Effects Rack-kedja som laddar EQ, kompression, de-essing, färg och rymd i ett steg. Denna guide visar exakt hur du laddar förinställningar, ställer in hälsosam gain, anpassar makron/kontroller till din röst, routar sends, automatiserar scener och sparar mallar—så att du får konsekventa, radioklara resultat utan att kämpa med menyer. Om du föredrar en snabb, beprövad startpunkt, prova utvalda Adobe Audition vokalförinställningar och finjustera sedan trösklar och sends för att matcha din mikrofon och rum.
I. Vad ”använda en vokalförinställning” betyder i Audition
Audition har tre användbara typer av förinställningar för musikvokaler:
- Effects Rack-förinställningar (spårnivåkedjor du laddar, justerar och sparar om).
- Spårförinställningar i en Sessionmall (Multitrack-layout med ditt vokalspår, sends och bussar förkopplade).
- Individuella plug-in-förinställningar (Parametrisk EQ, Dynamikbehandling, DeEsser, etc.).
Att använda en förinställning är mer än att ladda en kedja; det handlar om att anpassa gain, de-ess, närvaro, FX-balans och bussroutning till låten och rösten. Stegen nedan håller den anpassningen snabb och förutsägbar.
II. Förberedelser (så att förinställningen fungerar)
- Ljudhårdvara: ställ in ditt gränssnitt i Inställningar → Ljudhårdvara.
- Latensplan: lägre buffert för inspelning; höj för mixning.
- Sessionsfrekvens: 44,1 kHz för musik (48 kHz om du levererar till video).
- Ingångsnivå: sjung med prestationsvolym; sikta på råa toppar runt −12 till −8 dBFS före bearbetning.
- Multitrack-session: skapa en med ett Lead Vox-spår och två bussreturer (Slap, Plate).
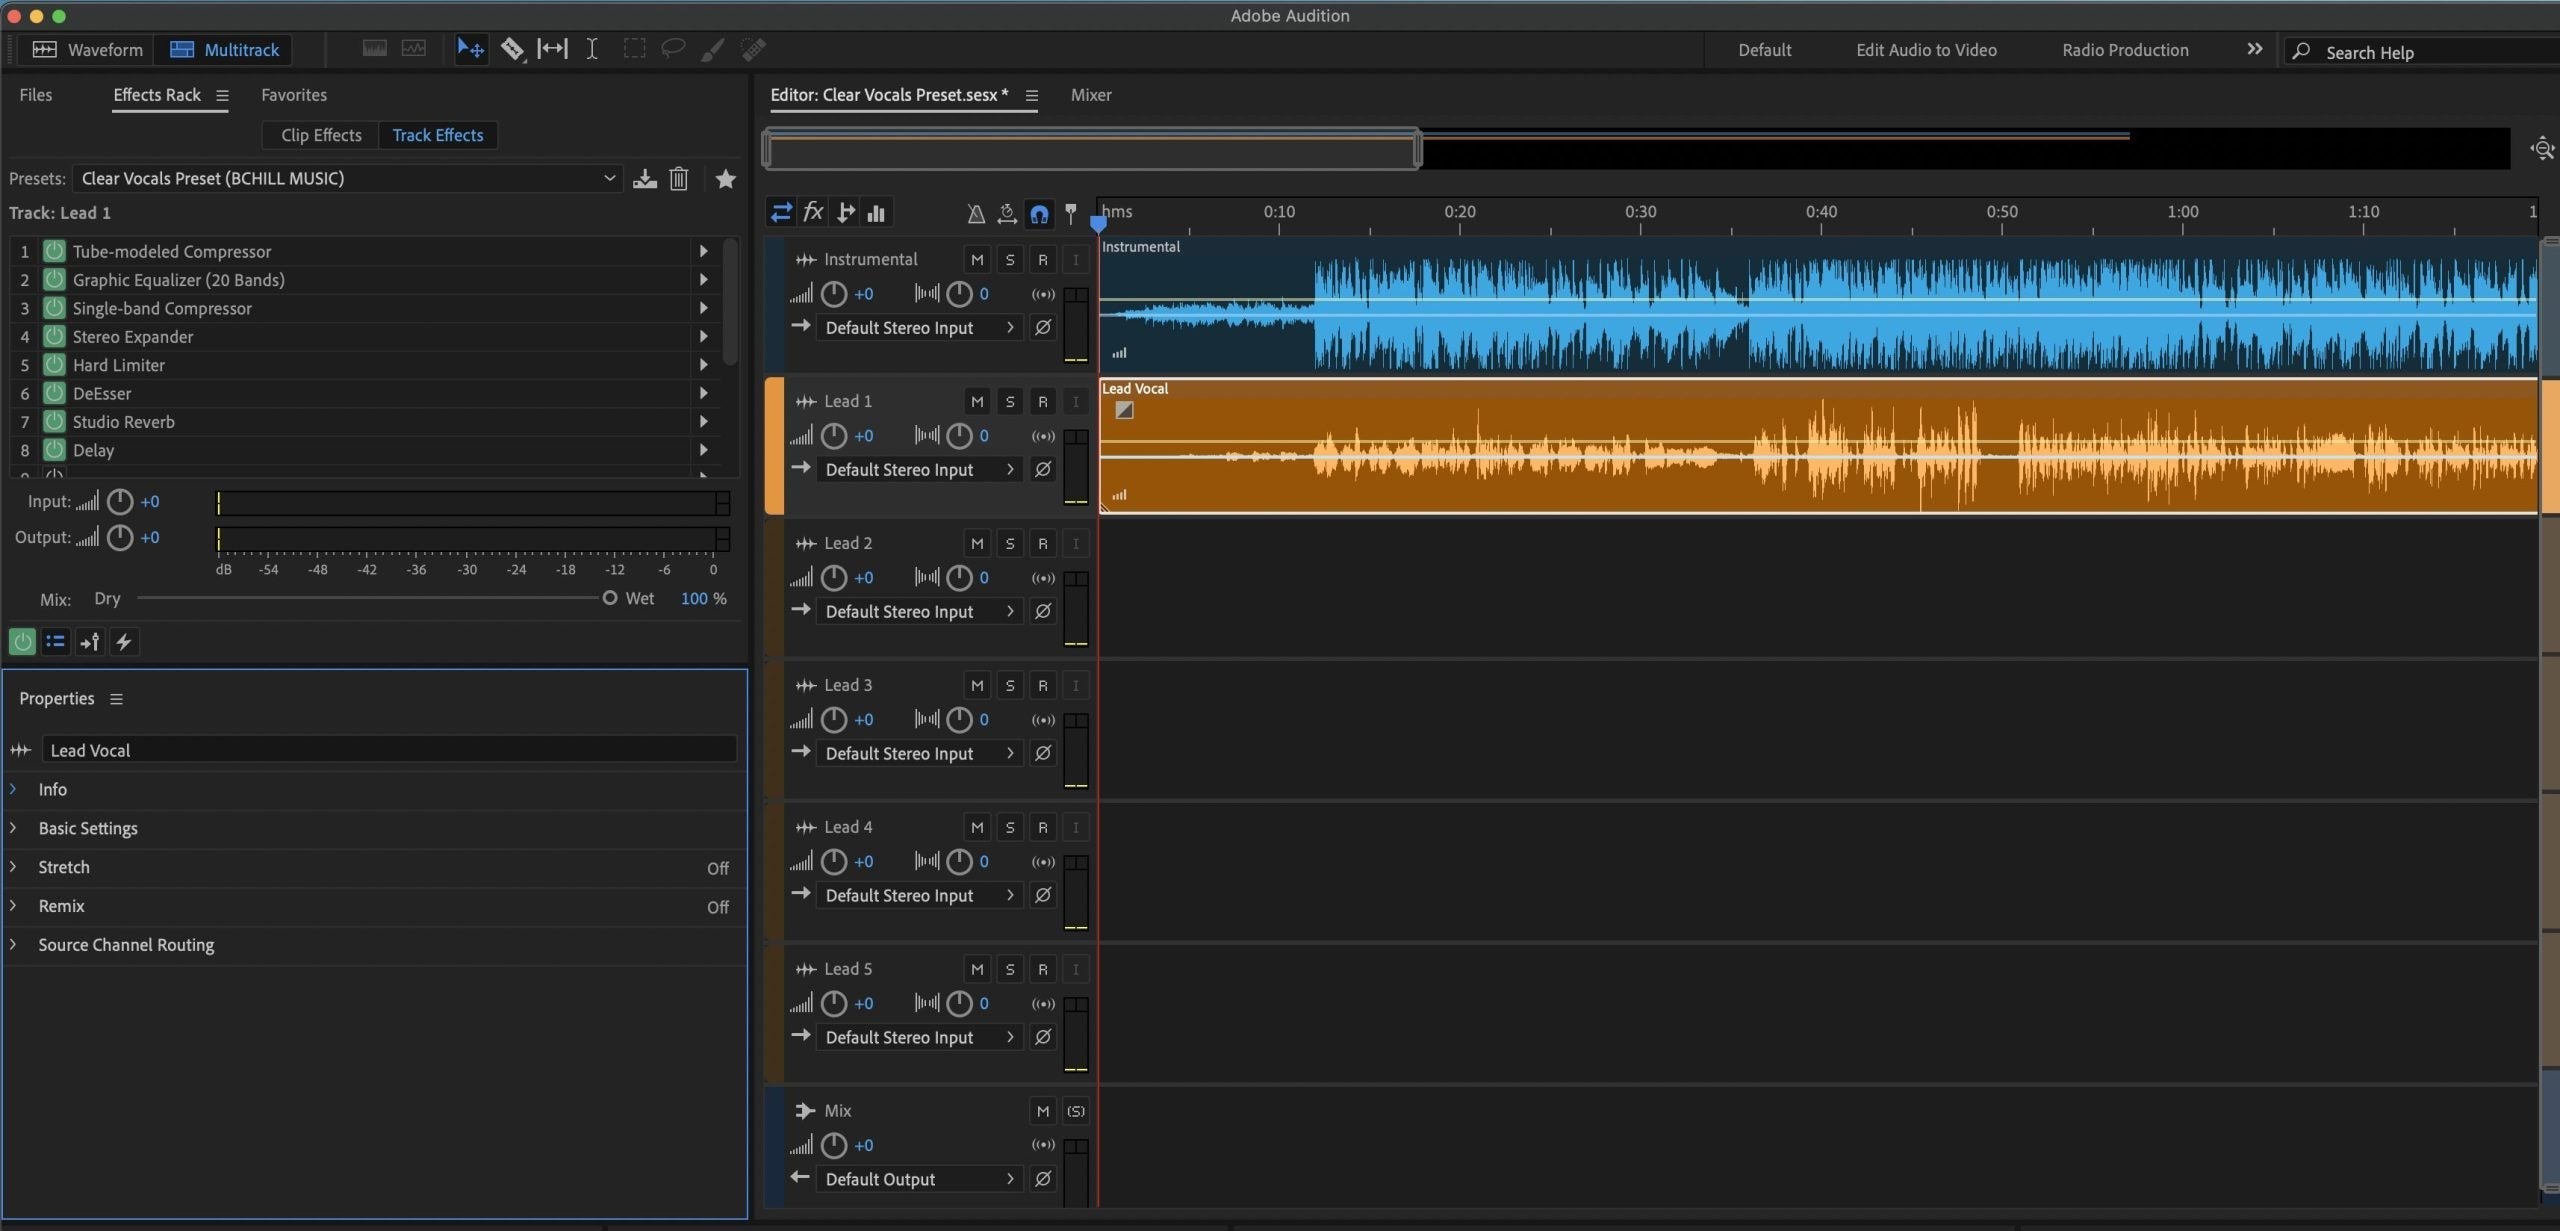
III. Ladda en förinställning på rätt sätt (Multitrack)
- Skapa eller öppna en Multitrack-session. Välj din Lead Vox-spår.
- Öppna Effects Rack (höger panel). Klicka på förinställningsmenyn (överst i Racket) → välj din vokalkedja.
- Bekräfta ordningen: EQ → Comp A → De-Ess → (Färg/Mättnad) → Comp B (fångare) → Utility/Trim.
- Spara din arbetskopia: Rackmeny → Spara Rackförinställning… (t.ex. Lead — Clean Pop (DittNamn)). Nu kommer justeringar inte skriva över tillverkarens original.
Waveform vs. Multitrack: för låtar, håll dig till Multitrack. Du får sends, automation och icke-destruktiv redigering. Använd Waveform endast för snabba engångsjobb eller podcastliknande redigeringar.
IV. Gain staging: skillnaden mellan ”okej” och ”färdigt”
- Interface-preamp först: ställ in mic-preamp så råa tagningar ligger runt −12 till −8 dBFS.
- Trimma i toppen: använd rackens input/trim eller en Hard Limiter (endast input gain) för finjusteringar; slamma inte kompressorn.
- Comp A-mål: 3–5 dB gainreduktion på fraser (ratio 2:1–3:1; attack 10–30 ms; release 80–160 ms).
- Efter racken: lämna toppar runt −6 till −3 dBFS. Loudness sker senare i mastring.
V. Fem kontroller du använder på varje låt
- De-Ess (6–8 kHz): vrid tills hörlurarna slutar klaga; sluta innan konsonanter blir suddiga.
- Body (120–200 Hz): lägg till värme; om booth ”box” uppstår, sänk 250–350 Hz brett i parametrisk EQ.
- Presence (3–4 kHz): små, breda lyft för artikulation. Om hi-hats/claps är ljusa, överväg att skära i beatet istället för att trycka på sången.
- Air (10–12 kHz): mikrohylla endast efter att sibilans lugnat sig.
- FX-balans: slapback 90–120 ms (filtrerad 150 Hz–6 kHz) och en kort plate (0,7–1,0 s, 20–50 ms fördröjning). Verser torrare; hooks öppna.
VI. Rutta returer och bussar (ditt ”rum” i två faders)
- Skapa två buss-spår: A = Slap (Delay), B = Plate (Reverb).
- På Lead-spåret, lägg till sends till A och B. Börja runt −18 till −15 dB; justera i kontext.
- Filterreturer: HPF ~150 Hz, LPF ~6–7 kHz för att hålla FX tighta och telefonvänliga.
- Ducking-trick: sätt en sidechain-kompressor på Slap-bussen med Lead som nyckel; snabb attack/release för ”eko i luckorna.”
VII. Lead vs. stackar: bygg en ”familj”, inte kopior
- Lead: mono-solid i mitten; minimala vidgningar; rides och artikulation först.
- Dubbler L/R: högre HPF än Lead, lite mer de-ess, nedtonad 6–9 dB; panorera vänster/höger (tight).
- Harmonier: mörkare EQ; bredare panorering; valfritt +0,5–1 dB vid 5 kHz om shimmer hjälper.
- Ad-libs: smalt bandbredd (HPF ~200 Hz, LPF 8–10 kHz), sidopannat, korta insatser vid övergångar.
Spara varje spårs rack som eget preset (Lead — Clean, Double — Tight, Harmony — Wide) så att återkallning tar ett klick.
VIII. Snabbstartskedja (endast stock, säker på de flesta röster)
- Parametrisk equalizer (först): HPF 80–100 Hz; −1 till −2 dB brett vid 250–350 Hz om boxigt; tajt notch nära 1 kHz om nasalt.
- Dynamics Processing A (form): mjuk kompression (2:1–3:1); attack 10–30 ms; release 80–160 ms; sikta på 3–5 dB GR på fraser.
- DeEsser: ställ in på ~6–8 kHz; minska tills sibilansen kontrolleras på hörlurar.
- Dynamics Processing B (fångare): snabbare för att fånga 1–2 dB toppar; stabiliserar sändnivåer.
- Tube/Analog Color (valfritt): subtil mättnad för densitet; utgång matchad så att högre volym inte lurar dig.
- Parametrisk EQ (polering): +0,5–1 dB brett vid 3–4 kHz endast om diktionen döljs; liten lufthylla sist.
Spara som Lead — Stock Clean (AA) och skapa lättare/tungare versioner per låt.
IX. Audition-specifika kraftknep
- Essential Sound-panel: tagga Lead som "Dialogue" för snabba klarhetspresets; finslipa sedan i Racken (bra för roughs).
- Clip FX vs. Track FX: timingredigeringar? Lägg "repair" EQ/De-Ess på ett problematiskt klipp; behåll ton/FX på spåret.
- Favoriter: spara batchåtgärder (t.ex. normalisera till −18 LUFS kortsiktigt före racken) för förberedelse med ett klick.
- Spektral vy: upptäck hårda S-kluster; sudda ut visslingar; minska sedan hur hårt de-essern jobbar.
X. Automation som säljer frasen
- Volym rides: +0,5–1 dB på downbeats; små dippar för tungvrickare.
- De-ess tröskel: skriv en något tajtare tröskel på ljusa fraser, lösare på mörka partier.
- Skicka rides: höj Slap/Plate 1–2 dB in i hooken; dra tillbaka i täta verser.
Tips: Auditions envelopes är snabba—växla Visa envelopes i spårhuvudet och skriv bara de 2–3 rörelser som är viktiga.
XI. Tvåspårs beat-överlevnad (ljusa hats, tunga subbar)
- Skär ut, kämpa inte: på Instrumental-bussen kan en mild mid-dipp (2–4 kHz) styrd av sången (sidechain-komp in i EQ-gain-länk) frigöra plats för konsonanter utan att tunna ut takten.
- Splash-kontroll: om hi-hats är isiga, lågpassa returer till ~6–7 kHz; håll Air-hyllan modest.
- Mono-kontroll: kollapsa övervakningen kort; om berättelsen håller på en telefon är du på rätt spår.
XII. Inspelning vs. mixning: printa det du behöver
Spåra torrt, hör vått: övervaka genom Rack men spela in ren input. Om en samarbetspartner behöver "demo-känslan," buss Lead till ett print-spår och spela in en våt säkerhetskopia. Namnge tydligt (Lead_Dry, Lead_Wet).
Frys/commit senare: commit CPU-tunga FX mot slutet; behåll ett FXPRINT-spår för återkallning.
XIII. Mallar: starta varje session redo
- Bygg en session med spår för Lead, Doubles L/R, Harmonier, Ad-libs, plus två returer (Slap, Plate).
- Ladda spårspecifika Rack-presets; färgkoda; ställ in rimliga standardvärden för send.
- Spara som Session Template så varje ny låt öppnas "redo att sjunga."
Vill du ha inspiration för layouter utanför en enda DAW? Se de plattformsöverskridande idéerna i Top 10 Vocal Templates Every Recording Artist Needs.
XIV. Felsökning (problem → fokuserad åtgärd)
- Hårda S-ljud efter att ha lagt till Air: höj De-Ess något; minska Air-hyllan med ~0,5 dB; lågpassa tillbaka till ~6–7 kHz.
- Sång drunknar under 808: håll verserna torrare; höj Presence något; överväg en subtil mid-dipp på takten medan sången hörs.
- Preset låter annorlunda vid export: kontrollera kvalitetslägen och eventuella look-ahead-inställningar som ändras vid rendering; håll mastern utan klippning.
- Latens vid övervakning: använd kortare reverb under tagningar; kringgå tunga analysatorer; sänk bufferten för inspelning.
- Rack känns "dött" på din mikrofon: minska låg-mellan skärningar; lätta på de-ess; en liten lyftning på 150–180 Hz kan återställa bröstkänsla utan att bli grumligt.
- Nivåhopp i A/B-tester: matcha output-trim innan bedömning; högre volym verkar ofta "bättre."
XV. Organisation & återkallning
-
Tydliga namn vinner:
Lead — Ren,Lead — Air+,Rap — Punch,Harmony — Wide,Ad-Lib — Telefon. - En per roll: separata förinställningar för Lead/Doubles/Harmonies förhindrar över-de-essing av doubles eller överljusa stackar.
- Backups: behåll din Audition-inställningsmapp och sessionsmallar i molnlagring så att utrustning följer med dig.
XVI. Snabb FAQ
Ska jag stapla två kompressorer?
Ja—använd Comp A för form (3–5 dB på fraser) och Comp B för toppar (1–2 dB). Det låter mer naturligt än en tung kompressor.
Behöver jag exakt den mikrofon som en förinställning nämner?
Nej. Behandla förinställningar som startpunkter. Anpassa Trim, De-Ess, Body, Presence och FX efter din mikrofon och leverans.
Var placerar jag autotune?
Först i kedjan (efter eventuell input-trim), så att downstream-dynamik ser en stabil, justerad signal.
Hur högt ska den slutgiltiga låten vara?
Håll mixens toppar runt −3 dBFS med true-peak-säkerhet hanterad vid mastering. Jaga inte LUFS under mixning.
XVII. Snabb handlingsplan (kopierbar)
- Ladda din Rack → ställ in Trim så att Comp A kyssar 3–5 dB på fraser.
- De-Essa till “mjuk-lysande,” inte matt; lägg till lite Presence endast om artikulationen döljs.
- Filtrera returer; verser torrare, refränger öppnare; ducka Slap från Lead.
- Spara spårspecifika förinställningar (Lead, Doubles, Harmonies); färgkoda sends.
- Rendera roughar; håll master oklippt; lämna headroom för mastering.
Använda väl är vokala förinställningar pålitliga genvägar—inte kryckor. Sätt hälsosamt headroom, gör små justeringar, automatisera bara det som är viktigt, och din röst kommer framåt utan hårdhet—låt efter låt. Om du vill hoppa direkt till ”låter fantastiskt på två klick”, prova specialbyggda Adobe Audition vokala förinställningar samt Adobe Audition inspelningsmall och lås sedan dina egna mallar för snabba, konsekventa sessioner.


