


Vocal Presets & Templates
Select your DAW below to browse Vocal Presets tailored for your setup.


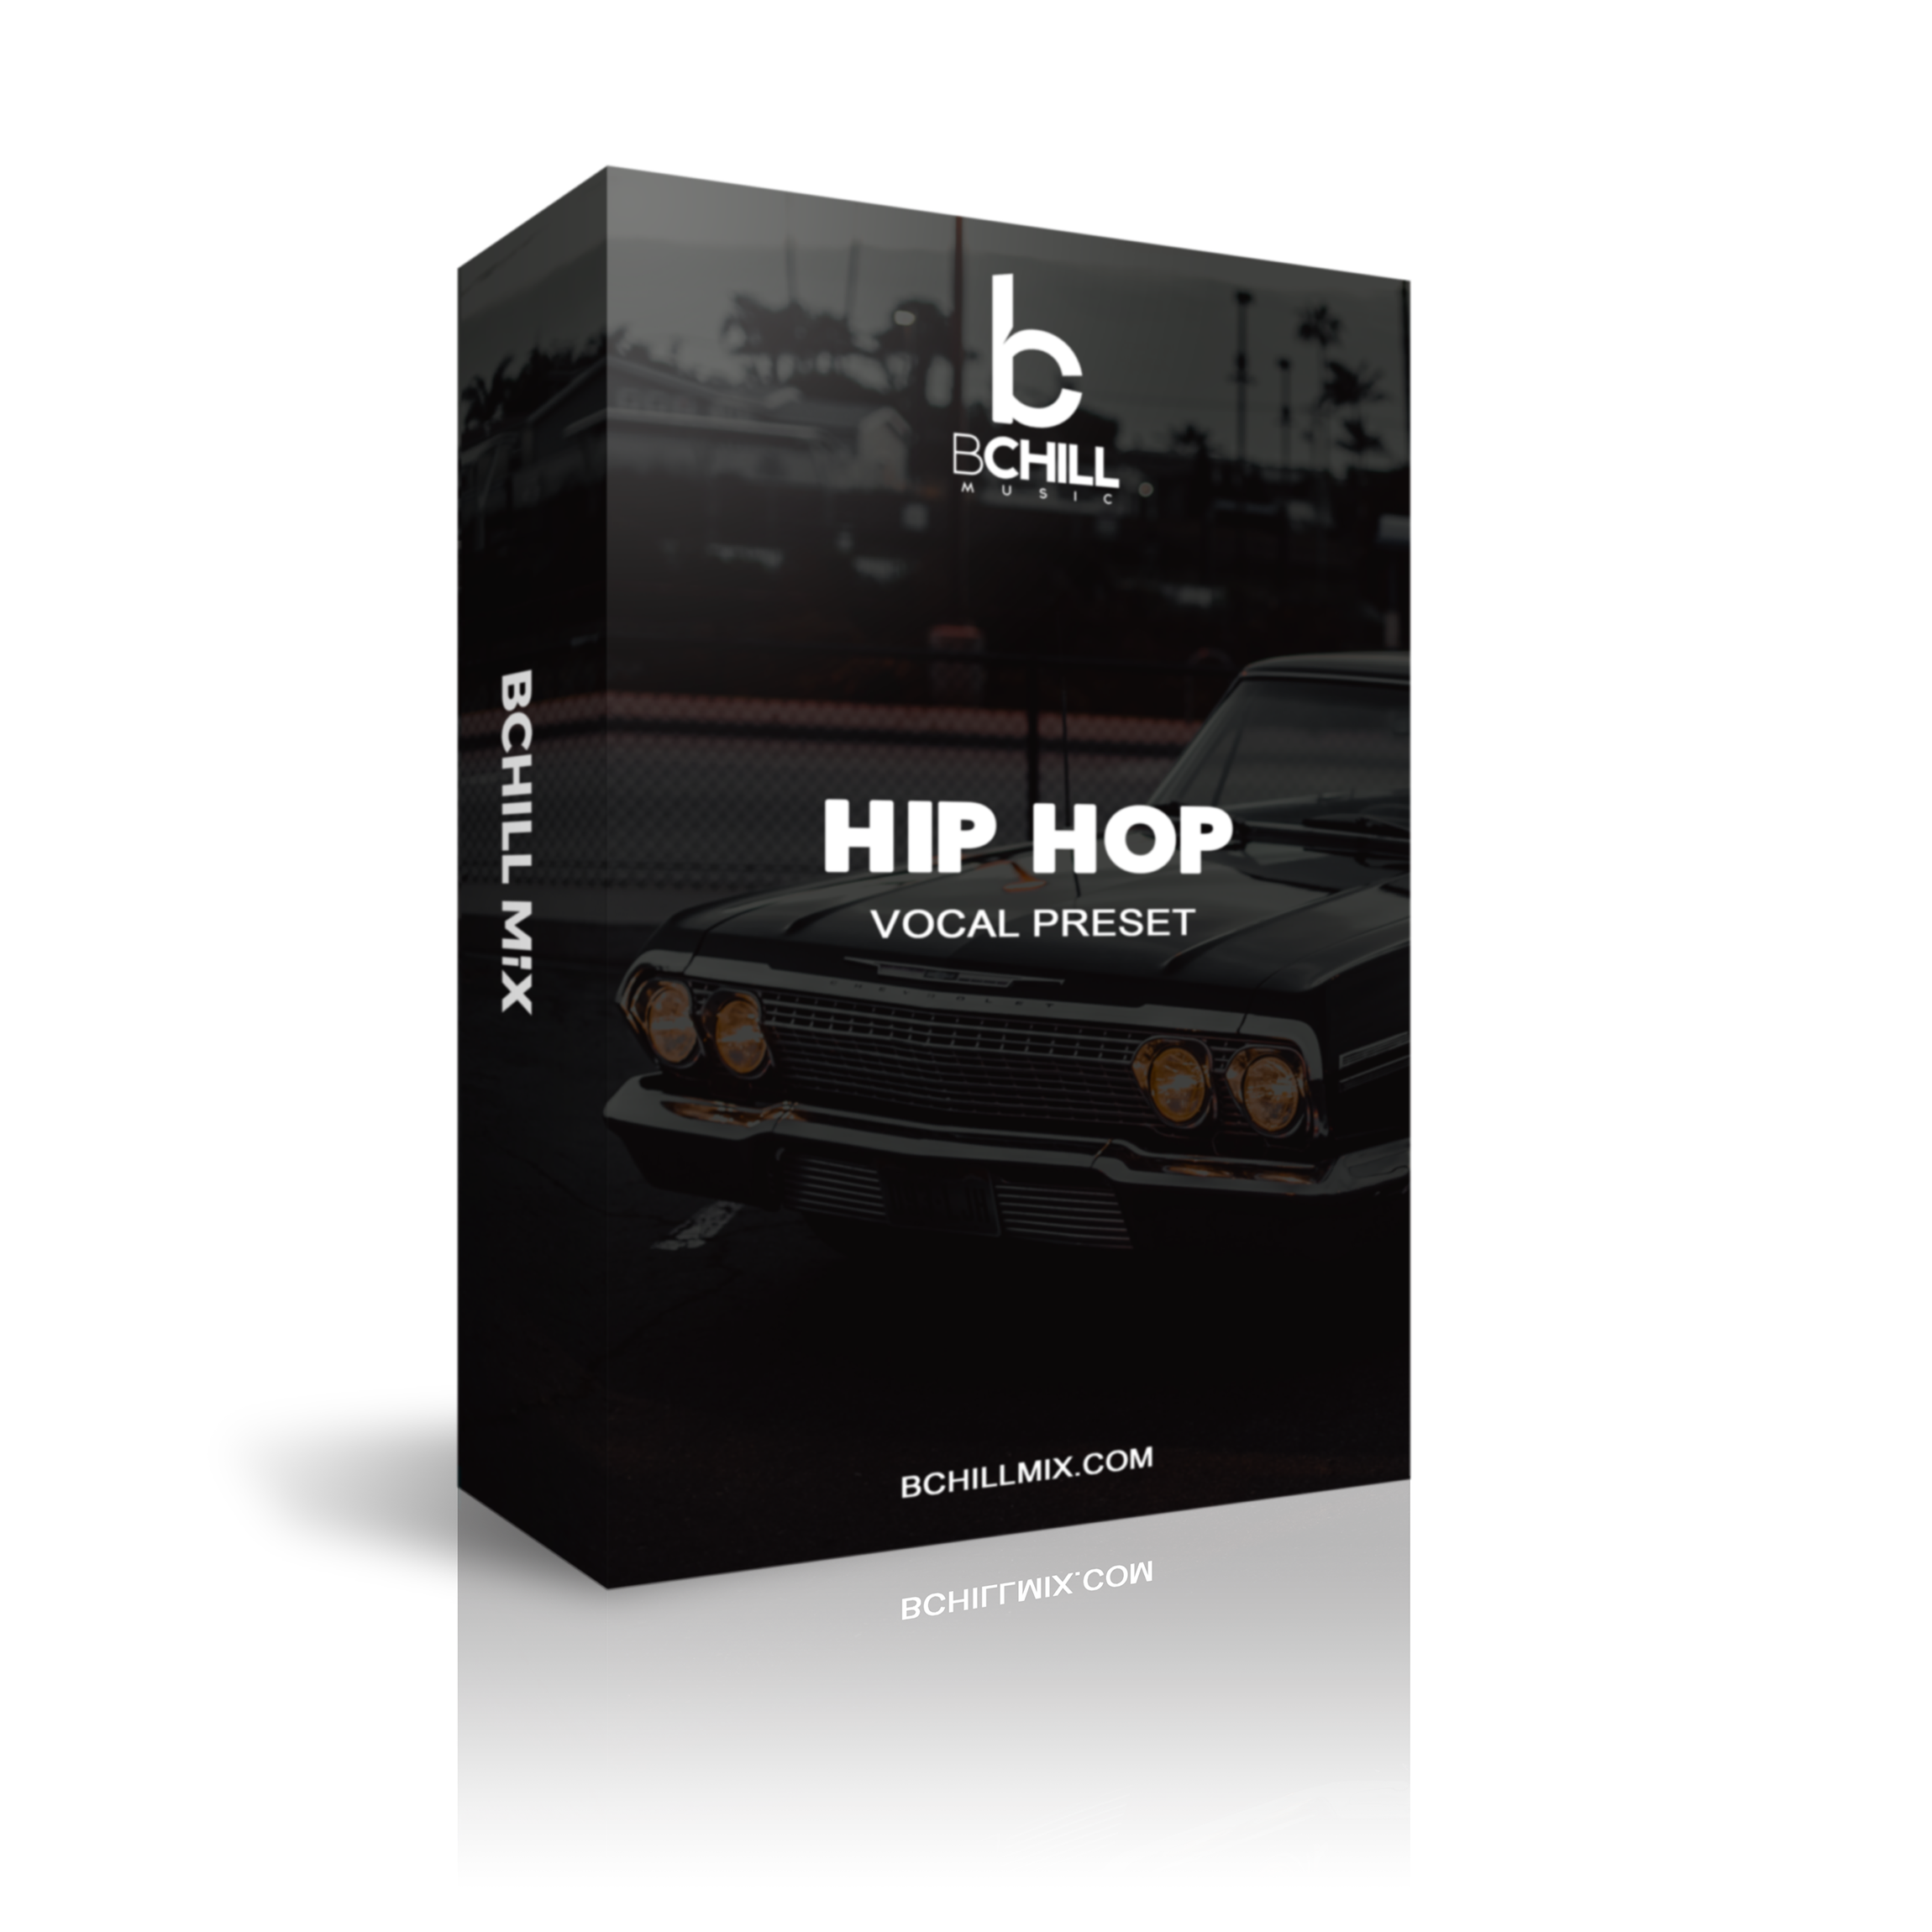
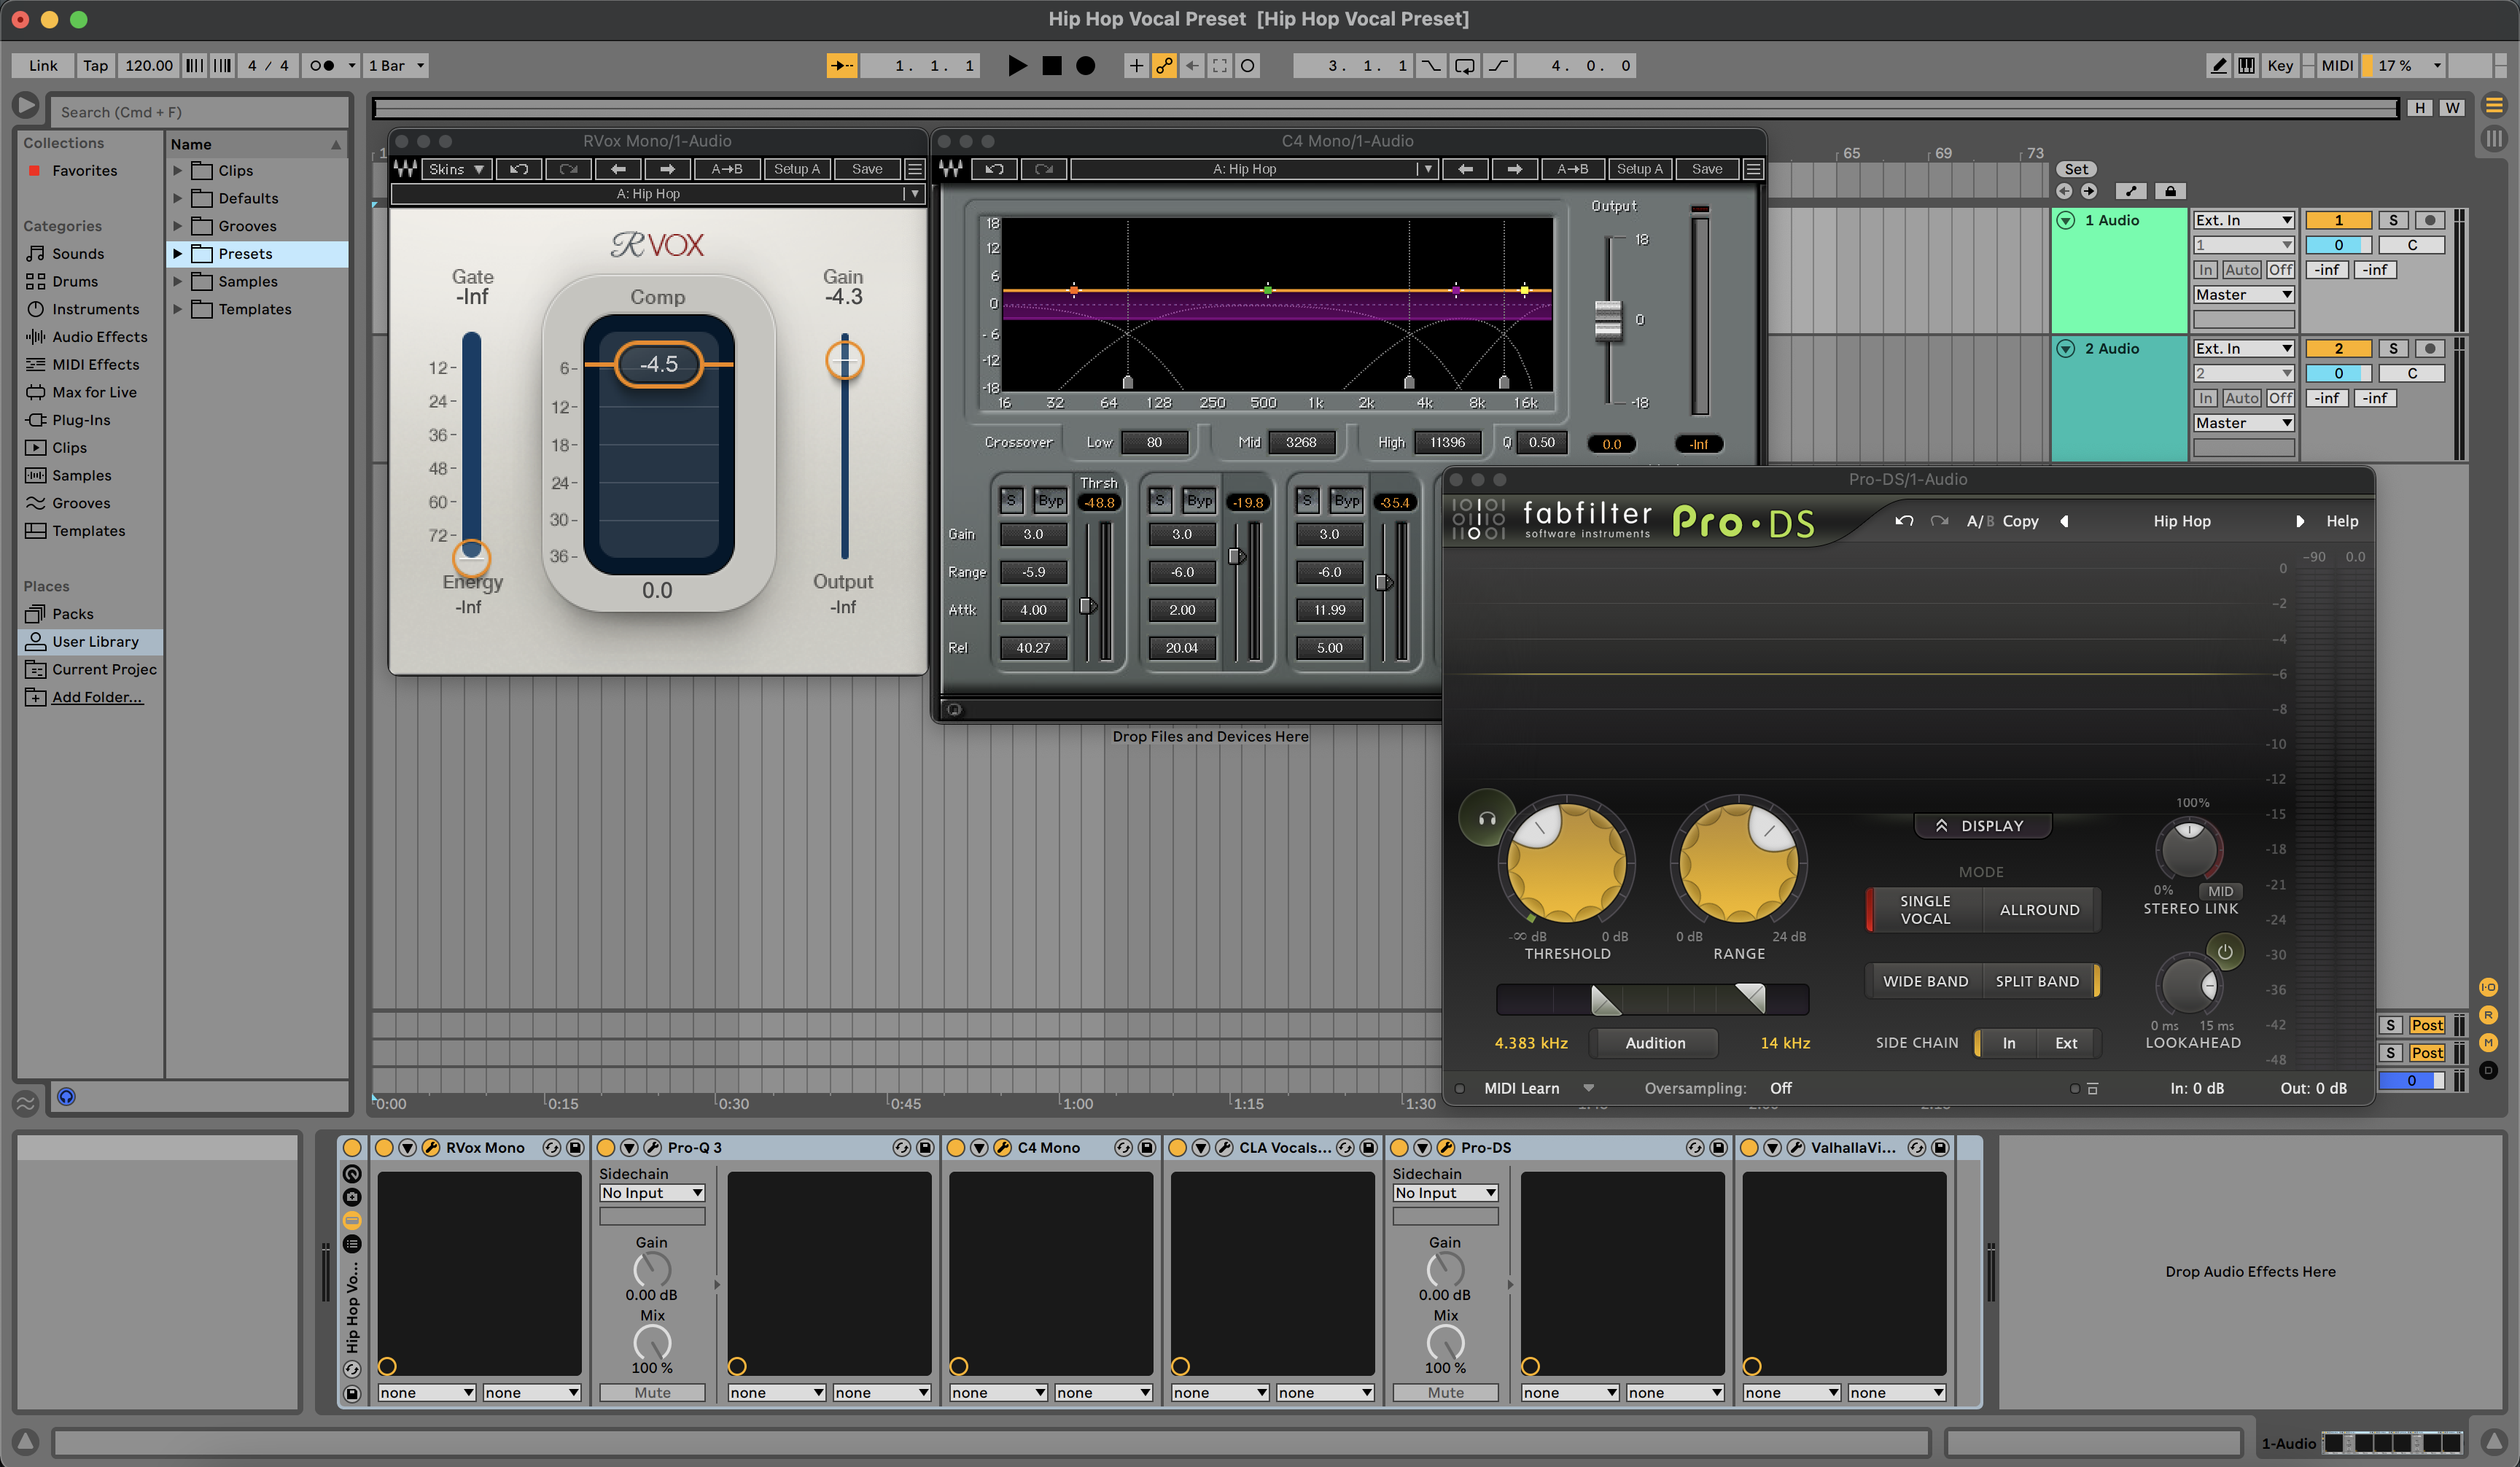
Type: Vocal Preset
Hip Hop Vocal Preset Ableton

Type: Vocal Preset
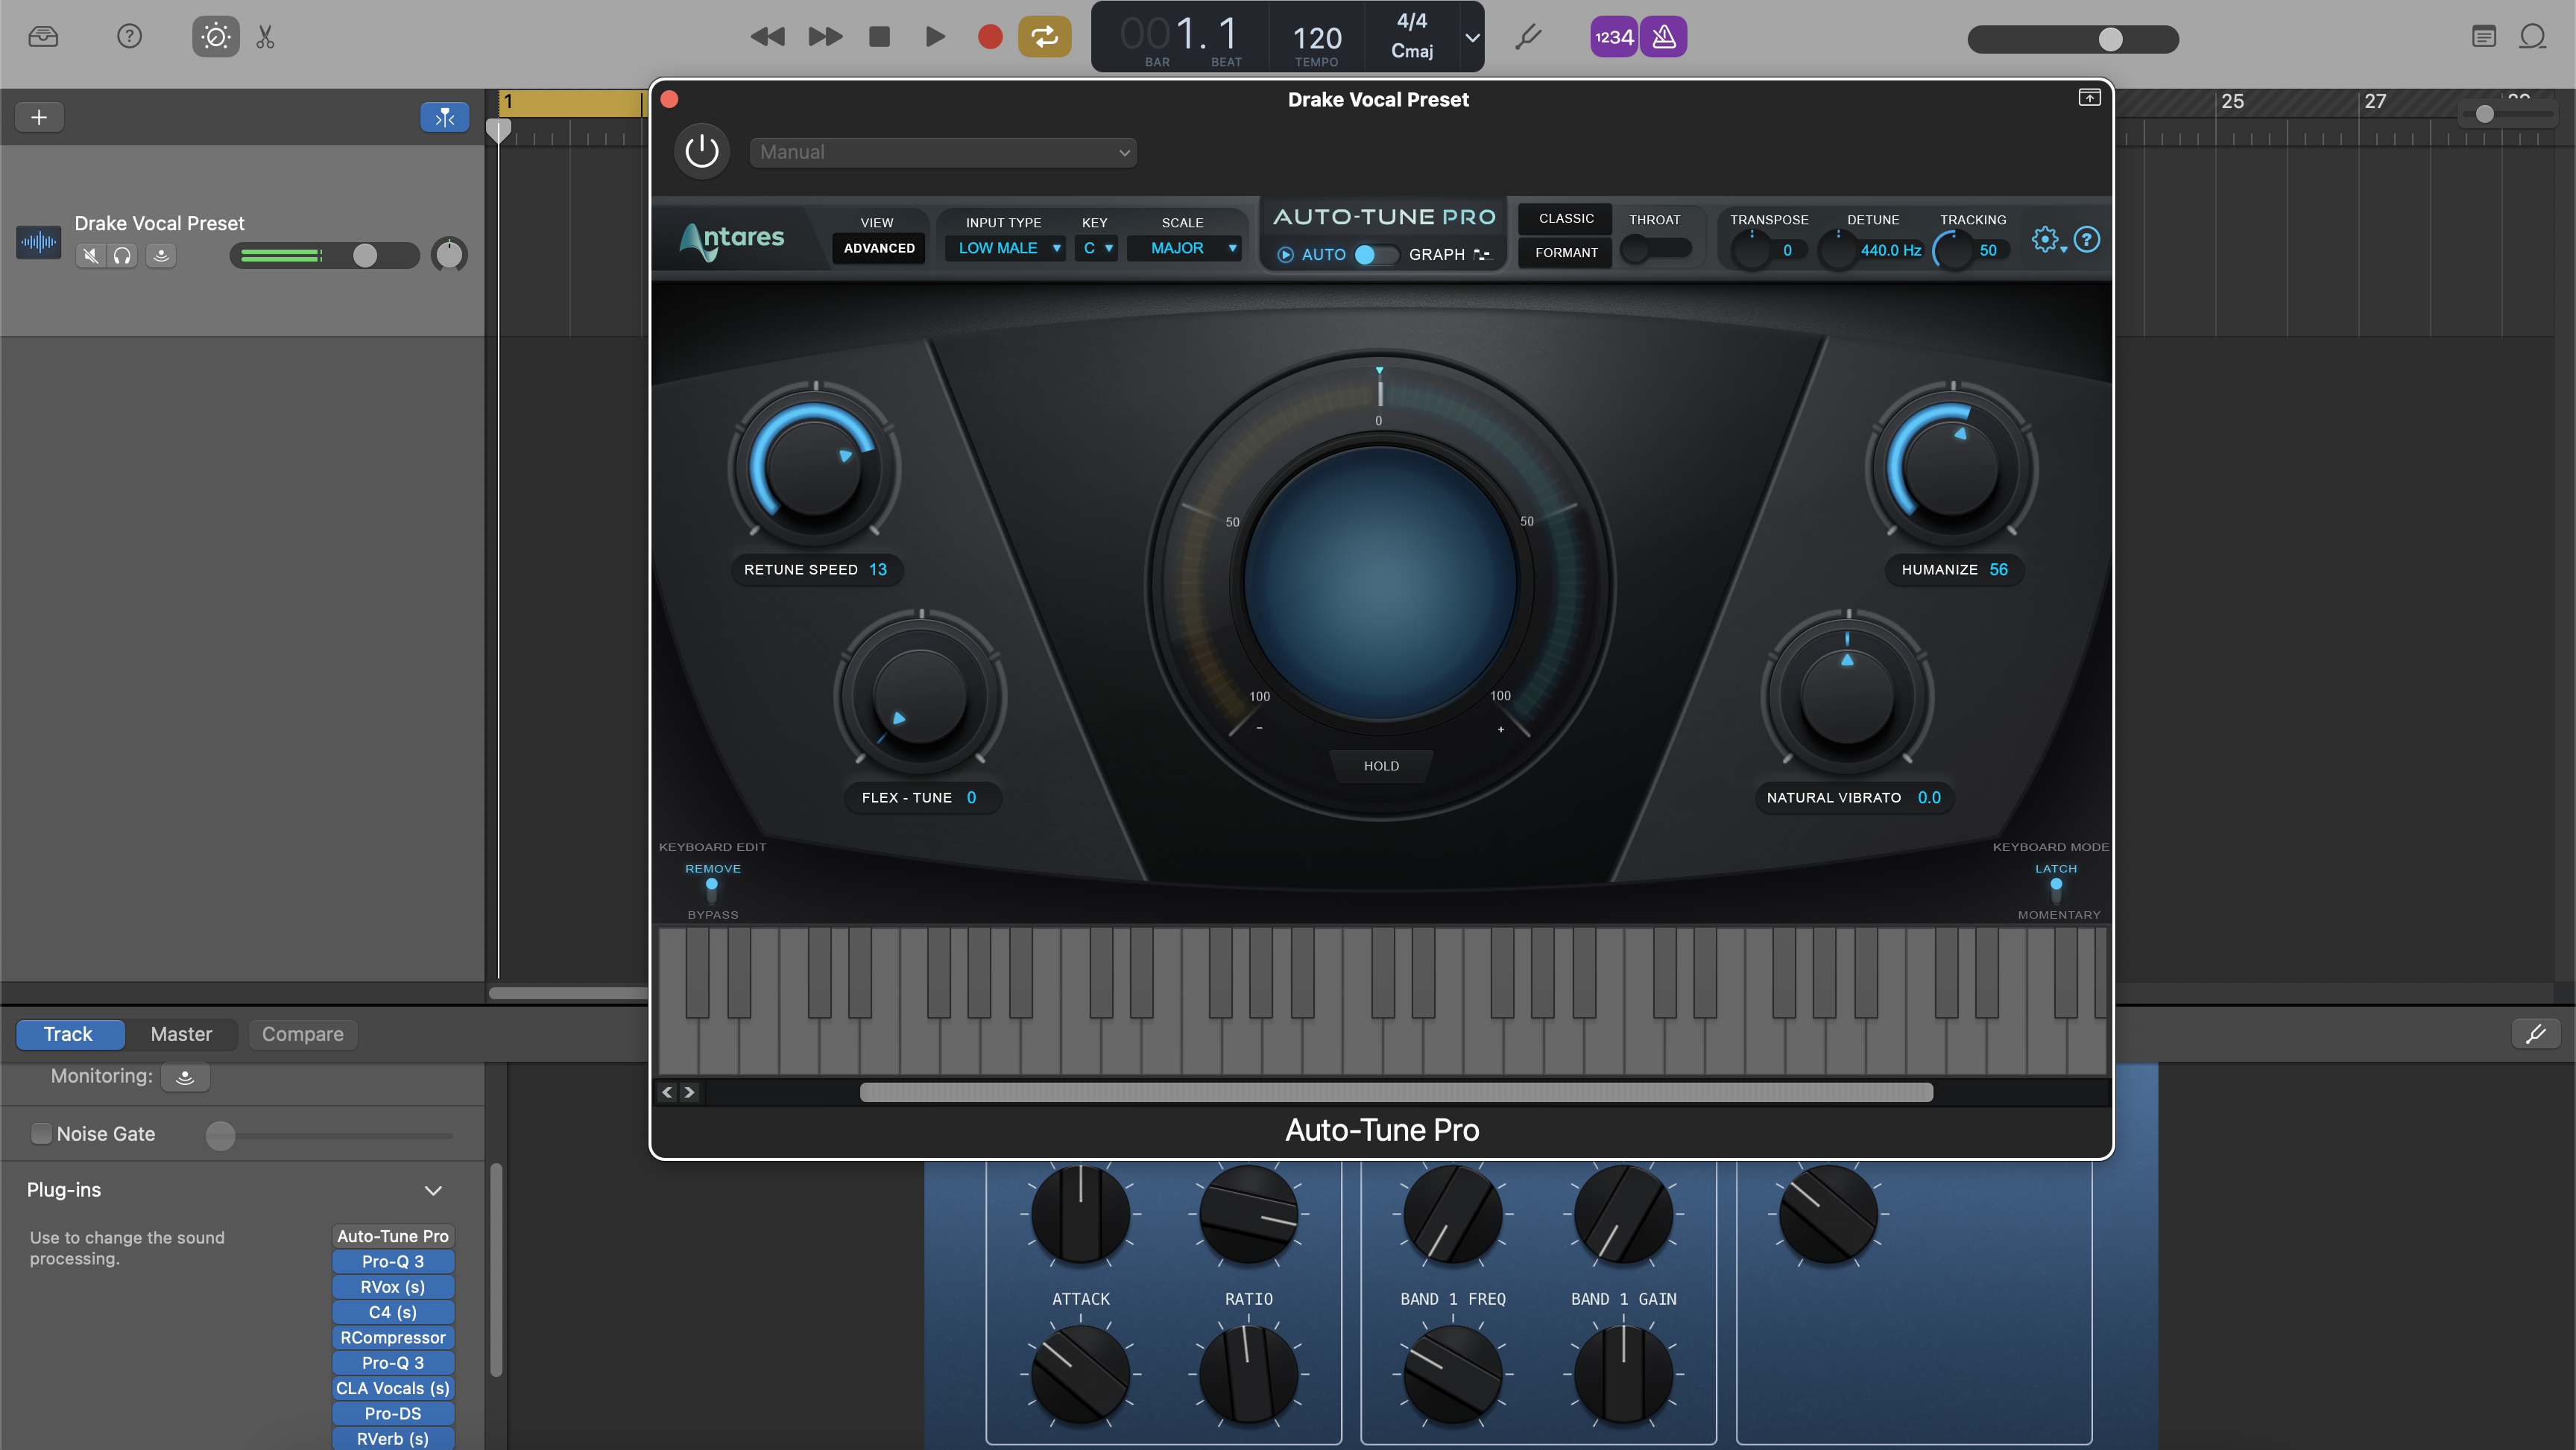
Drake Vocal Preset GarageBand

Type: Vocal Preset
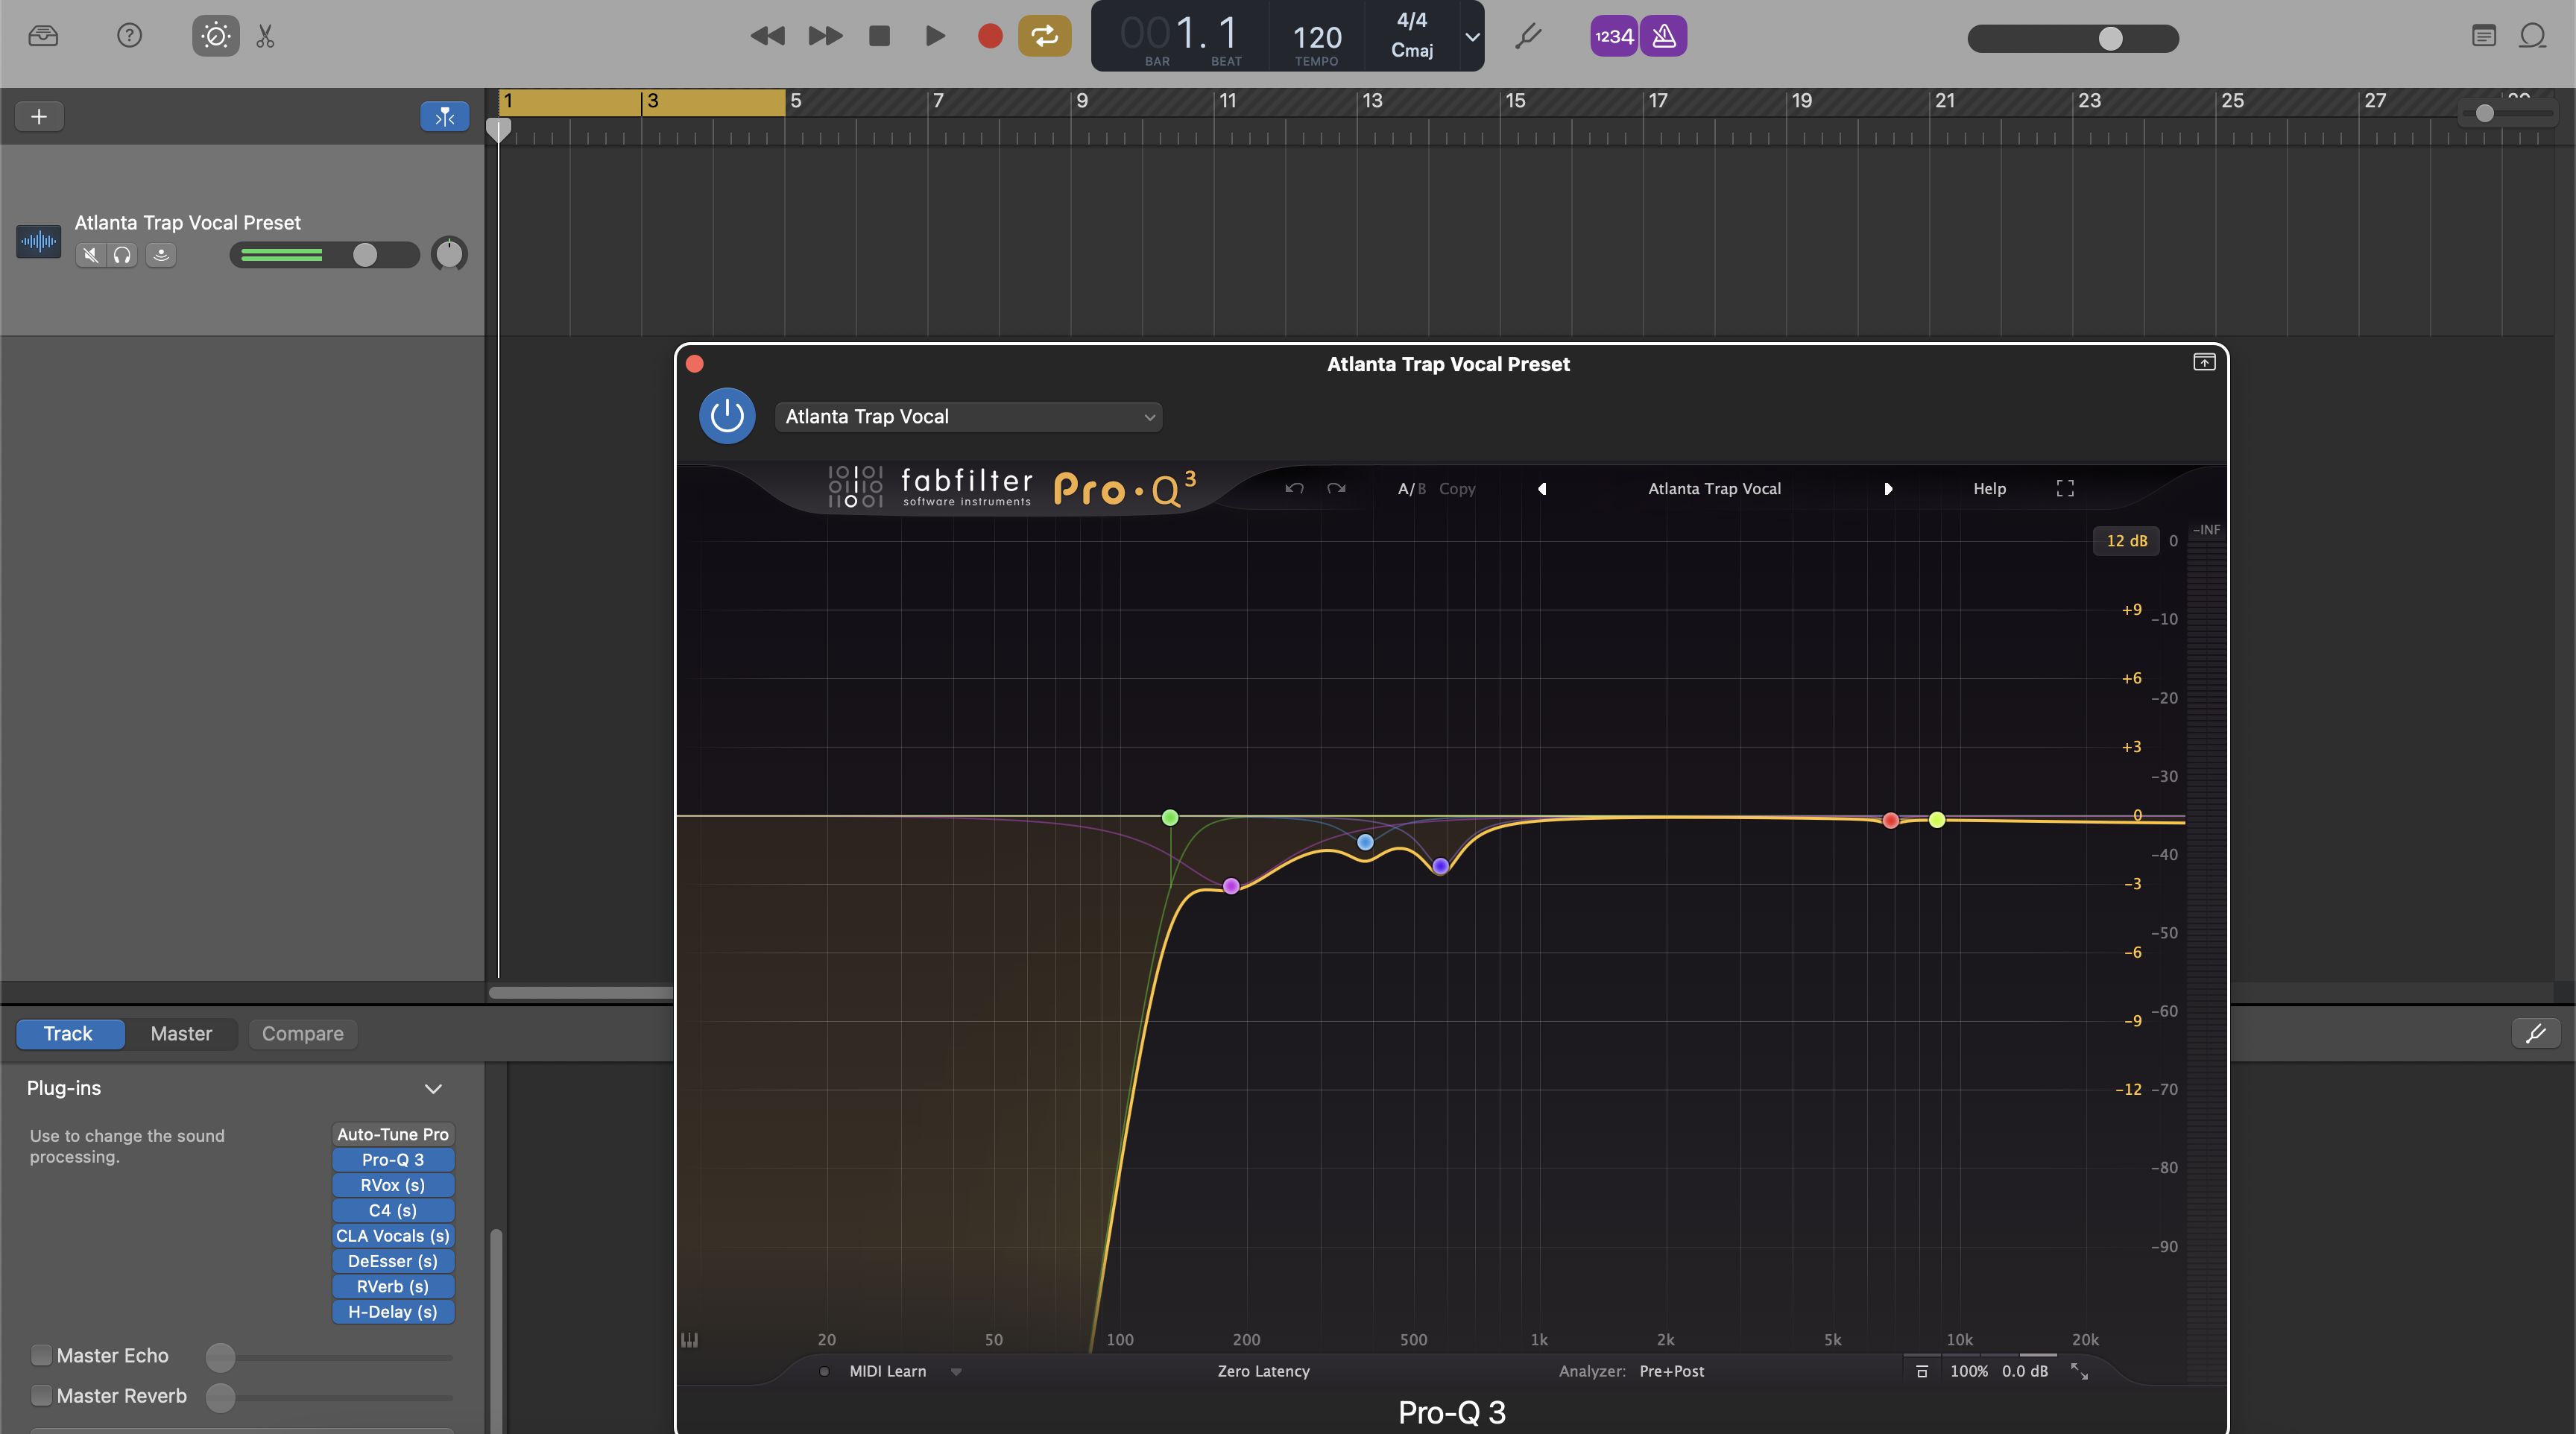
Atlanta Trap Vocal Preset GarageBand | Atlanta Trap Vocal Chain
Type: Vocal Preset
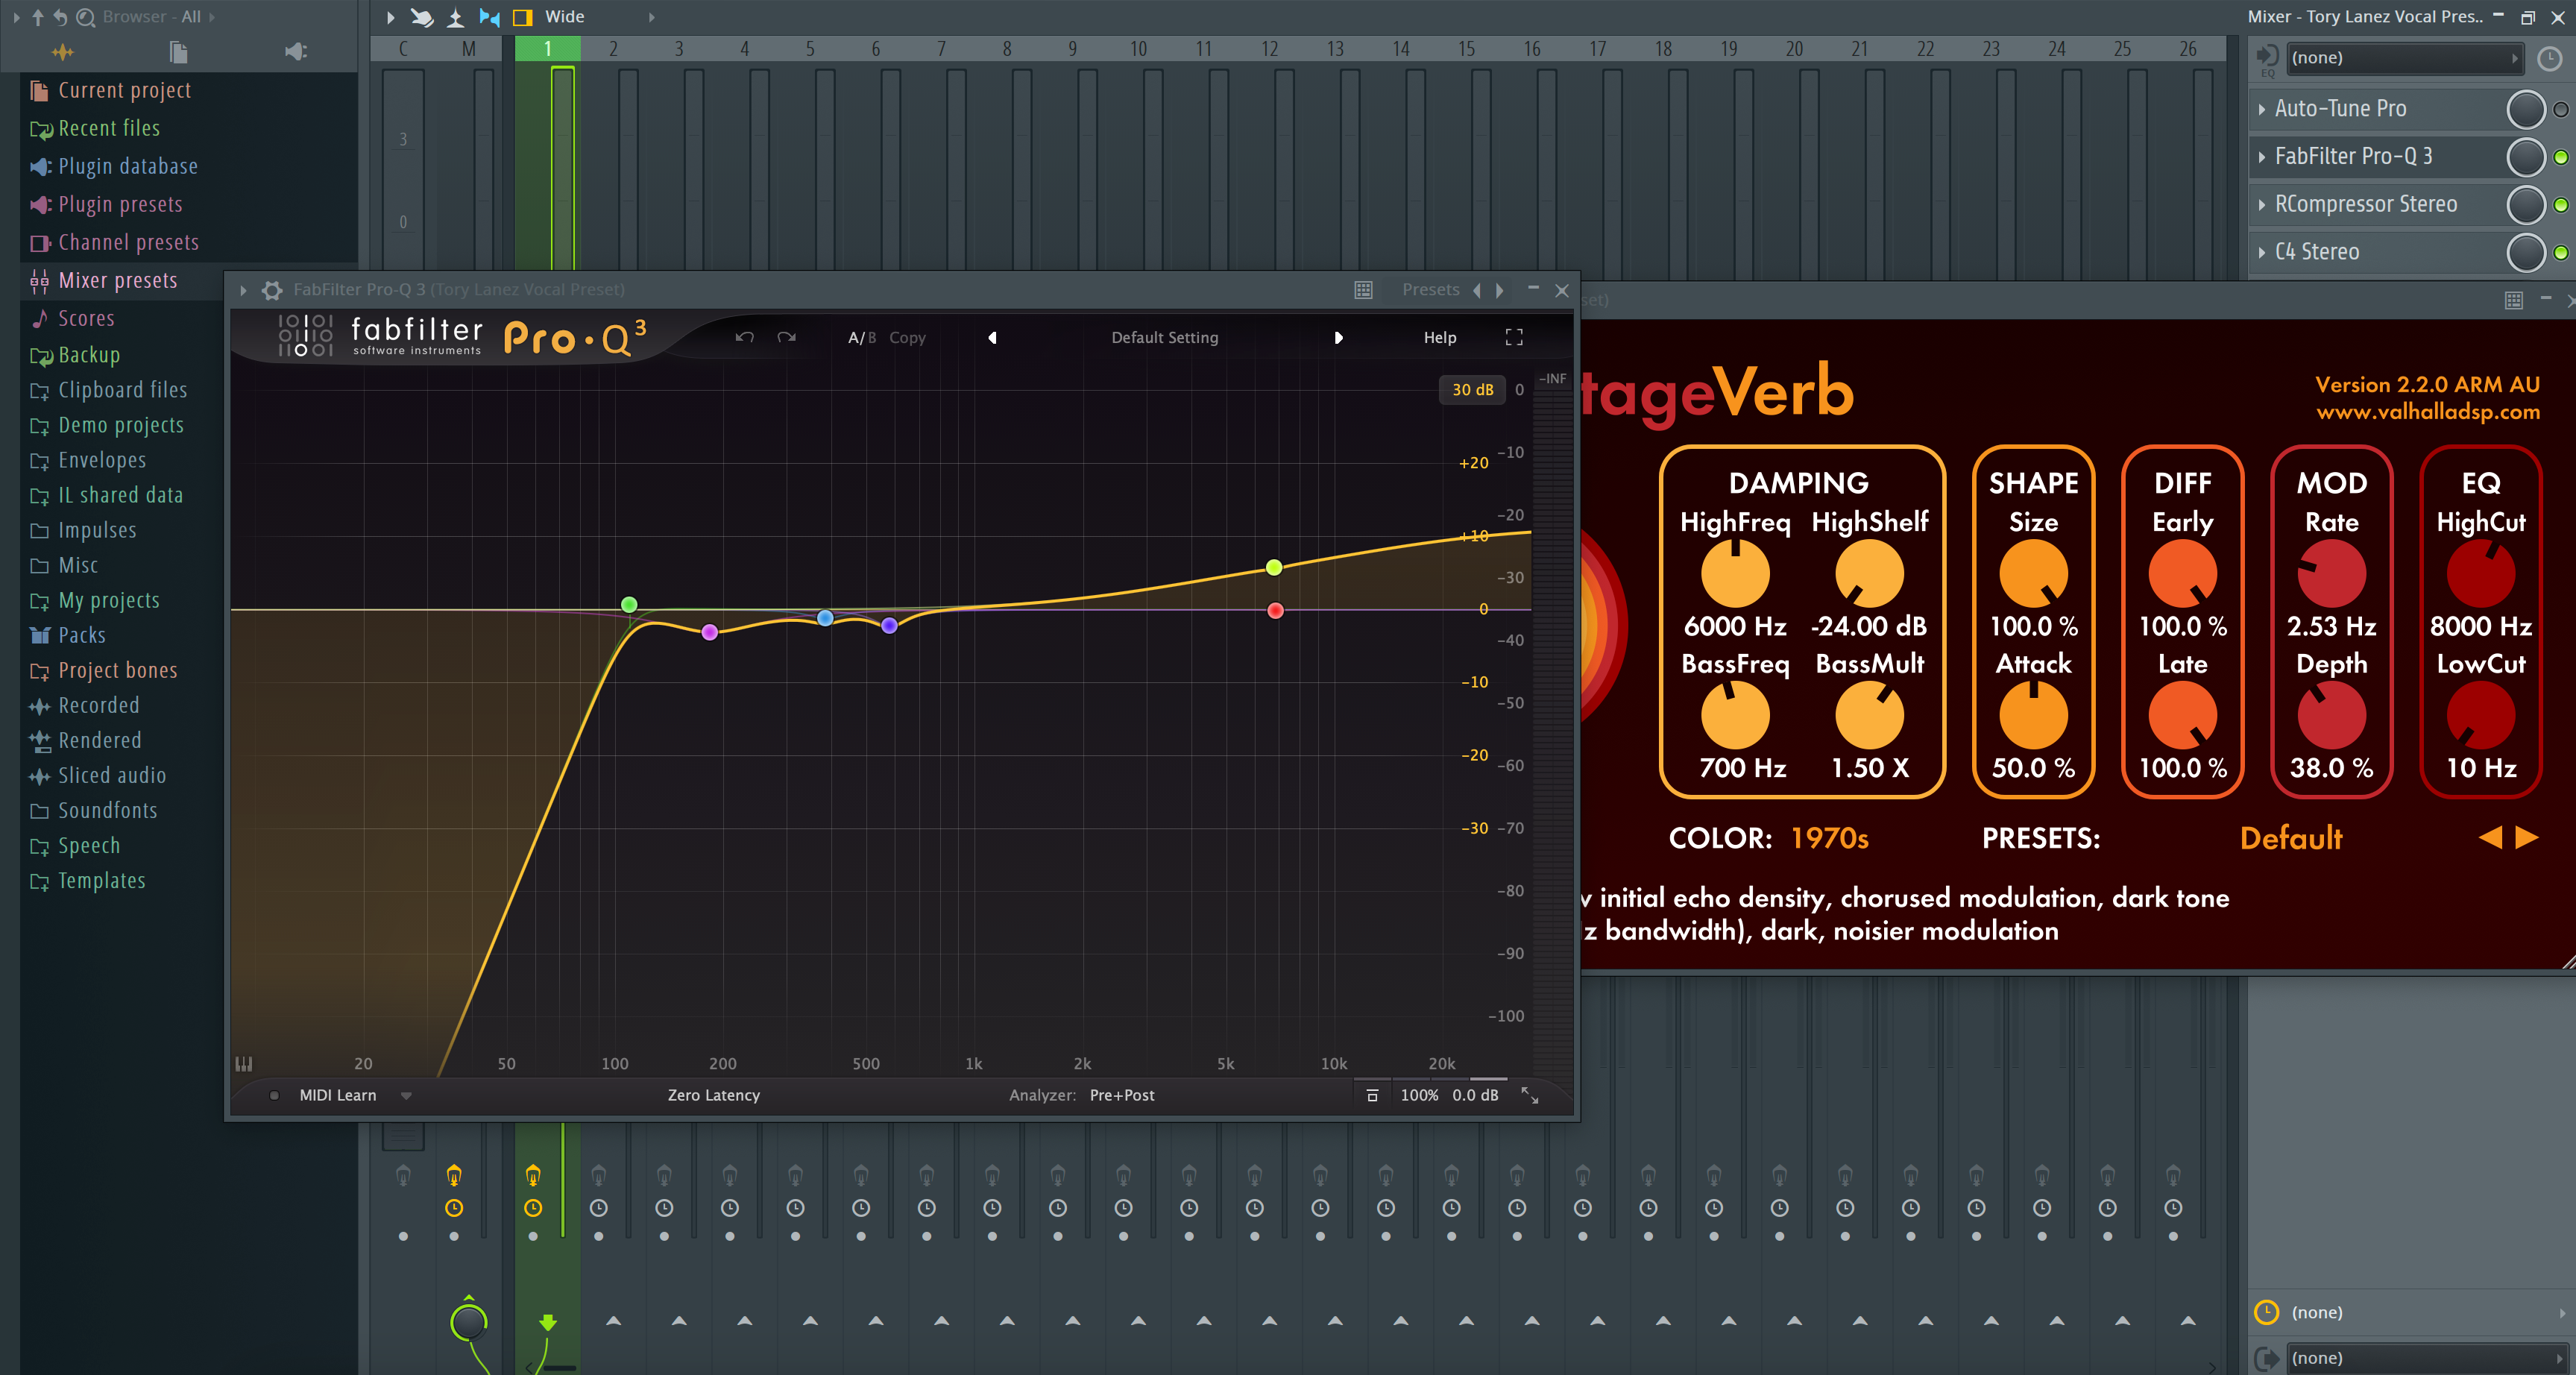
Tory Lanez FL Studio Vocal Preset
Type: Vocal Preset
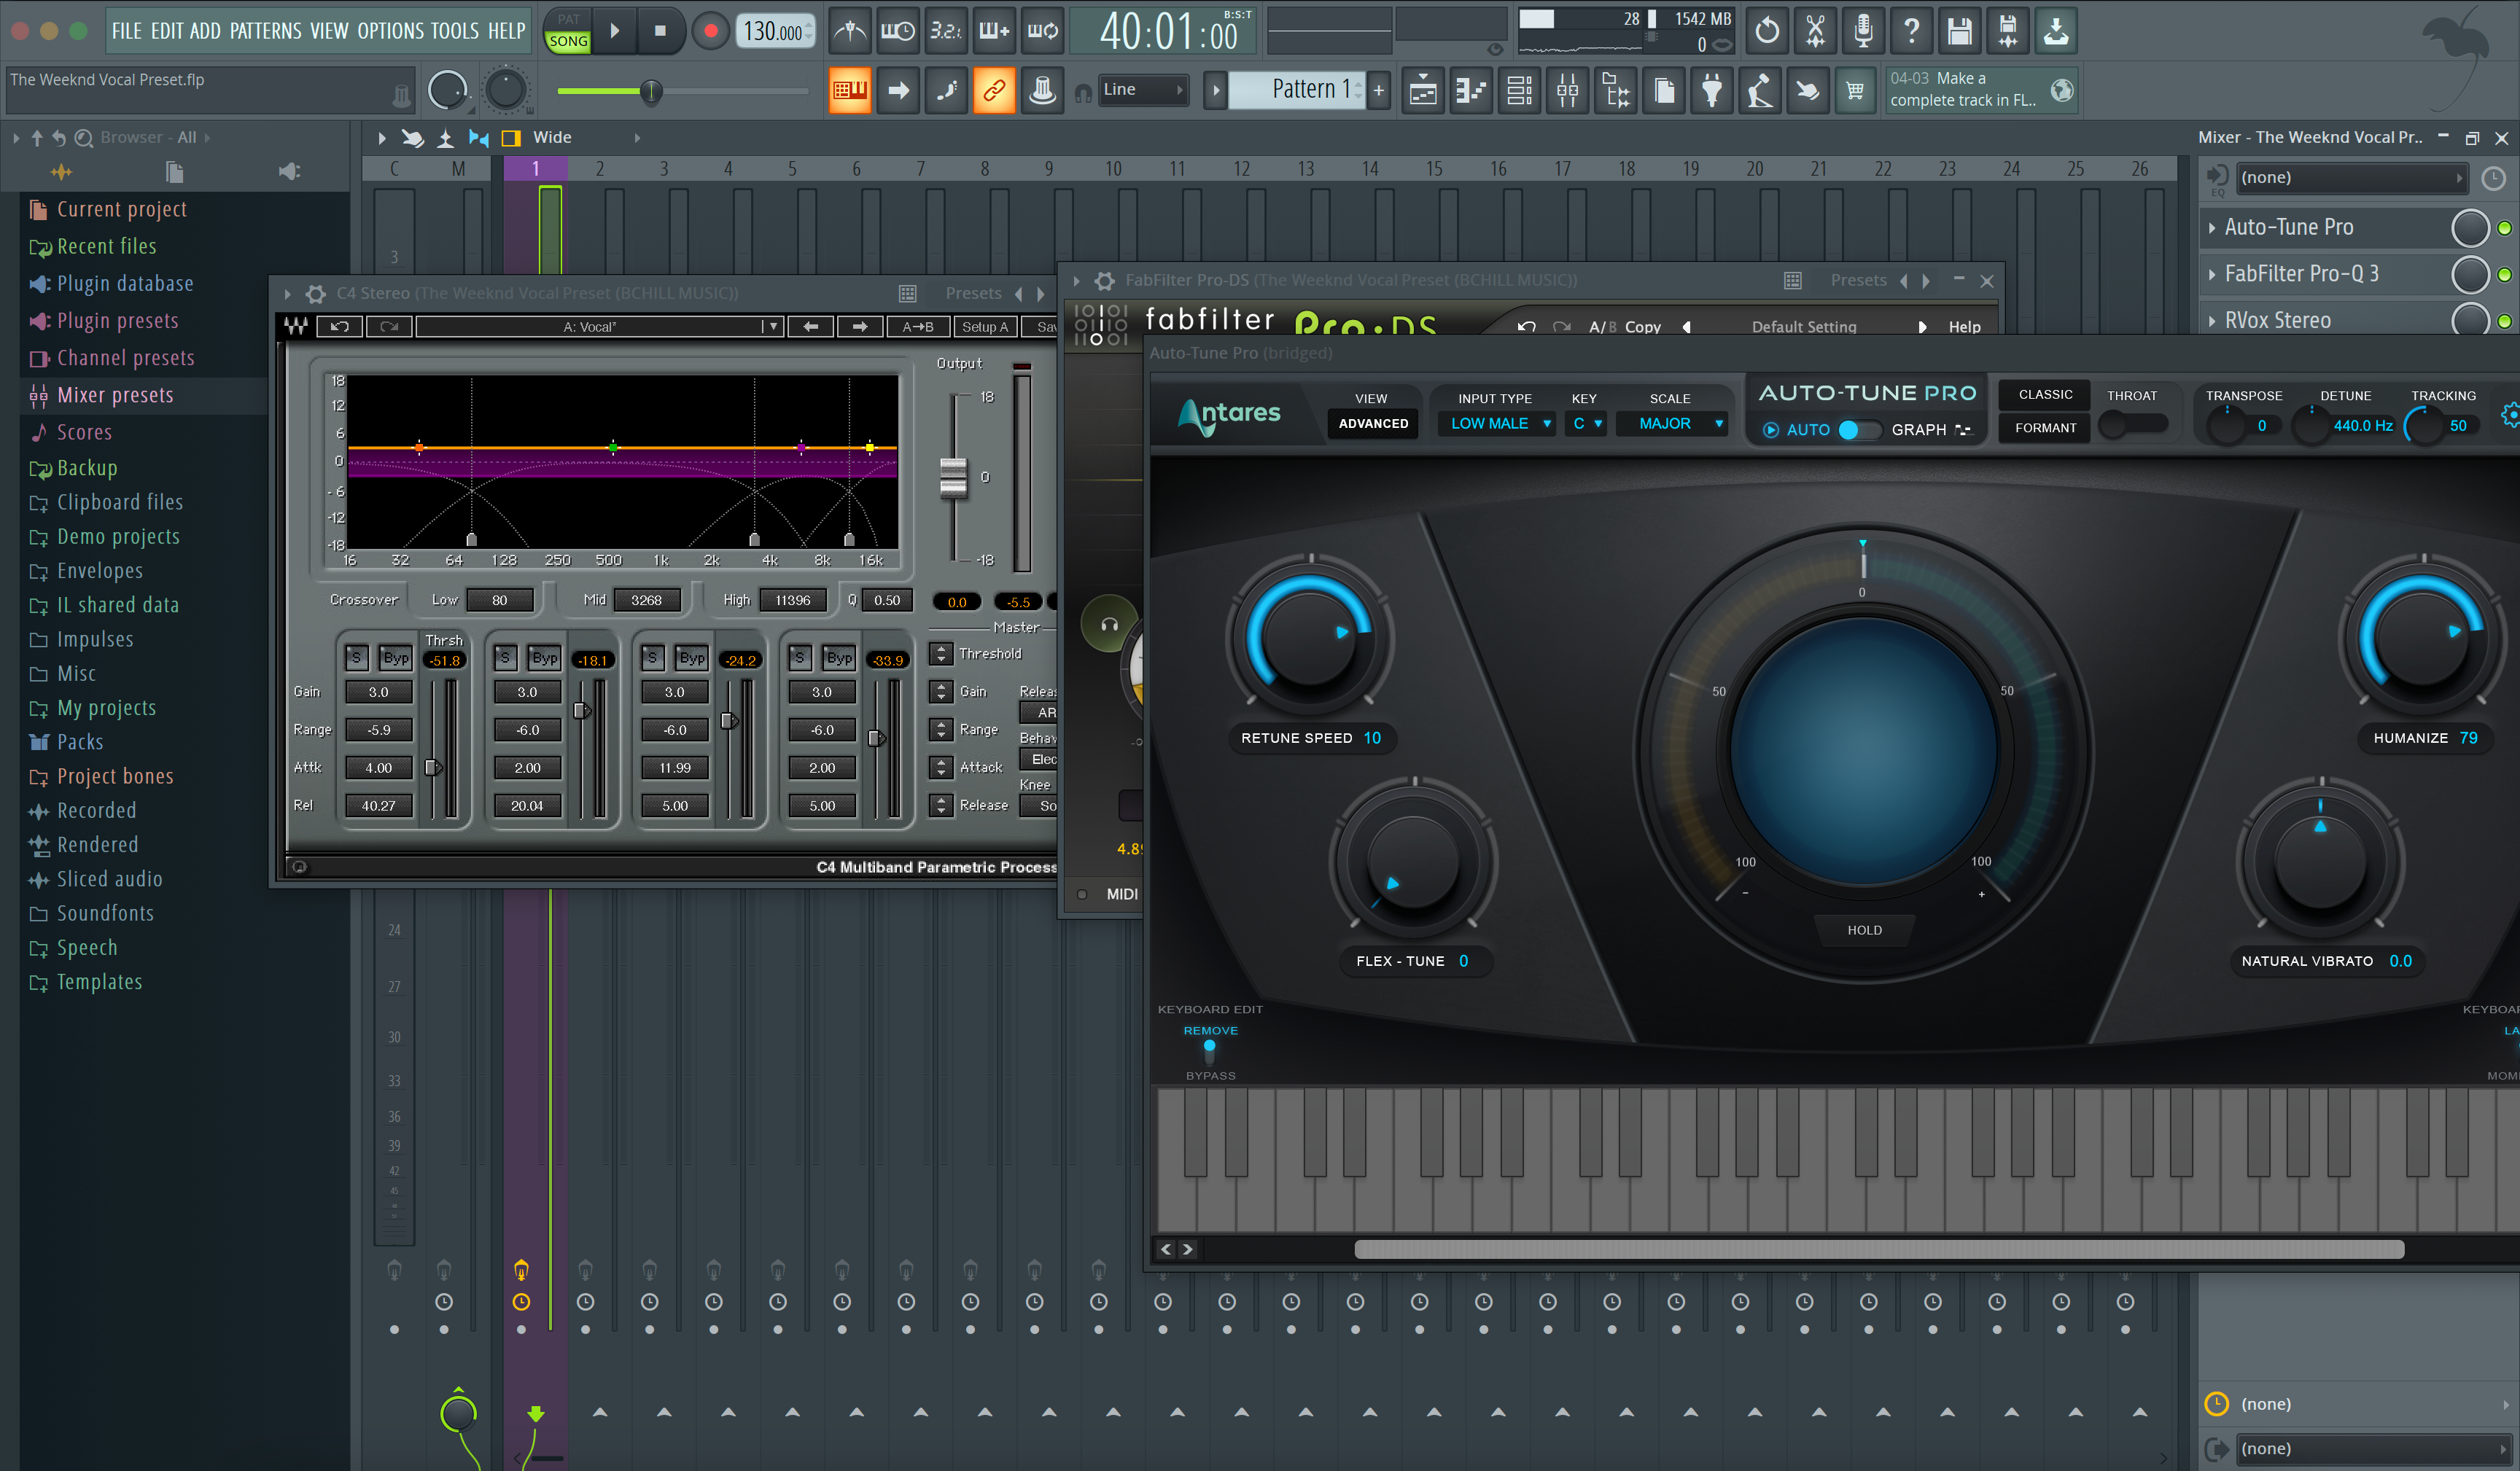
The Weeknd FL Studio Vocal Preset
Type: Vocal Preset
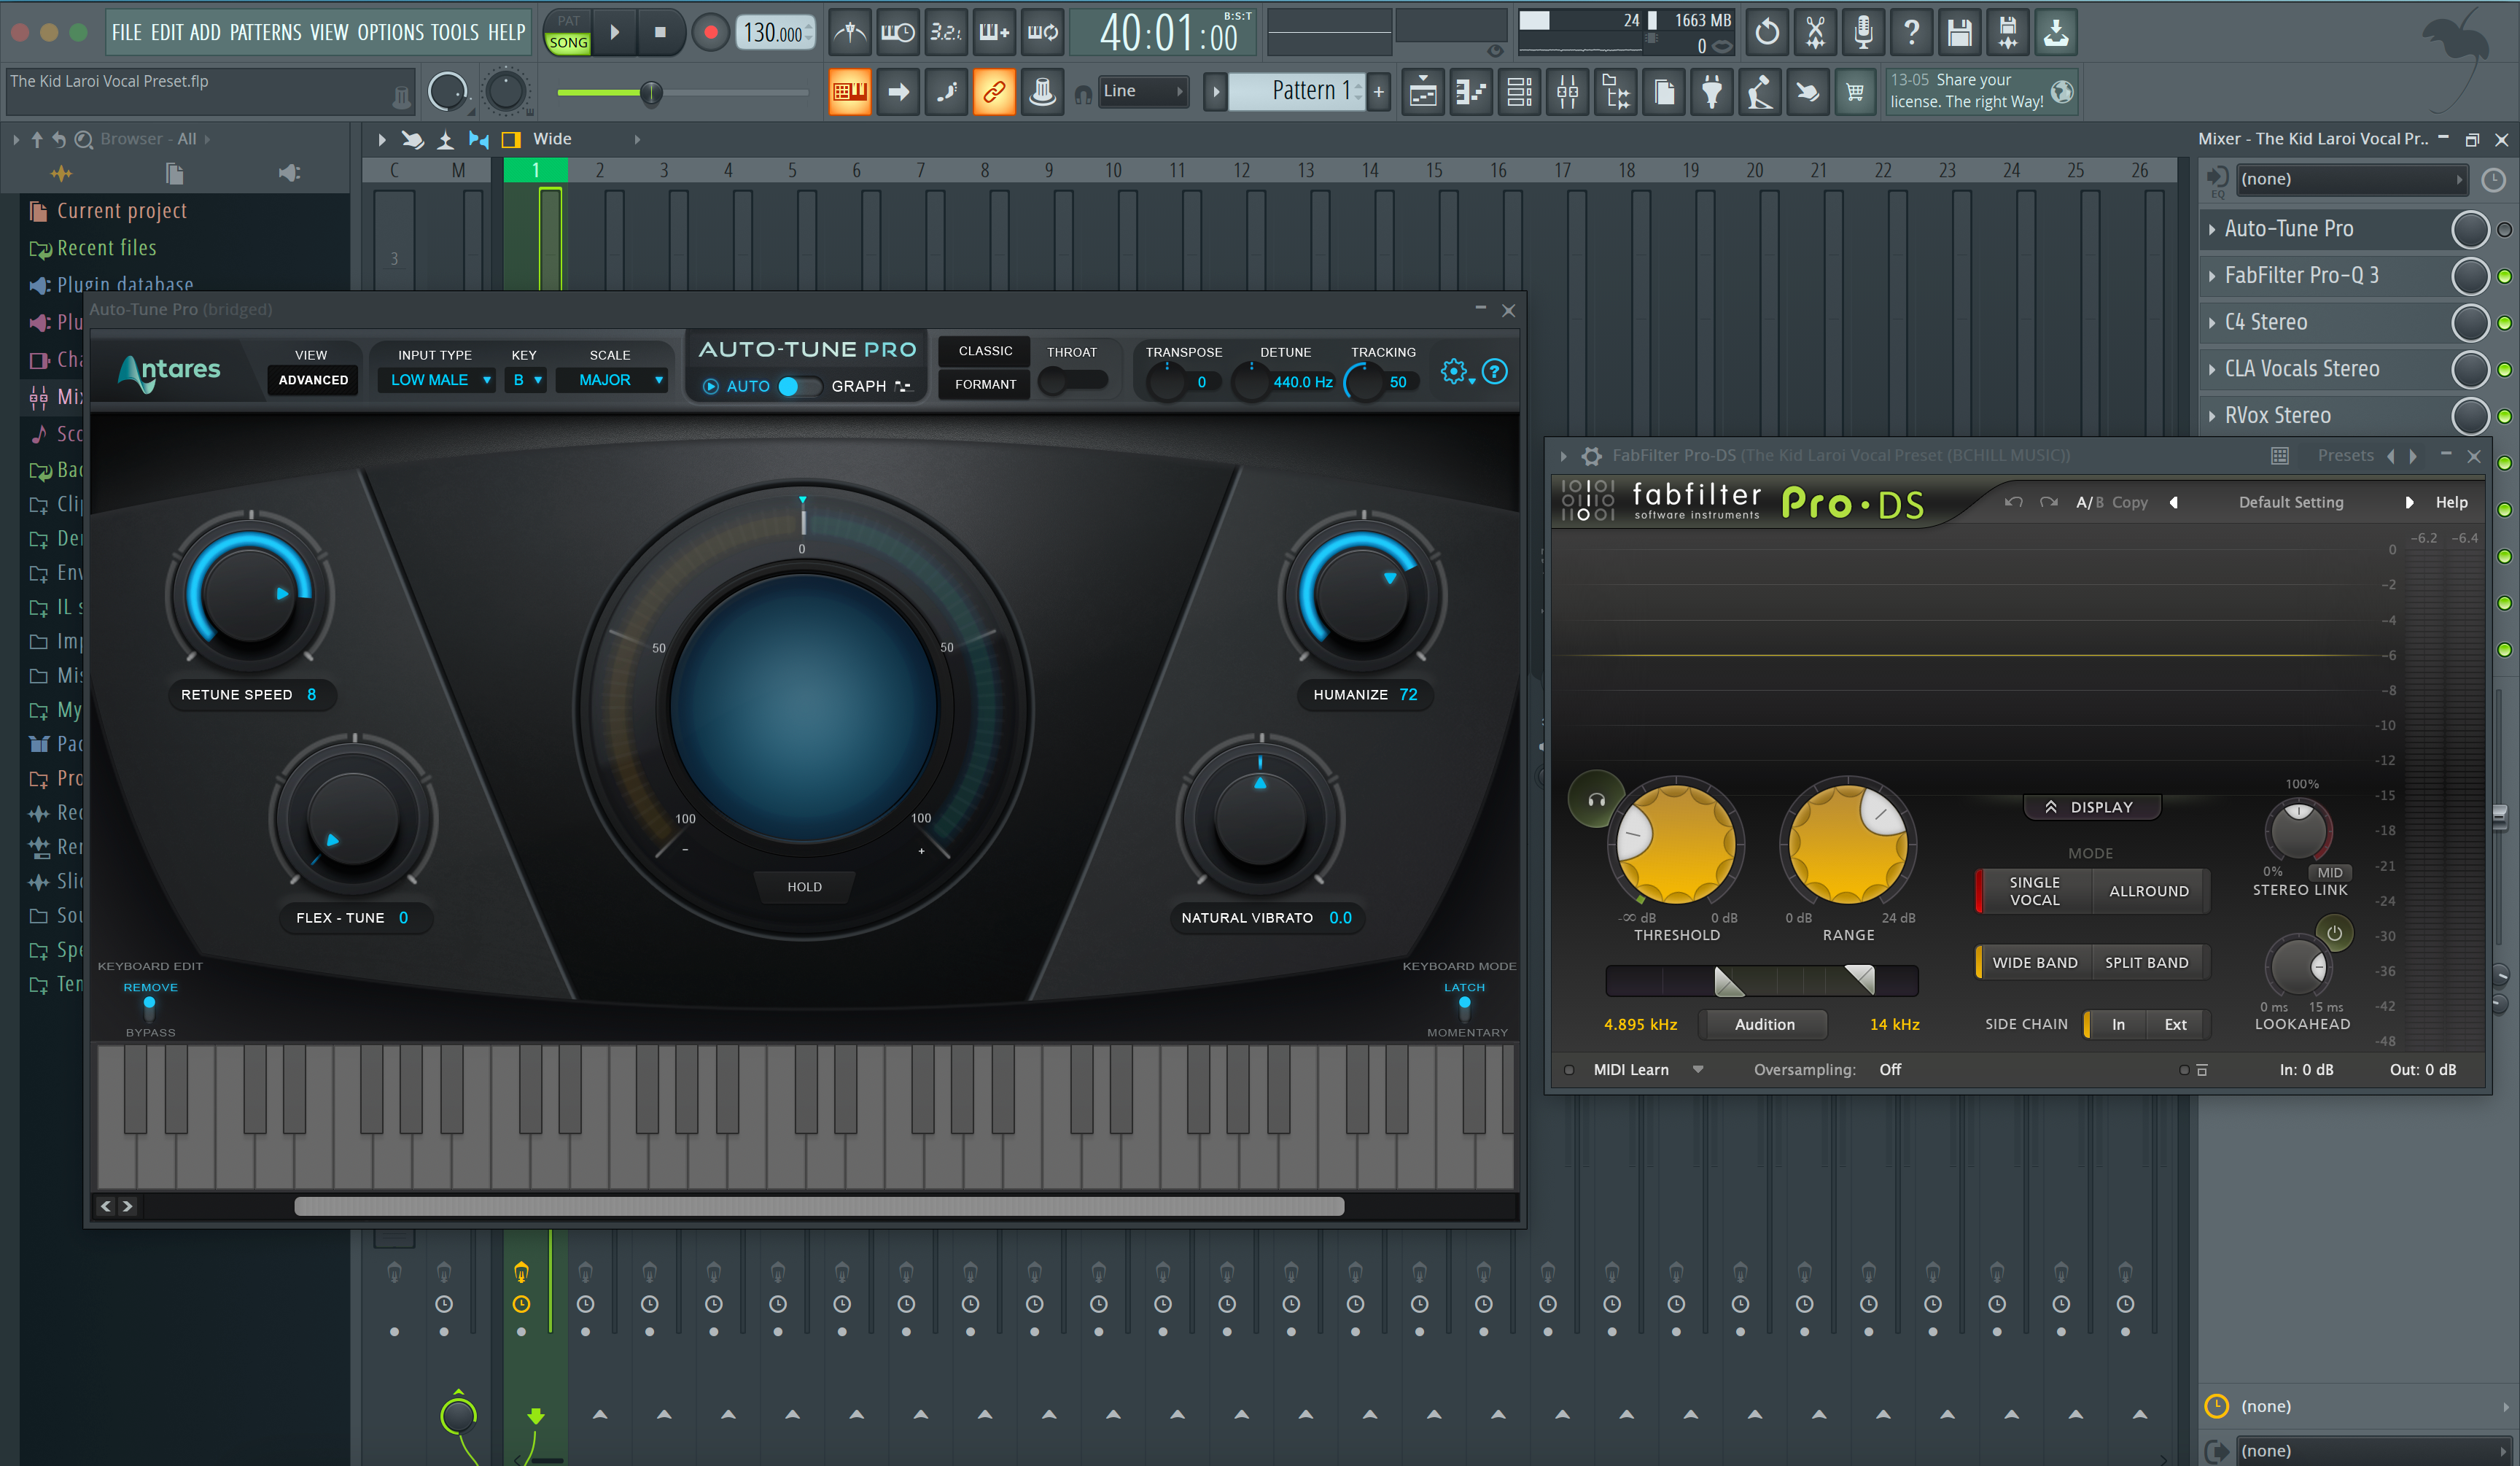
The Kid Laroi FL Studio Vocal Preset

Type: Vocal Preset
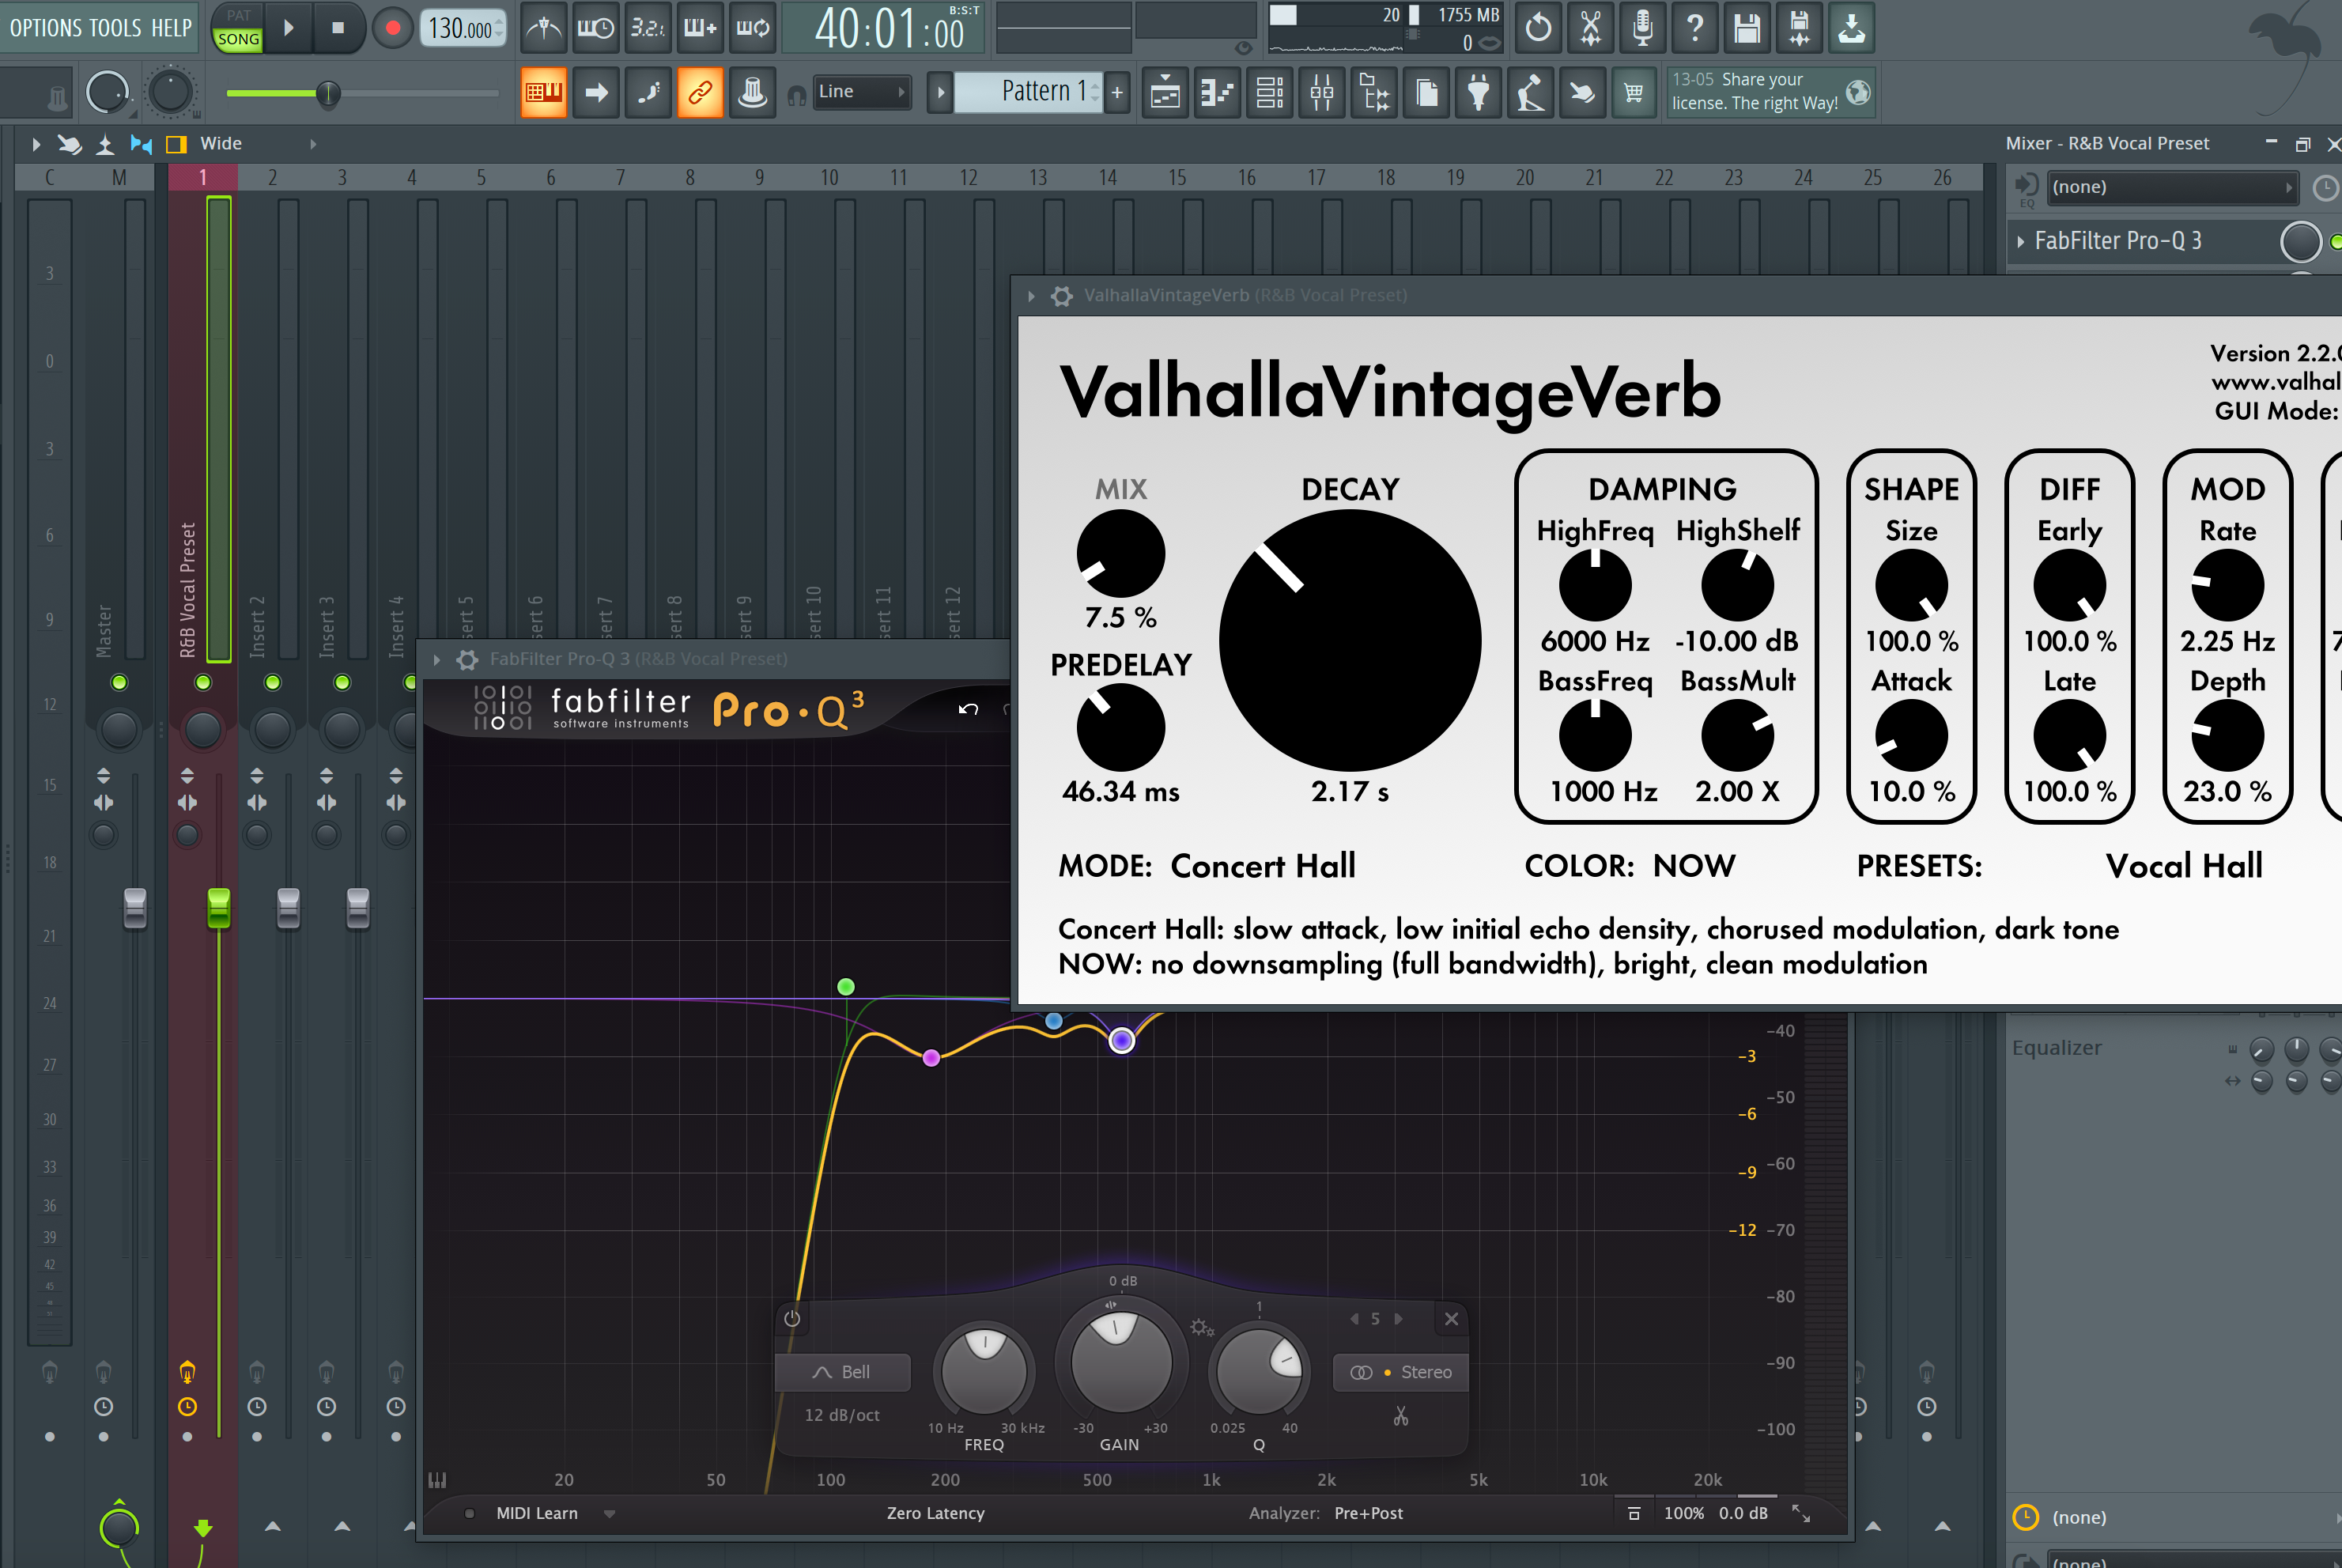
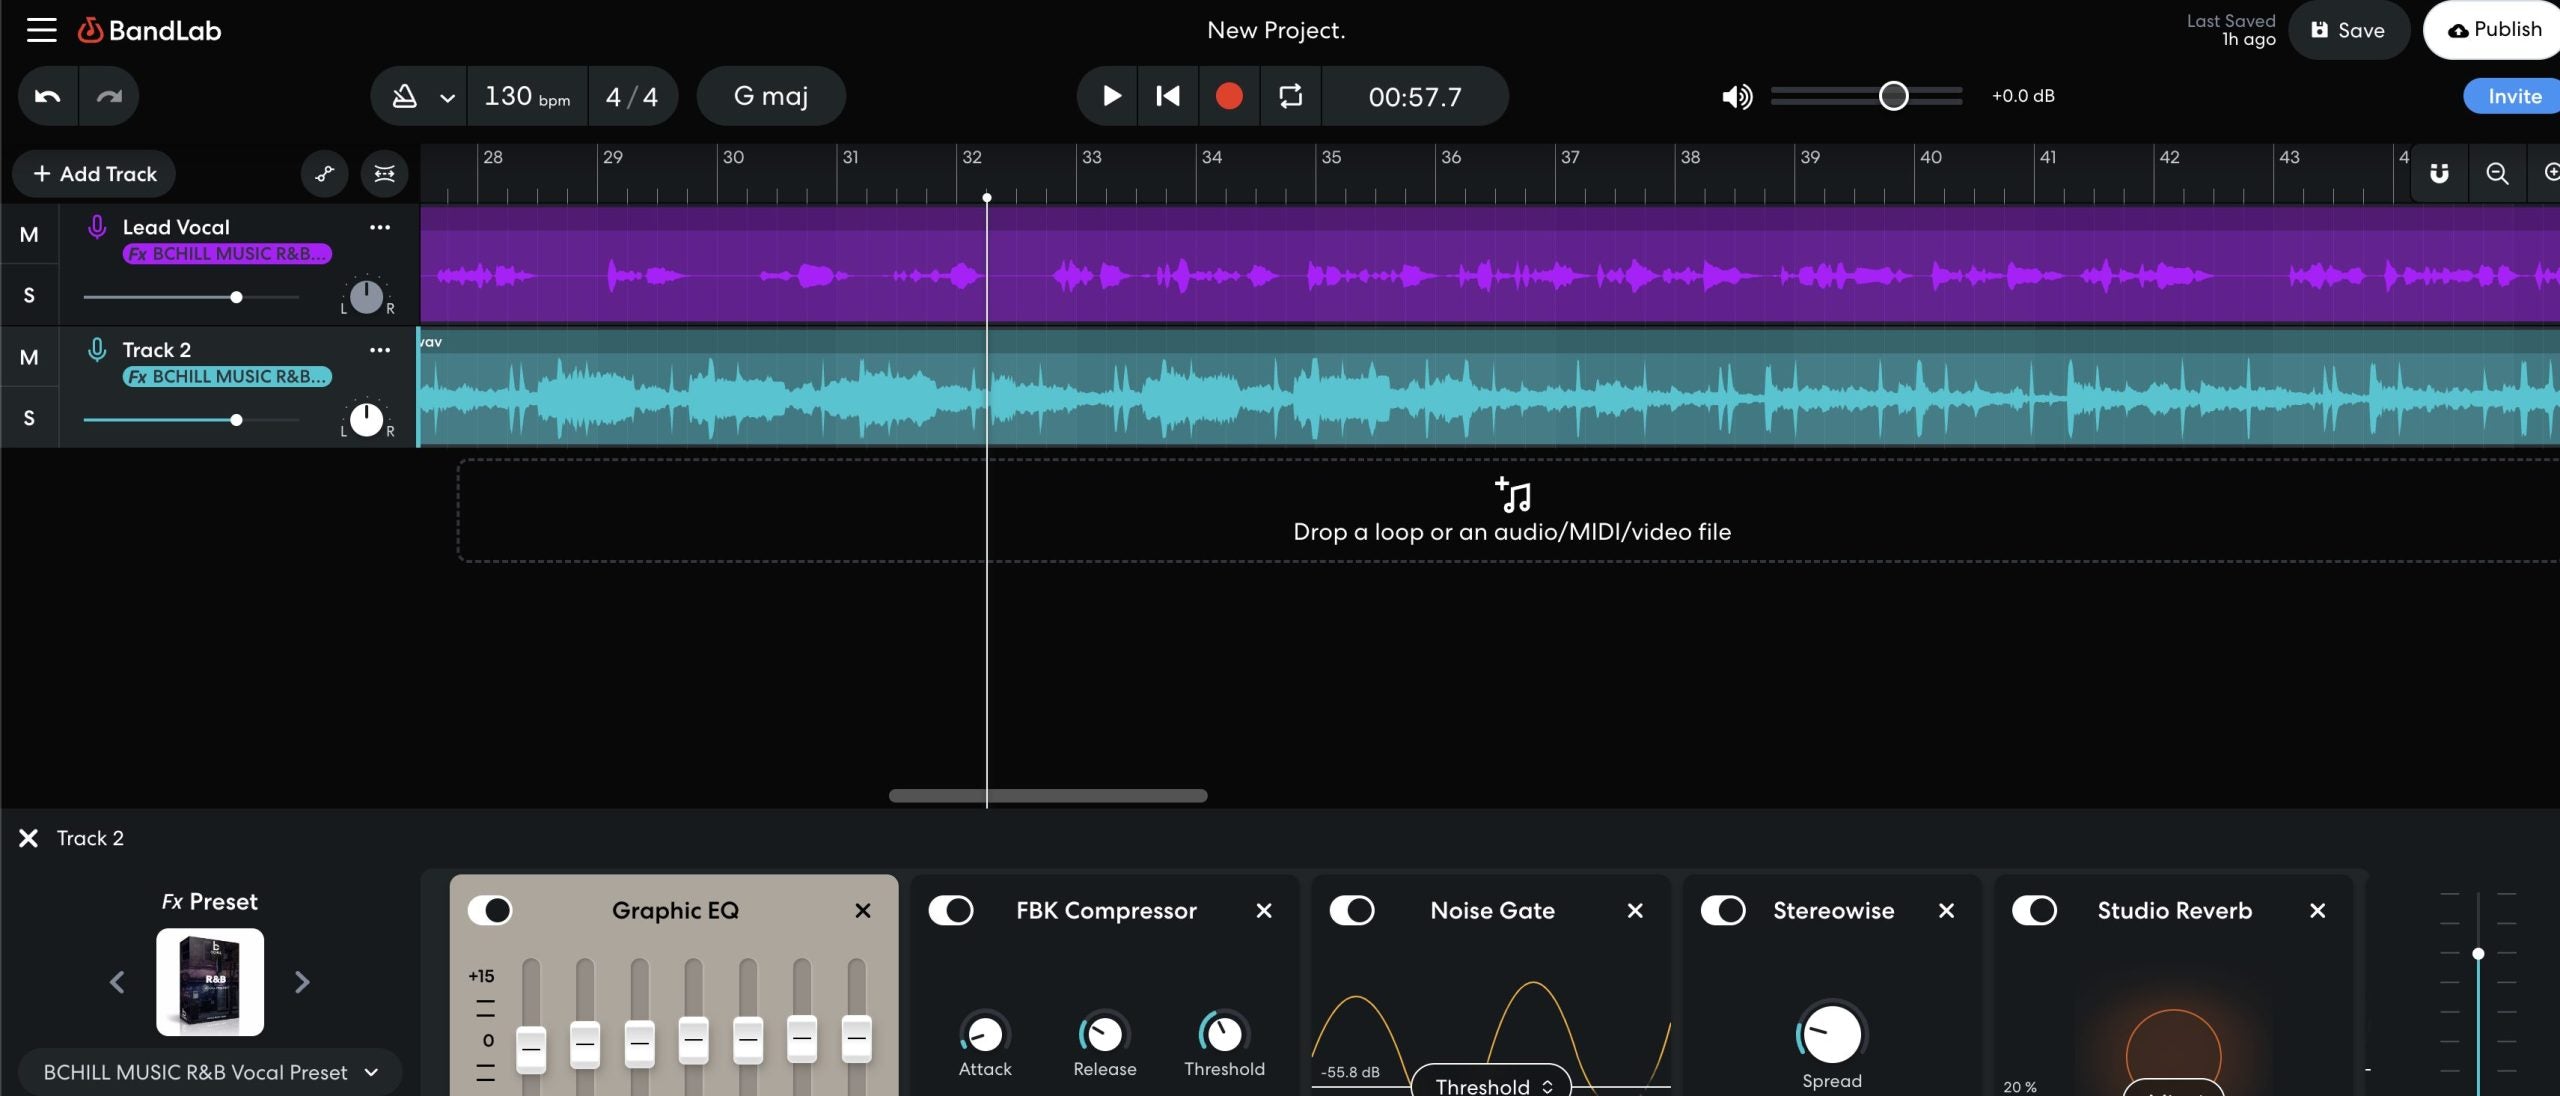
R&B FL Studio Vocal Preset


Type: Vocal Preset
Megan Thee Stallion FL Studio Vocal Preset
Type: Vocal Preset
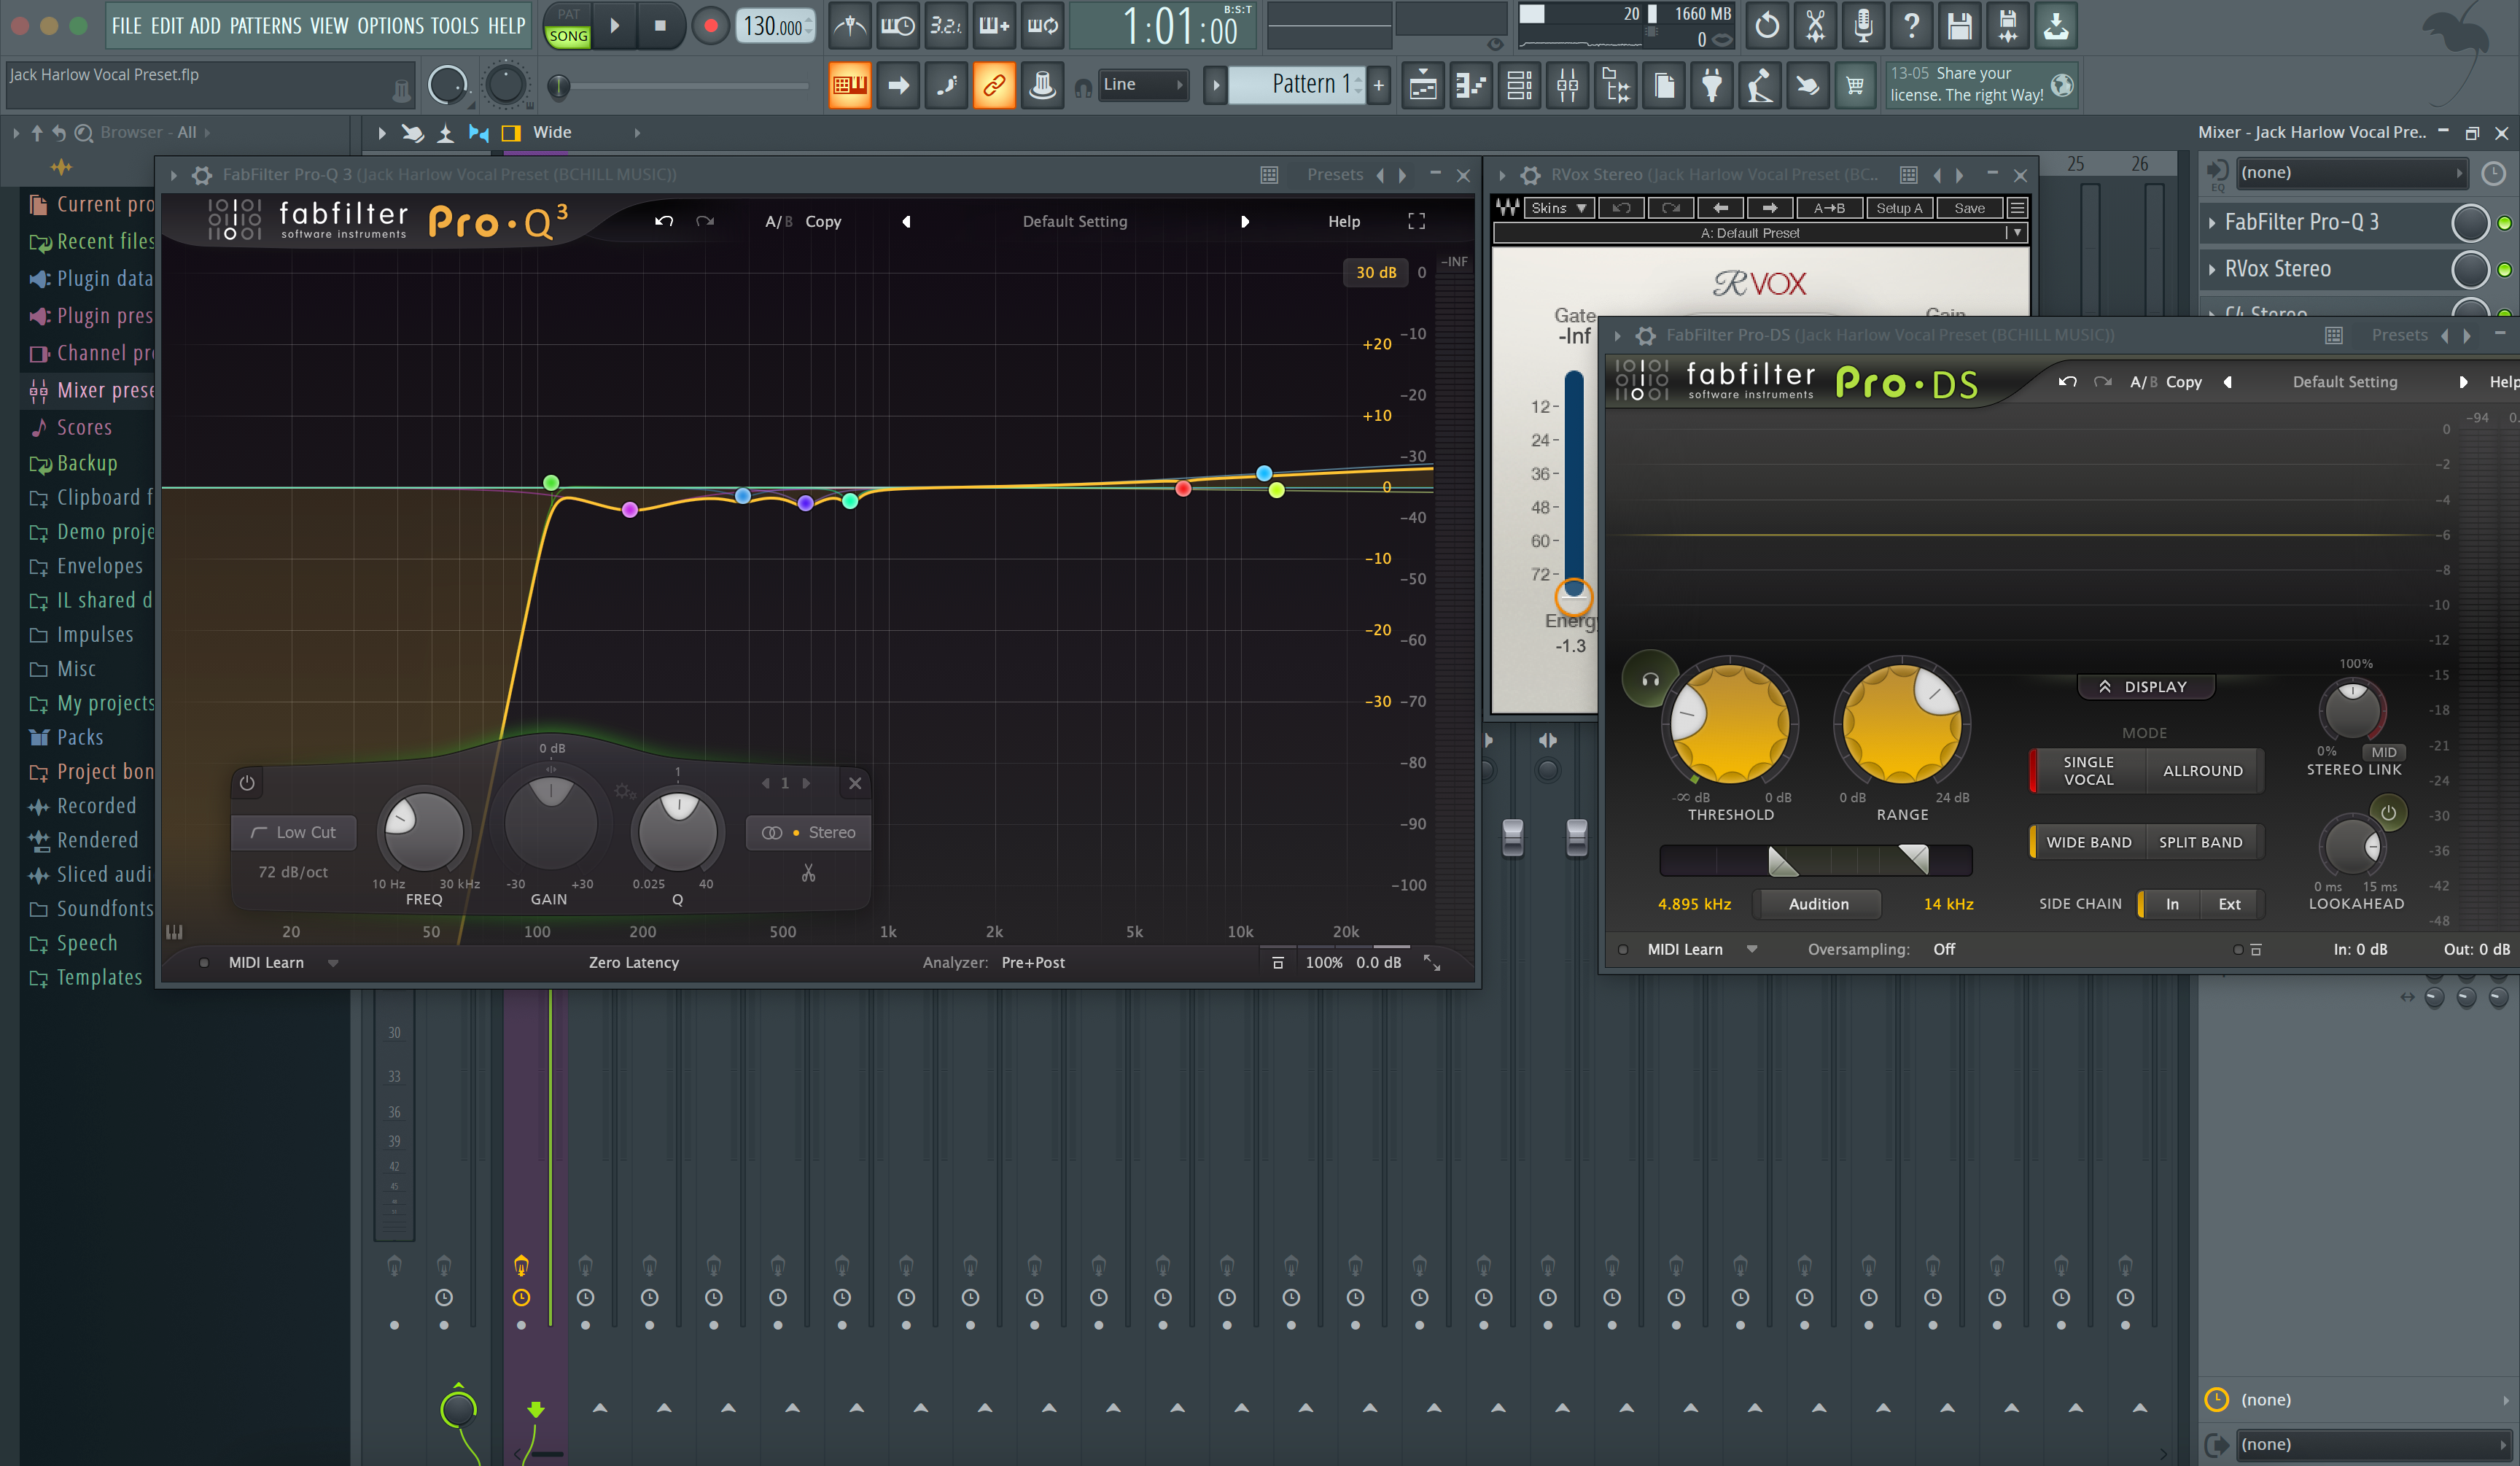
Jack Harlow FL Studio Vocal Preset

Type: Vocal Preset
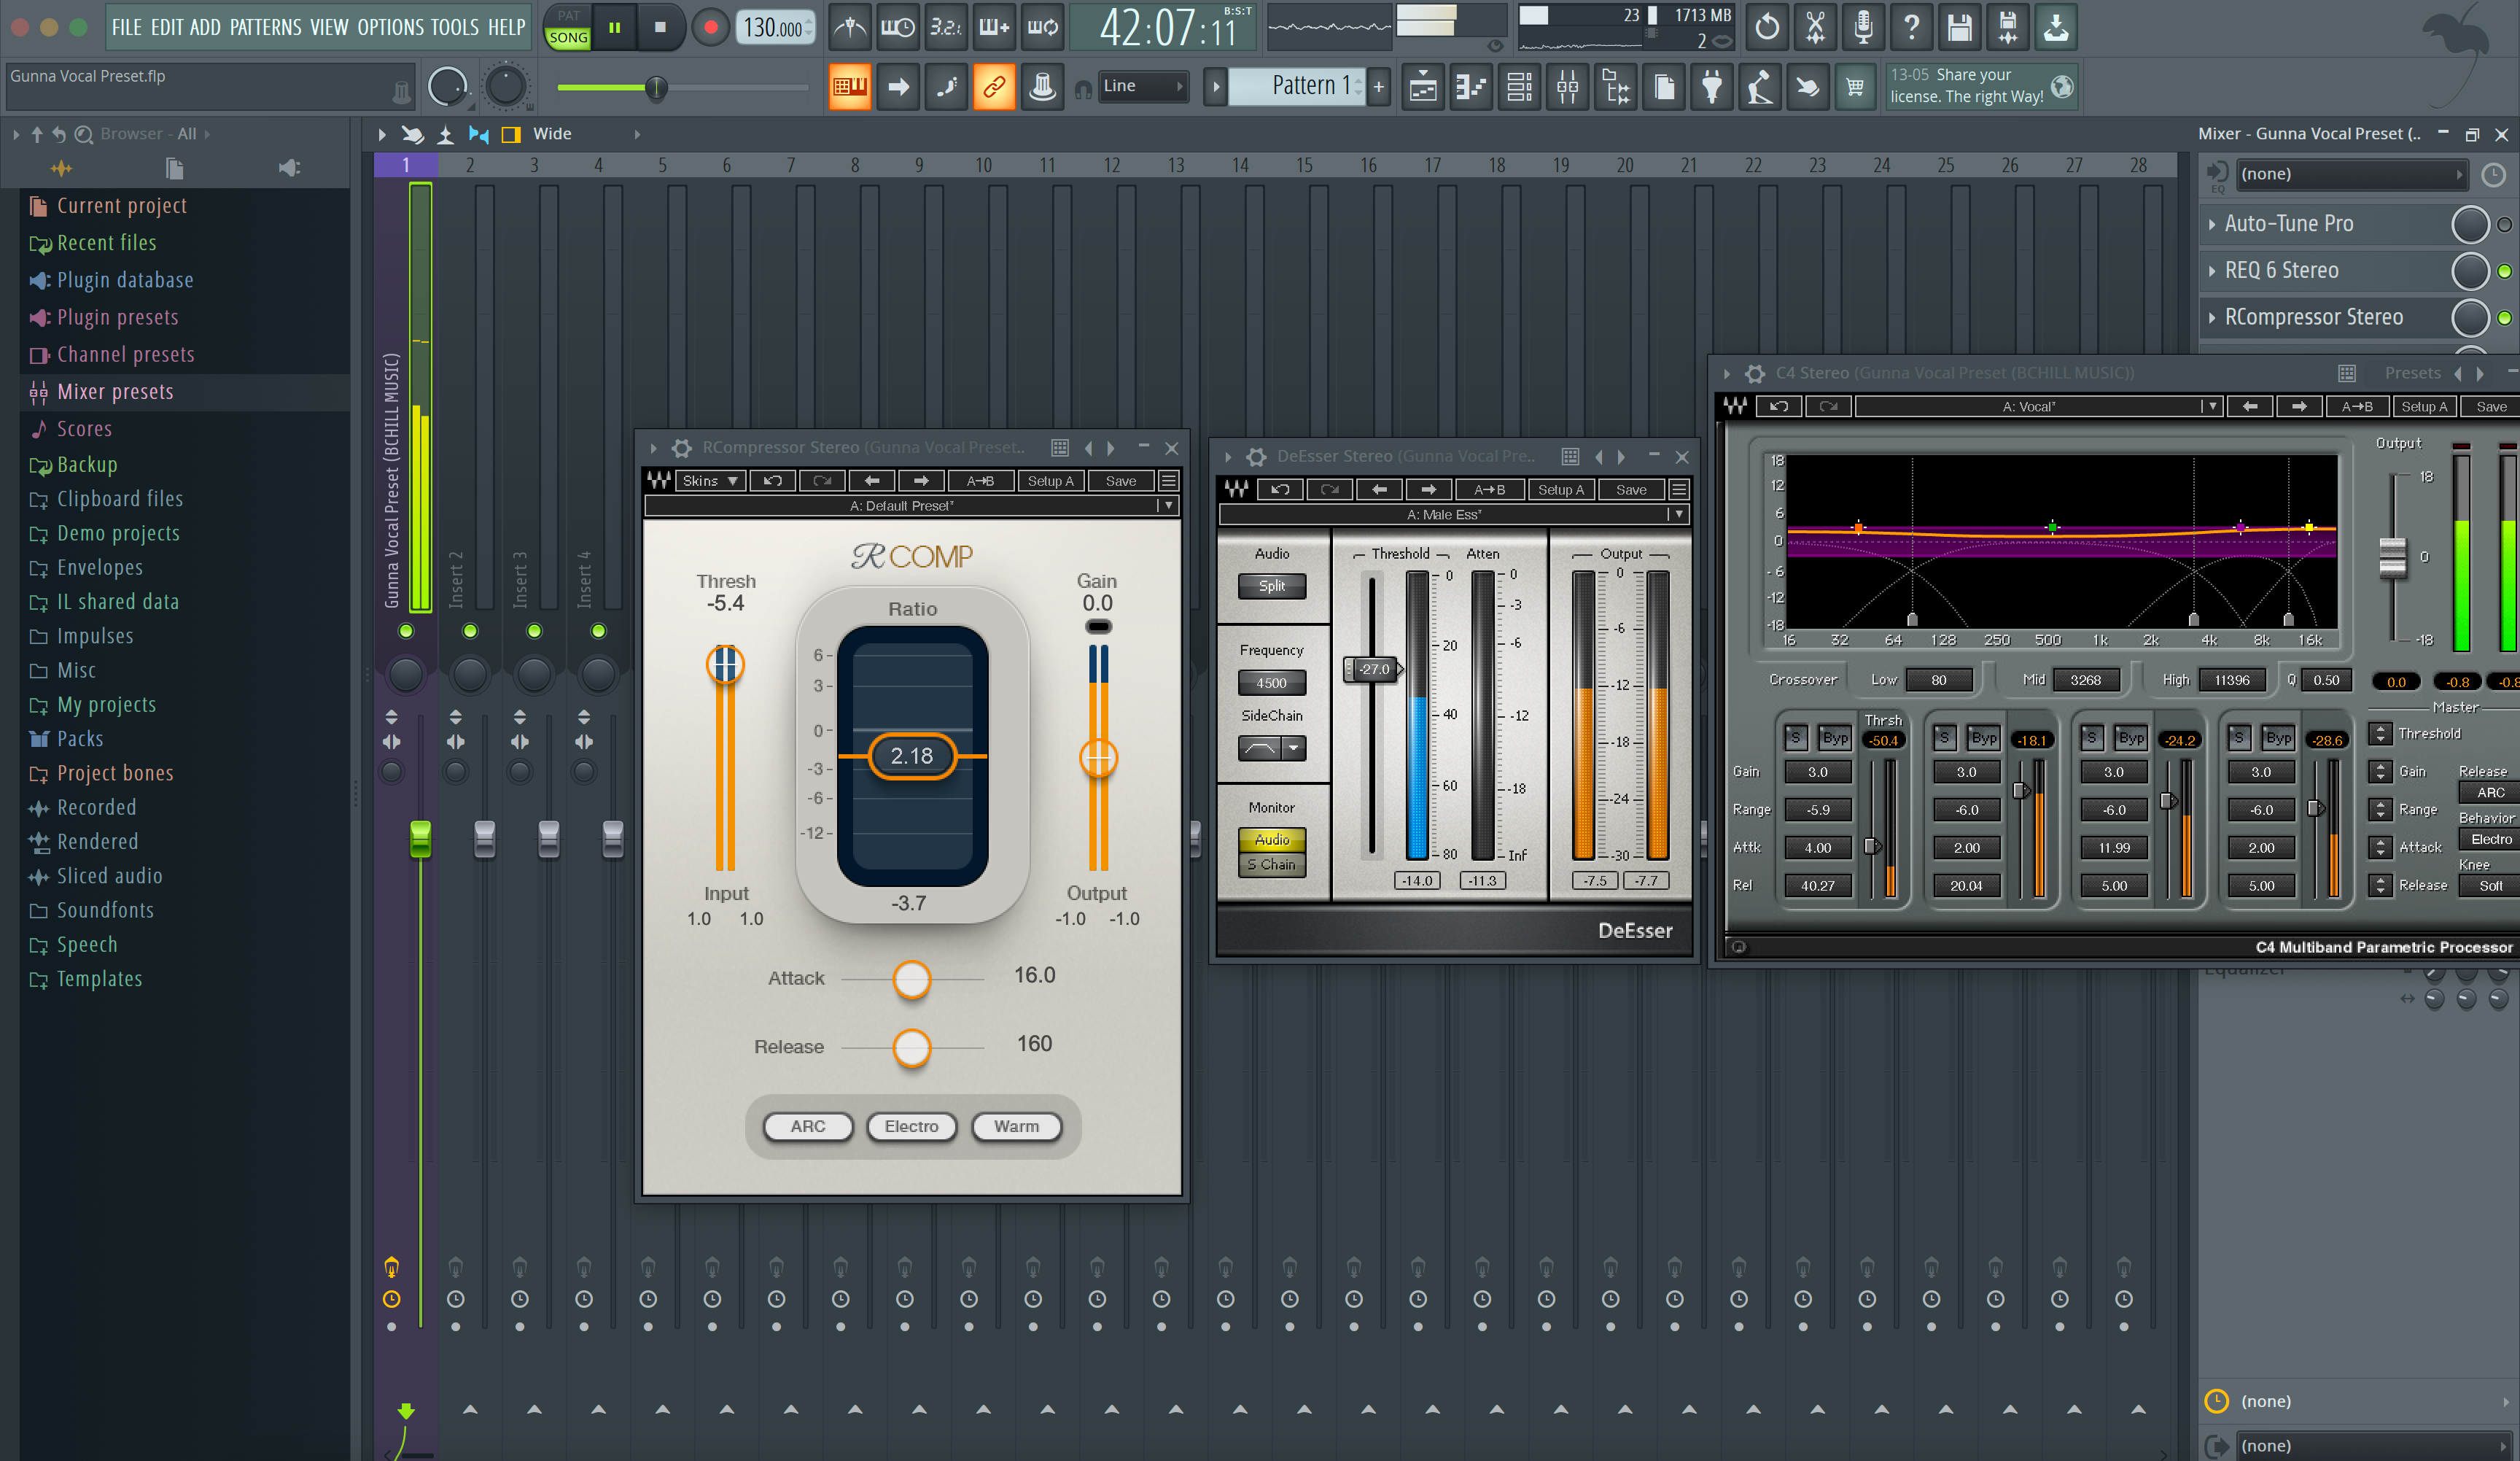
Gunna FL Studio Vocal Preset
Type: Vocal Preset
R&B Vocal Preset (Stock Plugins)

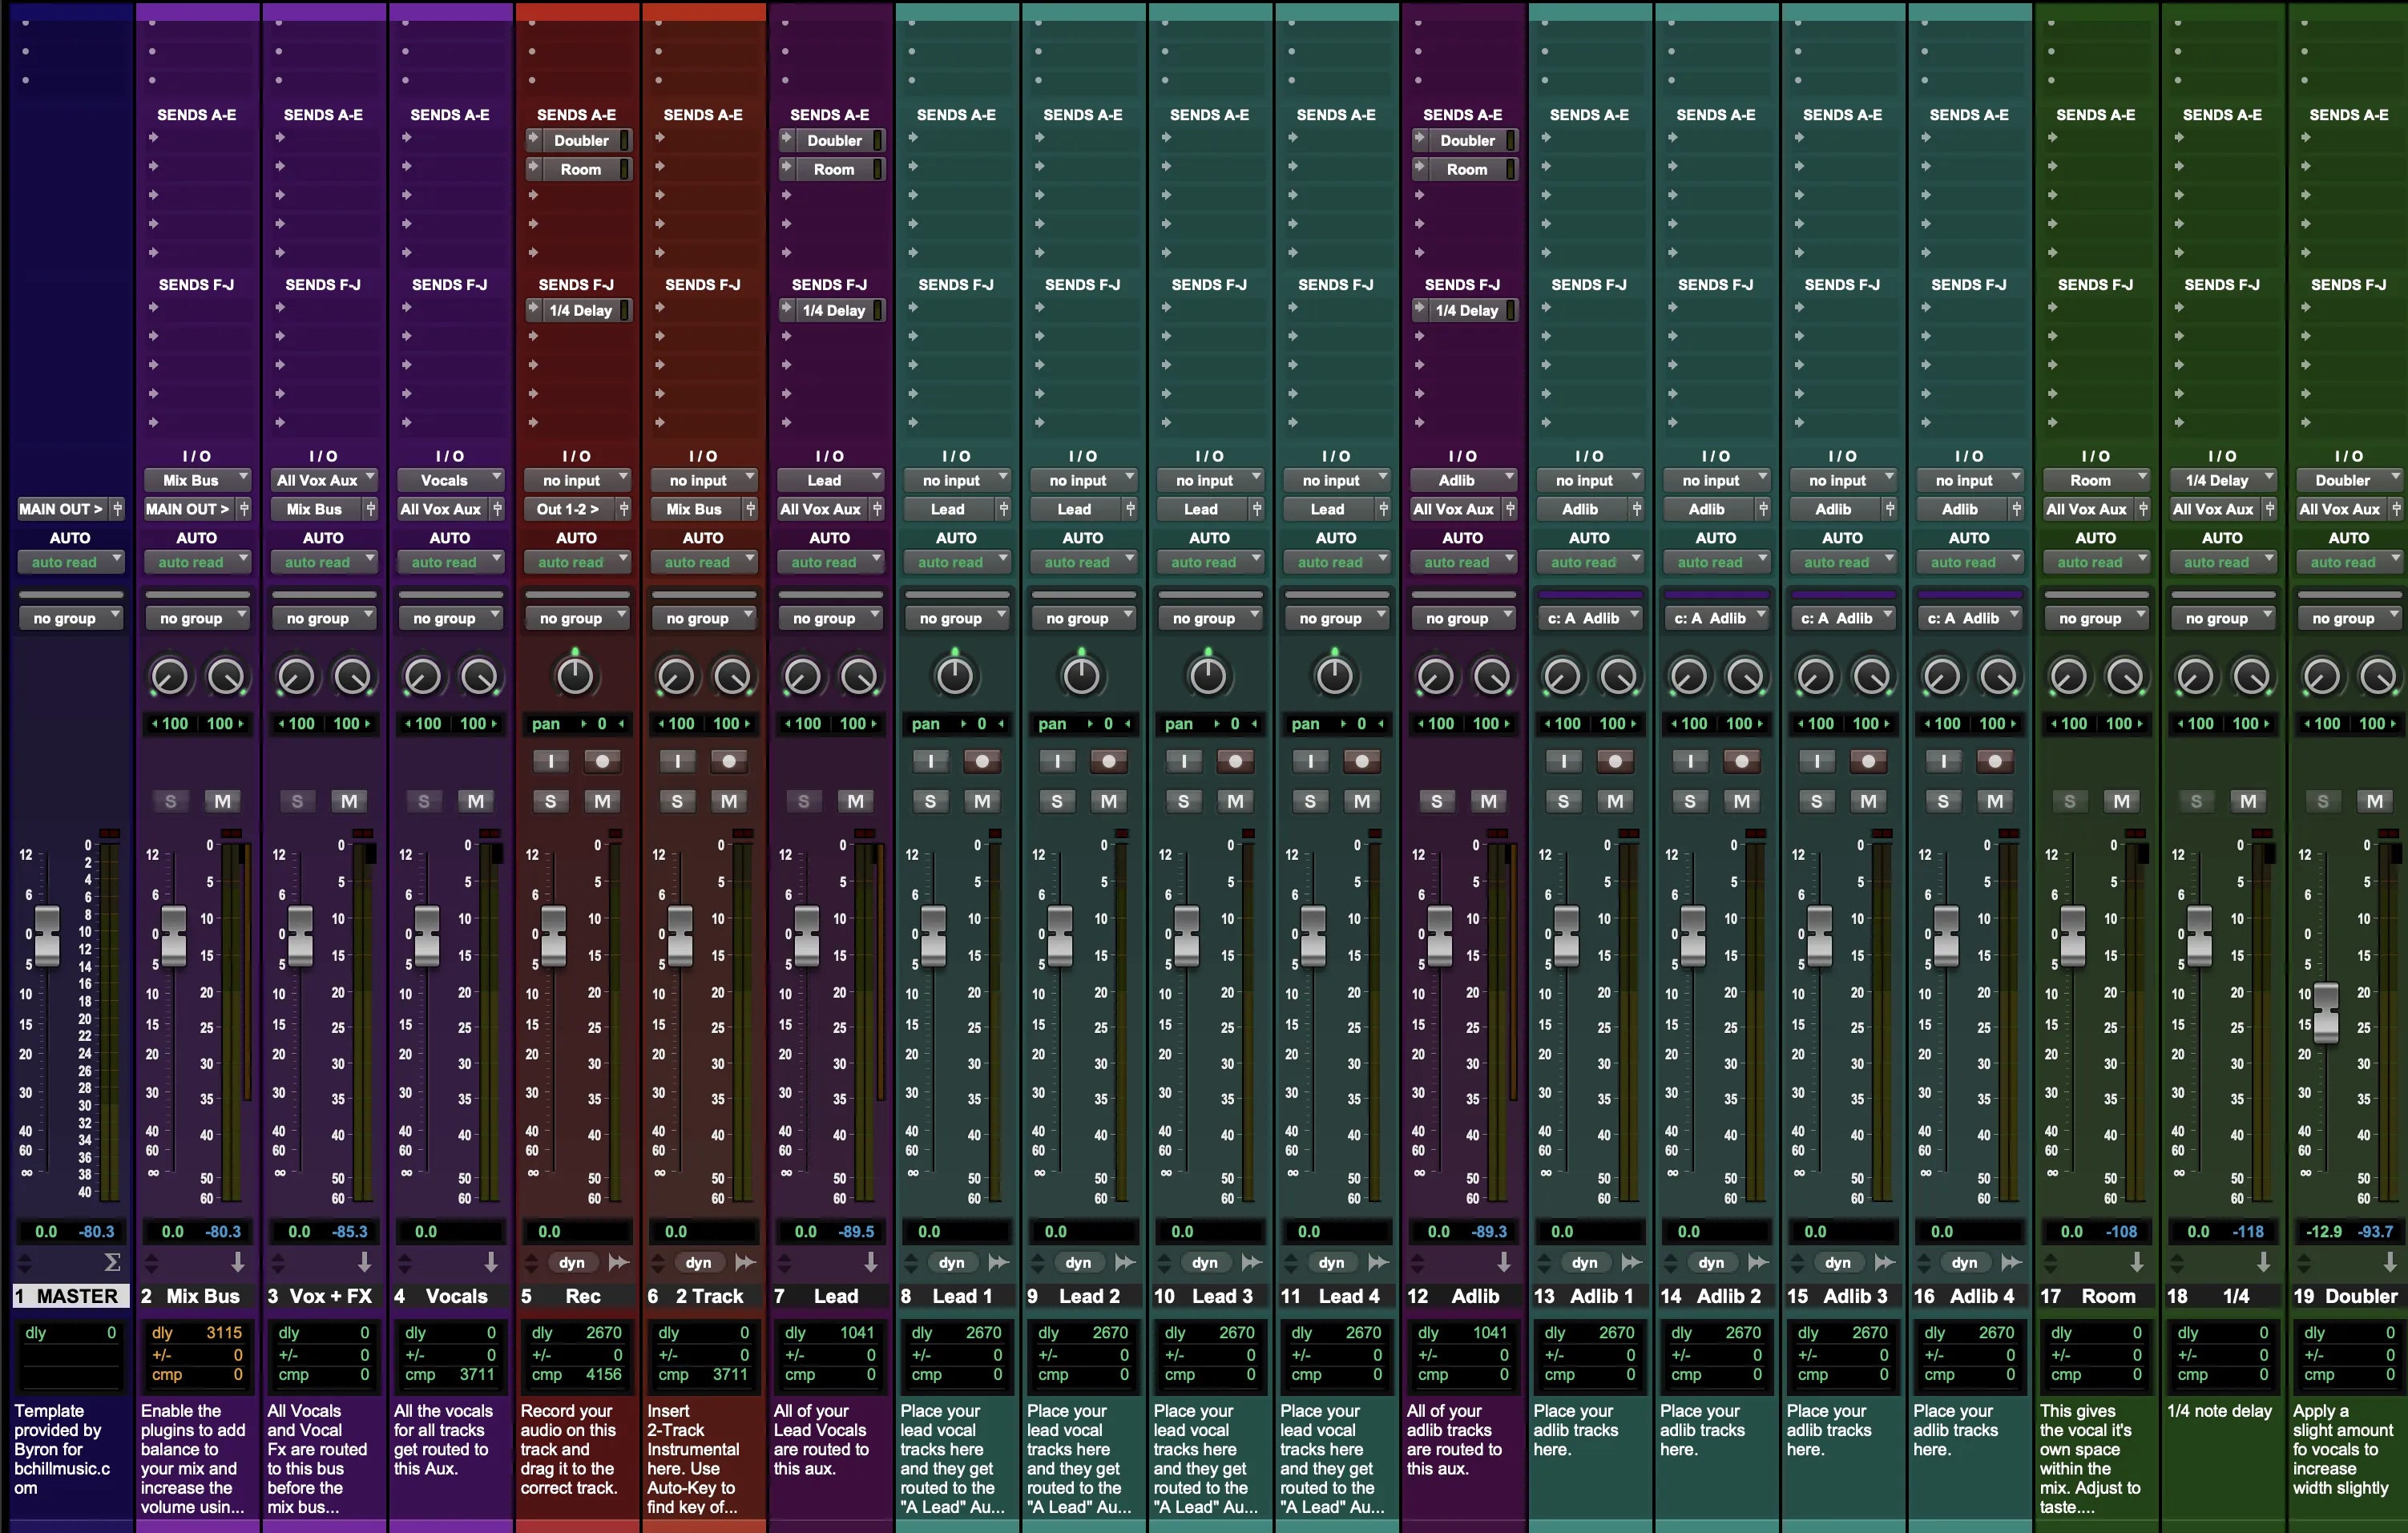
Type: Recording Template
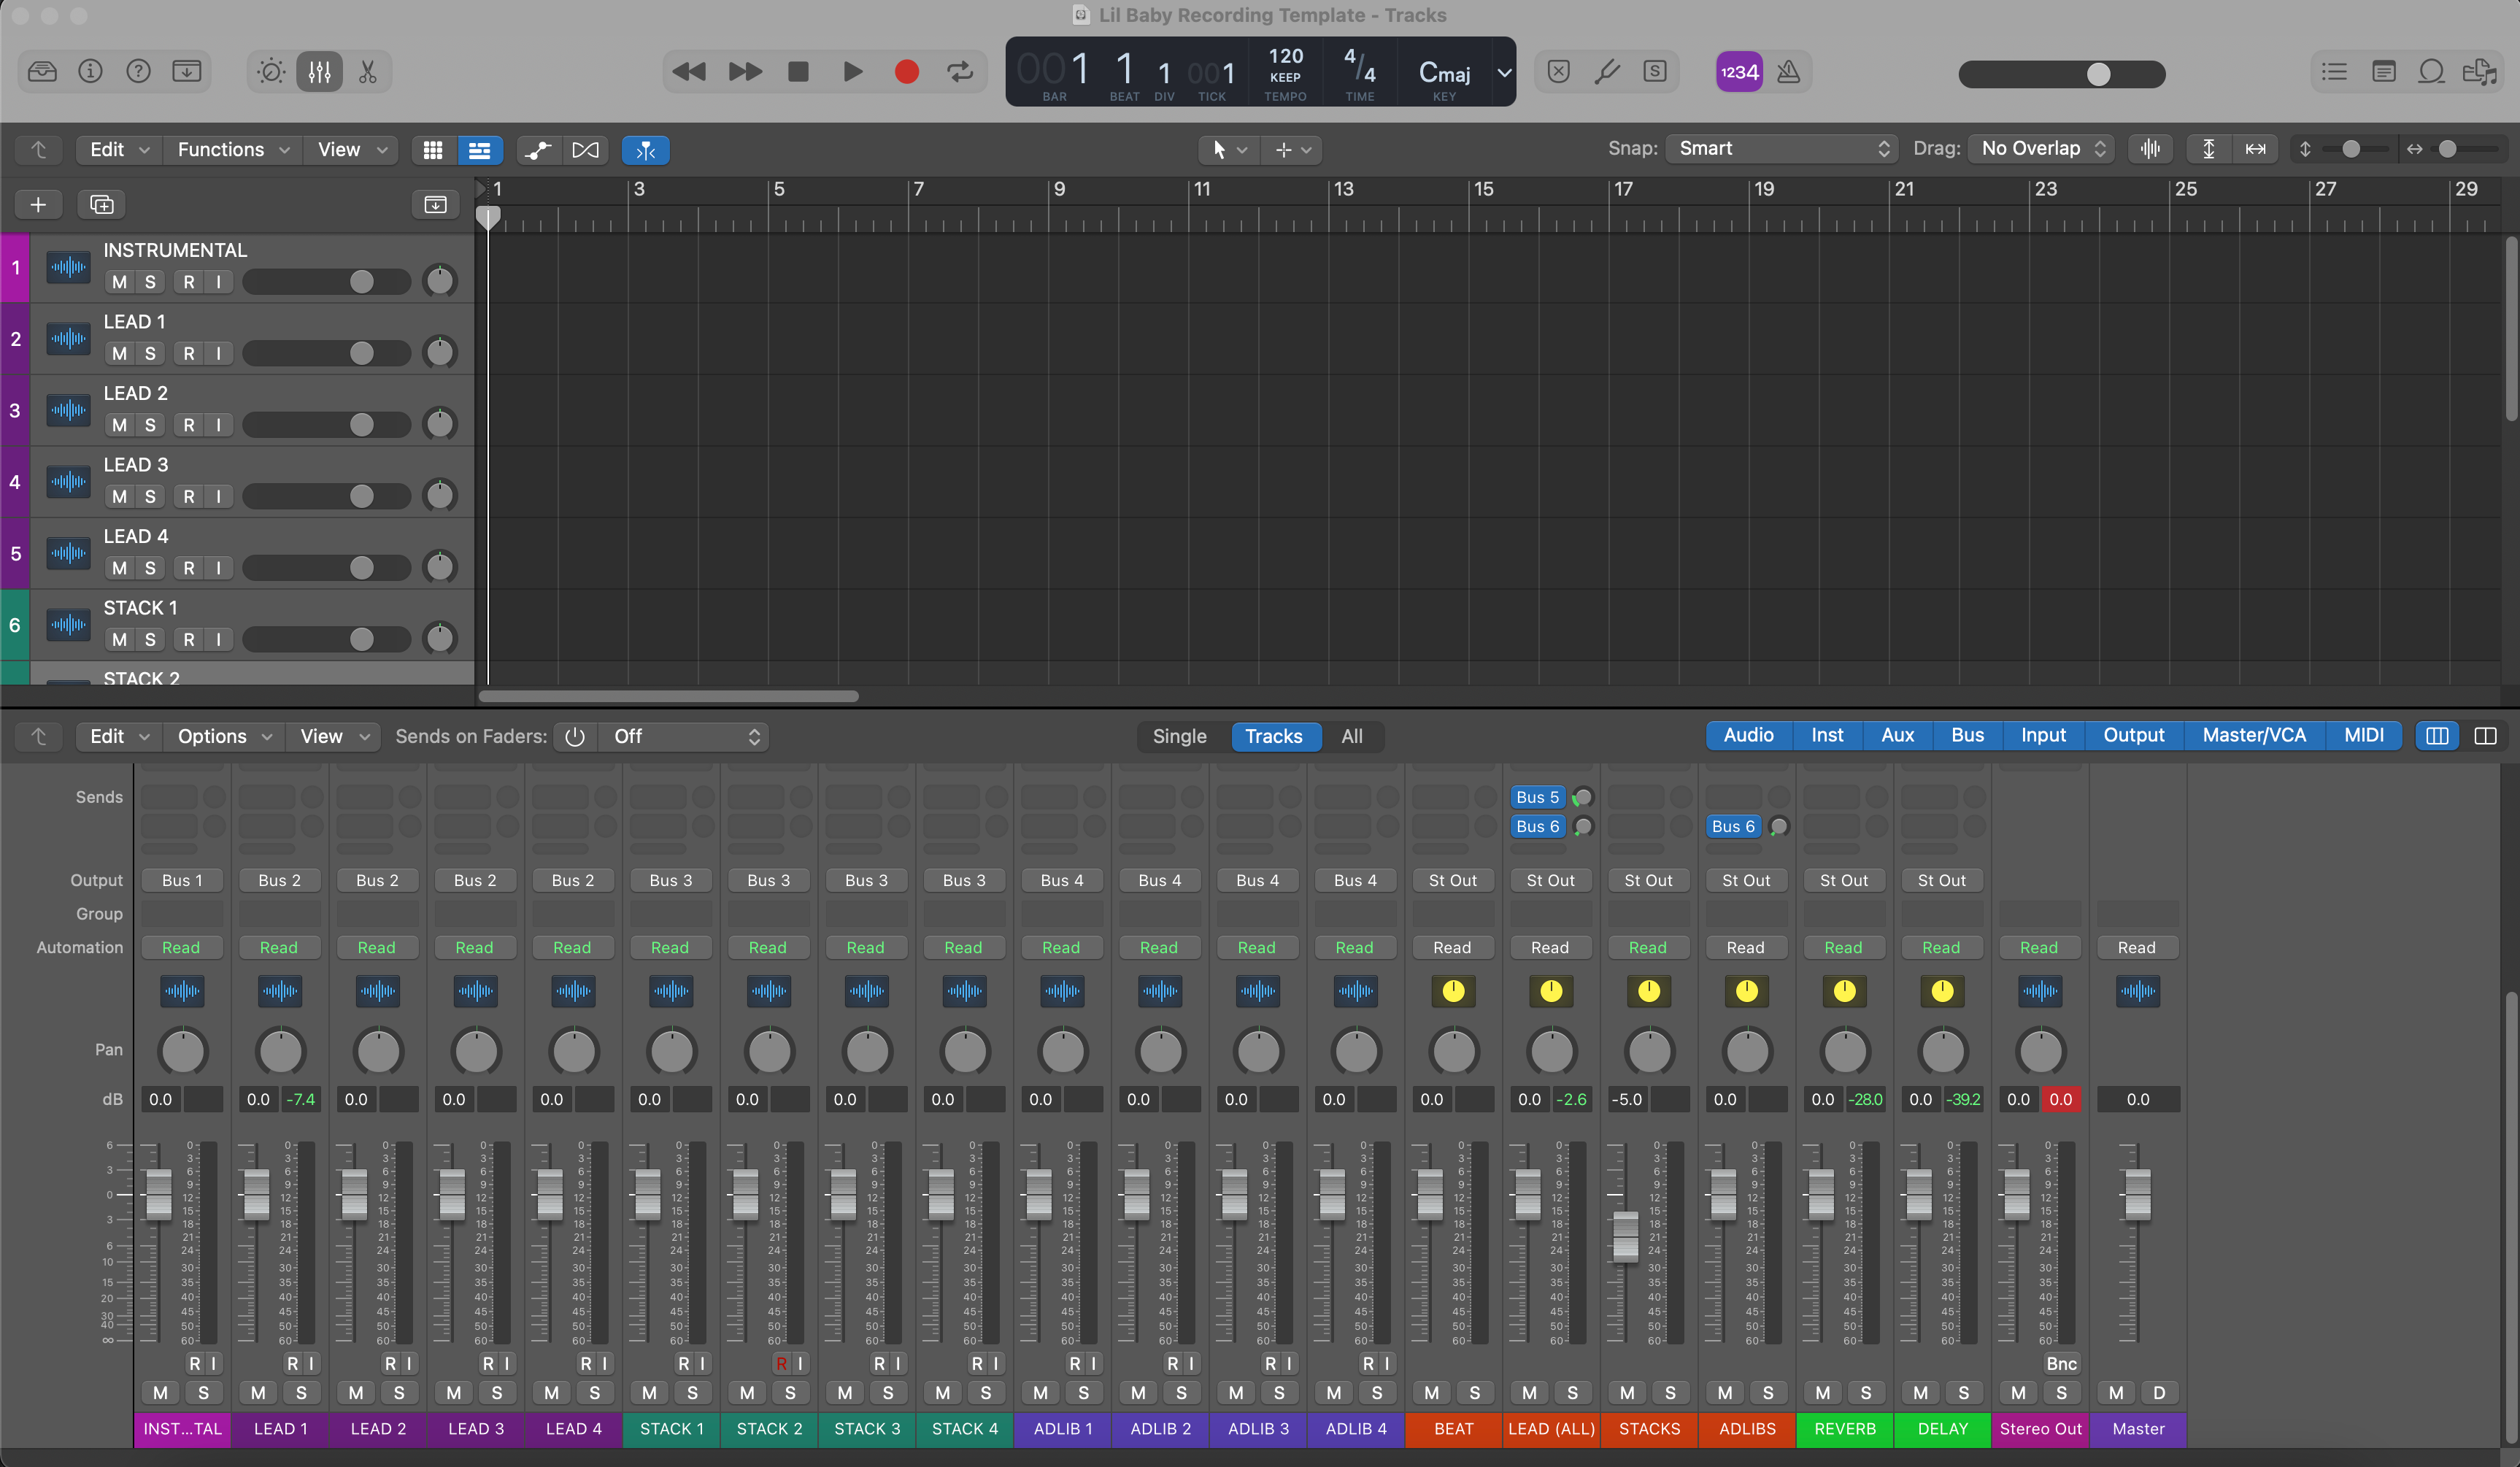
Logic Pro X Lil Baby Recording Template – Vocal Preset

Type: Recording Template
Logic Pro X Gunna Recording Template – Vocal Preset

Type: Recording Template
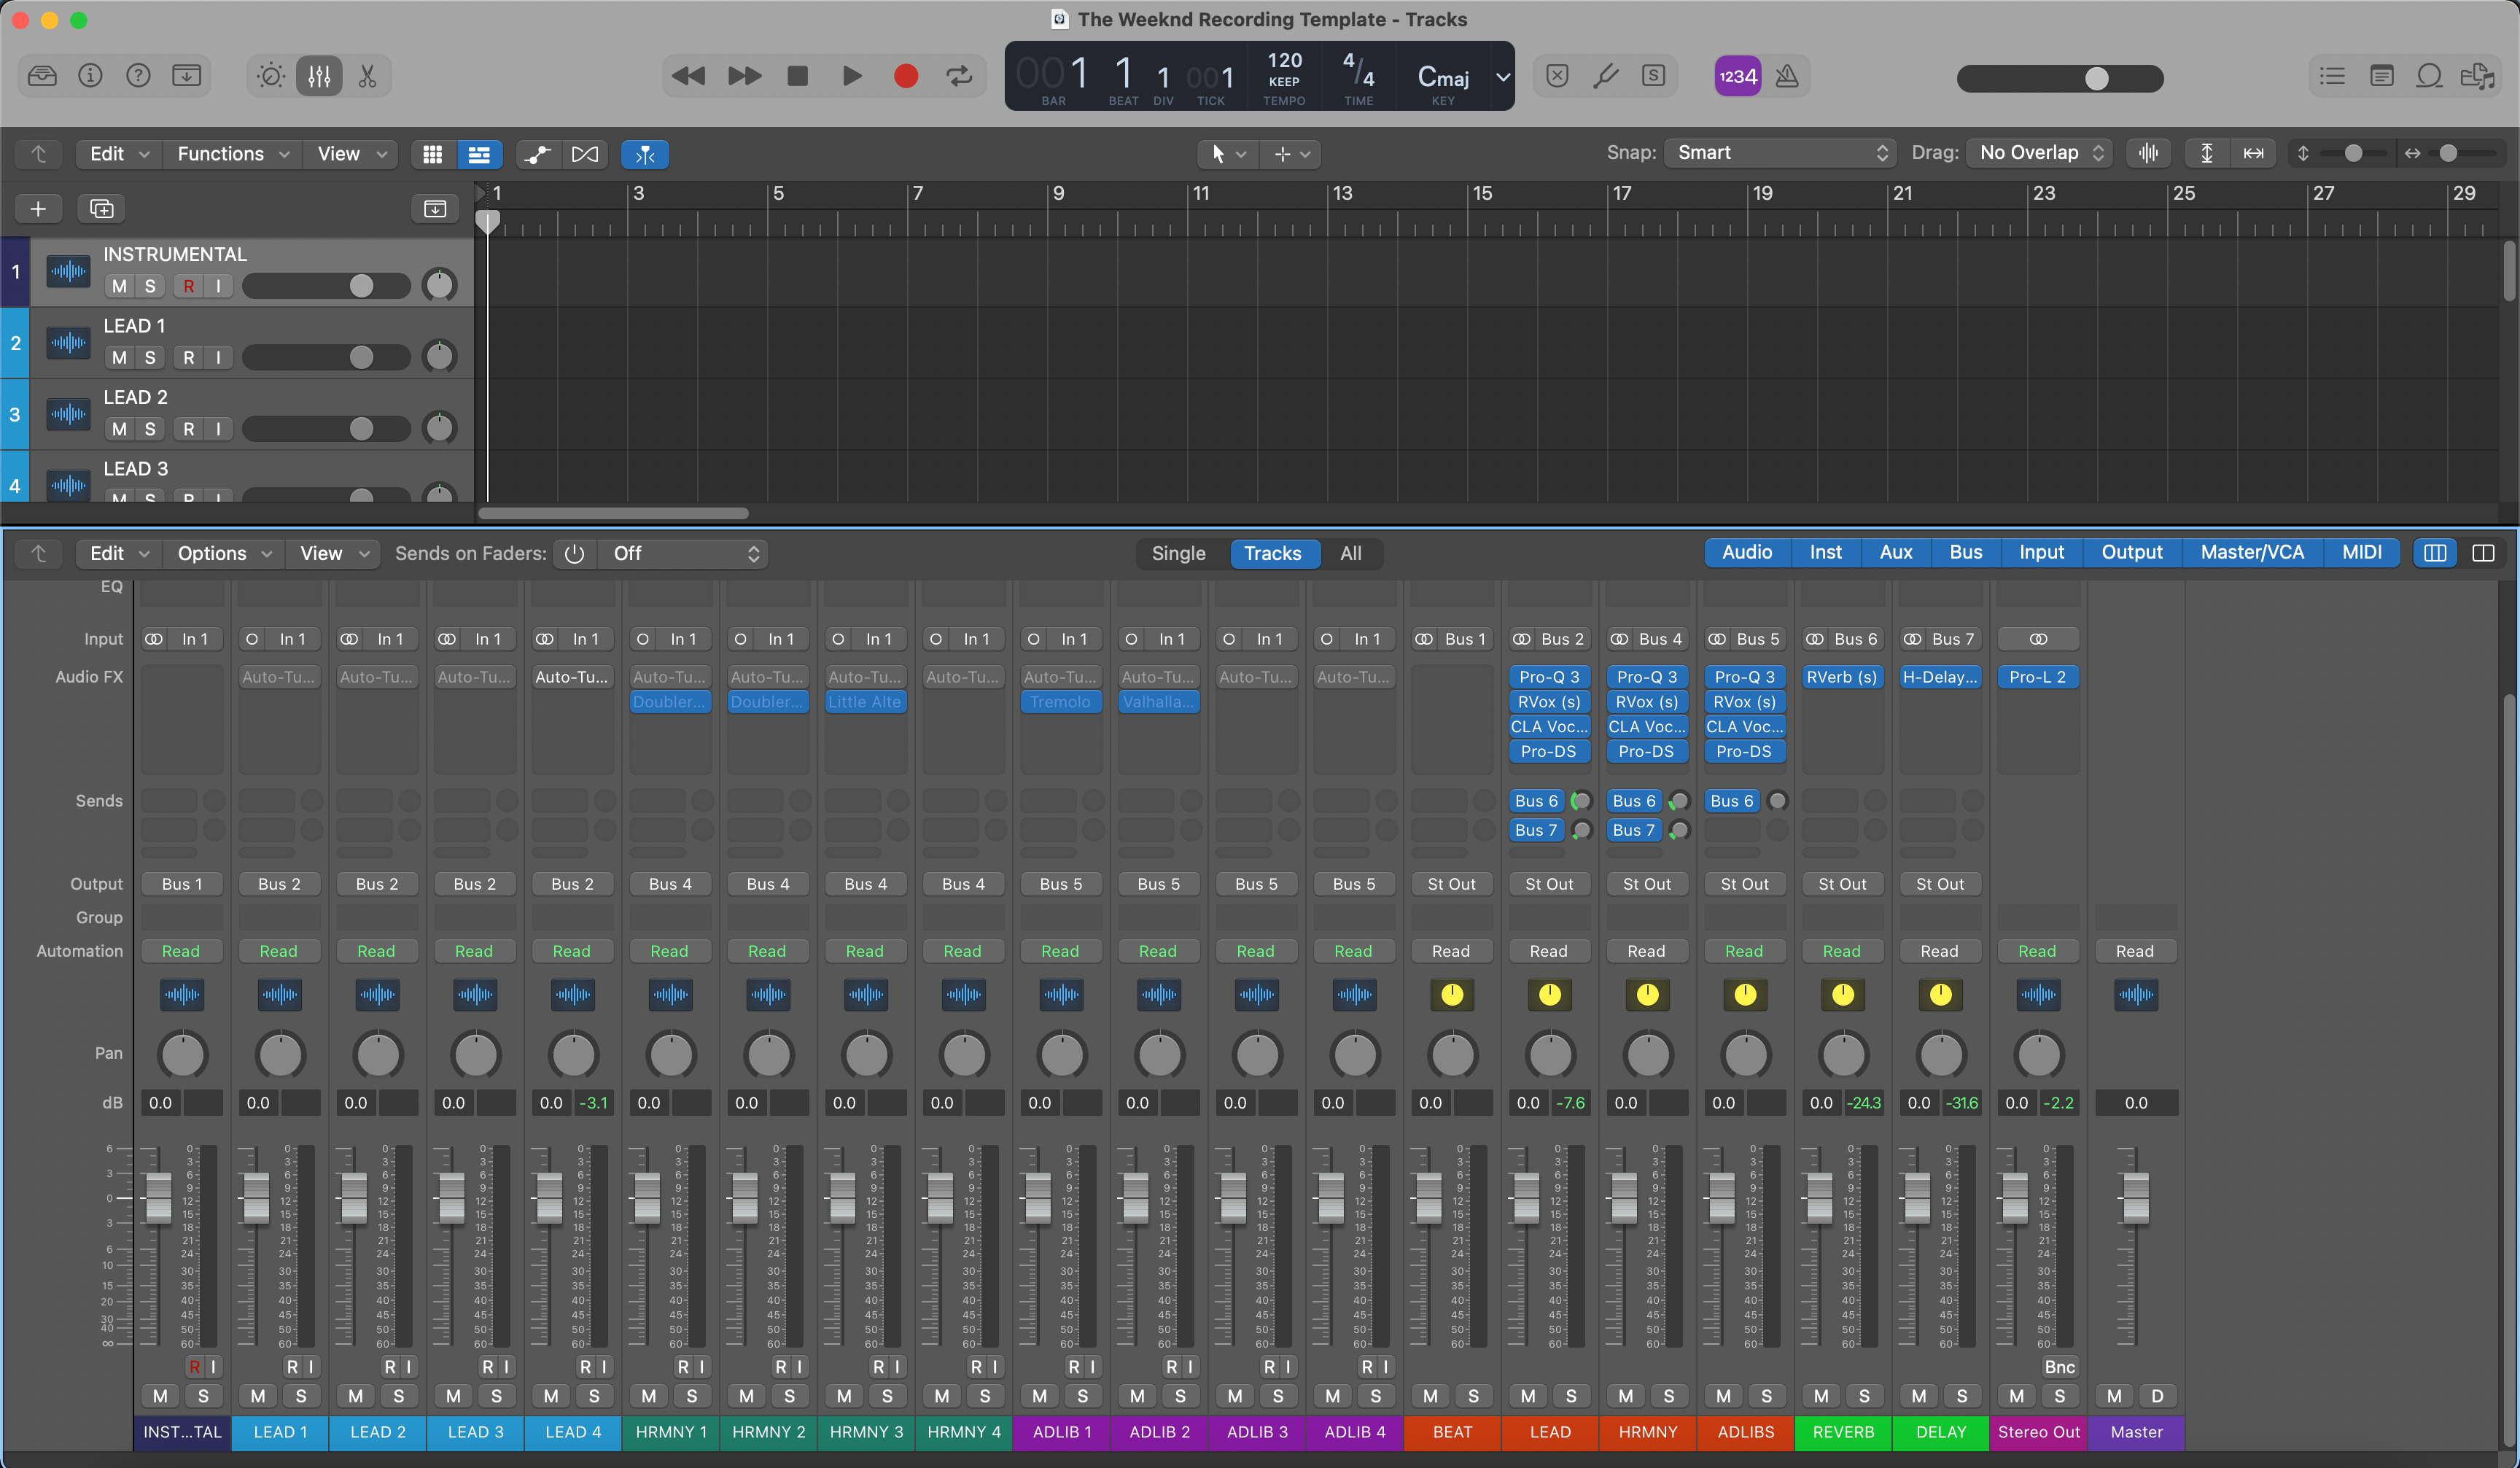
Logic Pro X The Weeknd Recording Template – Vocal Preset
Type: Recording Template
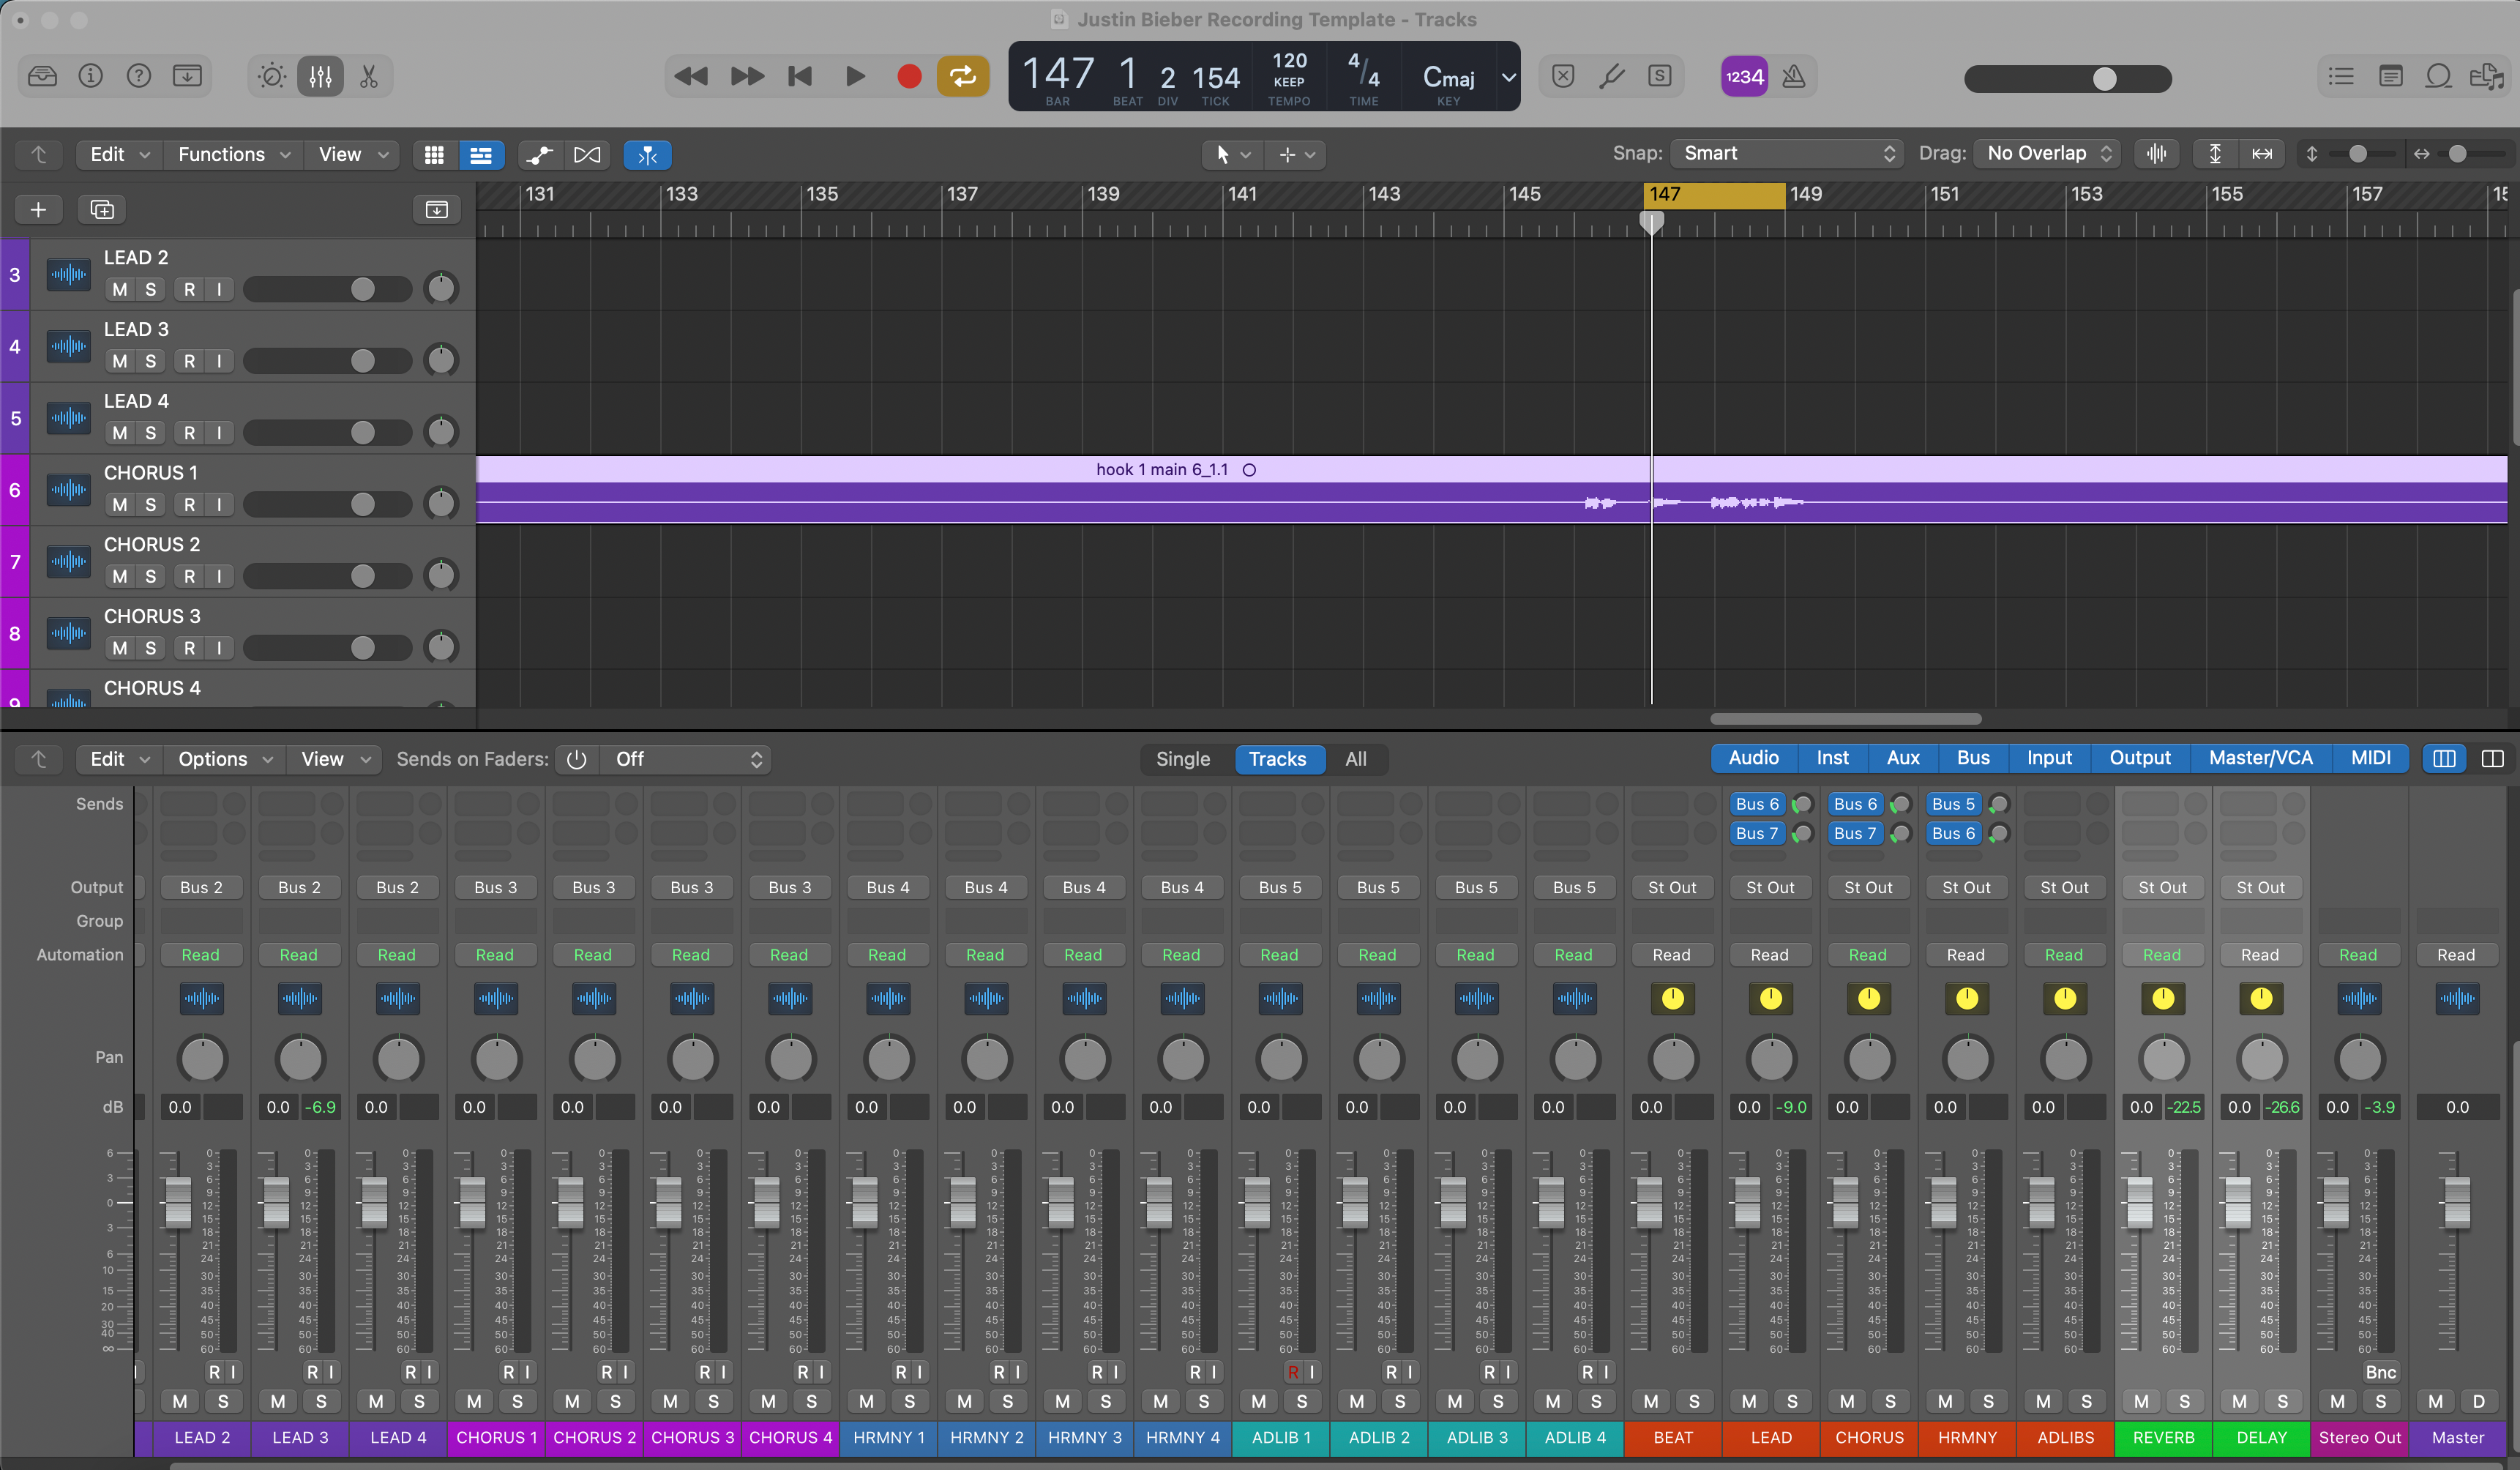
Logic Pro X Justin Bieber Recording Template – Vocal Preset
Transform Your Session In Seconds
Instant Session Setup With Our Ready-to-Use Recording Templates & Vocal Presets.


Industry Credits

Westside Boogie

Shontelle

Jarren Benton

DJ Tunez

Vory

Caskey

Rittz

Nia Riley

Eugy

Q Parker
About The Engineer

About The Engineer
Hey! I’m Byron Hill, a professional music producer and mixing engineer with over 15 years of experience, based in Atlanta, GA. I’ve worked with thousands of clients worldwide across a wide range of genres — from independent artists to major label talent. My credits include work with Westside Boogie, Vory, Shontelle, DJ Tunez, Jarren Benton, and Ritz, as well as creators and brands like Daryl Mayes, SeanDoesMagic, and Chubbies Clothing.
Over the years, I’ve developed a trained ear for crafting vocal chains that deliver a clean, balanced, and professional sound — no matter the genre or DAW. Each preset in this collection is built with the same goal: to help you move faster, sound better, and bring your voice to life with clarity, confidence, and intention.
Listen to our Work
R&B
Before
After
Rap
Before
After
Pop
Before
After
Soul
Before
After
Rock
Before
After
Latin
Before
After
FAQ'S
Are these presets beginner-friendly?
Are these presets beginner-friendly?
Yes — every preset is optimized to work instantly. Just drag, drop, and start recording. Whether you’re just starting out or already recording regularly, these presets help you sound mix-ready right away.
Do I need any third-party plugins to use these presets?
Do I need any third-party plugins to use these presets?
We offer both stock plugin versions (no extra plugins required) and premium versions (that use industry-standard third-party tools). The product description clearly lists any required plugins.
Will this work with my DAW (FL Studio, Ableton, etc.)?
Will this work with my DAW (FL Studio, Ableton, etc.)?
Yes — each preset is built specifically for your DAW.Just select your software from the preset menu before checkout. We support all major DAWs including FL Studio, Logic Pro, Pro Tools, Ableton, Studio One, and more.
Can I use these for singing, rapping, or both?
Can I use these for singing, rapping, or both?
Absolutely — presets are built for modern vocal styles and include EQ, compression, reverb, and delay settings tailored for both singing and rapping. The chain is flexible enough to work across genres.
How fast do I get my files after purchase?
How fast do I get my files after purchase?
Instantly. As soon as you complete your order, you’ll receive a download link along with a step-by-step install guide tailored to your DAW. You can be recording with your new vocal chain in minutes.
Our Blogs

How to Install Recording Templates in Studio One
Studio One can open straight into a record-ready studio—labeled vocal lanes, a Vocal Bus, filtered FX returns, and cue mixes that feel natural in headphones. This guide shows how to install templates the right way, where they live, and how to build a clean, repeatable layout for vocals. You’ll learn Song Templates and Track Presets, low-latency monitoring with Green Z/cue sends, a two-track beat variant, and quick fixes when something goes sideways. 1) Template mindset in Studio One (what you’re really saving) A template is a shortcut to a known-good setup. In Studio One there are two core flavors: Song Template — a complete project shell. Appears on the Start Page under New Song. Includes tracks, buses, FX Channels, colors, click prefs, markers, and cue mixes. Track/Channel Presets — lane-level presets for quick injection into any song. Great for “Lead Vox,” “Doubles Tight,” “Ad-libs Phone,” or a full “Vocal Stack” saved as a Multi Instrument/FX chain. Keep one or two Song Templates (Vocal over 2-Track, Full Stems) and a small library of Track Presets by role. You’ll move faster without locking yourself into a single layout. 2) Where templates live (so you stop guessing paths) You don’t need to hunt system folders. Use in-app commands and let Studio One manage locations: Save as Template from any open song; it appears in Start Page → New Song → User. Track/Channel Presets are saved/loaded from the Browser’s Presets area. Right-click a channel to store or recall. Shareable copies are just .song files and preset files. Zip a template folder with any custom IRs/samples in a sibling “Template Assets” directory and you’re portable. 3) Install route A — Save a Song as a Template (the everyday path) Open a clean song and build the layout you want to reuse (see Sections 6–7 for wiring and chains). Go to File → Save as Template…. Name it clearly, e.g., Vocal_Record_48k or Dubs_2Track_48k. Optionally add an image and a description so you can spot it quickly on the Start Page. Next time, choose New Song → User and select your template. Immediately Save As… a new folder named Artist_Song_YYYY-MM so the master stays pristine. Why this works: The Start Page becomes your “template chooser,” and you never touch system paths. 4) Install route B — Drop-in Track/Channel Presets (lanes on demand) Sometimes you’re already in a client’s session and just need your vocal lanes. Use Track/Channel Presets: In your best vocal session, select the Lead track (or a Summed/Bus channel if you use one). Right-click the channel header → Store Preset. Name it LeadVox_StockClean or LeadVox_Punch. Do the same for Doubles Tight, Ad-libs Phone, and your Vocal Bus. In any song, drag these from the Browser’s Presets onto existing tracks, or right-click a channel and load them. Pro tip: Save a “Vocal Stack” as a Folder/Bus preset if you prefer to drop the whole rig at once. 5) Install route C — A sharable “master copy” (drag, duplicate, go) Teams often keep a plain master .song in a shared folder: Create Template — Vocal Record — 48k.song with your lanes and routing. Duplicate that file for each new project at the OS level, rename, then open. It’s not as elegant as the Start Page, but it’s universal and easy to zip/share. 6) The vocal wiring: buses, FX Channels, and names that stick Structure beats guesswork. Build a vocal chassis you can trust: Tracks by role: Lead (mono), Boost Lines (mono—emphasis words), Ad-libs (mono, panned by section), Harmonies (stereo or dual mono). Vocal Bus (Bus Channel): route all vocal tracks here. Gentle glue and a broad final de-ess live on this bus; leave the Main clean while tracking. FX Channels: Room (0.4–0.8 s), Slap (mono 90–120 ms), and Tempo Echo (1/8 or dotted-eighth, low feedback). Filter returns: HPF ~150 Hz, LPF ~6–7 kHz so cans feel clear, not hissy. Ducking on delays: if you key a compressor on the Slap from Lead, repeats bloom in the gaps rather than sitting on words. Markers: Verse / Pre / Hook / Bridge, plus a 1-bar count-in for quick punches. 7) Tracking chain that stays out of the way (and in time) Keep the singer’s feel; save heavy polish for mix time. A dependable lane looks like this: Lead inserts: HPF (80–100 Hz) → Comp A (2:1–3:1; attack 10–30 ms; release 80–160 ms; 3–5 dB on phrases) → De-esser (broadband) → (optional light color) → Comp B (1–2 dB peaks) → tiny presence lift only if diction hides. Boost: slightly higher HPF, a touch more de-ess, tucked −6 to −9 dB under Lead. Ad-libs: band-limited (HPF ~200 Hz, LPF ~8–10 kHz) with a bit more Slap; pan off-center by section. Vocal Bus: gentle glue and a broad final de-ess; no brickwall limiting while recording. 8) Low-latency confidence (Green Z, Cue mixes, and honest cans) Latency kills performances. Use Studio One’s monitoring options to keep timing tight: Green Z / Low-latency monitoring: enable when available (especially with compatible PreSonus interfaces) to bypass heavy look-ahead while tracking. Buffers: 64–128 samples during takes; raise for mixing. If you hear flanging/doubling, you’re monitoring through hardware and software together—mute one path. Cue Mixes: create Cue sends from the Vocal Bus or Lead to headphones. Keep returns modest (small Room + Slap) so pitch and timing feel natural. Gain targets: raw input peaks around −12 to −8 dBFS; after inserts, peaks near −6 to −3 dBFS. Leave loudness for mastering. 9) Two-track beat layout (vocals over a stereo instrumental) When you only have a stereo beat, clarity matters more than size. Keep a dedicated template variant: Tracks: BEAT (stereo), Lead, Boost, Ad-libs, Harmonies, Vocal Bus, FX Channels. Beat control: ride intros/hooks with event gain or a pre-fader trim on the BEAT channel so you don’t squash the Main later. Space strategy: smaller Room and lower FX sends than with stems; dry-leaning verses read better. A tiny throw on the last bar into each hook sells size without smear. 10) Browser, colors, and notes (little things that save hours) Make the session self-explanatory: Palette: Lead = gold, Boost = orange, Ad-libs = blue, Harmonies = teal, Vocal Bus = dark gold, Returns = purple. Names: “Lead Vox,” “Boost Lines,” “Ad-libs,” “Harmonies,” “Vocal Bus,” “Room,” “Slap,” “Tempo Echo.” Avoid cryptic codes. Notes: pin a text event at bar 1 with mic distance, buffer target, and default send amounts. Everyone records faster when instructions are visible. 11) Troubleshooting ledger (one symptom → one move) Template not listed on the Start Page: re-save via File → Save as Template… (User tab). Add a description and image; relaunch if needed. Hearing a doubled voice: disable hardware monitoring or lower software monitoring. Track with Green Z/low-latency and a lean chain. FX lag while tracking: bypass look-ahead analyzers and long verbs; record with Comp/De-ess only; bring polish back for mix. Slap sits on words: add light ducking—sidechain a compressor on the Slap from the Lead, 2–3 dB dip, fast release. S’s sting on earbuds: broaden the de-ess band; back off any air shelf by 0.5 dB; low-pass delay returns to ~6–7 kHz. Hook collapses in mono: keep the Lead centered/drier; push width into doubles/ad-libs, not the main lane. Beat buries the voice (two-track): trim BEAT −1 to −2 dB and ride the Lead +0.5 dB rather than crushing compression. 12) Ten-minute build (copy this into your first template) Create song: “Template — Vocal Record — 48k.” Set BPM/key if helpful. Add tracks: Lead (mono), Boost (mono), Ad-libs (mono), Harmonies (stereo). Color and order them. Create Vocal Bus (Bus Channel) and route all vocal tracks to it. Add FX Channels: Room (0.4–0.8 s), Slap (90–120 ms mono), Tempo Echo (1/8 or dotted-eighth). Filter returns (HPF/LPF). Send defaults: Lead low Room + Slap; Boost a touch more Slap; Ad-libs more Room and occasional Echo throw. Lead chain: HPF → Comp A → De-ess → (optional color) → Comp B → tiny presence lift if needed. Markers: Verse / Pre / Hook / Bridge + a 1-bar count-in. Save as Template and add a short description so you (and collaborators) know what’s inside. 13) Printing and handoff (clean on the first try) Before export, trim heads/tails and leave natural reverb tails. Print Main, Instrumental, and A Cappella with identical starts and ends so versions line up in any DAW. Dither only when creating a 16-bit deliverable. If you’ll be sending stems, tighten routing now—group vocals to the Vocal Bus and music to clear buses—then follow a dedicated walkthrough to export stems from Studio One that drop straight into a mix session. 14) Where structure meets sound (add your chain once) A Studio One Recording template can handle wiring and speed; tone comes from the chain. If you want a polished starting point that loads in one click, drop curated Studio One vocal presets into your Lead/Boost/Ad-lib lanes, tweak thresholds to your voice, and re-save the template. You’ll start every session closer to “finished,” with room left for taste and performance. 15) FAQ (quick answers you’ll reuse) Do I need third-party plug-ins?No. Build a stock template first. If you add premium tools, keep a “stock” variant for collaborators. Can I keep multiple templates?Yes—one for two-track vocals, one for sessions with stems, and one for podcast/voiceover is a great start. What about sample rate?Keep 44.1 kHz and 48 kHz versions labeled in the name. Don’t rely on last-minute resampling. How loud while tracking?Raw peaks around −12 to −8 dBFS. After inserts, leave headroom; loudness happens at mastering. 16) Wrap-up Install a Studio One Song Template so the Start Page opens into a studio that already knows you. Keep Track/Channel Presets for roles you reuse. Route vocals to a bus, filter your returns, and track with a lean chain so timing stays honest. With that structure—and lane presets you trust—you’ll hit record sooner and deliver cleaner mixes with fewer revisions.
Learn more
Install Recording Templates in REAPER (Project & Track Templates)
How to Install Recording Templates in REAPER (Project & Track Templates) REAPER is fast when you teach it your routine. Recording templates load tracks, routing, colors, returns, and a lean tracking chain in one move. This guide shows how to install and manage Project Templates and Track Templates, where those files live, how to wire a dependable vocal rig, and how to keep latency low while you record. You’ll also learn a two-track beat layout, a tidy file strategy, and quick fixes when things go sideways. I. REAPER’s template mindset (what you’re really installing) In REAPER, “installing a template” means putting a reusable file where REAPER expects it. There are two main kinds: Project Template — a full session shell: tracks, folder buses, returns, markers, colors, and preferences. You open it from the New Project dialog or set it as default. Track Template — one or more selected tracks with their FX, colors, I/O, and sends. Great for dropping a complete vocal stack into any current song. Both are lightweight. You can keep a few focused Project Templates (e.g., “Vocal over 2-Track,” “Full Stems”) and a small library of Track Templates (Lead, Doubles, Ad-libs, Phone FX). Use whichever fits the session. II. Find the “Resource Path” once, then never guess again REAPER stores Templates, Track Templates, FX Chains, and more under a single “resource” folder. Open it from the app so you always land in the right place. Open path: Options → Show REAPER resource path in explorer/finder. Key subfolders: ProjectTemplates, TrackTemplates, FXChains, and ColorThemes. Backup tip: mirror this whole resource folder to cloud/external weekly. Your brain lives here. III. Install route A — Project Templates (new-project starting points) Open or build a clean session that has the tracks, returns, and routing you want to reuse. Go to File → Project templates → Save project as template…. Name it clearly (e.g., Vocal_Record_48k) and save. REAPER places it in ProjectTemplates. To use it: File → Project templates and choose the name; or set it as the default (see Section V). Rule: never record into the master template. Open → immediately Save As… with the song name. Why it’s great: fastest “new song” workflow and easy to share with a team. IV. Install route B — Track Templates (drop a vocal stack into any session) In your best session, select the tracks that form your vocal rig: Lead, Boost, Ad-libs, Harmonies, and the Vocal Bus. Include their FX and sends. Right-click a selected track header → Save tracks as track template…. Save into TrackTemplates with a precise name, e.g., VocalStack_Rap_Dry or LeadVox_StockClean. To recall: right-click in empty TCP space → Insert track from template → pick your stack or lane. Why it’s great: you can add a complete vocal system to any song without changing the rest of the project. V. Make it the default so REAPER always opens “record-ready” Go to Options → Preferences → Project. Under “When creating new projects,” choose Use the following project file as a template. Browse to your Vocal_Record_48k.RPP inside ProjectTemplates. Click OK. New projects now start from that layout automatically. Tip: keep a second default for 48 kHz video work if you bounce between audio and post. VI. The vocal chassis (folder buses, returns, and names that stick) REAPER’s folder tracks route like buses. Use them to keep your session tidy and to simplify rides and printing. Folder structure: make a parent folder named Vocal BUS. Child tracks: Lead, Boost, Ad-libs, Harmonies. The parent receives them all. Returns: create tracks named Room, Slap, Tempo Echo. Disable their record arms; set them to “Receives” only. Sends: from Lead to Room/Slap at low levels; Boost a touch more Slap; Ad-libs a bit more Room/Echo for character. Filters on returns: insert ReaEQ with HPF ~150 Hz and LPF ~6–7 kHz so monitoring stays clear on earbuds. Markers: drop Verse / Pre / Hook / Bridge and a 1-bar count-in; you’ll punch faster. Naming discipline: “Lead Vox,” “Boost Lines,” “Ad-libs,” “Harmonies,” “Vocal BUS,” “Room,” “Slap,” “Tempo Echo.” No puzzles. Your future self will mix faster. VII. Low-latency confidence (monitoring that feels like a record) Keep the tracking chain lean. Save polish for mix time. Device buffer: choose your interface; 64–128 samples while recording. Raise later for heavy mixes. Lead tracking chain: ReaEQ HPF ~80–100 Hz → ReaComp (2:1–3:1, 10–30 ms attack, 80–160 ms release, ~3–5 dB on phrases) → de-ess (ReaXcomp band or a de-ess preset) → optional tiny color (JS saturation) → fast peak catcher (1–2 dB). De-ess before air: if you add an air shelf later, revisit the de-esser so S’s stay friendly. Monitoring FX chain (optional): put comfort EQ/comp on the Monitoring FX chain so recordings stay dry while the singer hears polish. VIII. Duck your delays the REAPER way (simple sidechain) Let Slap and Echo bloom between words, not on them. On the Slap return, set track channels to 4. Insert ReaComp before the delay. Set Detector to auxiliary 3/4 (the sidechain). From Lead track, add a Send to the Slap’s channels 3/4 at 0 dB (this is the key signal). Set ReaComp for a light dip (2–3 dB GR) with a fast release so repeats re-appear in gaps. Use the same idea for the Tempo Echo return if you want extra clarity during dense lines. IX. Two-track beat mode (vocals over a stereo instrumental) When stems aren’t available, you still need lyric clarity and hook size. Keep a separate template variant: Tracks: BEAT (stereo), then the same Vocal BUS and returns. Beat control: use item gain on the BEAT region to ride intros and hooks without smashing the master later. Space choice: smaller Room and lower sends than with full stems; dry-leaning verses read better over dense two-tracks. Hook lift: automate a small Echo send bump on the last bar into each chorus. X. File hygiene that survives laptops, studios, and updates Self-contained template folder: keep a “Template Assets” folder next to your .RPP template with notes, impulse responses, and any custom JS presets. Versioning: when a template evolves, save a new version (_v1.2). Never overwrite the master. Sample-rate clarity: keep 44.1k and 48k variants if you switch between music and video jobs. Backups: zip the ProjectTemplates and TrackTemplates folders monthly. Your future self will thank you. XI. Symptom → single move (troubleshooting you’ll actually use) Template not listed: confirm the file lives in ProjectTemplates. Use the Resource Path menu to open the real folder; relaunch REAPER. Track Template loads but sends don’t work: the return names or channel counts changed. Recreate the send to the correct return, then re-save the Track Template. Doubled/flanged monitoring: you’re hearing hardware and software together. Mute one path or enable Monitoring FX and track dry. FX lag while recording: bypass look-ahead analyzers and long reverbs. Track with Comp/De-ess only; add polish after takes. S’s pierce on earbuds: widen the de-ess band; reduce any air by 0.5 dB; low-pass delay returns near 6–7 kHz. Hook collapses in mono: keep Lead centered and relatively dry; put width into doubles/ad-libs, not the Lead lane. Beat buries the voice (two-track): trim BEAT item −1 to −2 dB; ride Lead +0.5 dB; avoid crushing the chain to “keep up.” Sidechain not triggering: confirm the return has 4 channels; send the Lead to 3/4; set ReaComp detector to aux 3/4. XII. Ten-minute blueprint (from empty to record-ready) New project → set BPM/key if helpful. Save as “Template — Vocal Record — 48k.rpp”. Make a folder bus called Vocal BUS. Add child tracks: Lead (mono), Boost (mono), Ad-libs (mono), Harmonies (stereo or dual mono). Color them consistently. Create returns: Room (ReaVerbate/ReaEQ filters), Slap (ReaDelay 90–120 ms), Tempo Echo (synced 1/8 or dotted-eighth). Filter returns (HPF/LPF). Wire sends from vocal lanes to returns. Keep conservative default levels. Lead chain: ReaEQ HPF → ReaComp (shape) → de-ess band (ReaXcomp or de-ess preset) → optional light JS saturation → fast peak catcher. Markers for Verse / Pre / Hook / Bridge + a 1-bar count-in. Save project as template (File → Project templates → Save…). Also select all vocal tracks + returns and Save tracks as track template… named VocalStack_StockClean. XIII. Organization patterns that scale Keep a few focused starting points rather than one giant file. Examples: Vocal_Record_48k — lean returns, tracking chain only, Monitoring FX optional. Dubs_2Track_48k — BEAT stereo track, tighter returns, echo throw automation lanes. Podcast_DualMic_48k — two mono mics with gentle expanders, de-essers, and a mono bus for loudness control. Pair each with Track Templates: LeadVox_StockClean, LeadVox_Punch, AdLib_Phone, Doubles_Tight. Label by intent, not just gear names. XIV. Export and versioning (clean handoffs every time) Heads/tails: trim silence, add short fades, and leave clean reverb tails. Prints: Main, Instrumental, and A Cappella should share identical starts and ends so versions line up anywhere. Format: 24-bit WAV at session rate. Dither only when reducing bit depth for a specific deliverable. Archiving: save the final song as a new project folder; keep the master template untouched. XV. Next read: build a template fast (even if you’re new) If you want a quick primer that pairs with this article, this walk-through shows a simple, repeatable layout you can adapt to REAPER in minutes: build a vocal recording template in 10 minutes. Use it as a checklist while you save both your Project Template and your Track Template variants. XVI. Closing thoughts REAPER rewards structure. Put your template files in the right folders, keep roles separated, filter returns, and track with a lean chain. Save a true Project Template for “day one,” and a few Track Templates for lanes you use every session. With those pieces in place—and a tone starter like Reaper vocal presets for fast recall—you’ll open to a studio that already knows you, hit record sooner, and deliver cleaner mixes with less guesswork.
Learn more
How to Install Recording Templates in Pro Tools
In Pro Tools, a “recording template” is a ready-to-use session shell: named tracks, returns, colors, routing, metering, and a lean tracking chain that opens in one click. You can build it as a Session Template, keep modular Track Presets for lanes, or import a tuned vocal stack from another session. This guide walks you through each install route, plus bus mapping that never breaks, low-latency setup, a two-track variant, and a quick troubleshooting index. If you also want an instant tone base that drops into your vocal lanes, audition curated Pro Tools vocal presets and then fine-tune thresholds, de-ess bands, and send levels for your mic and room. I. Template mental model (what you’re actually saving) Pro Tools gives you three reusable building blocks. Knowing which one you’re using—and why—keeps sessions clean and predictable. Session Template: a complete studio shell that appears in the New Session Dashboard. It includes lanes, I/O, returns, markers, and colors. Best when you start from zero. Track Preset: a single lane (or folder of lanes) with inserts, sends, I/O, comments, and color. Best for dropping a Lead/Doubles/Ad-libs chain into an existing session. Import Session Data: cherry-pick tracks (and their buses) from another session—your “vocal stack in a box.” Best for revisiting a sound you love. All three approaches work together. Many engineers keep one Session Template plus a small library of Track Presets for roles and effects. II. Dashboard route: “Save as Template” → one-click in New Session Open a clean session and build your layout (see Section IV). Name buses clearly (e.g., “Vox Bus,” “Slap,” “Plate”). Go to File → Save as Template…. Give it a clear name like Vocal_Record_48k and put it in a meaningful category. Next time you create a project, open the Dashboard, choose your template under My Templates, set the file location, and click Create. Immediately Save As… with the song name so you never overwrite the master. Tip: keep the template light. Fast loads encourage you to use it every time. III. Five dependable install routes (pick what fits the day) Session Template (primary): save once; launch from the Dashboard forever. Cleanest new-song workflow. Track Presets (modular): right-click a track nameplate → Recall Track Preset… to load “Lead — Clean,” “Double — Tight,” “Ad-lib — Phone,” etc., into any session. Import Session Data: File → Import → Session Data… to bring your vocal lanes and auxes—preserving routing, groups, and automation when you choose them. Starter “master copy”: keep a plain .ptx “master” in a Templates folder. Duplicate it in Finder/Explorer, rename, and work—useful for teams that sync folders. Folder tracks for lane kits: store a ready-to-drop Folder Track that contains Lead/Doubles/Ad-libs/Harmonies plus sends. Drag it between sessions. IV. Wire the vocal rig (a stack that scales) Label lanes by role and keep each job on its own rails. Your eyes—and automation—will move faster. Lead Vox (mono): center lane; sends to Room/Slap. Inserts (tracking): HPF → Comp A (shape) → De-ess → (optional color) → Comp B (peaks) → tiny presence lift only if diction hides. Boost Lines (mono): tight unisons on selected words; slightly higher HPF and a touch more de-ess; tucked −6 to −9 dB. Ad-libs (mono): band-limited (HPF ~200 Hz, LPF ~8–10 kHz); pan off-center by section; short throws into transitions. Harmonies (stereo or dual mono): darker tone; wider placement; minimal air. Vox Bus (stereo submix): gentle glue and a broad final de-ess; leave the Master clean while tracking. Returns (auxes): Room 0.4–0.8 s, Slap 90–120 ms mono, Tempo Echo 1/8 or dotted-eighth with low feedback. Filter returns (HPF ~150 Hz, LPF ~6–7 kHz) so tails never hiss. Markers: Verse / Pre / Hook / Bridge; add a 1-bar count-in for quick punches. Two-track variant (vocals over a stereo instrumental): add a Beat track (stereo). Keep returns smaller; dry-leaning verses read better over dense 2-tracks. Automate a small Echo send rise on the last bar into hooks. V. I/O Setup and bus mapping that won’t betray you Templates fail when I/O doesn’t match the current rig. Lock this down and you’ll stop chasing silent sends. Name buses, not just outputs. Use meaningful labels (“Vox Bus,” “Slap,” “Plate”). Future you—and collaborators—will route correctly without guessing. Export I/O for travel. Save your I/O as a preset so you can reload it on any system before opening the template. When sessions come from other rigs: open I/O Setup, reset Bus paths to default or to your preset, then relink sends to your labeled returns. Don’t duplicate mystery buses. Import Session Data smartly. If you’re merging a vocal stack into an existing song, enable Match Tracks by Name to keep automation and routing intact. VI. Low-latency tracking that still feels like a record “Feel” beats features. Keep tracking chains lean; add polish later. Playback Engine: choose your interface; 64–128 samples while recording; raise buffer for mixing. Record gain target: raw input peaks around −12 to −8 dBFS; after inserts, keep peaks near −6 to −3 dBFS. Leave loudness for mastering. Two-compressor logic: Comp A shapes phrases (2–3 dB GR, 10–30 ms attack, 80–160 ms release). Comp B only catches spikes (1–2 dB) so sends stay stable. De-ess before “air.” Tame S’s first; then a small 10–12 kHz shelf if needed. Delay ducking. Key a light compressor on the Slap aux from the Lead so echoes bloom in gaps, not on syllables. VII. Team-safe, portable sessions (so nothing goes missing) Save Copy In for hand-offs. When you share, use File → Save Copy In… with audio files included so collaborators don’t chase media. Keep assets close. Store impulse responses, custom samples, and notes in a sibling “Template Assets” folder next to the session for simple zip/share. Versioning: suffix small updates (_v1.1, _v1.2). Never overwrite the master template. Rate variants: keep 44.1k and 48k template versions if you bounce between music and video work. VIII. Symptom → single move (fast fixes) Template not in Dashboard: re-save via File → Save as Template… into a visible category; restart Pro Tools. Sends do nothing: your bus map changed. Open I/O Setup → Bus; load your I/O preset or reset to default; relink Slap/Plate. Doubled/flanged monitoring: you’re hearing hardware and software together. Mute one path or monitor through a leaner chain. FX lag while tracking: bypass heavy look-ahead plugs; record with Comp/De-ess only; print sweetening later. Click prints in bounces: route the metronome to cue only; make sure no click aux reaches the print path. S’s sting on earbuds: widen the de-ess band slightly; back off air by 0.5 dB; low-pass delay returns to ~6–7 kHz. Hook collapses in mono: keep Lead dry-leaning and centered; put width in doubles/ad-libs, not the Lead lane. Beat overwhelms the voice (2-track): trim Beat region −1 to −2 dB; raise Lead +0.5 dB; don’t over-compress to “keep up.” IX. Coffee-break build (from blank to record-ready in ~10 minutes) New session: name it “Template — Vocal Record — 48k.” Set tempo/key if helpful. Add lanes: Lead (mono), Boost (mono), Ad-libs (mono), Harmonies (stereo or dual mono). Color and order them. Create returns: Aux A = Slap (mono 90–120 ms), Aux B = Room/Plate (0.4–0.8 s). Filter both (HPF ~150 Hz, LPF ~6–7 kHz). Route: all vocal lanes → Vox Bus (stereo); Vox Bus → Master. Sends from Lead to A/B at conservative levels. Tracking chain on Lead: HPF → Comp A → De-ess → (optional color) → Comp B → tiny presence lift if needed. Markers: drop Verse / Pre / Hook / Bridge; add a 1-bar count-in. Save as Template: File → Save as Template… → category “Vocal.” Keep the master clean; never record into it. X. Housekeeping that keeps sessions calm One job per lane. Don’t stack roles on the Lead. Use Boost for emphasis words; Ad-libs for call/response; Harmonies for size. Filter returns. Returns that carry only midrange keep tracking honest on small speakers. Small moves win. Fix boxiness and sibilance first. A wide −1 dB can improve a record more musically than a narrow −3 dB. Print dry, monitor wet. Capture a clean Lead; if “vibe” helps, print a safety Lead_Wet on a separate track. XI. Next up: chain-level setup tailored to this DAW Once your template opens flawlessly, dial the lane chains so they translate on phones and speakers without harshness. This step-by-step walkthrough covers Track Presets, gain targets, and modern ambience routing, all inside Pro Tools: How to Use Vocal Presets in Pro Tools. XII. Wrap-up Pro Tools templates reduce decisions and protect headspace. Save a true Session Template for new projects, keep a tiny library of Track Presets for roles, and import a trusted vocal stack when you need that exact sound again. With labeled buses, filtered returns, and a lean tracking chain, Pro Tools will open like a studio that already knows you—so you hit record sooner and deliver cleaner mixes on the first pass.
Learn more