Stock Vocal Presets & Templates
Streamline your workflow with our ready-to-use Recording Template and Stock Vocal Presets.

Type: Recording Template
Cubase Recording Template (Stock Plugins)
Type: Vocal Preset
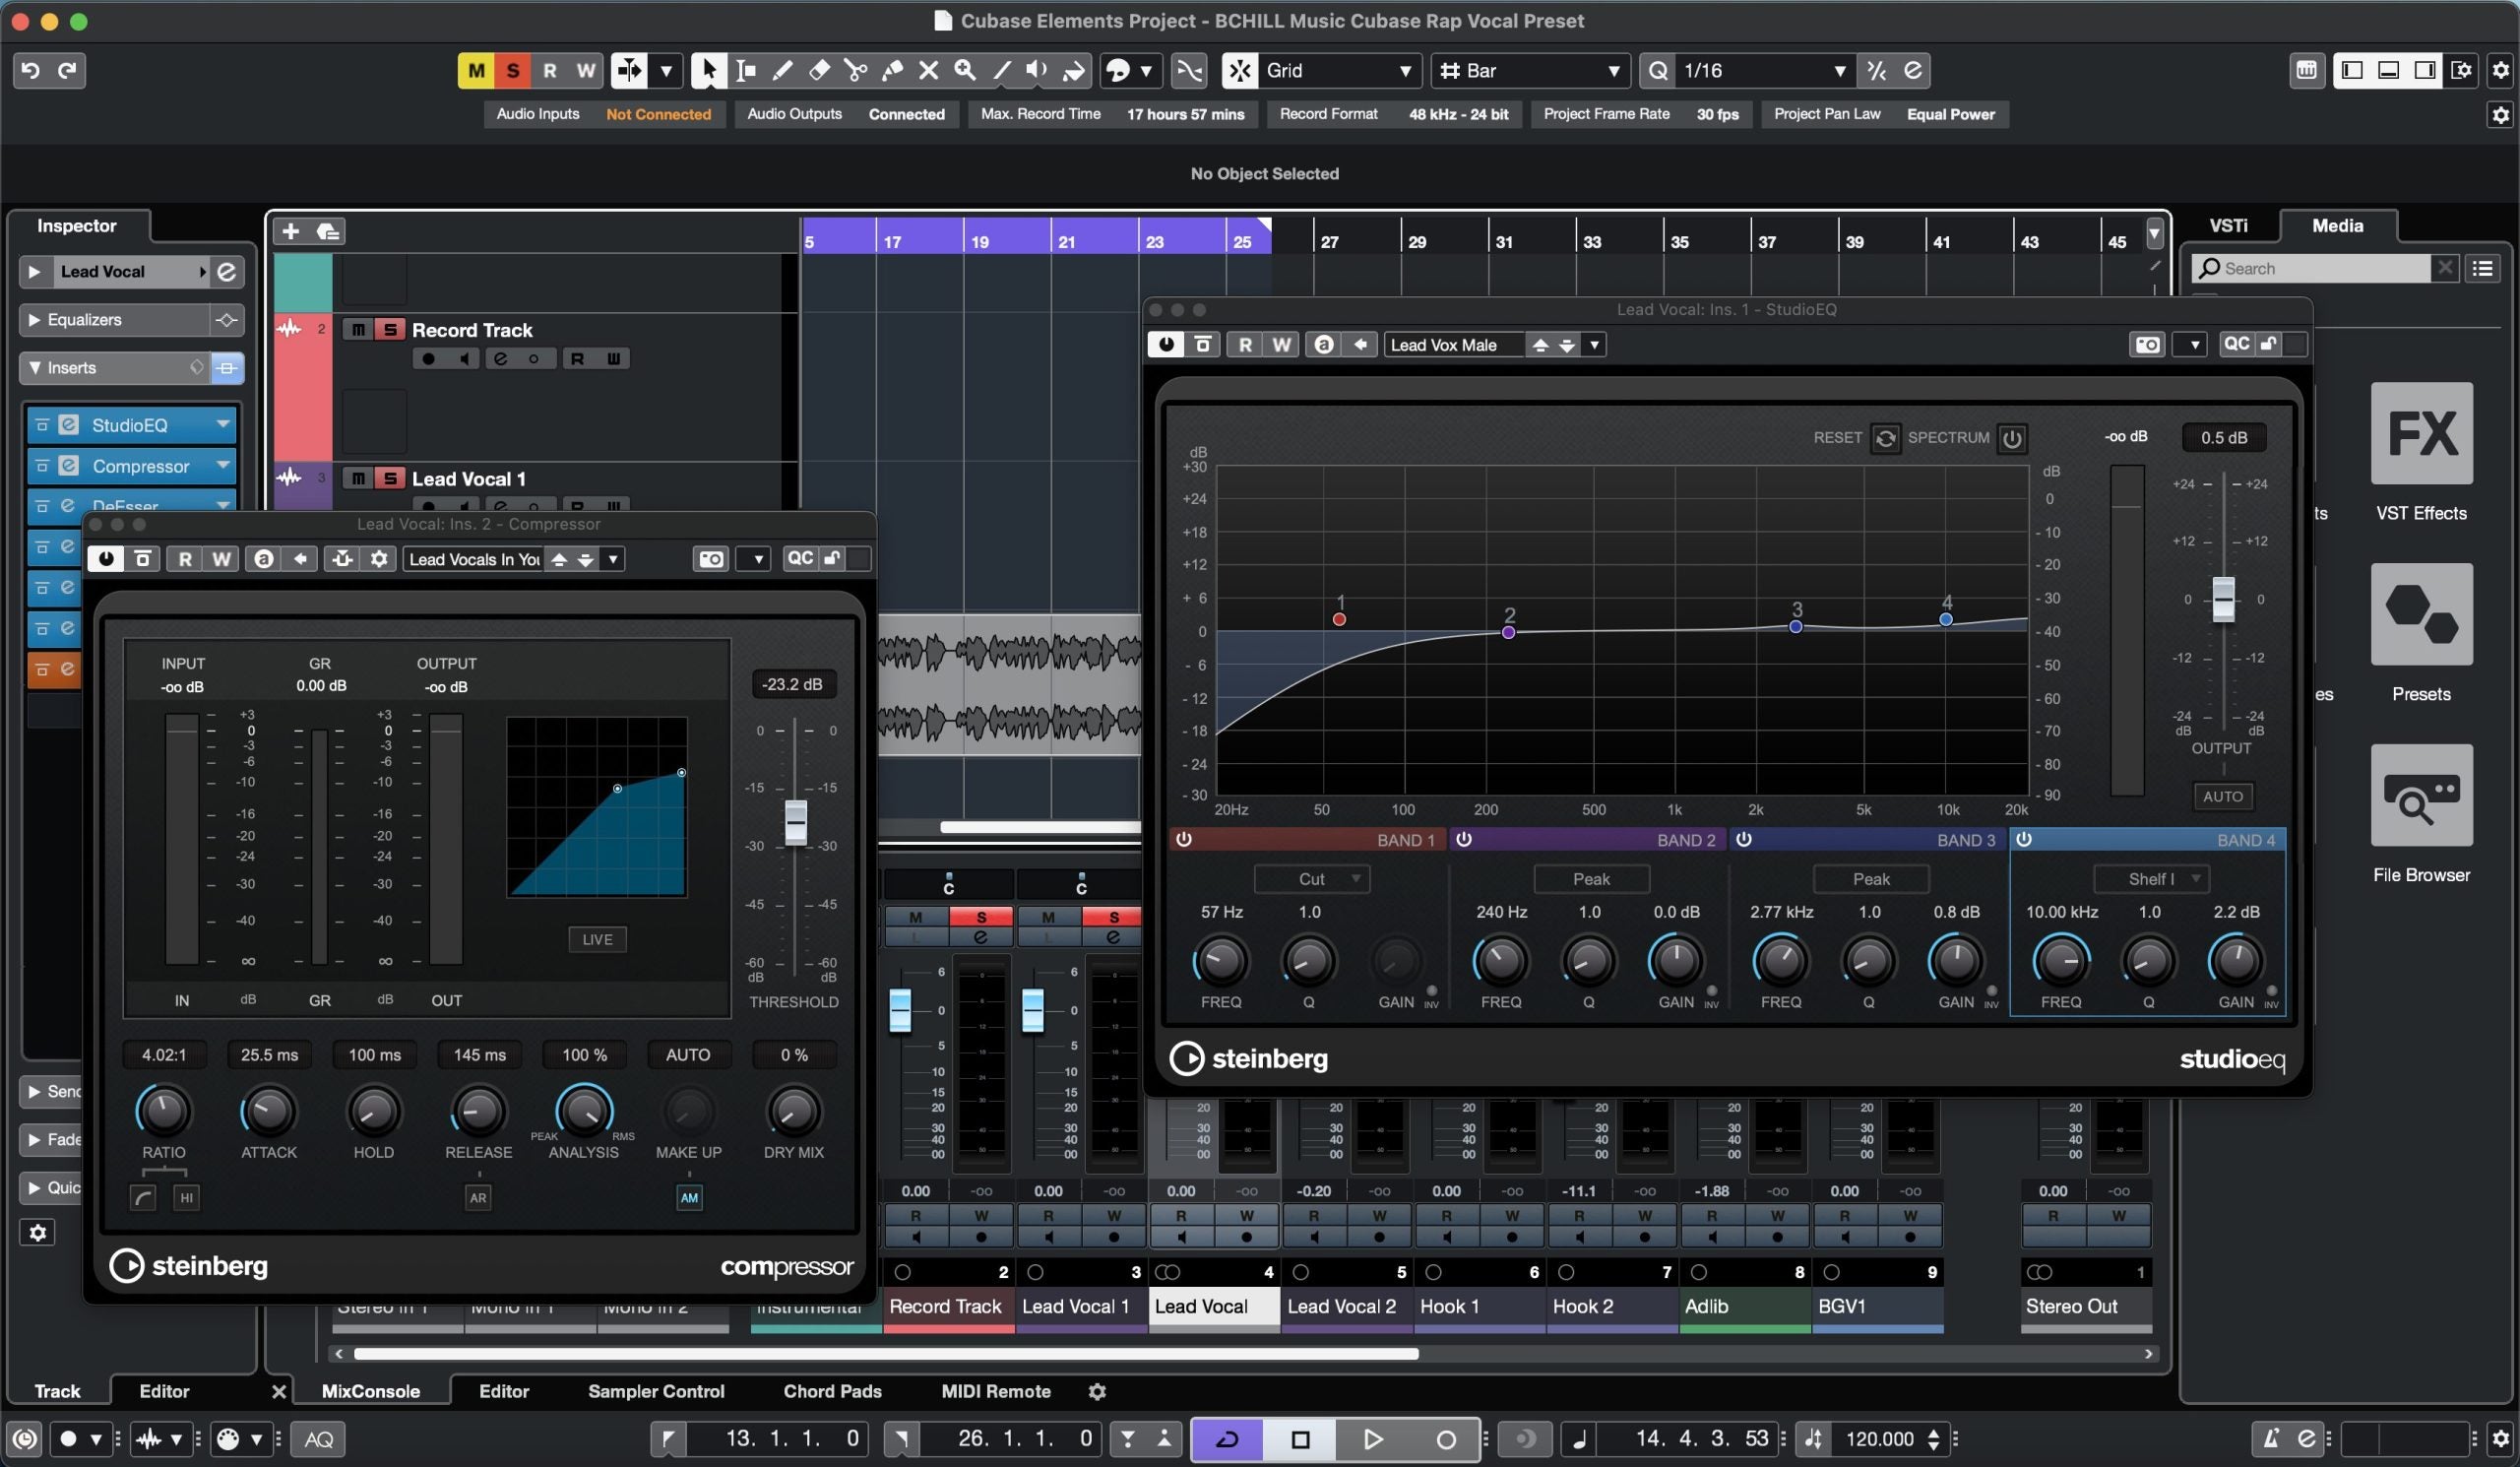
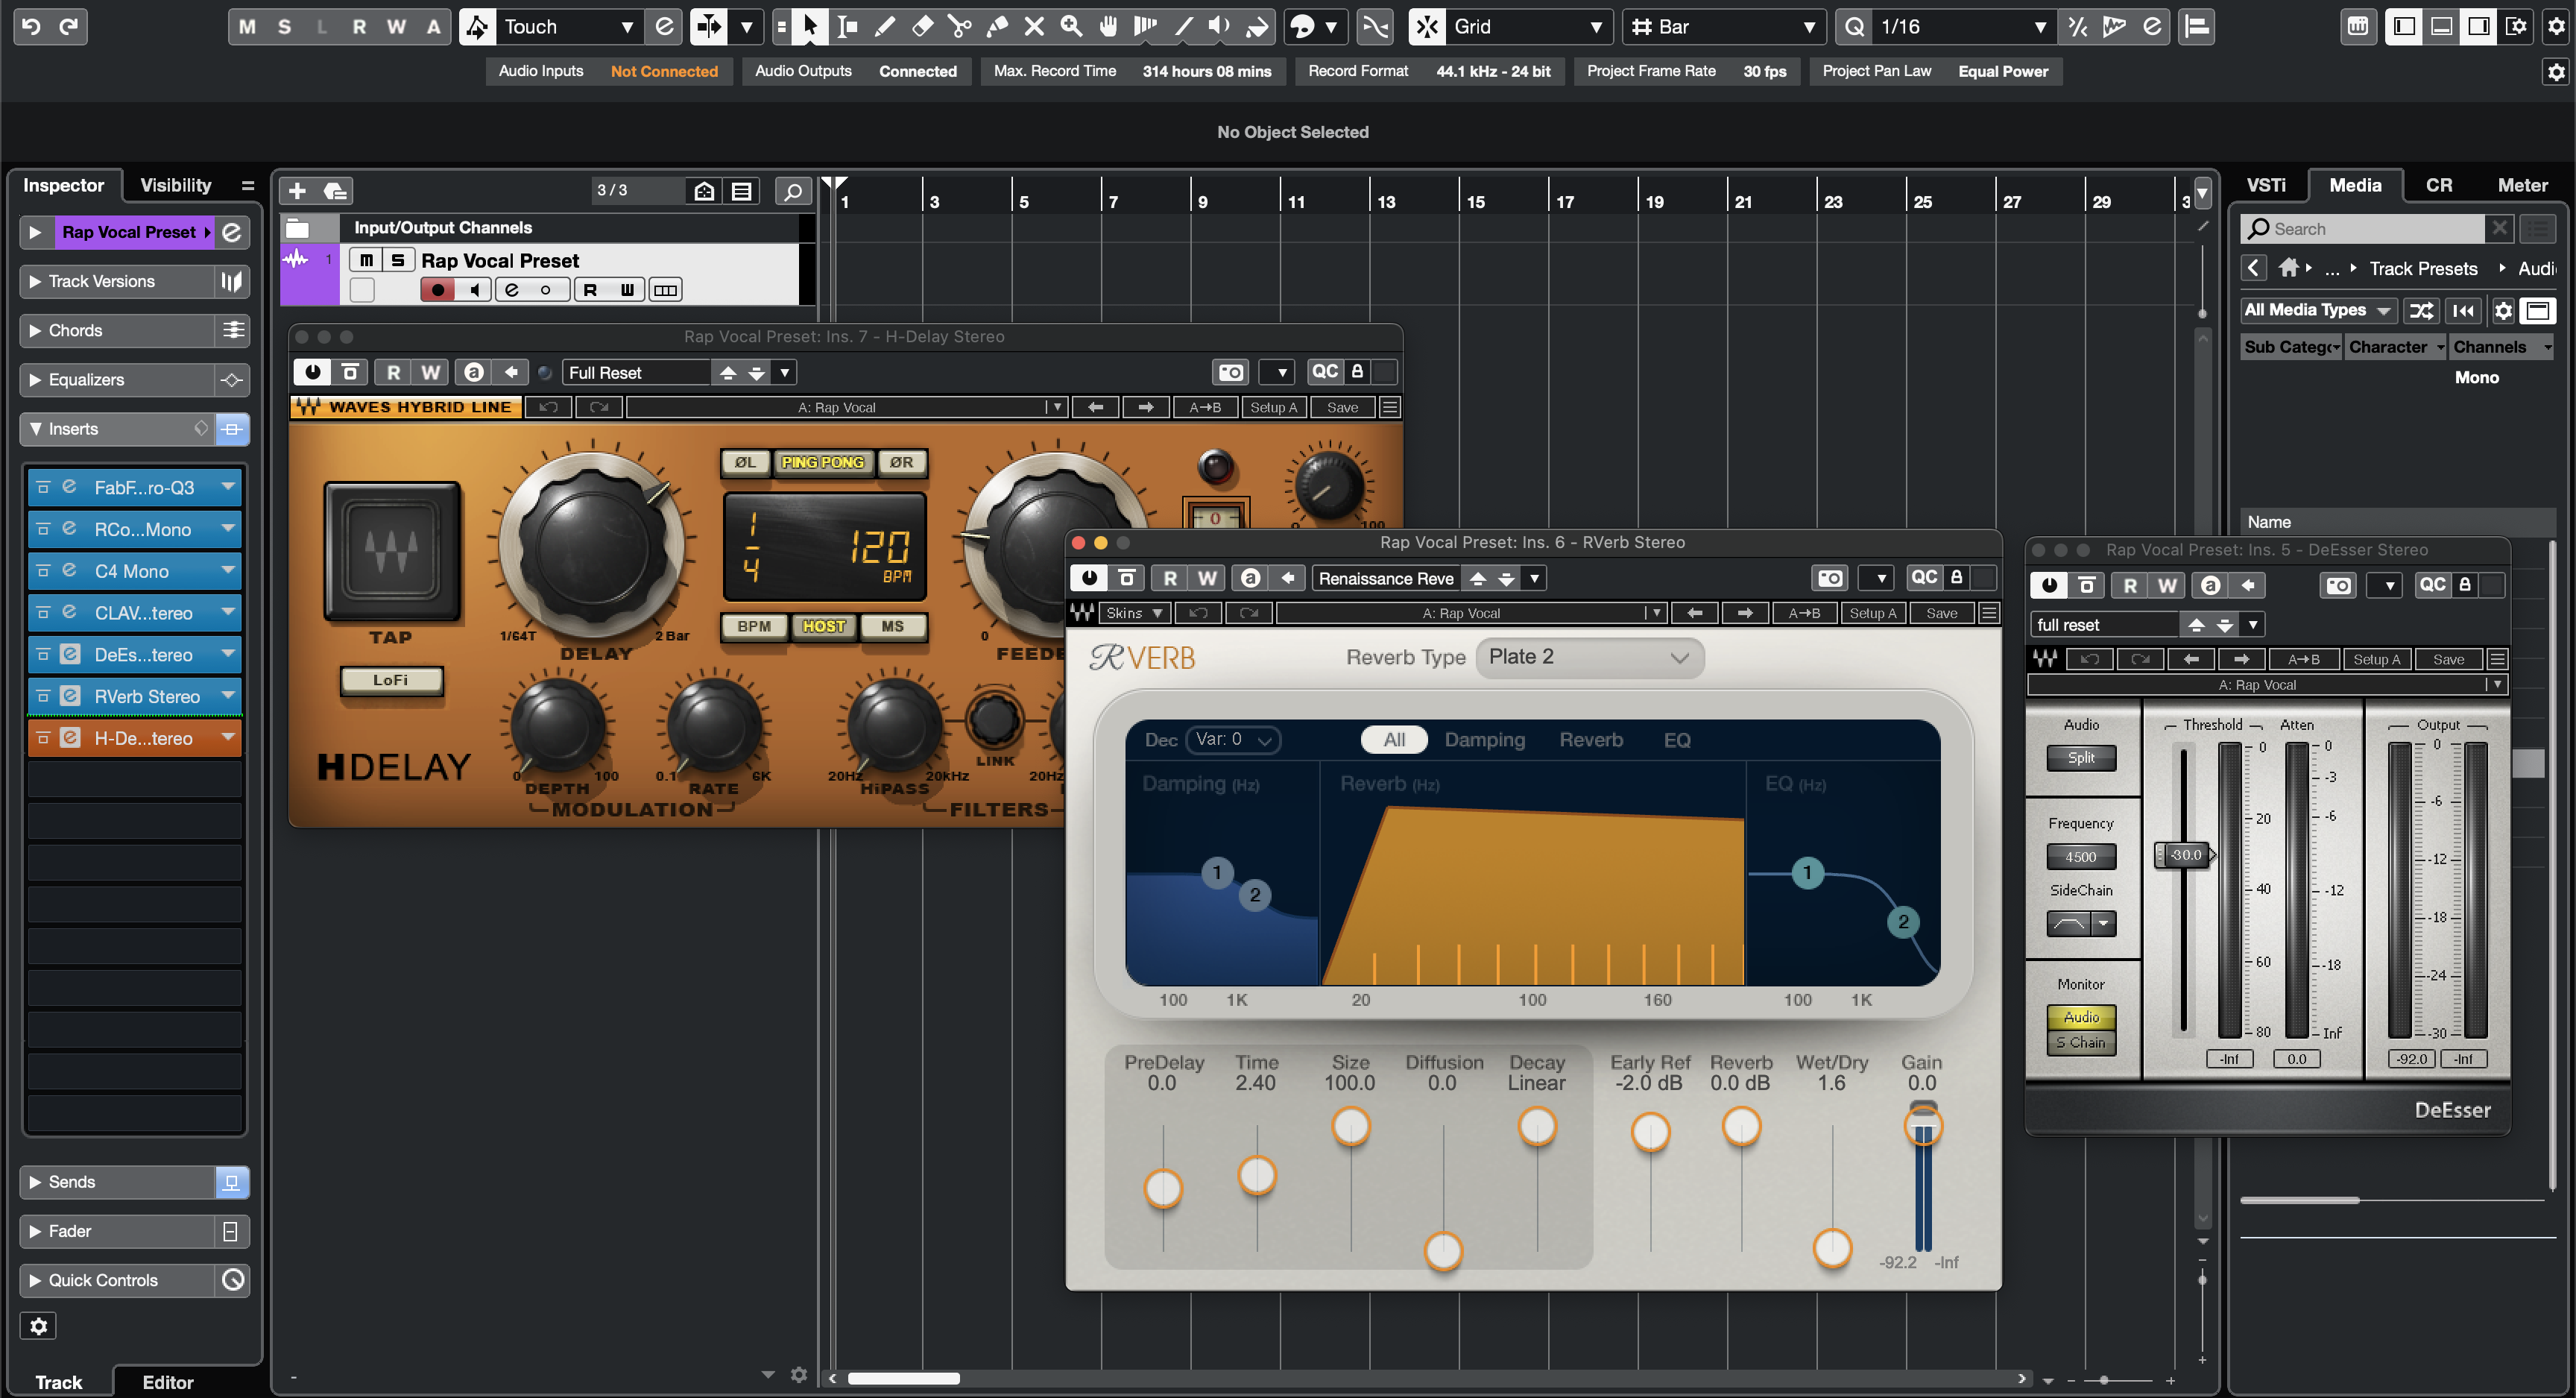
Rap Vocal Preset for Cubase (Stock Plugins)

Type: Vocal Preset
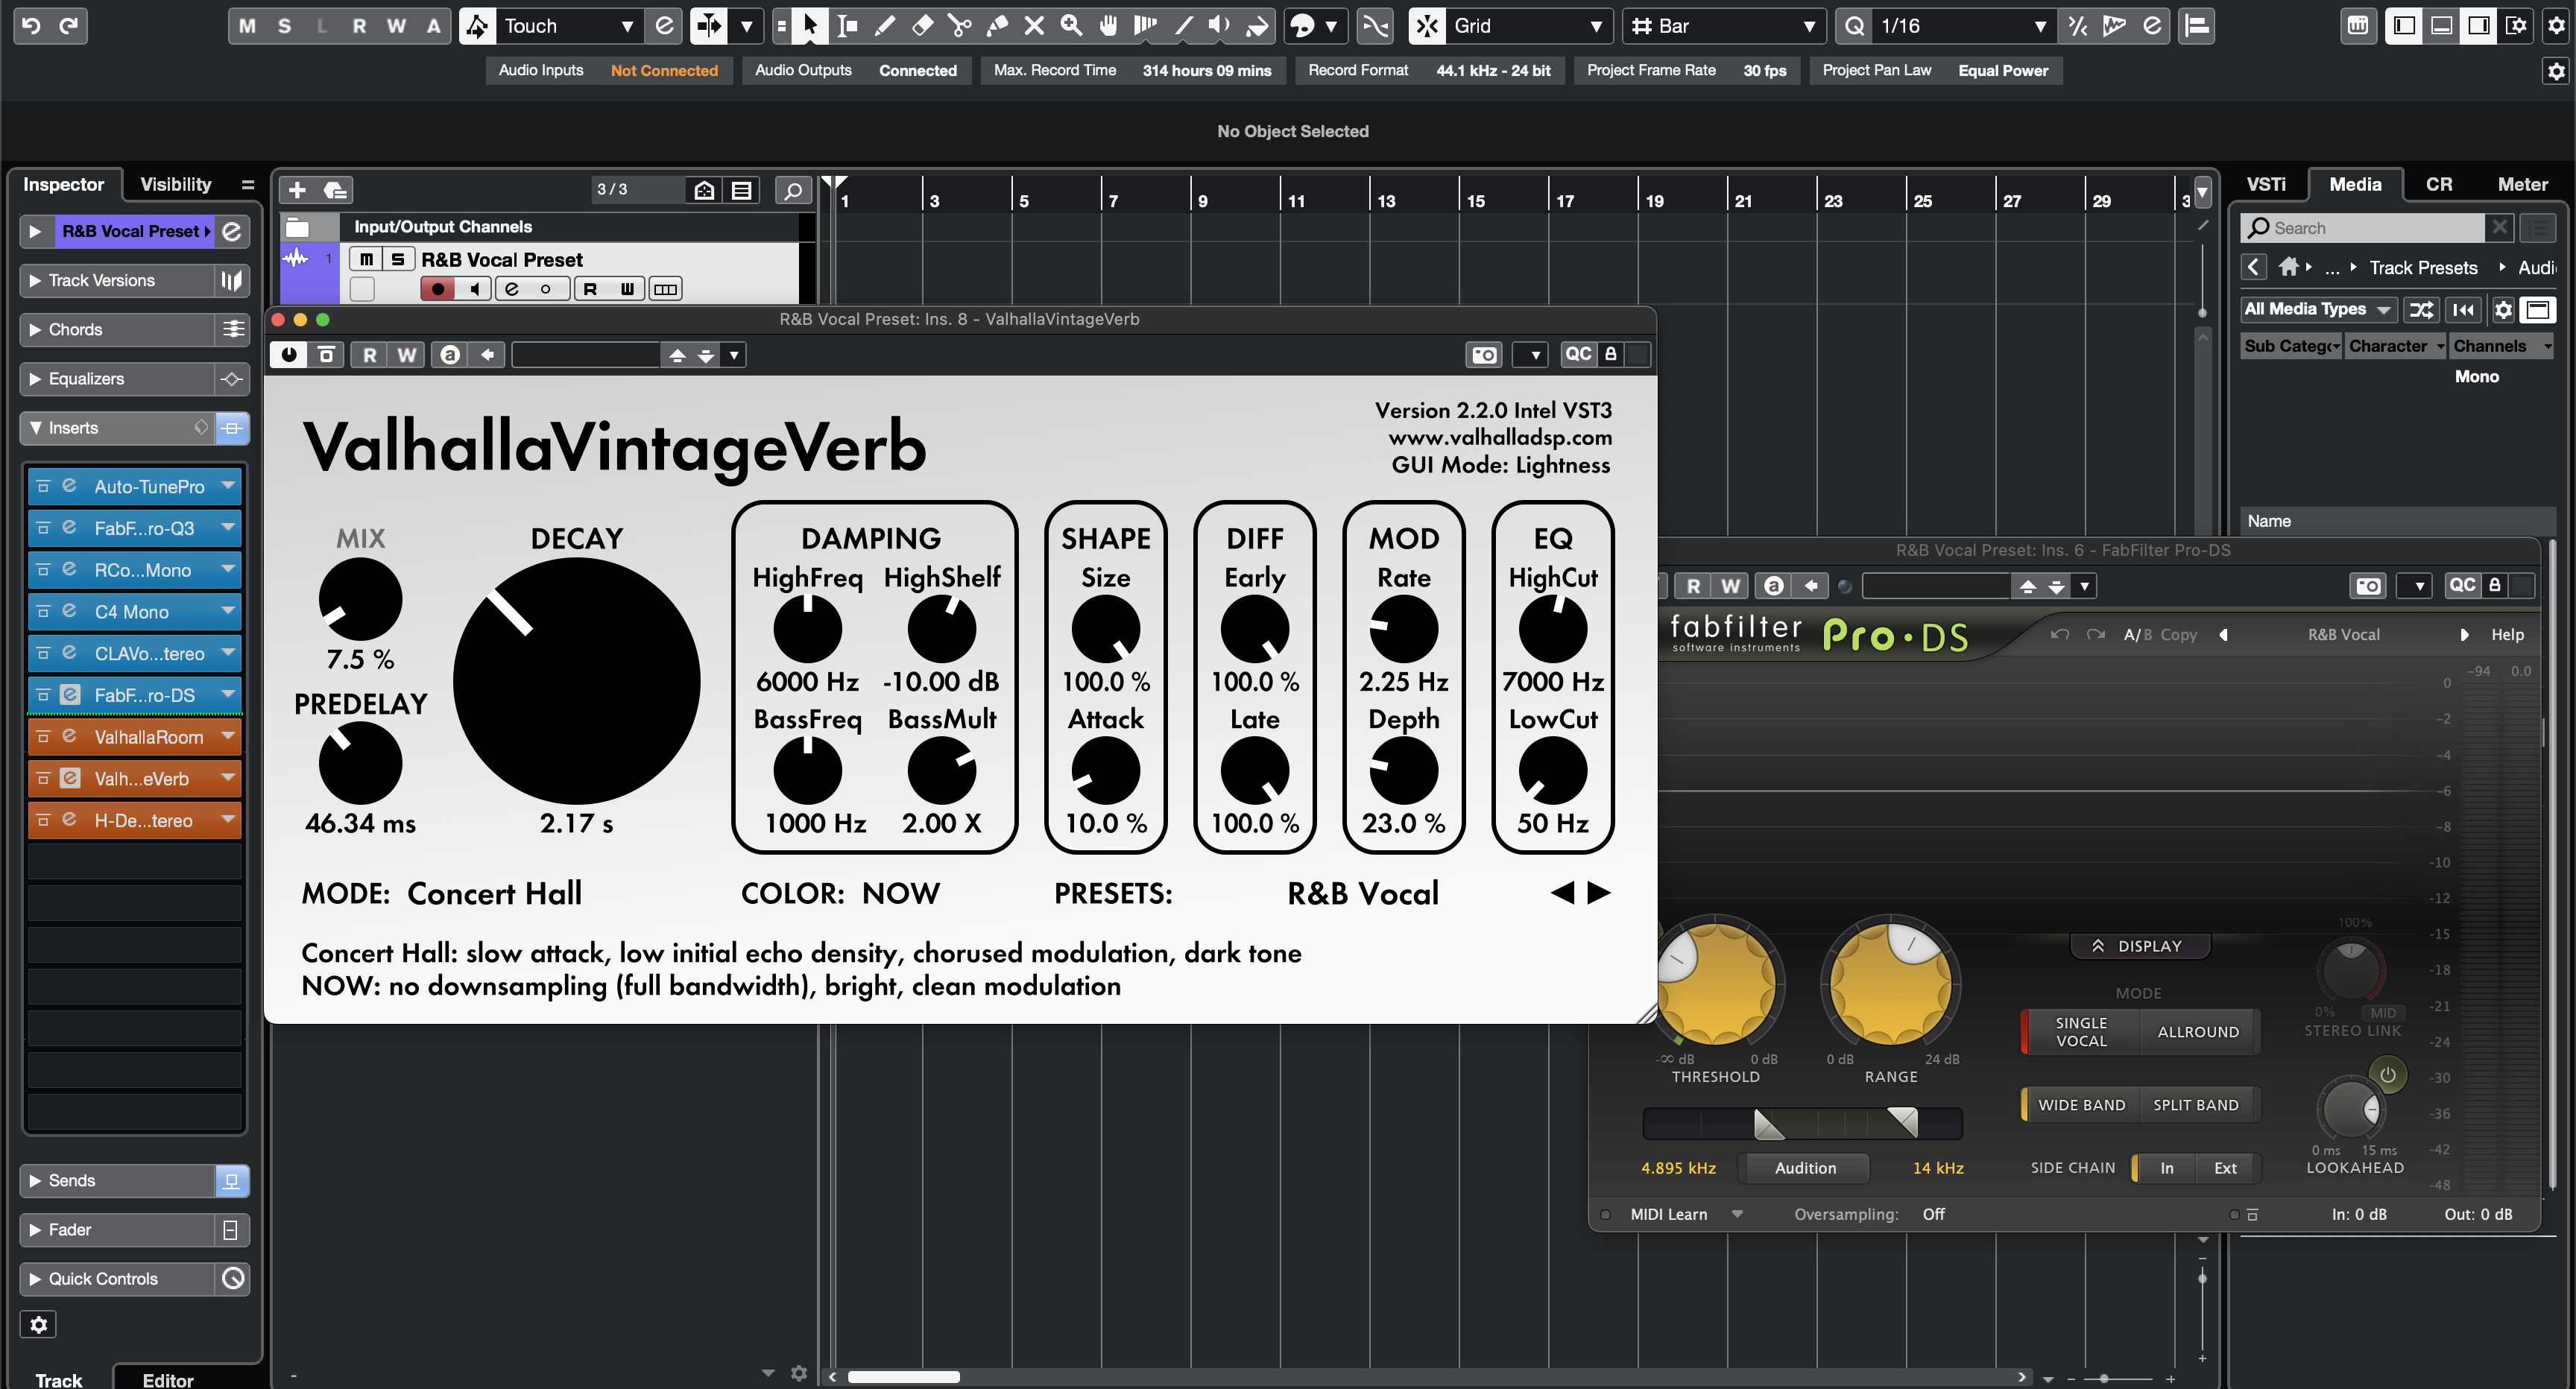
R&B Vocal Preset Cubase (Stock Plugins)
Type: Vocal Preset
Clear Vocals Preset Cubase (Stock Plugins)
Premium Vocal Presets
Experience unmatched sound quality with our Premium Vocal Presets, crafted with top-tier plugins.

Type: Vocal Preset
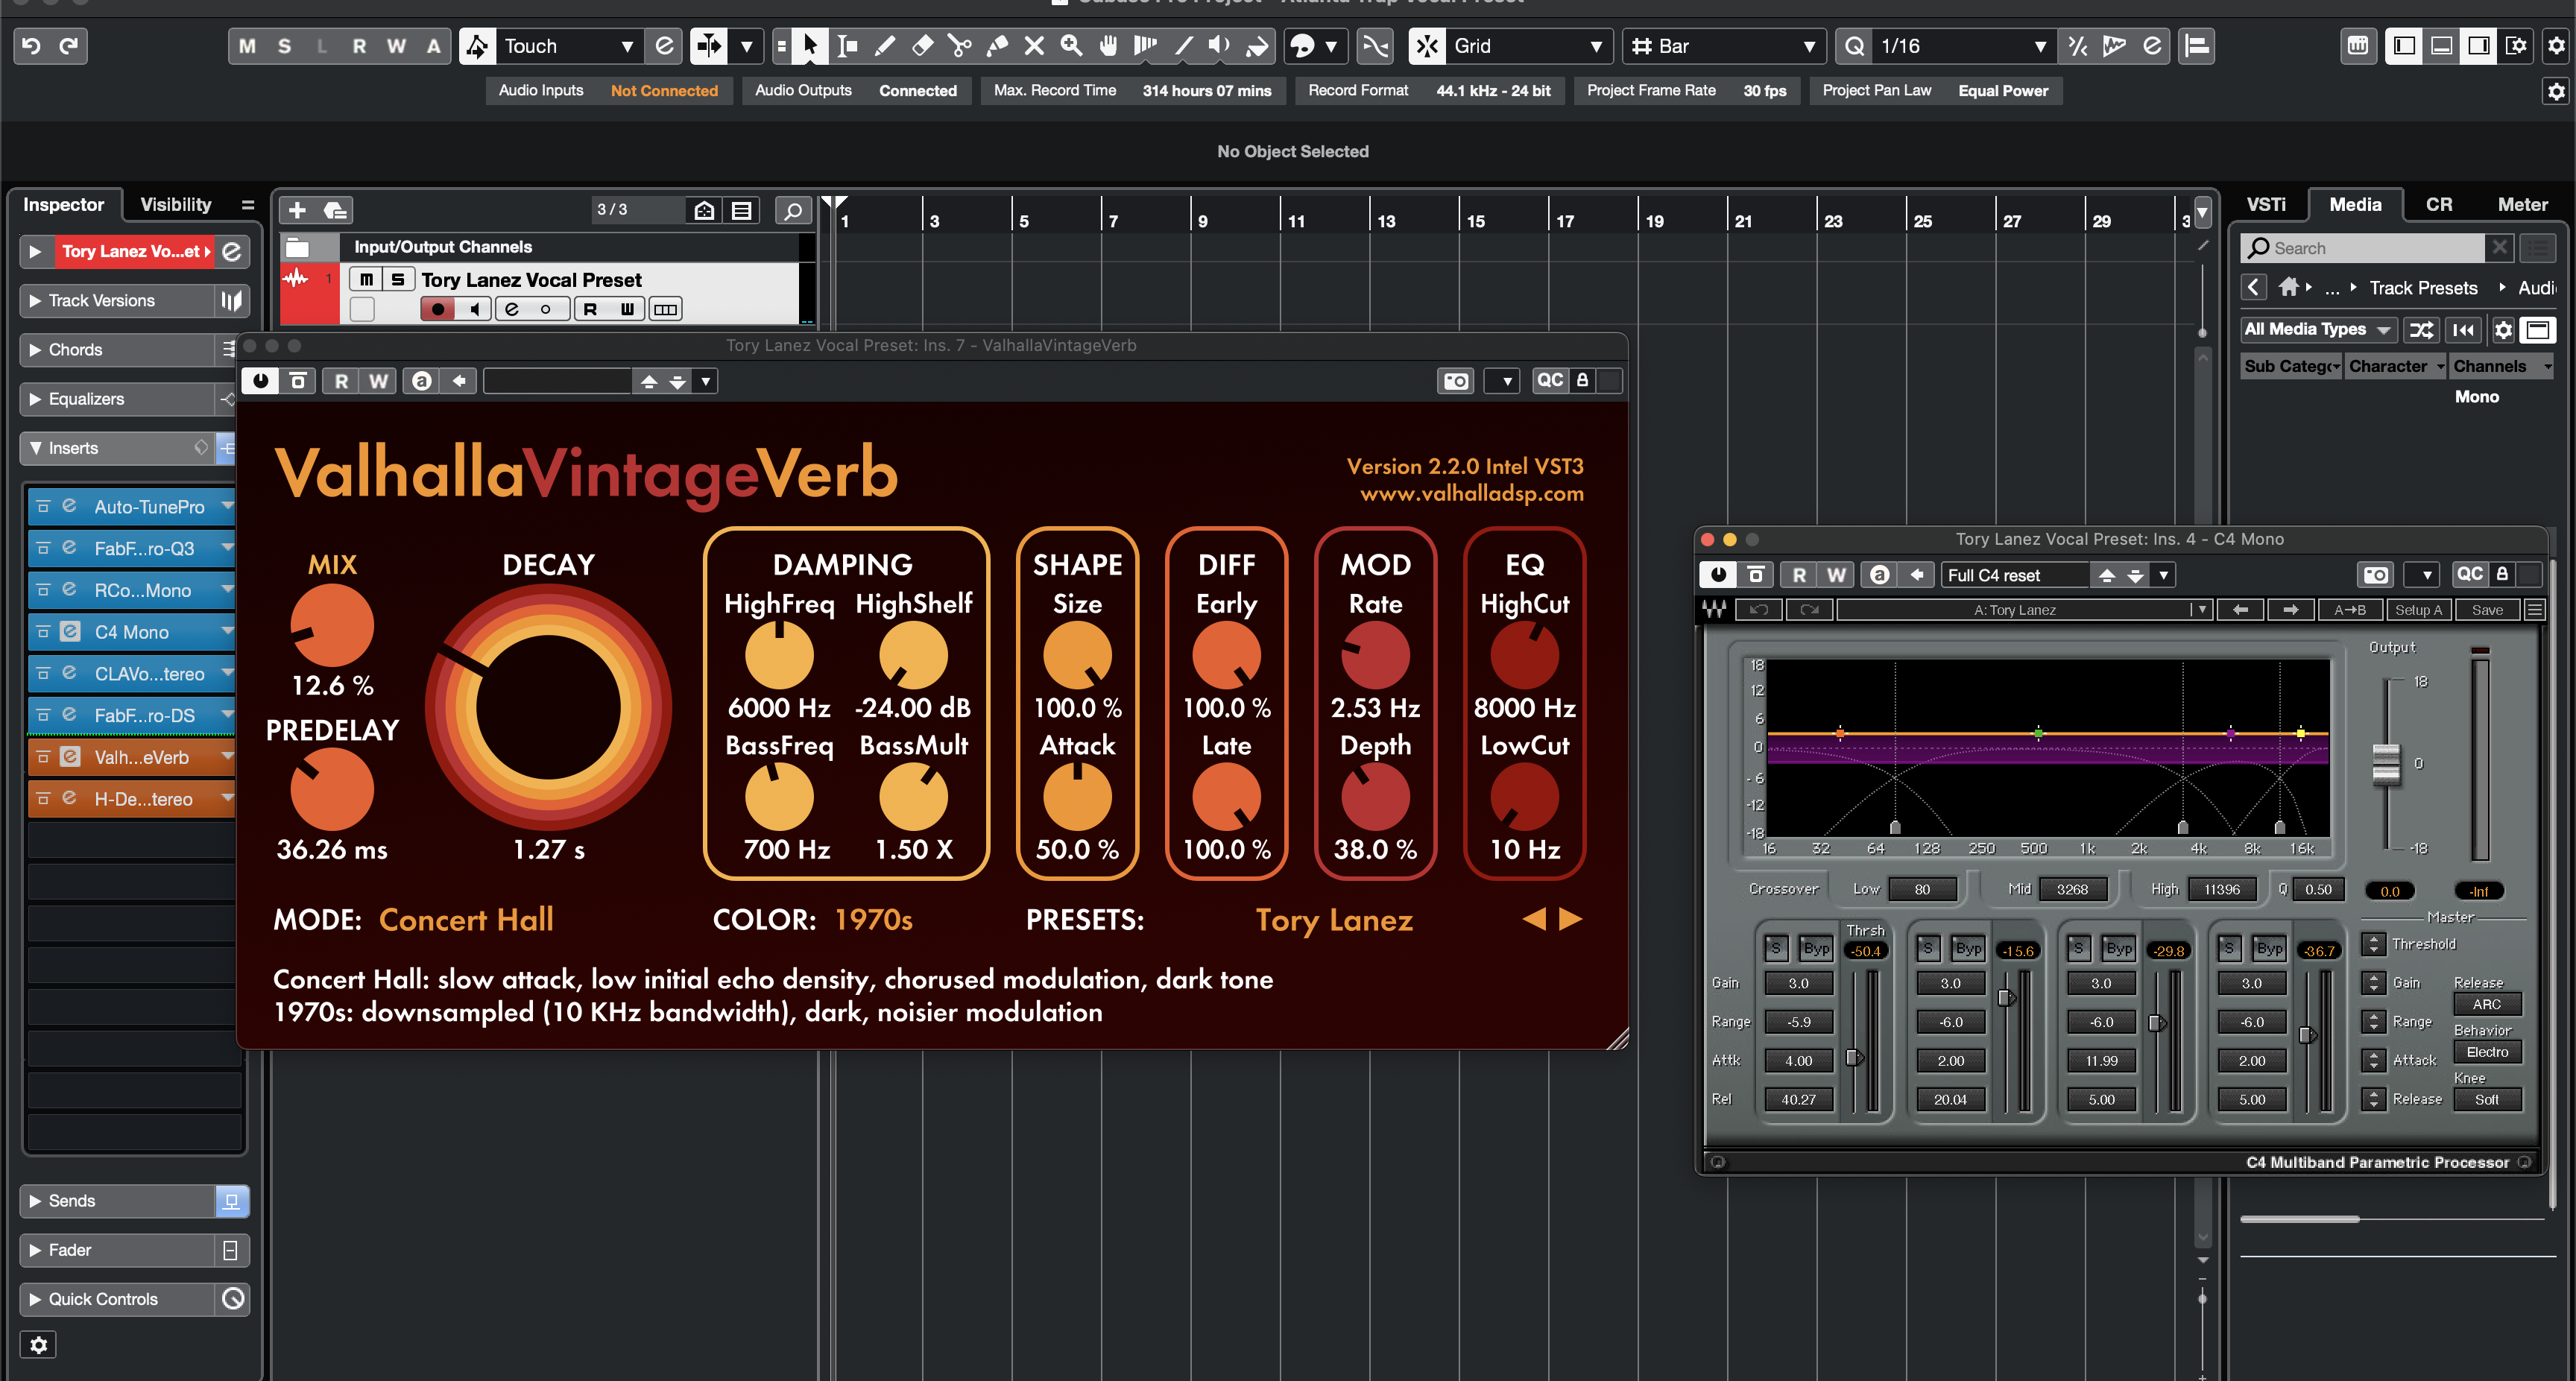
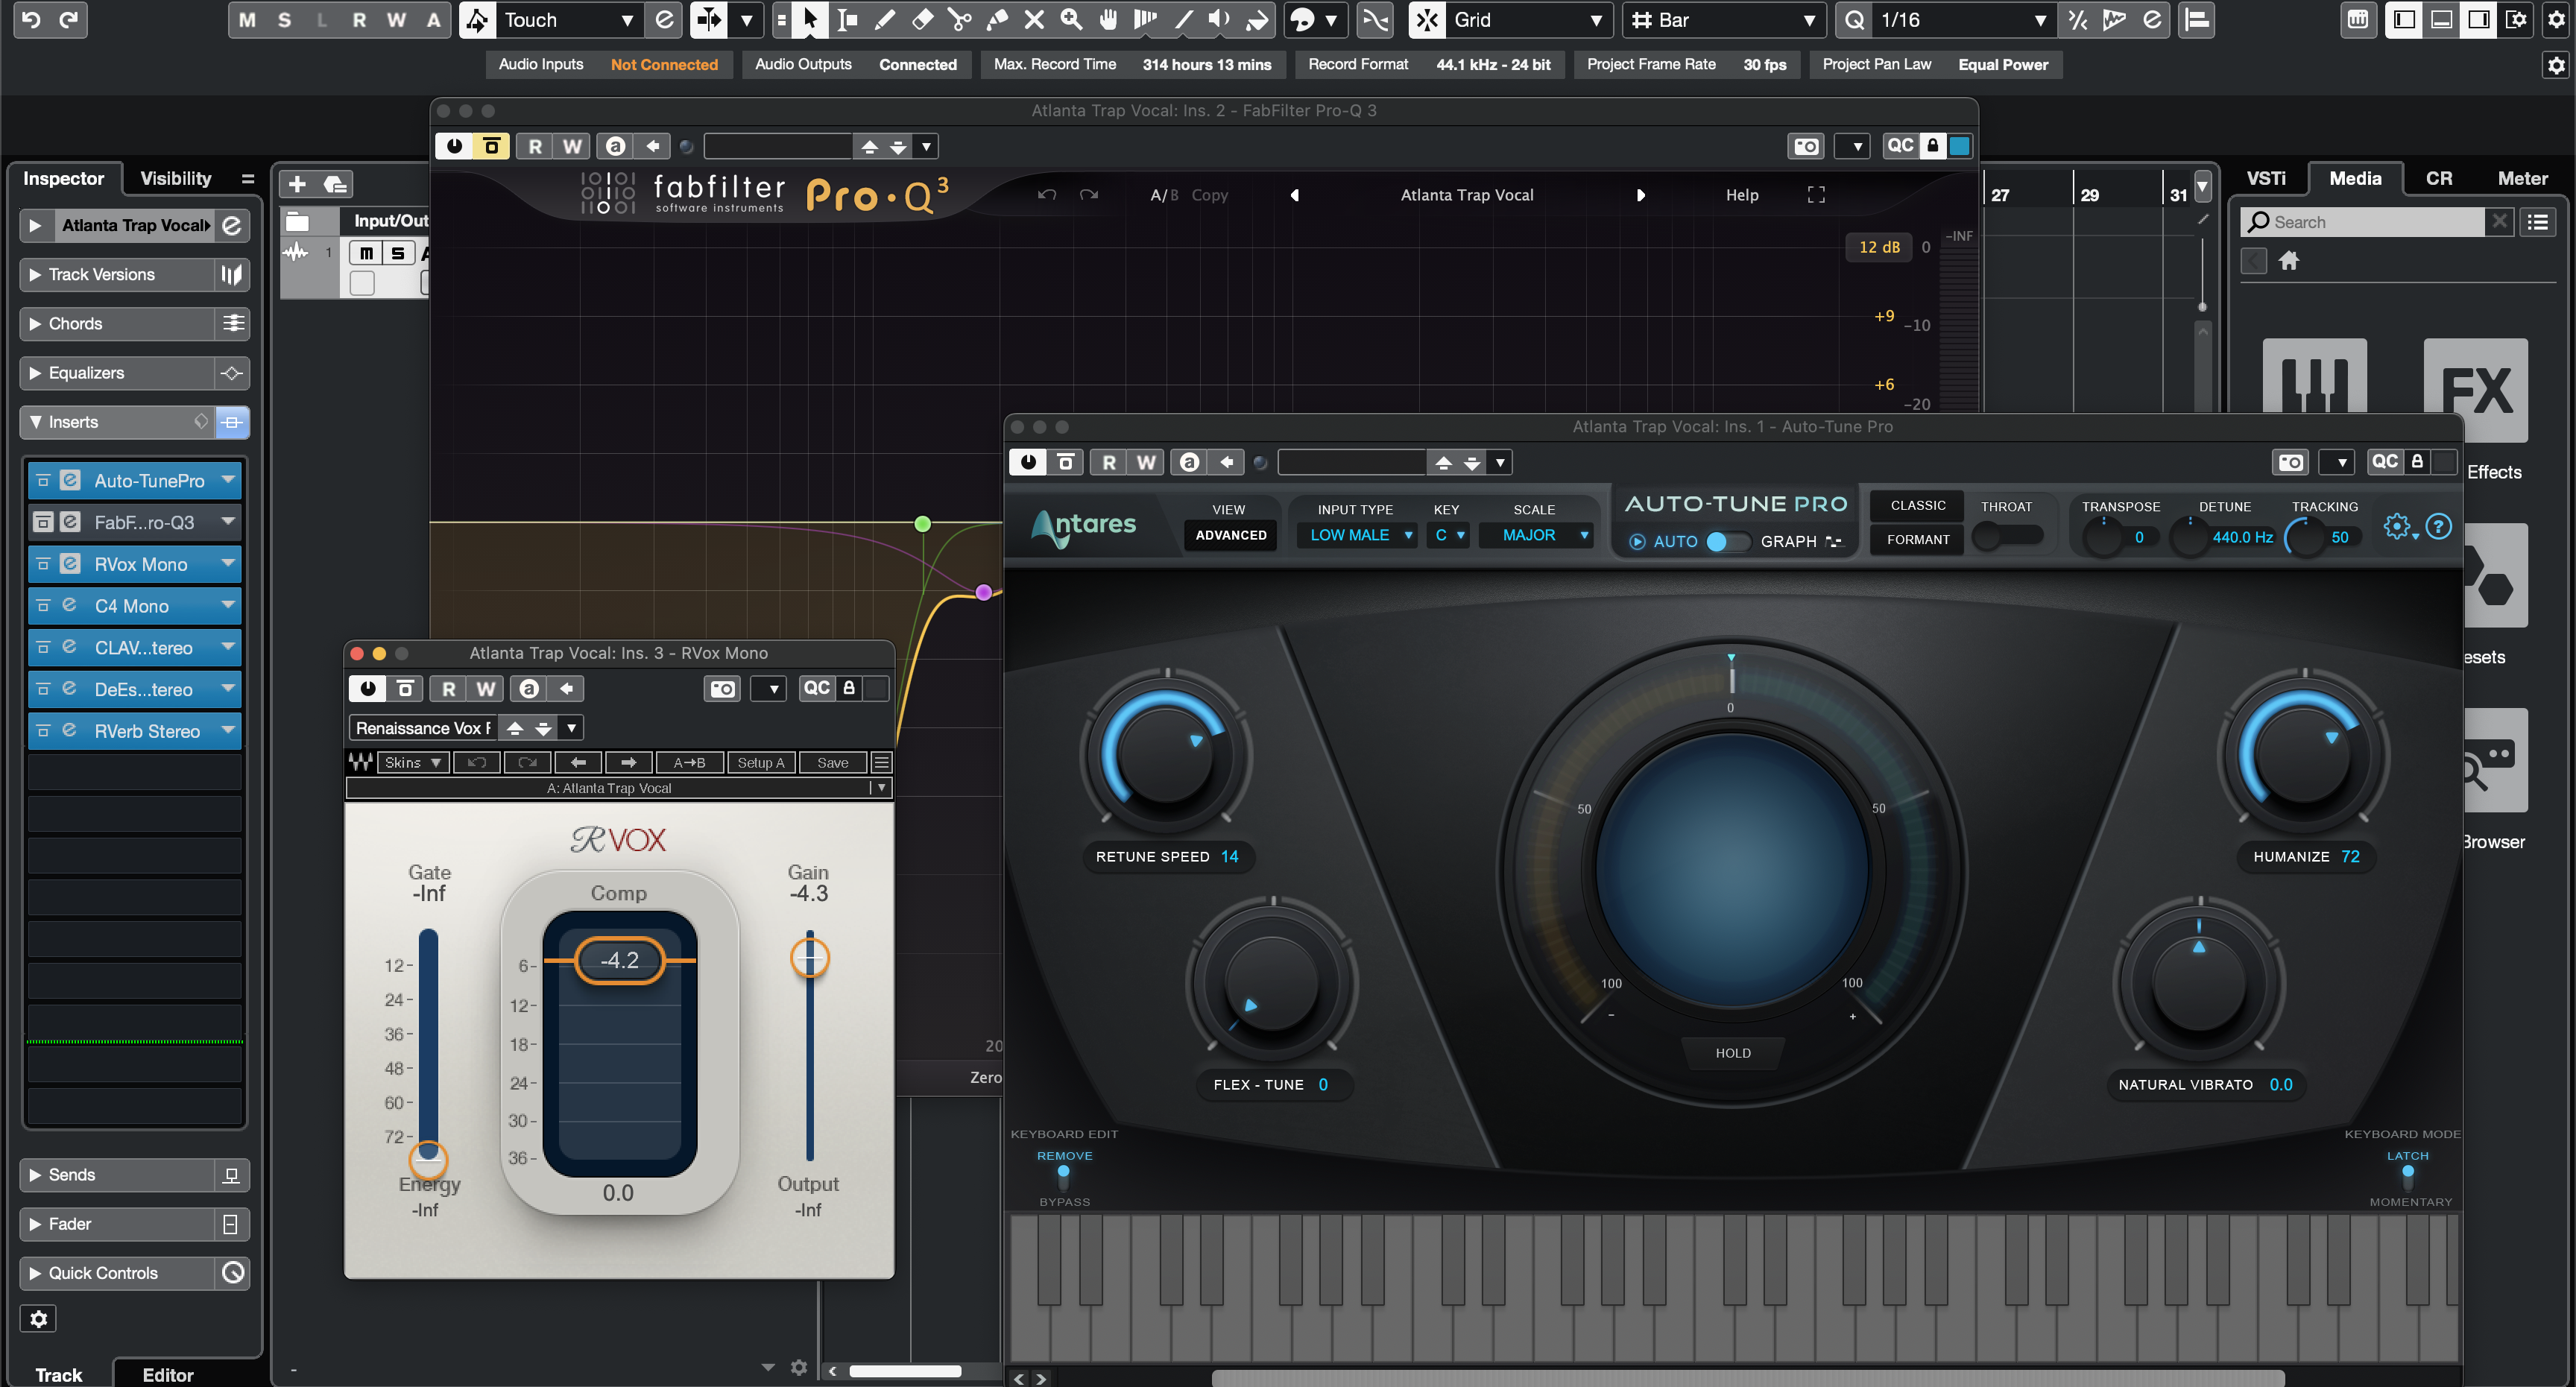
Atlanta Trap Vocal Preset Cubase
Type: Vocal Preset
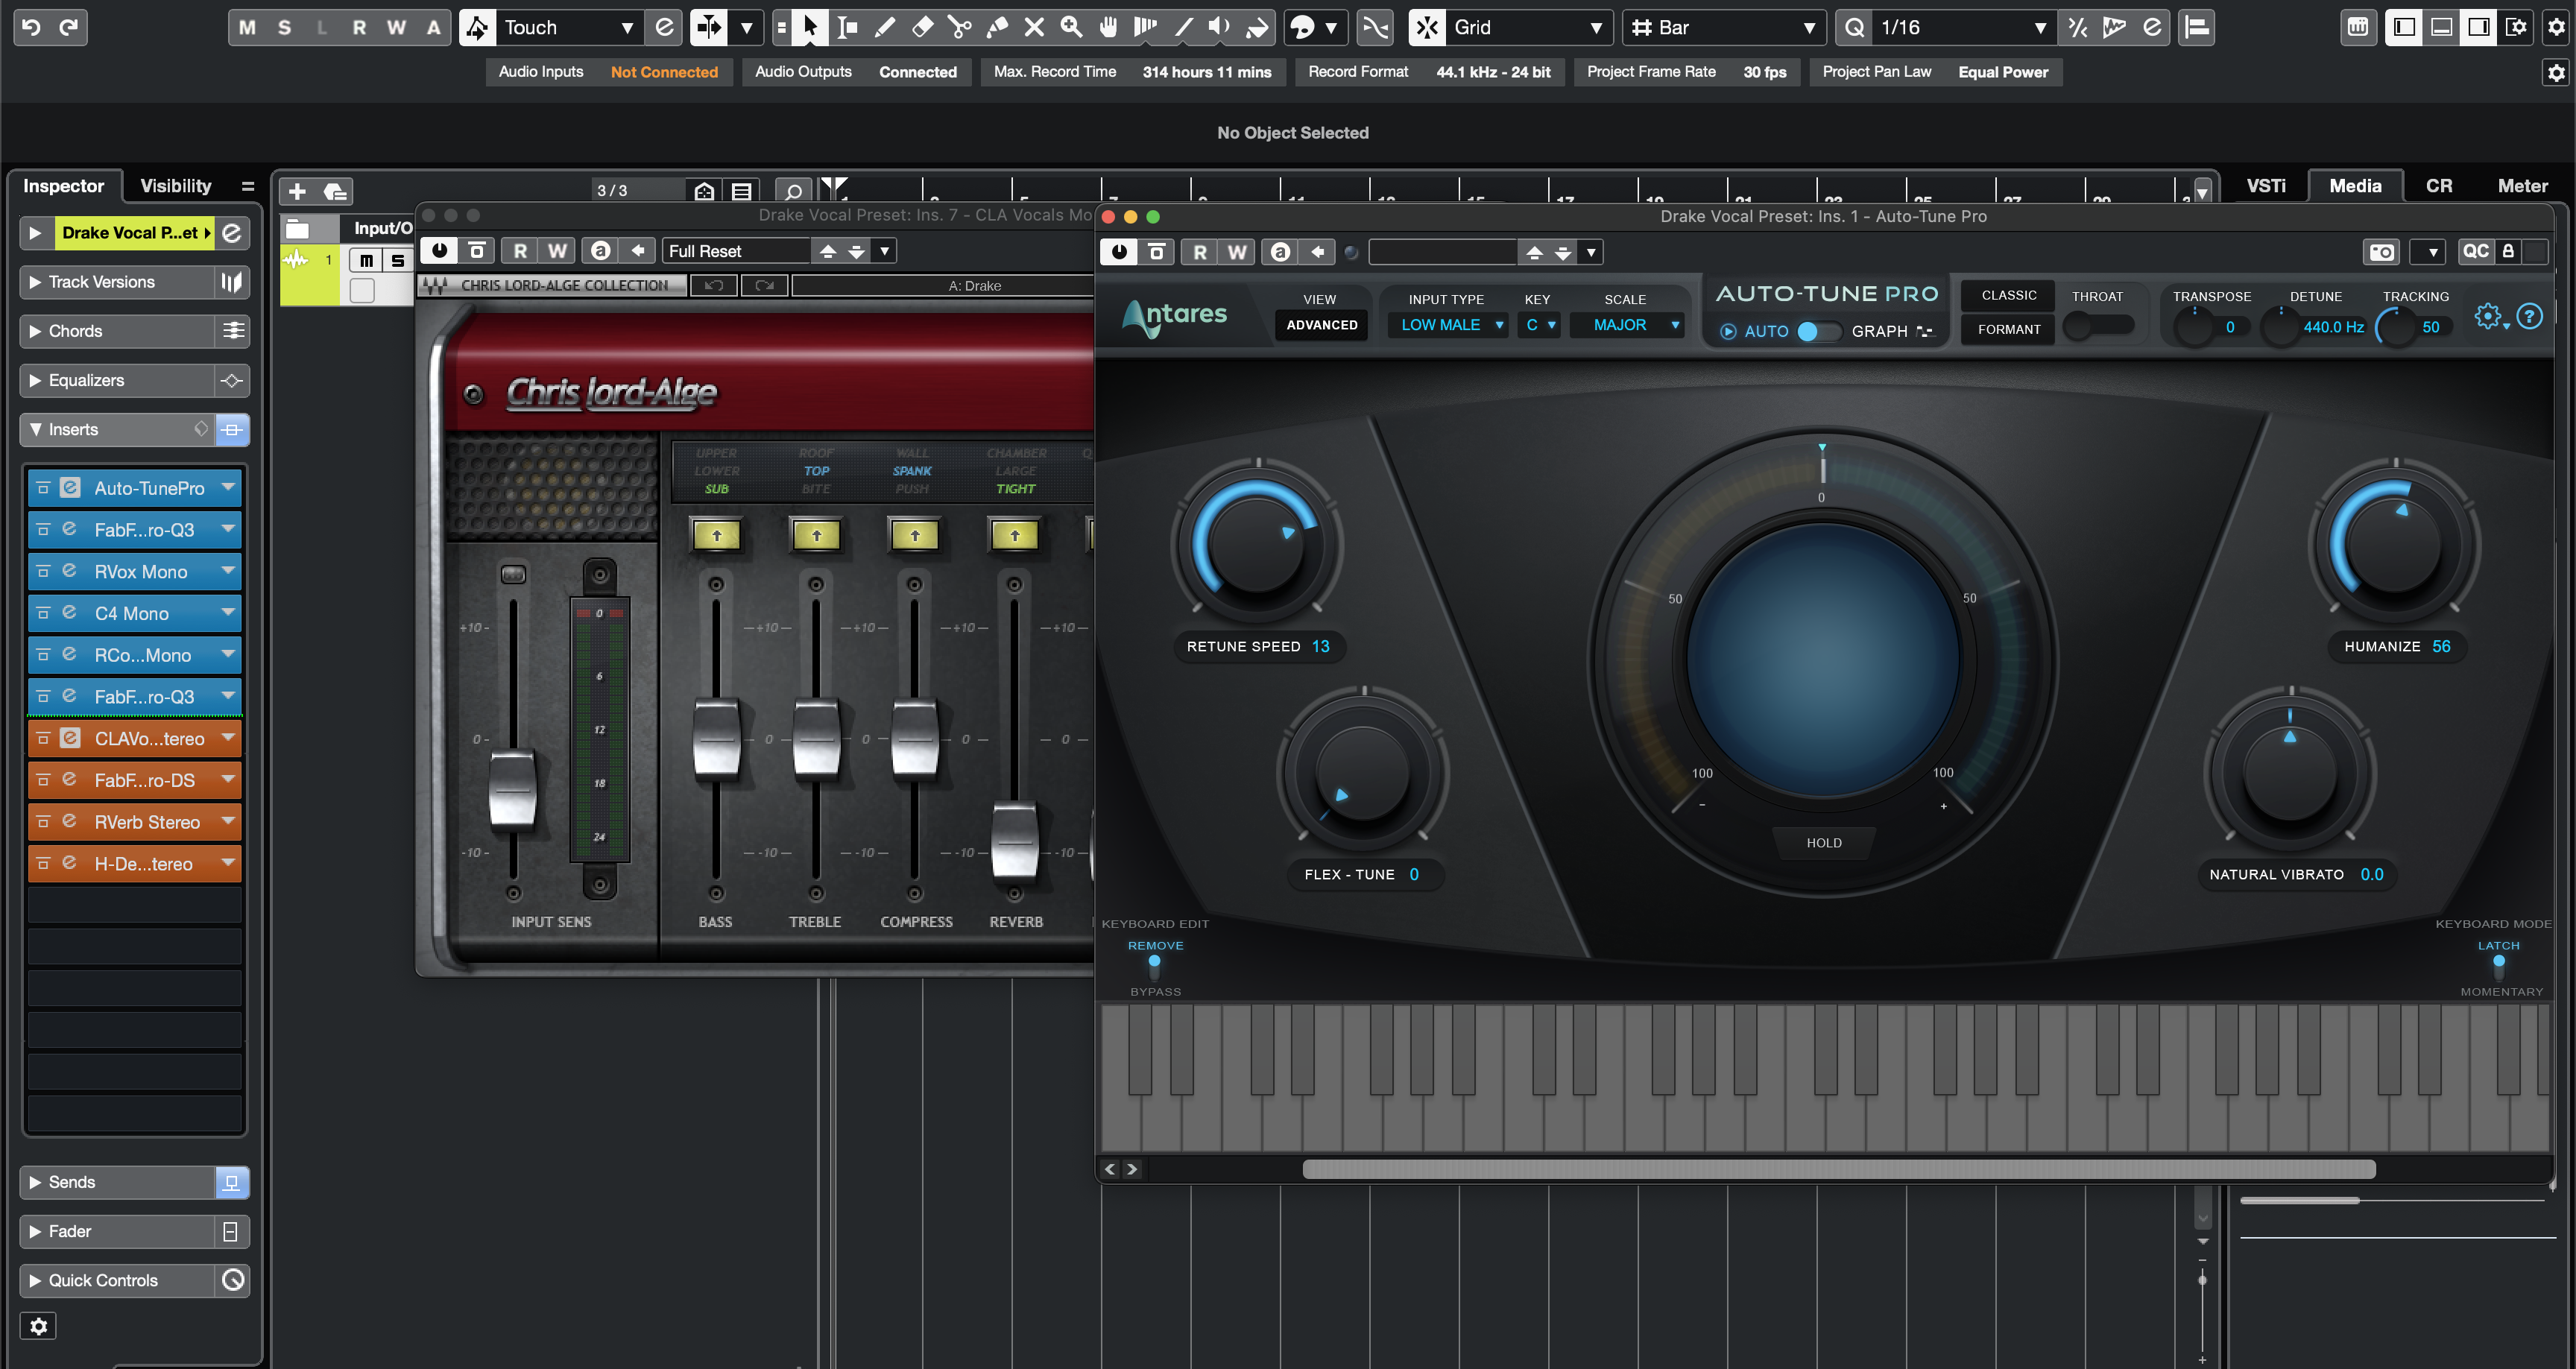
Drake Vocal Preset Cubase
Type: Vocal Preset
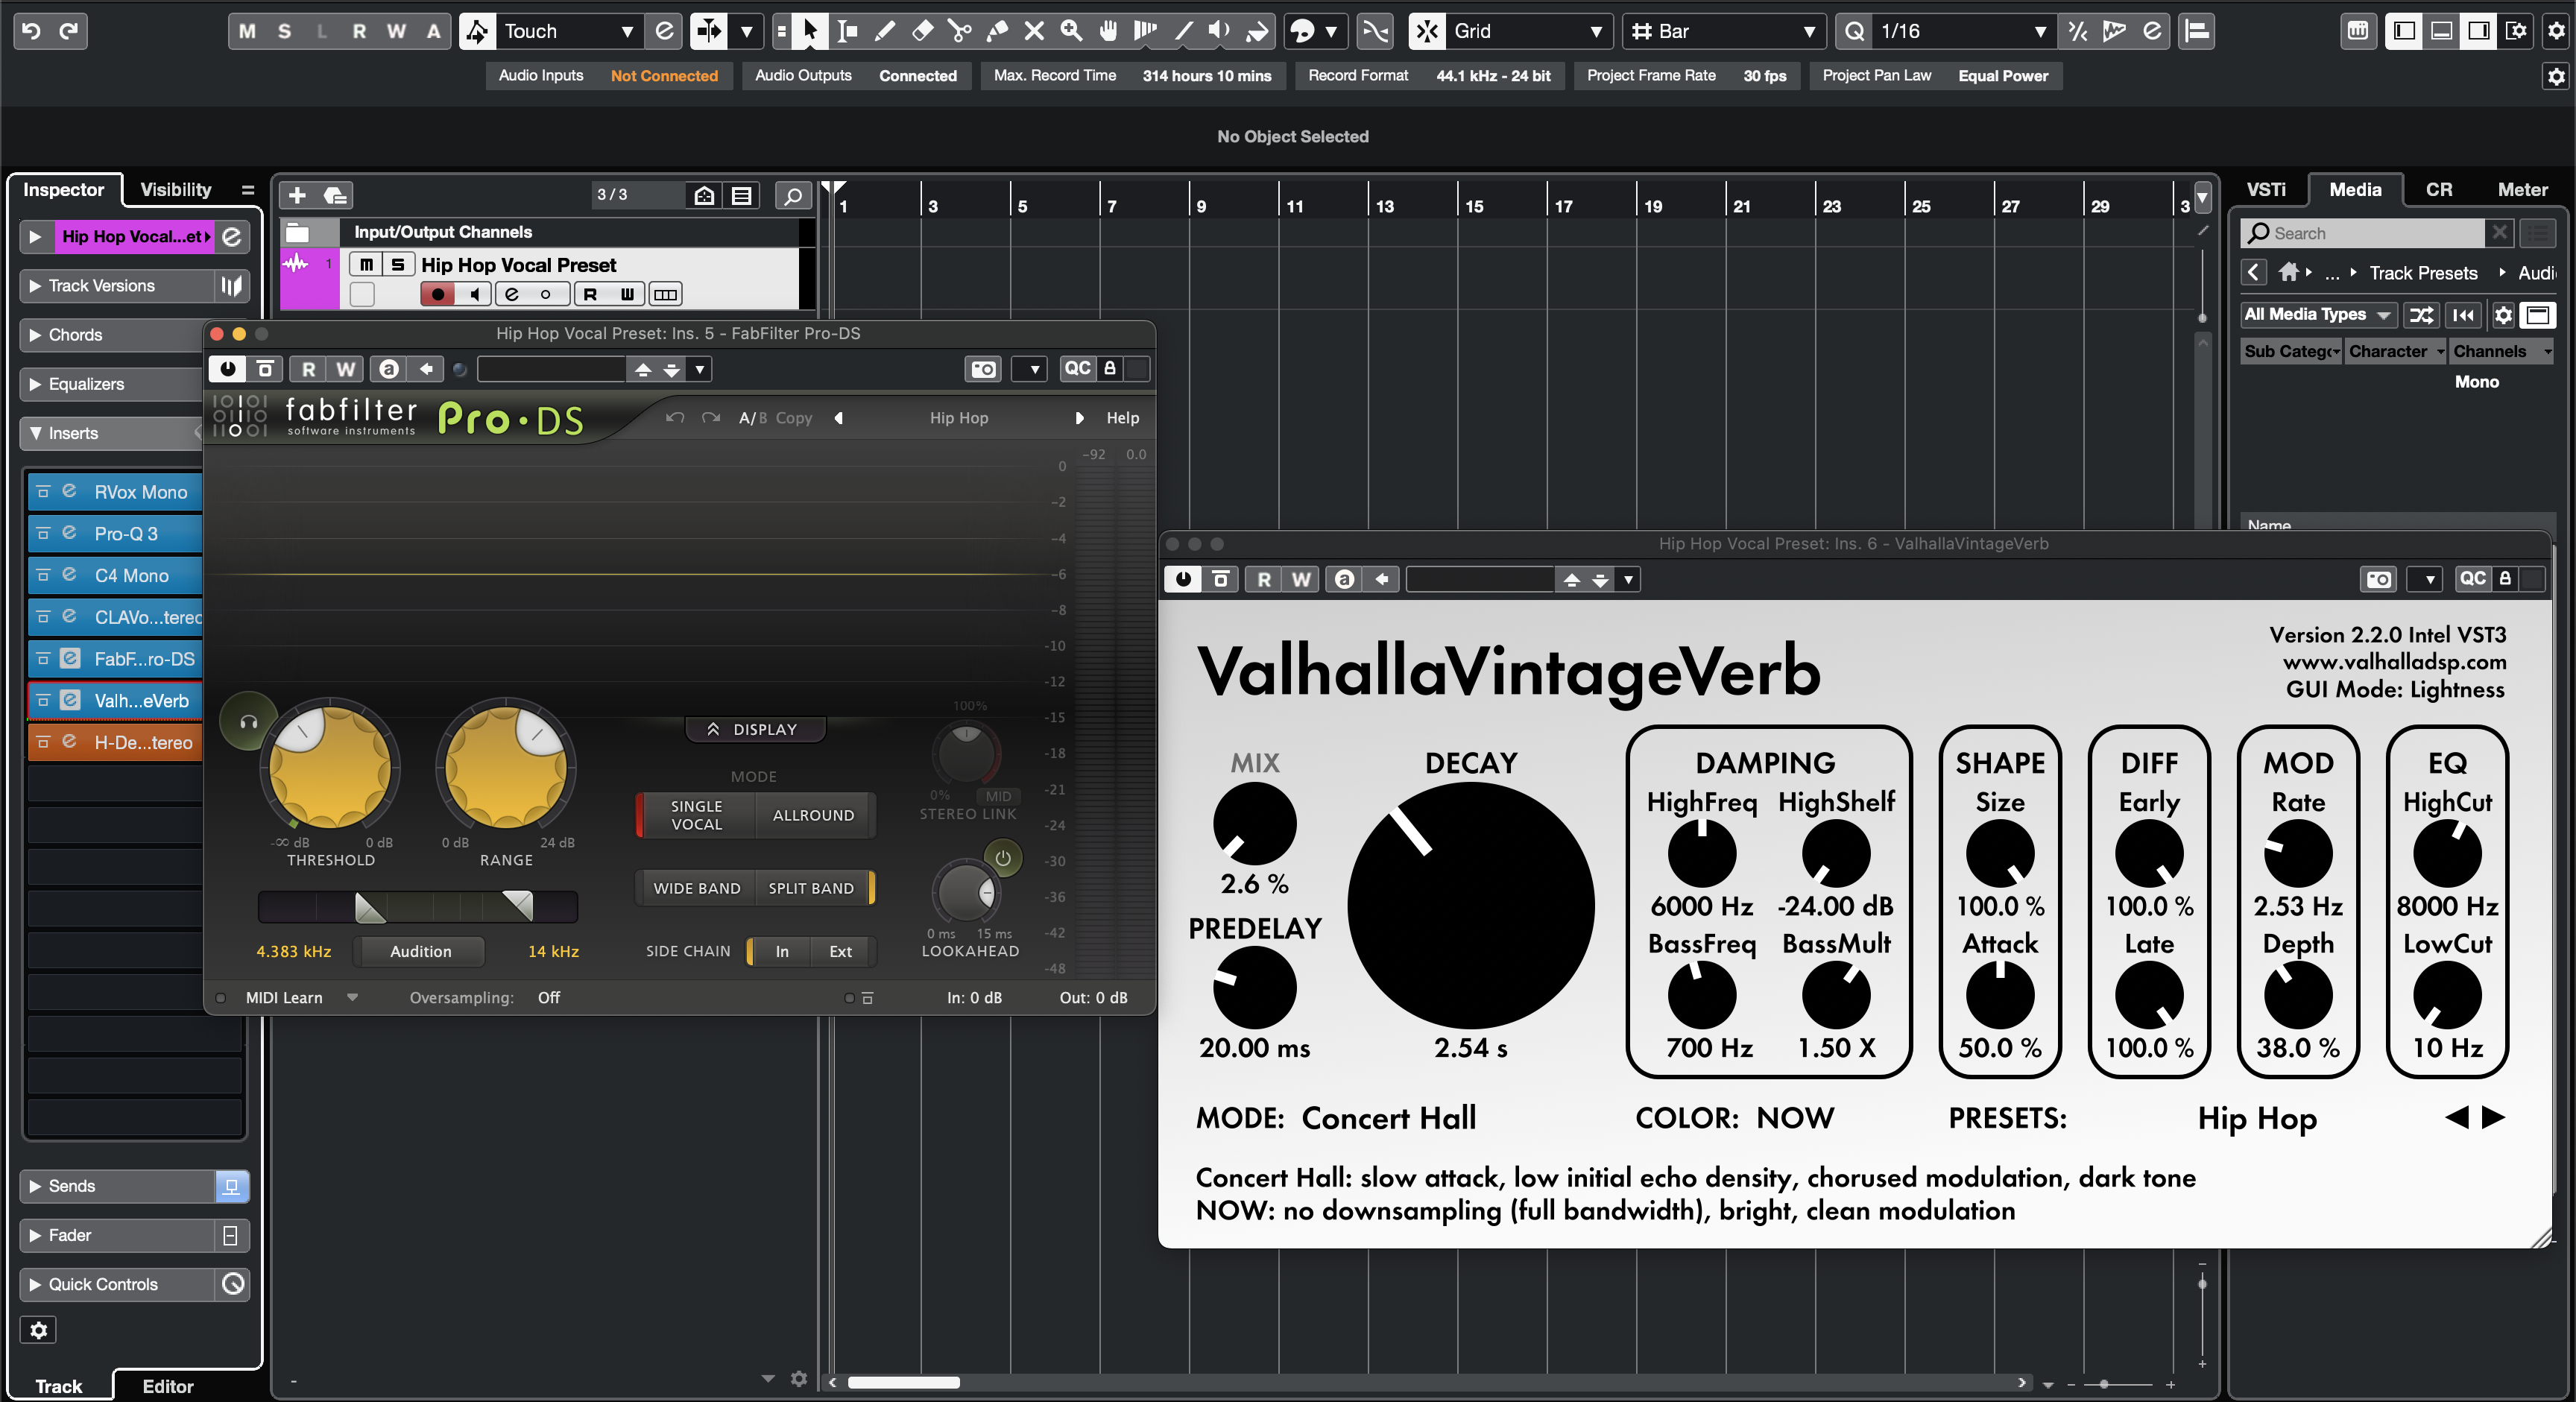
Hip Hop Vocal Preset Cubase
Type: Vocal Preset
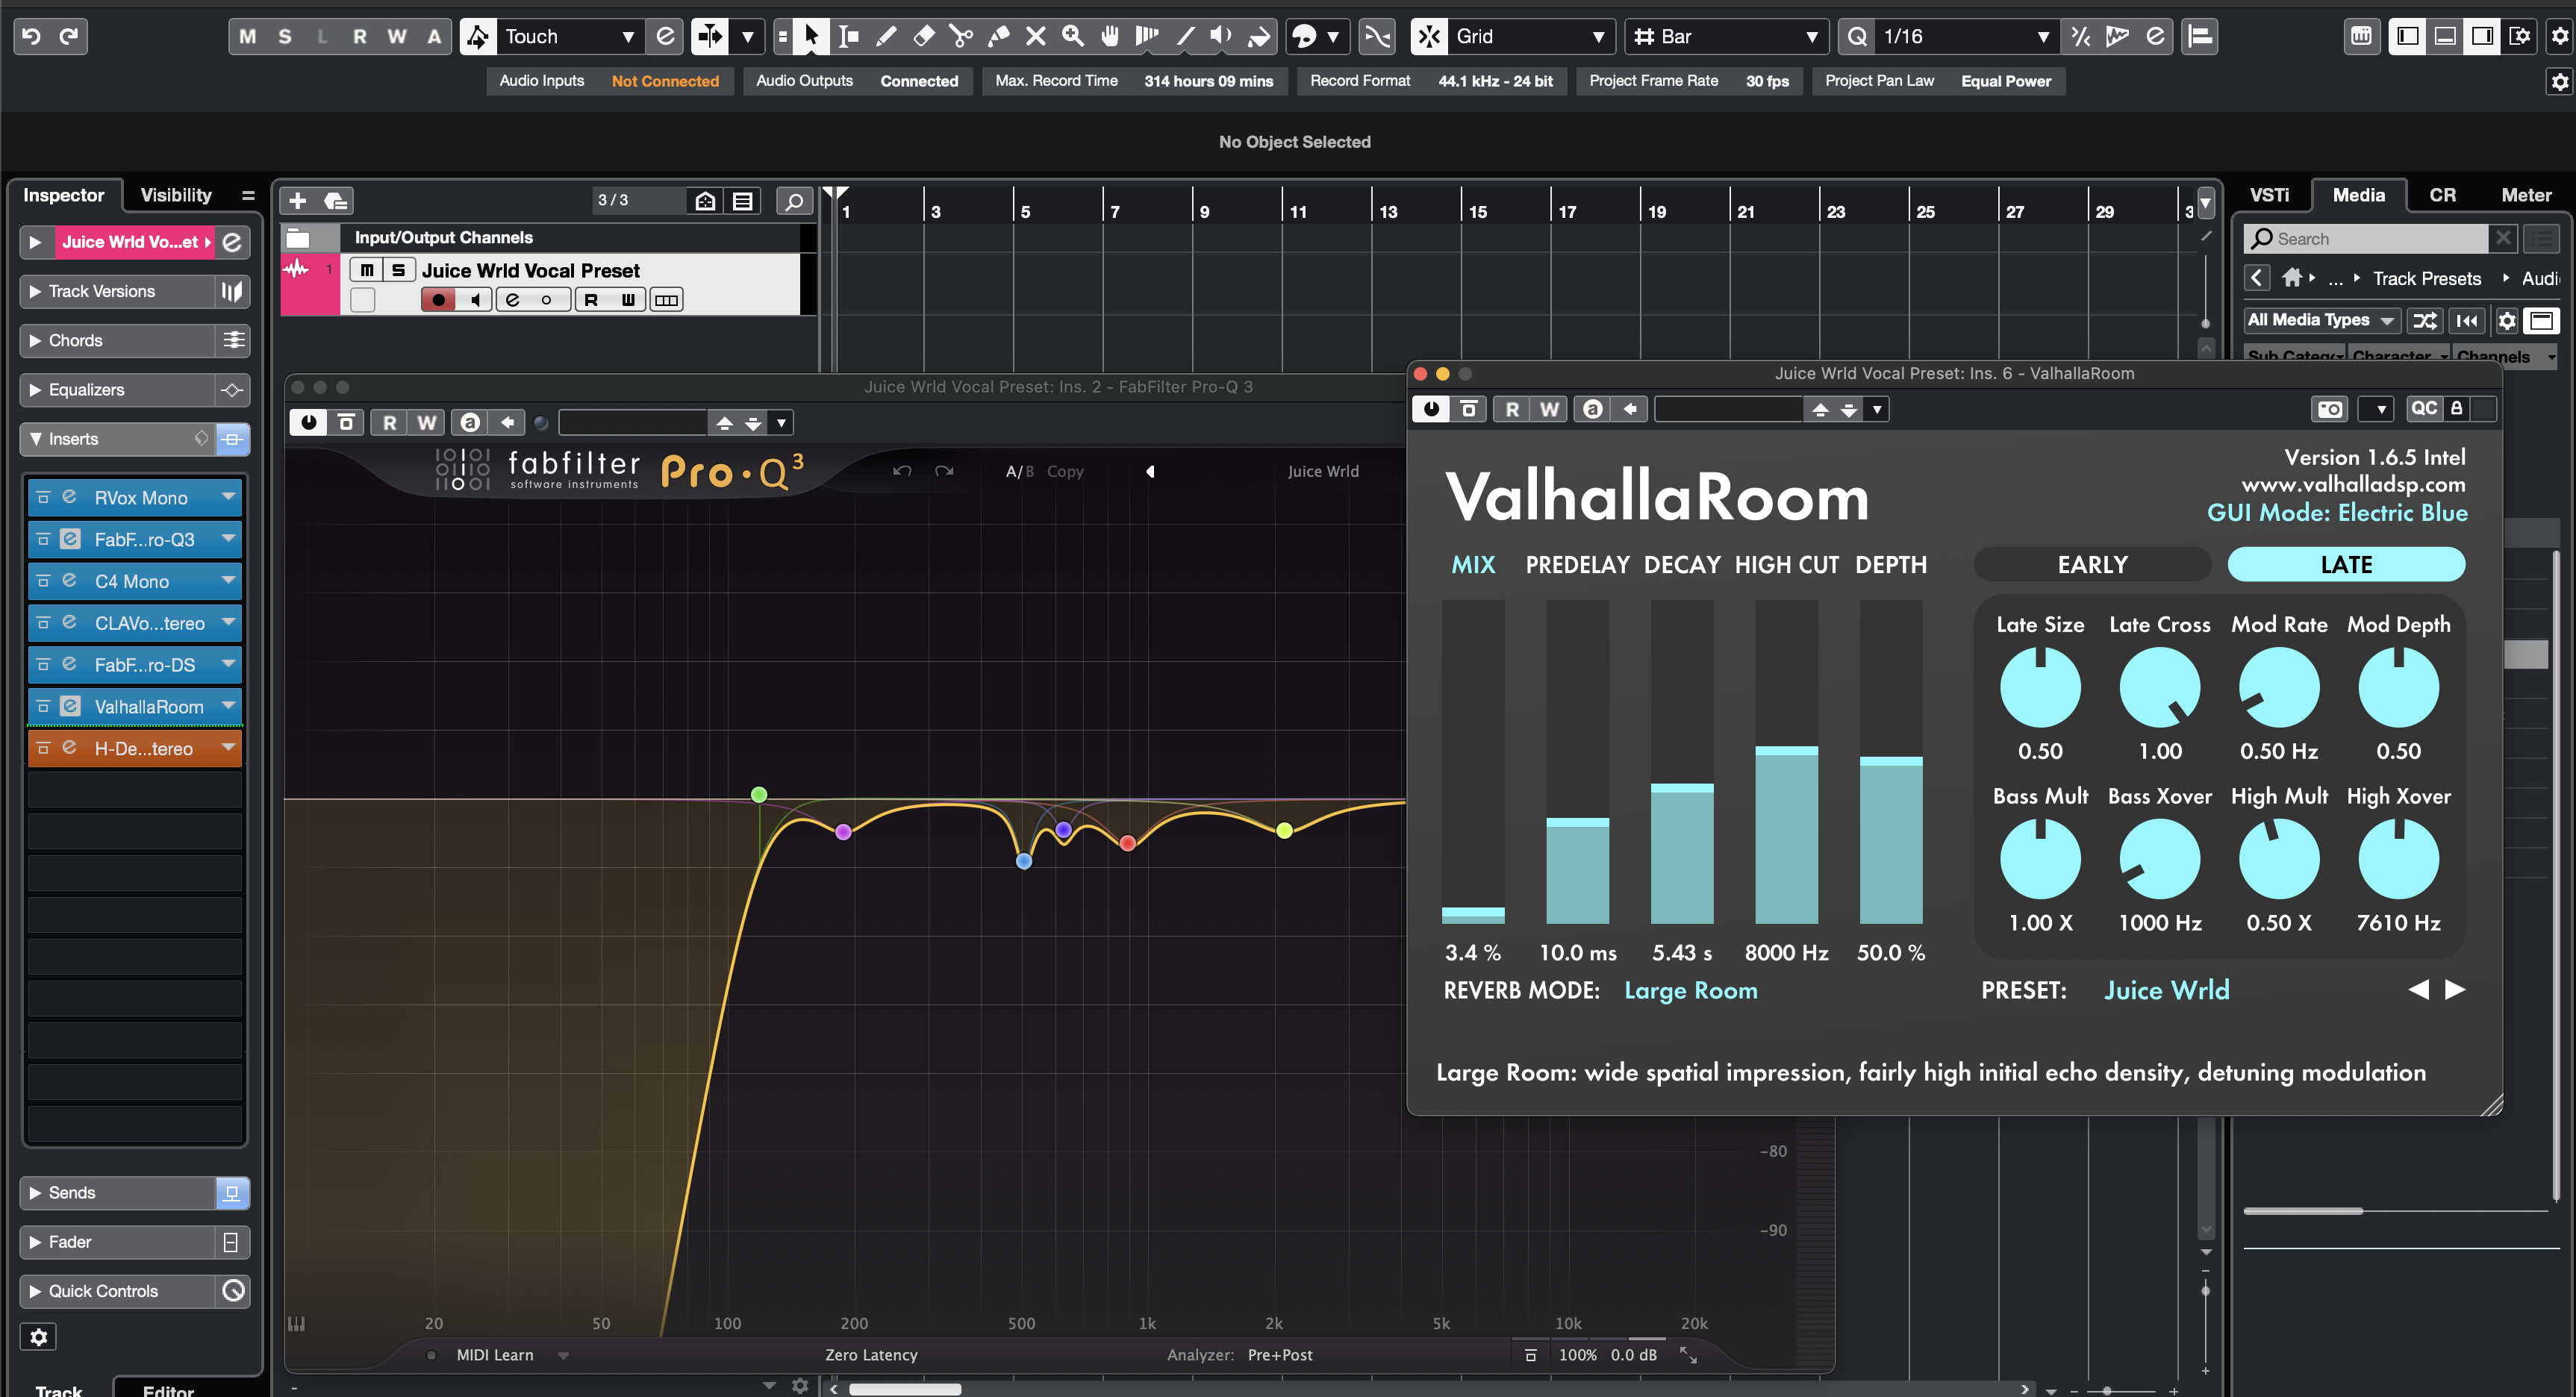
Juice Wrld Vocal Preset Cubase

Type: Vocal Preset
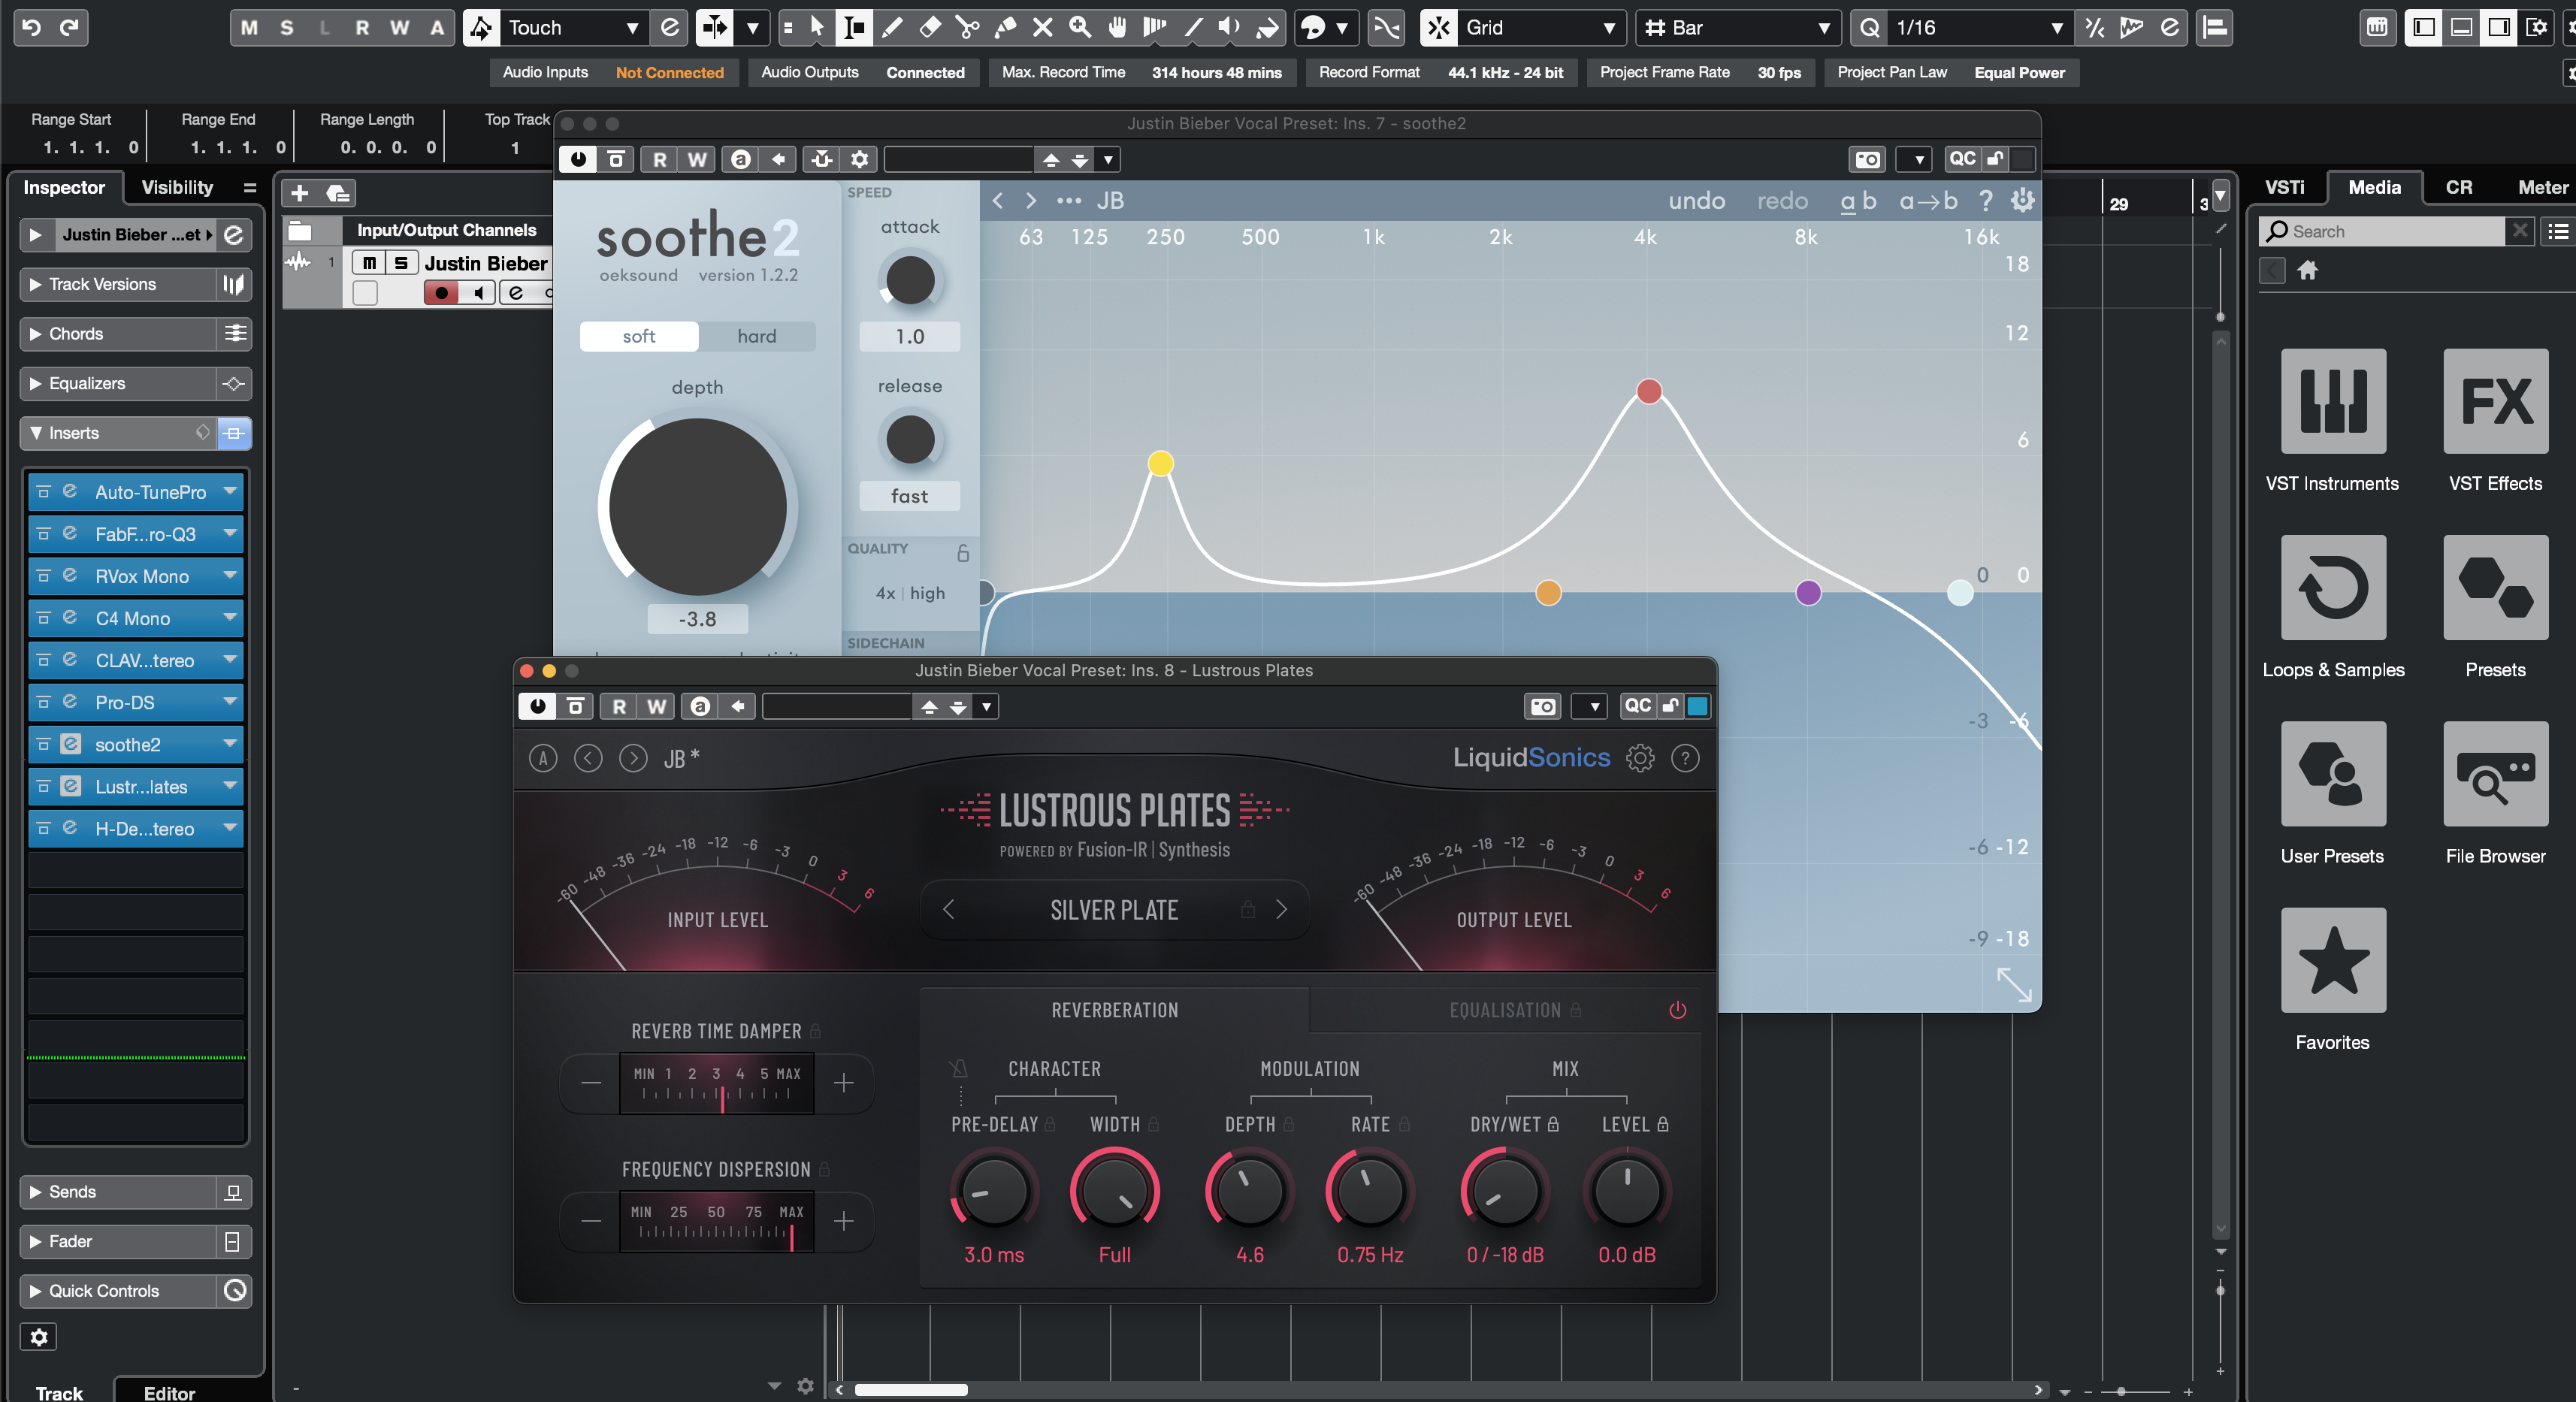
Justin Bieber Vocal Preset Cubase
Type: Vocal Preset
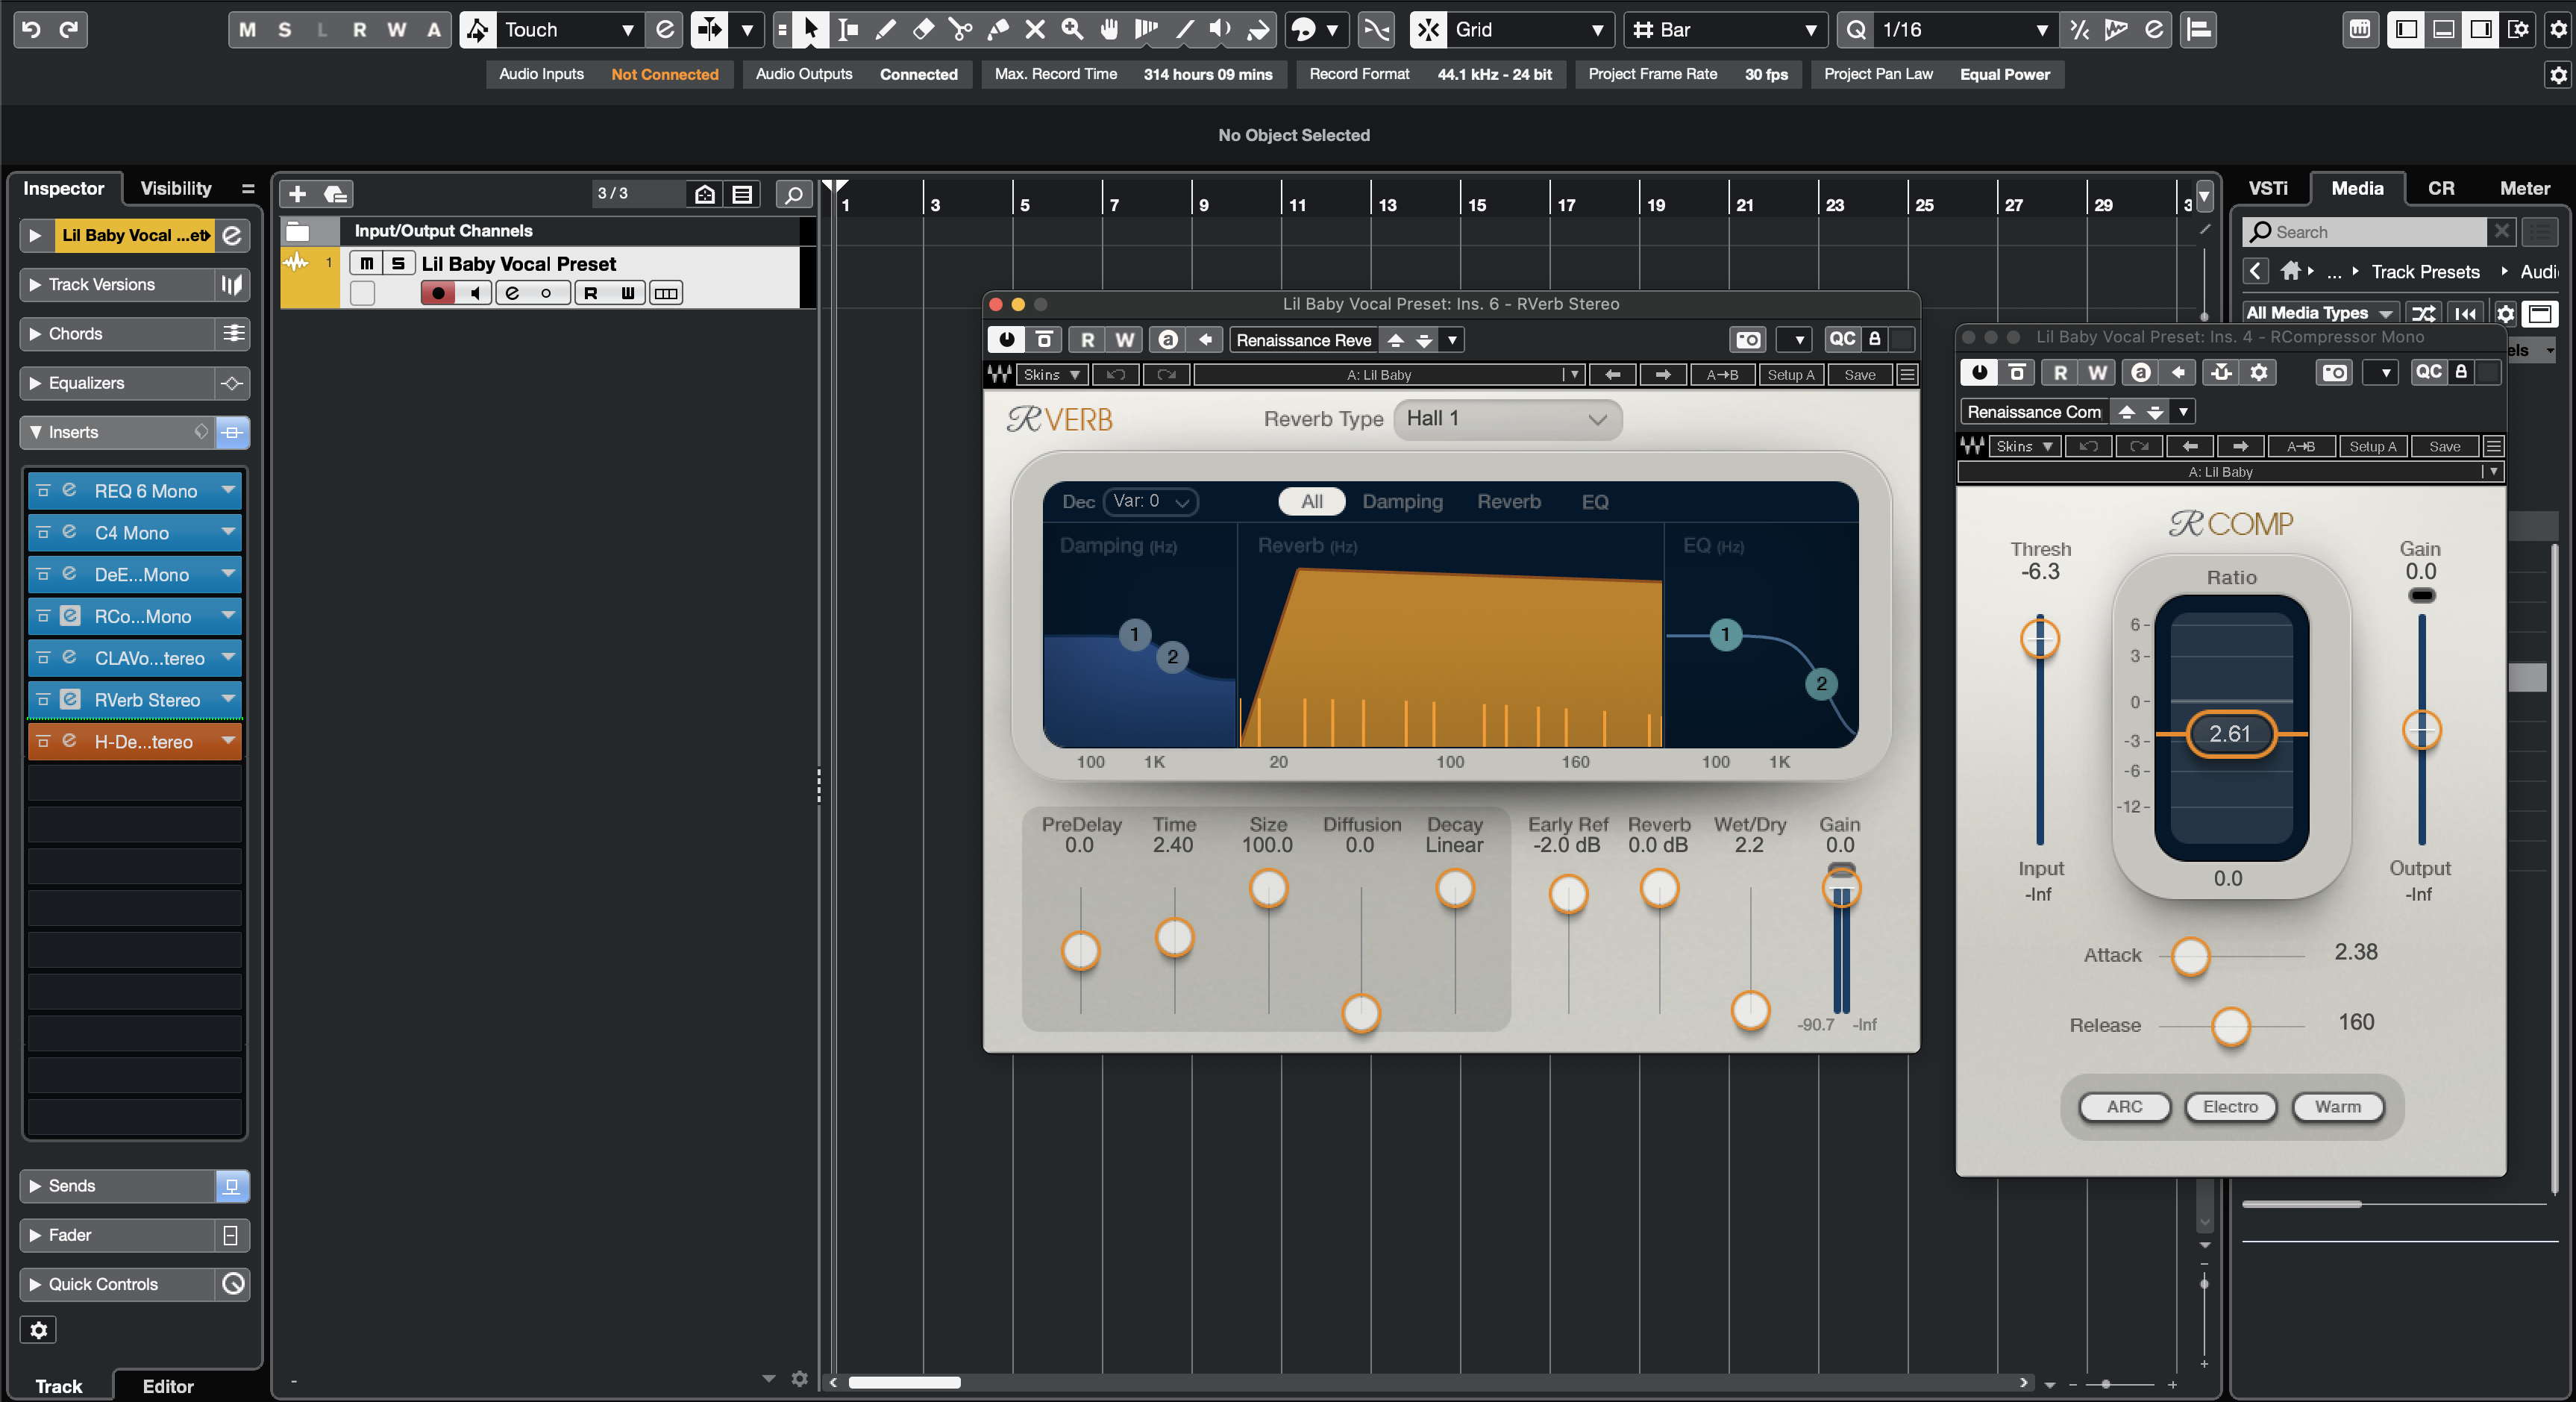
Lil Baby Vocal Preset Cubase
Type: Vocal Preset
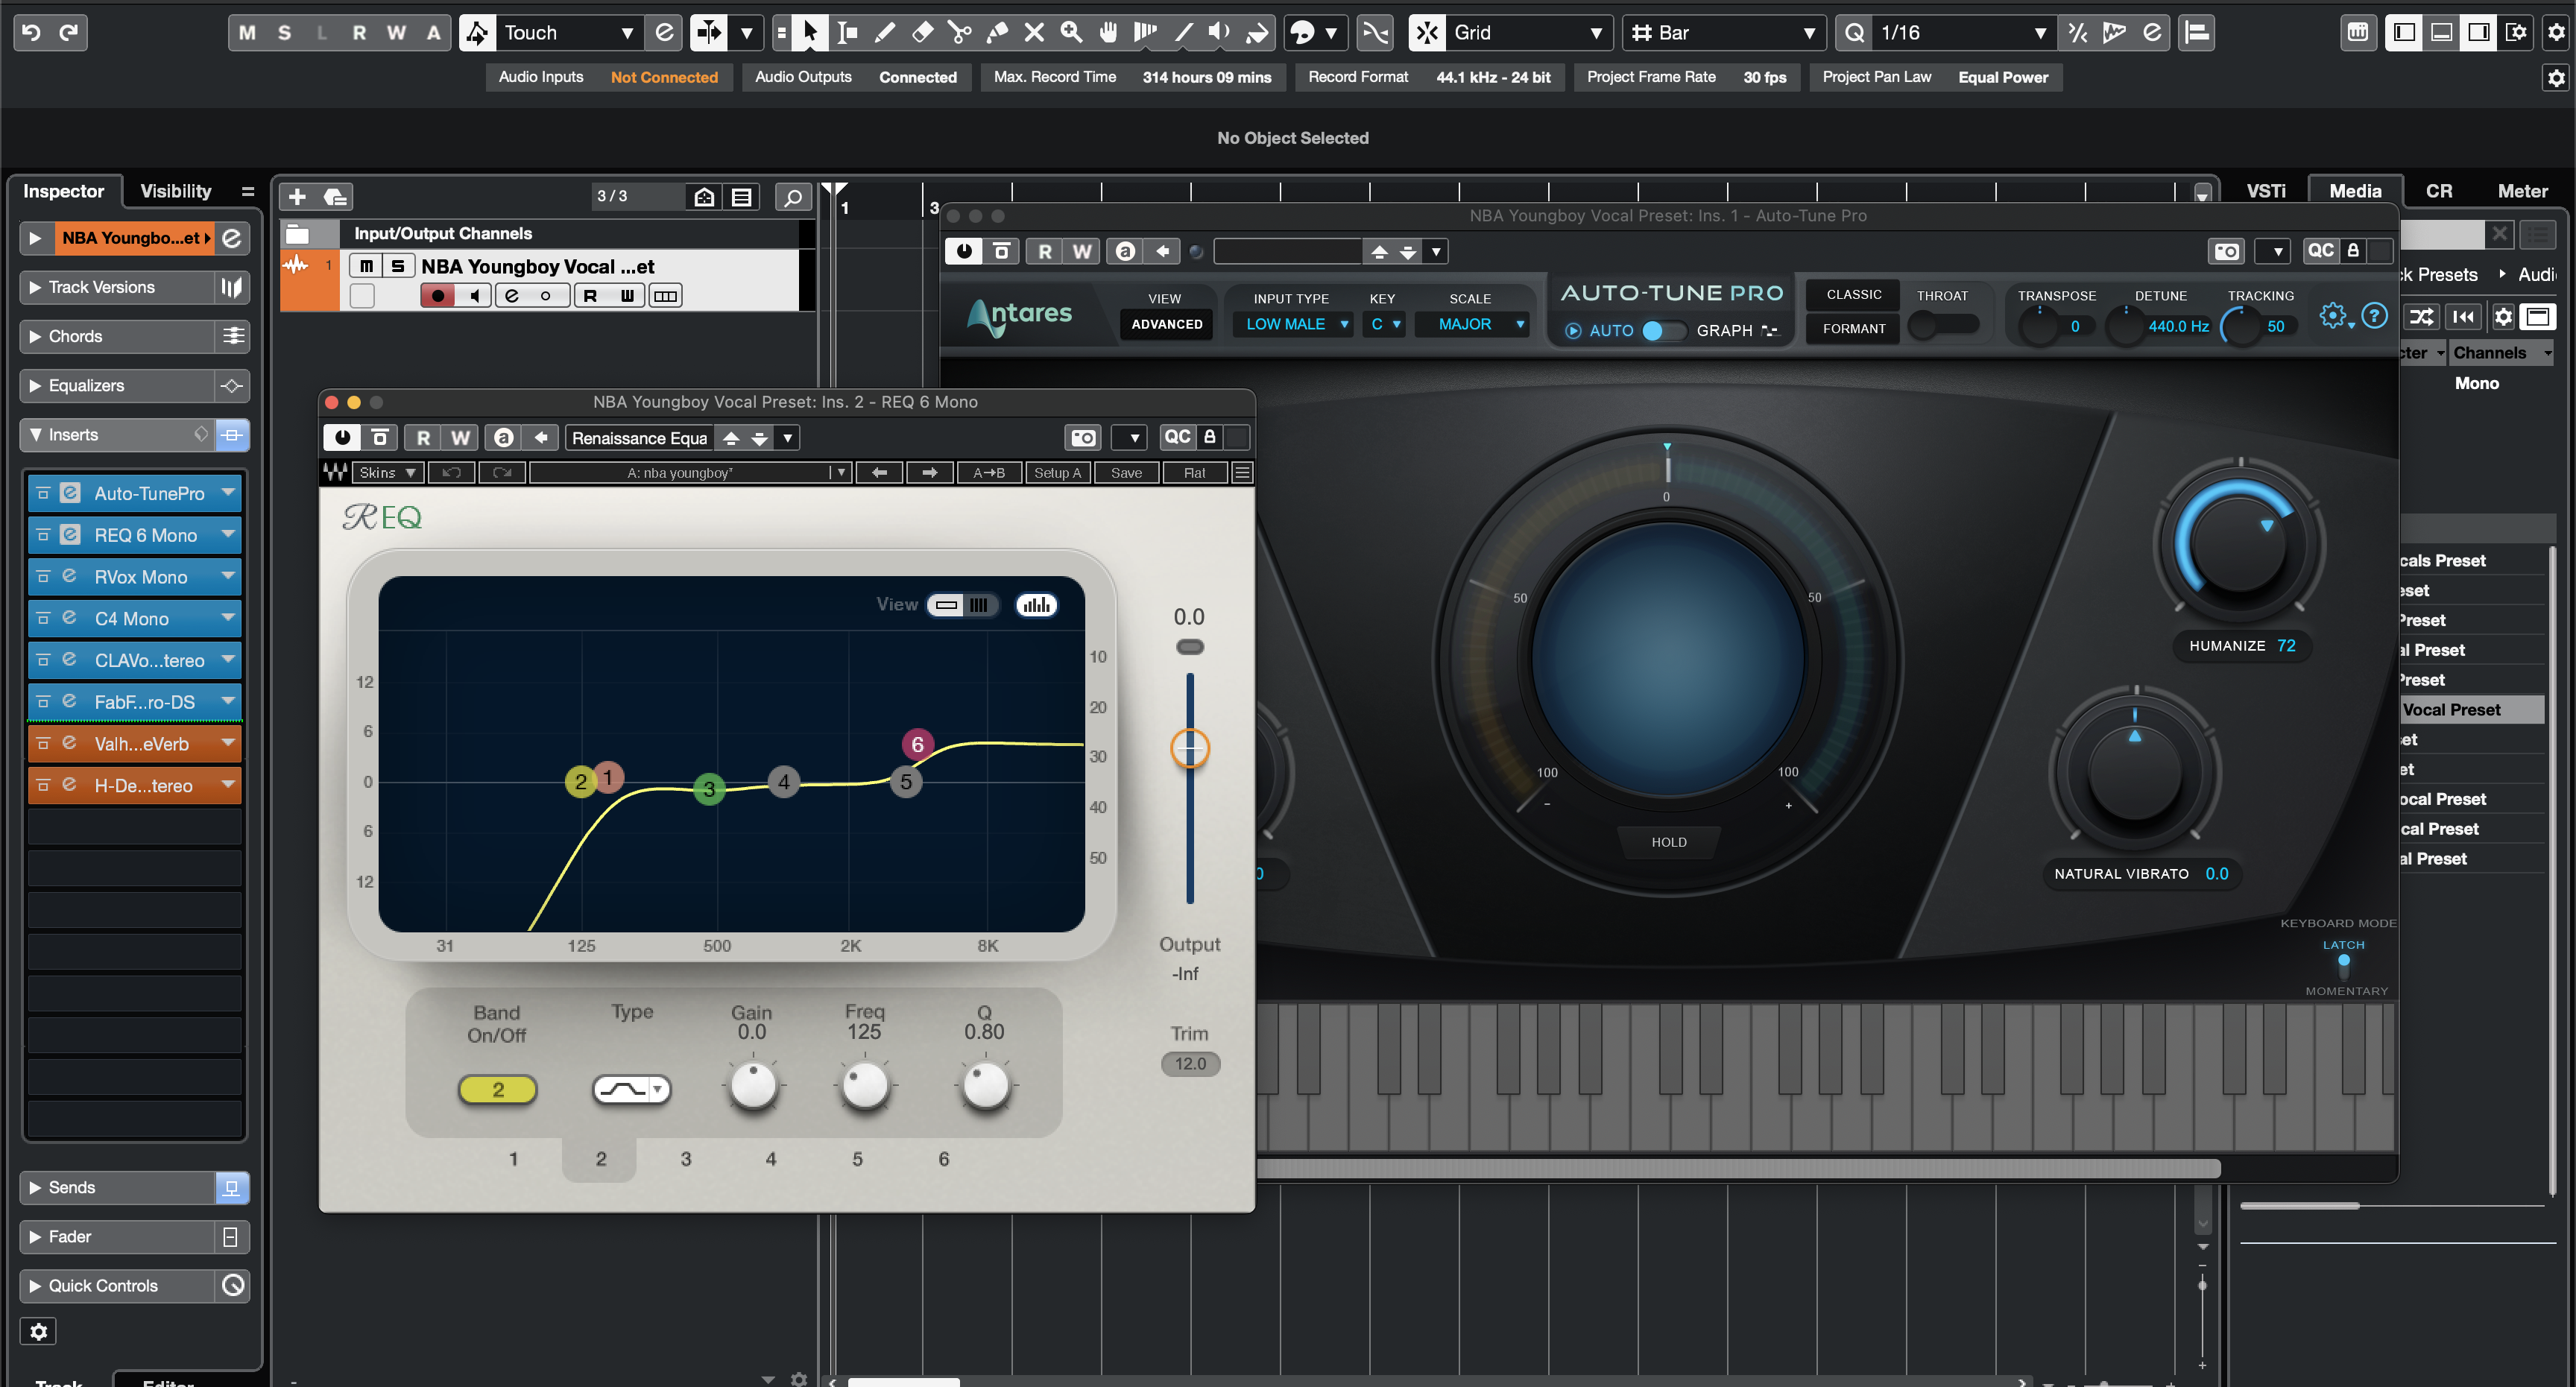
NBA YoungBoy Vocal Preset Cubase
Type: Vocal Preset
Rap Vocal Preset Cubase
Type: Vocal Preset
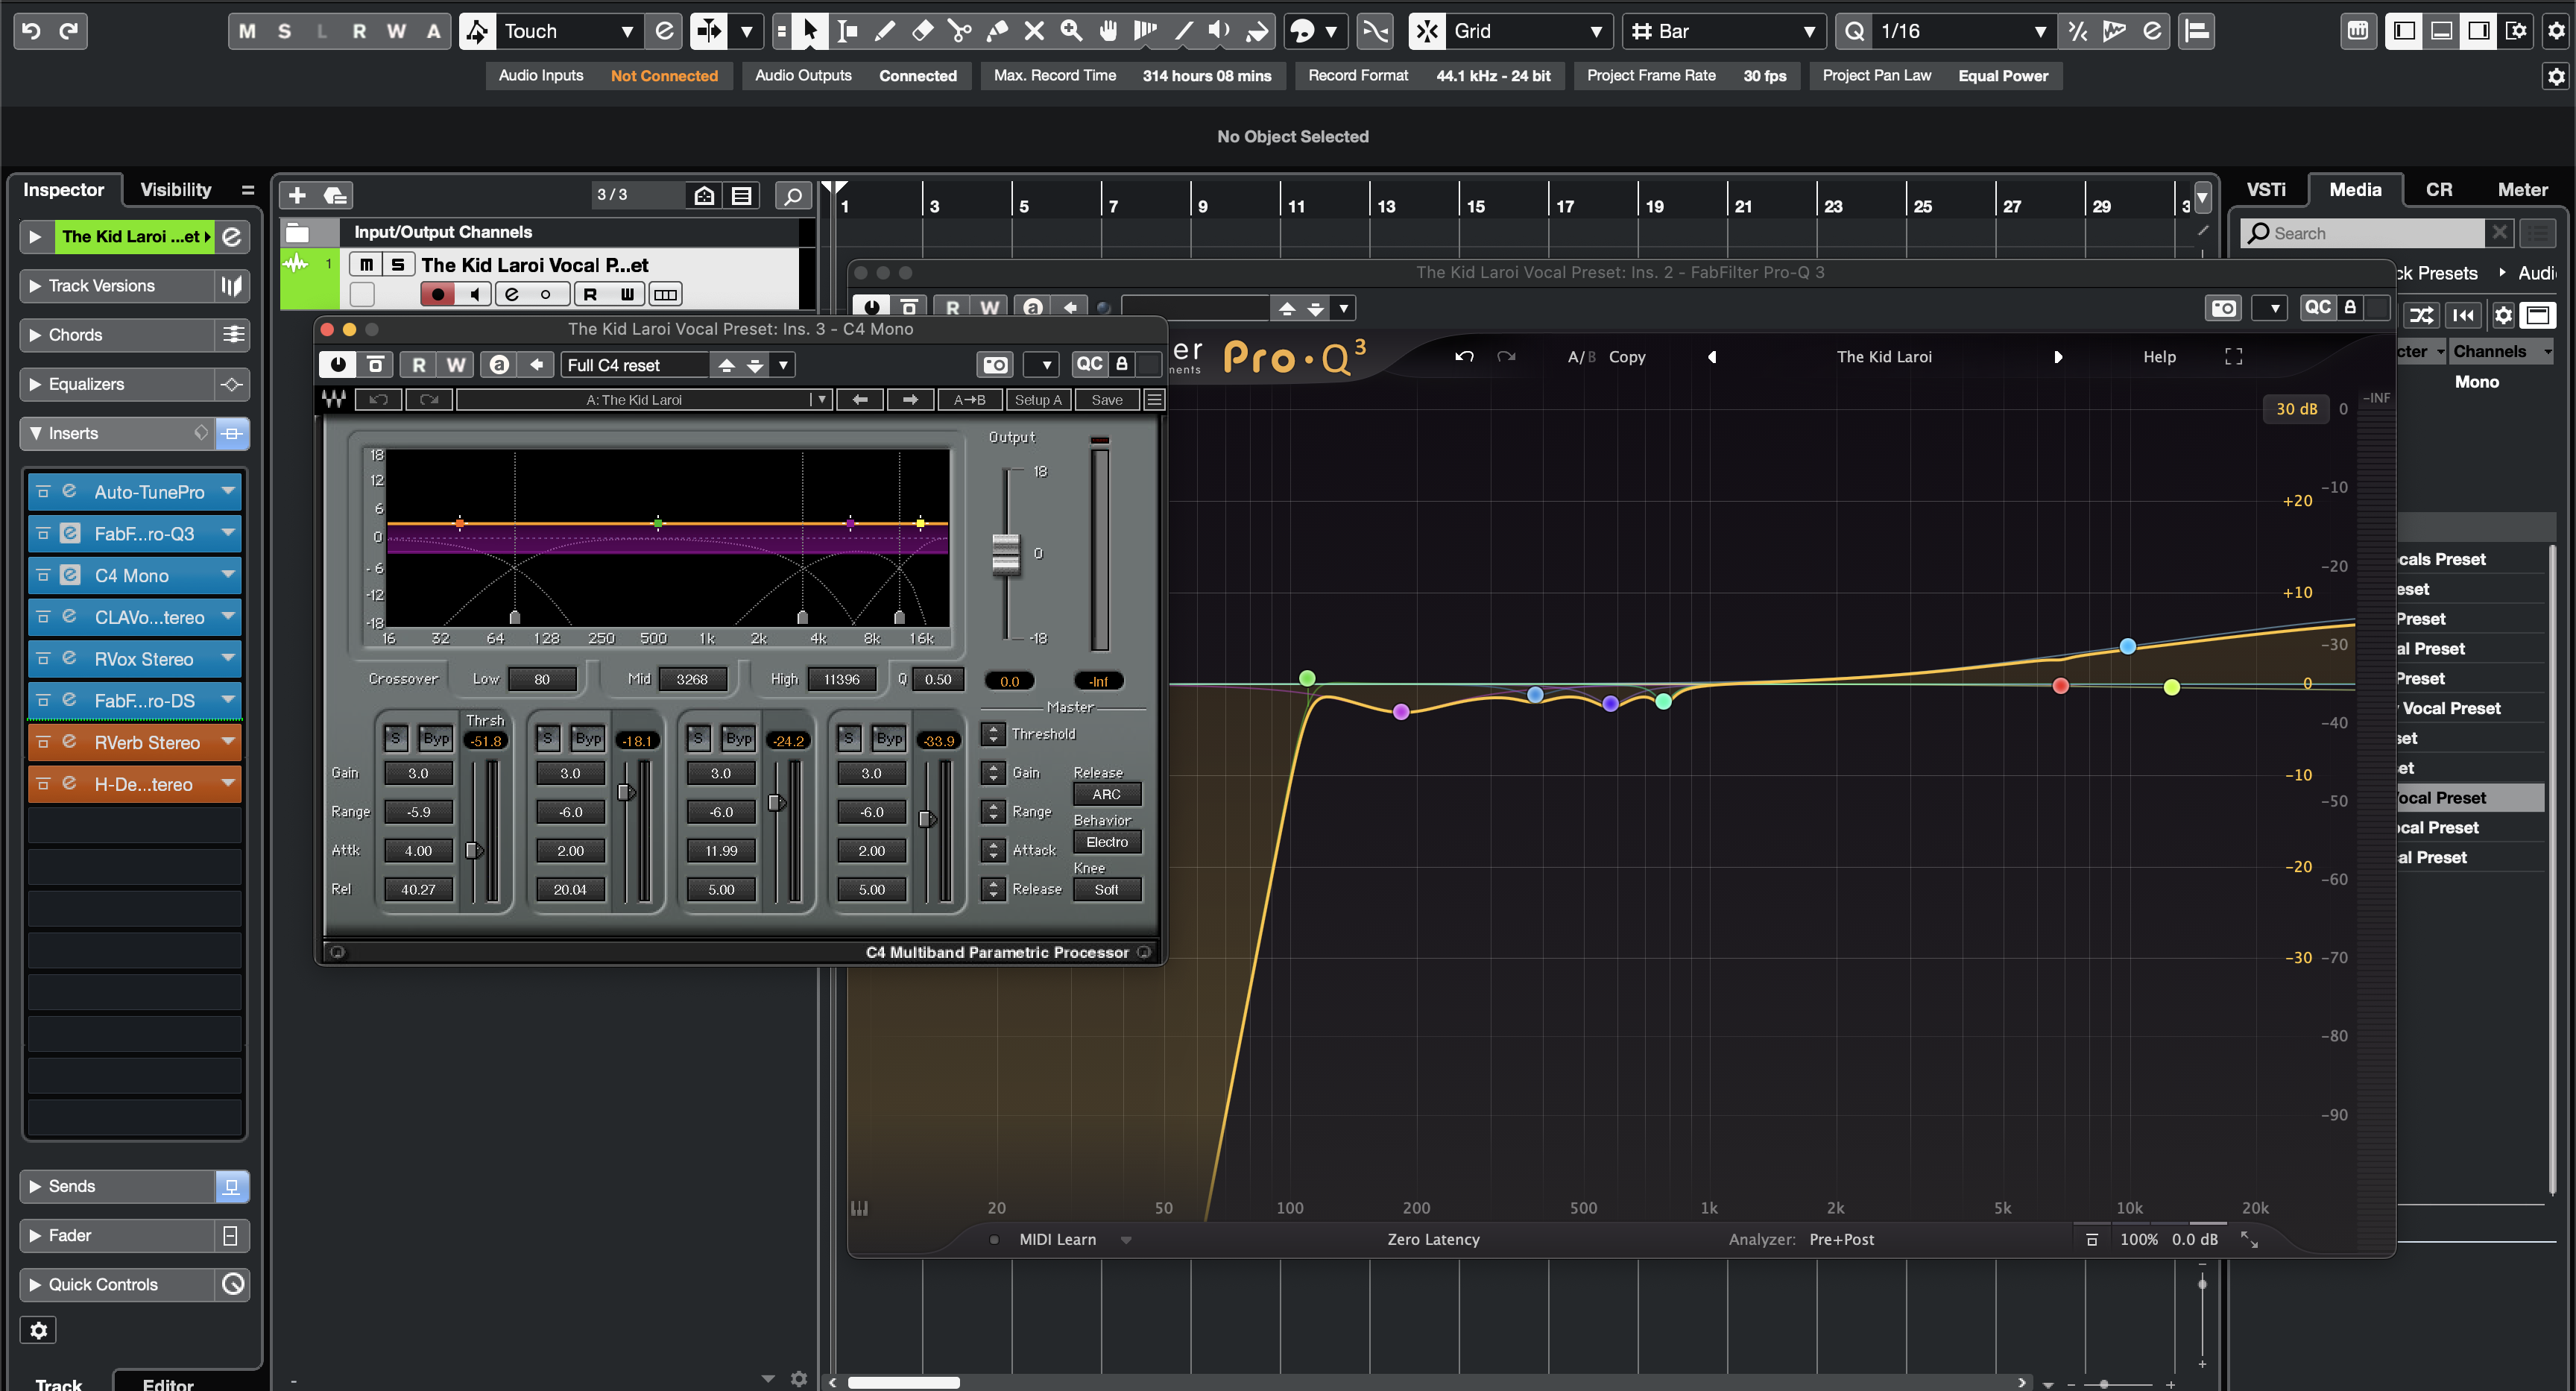
The Kid Laroi Vocal Preset Cubase

Type: Vocal Preset
The Weeknd Vocal Preset Cubase
Type: Vocal Preset
Tory Lanez Vocal Preset Cubase
FAQs
What are Cubase vocal presets?
What are Cubase vocal presets?
Cubase vocal presets are prebuilt vocal processing setups designed to help you load a more useful chain quickly instead of building EQ, compression, de-essing, and ambience from scratch every time.
They are meant for artists and producers who want a faster route to a cleaner Cubase vocal workflow.
Are these Cubase products presets, FX chains, channel settings, or full recording templates?
Are these Cubase products presets, FX chains, channel settings, or full recording templates?
This collection can include single-channel preset-style products as well as broader session-ready template workflows depending on the listing.
The product page should clarify whether you are buying a focused chain, a saved channel setup, or a fuller session layout.
What do I get after I buy a Cubase vocal preset or template?
What do I get after I buy a Cubase vocal preset or template?
You receive the file format listed on the product page plus any included setup notes needed to load it correctly in Cubase.
That usually means a faster starting point for tracking or mixing and less time rebuilding the same basic structure manually.
How fast do I receive the Cubase files after purchase?
How fast do I receive the Cubase files after purchase?
Cubase preset and template products are delivered digitally, so access is generally immediate after checkout.
Most buyers should be able to reach the files right away through the normal order confirmation flow.
Do I need any third-party plugins to use these Cubase presets?
Do I need any third-party plugins to use these Cubase presets?
Some Cubase products are built around stock Steinberg tools, while premium options may use third-party plugins for added control or coloration.
Always review the product page if you want to confirm whether a listing is stock-only or plugin-dependent.
Are these Cubase presets compatible with Cubase Elements, Artist, and Pro?
Are these Cubase presets compatible with Cubase Elements, Artist, and Pro?
Compatibility depends on the specific product and the processors or routing features it uses.
Simpler stock chains may work more broadly, while deeper template workflows often make the most sense in Cubase Artist or Pro.
How do I install Cubase vocal presets or templates?
How do I install Cubase vocal presets or templates?
The usual workflow is to load the preset or channel setup into the vocal track or open the template as a session and then confirm your routing, monitoring, and I/O.
Once it is loaded, you can save your own version for future projects if you want a personal variation.
Are these Cubase presets beginner-friendly?
Are these Cubase presets beginner-friendly?
Yes. They are useful for beginners who want to stop rebuilding a basic vocal chain from scratch every session.
They are also useful for more experienced Cubase users who want a faster, more repeatable baseline for vocals.
Can I tweak the Cubase preset or template to fit my voice and workflow?
Can I tweak the Cubase preset or template to fit my voice and workflow?
Yes. You can adjust EQ, compression, send effects, track routing, bus structure, and gain staging so the file fits your own voice and session style.
That flexibility matters because no single preset should be treated as a final answer for every singer, rapper, or room.
What makes these better than Cubase's default vocal presets?
What makes these better than Cubase's default vocal presets?
Default presets are fine for quick testing, but BCHILL MIX products are built as more complete, workflow-aware starting points.
That usually means a stronger signal path, better session speed, and less time spent piecing together the basics one plugin at a time.

Build Your Own Basket

Transform Your Session In Seconds
Instant Session Setup With Our Ready-to-Use Recording Templates & Vocal Presets.


Industry Credits

Westside Boogie

Shontelle

Jarren Benton

DJ Tunez

Vory

Caskey

Rittz

Nia Riley

Eugy

Q Parker
Listen to our Work
R&B
Before
After
Rap
Before
After
Pop
Before
After
Soul
Before
After
Rock
Before
After
Latin
Before
After
Cubase Vocal Presets: Explained & Features
Introduction to Cubase Vocal Presets
If you record or mix vocals in Cubase, a vocal preset gives you a reliable, repeatable sound without rebuilding the same chain every session. A preset loads a complete vocal chain—EQ for tone shaping, compression for control, de-essing for smooth “s” sounds, and tasteful ambience—so you can capture ideas fast and keep your tone consistent from demo to release. At BCHILL MIX, every Cubase preset and template is tuned for clarity, controlled dynamics, and translation on headphones, monitors, and phones.
You can use presets for rap, R&B, pop, melodic trap, or spoken voice. This guide explains what Cubase vocal presets are, when they help, how to install and tweak them, and how Cubase vocal presets and the Cubase recording template fit together for a faster, more organized workflow.
What Are Vocal Presets in Cubase?
In Cubase, a vocal preset is a saved FX chain or Track Preset that applies a known order of processors with sensible starting settings. A balanced chain often includes:
- A gentle high-pass filter and small surgical EQ moves to remove rumble and tame harshness.
- One or two compressors in series to smooth loud/quiet phrases without pumping.
- A de-esser placed before final brightening so sibilance stays smooth.
- Optional saturation or exciter for presence.
- Tempo-matched delay and a short plate or room reverb for space.
You can build chains with Inserts and the built-in Channel Strip modules, then save them as presets to reuse on Lead, Doubles, Harmonies, or a vocal bus. The goal is predictable gain staging and a clean, modern vocal tone you can refine quickly instead of reinventing it each session.
Why Use Presets (Benefits & When They Help)
- Speed: Skip repetitive setup. Open a project, choose your preset, and record while inspiration is fresh.
- Consistency: A calibrated chain keeps tone aligned across songs and sessions—useful for singles, EPs, and content series.
- Focus: With the technical “plumbing” handled, you can spend time on performance, doubles/ad-libs, and arrangement.
- Translation: A good chain stays intelligible on earbuds and phones as well as full-range monitors, so rough mixes travel well.
- Low friction: Fewer choices in the moment—especially helpful when tracking on a laptop or tight schedule.
When they help most: fast writing sessions; remote collaboration; content creation (shorts/reels); keeping a consistent sound across a series; and any workflow where you want to move from idea to take in minutes.
Stock vs. Premium Approaches in Cubase
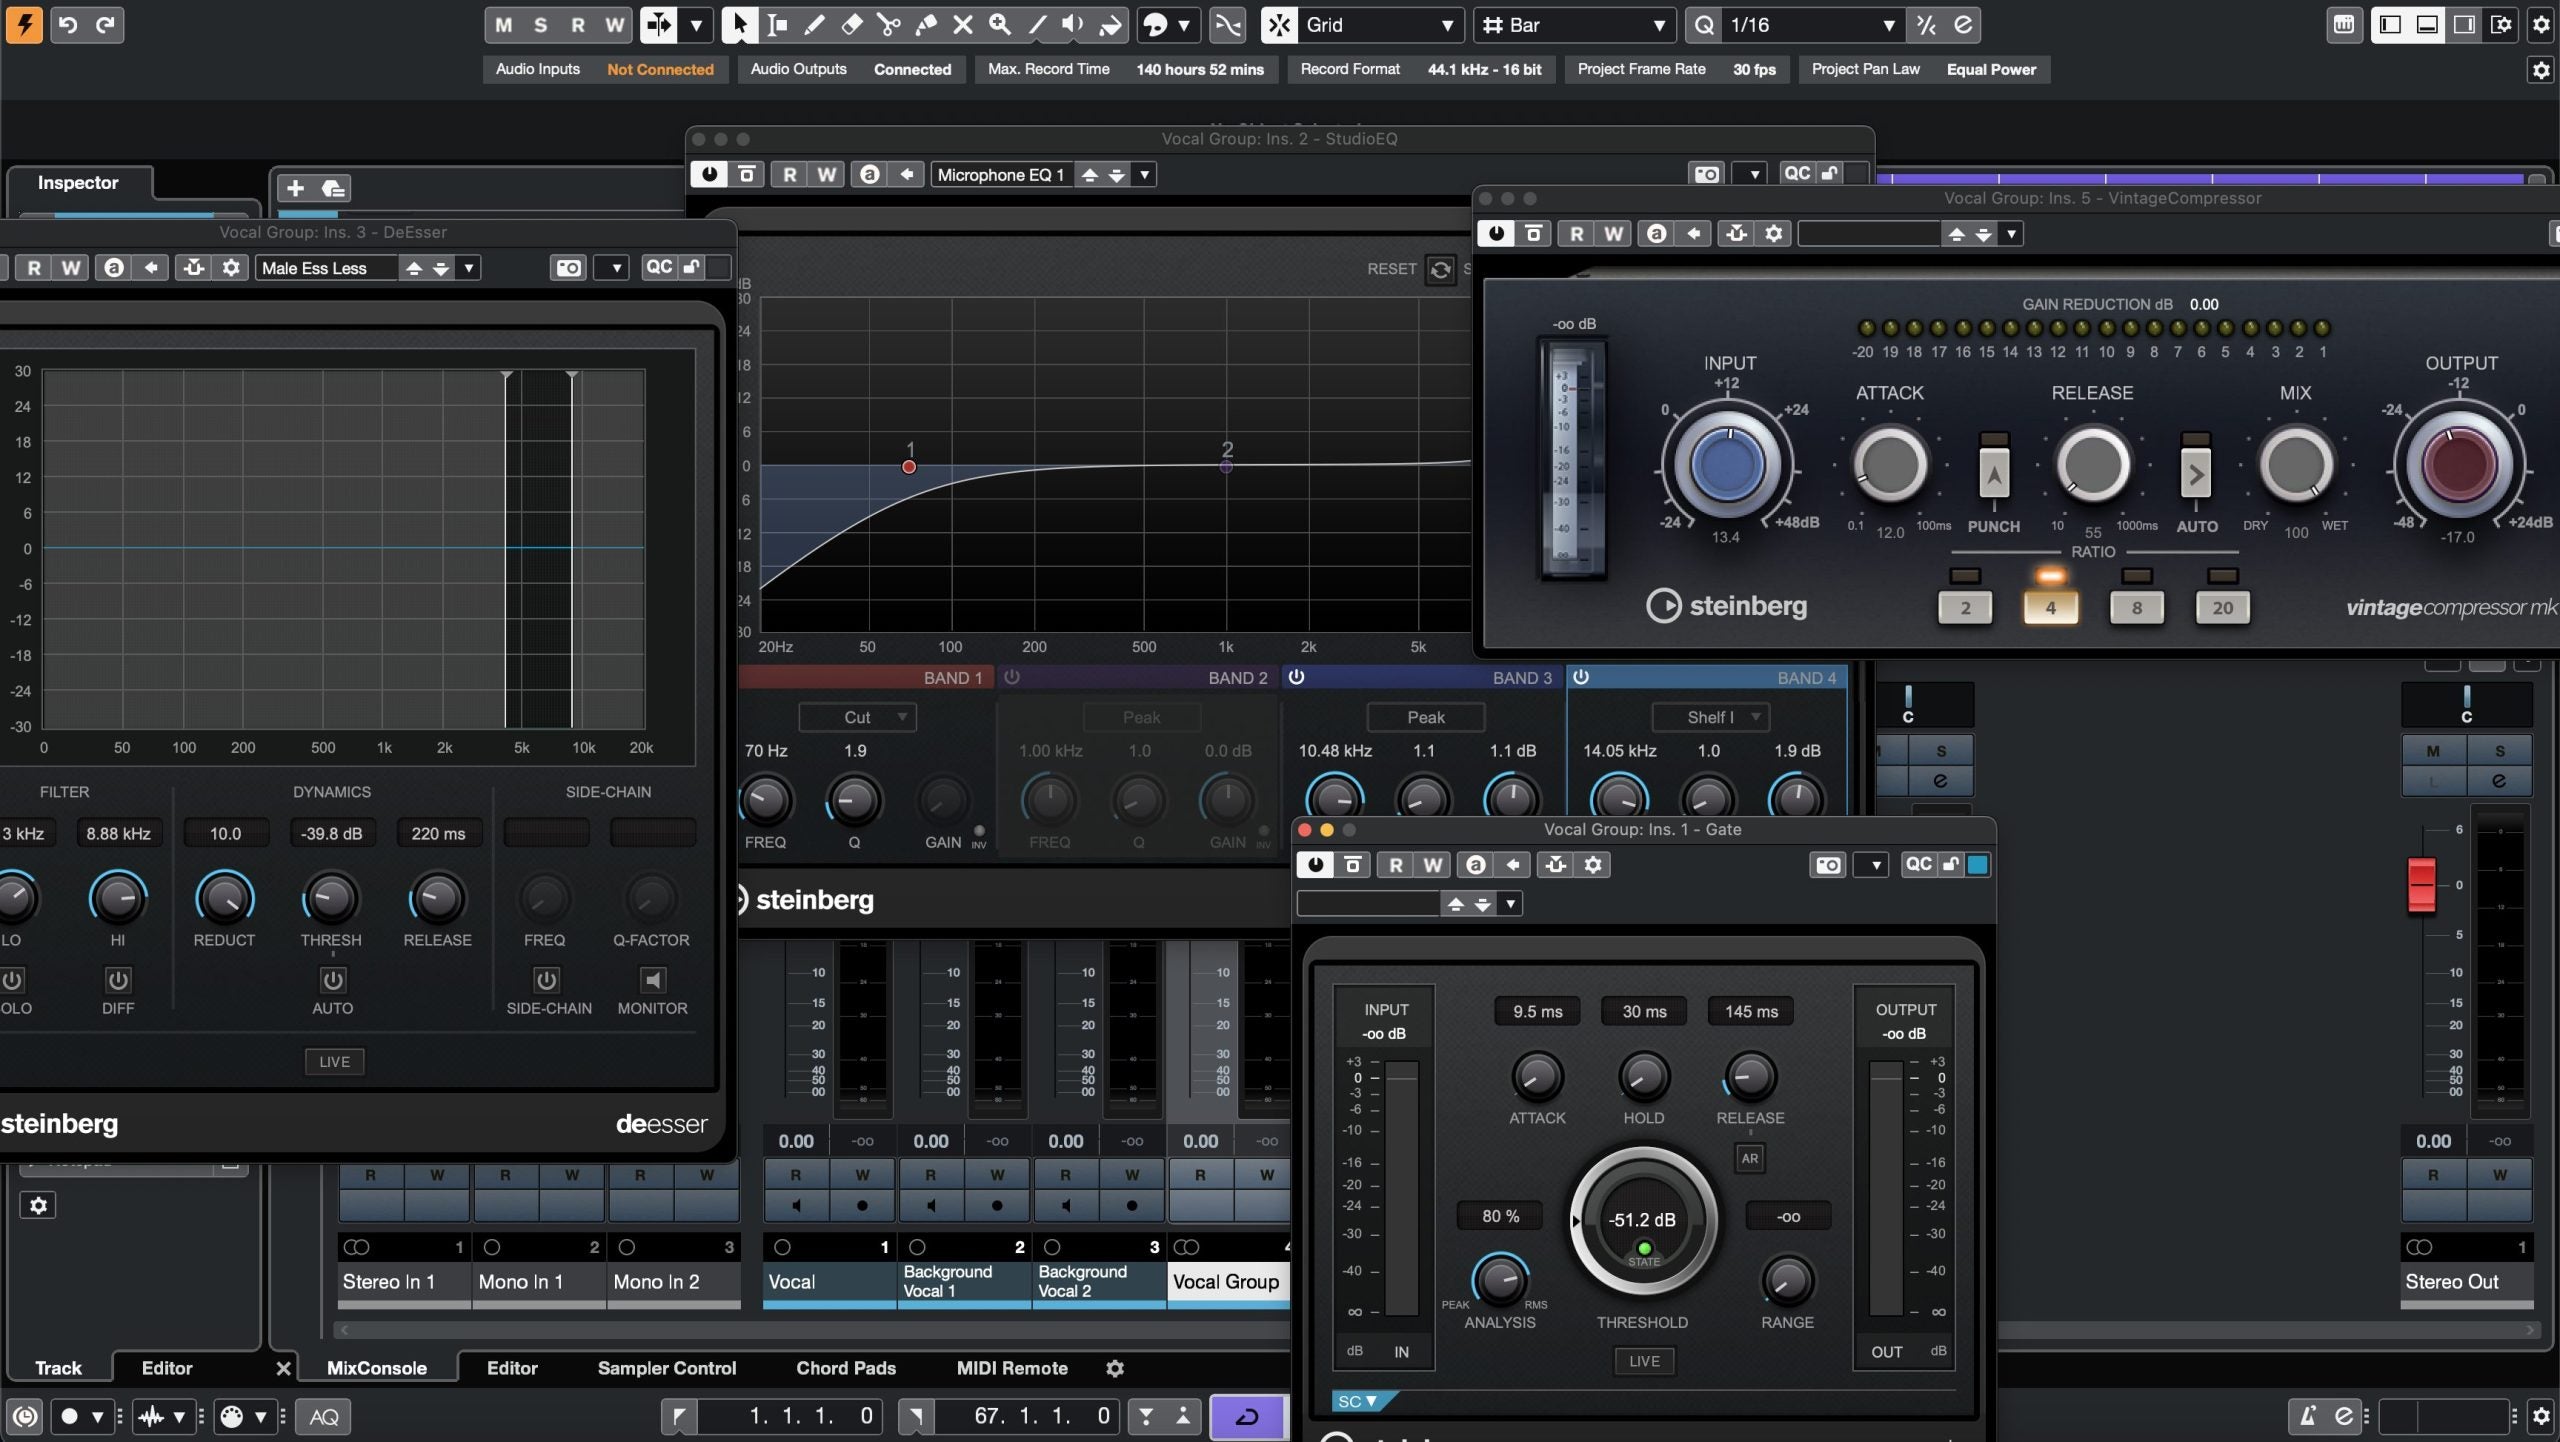
Stock chains use Cubase’s native processors (Channel Strip, stock EQ/Compressor/De-Esser, Reverence/RoomWorks, etc.). They load on any system running Cubase—no third-party licenses—and are ideal if you collaborate or move between machines. Stock chains are light on CPU and eliminate “missing plug-in” issues on a different computer.
Premium chains add third-party tools for finer control or a specific color (for example, character compressors, specialty saturators, or advanced pitch correction). These can sound great, but they require the listed plug-ins to be installed and activated on the machine that opens the session.
Which should you choose? If portability and simplicity matter most, start with stock. If your rig already includes third-party plug-ins and you want more tone-shaping options, premium can be a perfect fit. Many artists keep both: a stock chain for tracking anywhere and a premium chain for polishing at home or in the studio. Whichever path you pick, keep gain staging consistent so presets behave predictably across projects.
Install & Quick-Start (Step-by-Step)
- Create and organize. Start a new project. Add tracks for Lead, Doubles, Harmonies, and Ad-libs. Color-code them and set outputs to a Vocal Bus for grouped control.
- Set input and buffer. Choose your mic input on the Lead track. Record a short test phrase and set preamp/interface gain so peaks hit roughly −10 to −6 dBFS. For tracking, use a smaller ASIO/CoreAudio buffer for lower latency; for mixing, raise it for stability. See Steinberg’s buffer/latency guidance here.
- Load the chain. Open Inserts/Channel Strip on your vocal track. Load the preset (Track Preset or .vstpreset) or insert processors in this order: EQ → Compressor 1 (gentle) → De-Esser → Compressor 2 (fast/clean) → optional Saturation → sends to Reverb/Delay.
- Dial thresholds & sends. Lower compressor thresholds until the loudest lines reduce by a few dB without pumping. Adjust de-ess so consonants are smooth, not dull. Add ambience with sends; keep inserts mostly dry while tracking for clarity and low latency.
- Save your setup. Save a Track Preset for your voice, and save a Project Template so every session opens with the same headroom, routing, and colors. Prefer a ready-made layout? Try the Cubase Recording Template (Stock).
Optional but powerful: set up the Control Room for accurate monitoring/cues, use Audio Alignment to tighten doubles/harmonies, and use VariAudio for pitch work where available.
Styles & Use Cases (Rap, R&B, Pop, Clear/Podcast)
Rap lead (punch + clarity). Use two lighter compressors in series for control without killing transients. Focus intelligibility around 2–5 kHz with careful EQ, and add a short slap or small plate for energy without wash. Keep hooks wider by automating a bit more delay send on chorus lines. If your delivery is very centered, try a subtle doubler for width on hooks.
Melodic trap / drill. Keep the top end bright but smooth. A touch of saturation before de-ess adds bite; follow it with de-ess so consonants don’t get spitty. Layer ad-libs with a slightly higher high-pass filter and a touch more de-ess to keep stacks tidy. For fast results, start from an artist-style chain (for example, Atlanta Trap Vocal Preset or NBA YoungBoy Vocal Preset) and tweak sends/thresholds for your voice.
R&B / soul (smooth singing). Aim for a silky top and controlled low-mid warmth. Use gentler attack/release, a soft “air” shelf, and wider ambience for depth. Longer pre-delay adds space without masking words. On backgrounds, use stereo-widened delays and high-pass to prevent low-mid fog. If your mic is bright, cut a little harshness before compression so it doesn’t overreact.
Pop. Modern pop benefits from lift and polish. Add a tasteful high-shelf and keep sibilance in check with de-ess. Use tempo-synced delays for width; a very short room reverb can “glue” the vocal without sounding wet. Compare choices at matched loudness—“louder” often sounds “better,” so level-match before deciding. On dense arrangements, carve 2–4 kHz carefully so words stay intelligible.
Clear vocals / podcast / talking. Prioritize intelligibility and noise control. Use transparent compression, moderate de-ess, and just a hint of short ambience if dry feels unnatural. Technique beats processing: consistent mic distance, a pop filter, and a quiet room will outperform heavy plug-ins. If you record in a lively space, try a gentle denoise/dereverb before EQ and compression.
Backings, doubles, ad-libs. Slightly tighter compression and a touch more de-ess help stacks sit without clutter. Push a higher high-pass filter on layers to remove rumble and low-mid fog. Wider or longer ambience separates backgrounds from the lead without masking words. To tighten timing across stacks, use Cubase Audio Alignment where available.
Recording Templates vs. Presets (Workflow)
Vocal presets shape tone and dynamics on a single track or vocal bus. Recording templates provide the full session layout—pre-named tracks (Lead, Doubles, Harmonies, Ad-libs), color-coding, routing, cue mixes, and ready sends—so you can move from idea to take with minimal setup. Many creators use both:
- A simple template so every project opens organized and calibrated, and
- A small set of presets—Bright, Neutral, Soft—so each new song starts with the closest tone.
If you bounce between laptops or studios, save presets to your user library so the same chain travels with you. For deeper mixes, try a bus workflow: put corrective processing on the track (EQ/Comp/De-ess) and creative polish on a vocal bus (exciter, glue compression, time-based FX). That keeps the lead track clean and lets you lift choruses by riding a few bus controls instead of every insert.
Explore related music tools on BCHILL MIX: the Cubase Recording Template (Stock), genre/artist-inspired chains like the Rap Vocal Preset for Cubase or browse the full Cubase Vocal Presets collection.
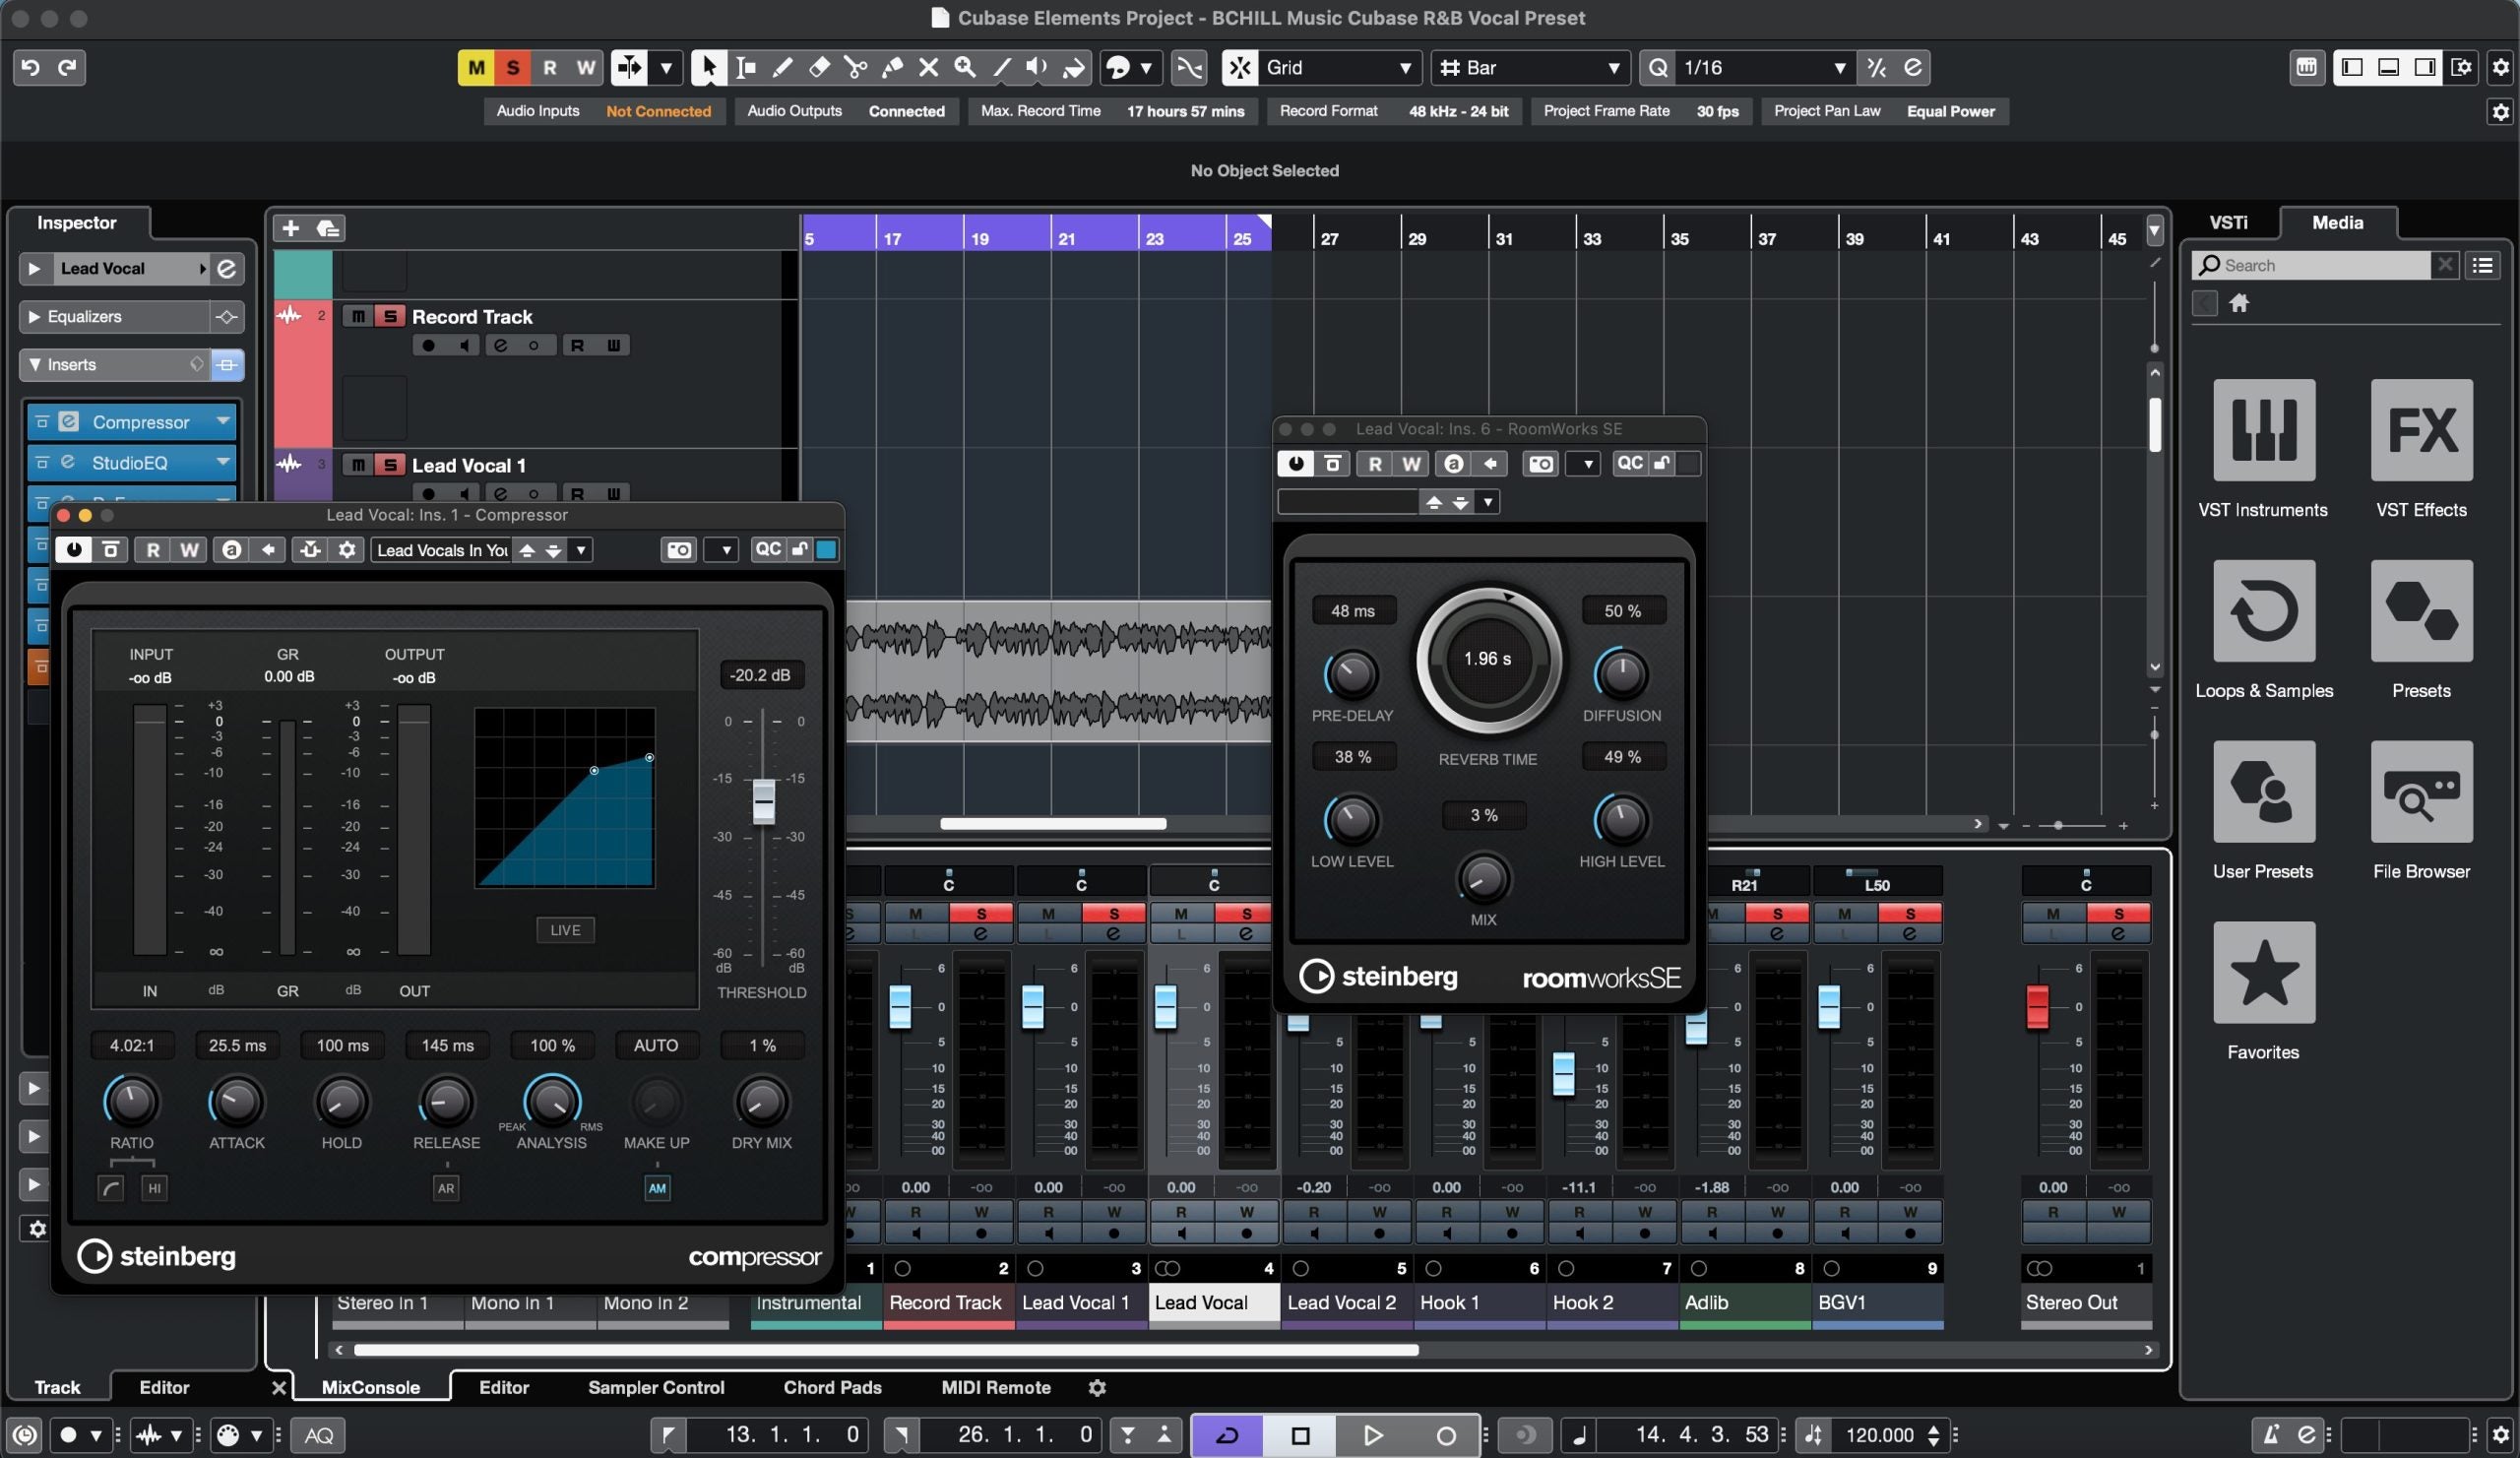
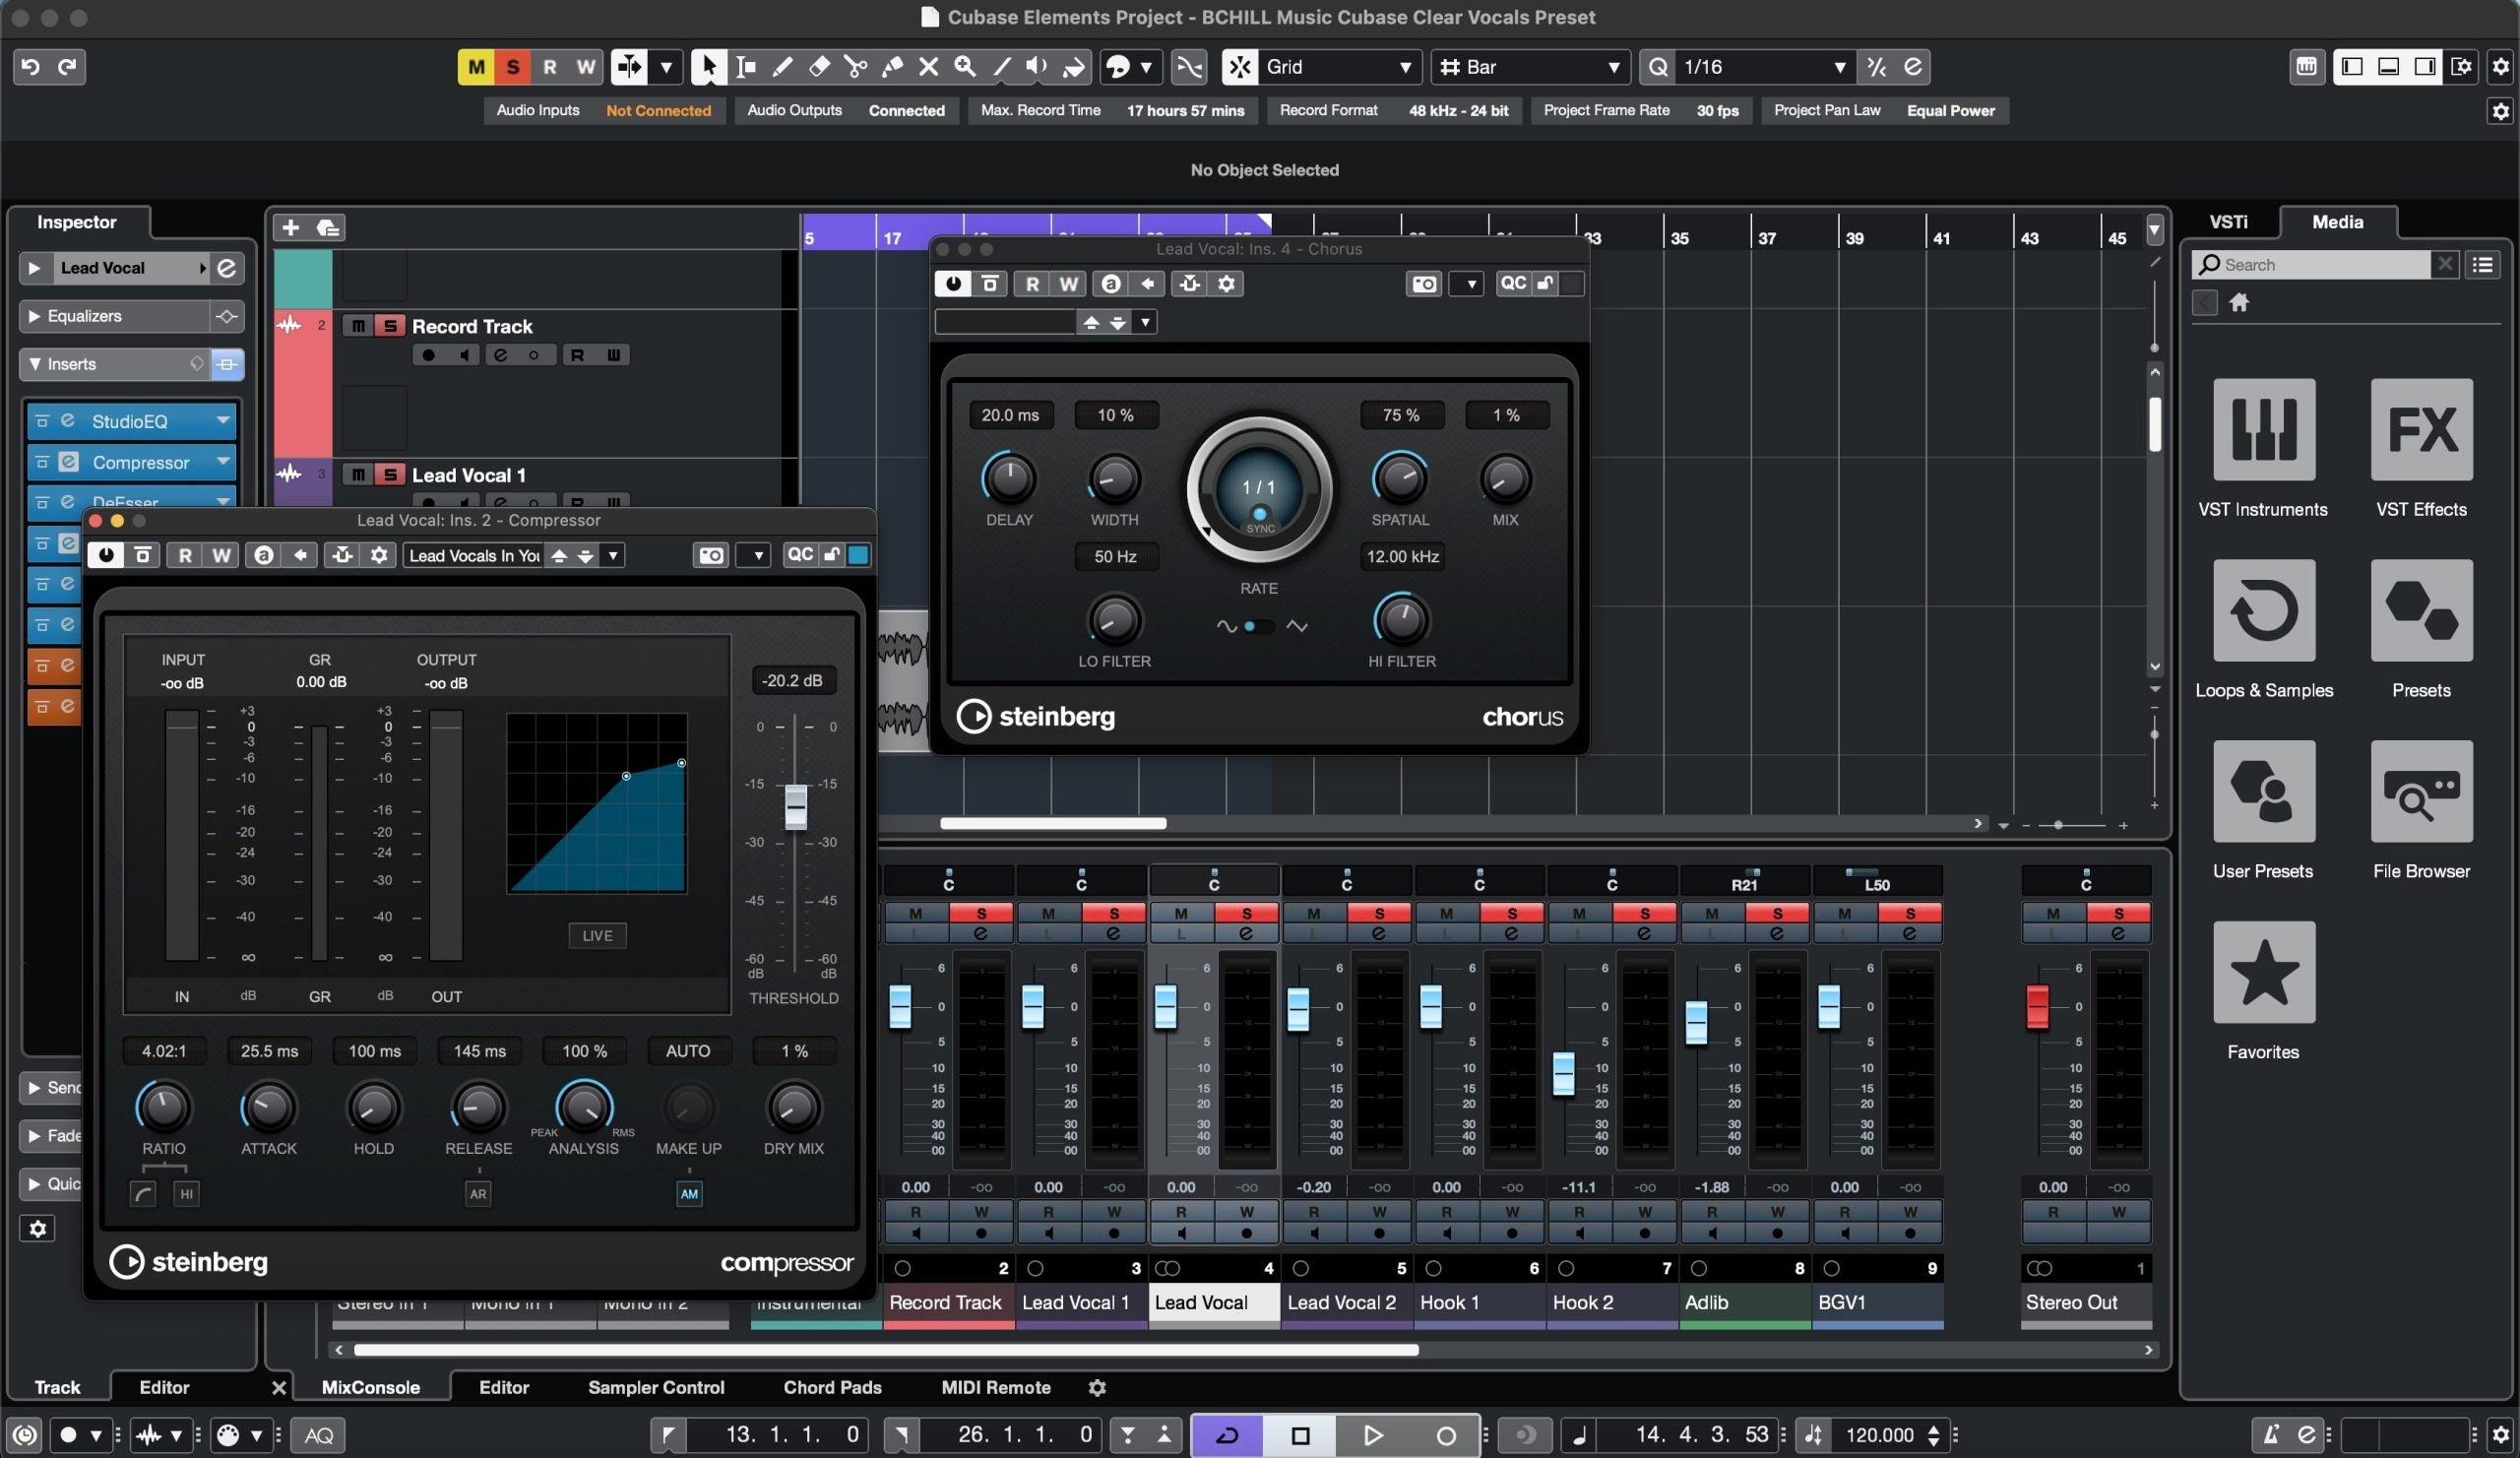
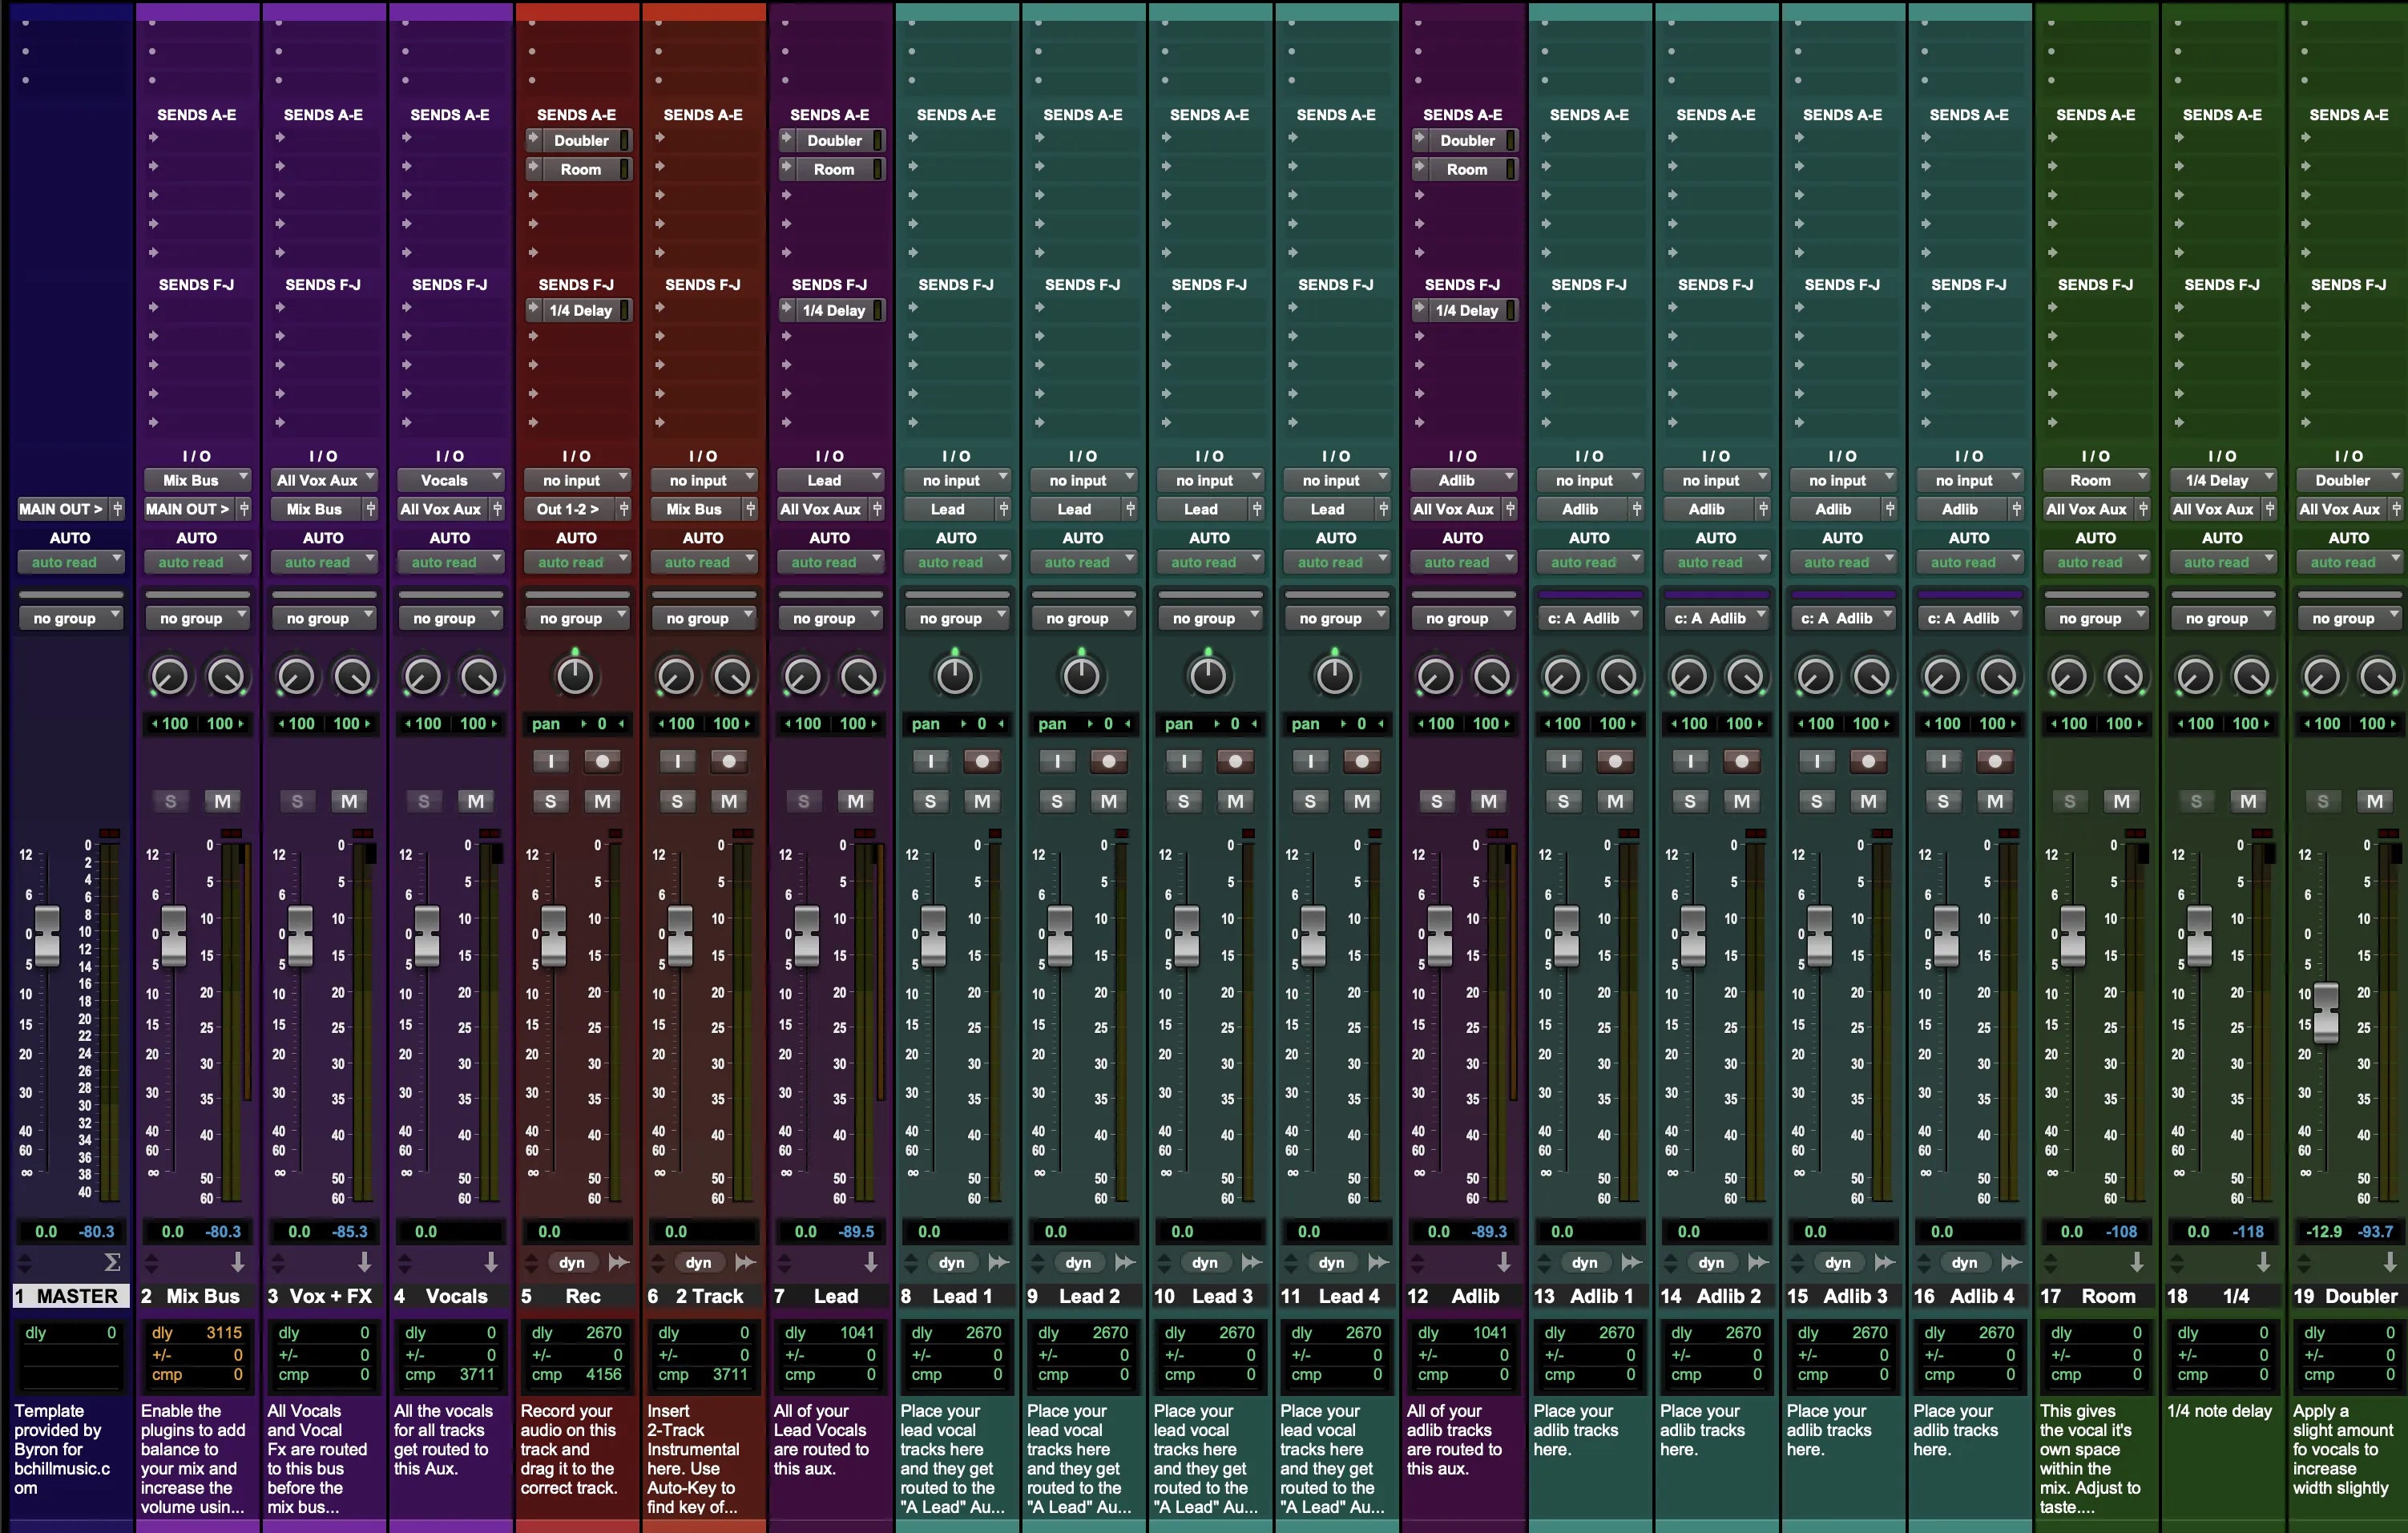
Inside the DAW: Cubase Vocal Preset Settings (Screenshots)
See how our Cubase vocal chain loads on Lead and Bus tracks. These screenshots show starter settings for rap, R&B, and pop, plus quick pointers for doubles/harmonies with Audio Alignment and VariAudio.