Modelli Logic Pro
Apri una sessione di Logic Pro più pulita e inizia a registrare più velocemente con instradamenti pronti, flusso di lavoro vocale e struttura della sessione.

Tipo: Modello di Registrazione
Modello di registrazione Logic Pro (Plugin standard)
Tipo: Modello di Registrazione
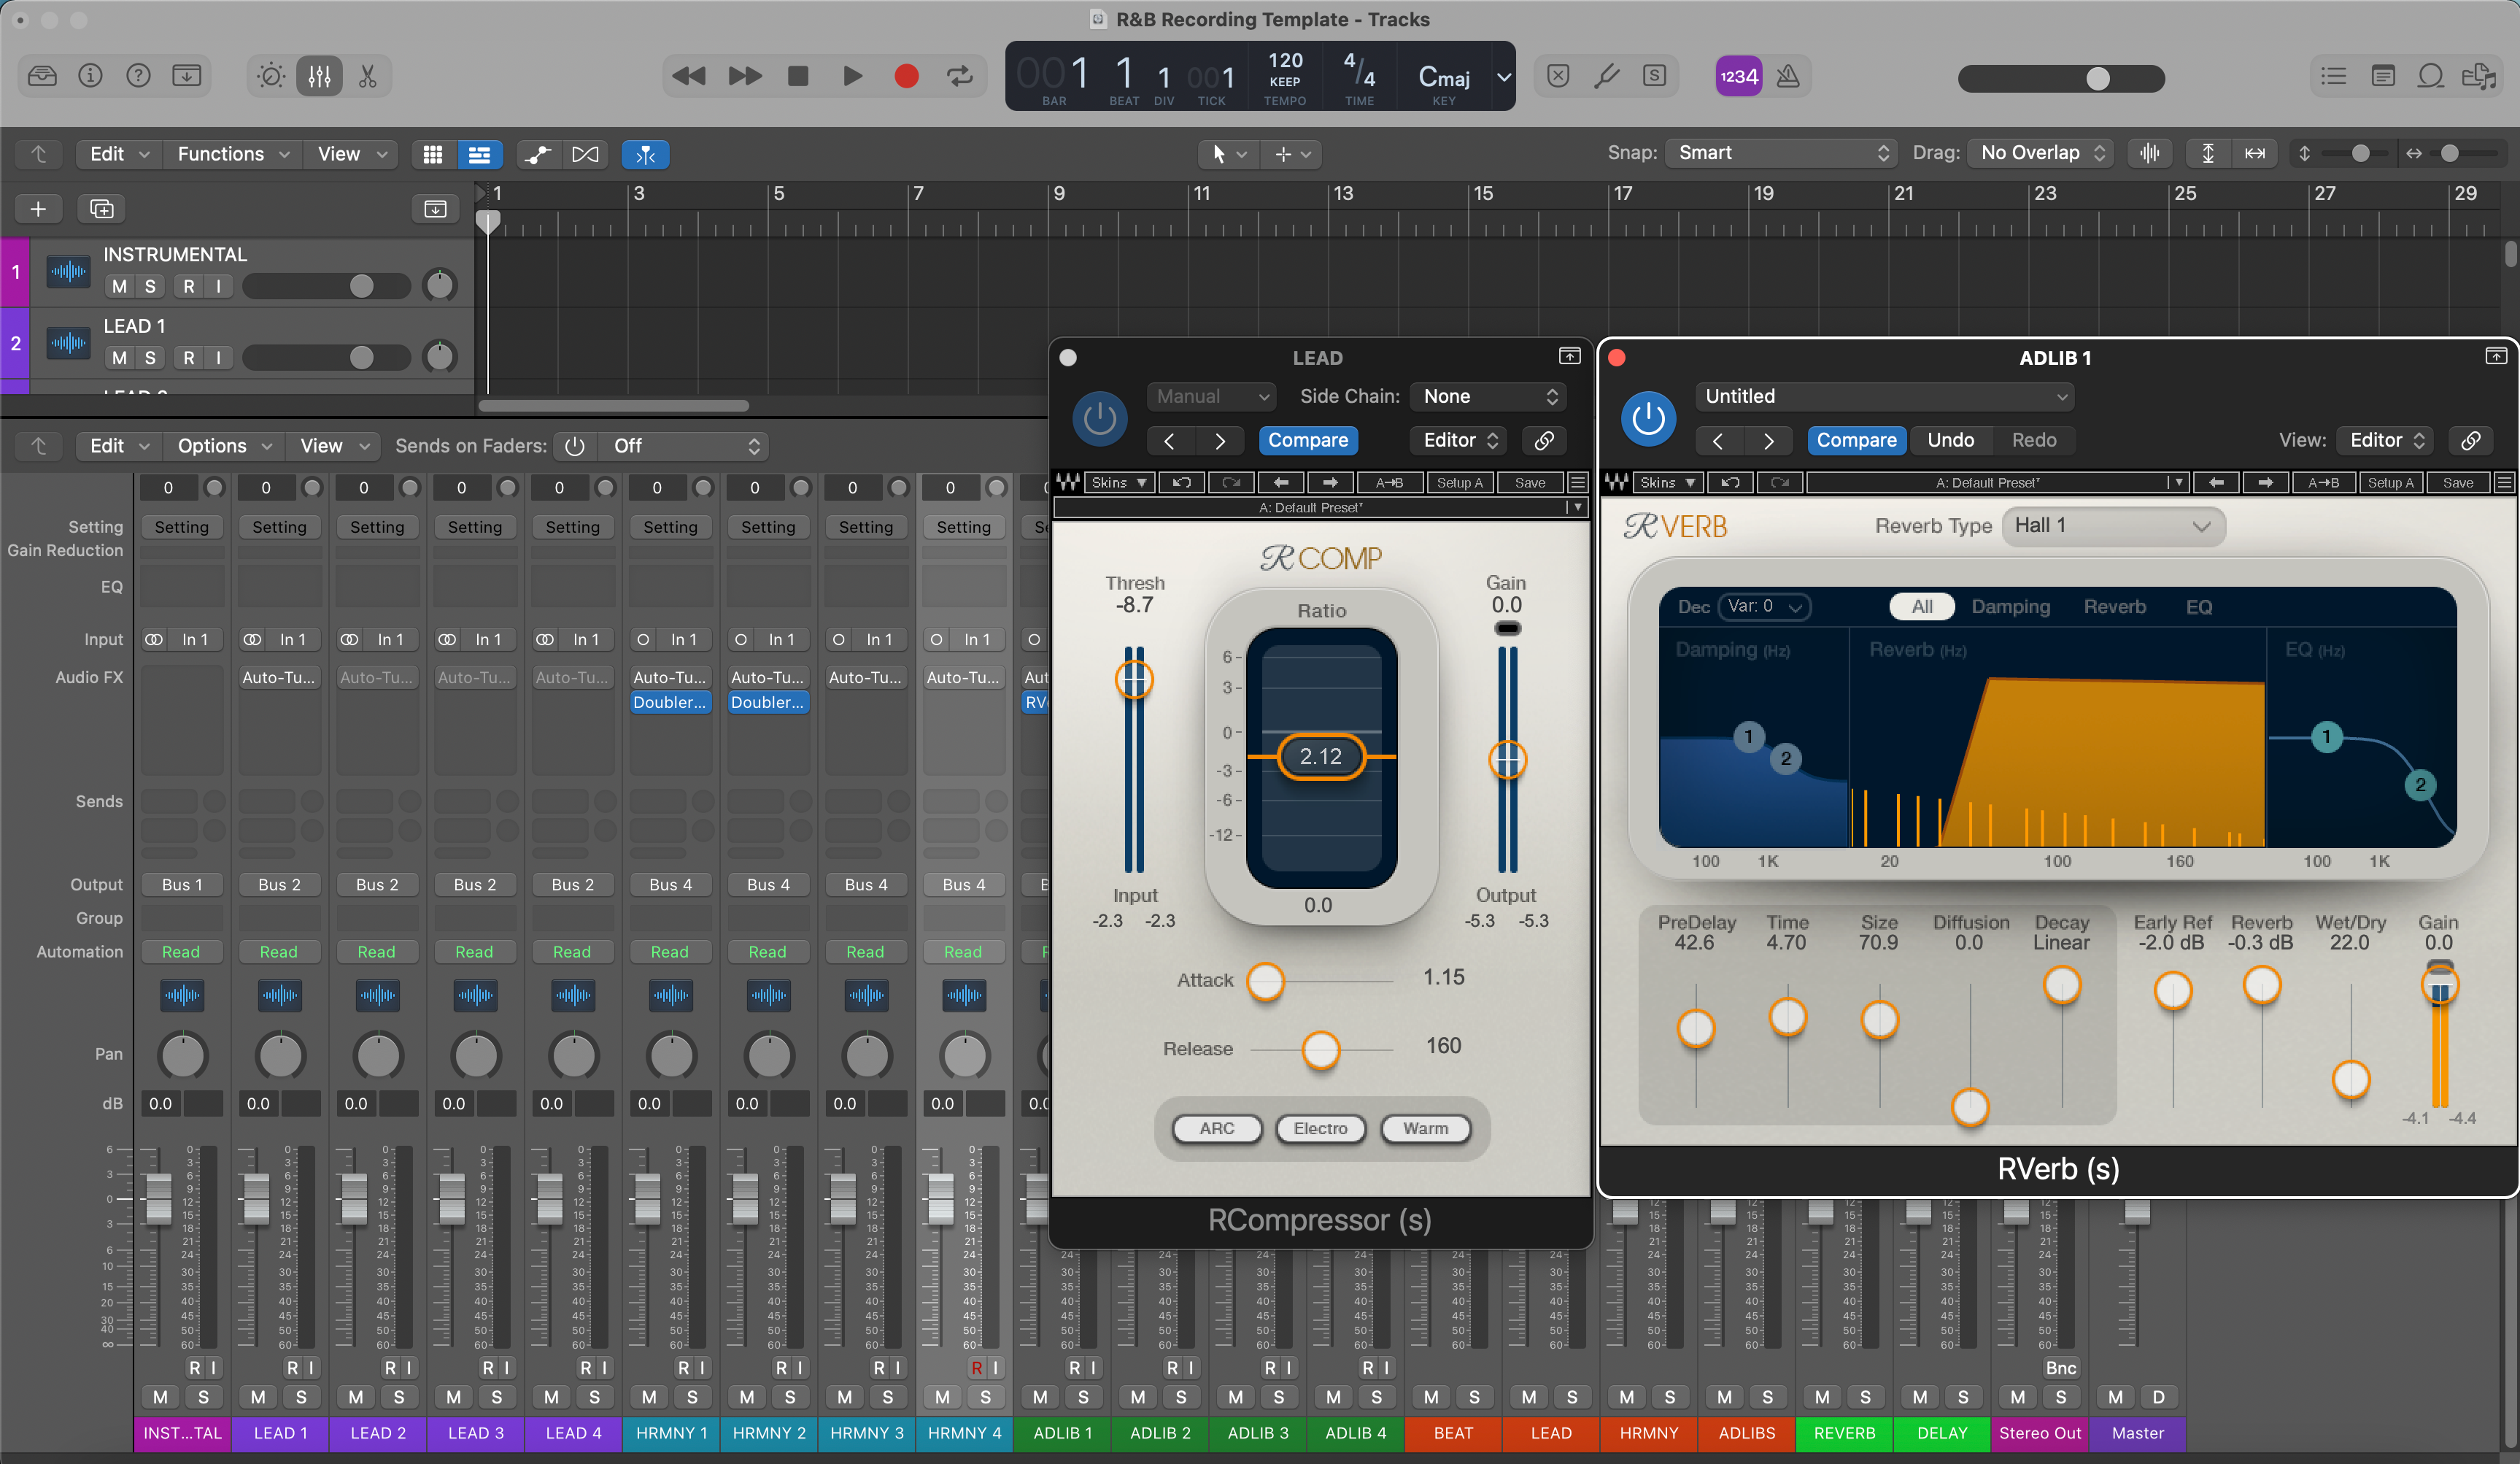
Logic Pro X Modello di Registrazione R&B – Preset Vocale

Tipo: Modello di Registrazione
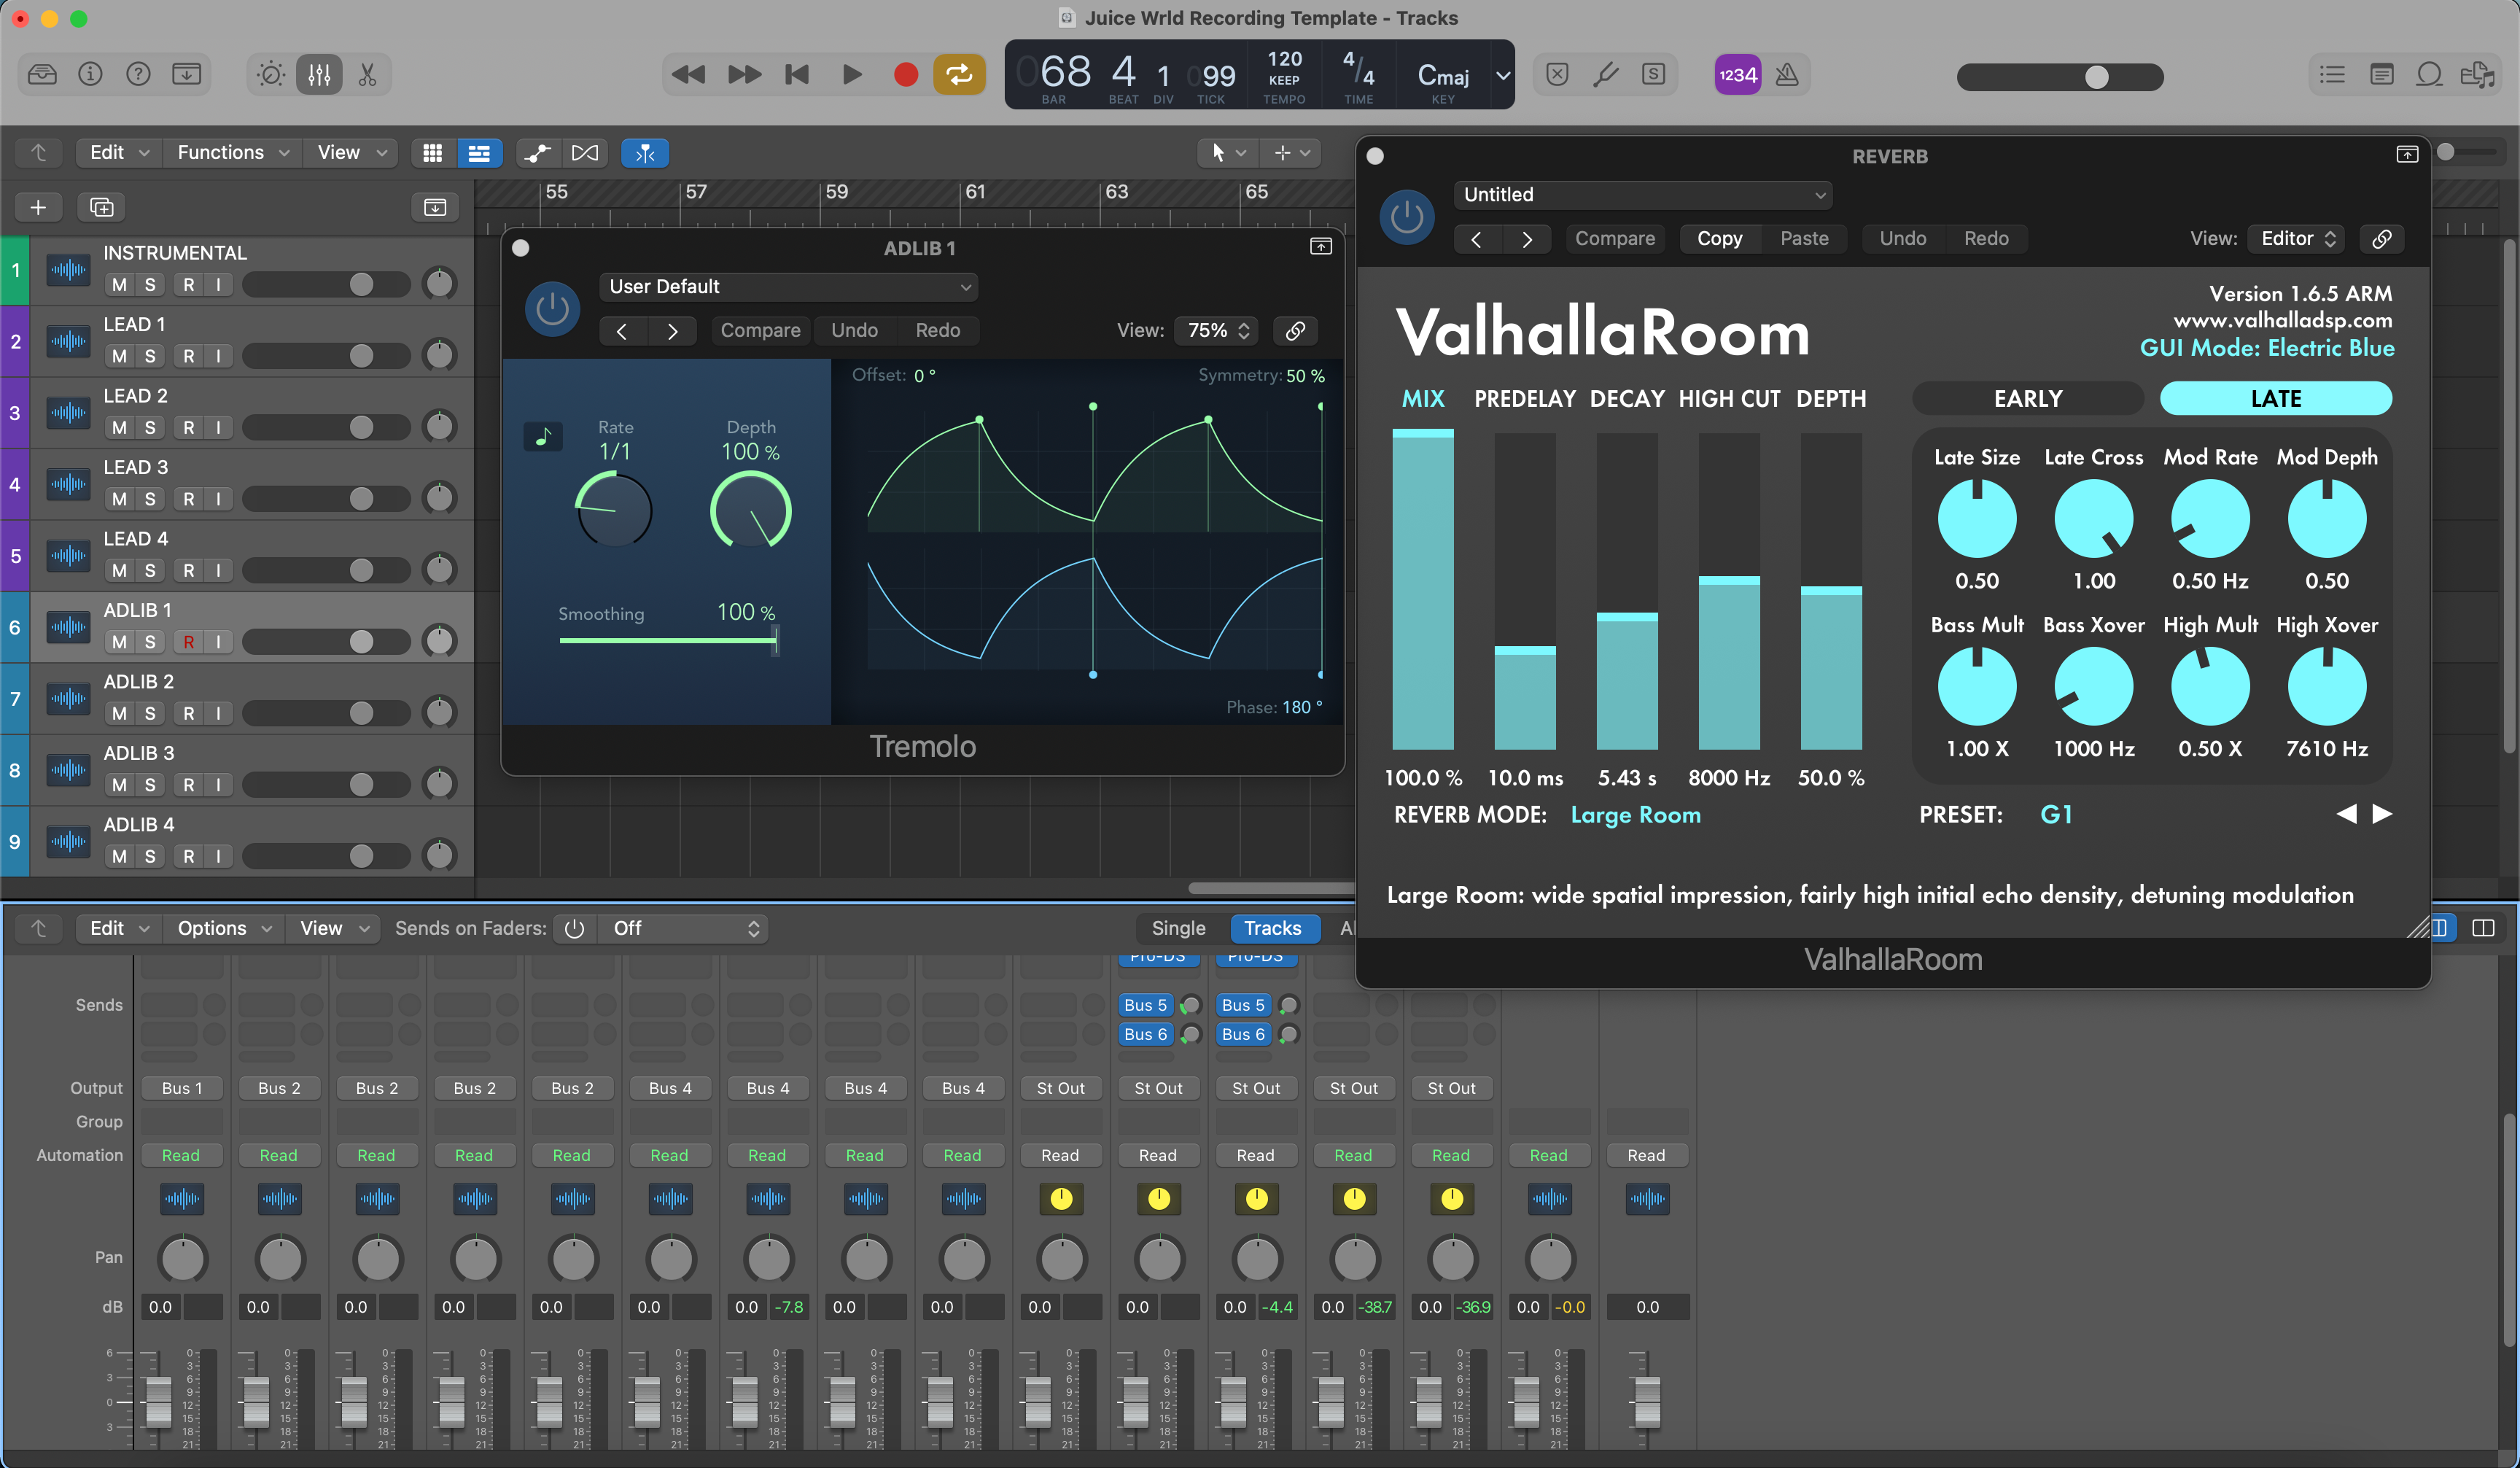
Juice World Modello di Registrazione Logic Pro X
Tipo: Modello di Registrazione
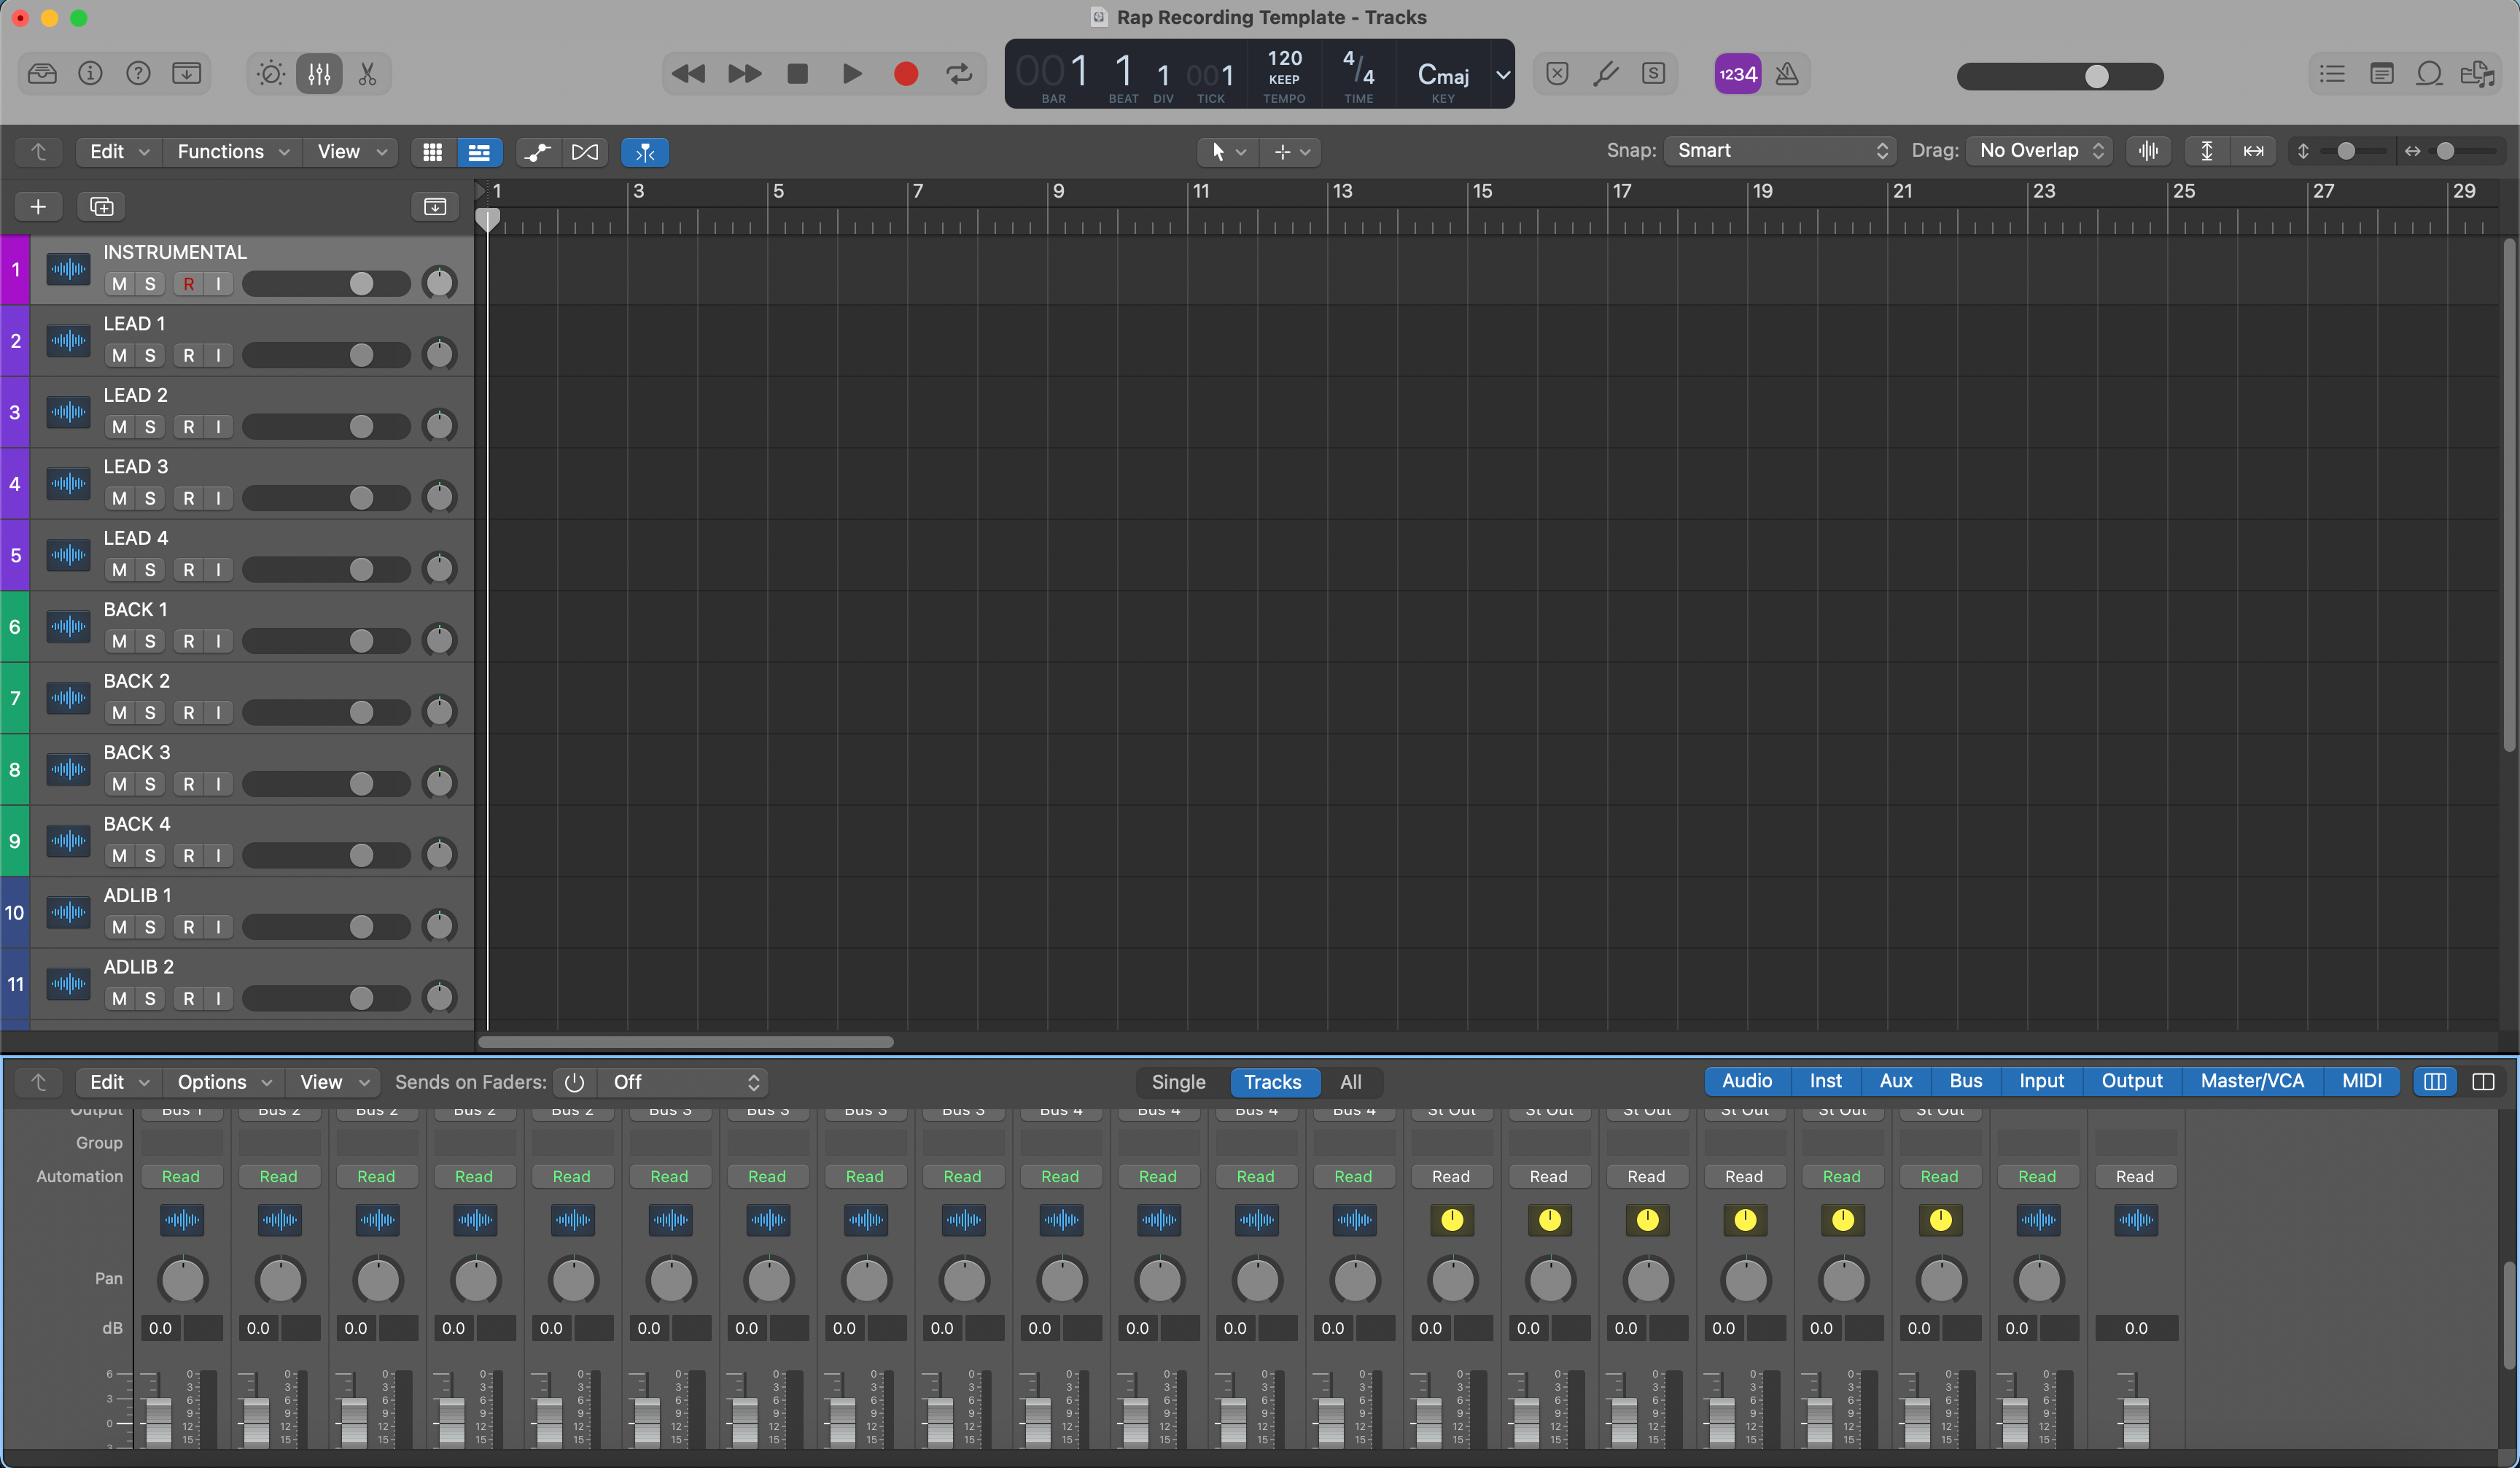
Logic Pro X Modello di Registrazione Rap - Preset Vocale

Tipo: Modello di Registrazione
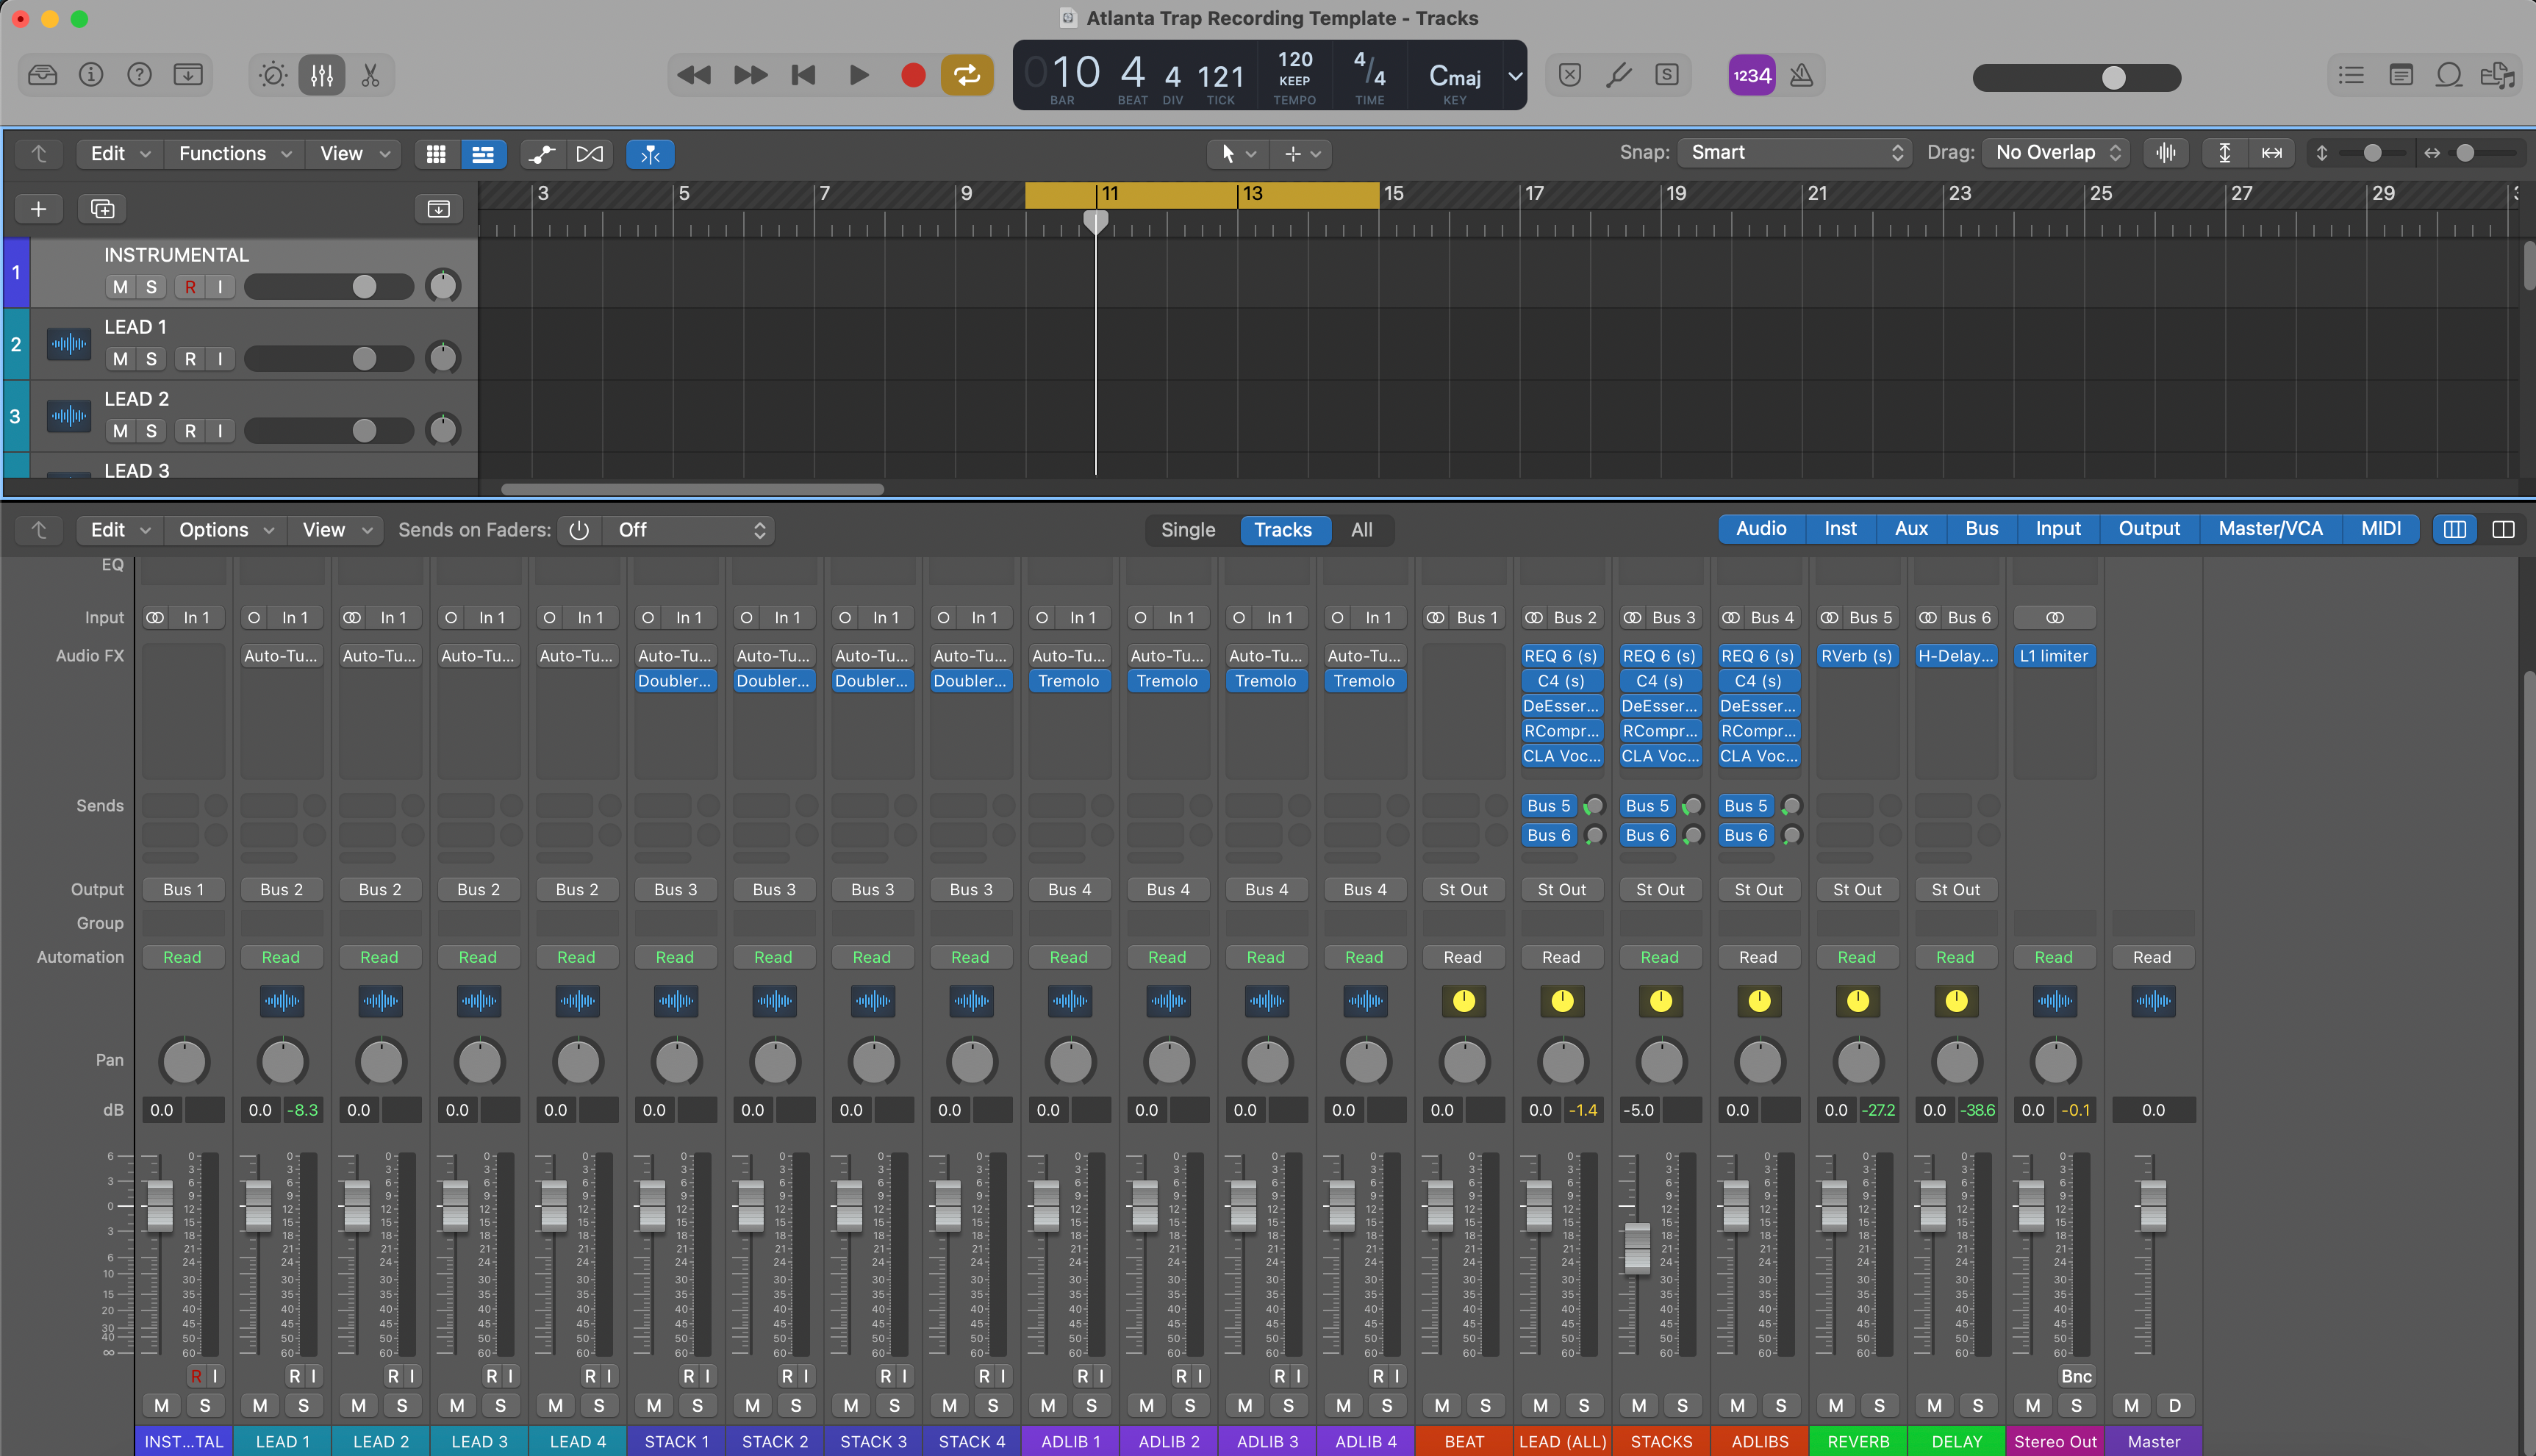
Logic Pro X Atlanta Trap Modello di Registrazione – Preset Vocale
Tipo: Modello di Registrazione
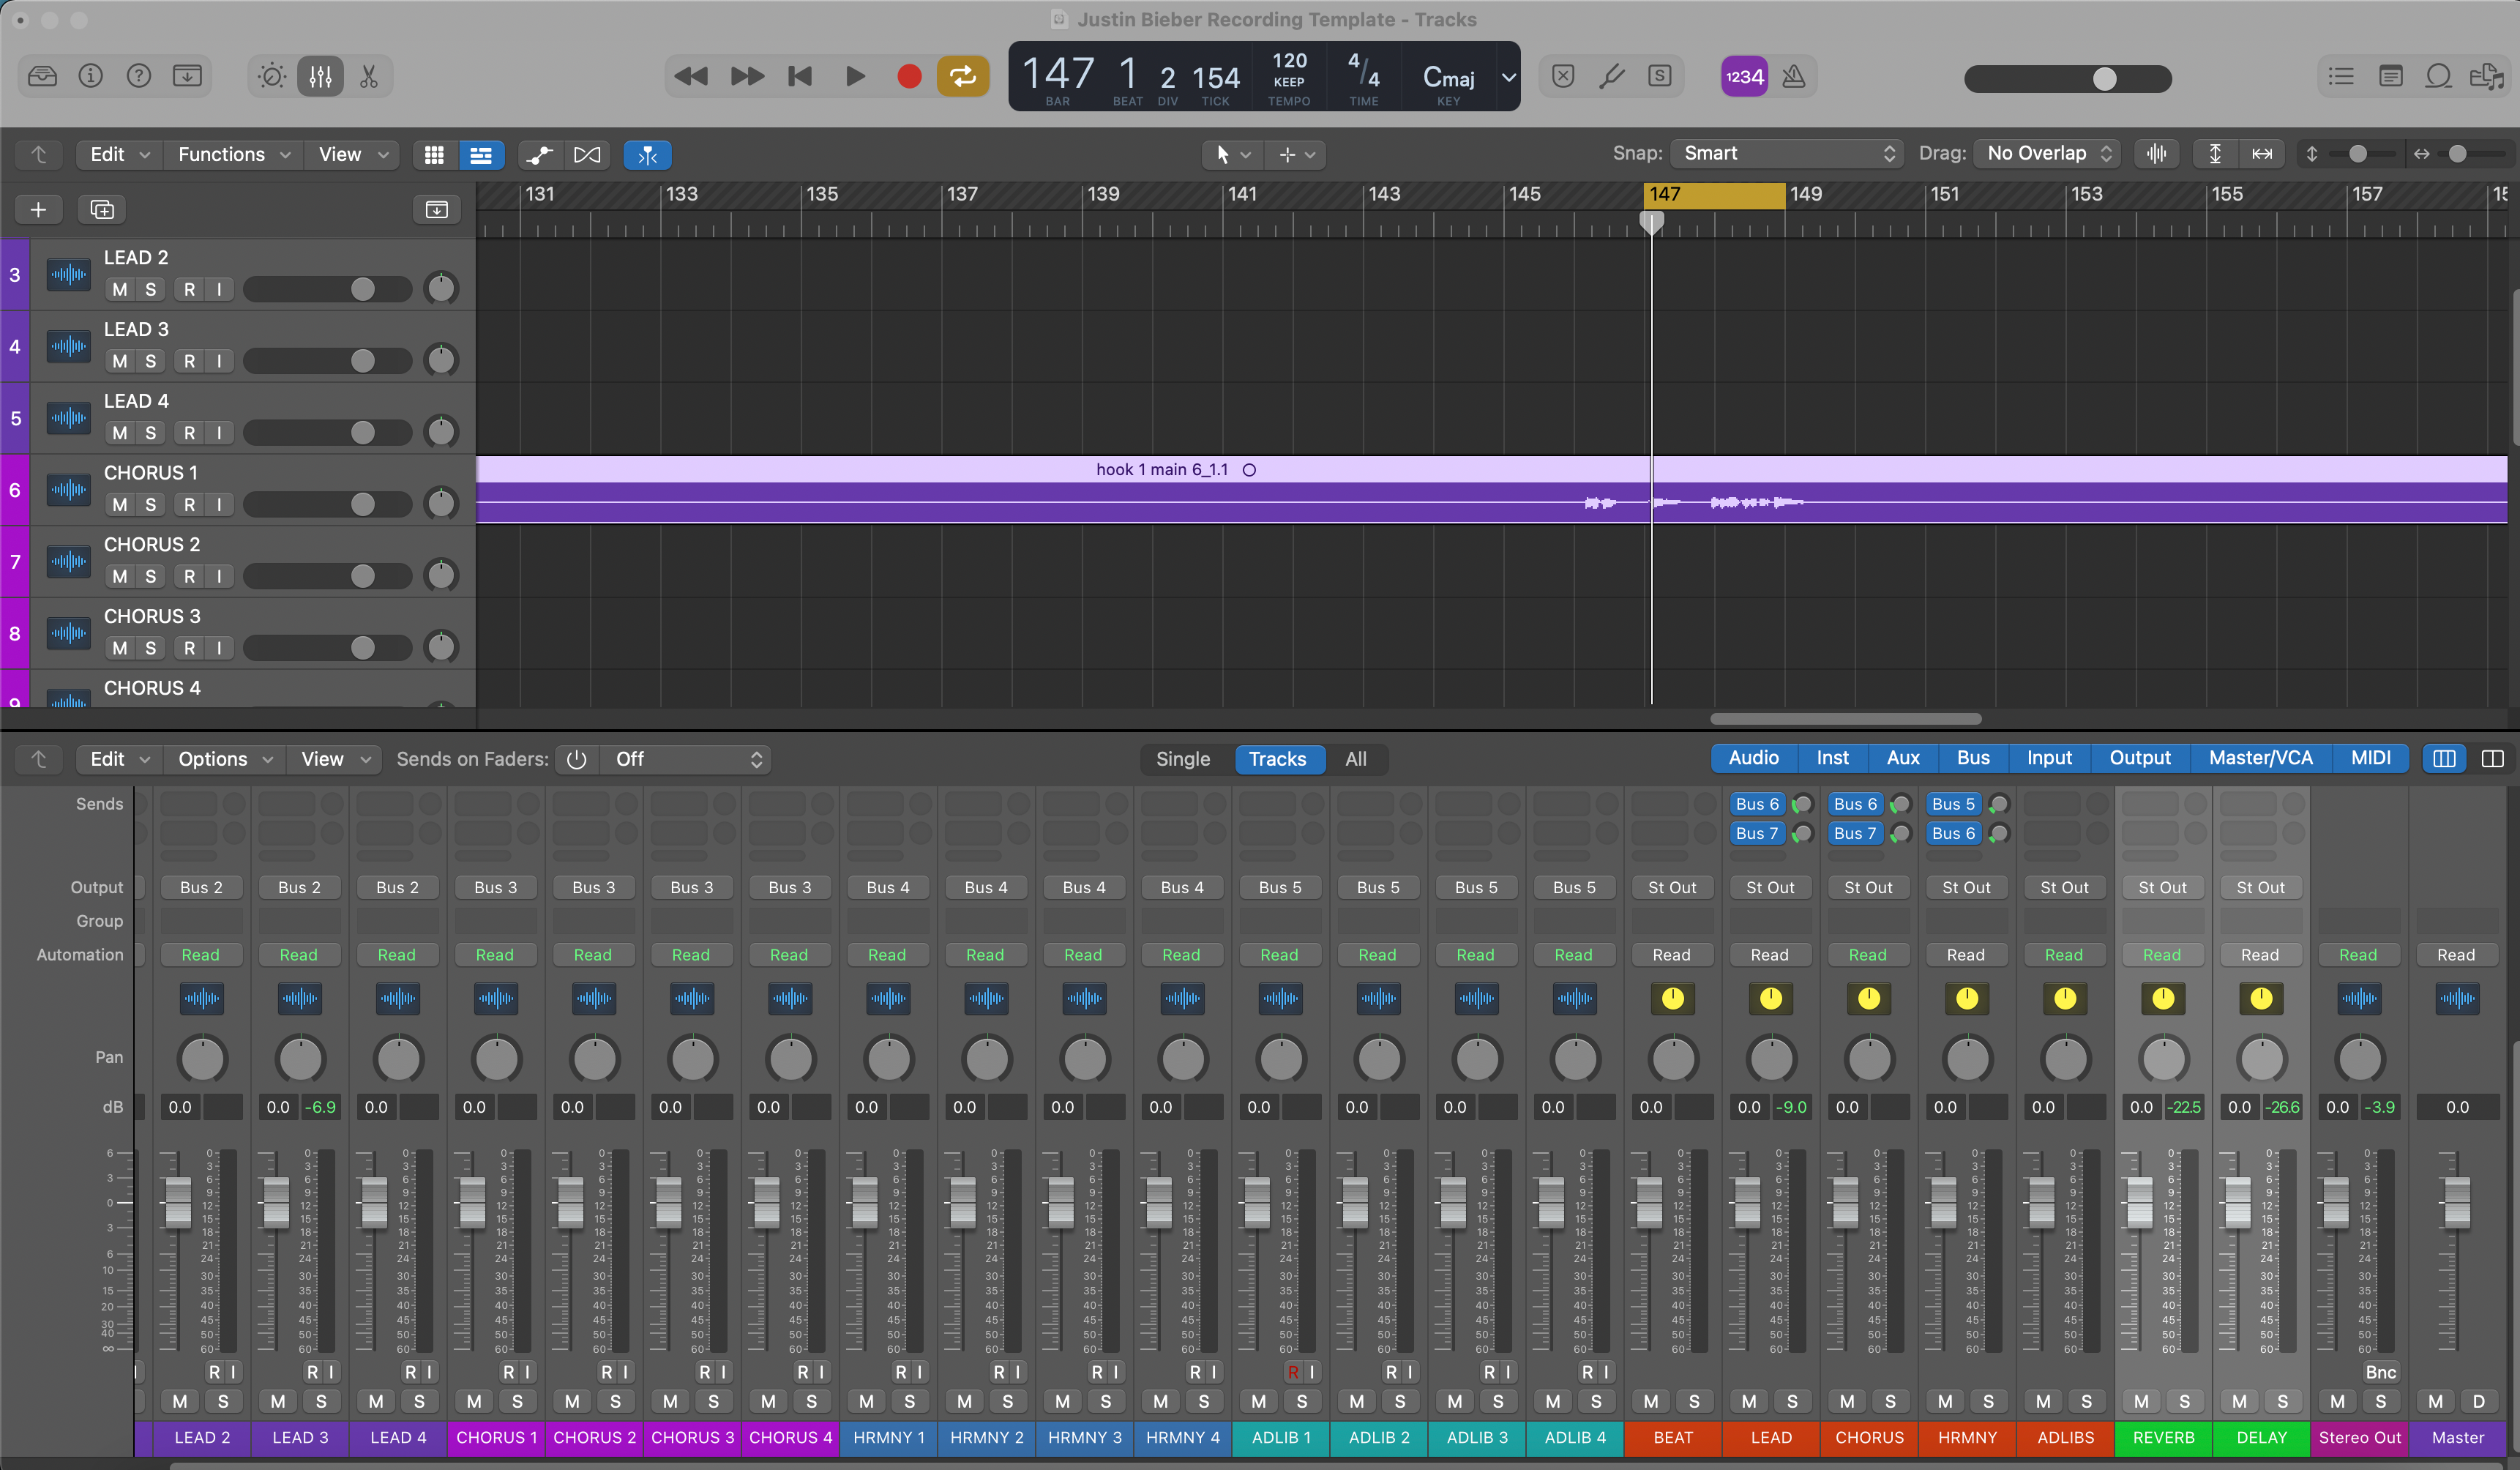
Logic Pro X Modello di Registrazione Justin Bieber – Preset Vocale
Tipo: Modello di Registrazione
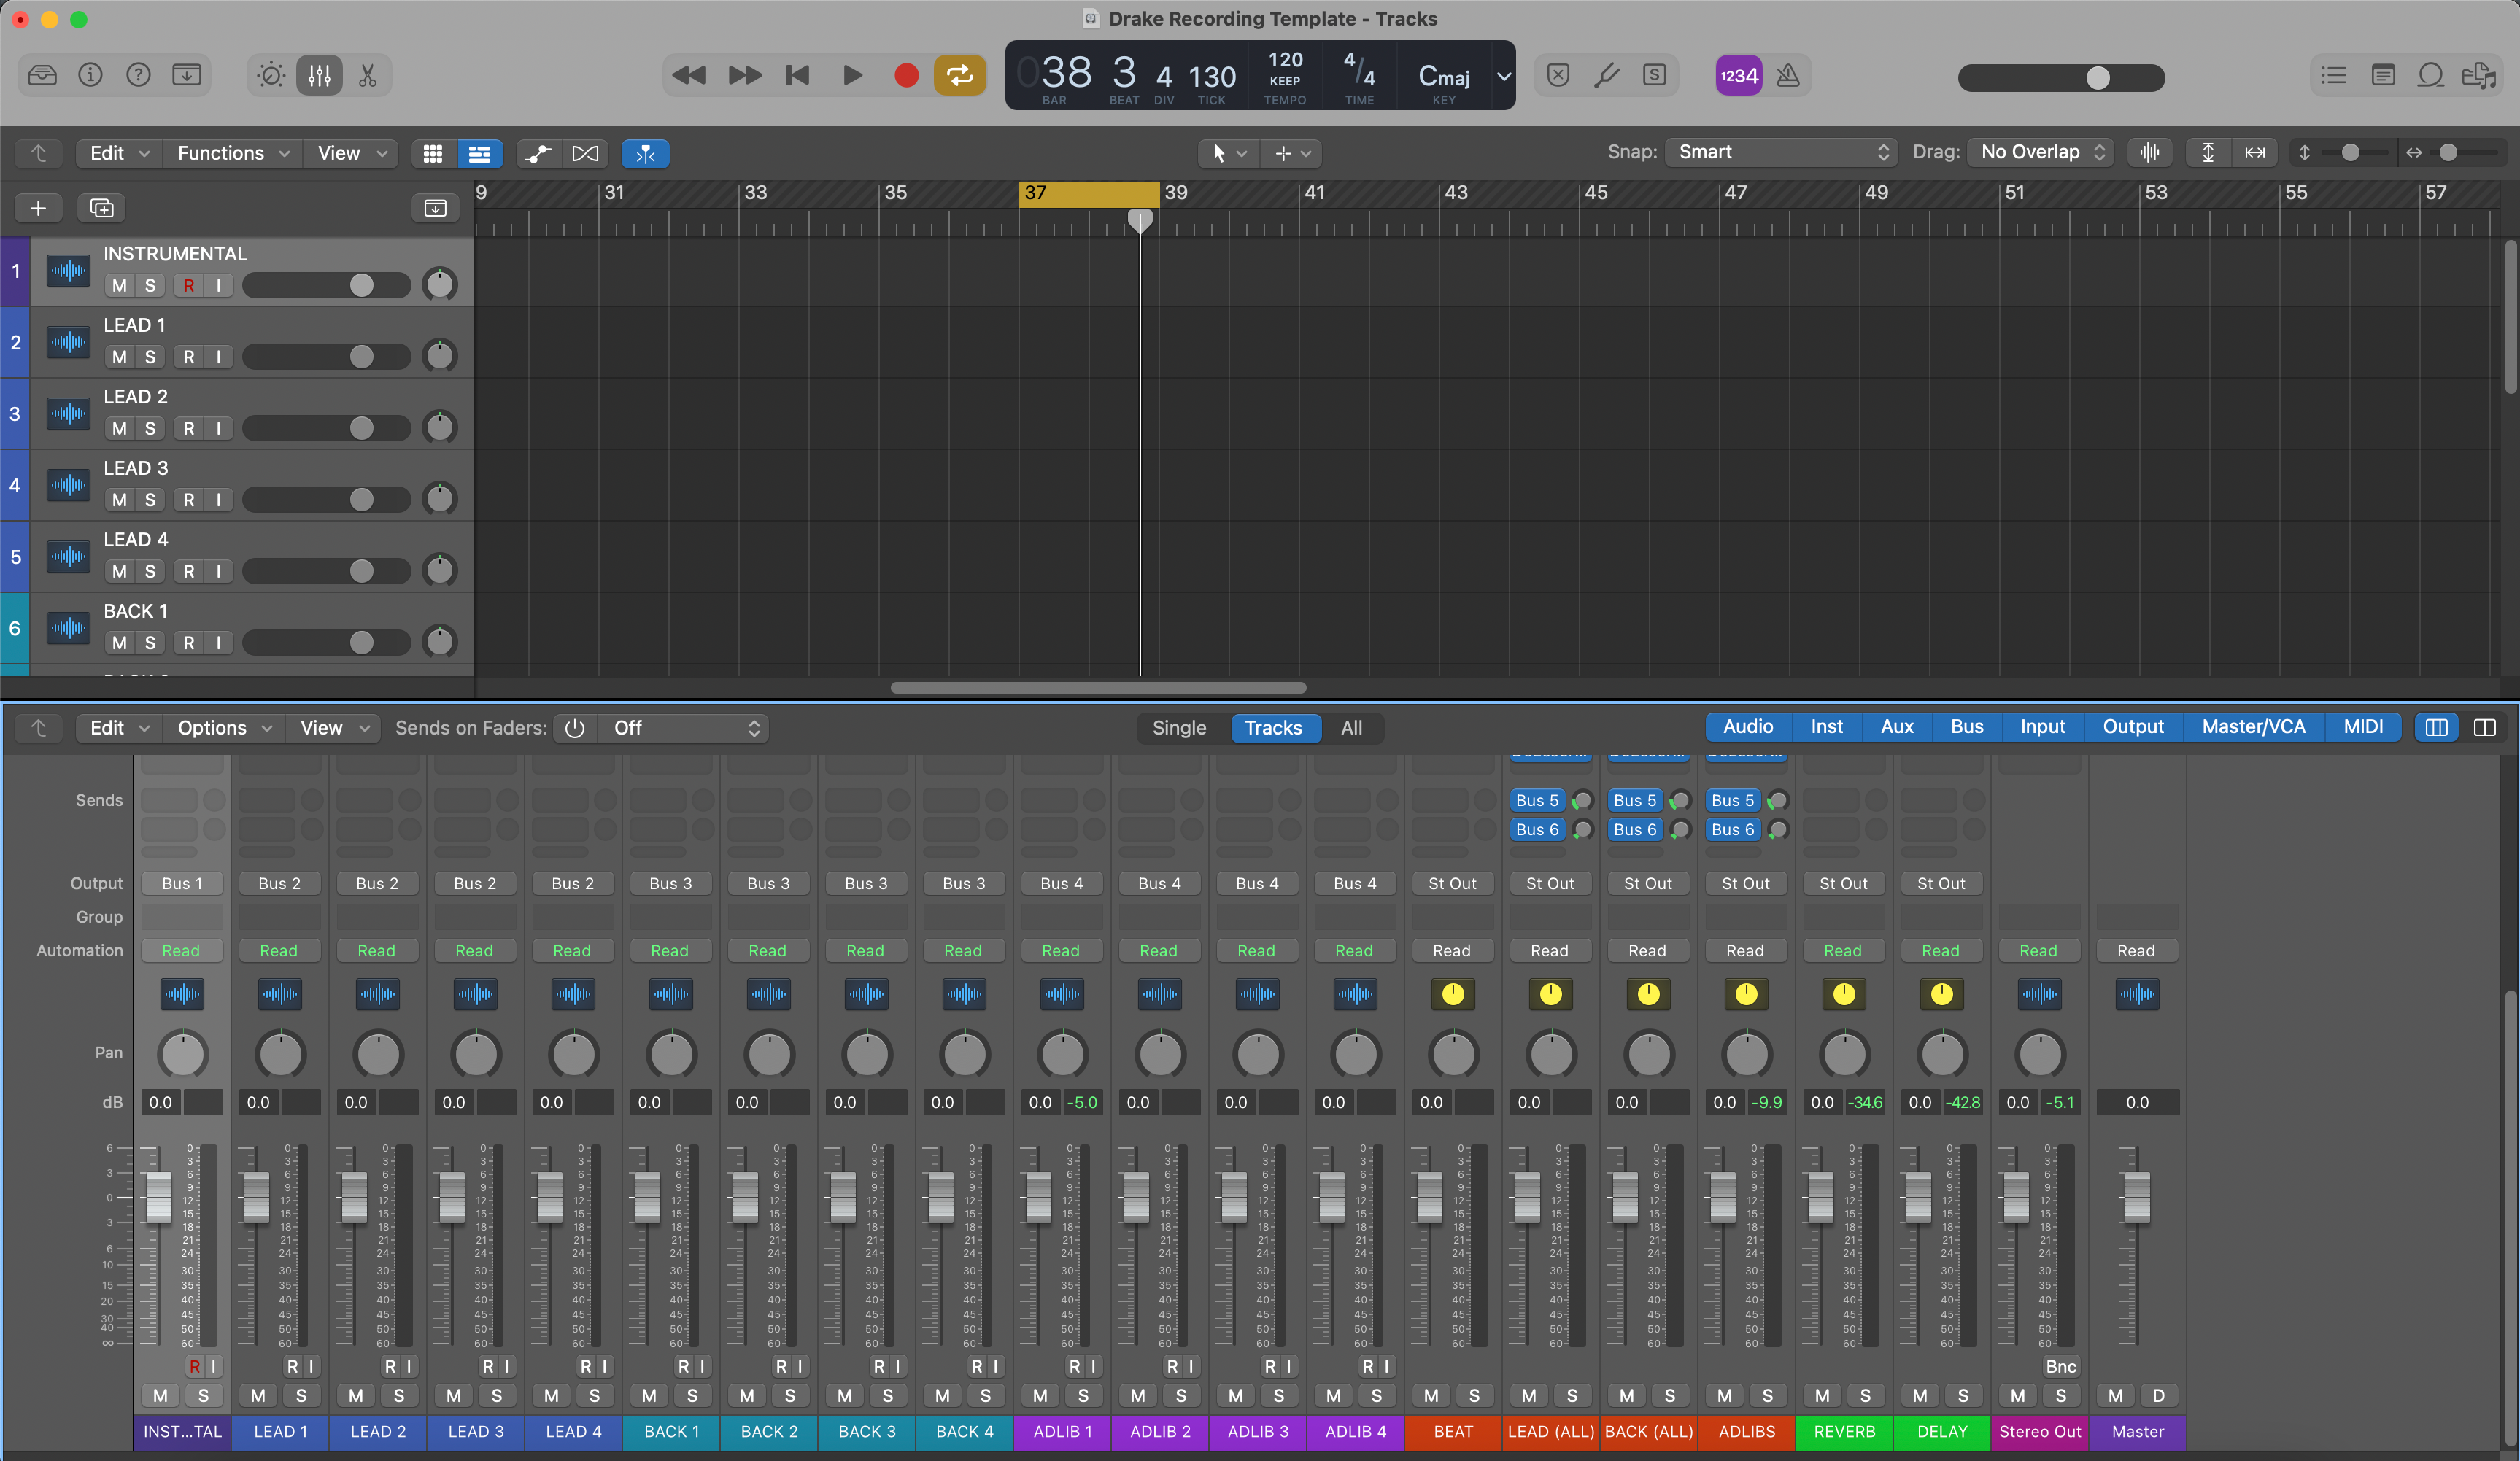
Logic Pro X Drake Modello di Registrazione – Preset Vocale
Tipo: Modello di Registrazione
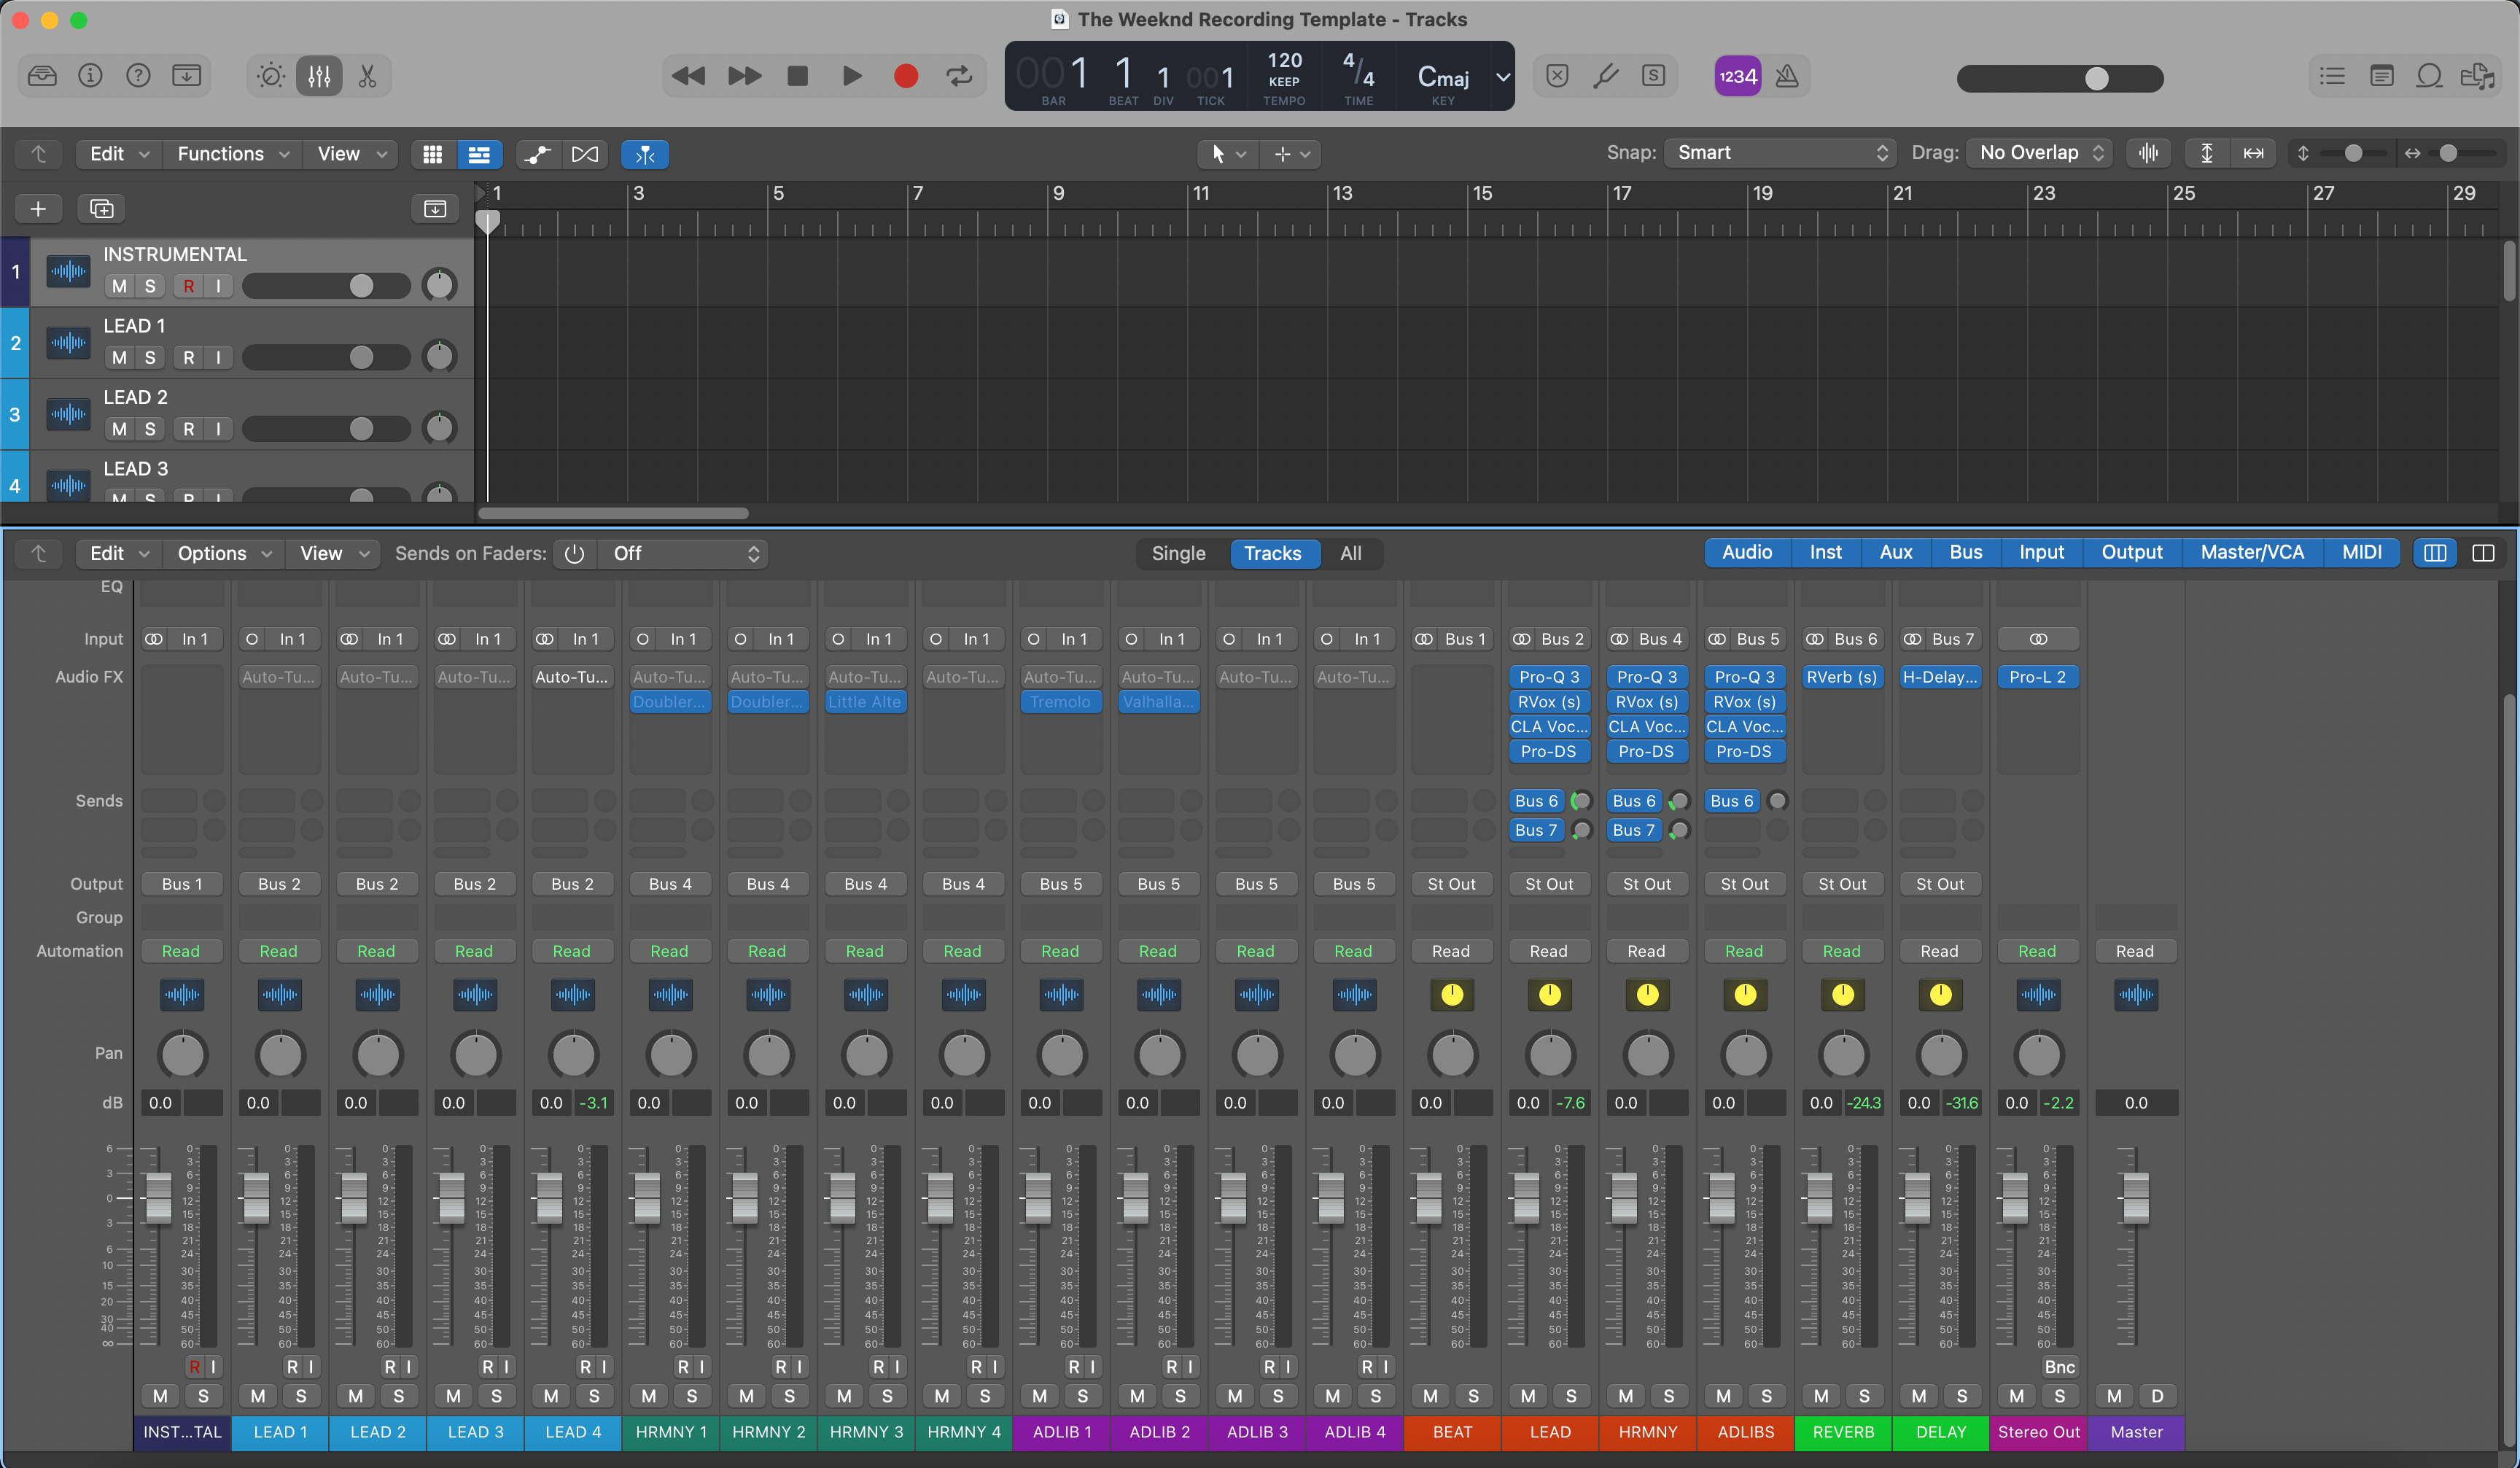
Logic Pro X The Weeknd Modello di Registrazione – Preset Vocale
Domande frequenti
Cos'è un modello di Logic Pro?
Cos'è un modello di Logic Pro?
Un template di Logic Pro è un file di sessione pronto all'uso che include già la struttura delle tracce, il routing, i bus, gli invii e il layout di base necessari per iniziare a registrare o mixare più rapidamente.
Invece di aprire Logic con un progetto vuoto, inizi con una configurazione che già sembra una sessione di lavoro.
Cosa è incluso in un modello di Logic Pro di BCHILL MIX?
Cosa è incluso in un modello di Logic Pro di BCHILL MIX?
Questo di solito significa tracce vocali organizzate, instradamento delle sessioni, bus effetti e una struttura progettata per velocizzare la registrazione e il missaggio preliminare.
Alcuni prodotti possono anche includere elaborazioni vocali in stile preset o scelte di layout che facilitano la gestione di parti principali, doppi, ad-lib e armonie fin dall'inizio.
Quanto velocemente ricevo i file del modello Logic Pro dopo l'acquisto?
Quanto velocemente ricevo i file del modello Logic Pro dopo l'acquisto?
I prodotti template per Logic Pro vengono consegnati in formato digitale, quindi di solito dovresti avere accesso immediatamente dopo il pagamento.
Questo ti permette di passare dall'acquisto all'apertura della sessione senza dover aspettare un processo di consegna manuale.
Questi modelli di Logic Pro utilizzano plugin di serie, plugin di terze parti o entrambi?
Questi modelli di Logic Pro utilizzano plugin di serie, plugin di terze parti o entrambi?
Alcuni prodotti Logic sono basati su plugin nativi, mentre altri possono utilizzare strumenti esterni per scelte tonali o creative specifiche.
Se sono necessari plugin di terze parti, la pagina del prodotto dovrebbe informarti prima dell'acquisto.
Questi modelli di Logic Pro sono compatibili con le versioni attuali di Logic Pro?
Questi modelli di Logic Pro sono compatibili con le versioni attuali di Logic Pro?
Sono pensati per i flussi di lavoro attuali di Logic Pro su desktop, ma la compatibilità esatta dipende dalla struttura del file e da eventuali requisiti di plugin legati al prodotto specifico.
Se un modello dipende da una funzione più recente di Logic o da una configurazione particolare di plugin, la pagina del prodotto dovrebbe indicarlo chiaramente.
Come si installa un modello di Logic Pro?
Come si installa un modello di Logic Pro?
Il processo abituale consiste nel posizionare il file dove puoi aprirlo in Logic, avviare la sessione e quindi confermare la configurazione di ingresso, uscita, buffer e monitoraggio prima della registrazione.
Da lì, puoi salvare la tua versione di lavoro in modo che le sessioni future inizino dalla stessa struttura.
Questi modelli di Logic Pro sono adatti ai principianti?
Questi modelli di Logic Pro sono adatti ai principianti?
Sì. Aiutano i principianti a evitare molte configurazioni ripetitive e mostrano come può essere una sessione più organizzata.
Aiutano anche gli utenti esperti a mantenere la coerenza tra i progetti quando velocità e ripetibilità sono importanti.
Posso personalizzare il modello di Logic Pro per adattarlo al mio flusso di lavoro di registrazione o missaggio?
Posso personalizzare il modello di Logic Pro per adattarlo al mio flusso di lavoro di registrazione o missaggio?
Sì. Puoi scambiare i plugin, rinominare le tracce, modificare la struttura dei bus, regolare i colori, rielaborare gli effetti di invio e personalizzare la sessione secondo il tuo processo.
Il modello è pensato per risparmiare tempo all'inizio, non per limitare ciò che accade dopo.
Questi template di Logic Pro funzionano bene per le voci principali, i doppi, le armonie, gli ad-lib e le sessioni vocali complete?
Questi template di Logic Pro funzionano bene per le voci principali, i doppi, le armonie, gli ad-lib e le sessioni vocali complete?
Sì, questo è uno dei motivi principali per usare un modello invece di un singolo preset.
I modelli sono particolarmente utili quando registri regolarmente voci stratificate e vuoi avere la struttura, il routing e gli effetti di spazio pronti prima della prima registrazione.
Cosa rende questi migliori rispetto a iniziare da una sessione vuota di Logic Pro?
Cosa rende questi migliori rispetto a iniziare da una sessione vuota di Logic Pro?
Una sessione vuota ti offre totale libertà, ma comporta anche tutto il lavoro di configurazione ogni singola volta.
Un modello BCHILL MIX Logic parte più vicino a un flusso di lavoro di registrazione reale, così puoi dedicare più tempo a creare e meno tempo a ricostruire la stessa infrastruttura.
Crea il tuo cestino


Trasforma la tua sessione in secondi
Configurazione istantanea della sessione con i nostri modelli di registrazione pronti all’uso e preset vocali.


Crediti Industria

Westside Boogie

Shontelle

Jarren Benton

DJ Tunez

Vory

Caskey

Rittz

Nia Riley

Eugy

Q Parker
Ascolta il nostro lavoro
R&B
Prima
Dopo
Rap
Prima
Dopo
Popolare
Prima
Dopo
Anima
Prima
Dopo
Roccia
Prima
Dopo
Latino
Prima
Dopo
Template di Registrazione Logic Pro: Spiegazione e Funzionalità
Introduzione ai Preset Vocali di Logic Pro
Se registri o mixi voci in Logic Pro, un preset ben costruito ti offre un tono vocale moderno e ripetibile senza dover ricostruire la stessa catena ogni sessione. Un preset carica un percorso effetti bilanciato—EQ per modellare il tono, compressione per il controllo del livello, de-essing per “s” morbide e un’ambienza di buon gusto—così puoi catturare idee rapidamente e mantenere il suono coerente dal demo alla release. Da BCHILL MIX, il nostro approccio è semplice: fornire catene vocali che suonano bene su auricolari, telefoni e monitor da studio, restando abbastanza leggere da registrare comodamente.
Questa guida spiega cos’è un preset vocale di Logic Pro, perché è utile, come installarlo e modificarlo, e ricette pratiche per rap, R&B, pop, rock/alternative, cantautore/podcast e stili con tuning avanzato. Vedrai anche come un template di registrazione minimale può velocizzare la configurazione della sessione e mantenere organizzati i progetti grandi. Esplora le nostre opzioni attuali qui: Logic Pro Templates & Vocal Presets e la più ampia collezione di Vocal Presets.
Cos’è un Preset Vocale in Logic Pro?
In Logic Pro, un preset vocale è una strip di canale o patch salvata contenente un ordine noto di processori con impostazioni iniziali sensate. Una catena pulita e moderna di solito include:
- EQ di canale con un delicato filtro passa-alto e piccoli interventi chirurgici per rimuovere rimbombi/domare asprezze.
- Due compressori leggeri in serie (per esempio, una fase “livellante” più lenta e una fase “cattura picchi” più veloce) per stabilizzare la dinamica senza pompare.
- De-esser prima di qualsiasi aria/luminosità così le consonanti restano morbide.
- Saturazione/exciter opzionale per presenza e brillantezza (il sottile è meglio durante la registrazione).
- Effetti basati sul tempo tramite send (plate/room breve e delay sincronizzato al tempo) in modo che lo spazio supporti il testo senza annegarlo.
Puoi caricare la catena su una traccia Lead, duplicarla per Doppi/Armonie con soglie leggermente diverse, oppure posizionare un processamento correttivo sulla traccia e una rifinitura creativa su un Vocal Bus. I preset sono punti di partenza—registra attraverso di essi, poi regola soglie, quantità di EQ e livelli di invio per la tua voce, microfono e canzone. Quando trovi il punto ideale, salvalo come tuo patch personale così i progetti futuri si apriranno pronti per registrare.
Perché Usare i Preset (Vantaggi e Quando Sono Utili)
- Velocità: Apri, scegli un preset, premi registra—niente più riscaldamenti di 20 minuti con i plug-in.
- Coerenza: Una catena calibrata mantiene il tono allineato tra singoli, EP e serie di contenuti.
- Focus creativo: Dedica tempo alla performance, ai doppi/ad-libs e all’arrangiamento—non alla configurazione tecnica.
- Traduzione: Le catene sono progettate per restare intelligibili su telefoni/auricolari così come su monitor.
- Bassa frizione: Meno decisioni sul momento—ottimo per laptop e setup mobili.
Dove i preset aiutano di più: sessioni di scrittura veloci, collaborazioni a distanza, reels/shorts, uscite settimanali di singoli, voiceover/podcast e qualsiasi flusso di lavoro in cui vuoi passare dall’idea alla registrazione in pochi minuti.
Stock vs. Premium in Logic Pro (Cosa ti serve davvero)
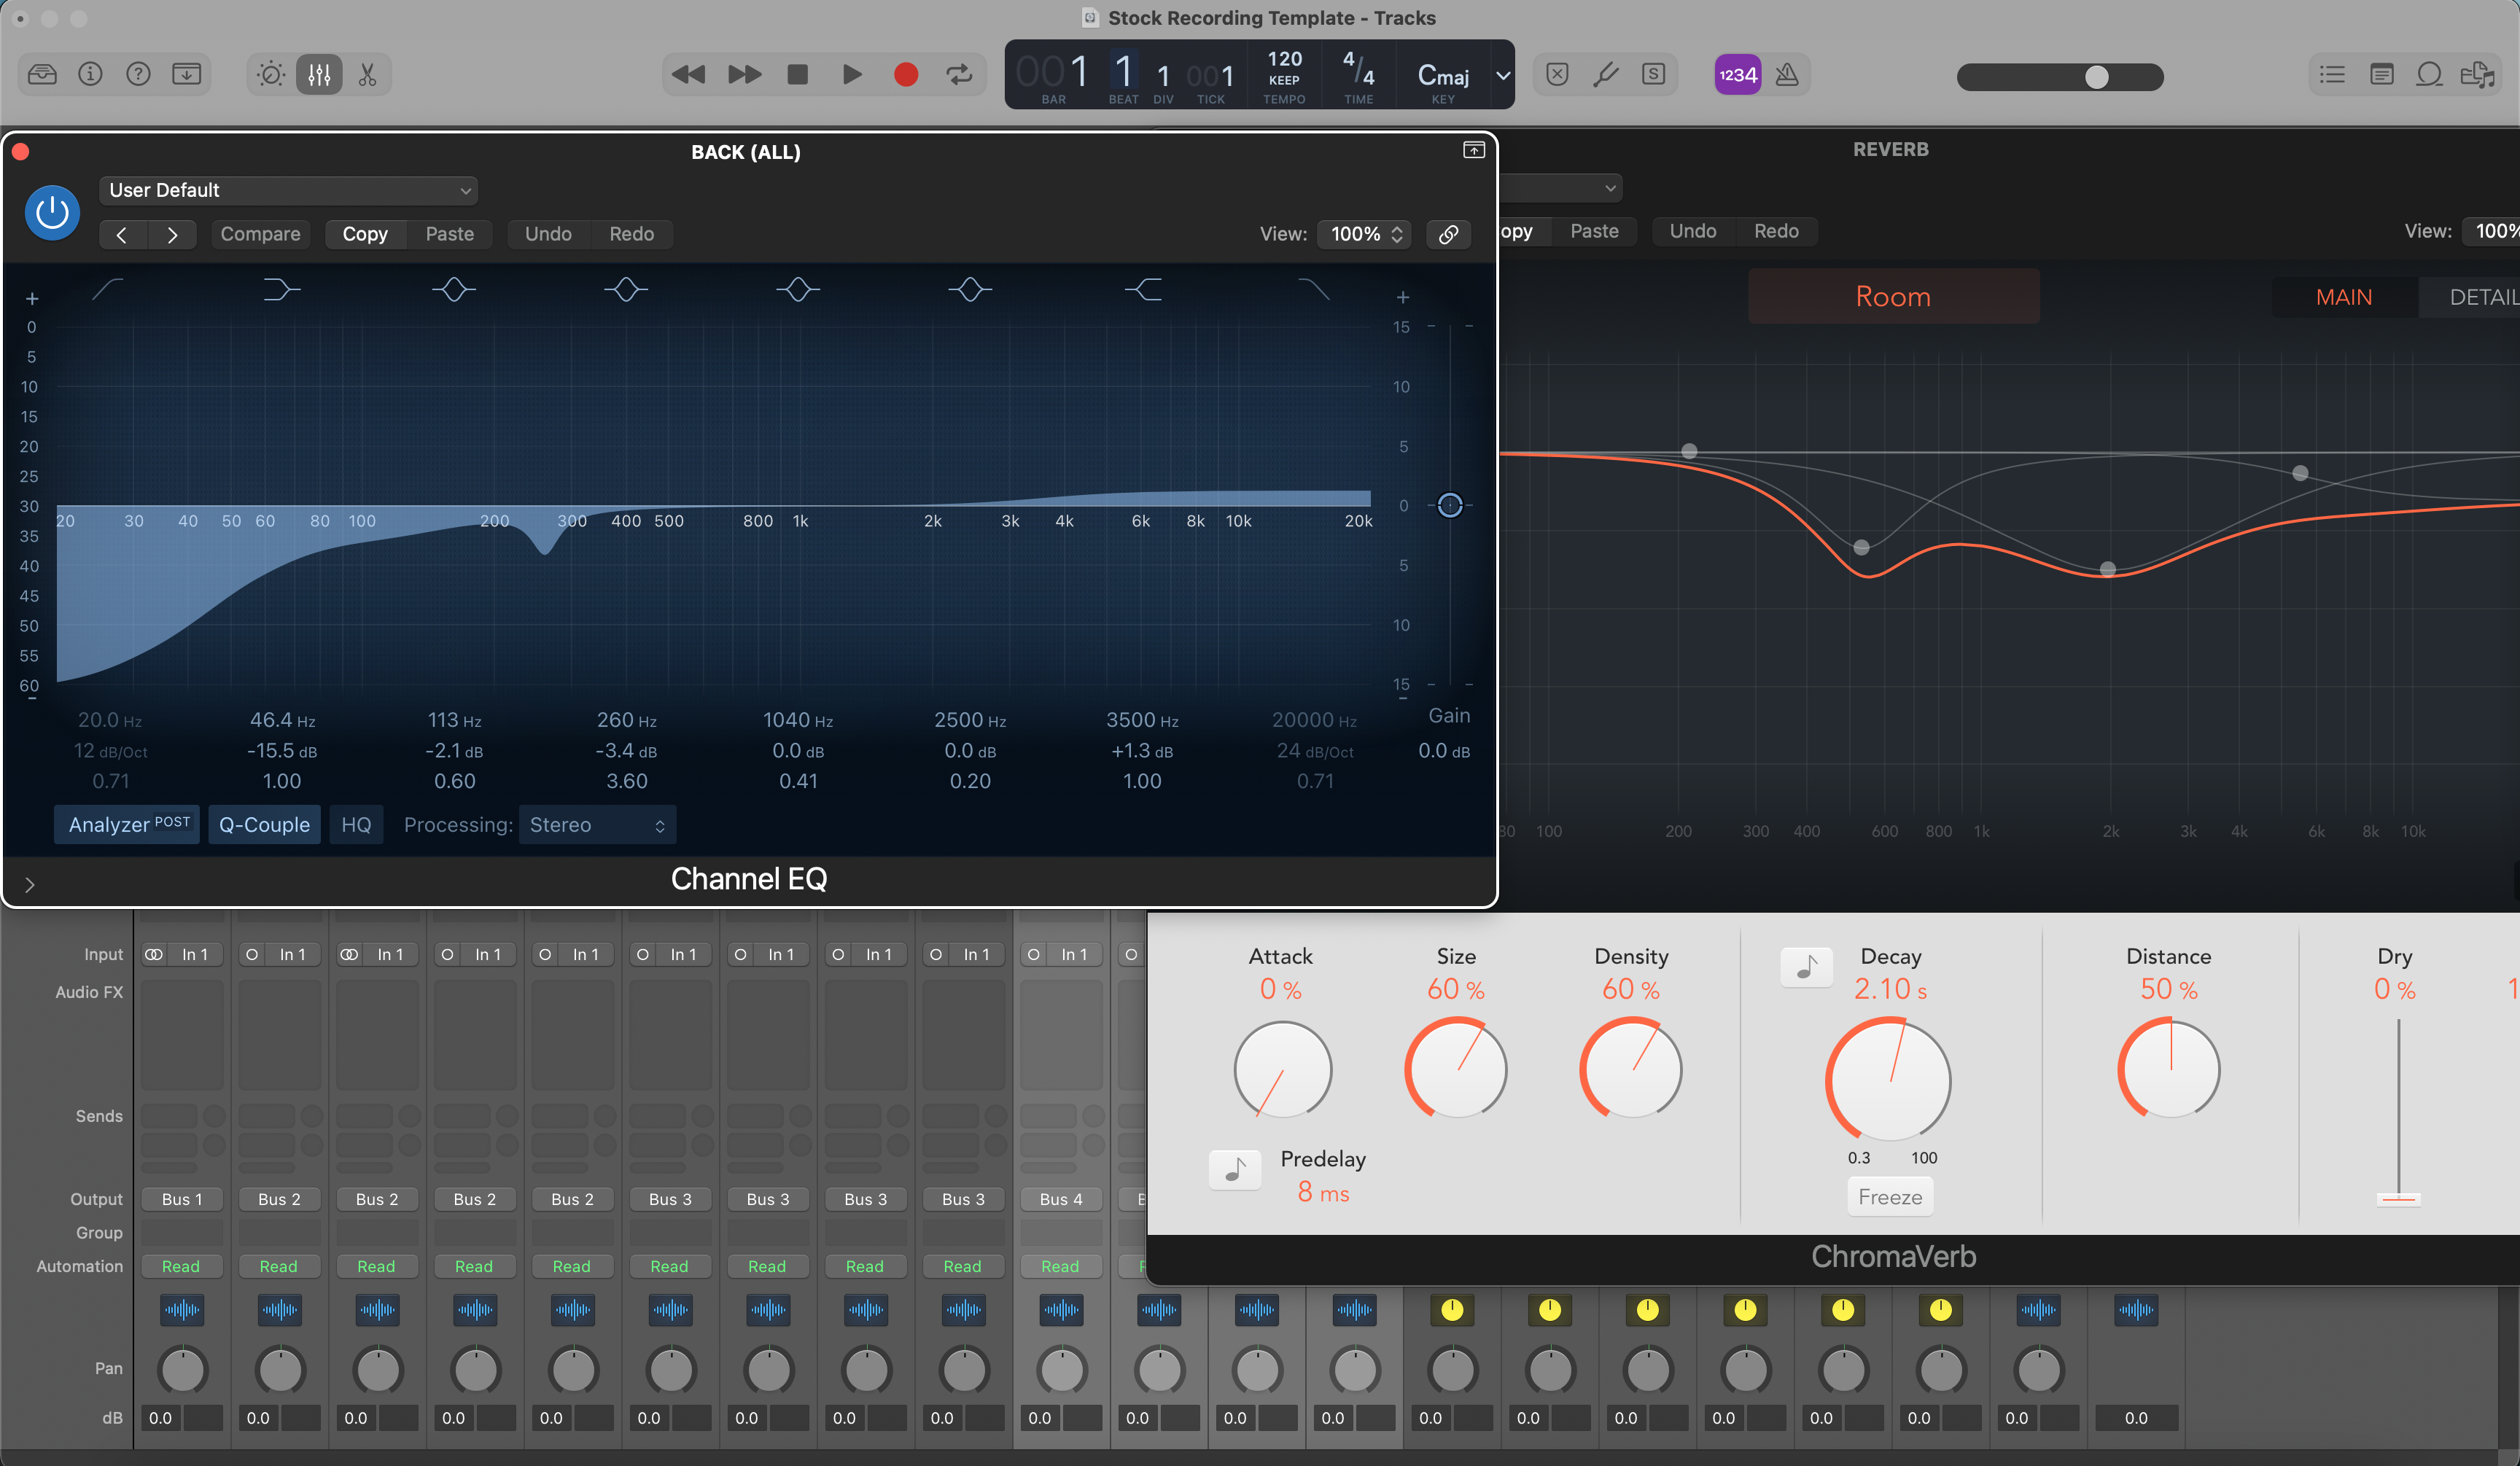
Le catene solo stock usano processori integrati come Channel EQ, Compressor, De-Esser, Noise Gate, ChromaVerb/Space Designer e Tape Delay/Echo. Sono portatili, poco esigenti in CPU e apribili su qualsiasi Mac con Logic—ideali per collaborazioni e setup da viaggio.
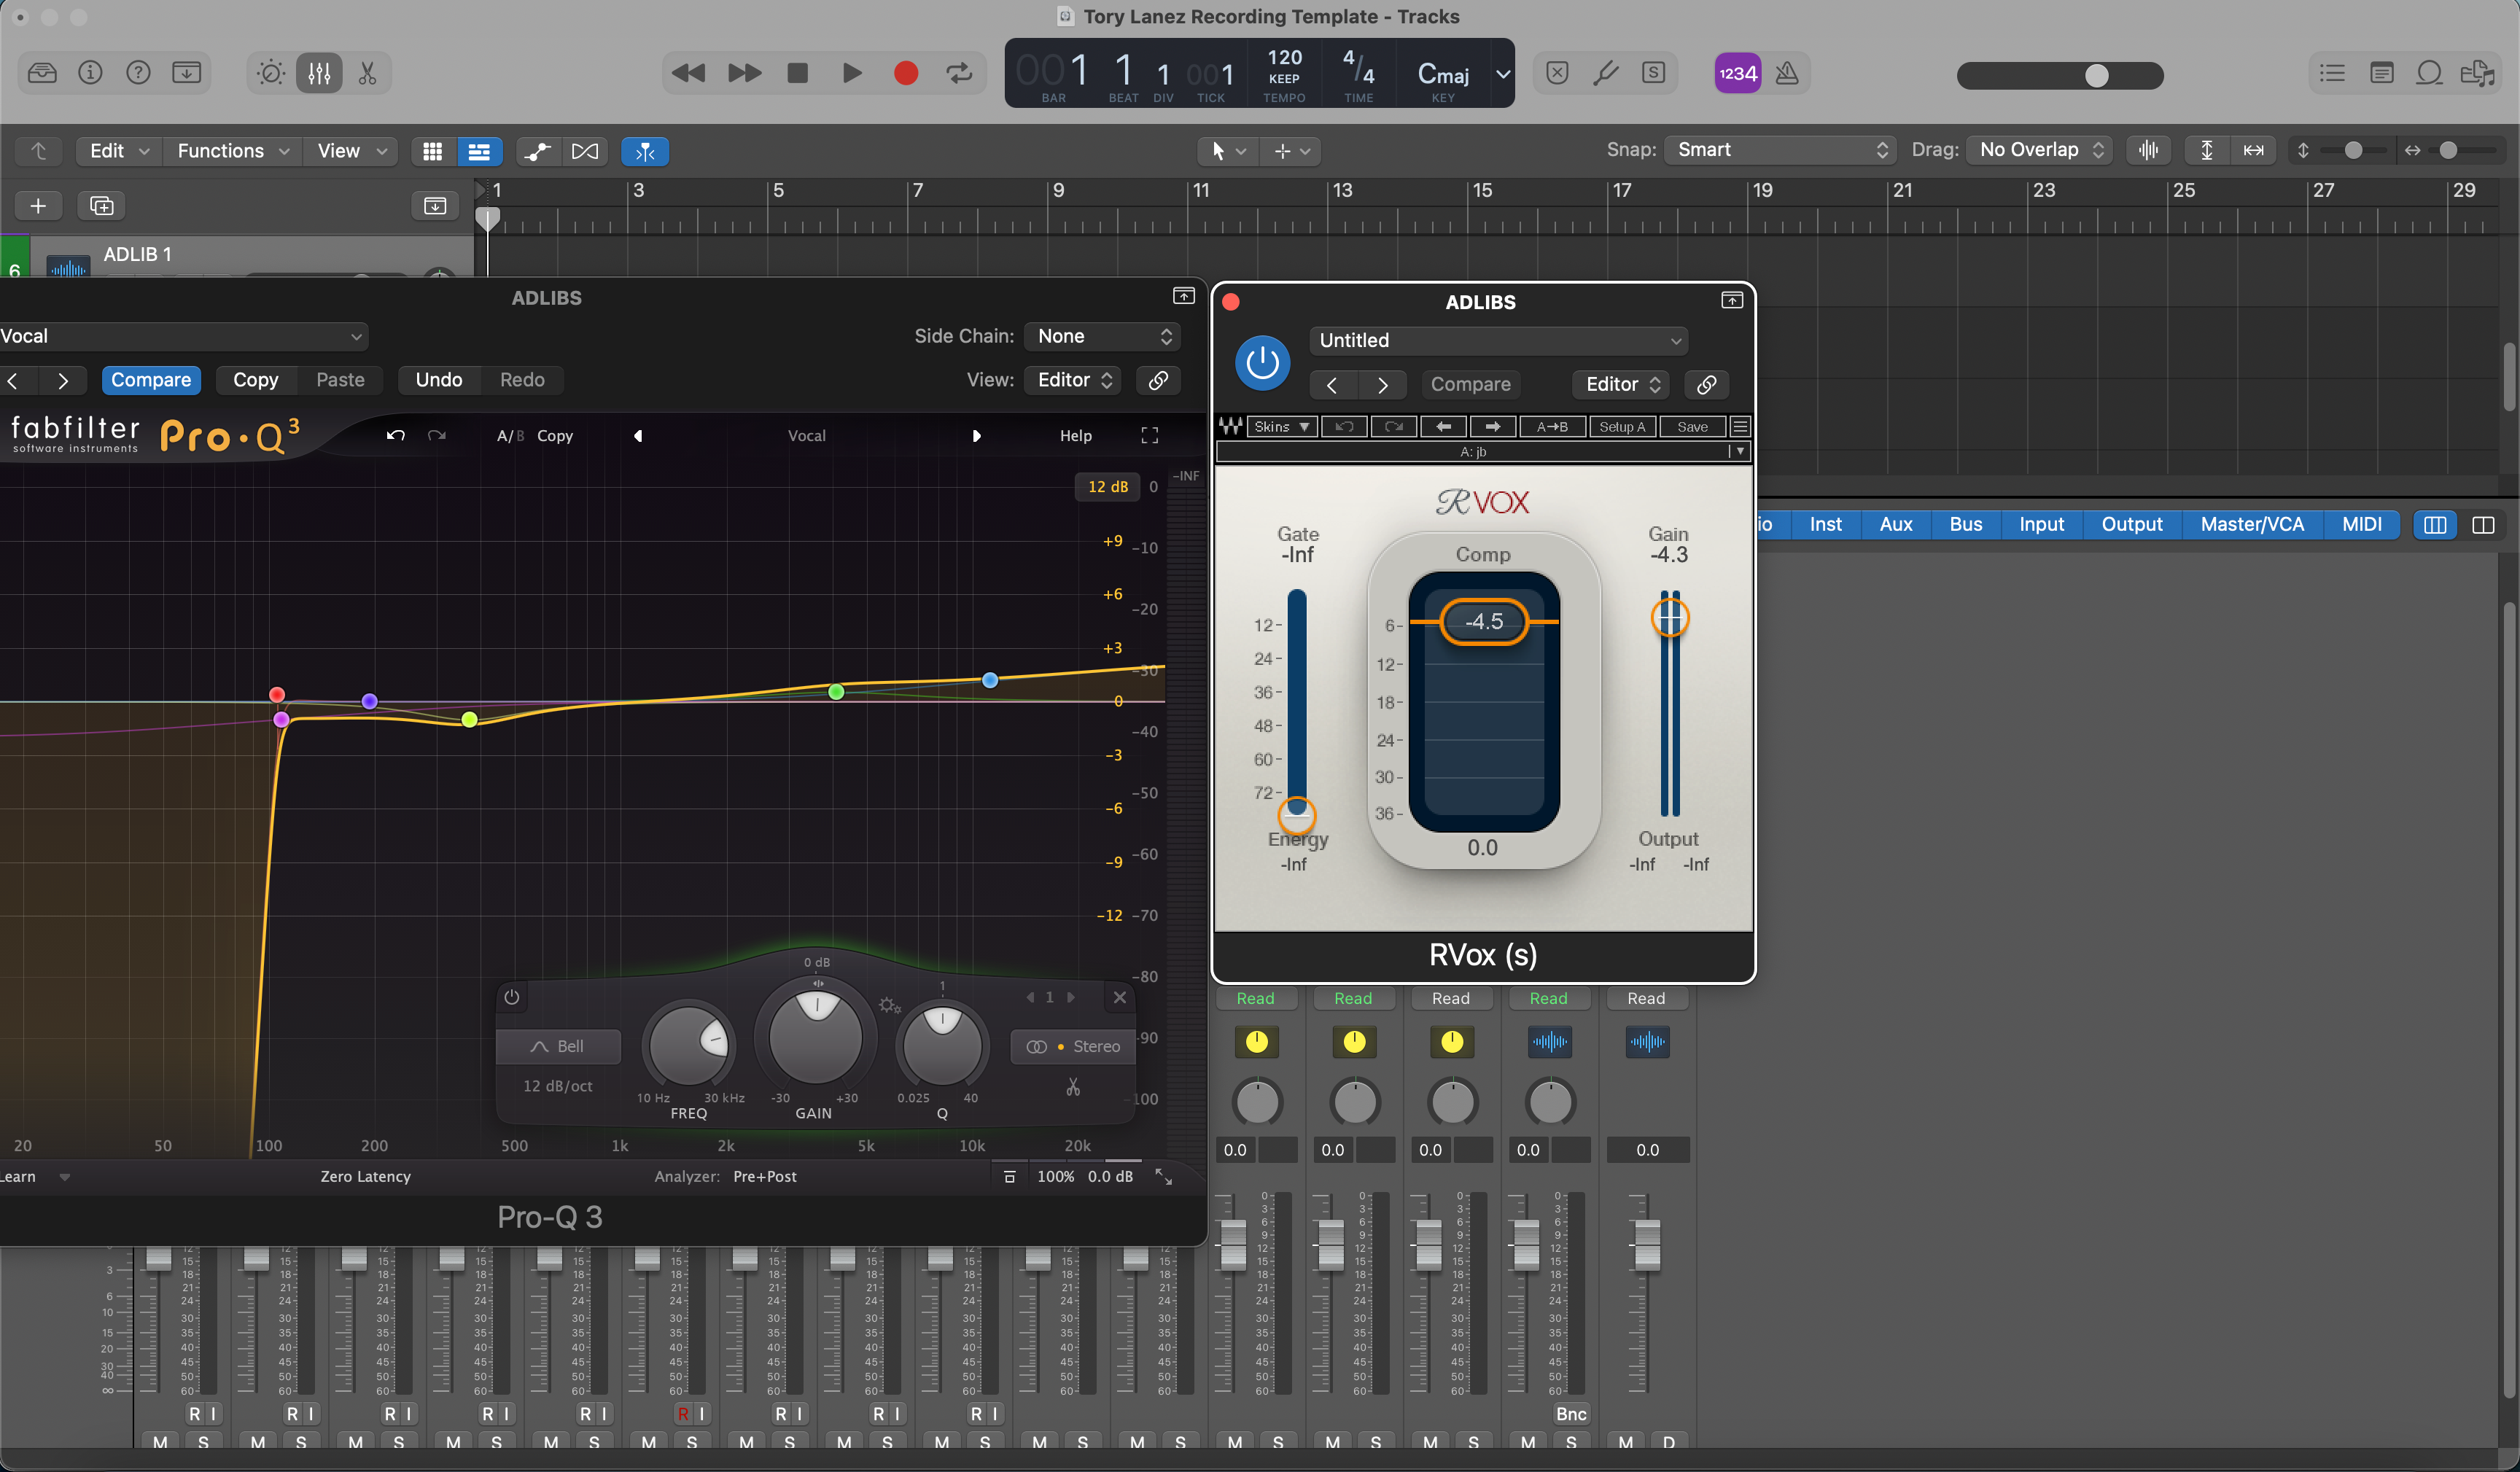
Le catene Premium aggiungono selezionati Audio Units di terze parti (se li possiedi già) per colore o controllo extra—EQ dinamico, compressori caratteristici, saturazione avanzata, riverberi speciali o tuning dedicato. Molti artisti usano entrambe: una catena stock per registrare ovunque e una premium per la rifinitura a casa.
Scelta rapida: sei nuovo ai preset? Inizia con una catena “voci chiare” pulita. Hai già un’idea? Carica una catena tarata sullo stile (rap, R&B, pop, rock) e fai piccole modifiche invece di ricostruire da zero.
Installazione & Avvio Rapido (Passo dopo Passo)
- Crea e nomina le tracce. Aggiungi tracce audio per Lead, Doubles, Harmonies e Ad-libs. Codificale con colori e, se ti piace il controllo raggruppato, instradale a un semplice Vocal Bus o Summing Stack.
- Imposta ingresso e monitoraggio. Scegli l’ingresso della tua interfaccia sulla traccia Lead. Registra una breve frase di prova e regola il preamplificatore in modo che i picchi restino al sicuro sotto il clipping. Se il monitoraggio sembra ritardato, riduci la dimensione del buffer I/O e attiva la Modalità a Bassa Latenza durante la registrazione; riattiva le catene complete per il mixdown. (Vedi i consigli sulla latenza di Apple linkati sotto.)
- Carica la catena preset. Nella traccia, inserisci Channel EQ → Compressor (delicato) → De-Esser → Compressor (veloce/pulito) → Saturazione opzionale → invii a Delay/Reverb. Mantieni gli inserti per lo più asciutti durante la registrazione; usa gli invii per lo spazio in modo che latenza e dizione restino pulite.
- Regola le soglie e gli invii. Punta a qualche dB di riduzione del guadagno sulle linee più forti senza creare pumping. Se aggiungi aria, rivedi il de-esser in modo che la “s” rimanga morbida. Usa un piccolo delay sincronizzato al tempo e una breve plate; automatizza gli invii per i ritornelli.
- Salva la tua configurazione. Memorizza la catena come patch utente o impostazione della strip di canale. Salva un template di progetto così ogni sessione si apre con routing, headroom e colori coerenti.
Note sul gain-staging: registra con headroom sano (picchi intorno a −10 a −6 dBFS sul misuratore della traccia); evita luci rosse sull’interfaccia—il clipping non si può correggere. Se il makeup gain alza troppo i livelli, riduci l’uscita del clip o dell’effetto invece di spingere troppo il processore successivo. Mantieni i picchi del mix grezzo sensati così non inseguirai il loudness durante la registrazione.
Opzioni di tuning: per correzioni delicate, prova il plug-in Pitch Correction all’inizio della catena (prima del de-ess). Per modifiche chirurgiche, usa Flex Pitch sulle take dopo la registrazione. Ricontrolla la sibilanza se illumini la voce in seguito.
Riferimenti utili (dopo aver incollato questo articolo): le guide Apple su gestione della latenza di ingresso, EQ di canale e Flex Pitch.
Ricette di stile e soluzioni rapide (Rap, R&B, Pop, Rock/Alt, Cantautore/Podcast, Tuning-Forward)
Rap Lead (modern punch) — Due compressori leggeri in serie mantengono la dinamica stretta senza uccidere i transienti. Concentrati sull’intelligibilità intorno a 2–5 kHz; taglia piccole zone nell’instrumentale invece di sovra-potenziare la voce. Aggiungi uno slap corto o un piccolo plate per energia senza wash. Solleva i ritornelli automatizzando l’invio del delay invece di alzare troppo il livello wet dell’inserto.
Melodic Rap / Trap — Punta a un top brillante ma morbido. Un tocco di saturazione prima del de-ess aggiunge mordente; seguilo con il de-ess così le consonanti non diventano sibilanti. Per gli ad-libs, alza leggermente il passa-alto e aumenta un po’ il de-ess per mantenere le pile ordinate. Allarga i ritornelli con un po’ più di feedback del delay e pre-delay sul plate.
R&B / Soul — Attacco/rilascio delicati, ripiano d’aria morbido, ambiente più ampio. Se i boost aggiungono fruscio, riduci l’illuminazione o aggiungi un secondo de-ess più morbido. Fai un filtro passa-alto ai background e usa delay stereo lenti che stiano dietro la voce principale così il testo resta in primo piano. Per pile lussureggianti, sperimenta un pre-delay più lungo e un livello di invio più basso così la coda del riverbero non maschera le parole.
Pop — Alti lucidi con de-ess attento, delay sincronizzati al tempo per uno spazio ritmico e una stanza molto corta per “incollare.” Prendi decisioni a volume corrispondente così “più forte” non influenza i tuoi controlli A/B. In arrangiamenti densi, scolpisci 2–4 kHz in chitarre/sintetizzatori per mantenere le parole intelligibili.
Rock / Alternative — Mantieni la voce in primo piano senza durezza: compressione moderata con un piccolissimo tocco di saturazione, poi de-ess. Per energia, usa riverbero breve room/plate e un mono slap intorno a 80–120 ms. Se i piatti competono con la brillantezza vocale, taglia un po’ di high-shelf sul bus batteria invece di esagerare con il de-essing sulla voce.
Singer-Songwriter / Podcast (voce chiara) — Dai priorità all’intelligibilità e al controllo del rumore: compressione trasparente, de-ess moderato e un accenno di ambiente breve se il dry sembra innaturale. La tecnica vince—distanza costante dal microfono, filtro anti-pop e una stanza silenziosa battono sempre gli effetti pesanti. Se il respiro/rumore è un problema, automatizza il clip gain intorno ai respiri invece di usare un gating rigido.
Correzione intonazione in evidenza (hook & pop iper-pulito) — Imposta prima la tonalità/scala della canzone. Usa quantità moderate di retune per un effetto naturale o spingi di più deliberatamente per un tono robotico. Dopo aver schiarito, ricontrolla il de-ess e regola le soglie per mantenere la sibilanza morbida.
Rimedi comuni:
- Sibilanti dure “s/t”: riduci leggermente lo shelf delle alte frequenze e/o alza la soglia del de-esser in modo che agisca solo sulle sibilanti.
- Bassi medi rimbombanti: tagli piccoli e stretti intorno a 150–350 Hz; passa un filtro high-pass su doubles/armonies più alto rispetto al lead.
- Voce sommersa nel beat: crea piccole tasche negli strumenti concorrenti (2–5 kHz) o alza il bus vocale di circa 1 dB nei ritornelli.
- Troppo spazio: inizia con send bassi; automatizza nei ritornelli invece di mantenere riverbero/delay alti per tutto il tempo.
- Latencia durante la registrazione: abbassa il buffer e attiva la modalità a bassa latenza; registra con una catena leggera, aggiungi gli enhancer dopo.
Preset vs. Template di registrazione (Workflow scalabile)
I preset vocali modellano tono e dinamica su una traccia o un bus. I template di registrazione ti offrono l’intera disposizione della sessione—tracce pre-nominate (Lead, Doubles, Harmonies, Ad-libs), codifica colore, instradamento bus, basi per il cue mix e send pronti—così puoi passare dall’idea alla take in pochi secondi e mantenere ordinate le sessioni grandi.
- Apri il tuo template per garantire che headroom, meter e routing siano coerenti da una canzone all’altra.
- Carica la catena di preset che corrisponde allo stile (Rap, R&B, Pop, Rock), poi salva la tua versione modificata come punto di partenza “voce”.
- Usa uno Summing Stack o un bus vocale dedicato per la rifinitura creativa (exciter, compressore leggero glue, modulazione), mantenendo le correzioni sulle tracce.
Se collabori, condividi un template compatto e una o due patch di riferimento così tutti sentono bilanci simili anche su computer diversi. Quando vuoi un punto di partenza organizzato dal primo giorno, esplora le opzioni attuali qui: Logic Pro Templates & Vocal Presets.
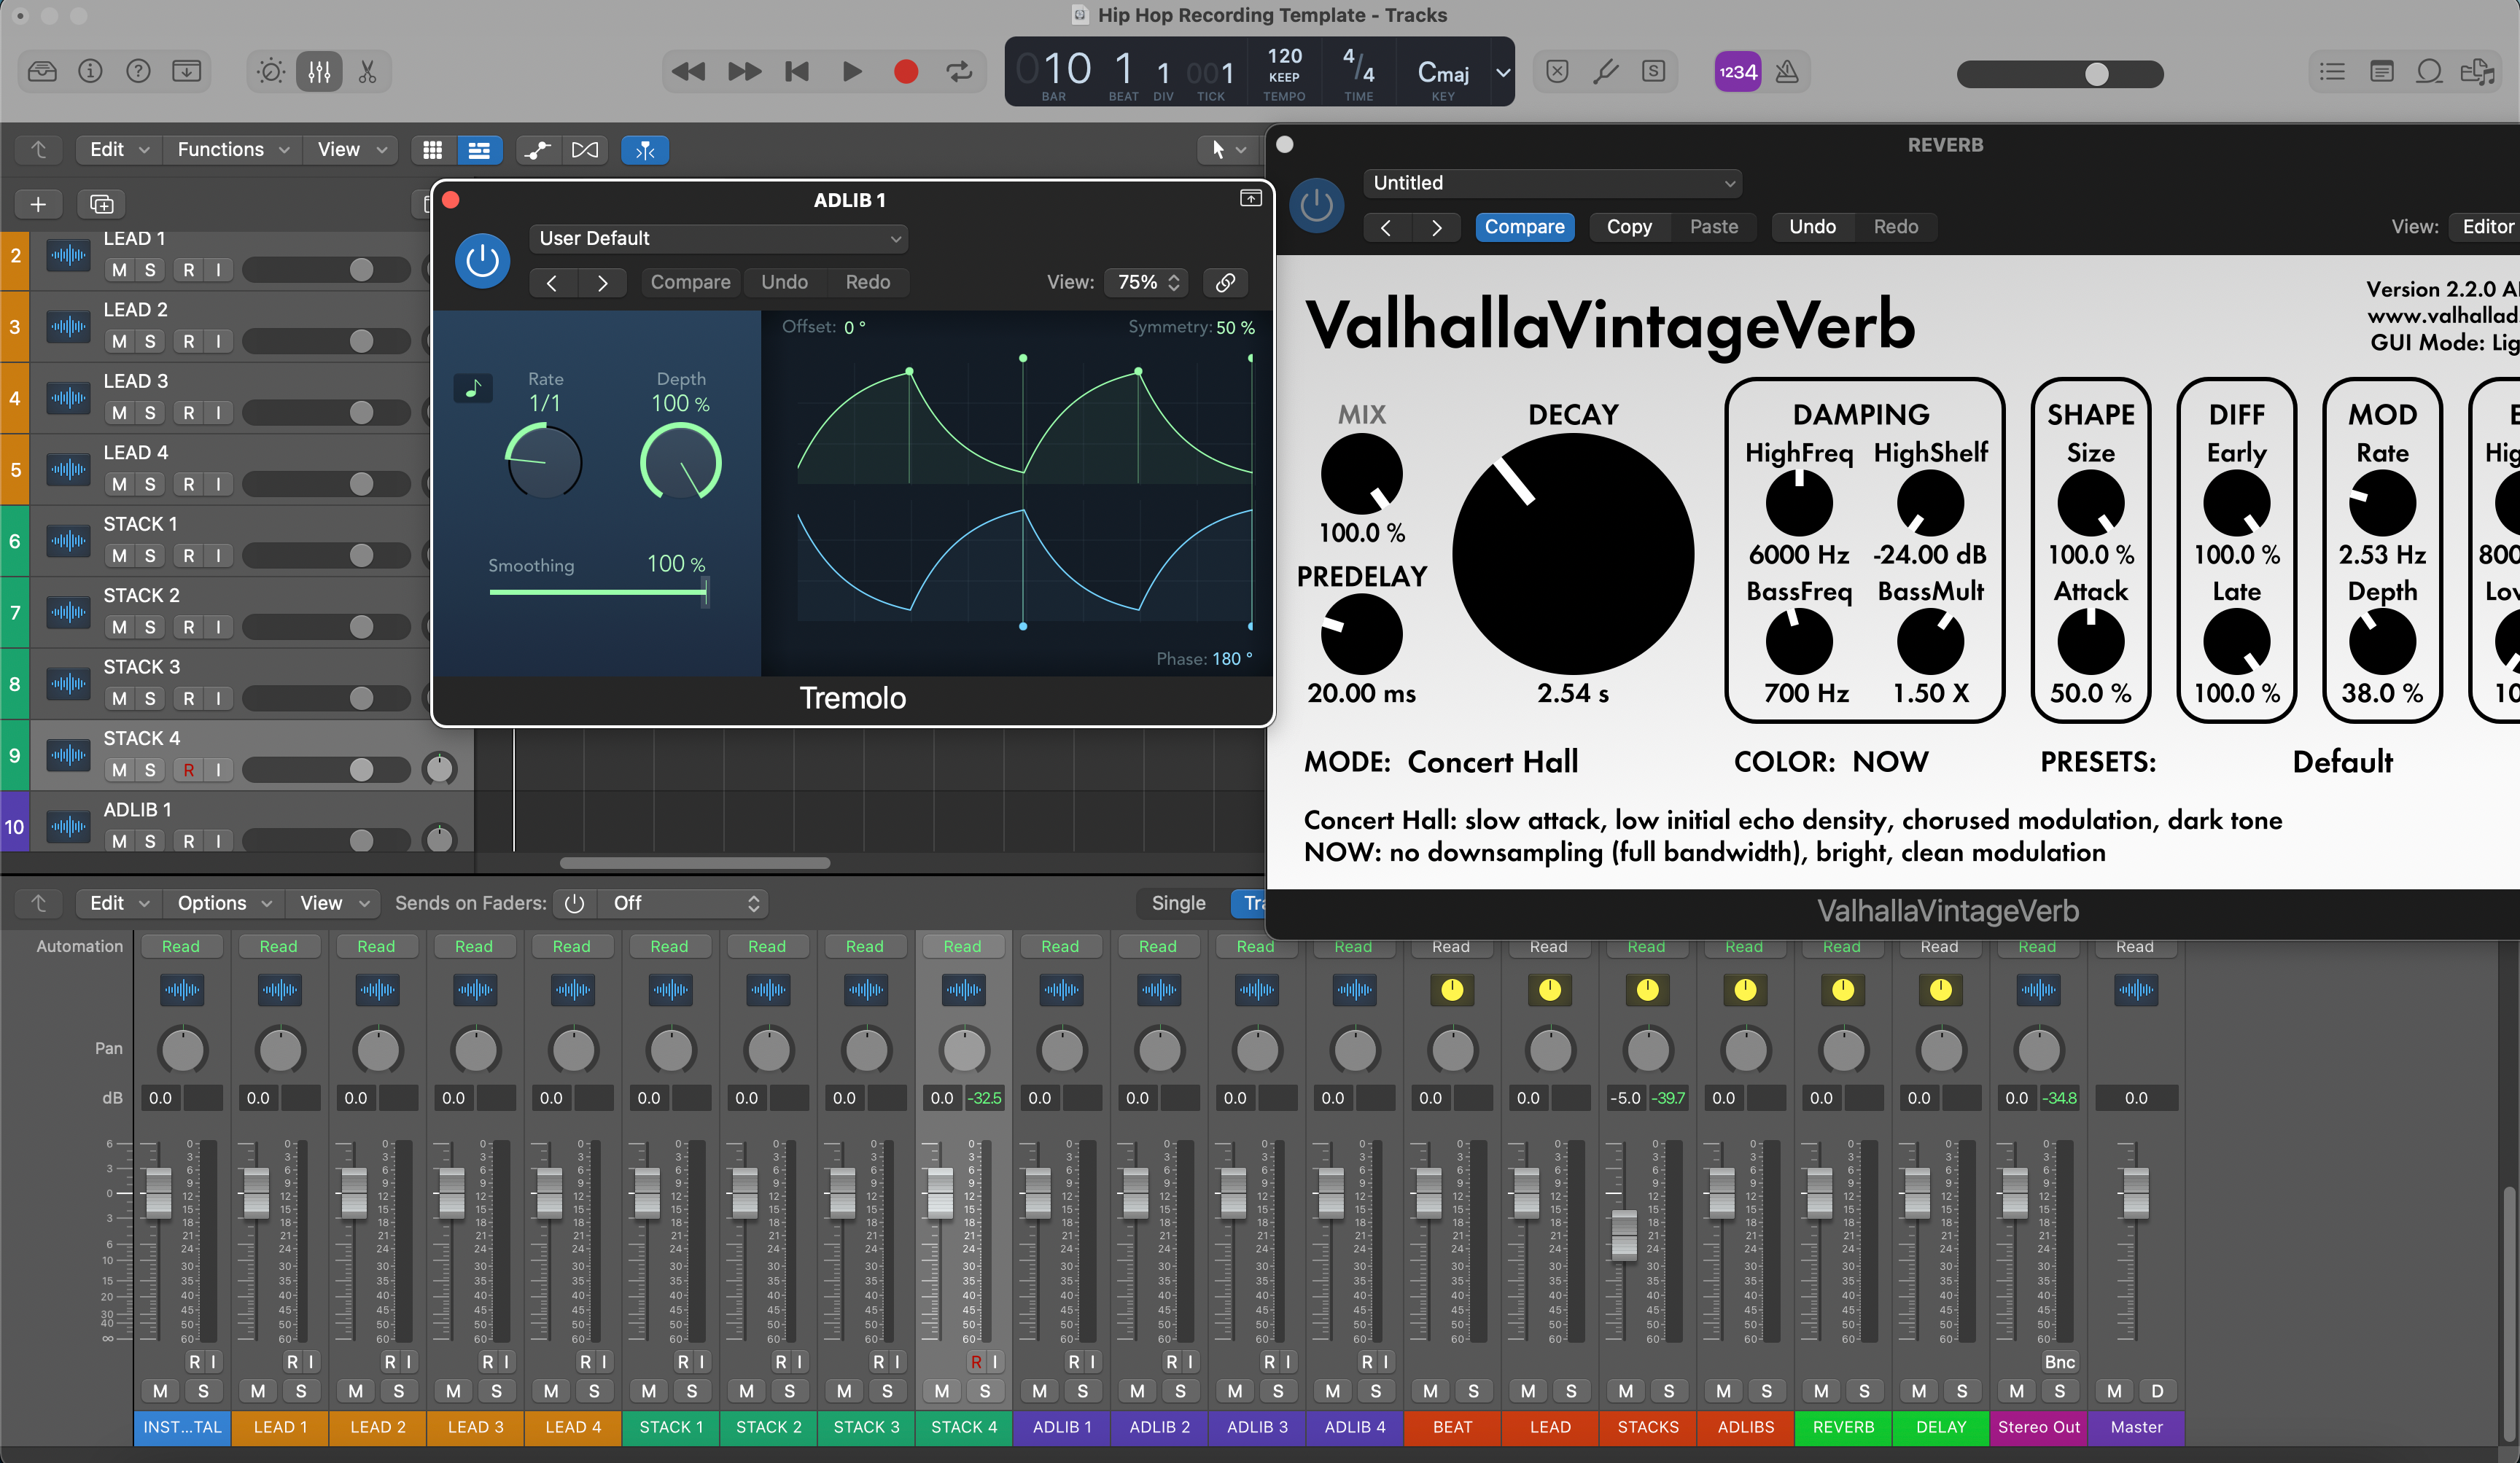
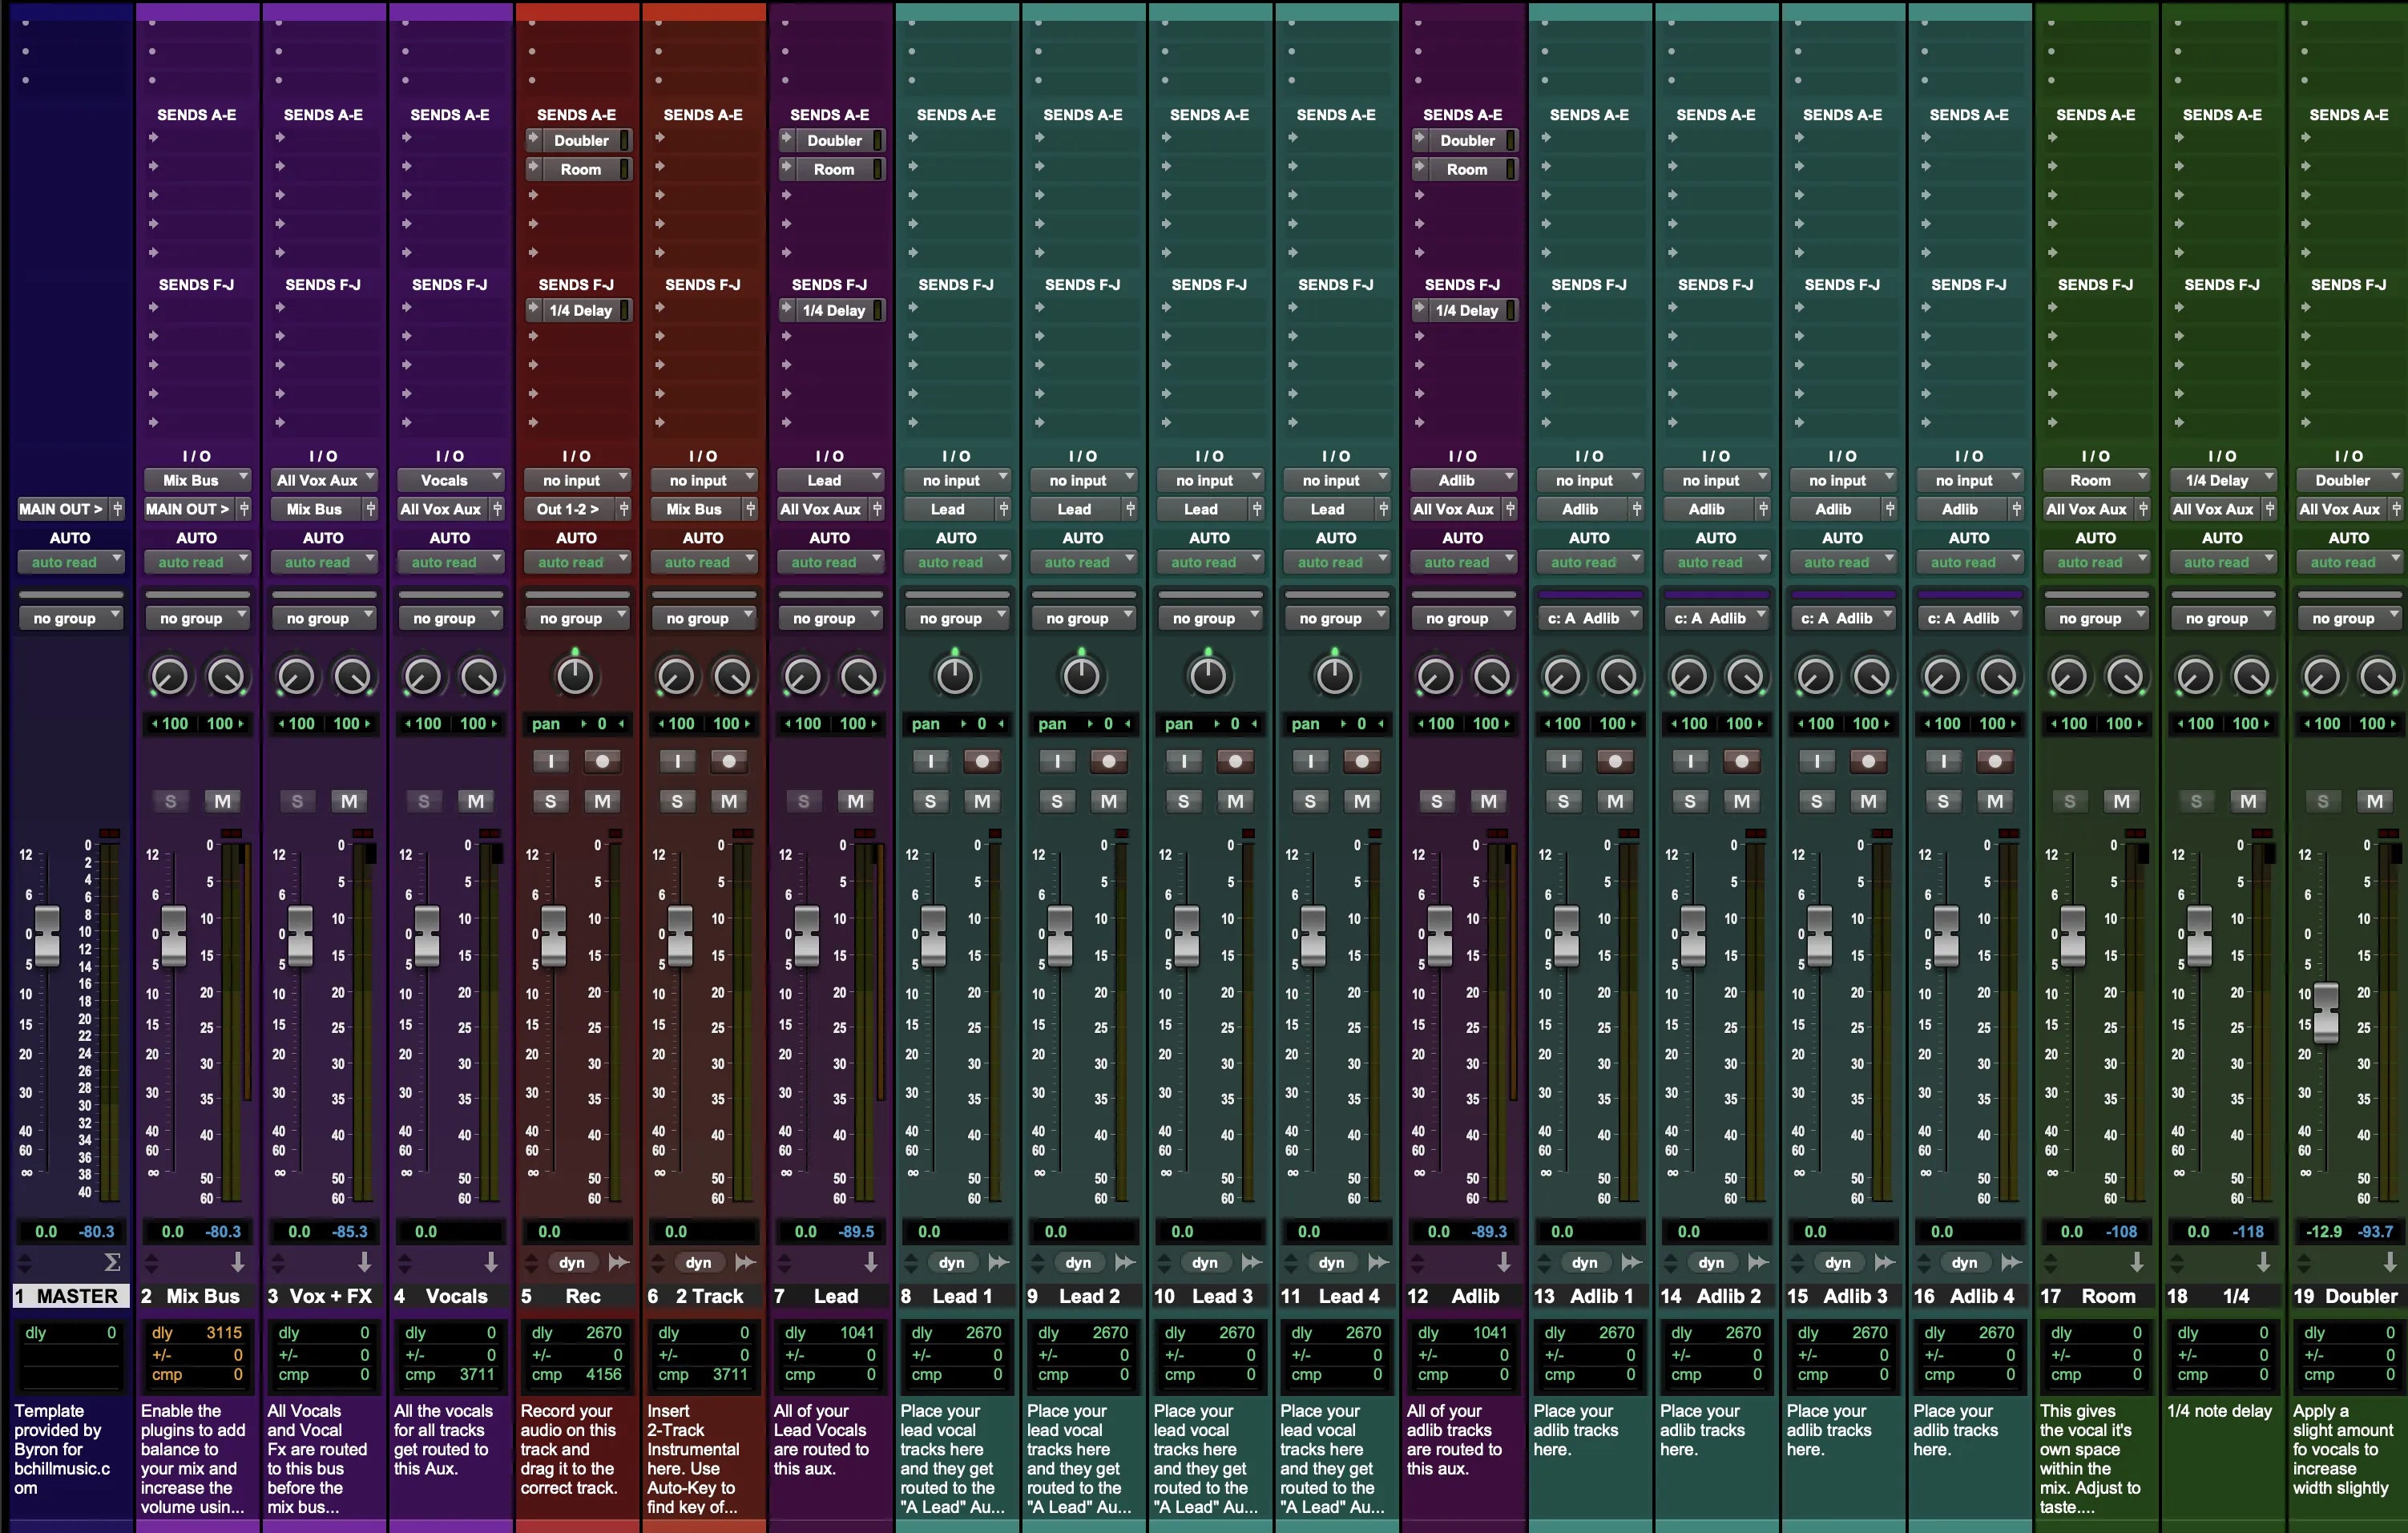
All'interno della DAW: Impostazioni del Template di Logic Pro (Screenshot)
Guarda come i nostri template di Logic Pro si caricano su voci principali, doppi e catene bus. Questi screenshot mostrano il routing e il processamento iniziale così puoi aprire la sessione e modificarla per la tua voce, microfono e ambiente.