Predefinições e Modelos de Gravação
Otimize seu fluxo de trabalho com nosso Modelo de Gravação pronto para uso e Presets Vocais Padrão.

Tipo: Modelo de Gravação
Modelo de Gravação Adobe Audition (Plugins Padrão)
Tipo: Preset Vocal
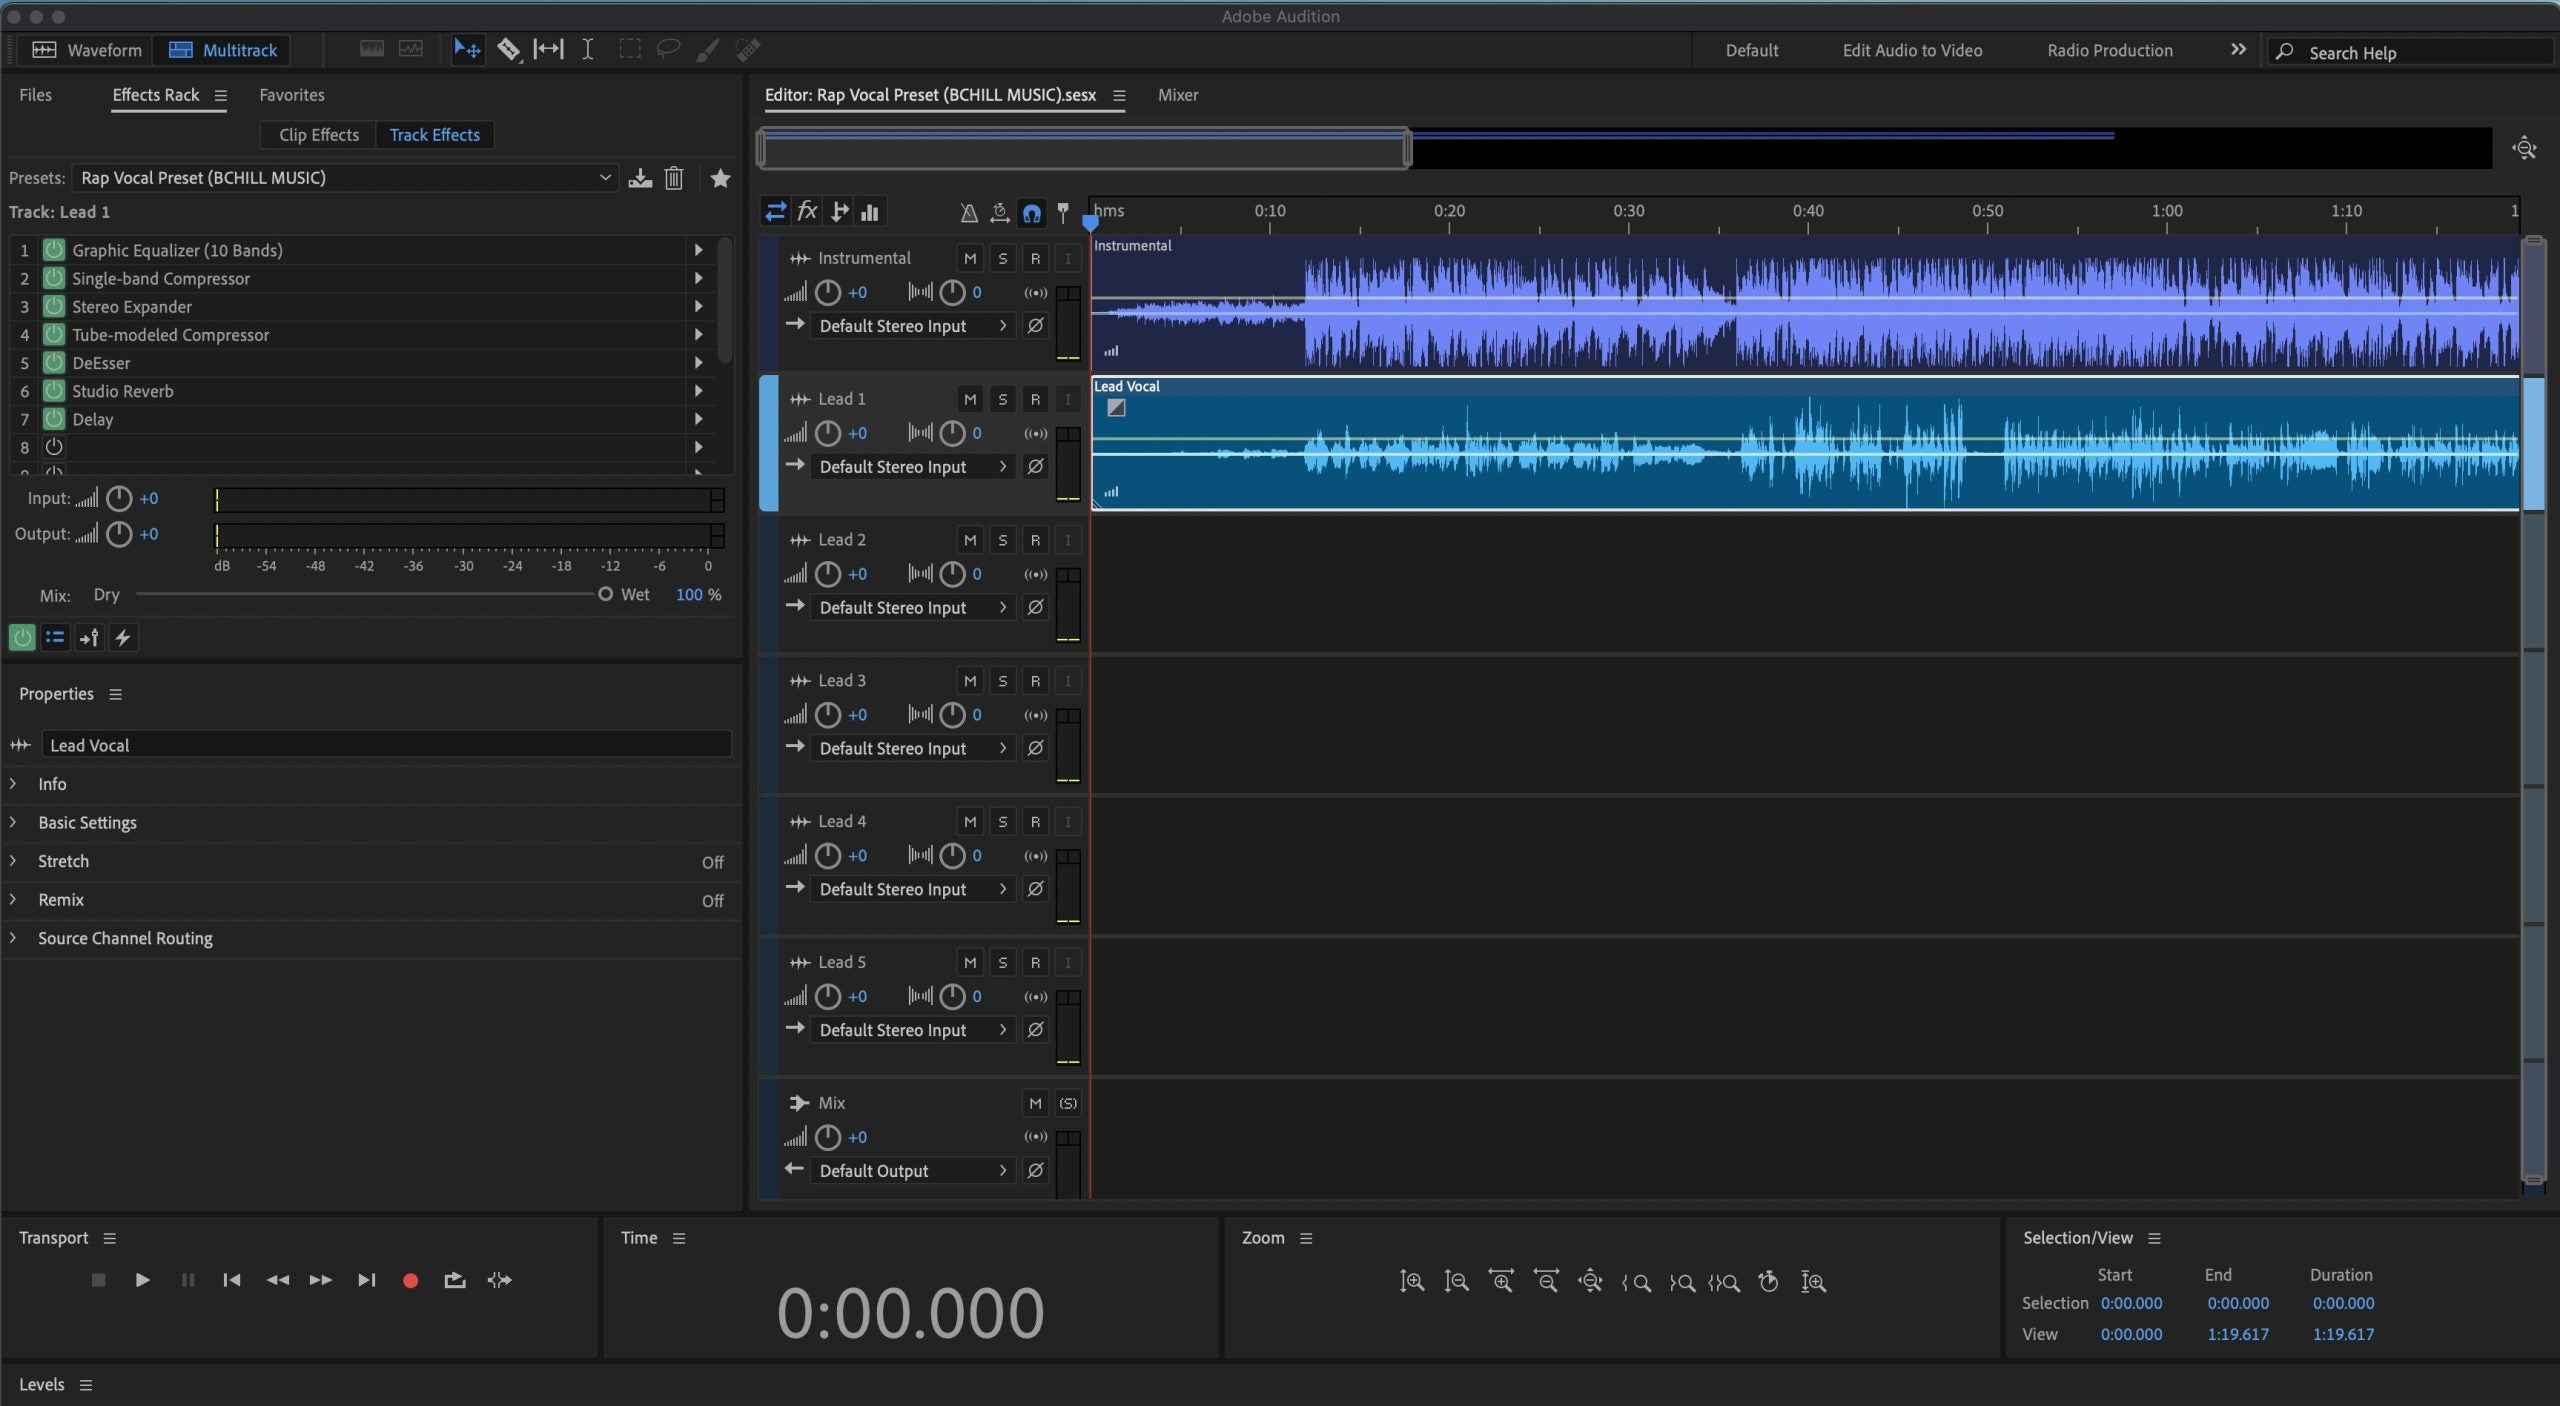
Predefinição de Vocal Rap Adobe Audition (Plugins Padrão)

Tipo: Preset Vocal
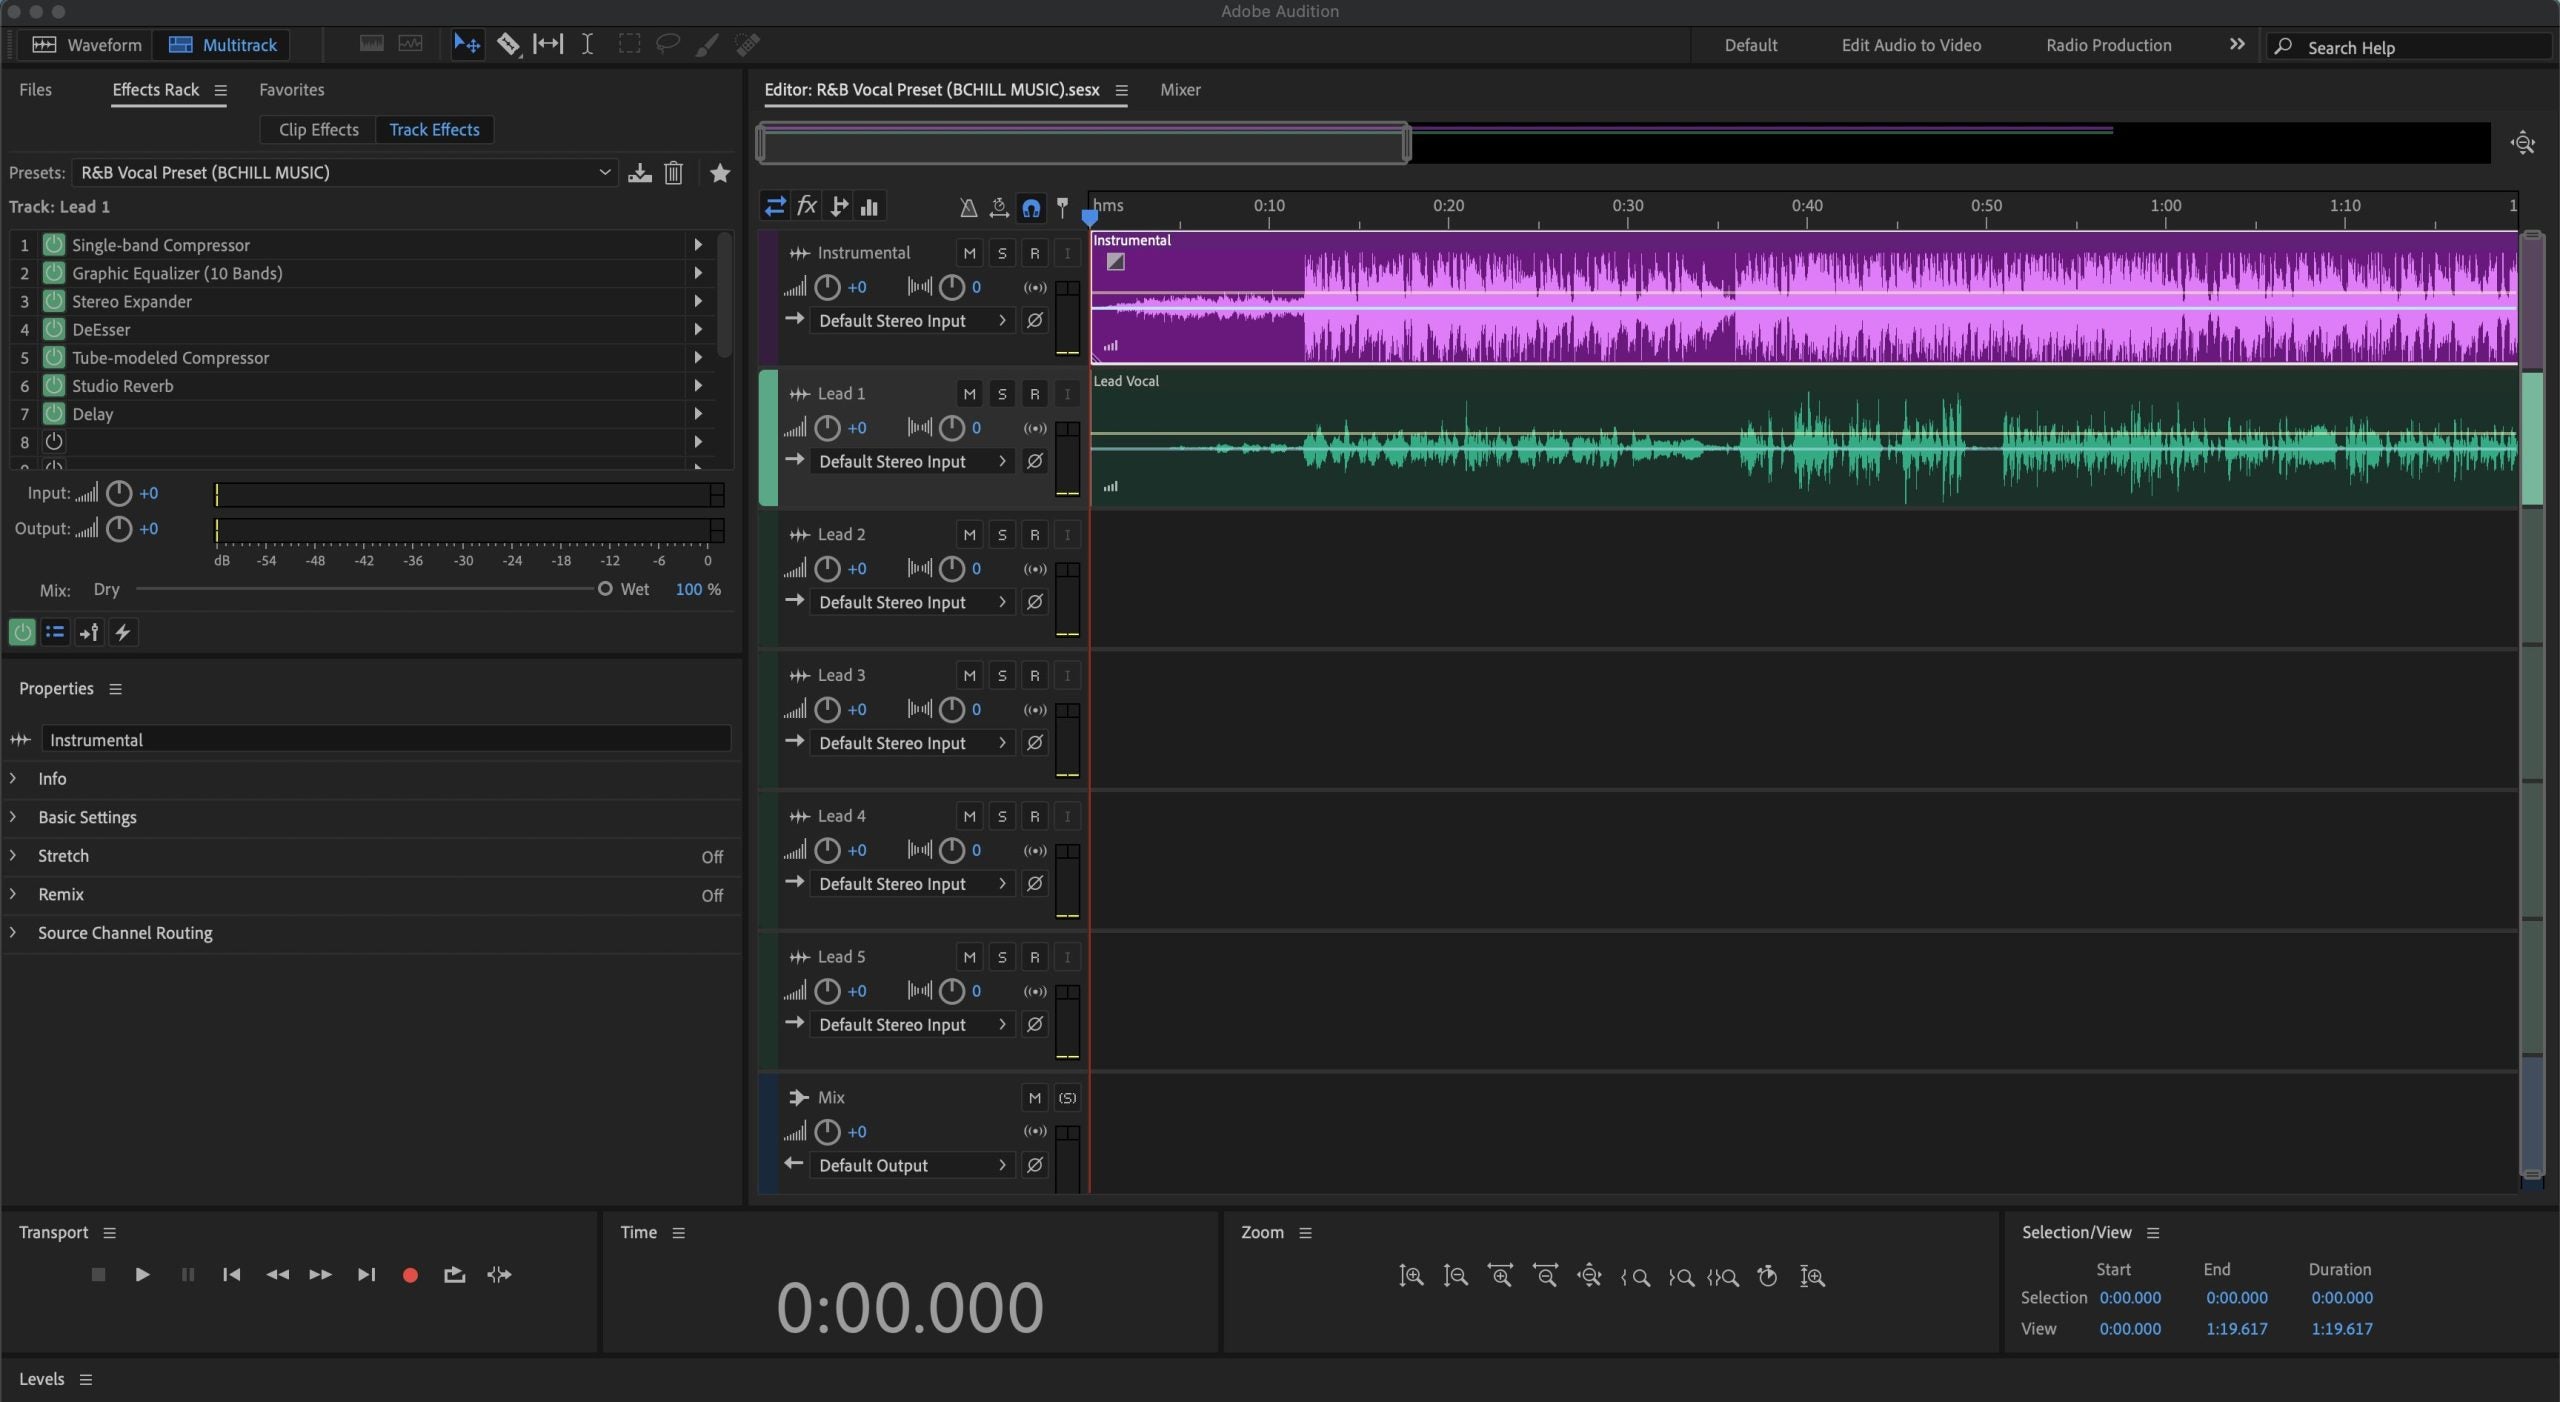
Predefinição Vocal R&B Adobe Audition (Plugins Padrão)
Tipo: Preset Vocal
Predefinição Vocais Claros Adobe Audition (Plugins Padrão)
Monte Sua Própria Cesta


Transforme Sua Sessão em Segundos
Configuração Instantânea de Sessão com Nossos Modelos de Gravação Prontos para Uso e Predefinições Vocais.

Créditos da Indústria

Westside Boogie

Shontelle

Jarren Benton

DJ Tunez

Vory

Caskey

Rittz

Nia Riley

Eugy

Q Parker
Sobre o Engenheiro

Sobre o Engenheiro
Olá! Eu sou Byron Hill, um produtor musical profissional e engenheiro de mixagem com mais de 15 anos de experiência, baseado em Atlanta, GA. Já trabalhei com milhares de clientes ao redor do mundo em uma ampla variedade de gêneros — desde artistas independentes até talentos de grandes gravadoras. Meus créditos incluem trabalhos com Westside Boogie, Vory, Shontelle, DJ Tunez, Jarren Benton e Ritz, além de criadores e marcas como Daryl Mayes, SeanDoesMagic e Chubbies Clothing.
Ao longo dos anos, desenvolvi um ouvido treinado para criar cadeias vocais que entregam um som limpo, equilibrado e profissional — independentemente do gênero ou DAW. Cada preset desta coleção foi criado com o mesmo objetivo: ajudar você a avançar mais rápido, soar melhor e dar vida à sua voz com clareza, confiança e intenção.
Ouça nosso Trabalho
R&B
Antes
Depois
Rap
Antes
Depois
Pop
Antes
Depois
Alma
Antes
Depois
Rocha
Antes
Depois
Latim
Antes
Depois
Perguntas Frequentes
O que são os presets vocais do Adobe Audition?
O que são os presets vocais do Adobe Audition?
Os presets vocais do Adobe Audition são configurações prontas de processamento vocal para criadores que desejam um ponto de partida mais limpo para gravações de música, fala, podcast ou locução dentro do Audition.
Eles são úteis quando você quer clareza, controle e um tom vocal mais polido sem precisar reconstruir a mesma cadeia toda vez.
Esses são feitos para o Effects Rack, cadeias de efeitos salvas ou templates completos de gravação?
Esses são feitos para o Effects Rack, cadeias de efeitos salvas ou templates completos de gravação?
Esta coleção pode incluir fluxos de trabalho de cadeia de faixa única e configurações mais completas no estilo de sessão, dependendo do produto.
A página do produto deve deixar claro se você está comprando uma cadeia vocal para o Rack de Efeitos ou um fluxo de trabalho de gravação mais amplo.
O que recebo depois de comprar um preset ou modelo do Adobe Audition?
O que recebo depois de comprar um preset ou modelo do Adobe Audition?
Você recebe o arquivo digital Audition ou o formato de preset listado na página do produto, junto com qualquer orientação incluída para configurá-lo corretamente.
Isso lhe dá um ponto de partida repetível para sessões futuras, em vez de reconstruir a mesma limpeza vocal e pilha de timbres do zero.
Com que rapidez recebo os arquivos do Adobe Audition após a compra?
Com que rapidez recebo os arquivos do Adobe Audition após a compra?
Estes são downloads digitais, portanto a entrega geralmente é imediata após a finalização da compra.
A maioria dos clientes deve esperar acesso imediato através do fluxo do pedido e do e-mail de confirmação.
Preciso de algum plugin de terceiros para usar esses presets do Adobe Audition?
Preciso de algum plugin de terceiros para usar esses presets do Adobe Audition?
Alguns produtos são desenvolvidos com base nas ferramentas nativas do Audition, enquanto outros podem depender de plugins externos para modelagem de tom mais avançada ou efeitos vocais.
A página do produto deve ser a verificação final antes da compra, caso você queira confirmar uma configuração apenas com estoque.
Esses presets do Adobe Audition são compatíveis com as versões atuais do Adobe Audition?
Esses presets do Adobe Audition são compatíveis com as versões atuais do Adobe Audition?
Eles são destinados aos fluxos de trabalho atuais do Audition para desktop, mas a compatibilidade exata sempre depende do tipo de arquivo e dos processadores usados naquele produto específico.
Se o arquivo depender de um fluxo de trabalho ou conjunto de plugins específico, a página do produto deve informar isso.
Como faço para instalar predefinições ou modelos vocais do Adobe Audition?
Como faço para instalar predefinições ou modelos vocais do Adobe Audition?
Na maioria dos casos, você carrega a cadeia no fluxo de processamento do Audition ou abre a estrutura do modelo/sessão e então confirma suas entradas, saídas e configurações de monitoramento.
Uma vez carregada, você pode ajustar a cadeia para que ela corresponda à gravação específica em que está trabalhando.
Esses presets do Adobe Audition são fáceis para iniciantes?
Esses presets do Adobe Audition são fáceis para iniciantes?
Sim. Eles são especialmente úteis para criadores que querem um ponto de partida mais limpo para vocais sem precisar aprender todos os plugins do zero no primeiro dia.
Como o Audition é usado tanto para música quanto para conteúdo falado, esses presets podem ajudar a simplificar um fluxo de trabalho que muitas vezes parece excessivamente manual no início.
Posso ajustar a cadeia para combinar melhor com meu microfone, ambiente ou tom vocal?
Posso ajustar a cadeia para combinar melhor com meu microfone, ambiente ou tom vocal?
Sim. Você deve ajustar o ganho, o equilíbrio de equalização, a redução de sibilância, o ambiente e a dinâmica para se adequar à gravação que você capturou.
O preset aproxima você do resultado mais rápido, mas os resultados finais ainda melhoram quando a cadeia é ajustada para sua voz, ambiente e microfone.
O que torna estes melhores do que os presets vocais integrados do Adobe Audition?
O que torna estes melhores do que os presets vocais integrados do Adobe Audition?
Predefinições integradas são úteis para experimentos rápidos, mas os produtos BCHILL MIX são projetados como pontos de partida mais intencionais e reais para trabalhos vocais finalizados.
Eles têm o objetivo de ajudar você a alcançar um som final mais forte mais rapidamente, com mais estrutura e menos suposições.
Predefinições Vocais do Adobe Audition: Explicação e Recursos
Introdução aos Presets Vocais do Adobe Audition
Se você quer um som vocal moderno e consistente sem precisar montar a mesma cadeia toda sessão, presets vocais para Adobe Audition oferecem um ponto de partida rápido e confiável. Um preset carrega um caminho completo de efeitos—modelagem de timbre, dinâmica, controle de sibilância e ambiente—para que você possa gravar com um sinal equilibrado e fazer pequenos ajustes para sua voz, microfone e música.
No BCHILL MIX, o objetivo é prático e repetível: cadeias que funcionam bem em fones, monitores de estúdio e celulares, para que mixes preliminares soem bem e mixes finais sejam concluídos mais rápido. Este guia cobre o que são presets, quando ajudam, opções nativas vs. premium, passos de configuração, dicas de estilo e como templates de sessão complementam sua cadeia vocal.
O que são Presets Vocais no Adobe Audition?
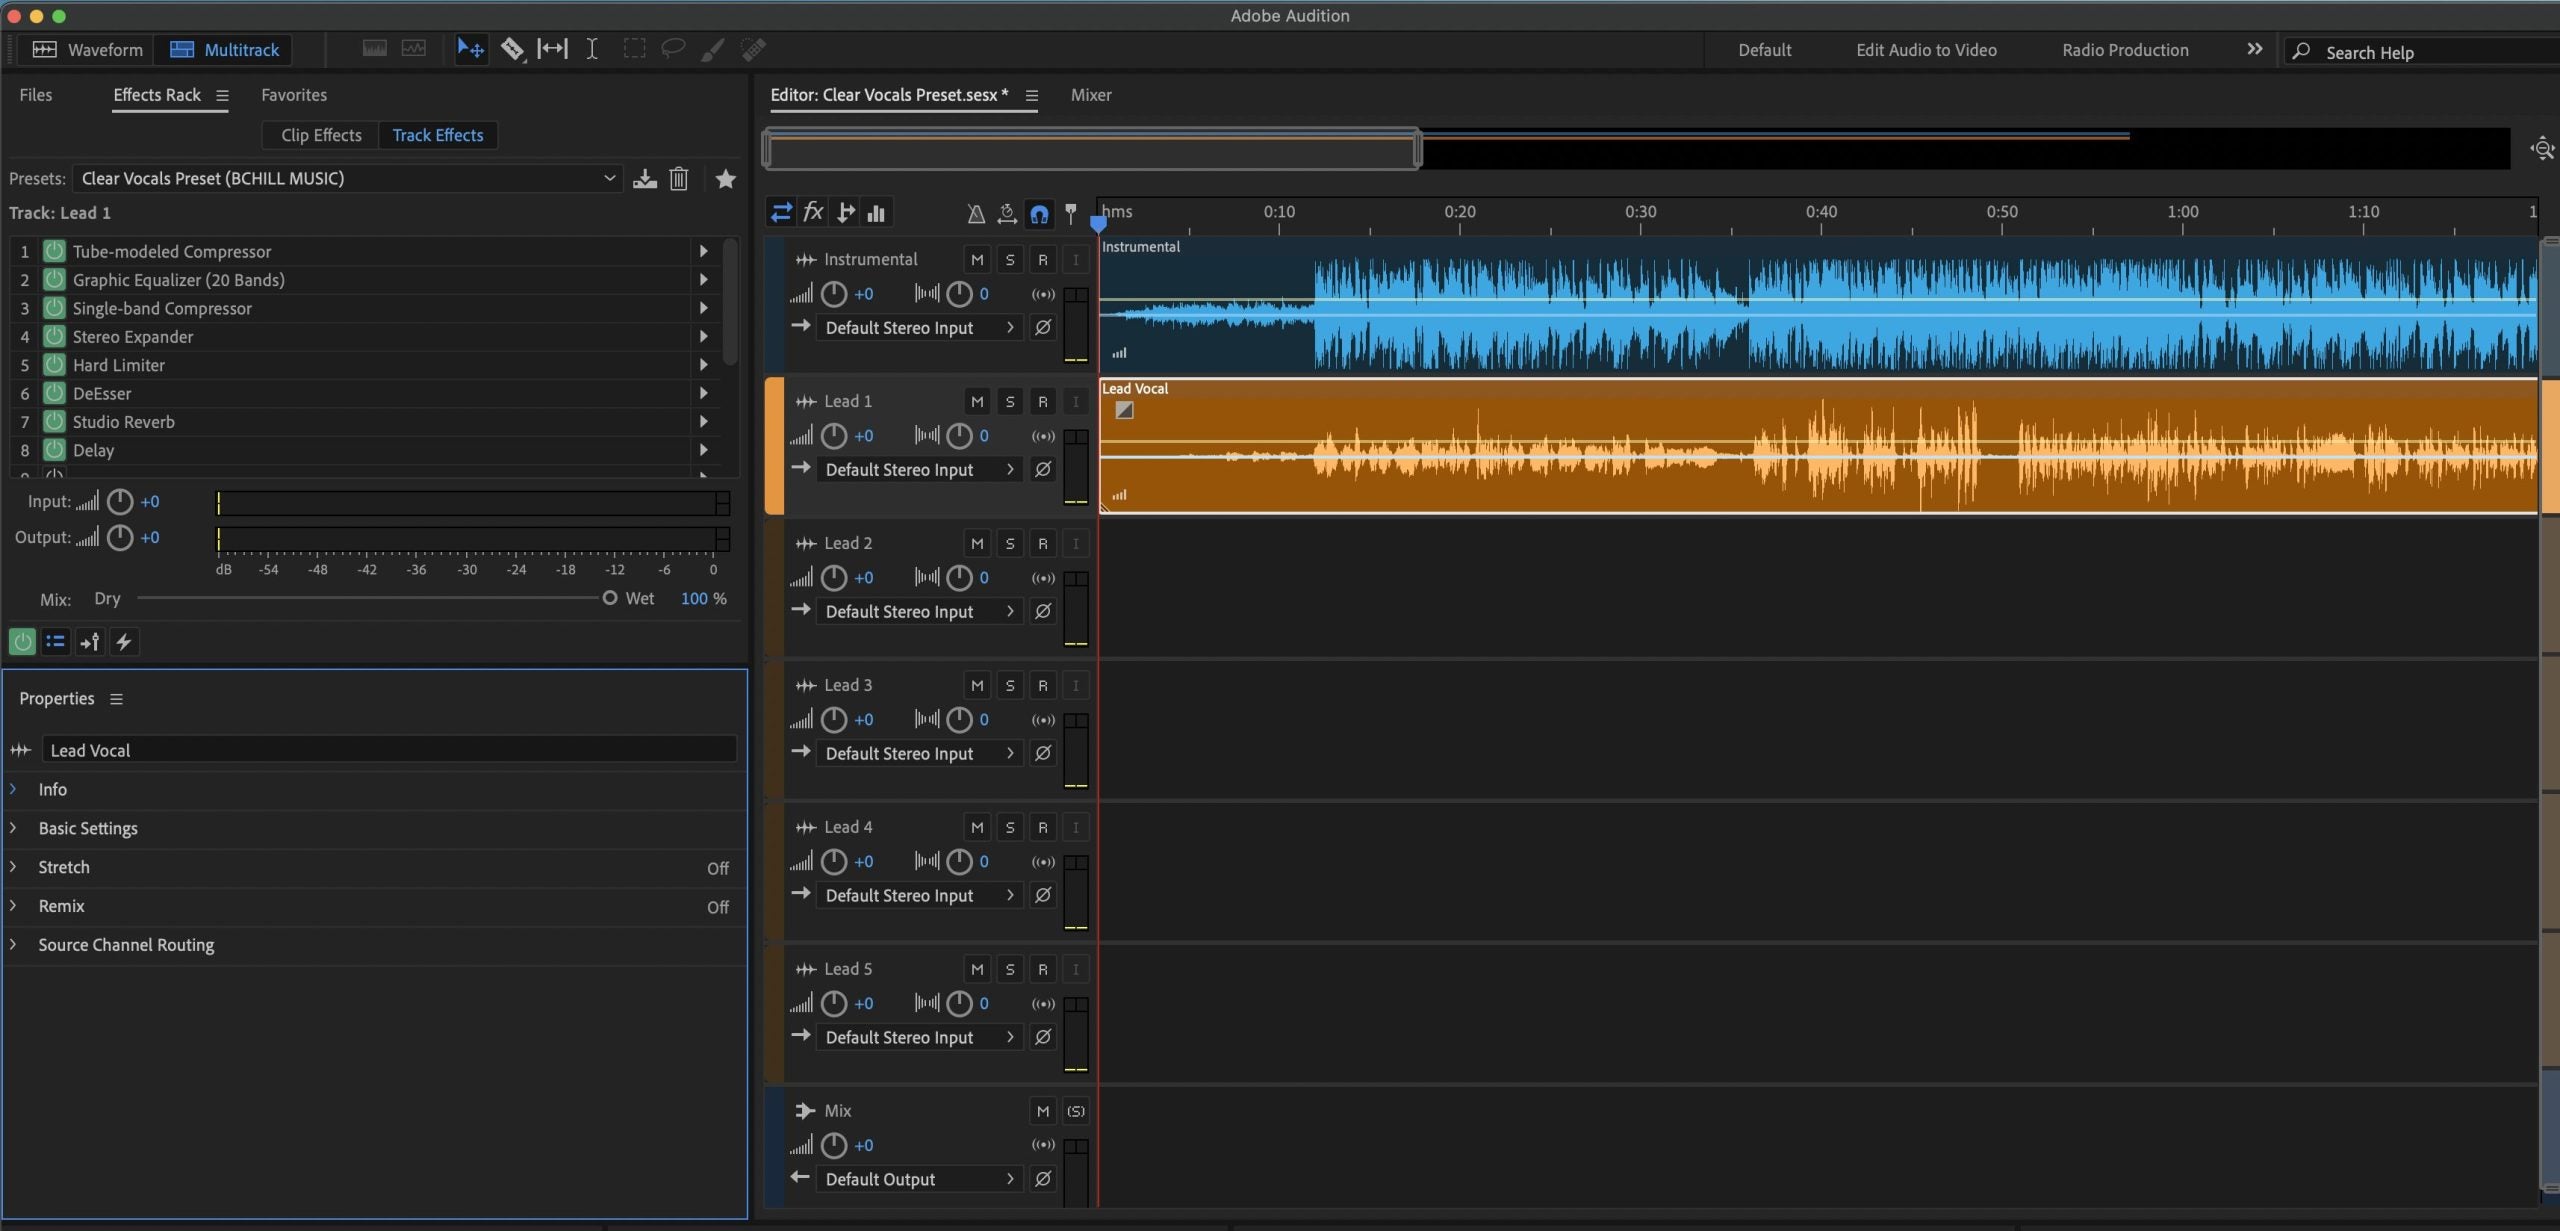
No Adobe Audition, um preset vocal é uma configuração salva do Effects Rack que aplica múltiplos processadores em uma ordem conhecida. Uma cadeia bem projetada normalmente inclui um filtro passa-alto suave e pequenos ajustes de EQ para controlar o timbre; um ou dois compressores para estabilizar o nível; um de-esser posicionado antes do brilho final para que os sons “s” fiquem suaves; saturação opcional para presença; e envios para reverb e delay sincronizado ao tempo.
Presets podem ser salvos como Rack presets que você carrega em qualquer faixa, incorporados dentro de um template de Sessão Multitrack, ou documentados como configurações passo a passo. Seja qual for a forma, usar um preset significa que o roteamento técnico está pronto antes da gravação—liberando você para focar em takes, overdubs, harmonias e ad-libs. Para colaboração, compartilhe o arquivo do rack ou abra um template para que todos ouçam equilíbrios similares em diferentes computadores.
Por que Usar Presets no Audition (Benefícios e Quando Ajudam)
- Velocidade: Pule configurações repetitivas e capture ideias enquanto a inspiração está fresca.
- Consistência: Uma cadeia calibrada mantém o timbre alinhado do demo ao lançamento e reduz retrabalho.
- Foco: Com o processamento principal em ação, você pode priorizar performance, arranjo e decisões criativas.
- Tradução: Cadeias bem feitas permanecem inteligíveis em fones e celulares, além de monitores full-range.
Quando ajudam mais: sessões rápidas de composição; gravação remota e podcasting; tom consistente em uma série de singles; criação de conteúdo para shorts/reels; e qualquer fluxo de trabalho onde você precisa ir da ideia ao take em minutos.
Cadeias Nativas vs. Premium para Audition
Cadeias nativas (stock) usam apenas processadores internos do Adobe Audition. Carregam em qualquer sistema—sem licenças extras—e são ideais se você colabora frequentemente ou troca de máquina. São leves para a CPU e reduzem problemas de “plug-in ausente”.
Cadeias premium adicionam ferramentas populares de terceiros (por exemplo, correção de pitch, EQ dinâmico, compressores com caráter, ou saturação especializada). Podem oferecer controle mais refinado e uma “cor” específica, mas exigem que os plug-ins listados estejam instalados e ativados.
Qual escolher? Se portabilidade e simplicidade são prioridades, comece com nativas. Se seu setup já inclui plug-ins de terceiros e você quer mais opções de modelagem de timbre, premium pode ser uma ótima escolha. Muitos artistas mantêm ambos: uma cadeia nativa para gravação em qualquer lugar e uma premium para polimento no estúdio. Em todos os casos, mantenha o ganho consistente para que os presets sejam previsíveis entre projetos.
Instalação e Início Rápido (Passo a Passo)
- Prepare sua sessão. Crie uma nova Sessão Multitrack. Adicione uma faixa vocal dedicada (Lead) e faixas opcionais para Doubles, Harmonias e Ad-libs. Nomeie e codifique as faixas por cor; direcione para um bus vocal se processar grupos.
- Configure entrada e níveis. Escolha a entrada do microfone. Grave uma frase de teste rápida e ajuste o ganho de entrada para que os picos fiquem entre aproximadamente −10 e −6 dBFS. Evite clipping na interface—isso não pode ser corrigido depois.
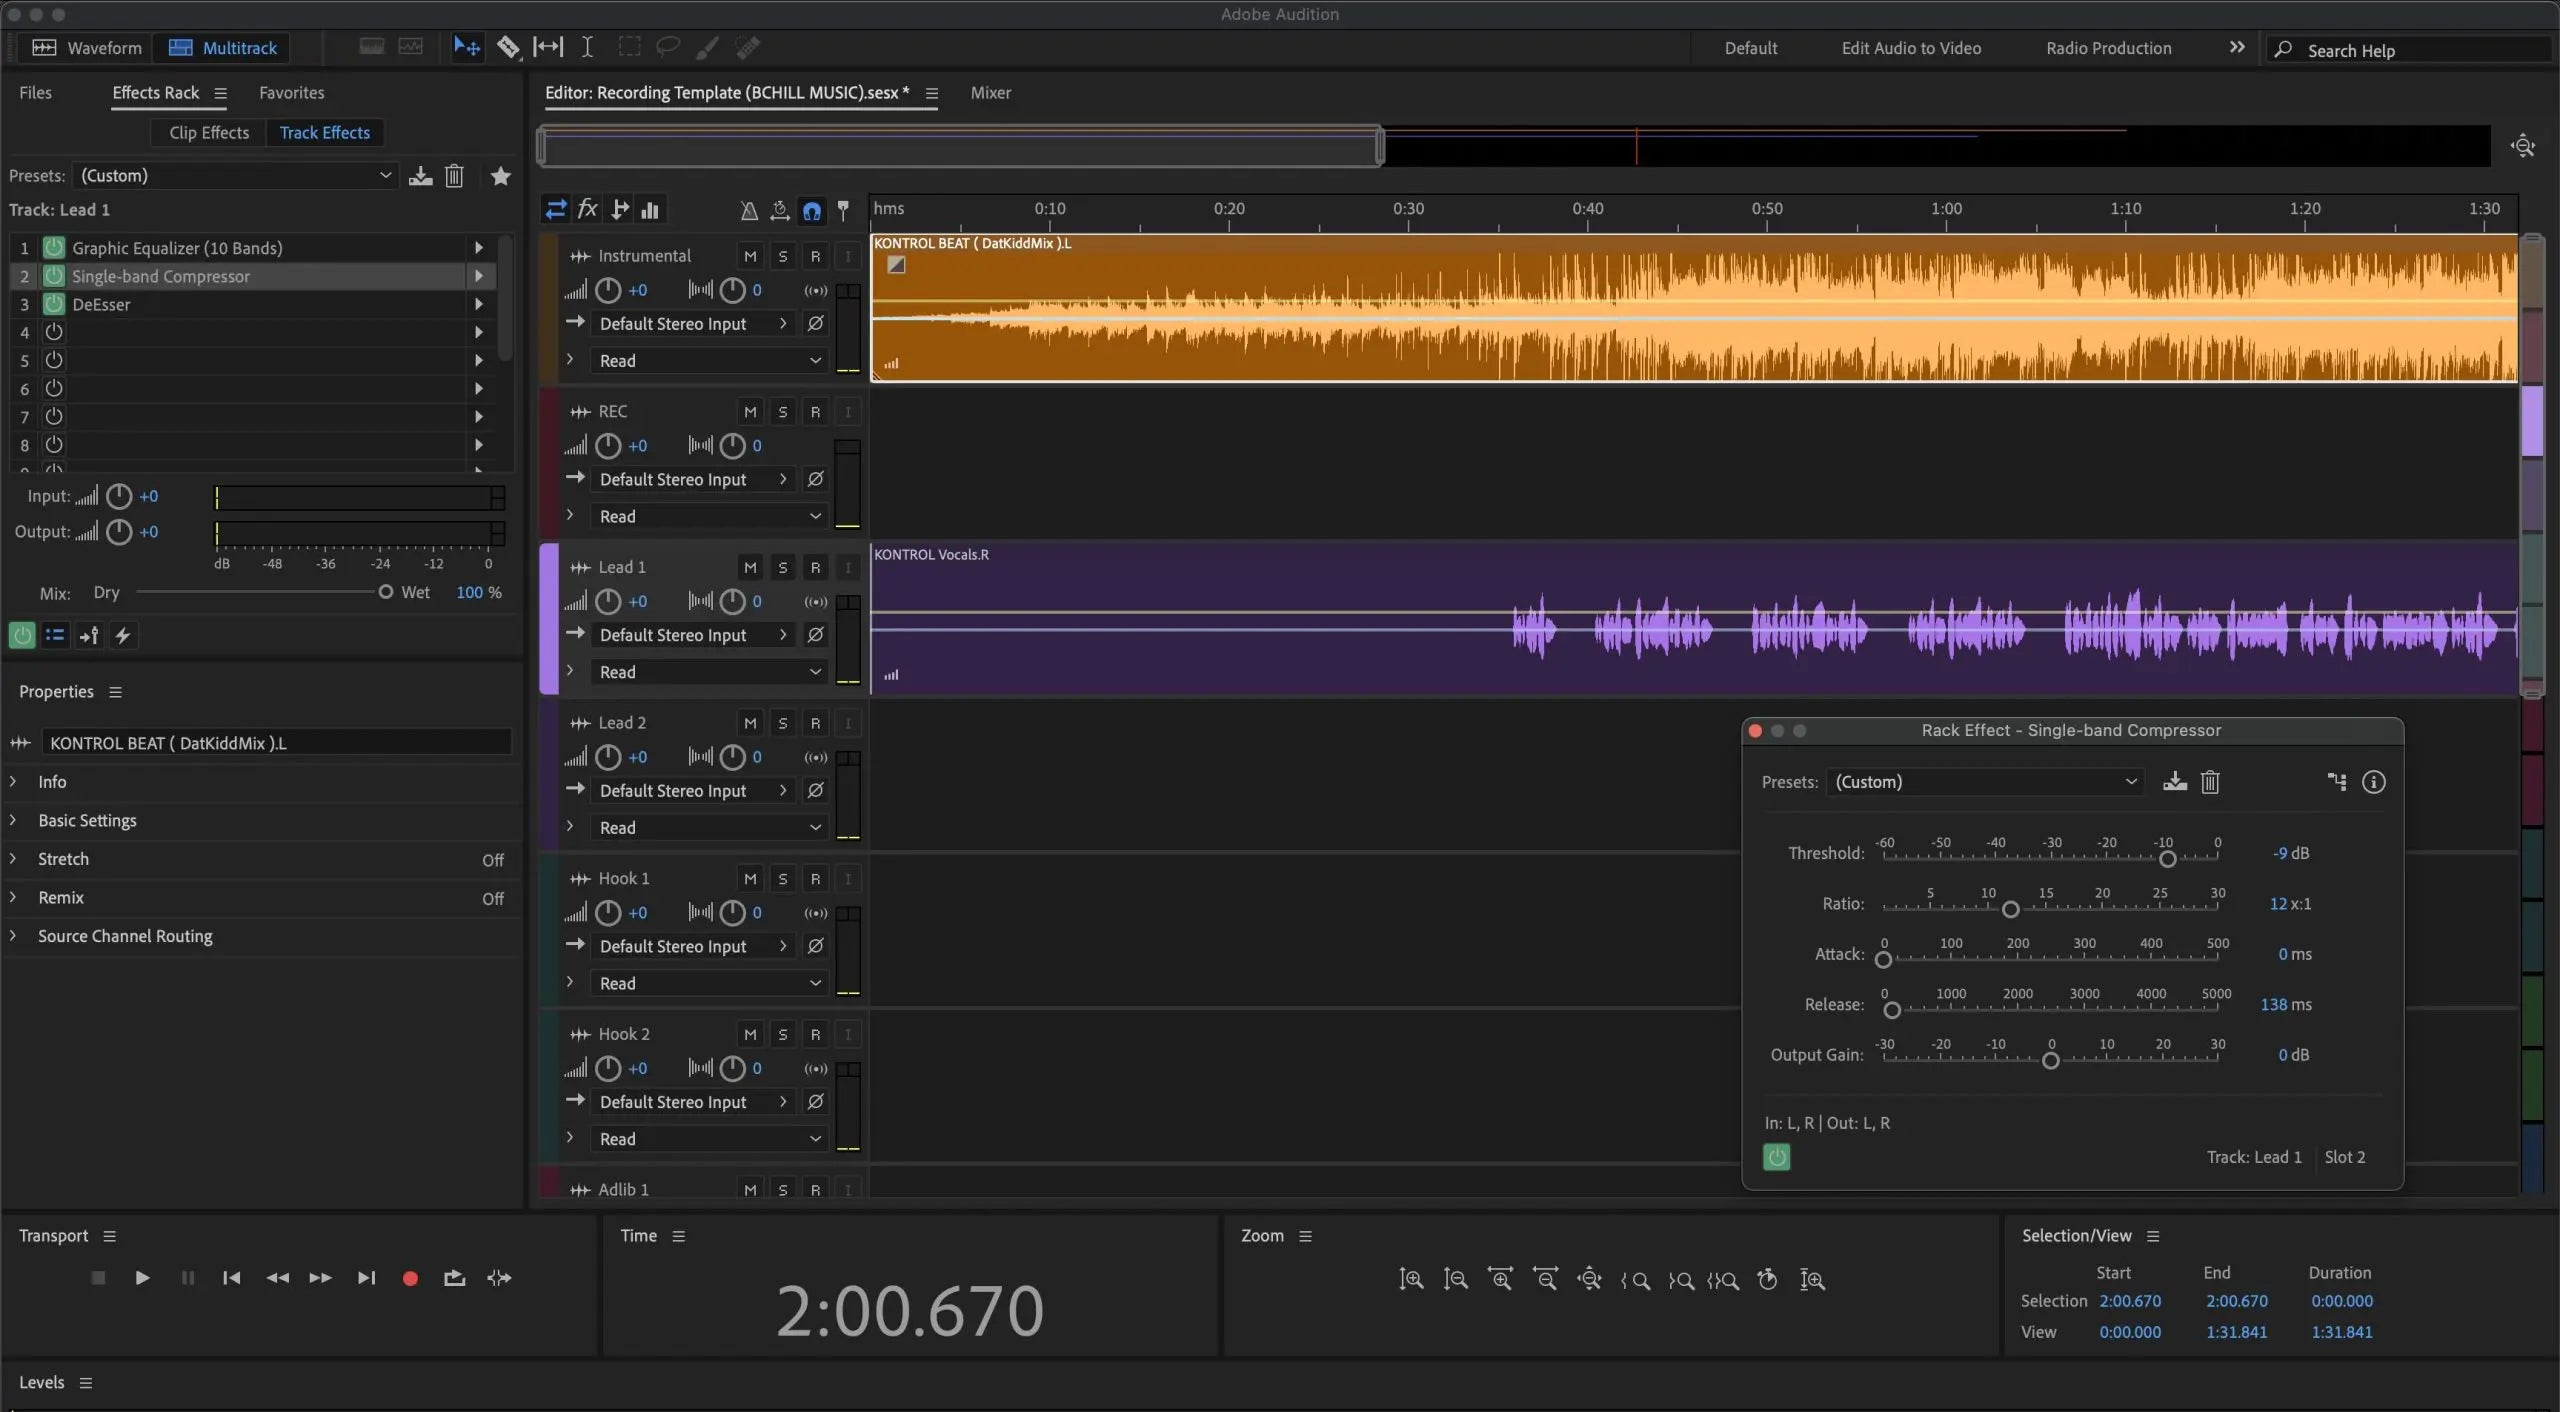
- Carregue a cadeia do preset. Abra o Effects Rack na faixa vocal. Carregue o rack preset fornecido ou insira os processadores nesta ordem: EQ → Compressor 1 (suave) → De-esser → Compressor 2 (rápido/limpo) → Saturação (opcional) → Envios para Reverb/Delay. Se seu preset vier como template .sesx, abra-o e copie a cadeia para sua sessão atual.
- Ajuste os thresholds e envios. Abaixe os thresholds dos compressores até que as linhas mais altas sejam reduzidas alguns dB sem causar pumping. Ajuste o de-esser para que as sibilantes fiquem suaves, não opacas. Adicione ambiente via envios; mantenha os inserts principalmente secos durante a gravação para clareza e menor latência.
- Salve sua configuração. Salve um Rack Preset para sua voz e salve um Template de Sessão para que todo novo projeto abra com a mesma margem, roteamento, cores e layout de faixas.
Estágio de ganho avançado e medição. Grave para que os picos vocais fiquem entre −10 e −6 dBFS no medidor da faixa. Se o ganho de compensação do compressor elevar os níveis, ajuste com Clip Gain em vez de sobrecarregar o próximo processador. Observe os medidores de saída do Rack e do Master—mire em picos do master entre −6 e −3 dBFS nos rough mixes para não ficar correndo atrás de volume durante a gravação. Grave em 24-bit/48 kHz para um piso de ruído saudável e edição flexível. Se a latência incomodar o artista, reduza o buffer e bypass temporariamente processadores pesados com look-ahead ou fase linear. Salve essa sessão calibrada como template para que todo projeto comece com margem e roteamento previsíveis.
Estilos e Casos de Uso (Rap, R&B, Pop, Claro/Podcast)
Rap lead. Objetivo: presença impactante com dinâmica controlada. Use dois compressores leves em série para controle sem artefatos; foque a presença entre 2–5 kHz; adicione um slap curto ou plate pequeno em um envio para energia sem wash. Automatize níveis de envio para destacar refrões. Para ad-libs, aplique um passa-alto um pouco mais alto que o lead e um pouco mais de de-ess para manter as consoantes limpas.
R&B lead. Objetivo: agudos suaves com profundidade e largura. Use ataque/liberação mais suaves, um shelf de ar sutil e envios de ambiente mais amplos para espaço. Se aumentar os agudos depois, revise o threshold do de-esser ou adicione um segundo de-esser mais suave para controlar a sibilância.
Vocal pop. Objetivo: brilho controlado com espaço rítmico. Mantenha os agudos polidos e seguros; use delays sincronizados ao tempo para largura; e de-esse cuidadosamente para que o “s” fique suave. Compare em volume igual ao fazer A/B.
Claro/Podcast. Objetivo: inteligibilidade e neutralidade. Escolha compressão transparente, de-ess moderado, baixo ruído e apenas um pouco de sala ou plate se necessário. Técnica (distância do microfone, pop filter, performance estável) é tão importante quanto o processamento.
Backings, doubles, ad-libs. Compressão um pouco mais apertada e um pouco mais de de-ess ajudam as camadas a se encaixarem sem bagunça. Aplique um passa-alto mais alto nas camadas para reduzir a névoa de médios graves. Ambientes mais amplos e longos separam os backings do lead sem mascarar as palavras.
Erros comuns e correções rápidas.
- Excesso de de-essing: Se o “s” soar opaco ou sibilante, aumente o threshold, estreite a banda ou mova o de-esser para antes na cadeia.
- Reverb/delay demais: Ótimo no solo, bagunçado no contexto. Comece com envios baixos e automatize para cima nos refrões.
- Clipping na interface: Luzes vermelhas na entrada não têm conserto. Reduza o pré-amplificador e deixe a compressão agir no Audition.
- Névoa de médios graves nas camadas: Aplique passa-alto em doubles/harmonias mais alto que no lead; adicione um pouco mais de de-ess para que as camadas se encaixem sem borrar.
- Latência na monitoração: Grave com uma cadeia enxuta (EQ/Comp/De-ess) e deixe os aprimoradores pesados para a reprodução.
Templates de Gravação vs. Presets Vocais no Audition
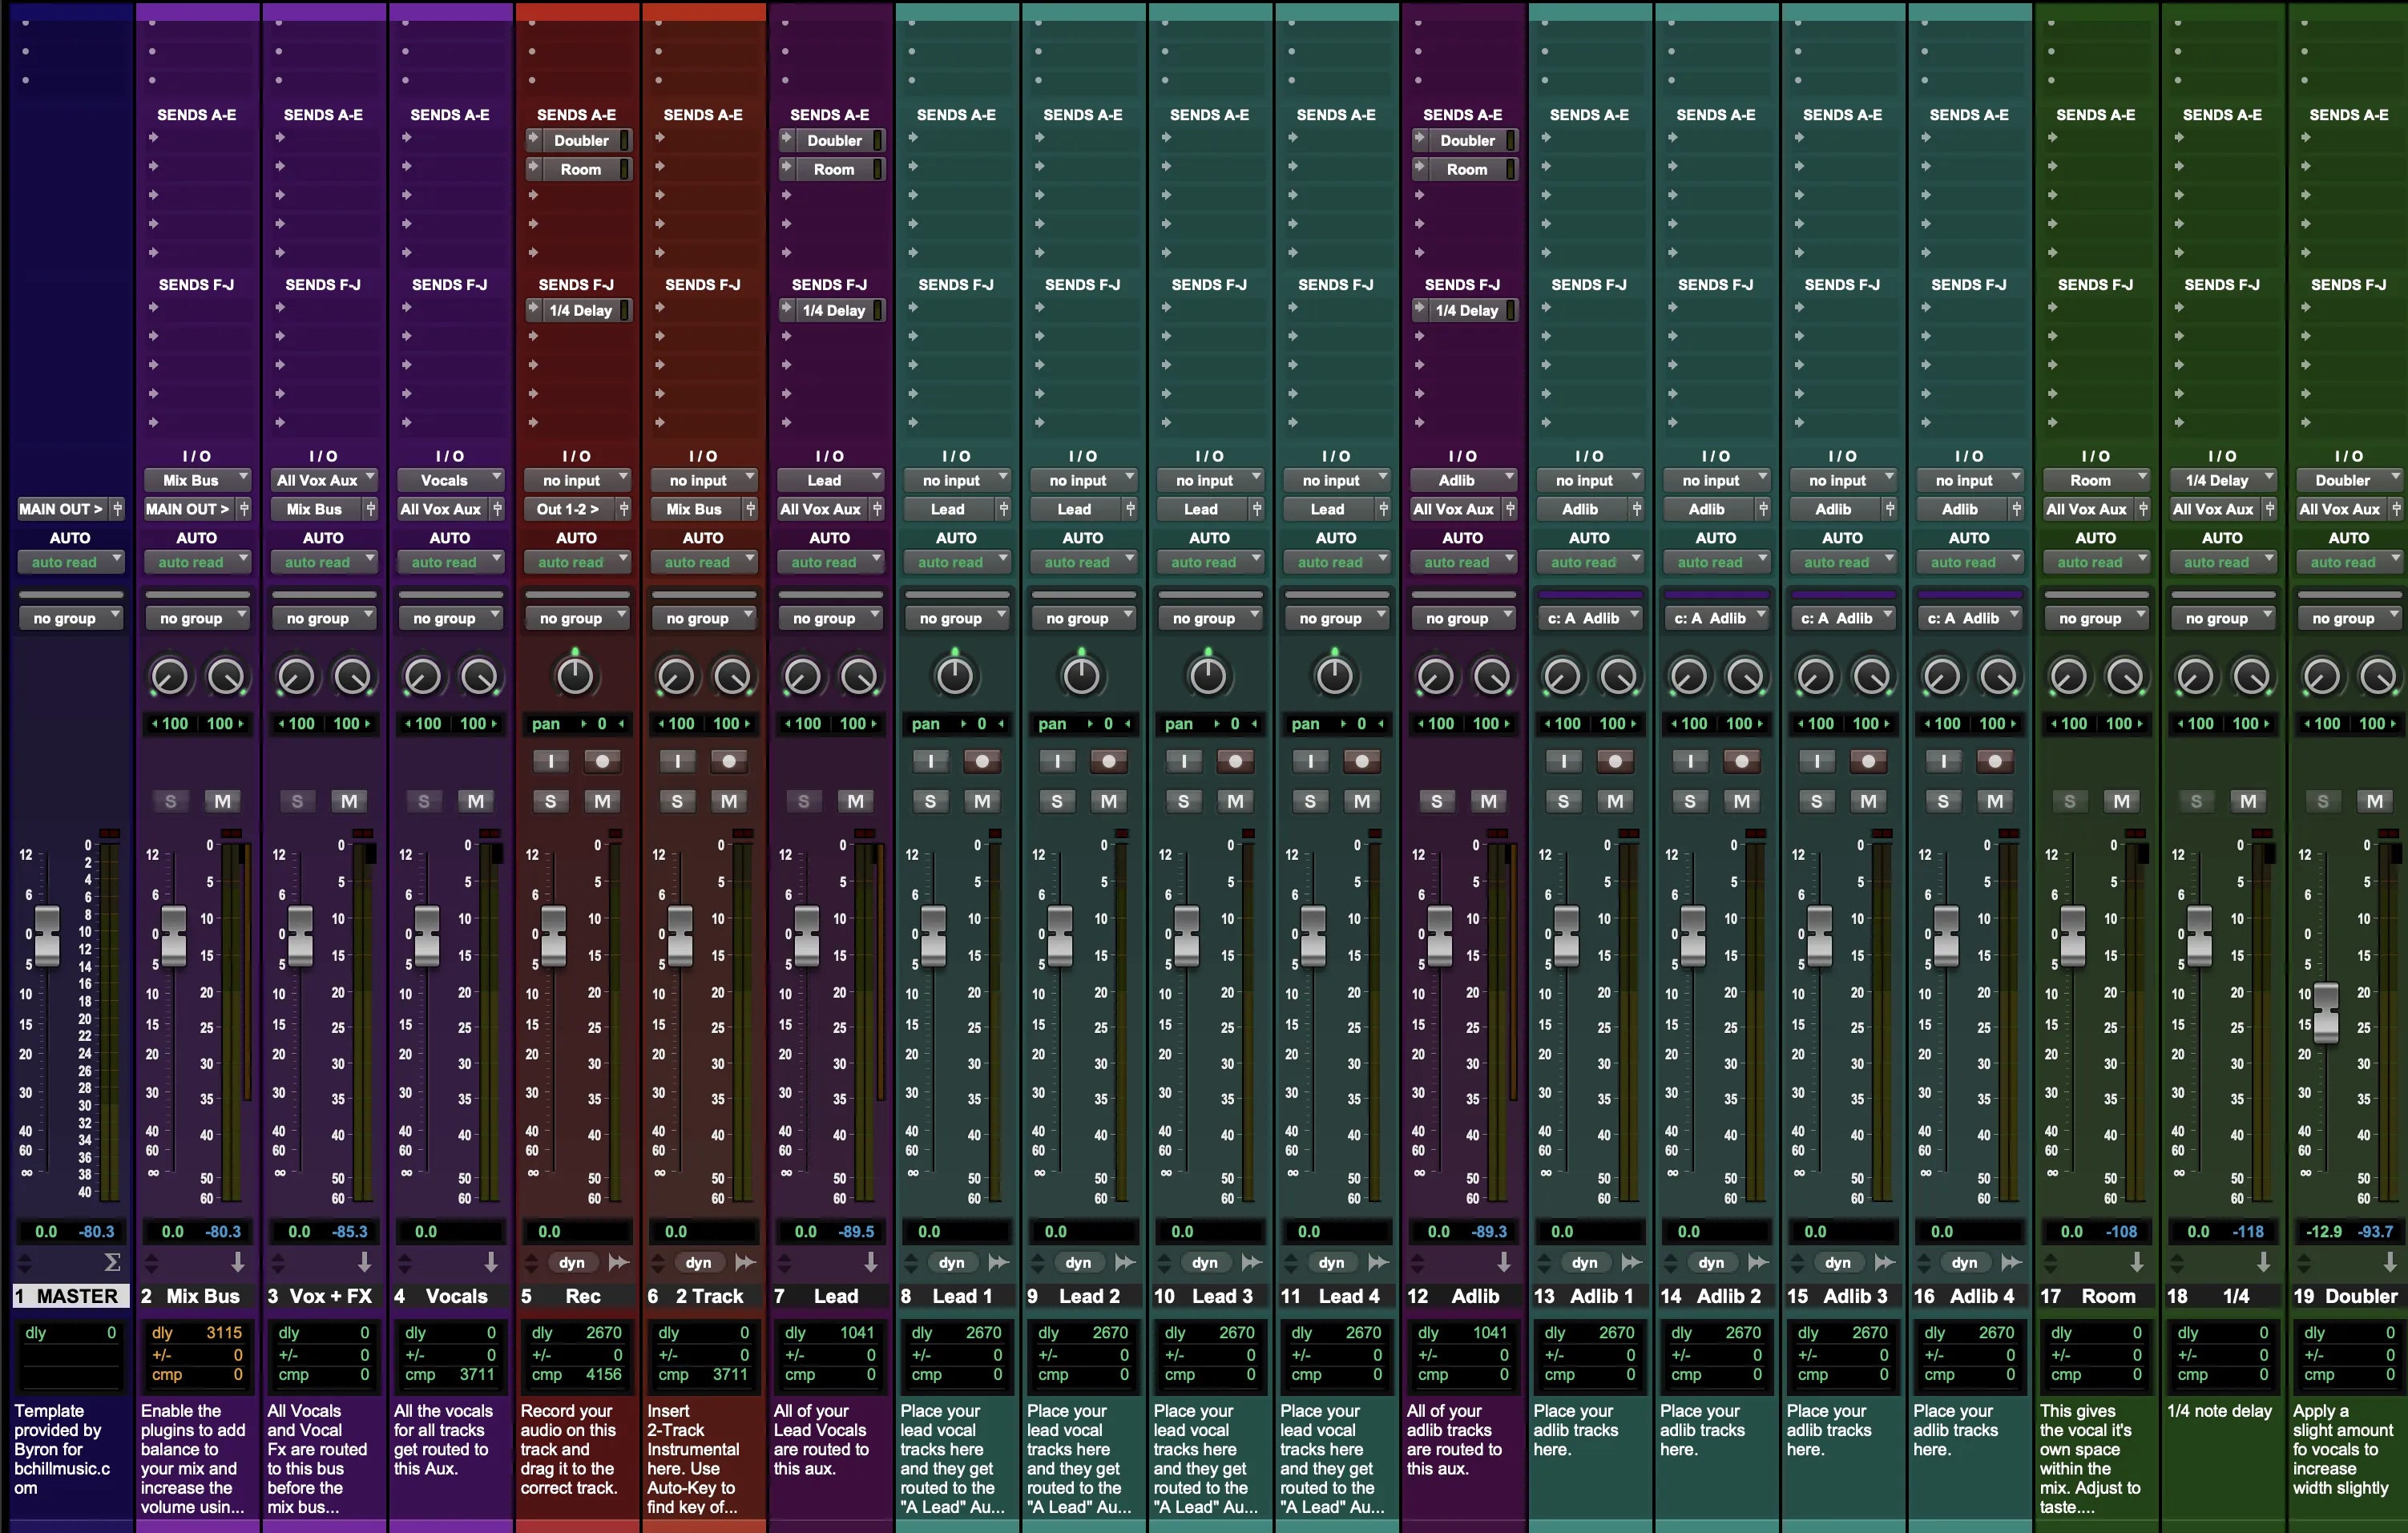
Presets vocais modelam timbre e dinâmica em uma única faixa ou bus vocal. Templates de gravação oferecem um layout completo de sessão—faixas pré-nomeadas, roteamento de bus, cores, mixagens de retorno e envios prontos—para que você possa ir da ideia ao take com configuração mínima e manter sessões grandes organizadas.
- Use um template para abrir cada projeto com estrutura pronta (Lead, Doubles, Harmonias, Ad-libs, buses de FX) e margem previsível.
- Use uma cadeia de preset (nativa ou premium) para definir timbre, dinâmica e espaço, depois ajuste thresholds e envios para a voz, microfone e arranjo.
Templates são úteis para colaboração e conteúdo recorrente. Se você grava semanalmente, crie uma sessão mestre com a ordem certa de faixas e metas de volume, depois troque a cadeia de preset quando o cantor ou estilo mudar. Para fluxos de trabalho mais amplos, explore cadeias e templates para outras plataformas e mantenha seu timbre consistente entre setups: veja Ableton Vocal Presets, FL Studio Vocal Presets ou o catálogo completo de Vocal Presets.
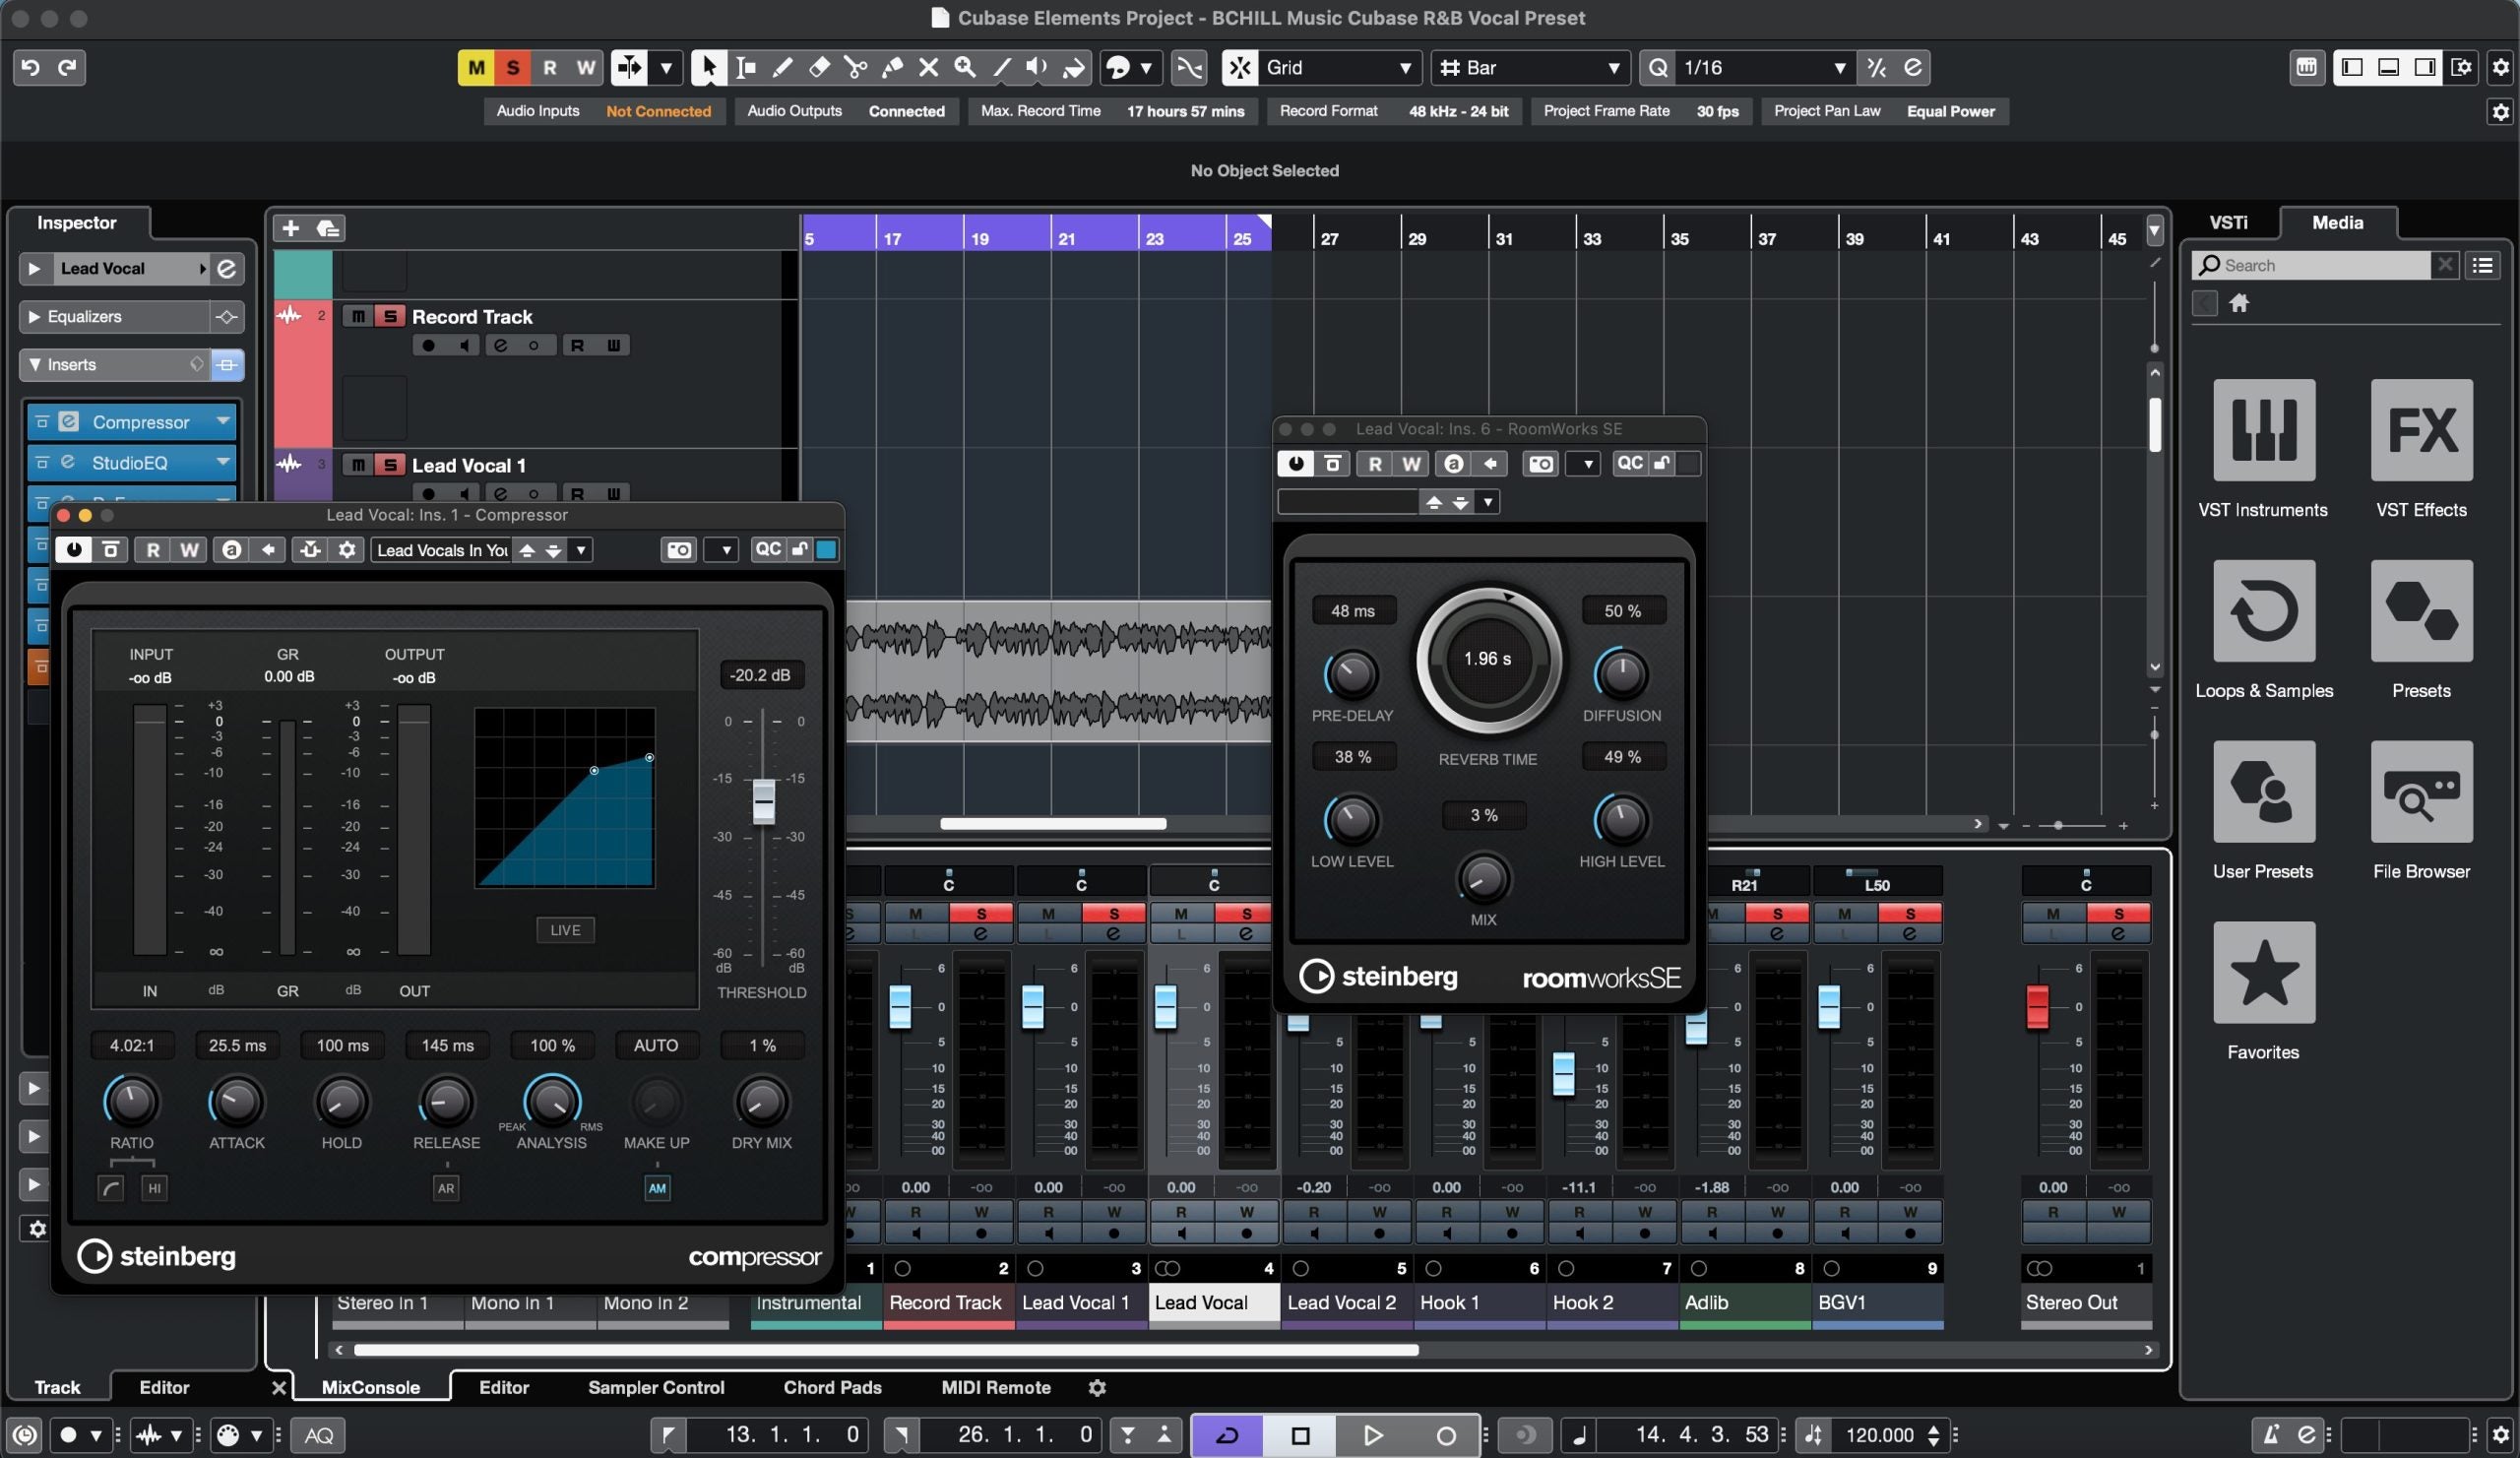
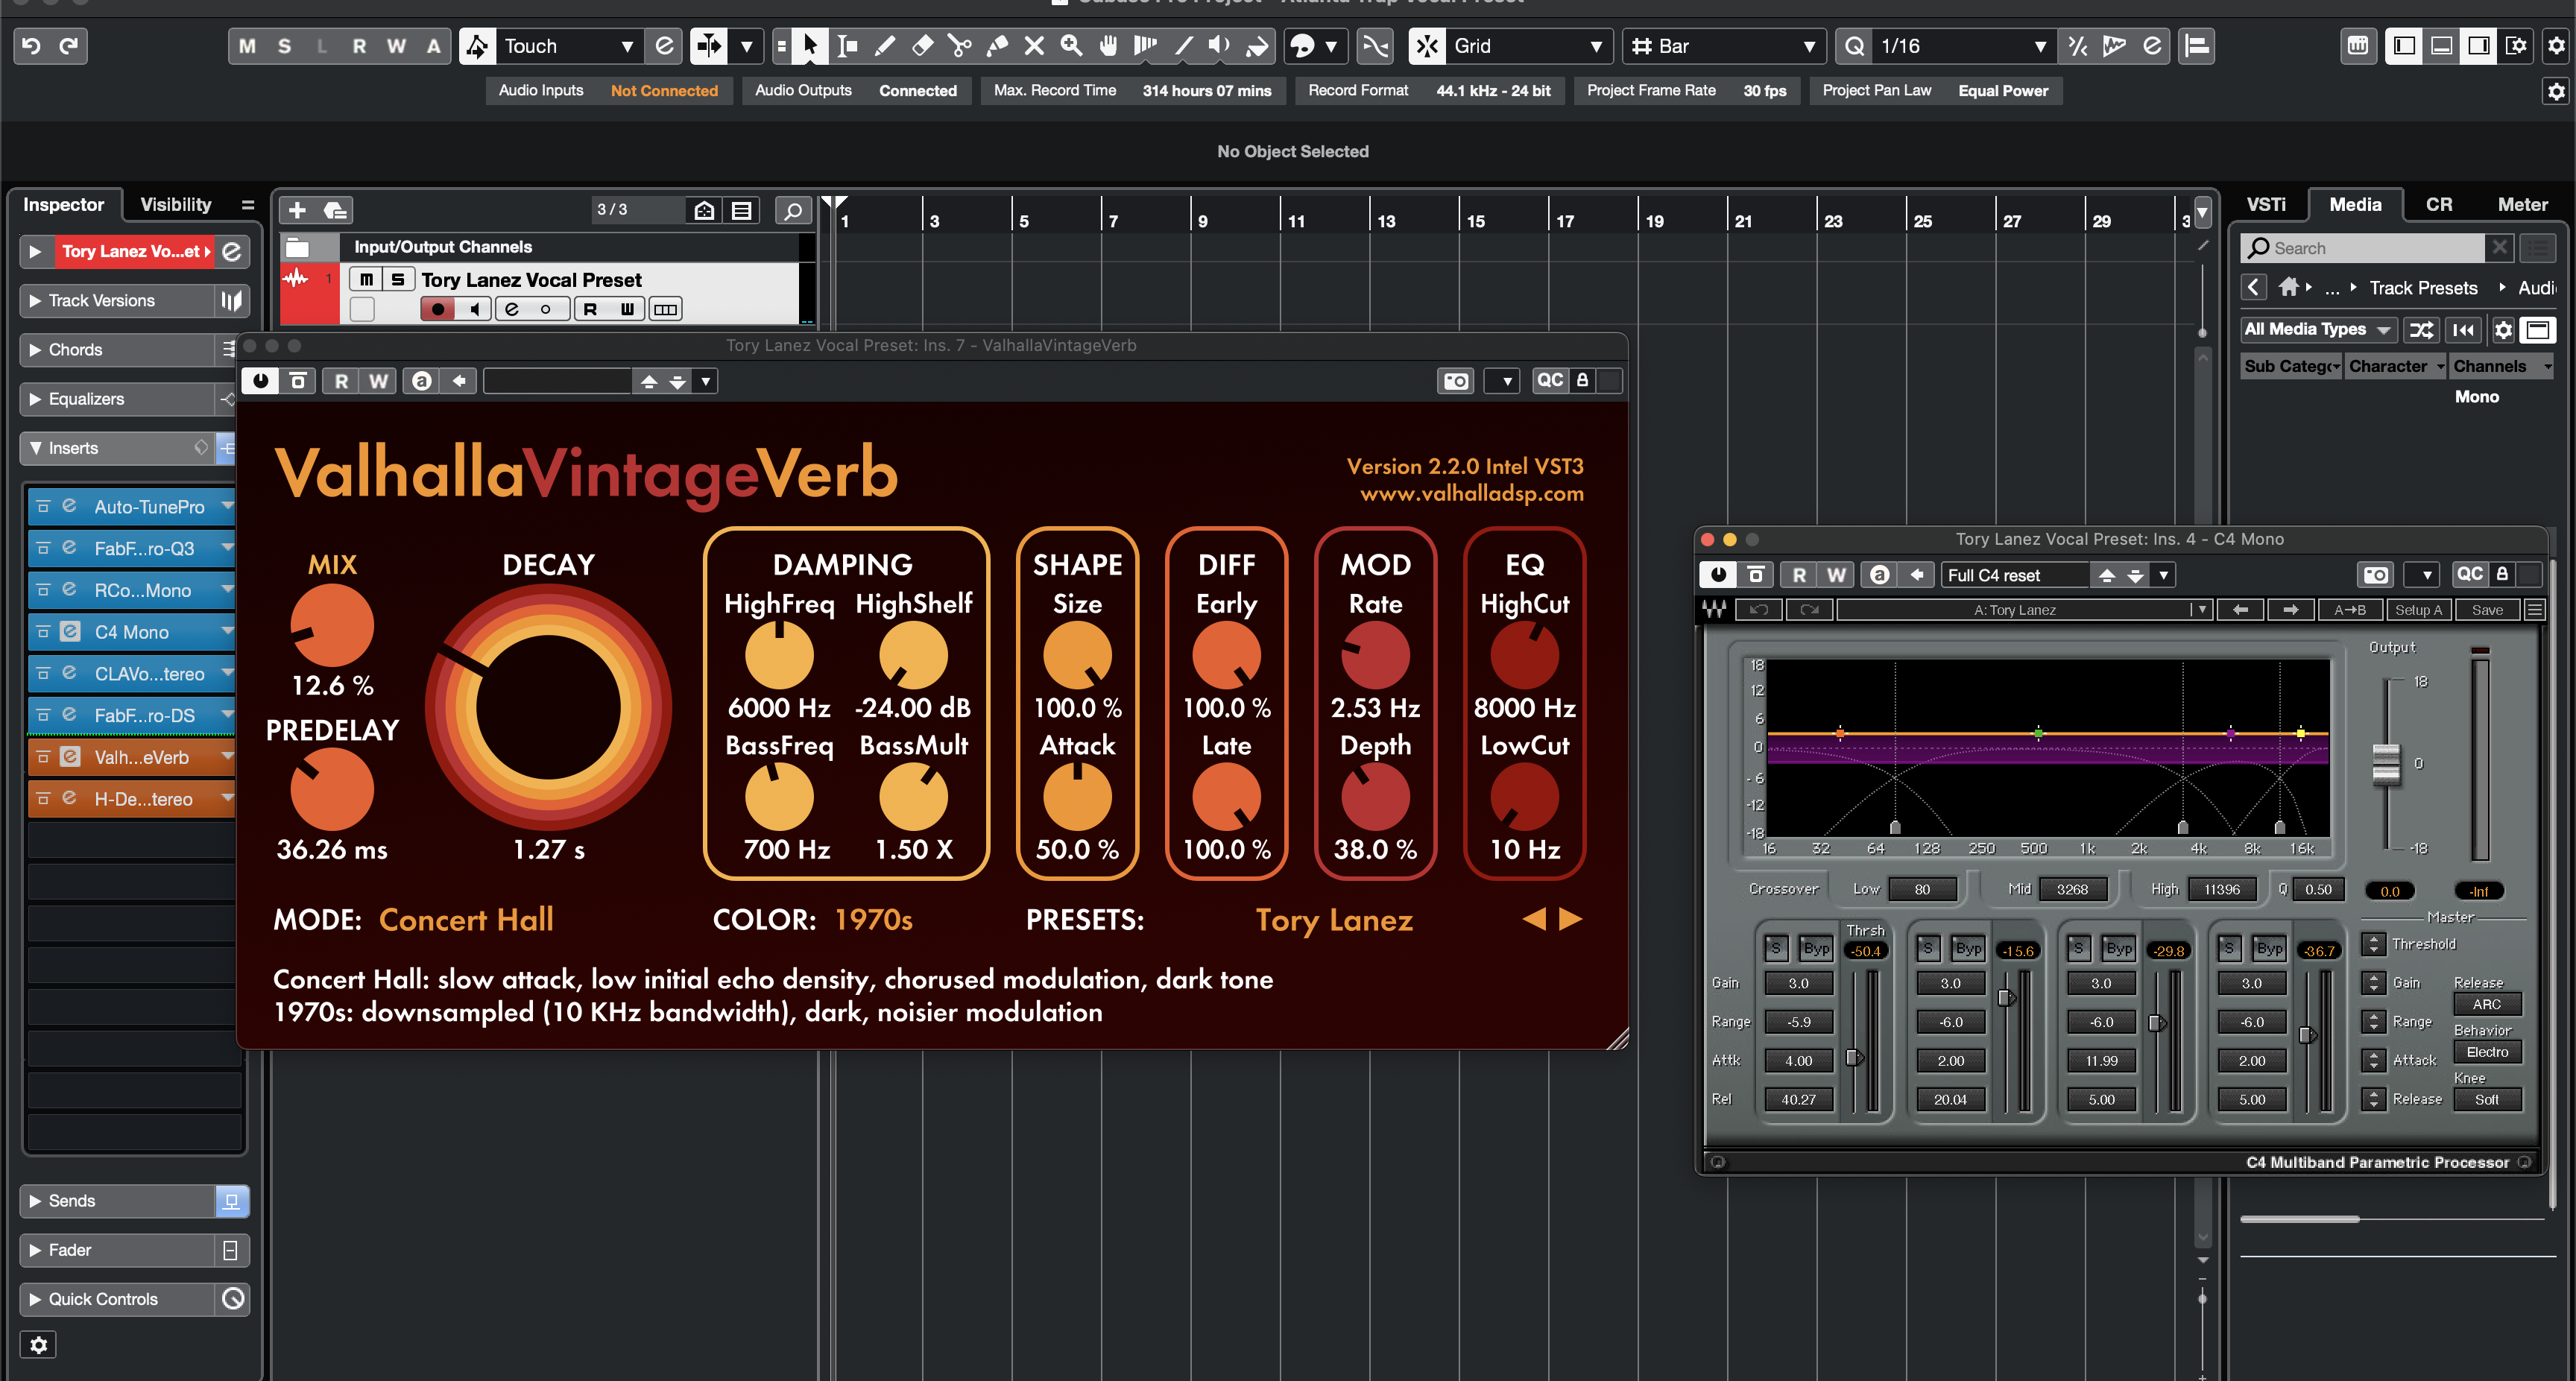
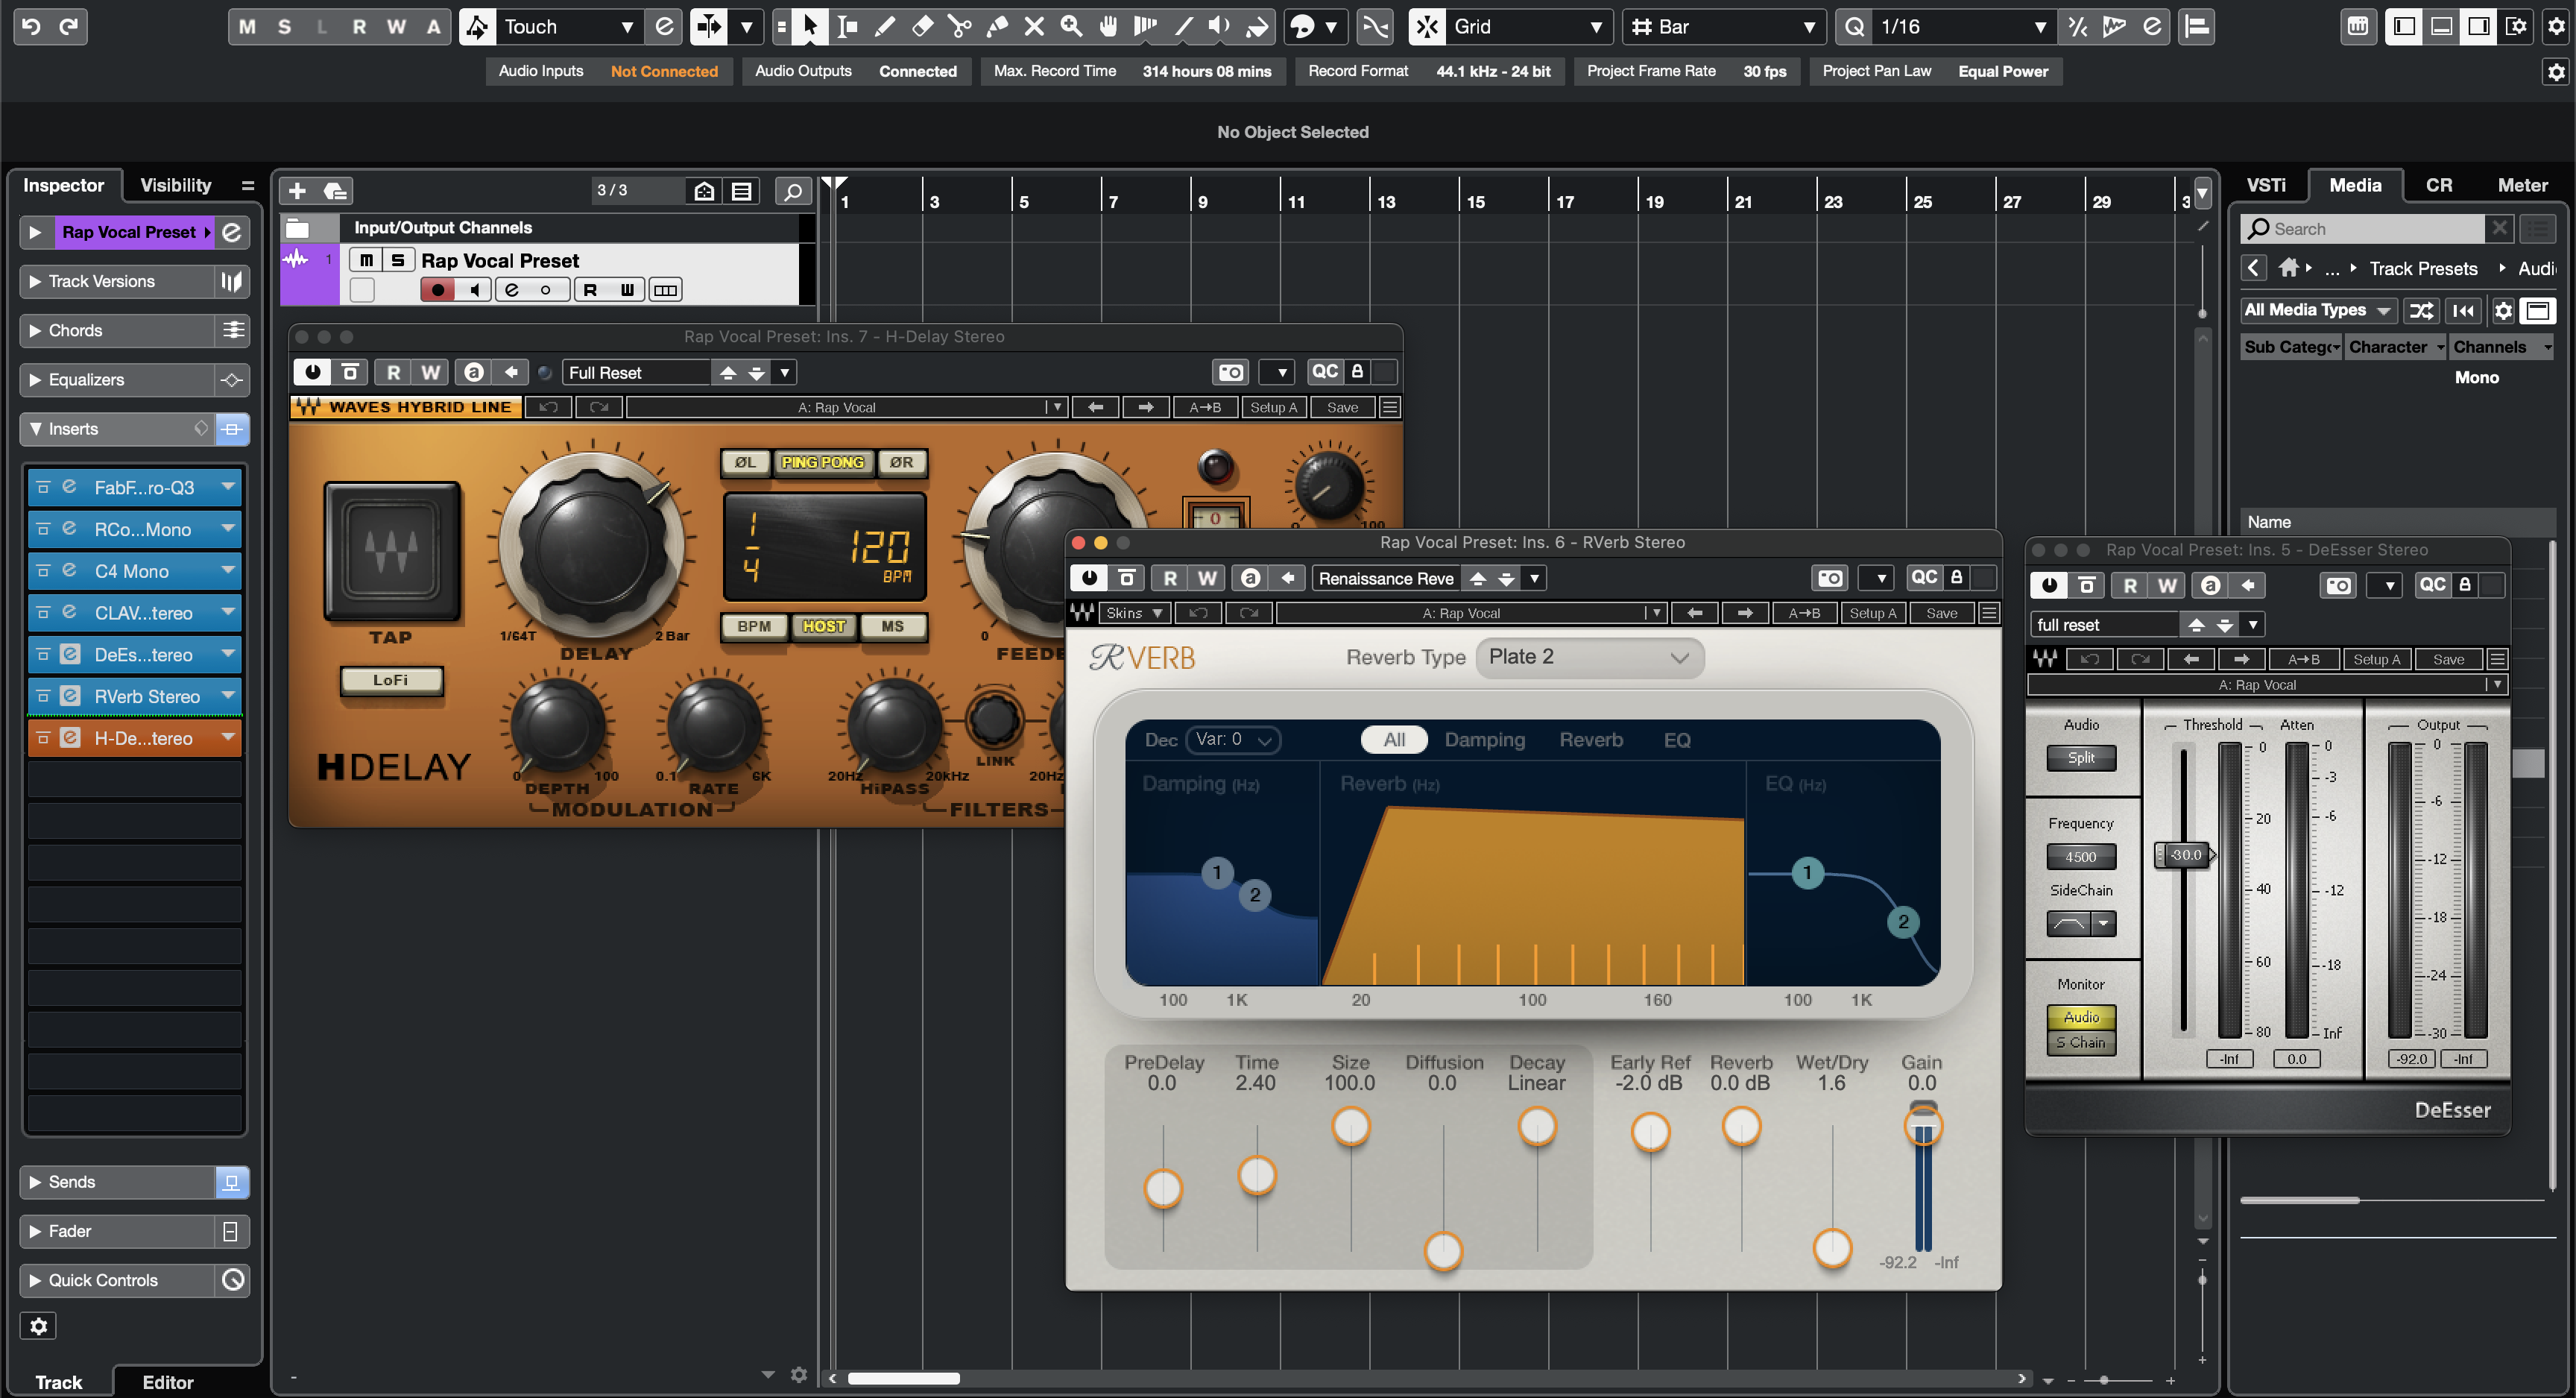
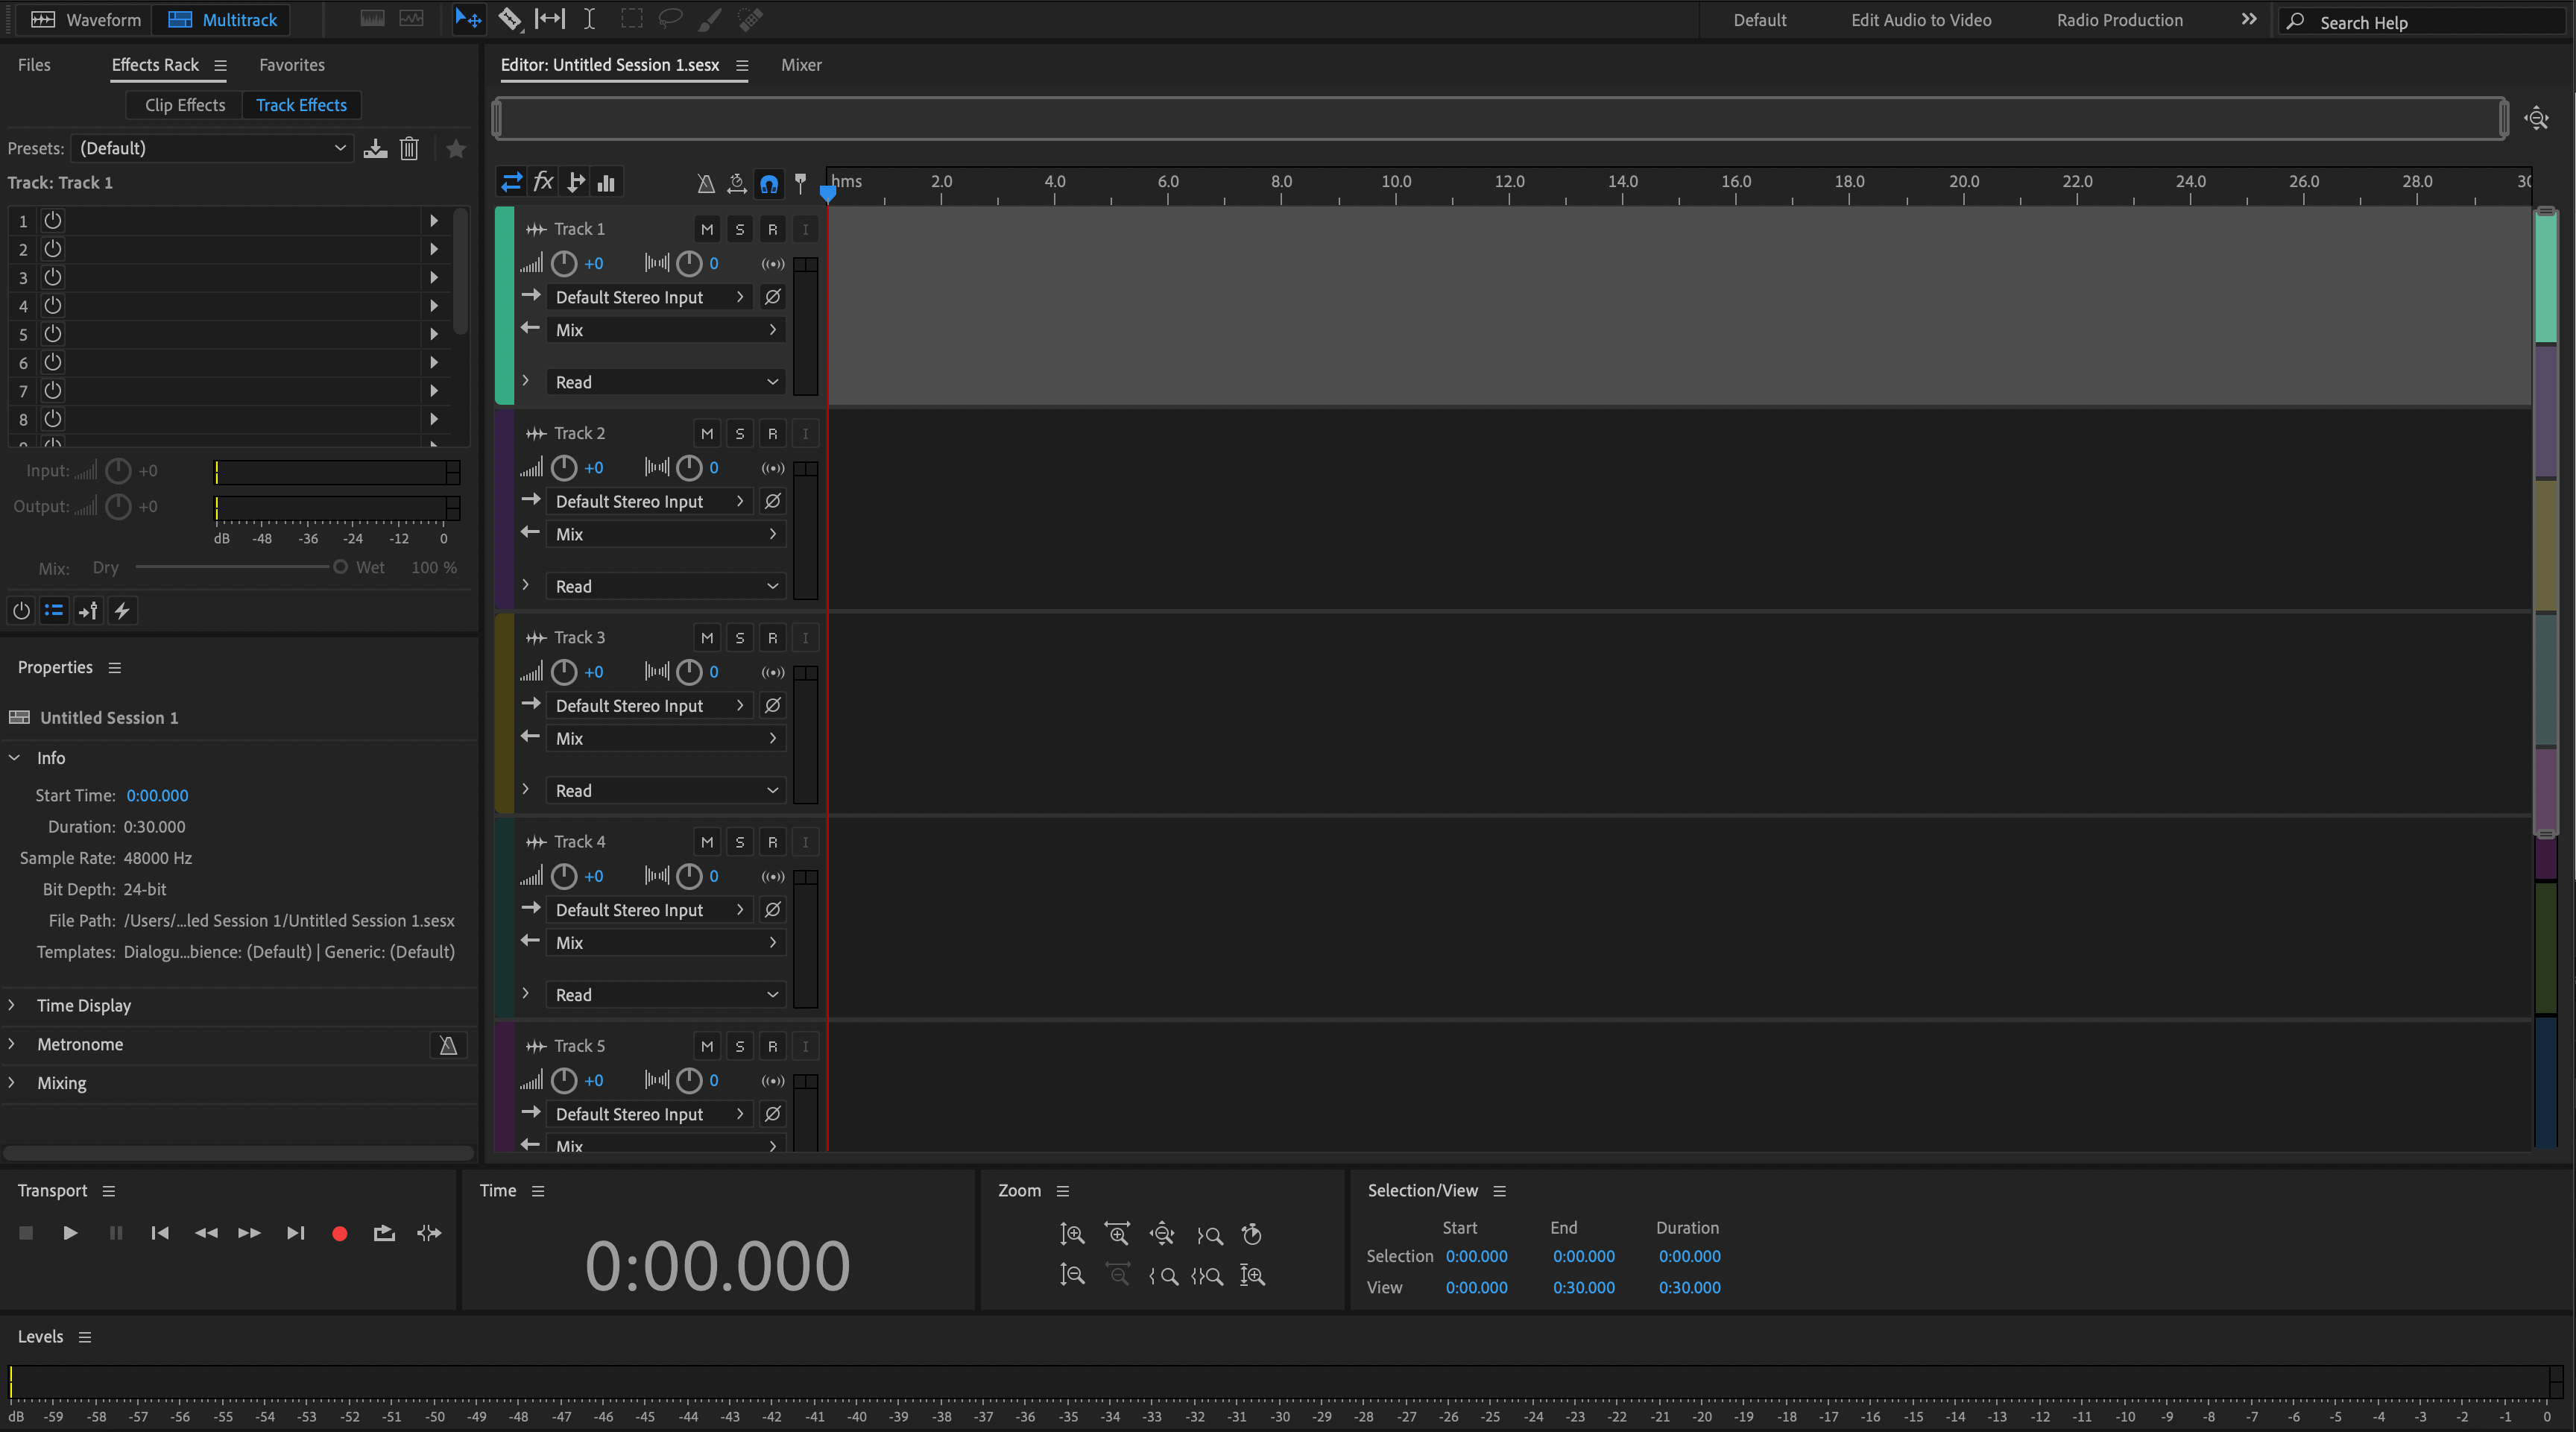
Dentro da DAW: Configurações de Preset Vocal do Adobe Audition
Veja exatamente como nossa cadeia vocal do Adobe Audition carrega no Rack de Efeitos e nos buses vocais. Estas capturas de tela mostram configurações iniciais para rap, R&B e pop para que você possa combinar rapidamente e ajustar para sua voz e microfone.