Modelos do Logic Pro
Abra uma sessão mais limpa do Logic Pro e comece a gravar mais rápido com roteamento pronto, fluxo de trabalho vocal e estrutura de sessão.

Tipo: Modelo de Gravação
Modelo de Gravação Logic Pro (Plugins Padrão)
Tipo: Modelo de Gravação
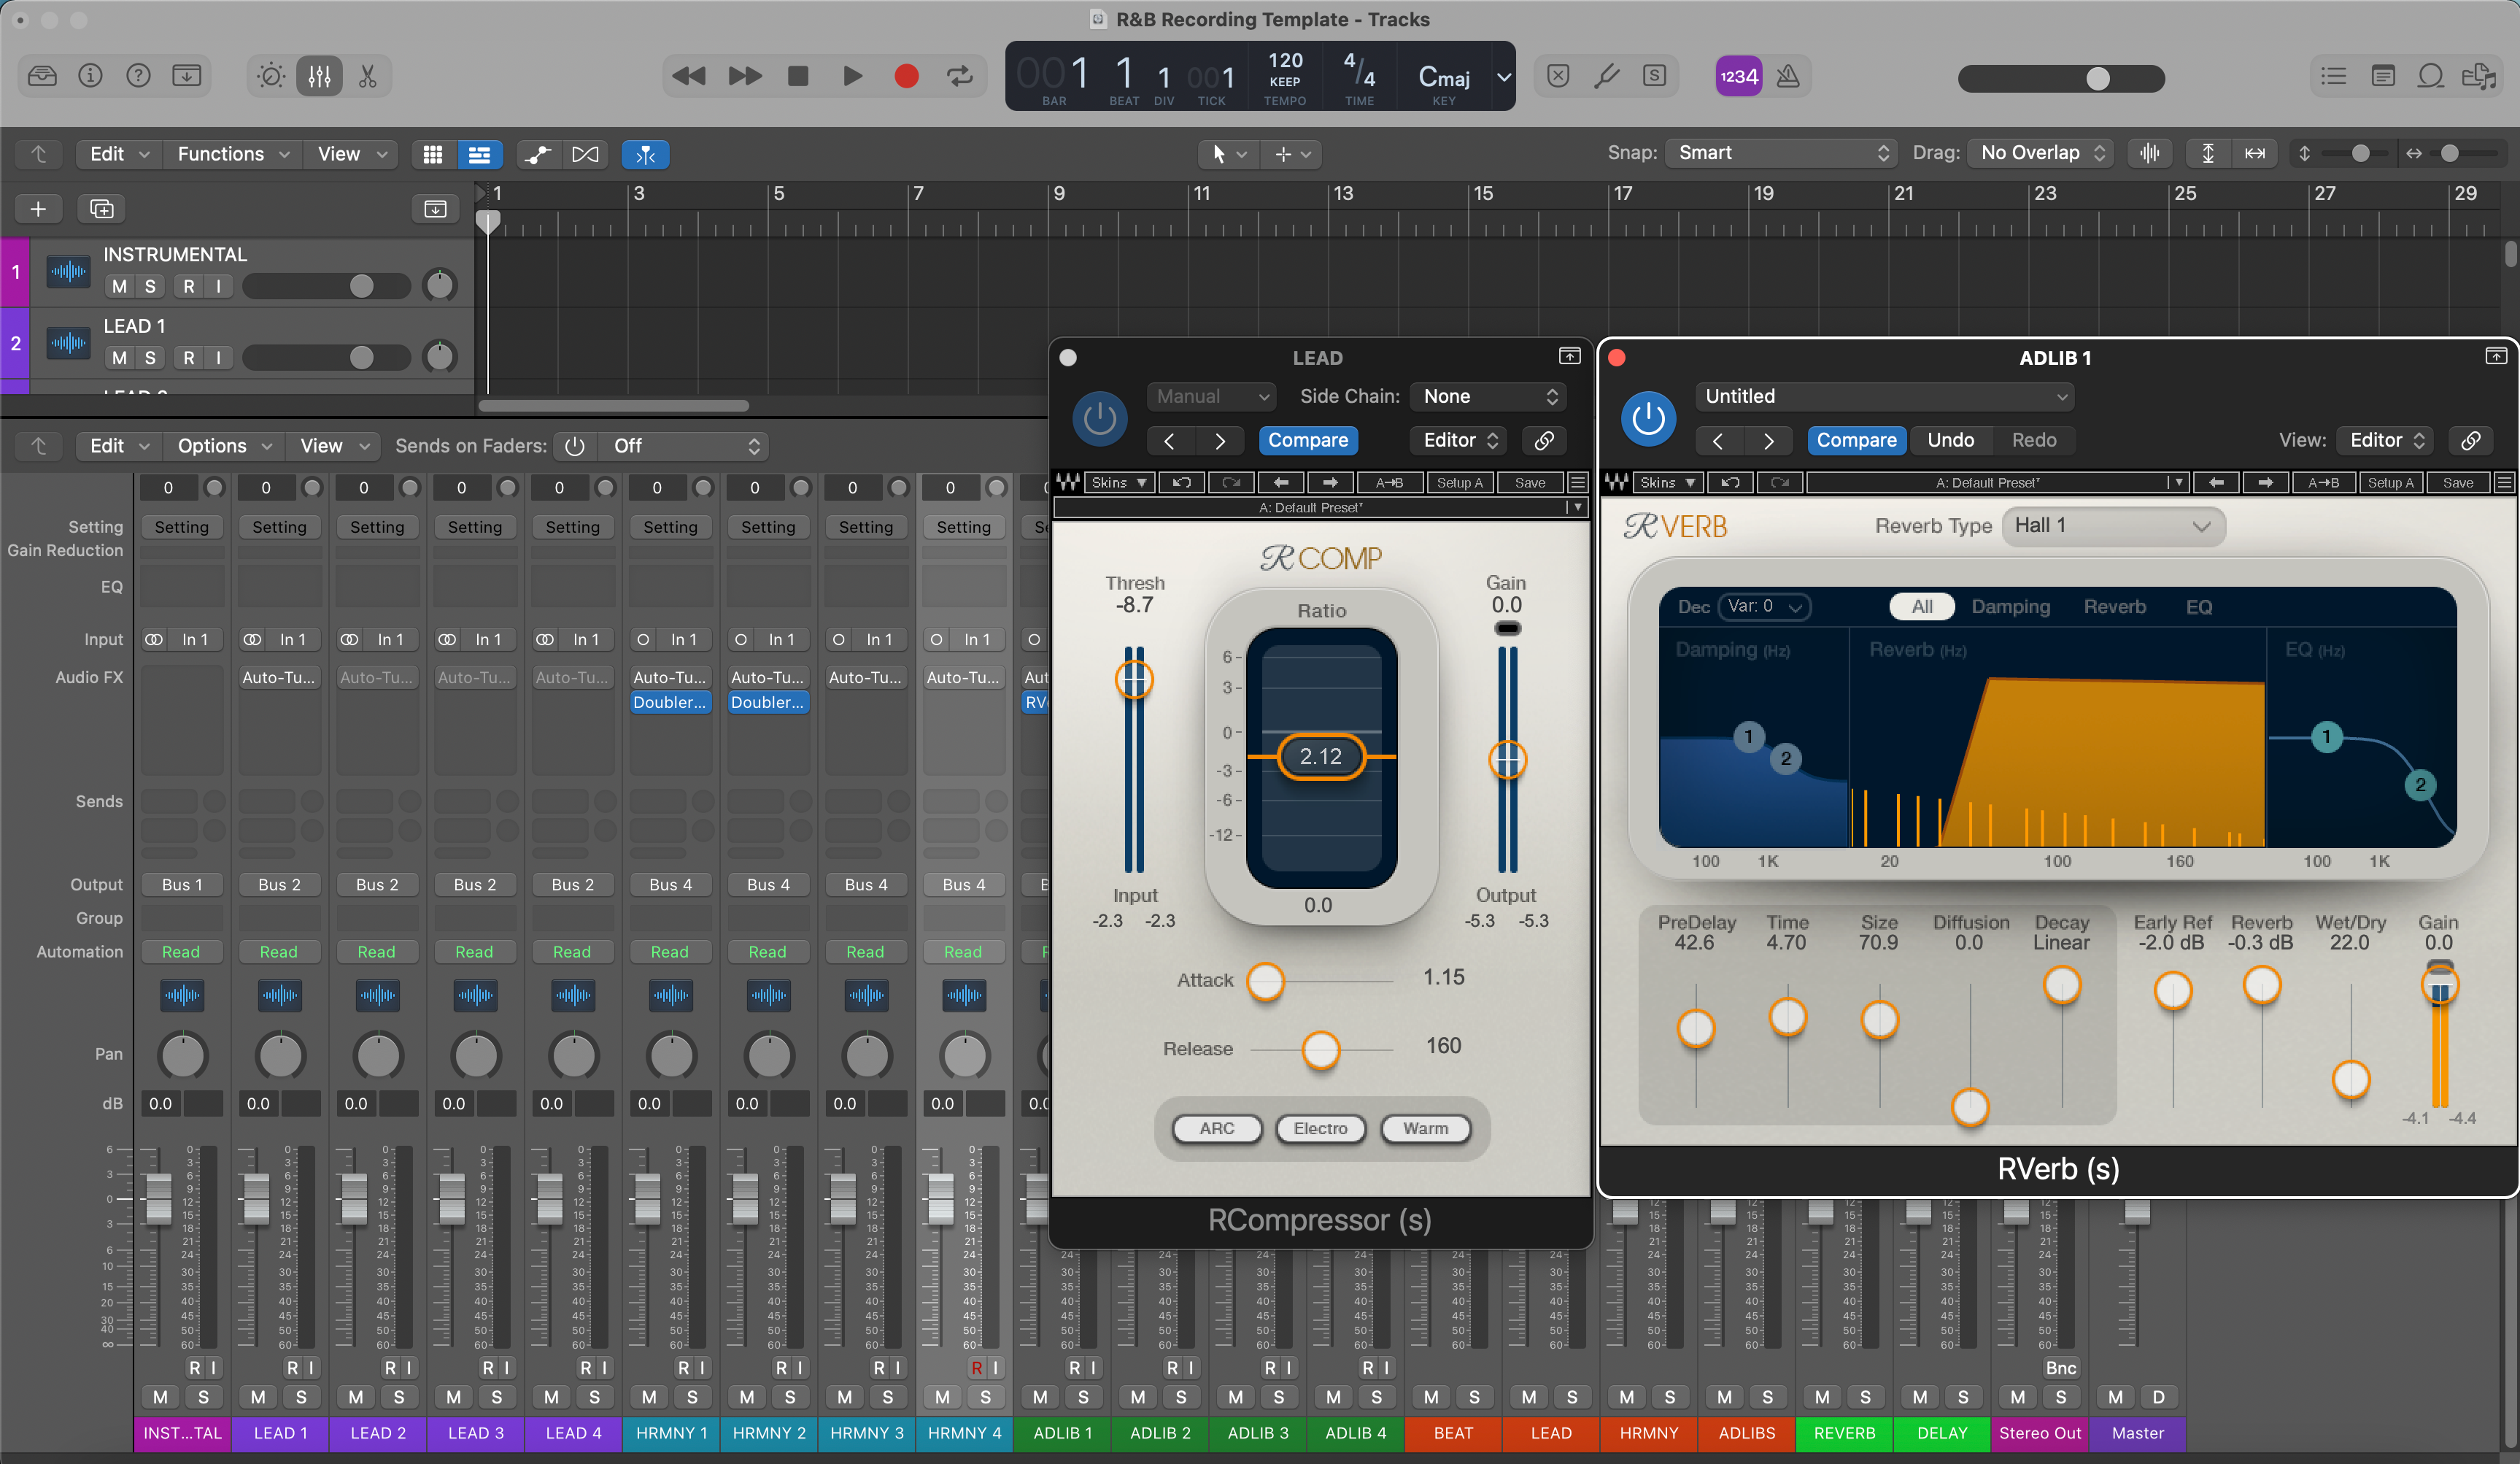
Modelo de Gravação R&B para Logic Pro X – Predefinição Vocal

Tipo: Modelo de Gravação
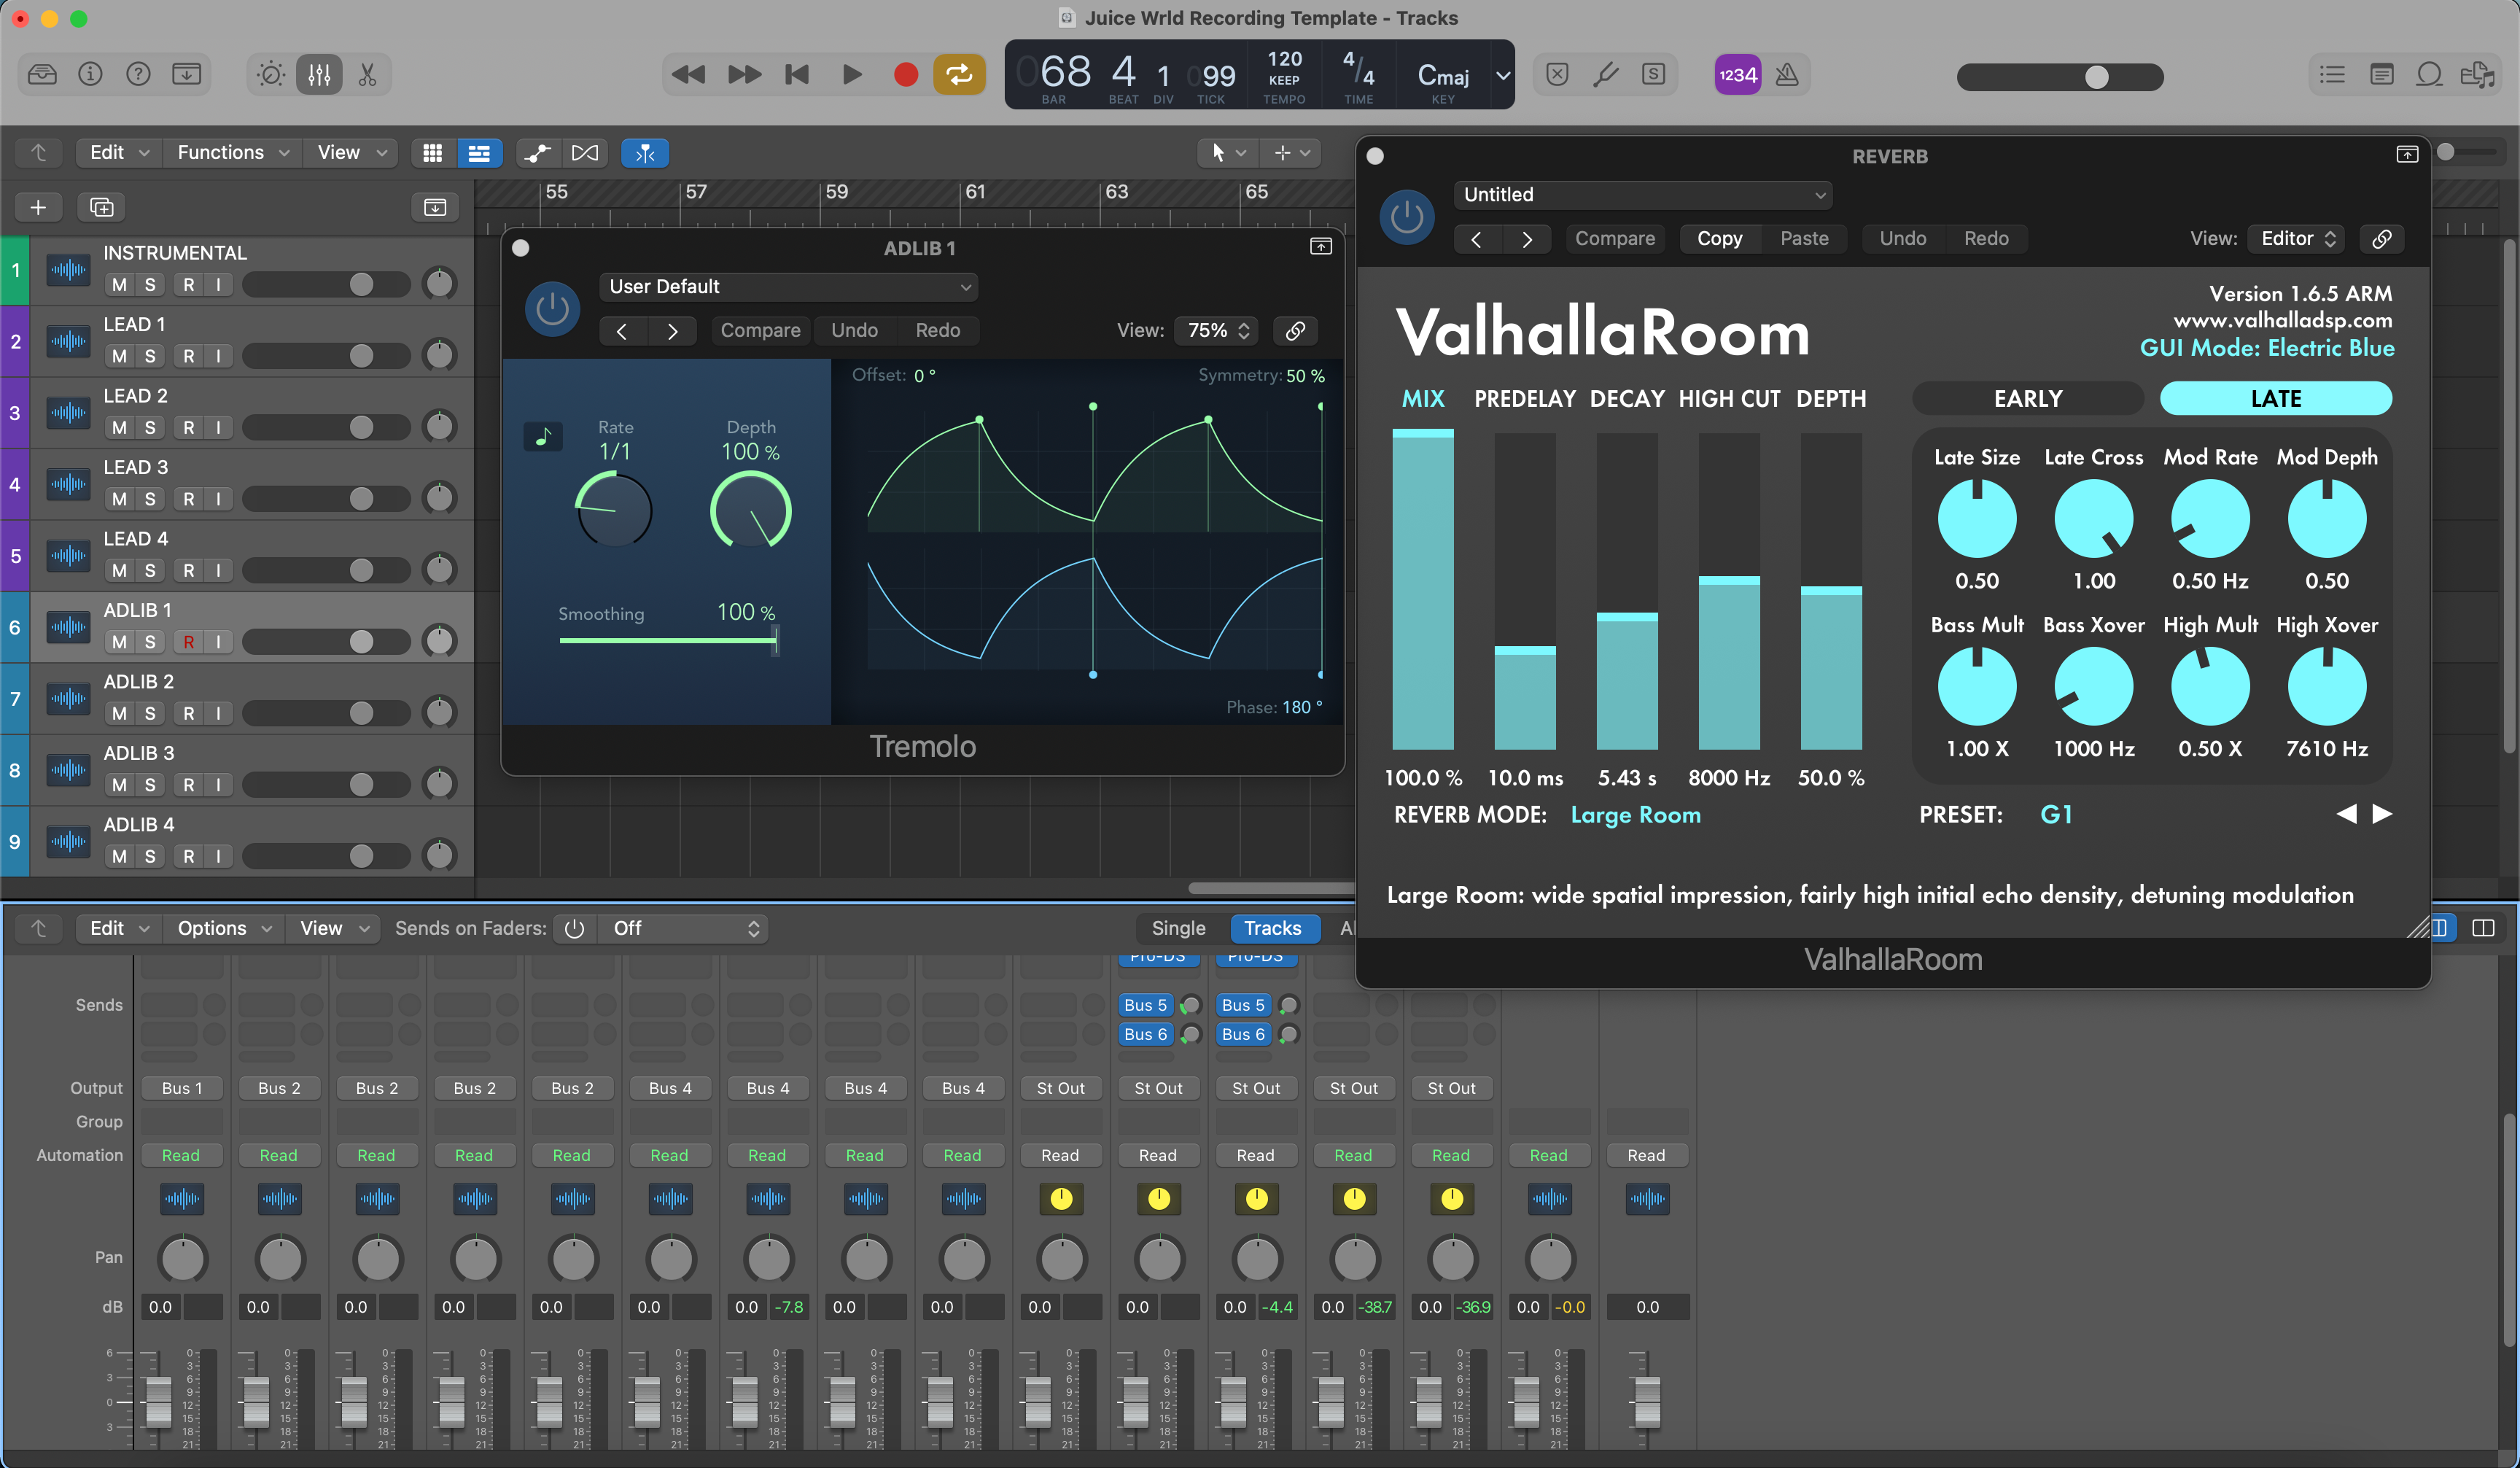
Modelo de Gravação Juice World Logic Pro X
Tipo: Modelo de Gravação
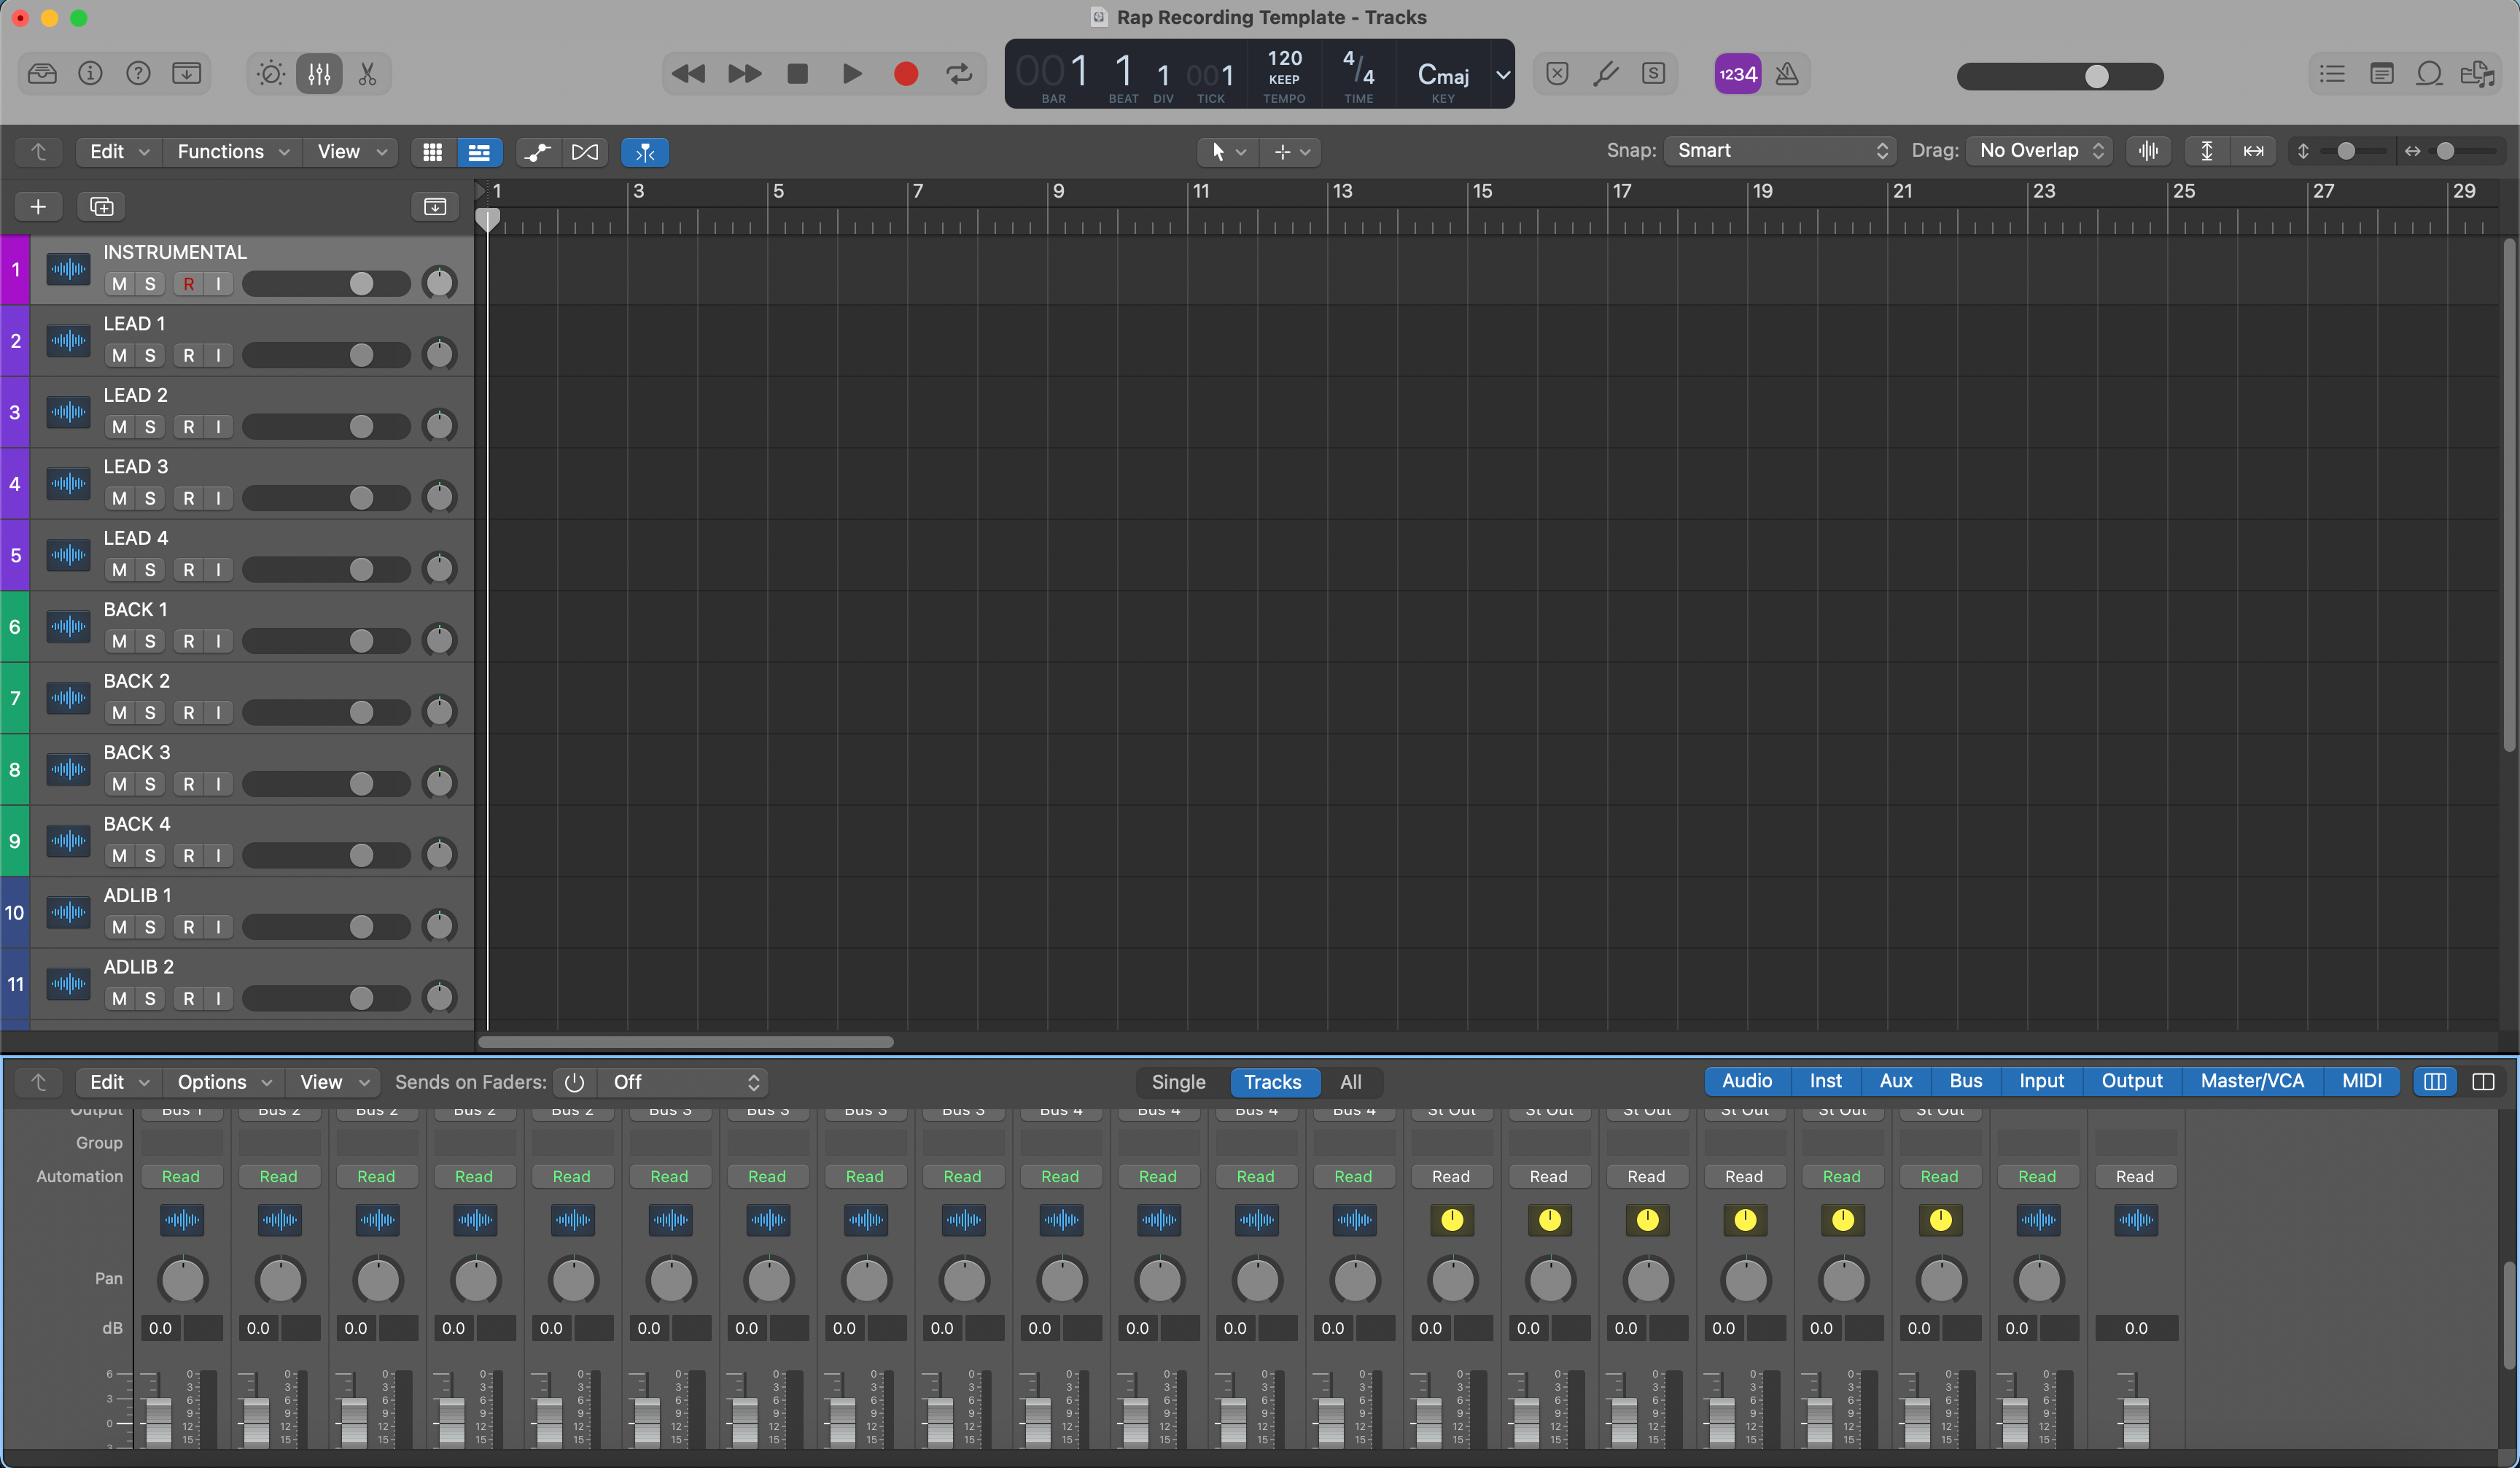
Modelo de Gravação de Rap Logic Pro X - Predefinição Vocal

Tipo: Modelo de Gravação
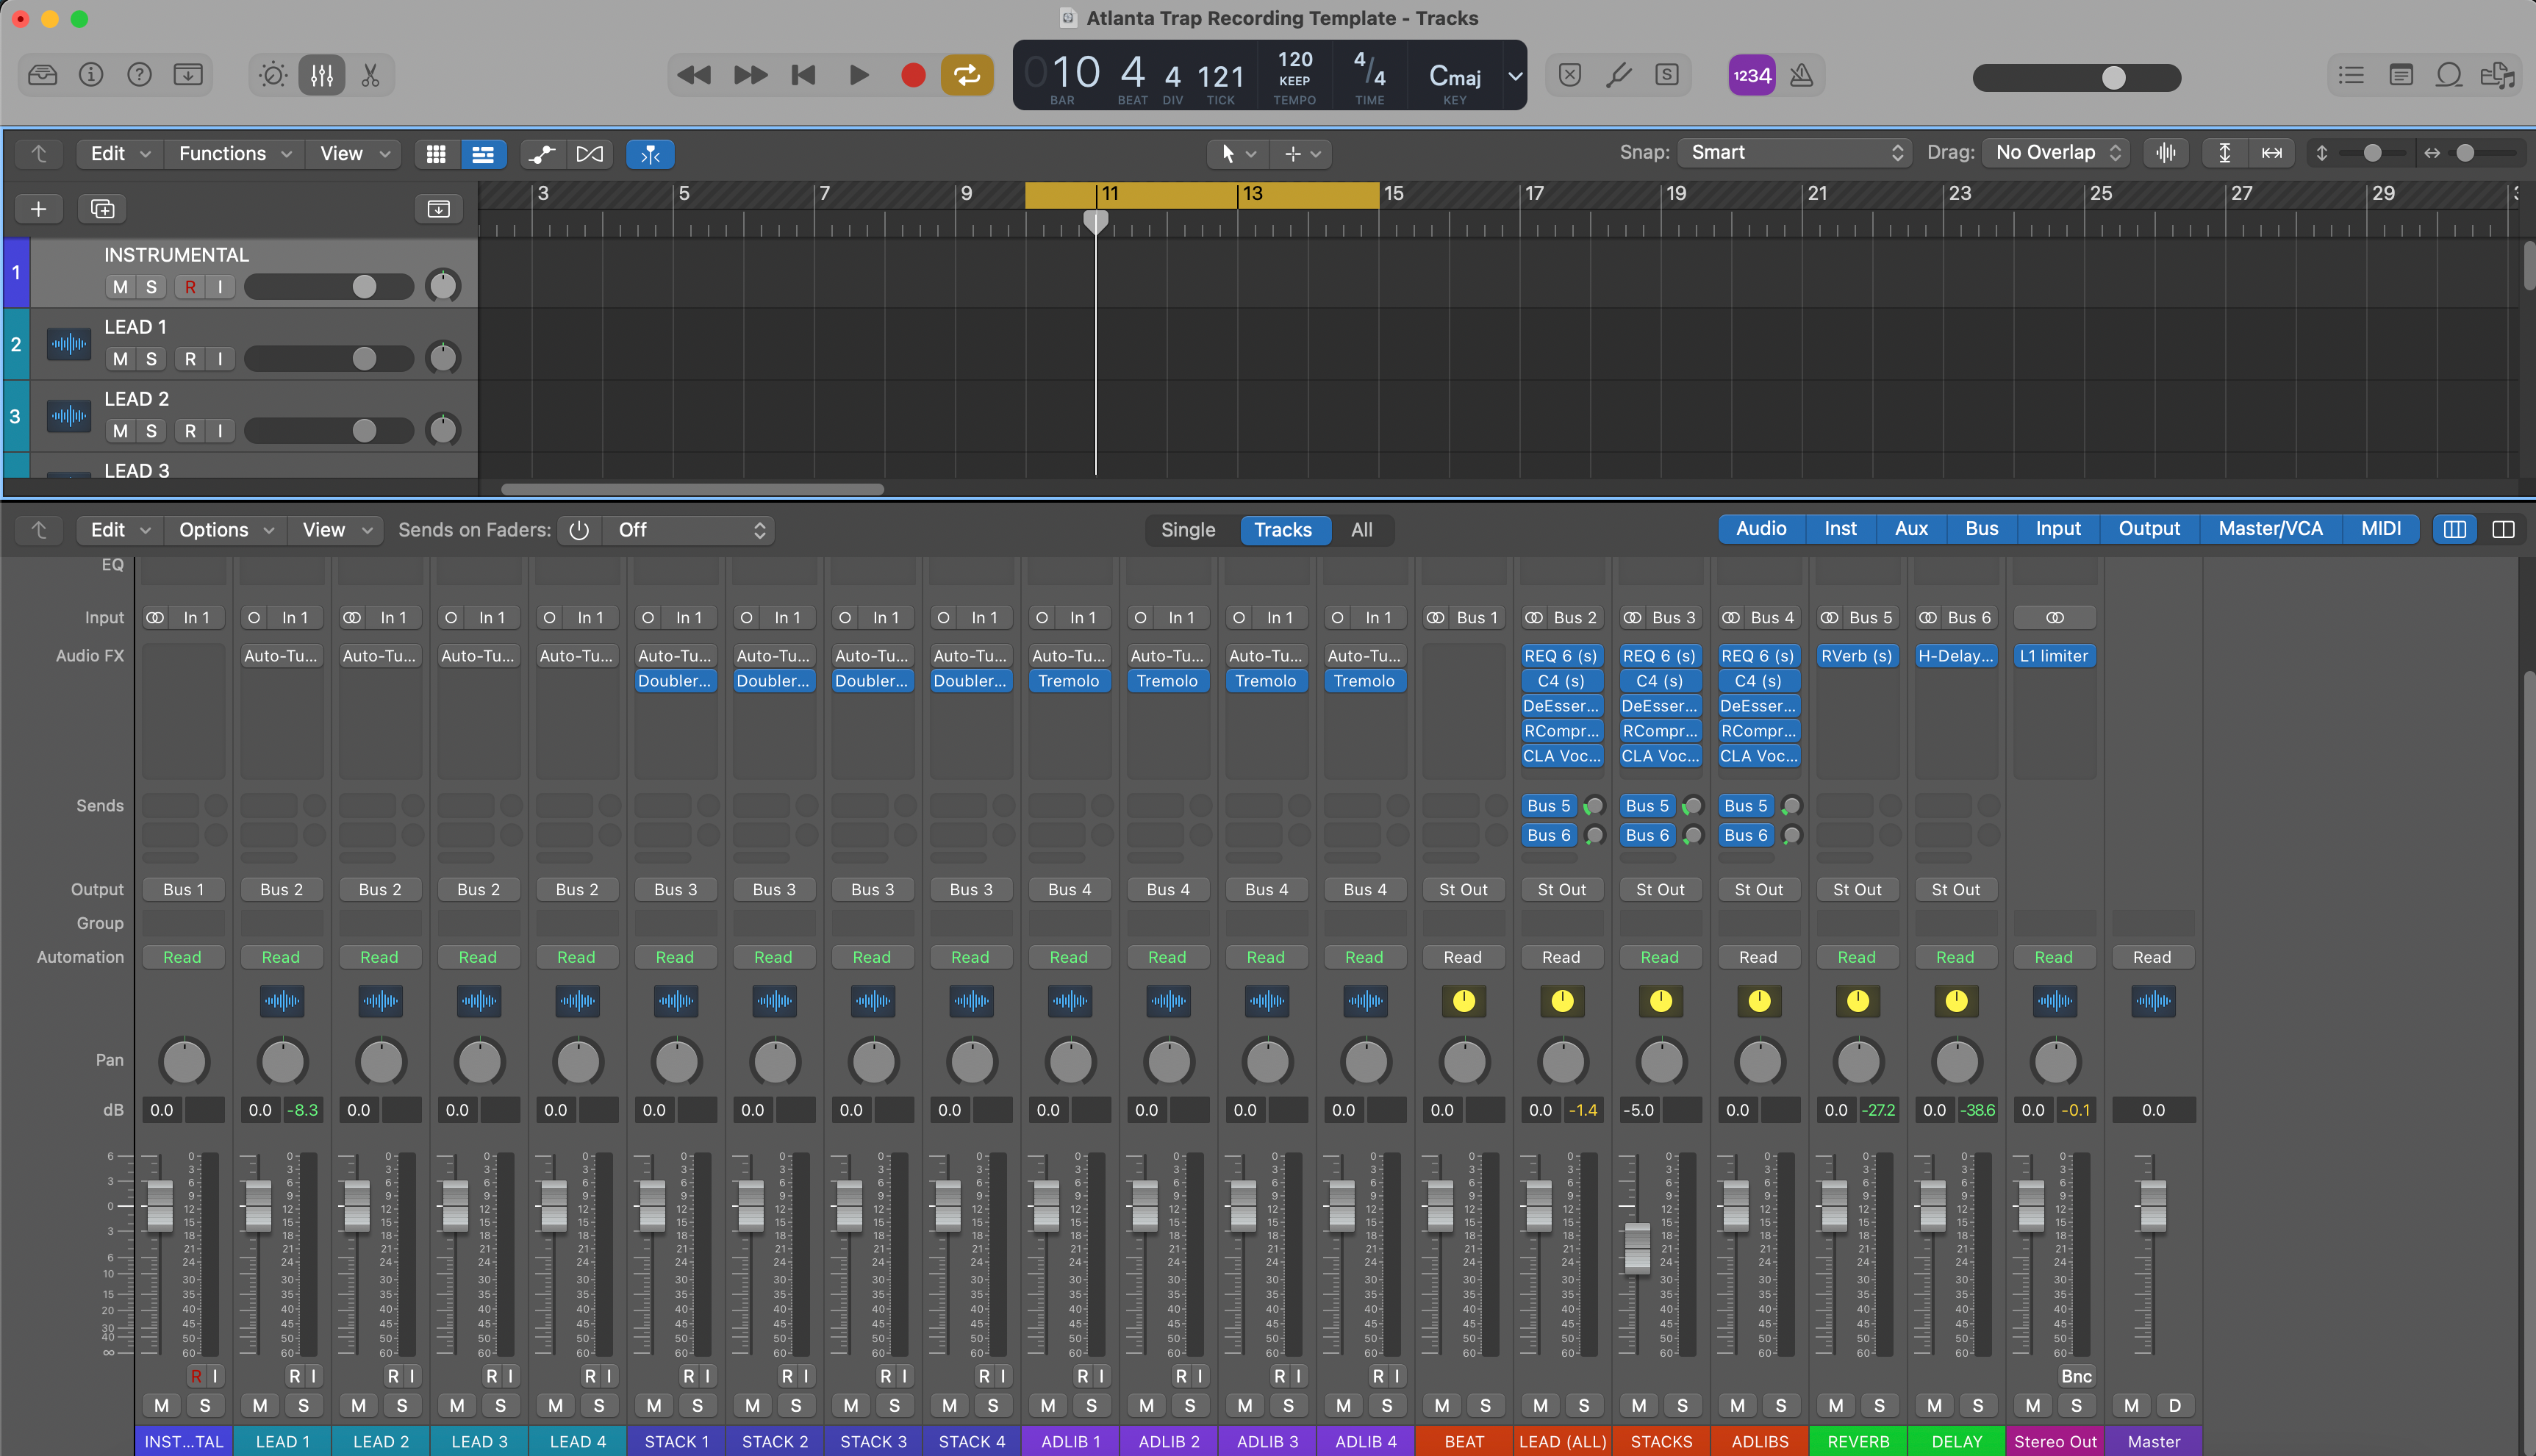
Modelo de Gravação Atlanta Trap para Logic Pro X – Predefinição Vocal
Tipo: Modelo de Gravação
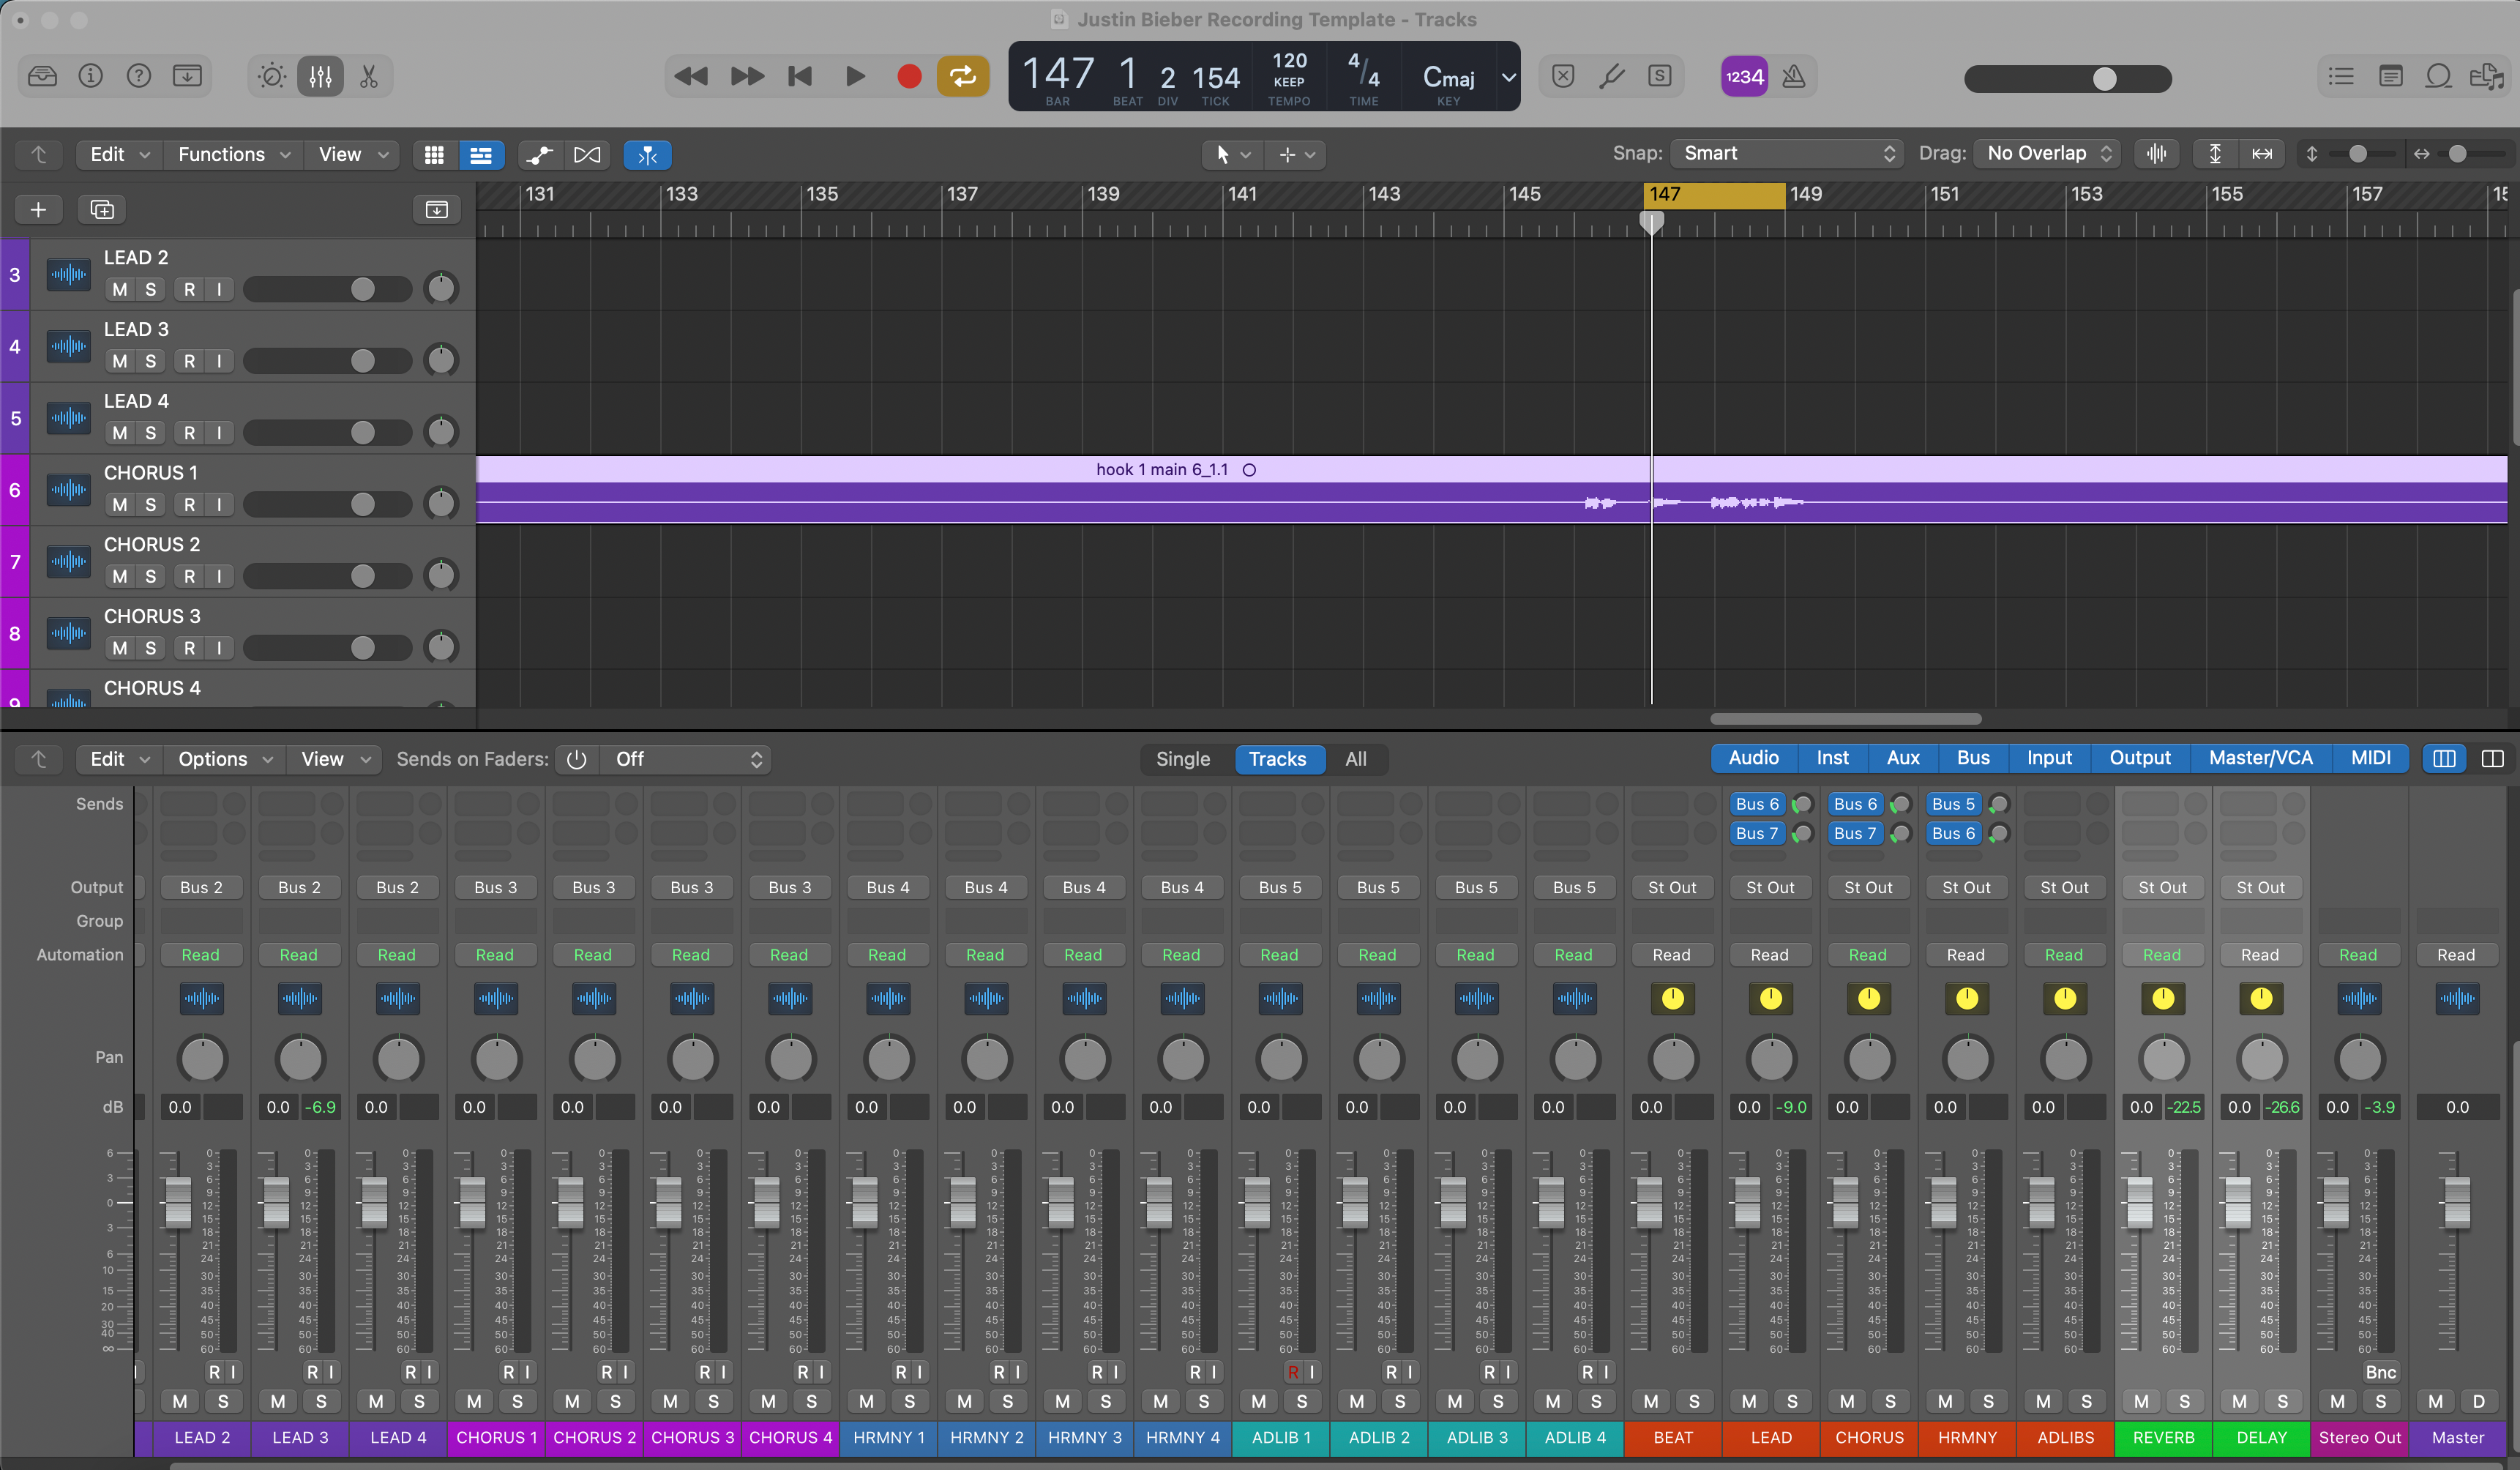
Modelo de Gravação Logic Pro X Justin Bieber – Predefinição Vocal
Tipo: Modelo de Gravação
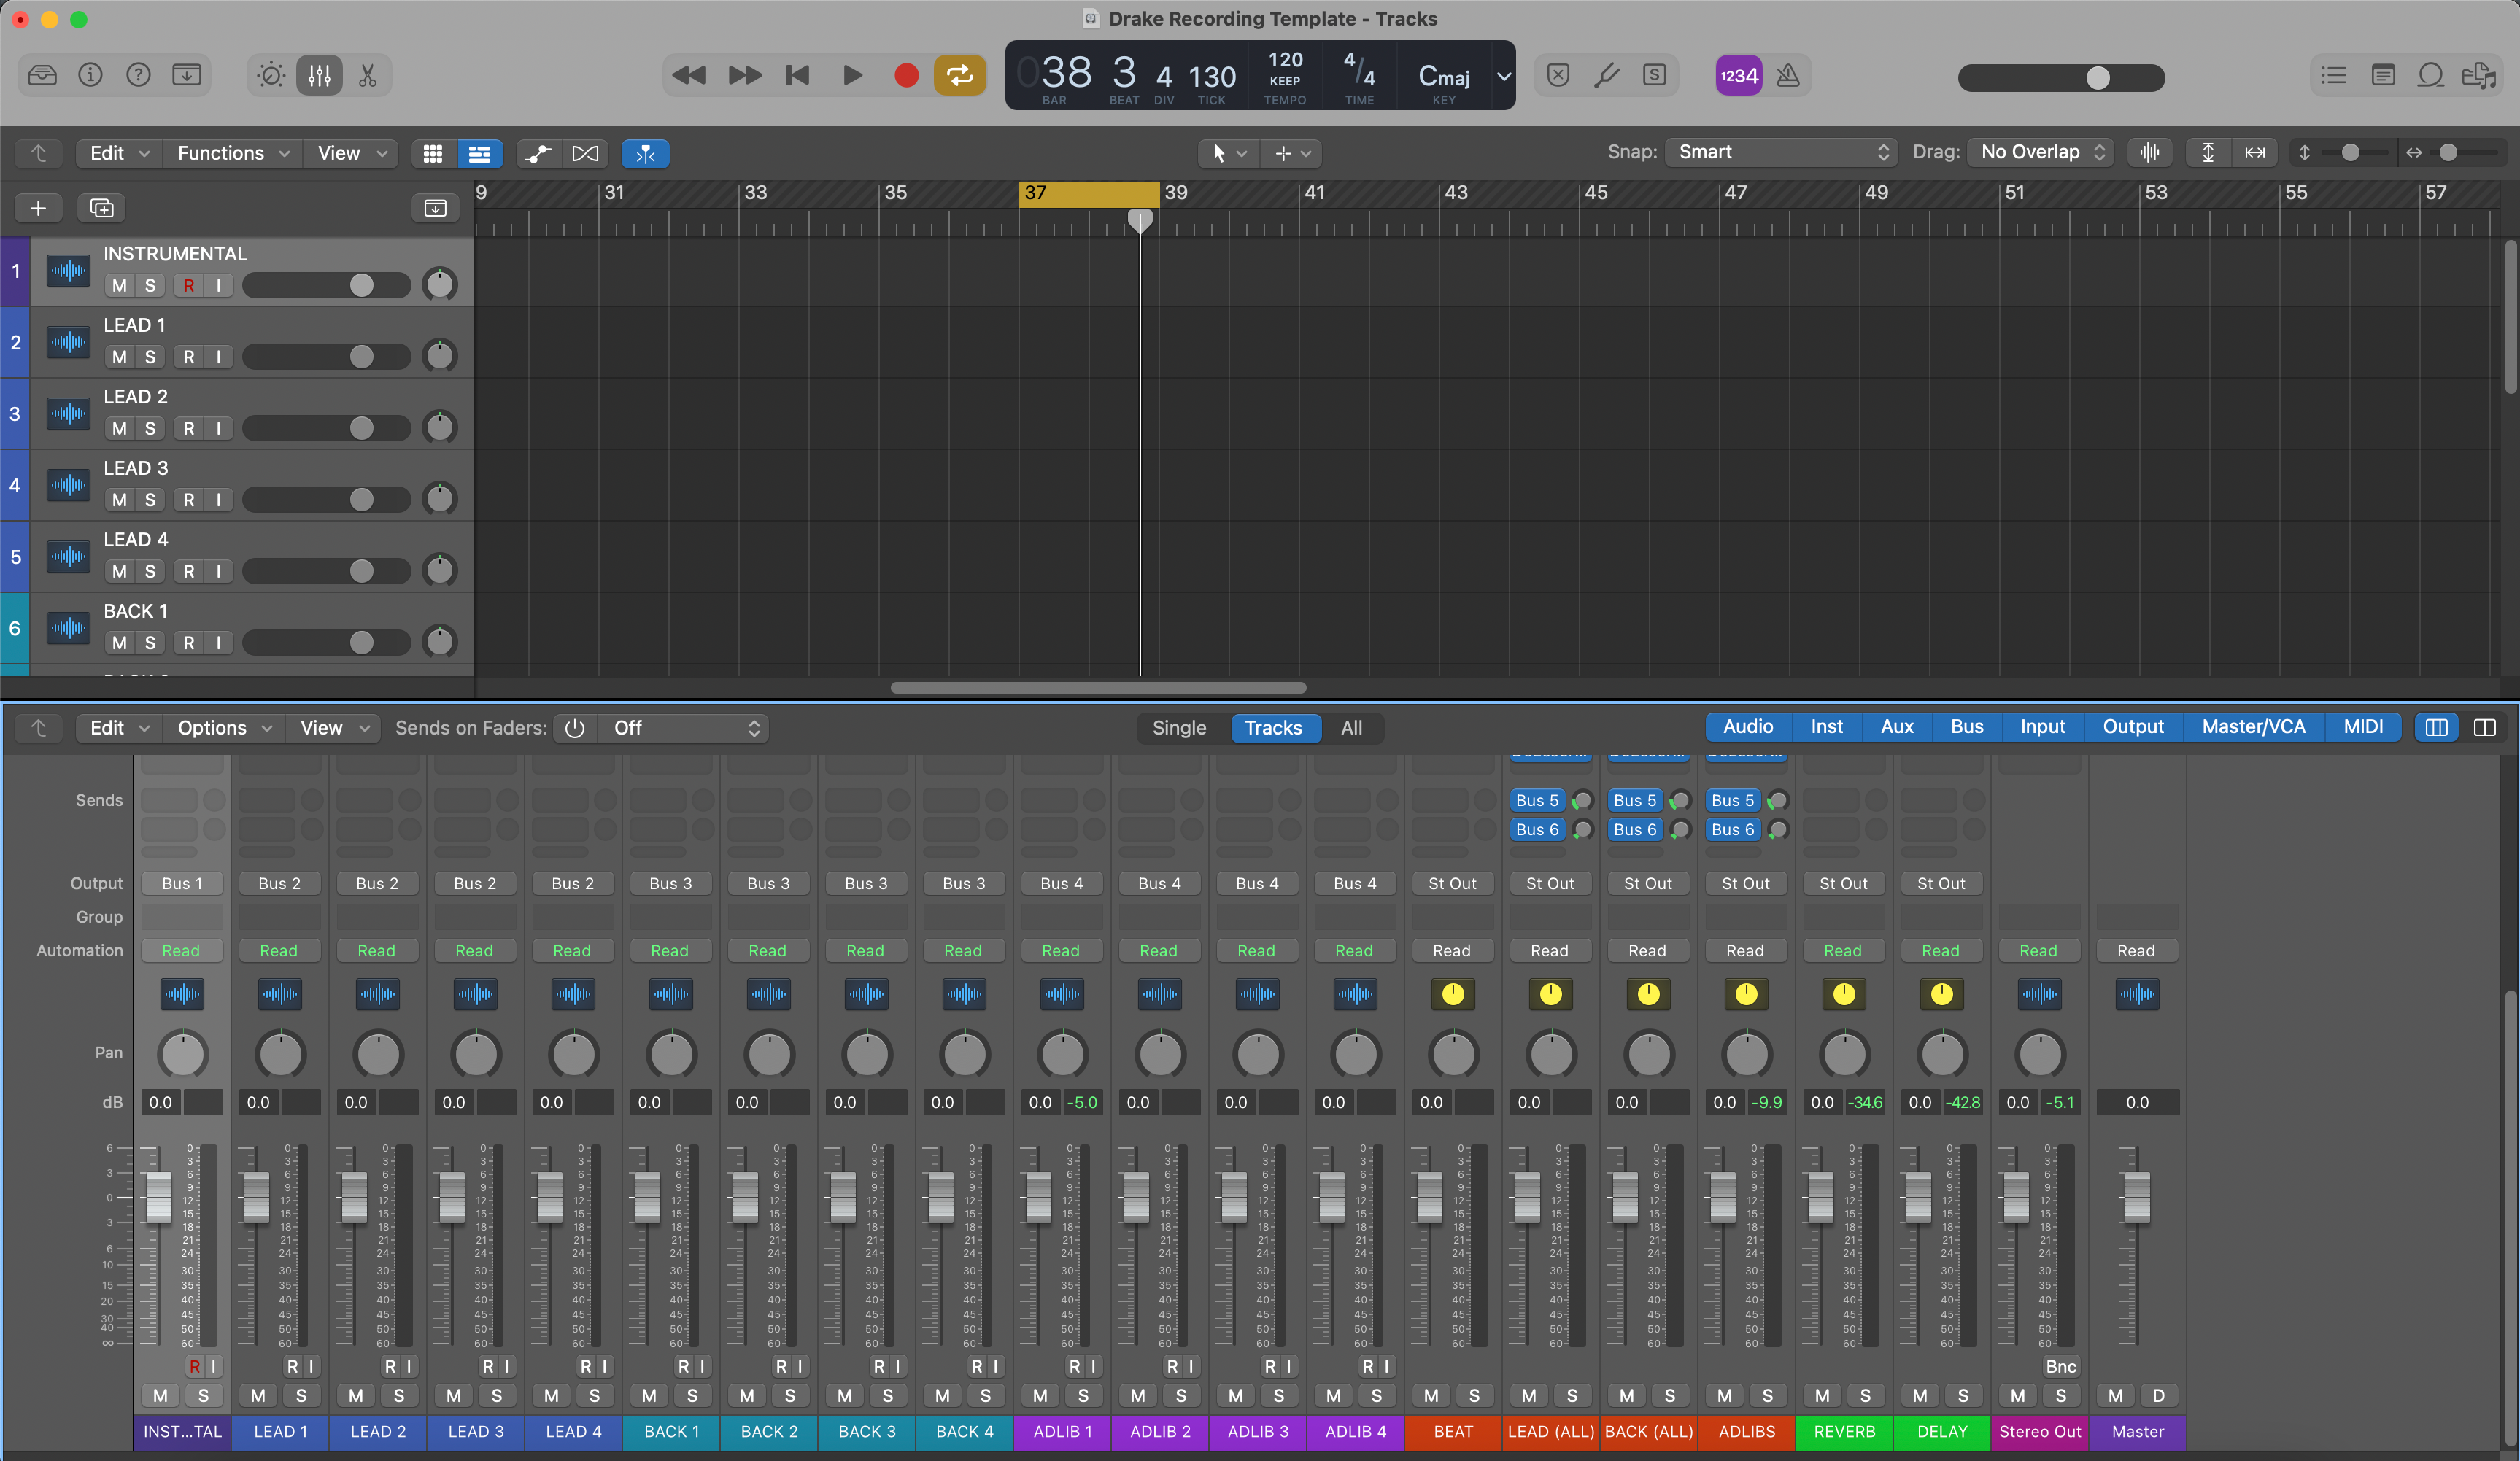
Modelo de Gravação Drake para Logic Pro X – Predefinição Vocal
Tipo: Modelo de Gravação
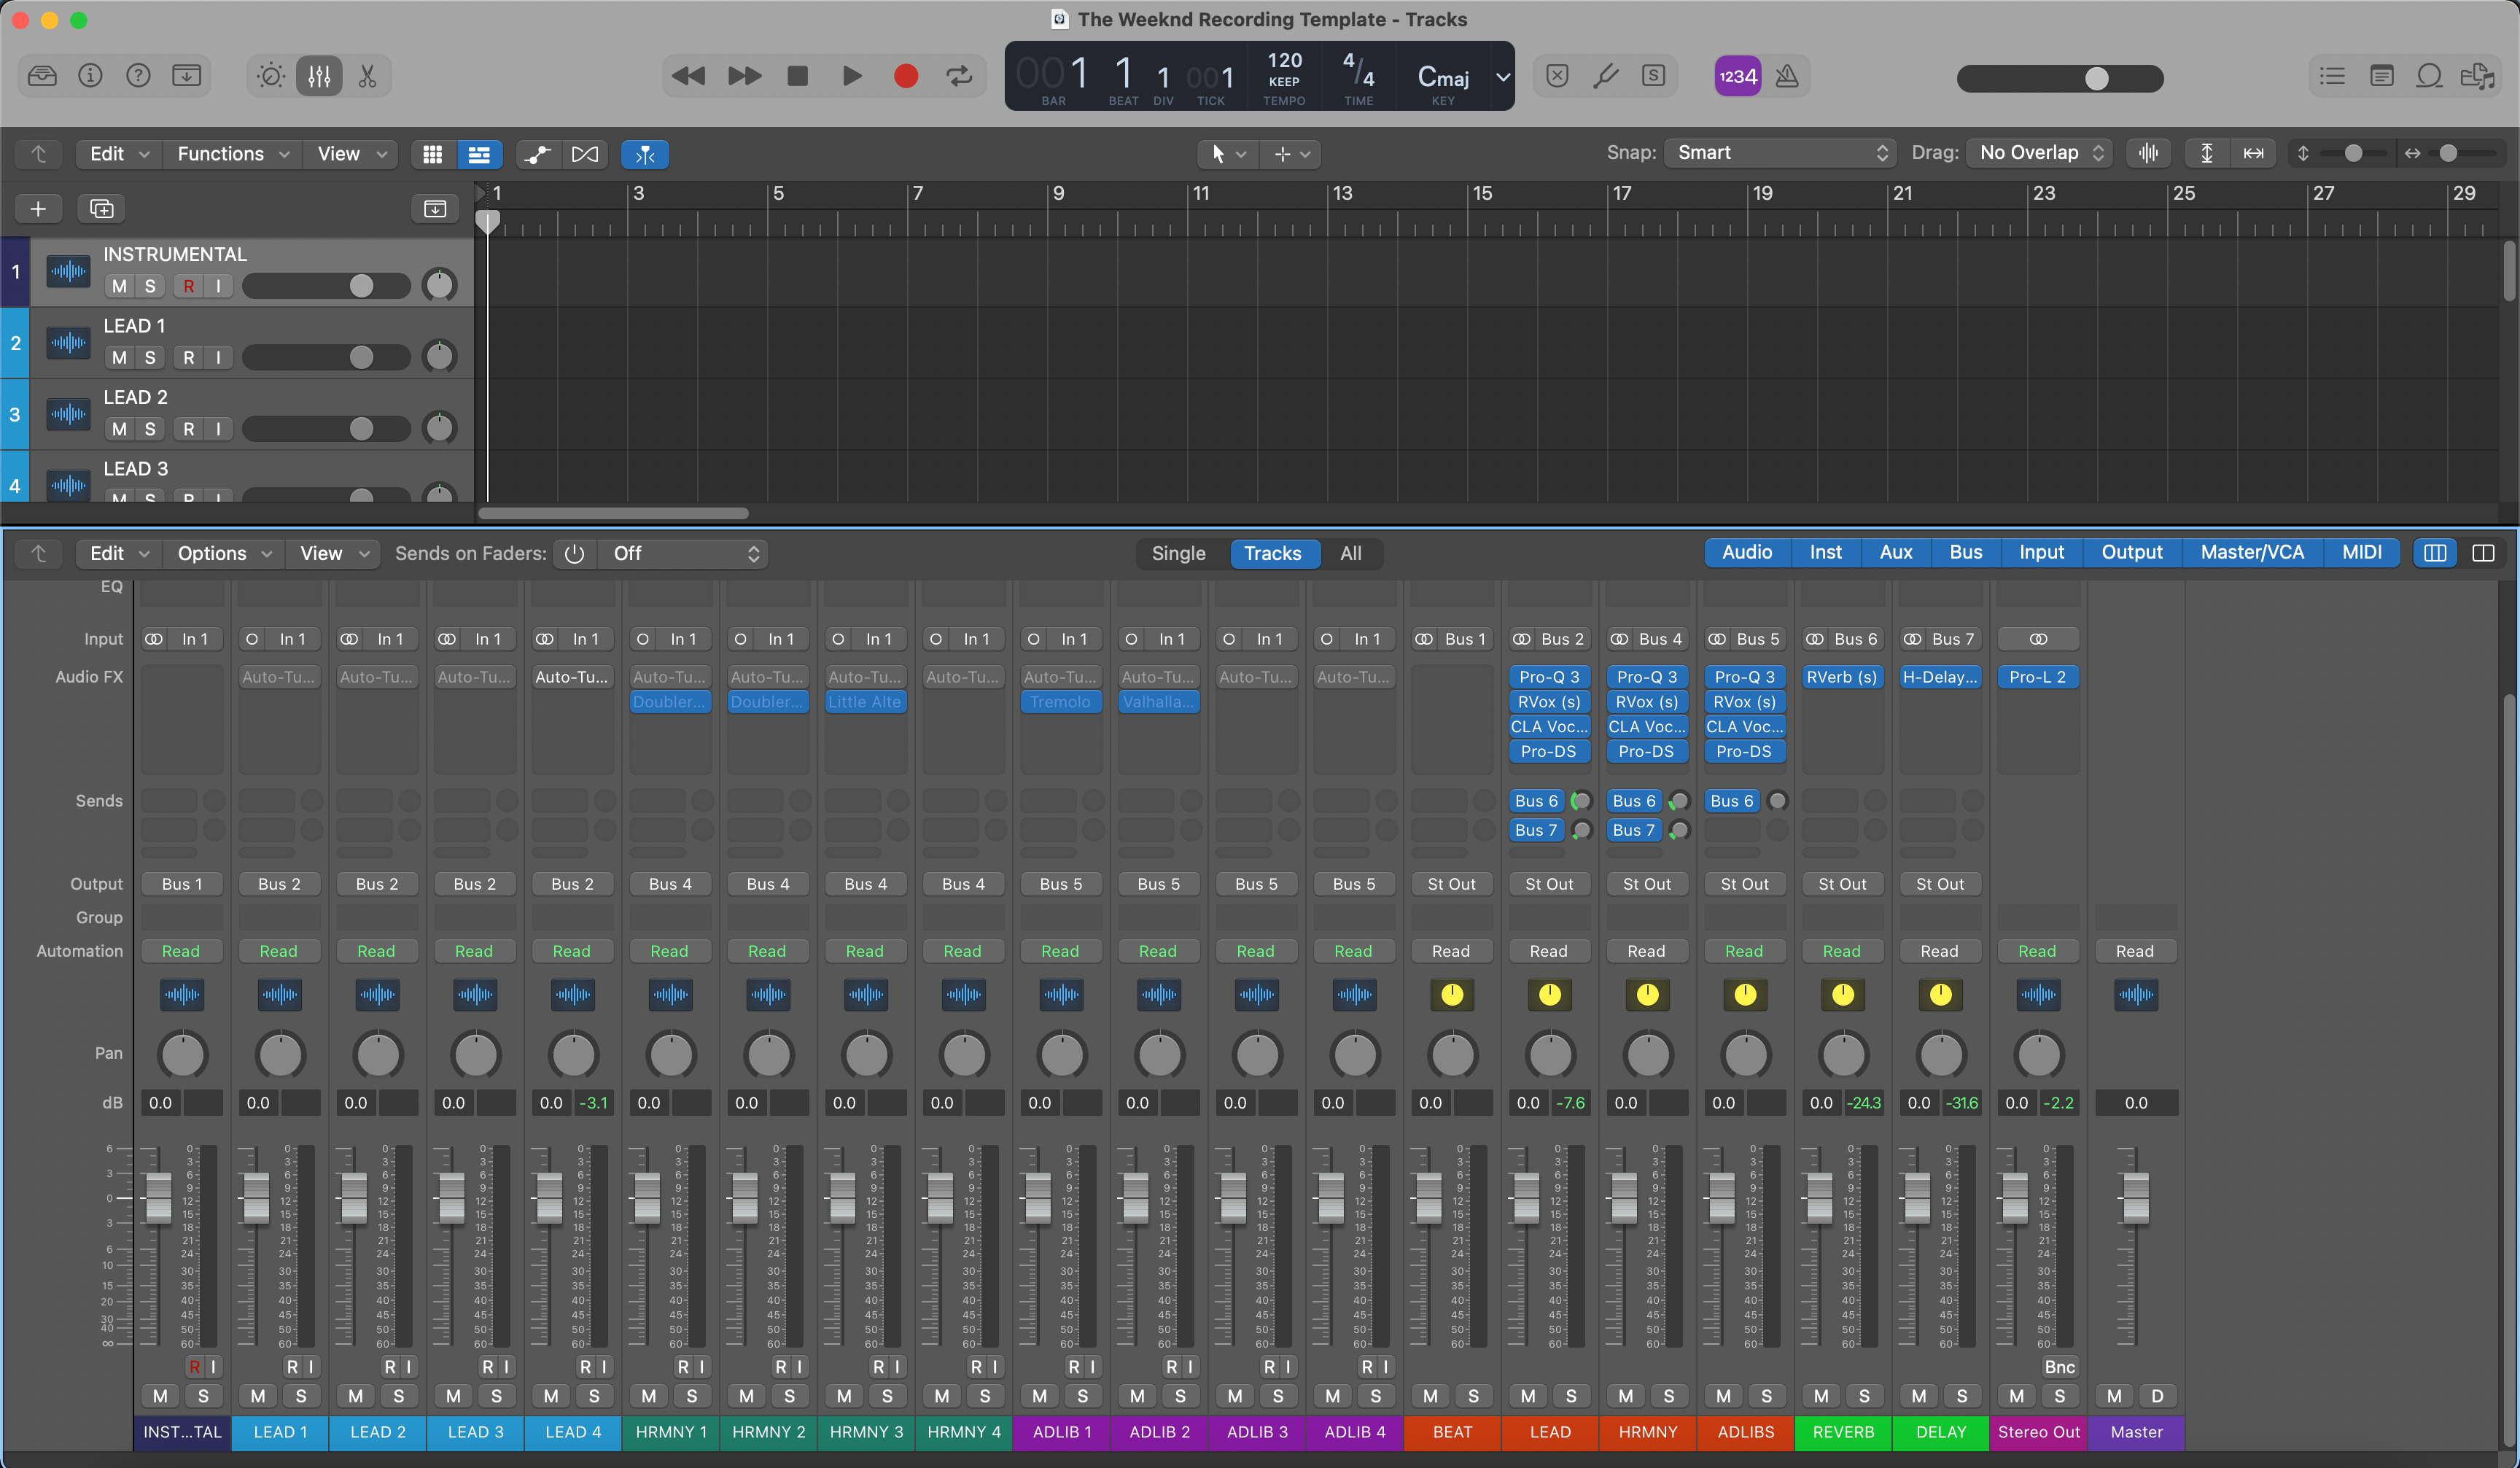
Logic Pro X The Weeknd Modelo de Gravação – Predefinição Vocal
Perguntas Frequentes
O que é um modelo do Logic Pro?
O que é um modelo do Logic Pro?
Um template do Logic Pro é um arquivo de sessão pronto para abrir que já inclui a estrutura das faixas, roteamento, buses, envios e o layout básico necessário para começar a gravar ou mixar mais rápido.
Em vez de abrir o Logic em um projeto em branco, você começa com uma configuração que já parece uma sessão de trabalho.
O que está incluído em um template do Logic Pro da BCHILL MIX?
O que está incluído em um template do Logic Pro da BCHILL MIX?
Isso geralmente significa faixas vocais organizadas, roteamento de sessão, barramentos de efeitos e uma estrutura criada para acelerar a gravação e a mixagem preliminar.
Alguns produtos também podem incluir processamento vocal no estilo de predefinição ou opções de layout que facilitam o manuseio de vocais principais, duplicatas, ad-libs e harmonias desde o início.
Quão rápido recebo os arquivos do template do Logic Pro após a compra?
Quão rápido recebo os arquivos do template do Logic Pro após a compra?
Os produtos de template do Logic Pro são entregues digitalmente, então você geralmente deve ter acesso imediatamente após a finalização da compra.
Isso permite que você passe da compra para a abertura da sessão sem esperar por um processo manual de entrega.
Esses templates do Logic Pro usam plugins nativos, plugins de terceiros ou ambos?
Esses templates do Logic Pro usam plugins nativos, plugins de terceiros ou ambos?
Alguns produtos Logic são construídos com plugins nativos, enquanto outros podem usar ferramentas externas para escolhas tonais ou criativas específicas.
Se plugins de terceiros forem necessários, a página do produto deve informar você antes da compra.
Esses modelos do Logic Pro são compatíveis com as versões atuais do Logic Pro?
Esses modelos do Logic Pro são compatíveis com as versões atuais do Logic Pro?
Eles são destinados aos fluxos de trabalho atuais do Logic Pro para desktop, mas a compatibilidade exata depende da estrutura do arquivo e de quaisquer requisitos de plugins vinculados ao produto específico.
Se um modelo depender de um recurso mais recente do Logic ou de uma configuração específica de plugin, a página do produto deve deixar isso claro.
Como faço para instalar um modelo do Logic Pro?
Como faço para instalar um modelo do Logic Pro?
O processo usual é colocar o arquivo onde você possa abri-lo no Logic, iniciar a sessão e então confirmar sua configuração de entrada, saída, buffer e monitoramento antes de gravar.
A partir daí, você pode salvar sua própria versão de trabalho para que sessões futuras comecem a partir da mesma estrutura.
Esses templates do Logic Pro são adequados para iniciantes?
Esses templates do Logic Pro são adequados para iniciantes?
Sim. Eles ajudam iniciantes a pular muita configuração repetitiva e mostram como uma sessão mais organizada pode ser.
Também ajudam usuários avançados a manter a consistência entre projetos quando velocidade e repetibilidade são importantes.
Posso personalizar o modelo do Logic Pro para se adequar ao meu próprio fluxo de trabalho de gravação ou mixagem?
Posso personalizar o modelo do Logic Pro para se adequar ao meu próprio fluxo de trabalho de gravação ou mixagem?
Sim. Você pode trocar plugins, renomear faixas, alterar a estrutura dos buses, ajustar cores, refazer os efeitos de envio e personalizar a sessão de acordo com seu próprio processo.
O modelo foi criado para economizar tempo no início, não para limitar o que acontece depois.
Esses templates do Logic Pro funcionam bem para vocais principais, dublagens, harmonias, ad-libs e sessões vocais completas?
Esses templates do Logic Pro funcionam bem para vocais principais, dublagens, harmonias, ad-libs e sessões vocais completas?
Sim, essa é uma das principais razões para usar um modelo em vez de um único preset.
Modelos são especialmente úteis quando você grava vocais em camadas regularmente e quer a estrutura, o roteamento e os efeitos de espaço prontos antes da primeira tomada.
O que torna estes melhores do que começar com uma sessão em branco no Logic Pro?
O que torna estes melhores do que começar com uma sessão em branco no Logic Pro?
Uma sessão em branco oferece total liberdade, mas também exige todo o trabalho de configuração a cada vez.
Um template BCHILL MIX Logic começa mais próximo de um fluxo de trabalho de gravação real, para que você possa passar mais tempo criando e menos tempo montando a mesma infraestrutura novamente.
Monte Sua Própria Cesta


Transforme Sua Sessão em Segundos
Configuração Instantânea de Sessão com Nossos Modelos de Gravação Prontos para Uso e Predefinições Vocais.


Créditos da Indústria

Westside Boogie

Shontelle

Jarren Benton

DJ Tunez

Vory

Caskey

Rittz

Nia Riley

Eugy

Q Parker
Ouça nosso Trabalho
R&B
Antes
Depois
Rap
Antes
Depois
Pop
Antes
Depois
Alma
Antes
Depois
Rocha
Antes
Depois
Latim
Antes
Depois
Modelos de Gravação do Logic Pro: Explicação e Recursos
Introdução aos Presets Vocais do Logic Pro
Se você grava ou mixa vocais no Logic Pro, um preset bem construído oferece um timbre vocal moderno e repetível sem precisar reconstruir a mesma cadeia a cada sessão. Um preset carrega um caminho de efeitos equilibrado—EQ para modelar o tom, compressão para controle de nível, de-essing para suavizar o “s” e ambiência de bom gosto—para que você capture ideias rapidamente e mantenha seu som consistente do demo ao lançamento. Na BCHILL MIX, nossa abordagem é simples: entregar cadeias vocais que funcionem em fones, celulares e monitores de estúdio, mantendo leveza suficiente para gravar confortavelmente.
Este guia explica o que é um preset vocal do Logic Pro, por que ele ajuda, como instalar e ajustar, e receitas práticas para rap, R&B, pop, rock/alternativo, cantor-compositor/podcast e estilos focados em afinação. Você também verá como um template de gravação minimalista pode acelerar a configuração da sessão e manter projetos grandes organizados. Explore nossas opções atuais aqui: Logic Pro Templates & Vocal Presets e a coleção mais ampla Vocal Presets.
O que é um Preset Vocal no Logic Pro?
No Logic Pro, um preset vocal é uma faixa salva ou patch contendo uma ordem conhecida de processadores com configurações iniciais sensatas. Uma cadeia limpa e moderna geralmente inclui:
- EQ de canal com um filtro passa-alto suave e pequenos ajustes cirúrgicos para remover ruídos graves/dominar aspereza.
- Dois compressores leves em série (por exemplo, uma etapa “niveladora” mais lenta e uma etapa “pegar picos” mais rápida) para estabilizar a dinâmica sem bombear.
- De-esser antes de qualquer ar/brilho para que as consoantes fiquem suaves.
- Saturação/exciter opcional para presença e definição (o sutil é melhor durante a gravação).
- FX baseados em tempo via envios (plate/sala curta e delay sincronizado ao tempo) para que o espaço apoie a letra sem lavá-la.
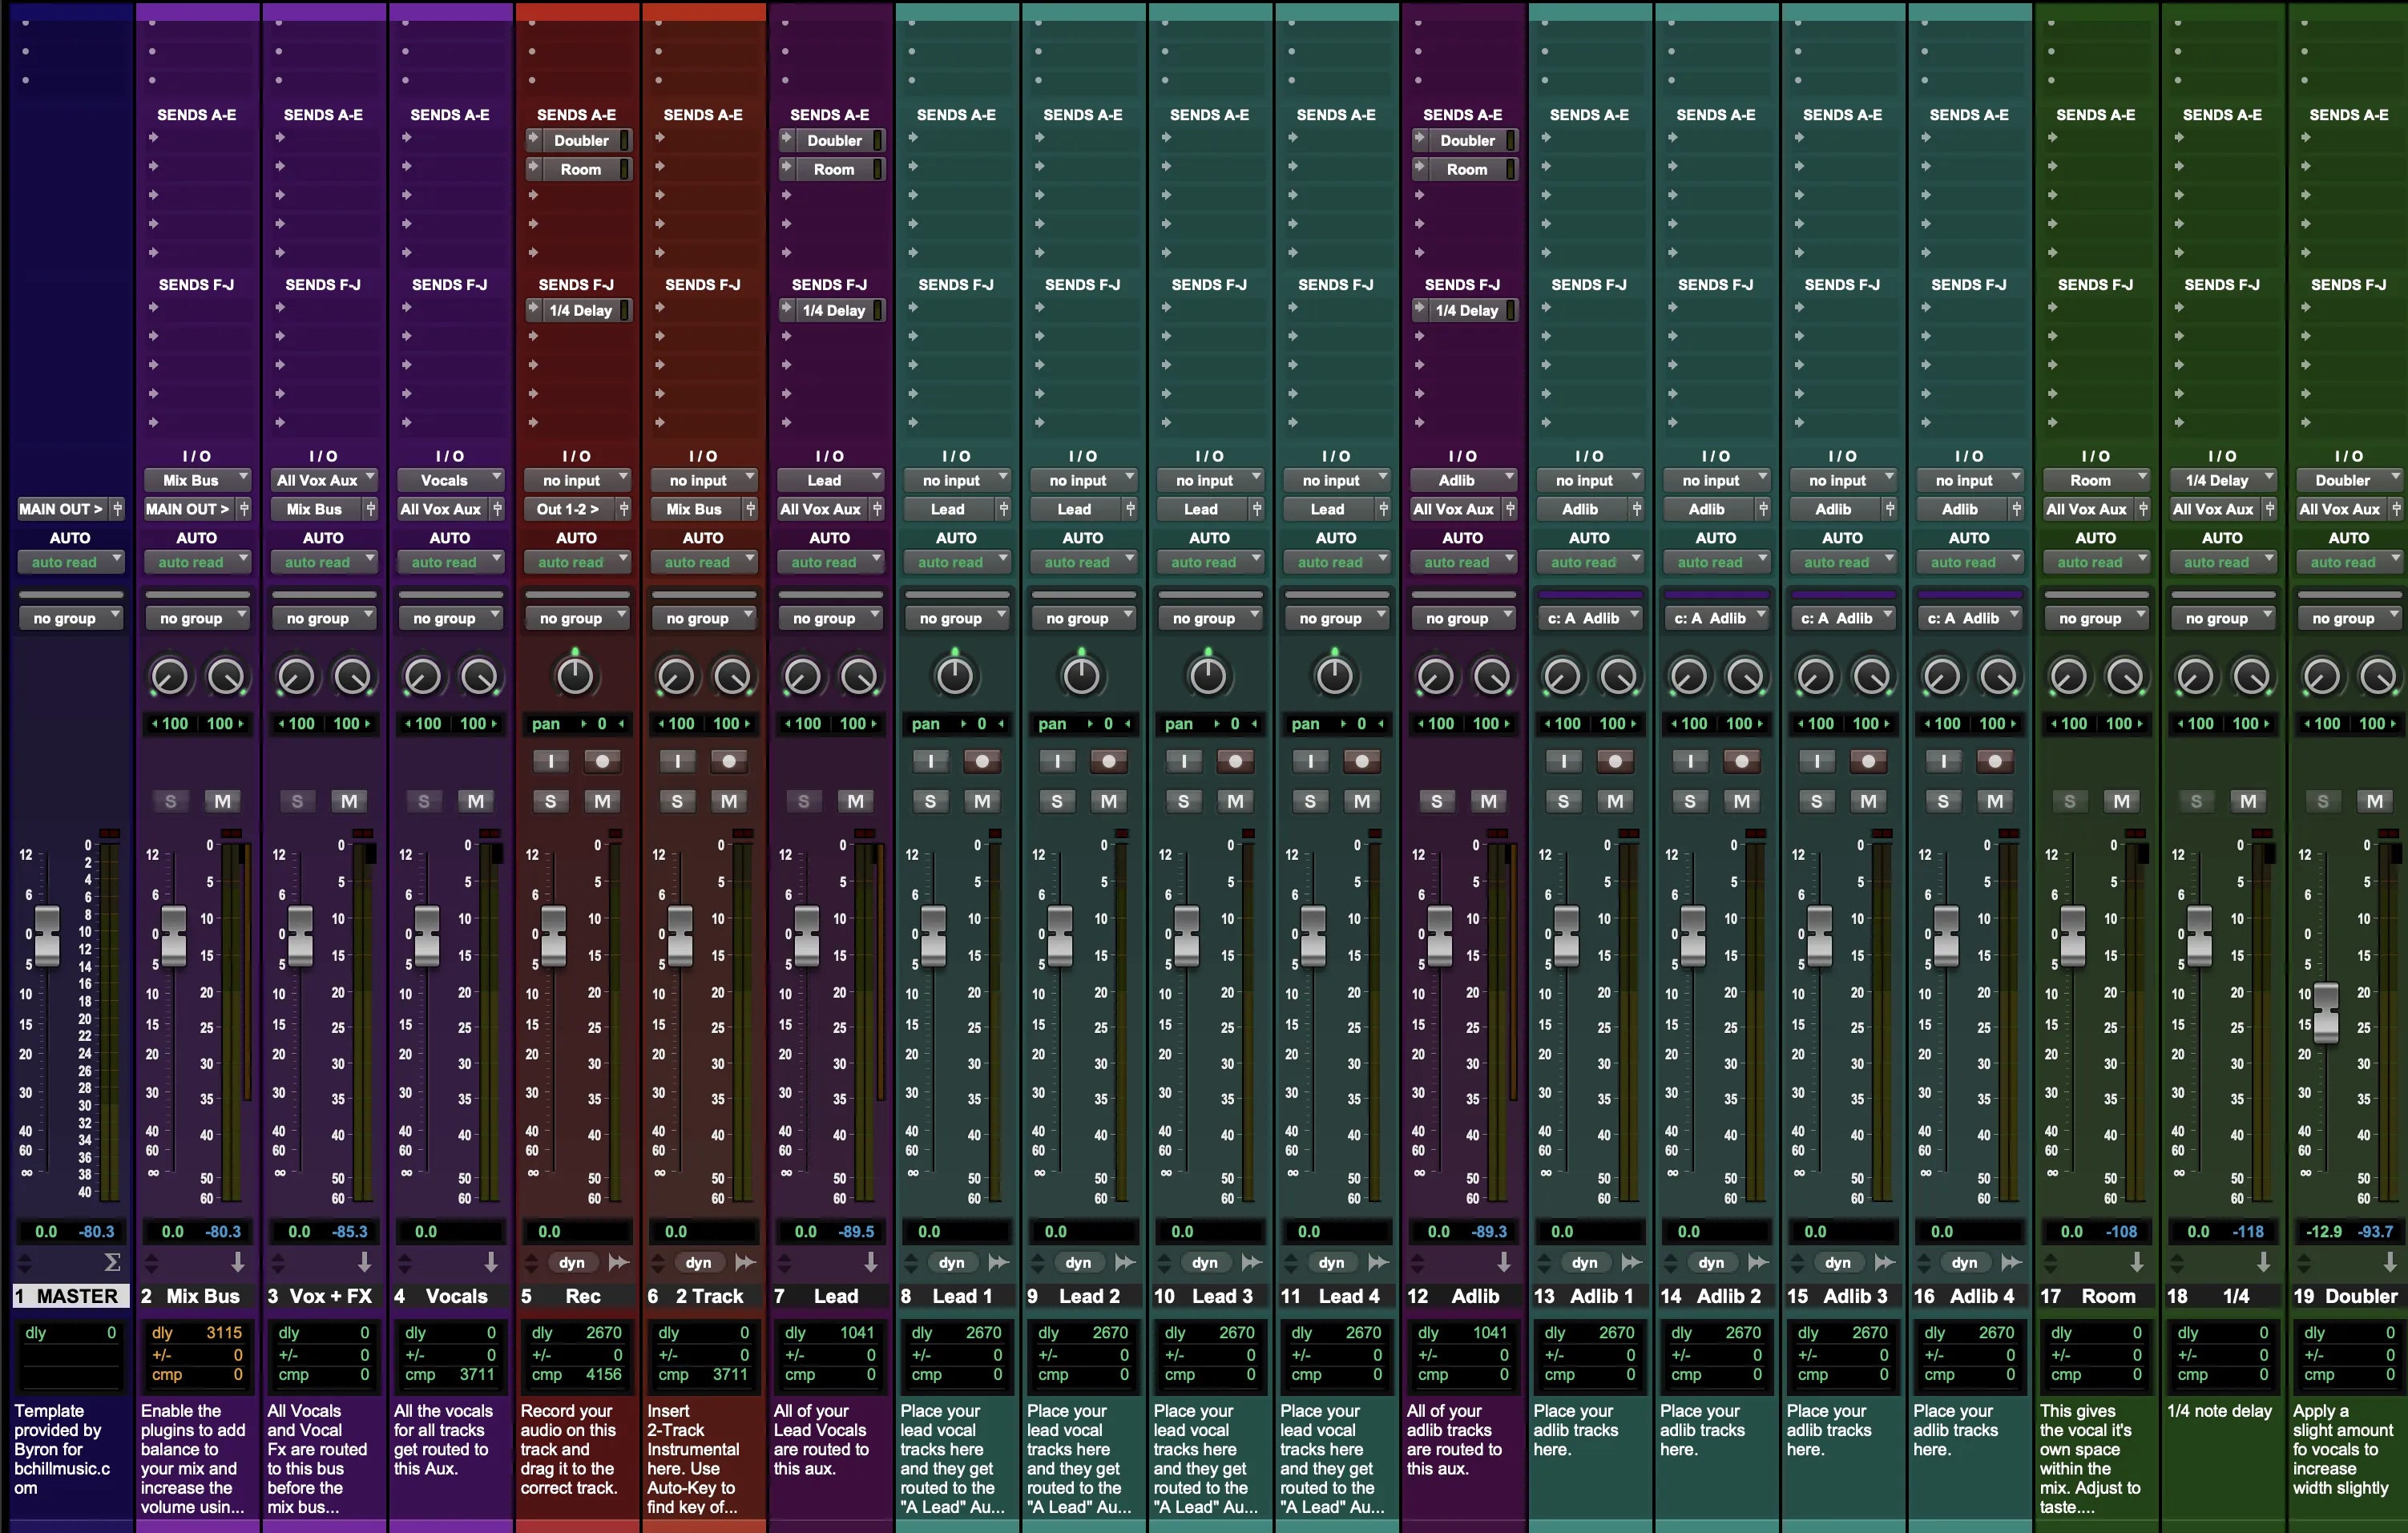
Você pode carregar a cadeia em uma faixa Lead, duplicá-la para Doubles/Harmonies com limiares ligeiramente diferentes, ou colocar processamento corretivo na faixa e polimento criativo em um Vocal Bus. Presets são pontos de partida—grave através deles, depois ajuste os limiares, quantidades de EQ e níveis de envio para sua voz, microfone e música. Quando encontrar o ponto ideal, salve como seu próprio patch para que projetos futuros abram prontos para gravar.
Por que Usar Presets (Benefícios e Quando Ajudam)
- Velocidade: Abra, escolha um preset, aperte gravar—sem mais aquecimentos de plug-in de 20 minutos.
- Consistência: Uma cadeia calibrada mantém o tom alinhado entre singles, EPs e séries de conteúdo.
- Foco criativo: Dedique tempo ao desempenho, improvisos/dublagens e arranjo—não à parte técnica.
- Tradução: As cadeias são configuradas para permanecer inteligíveis em telefones/fones de ouvido, assim como em monitores.
- Baixa fricção: Menos decisões no momento—ótimo para laptops e setups móveis.
Onde os presets ajudam mais: sessões rápidas de escrita, colaborações remotas, reels/shorts, lançamentos semanais de singles, voiceovers/podcasts e qualquer fluxo de trabalho onde você queira ir da ideia à gravação em minutos.
Padrão vs. Premium no Logic Pro (O que você realmente precisa)
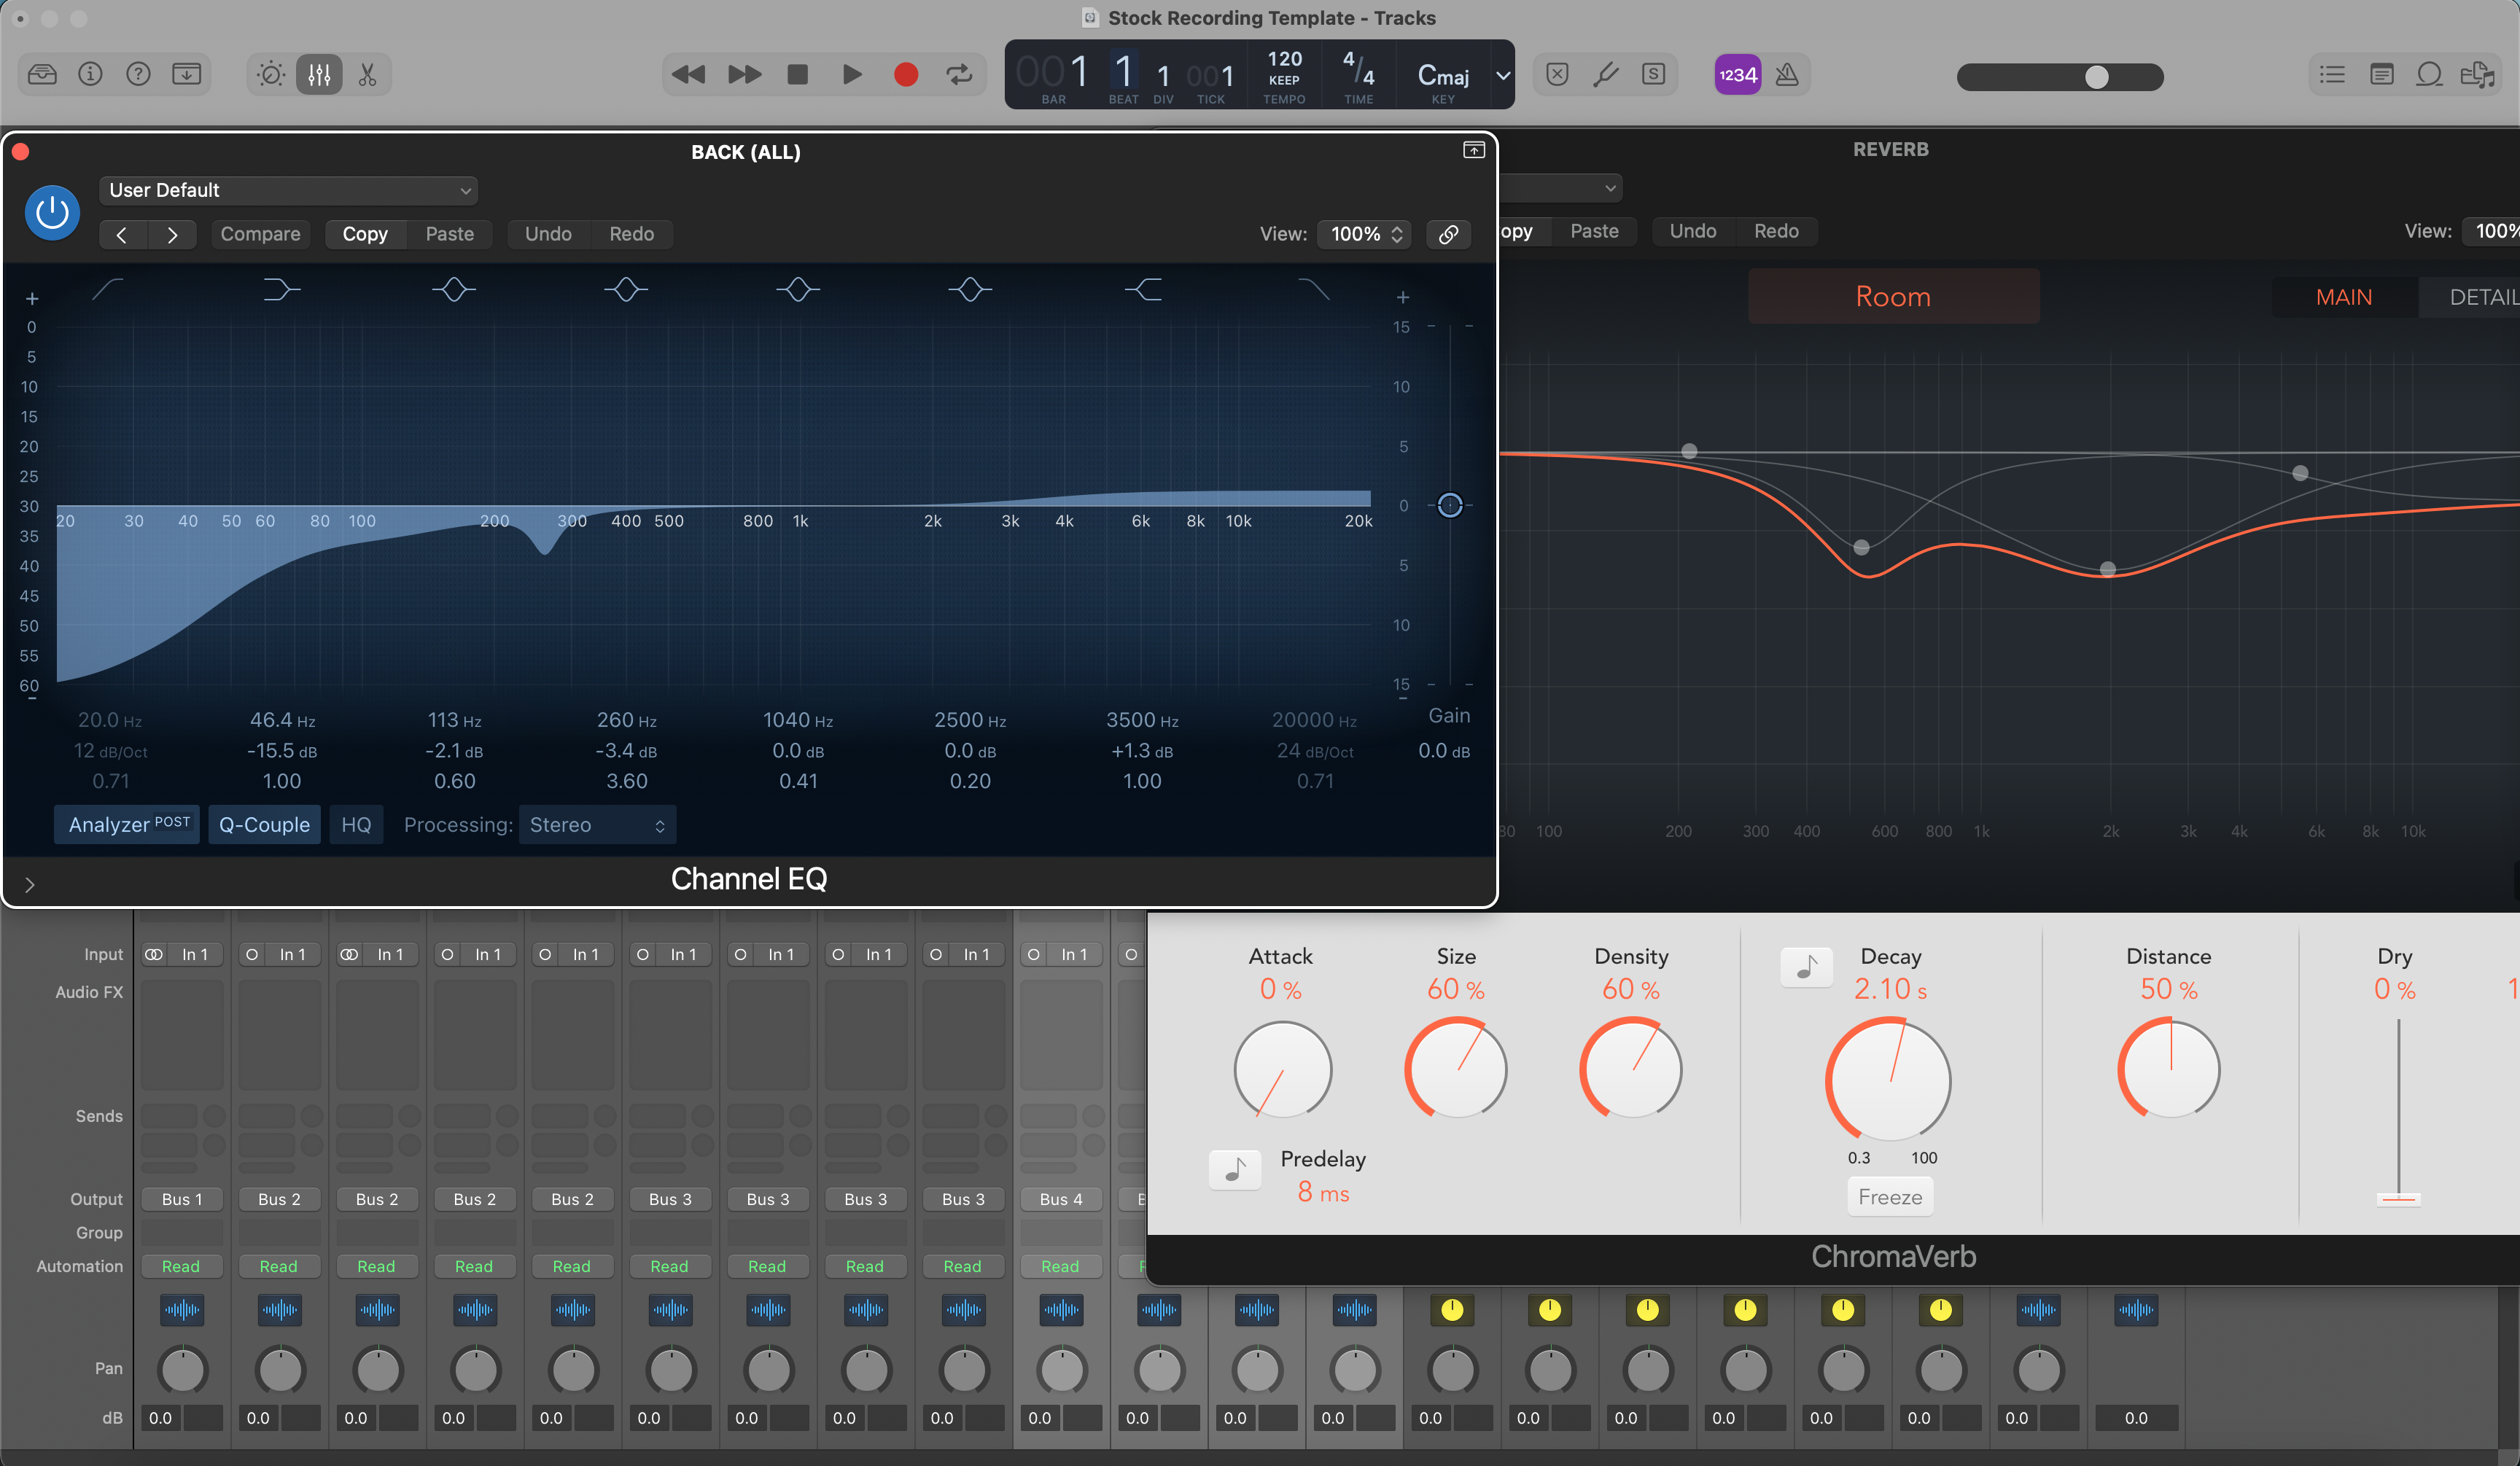
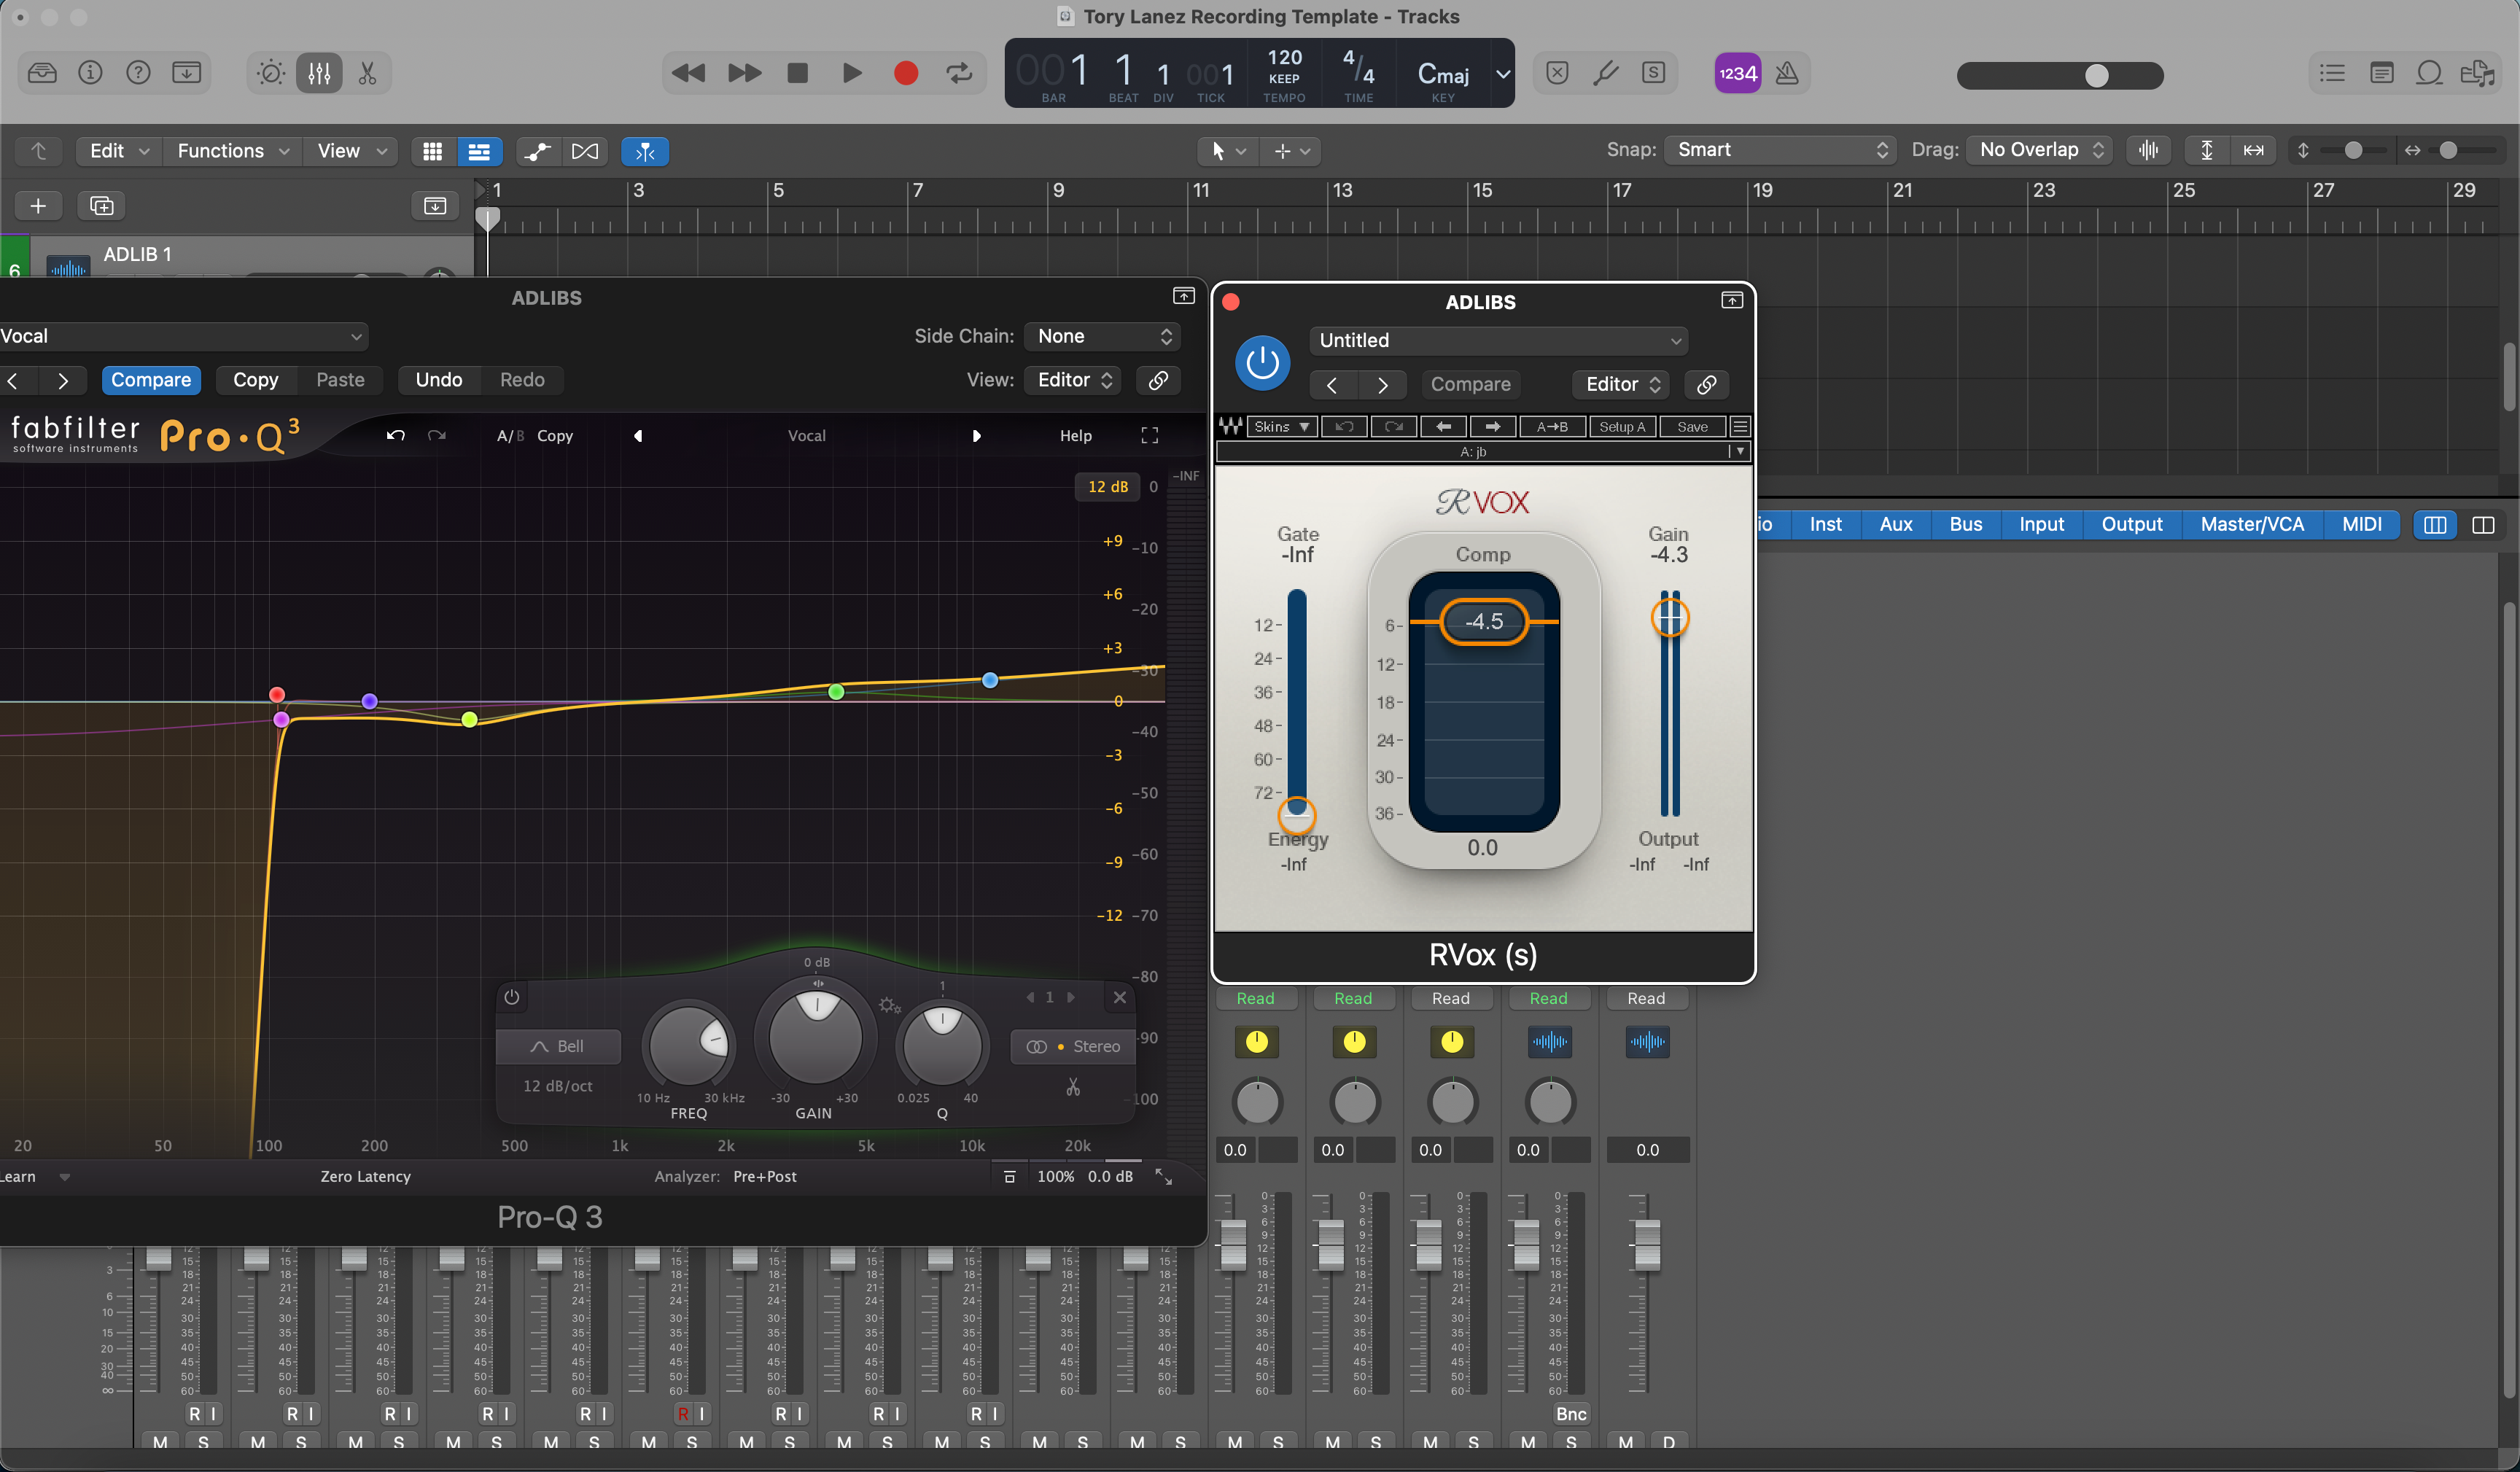
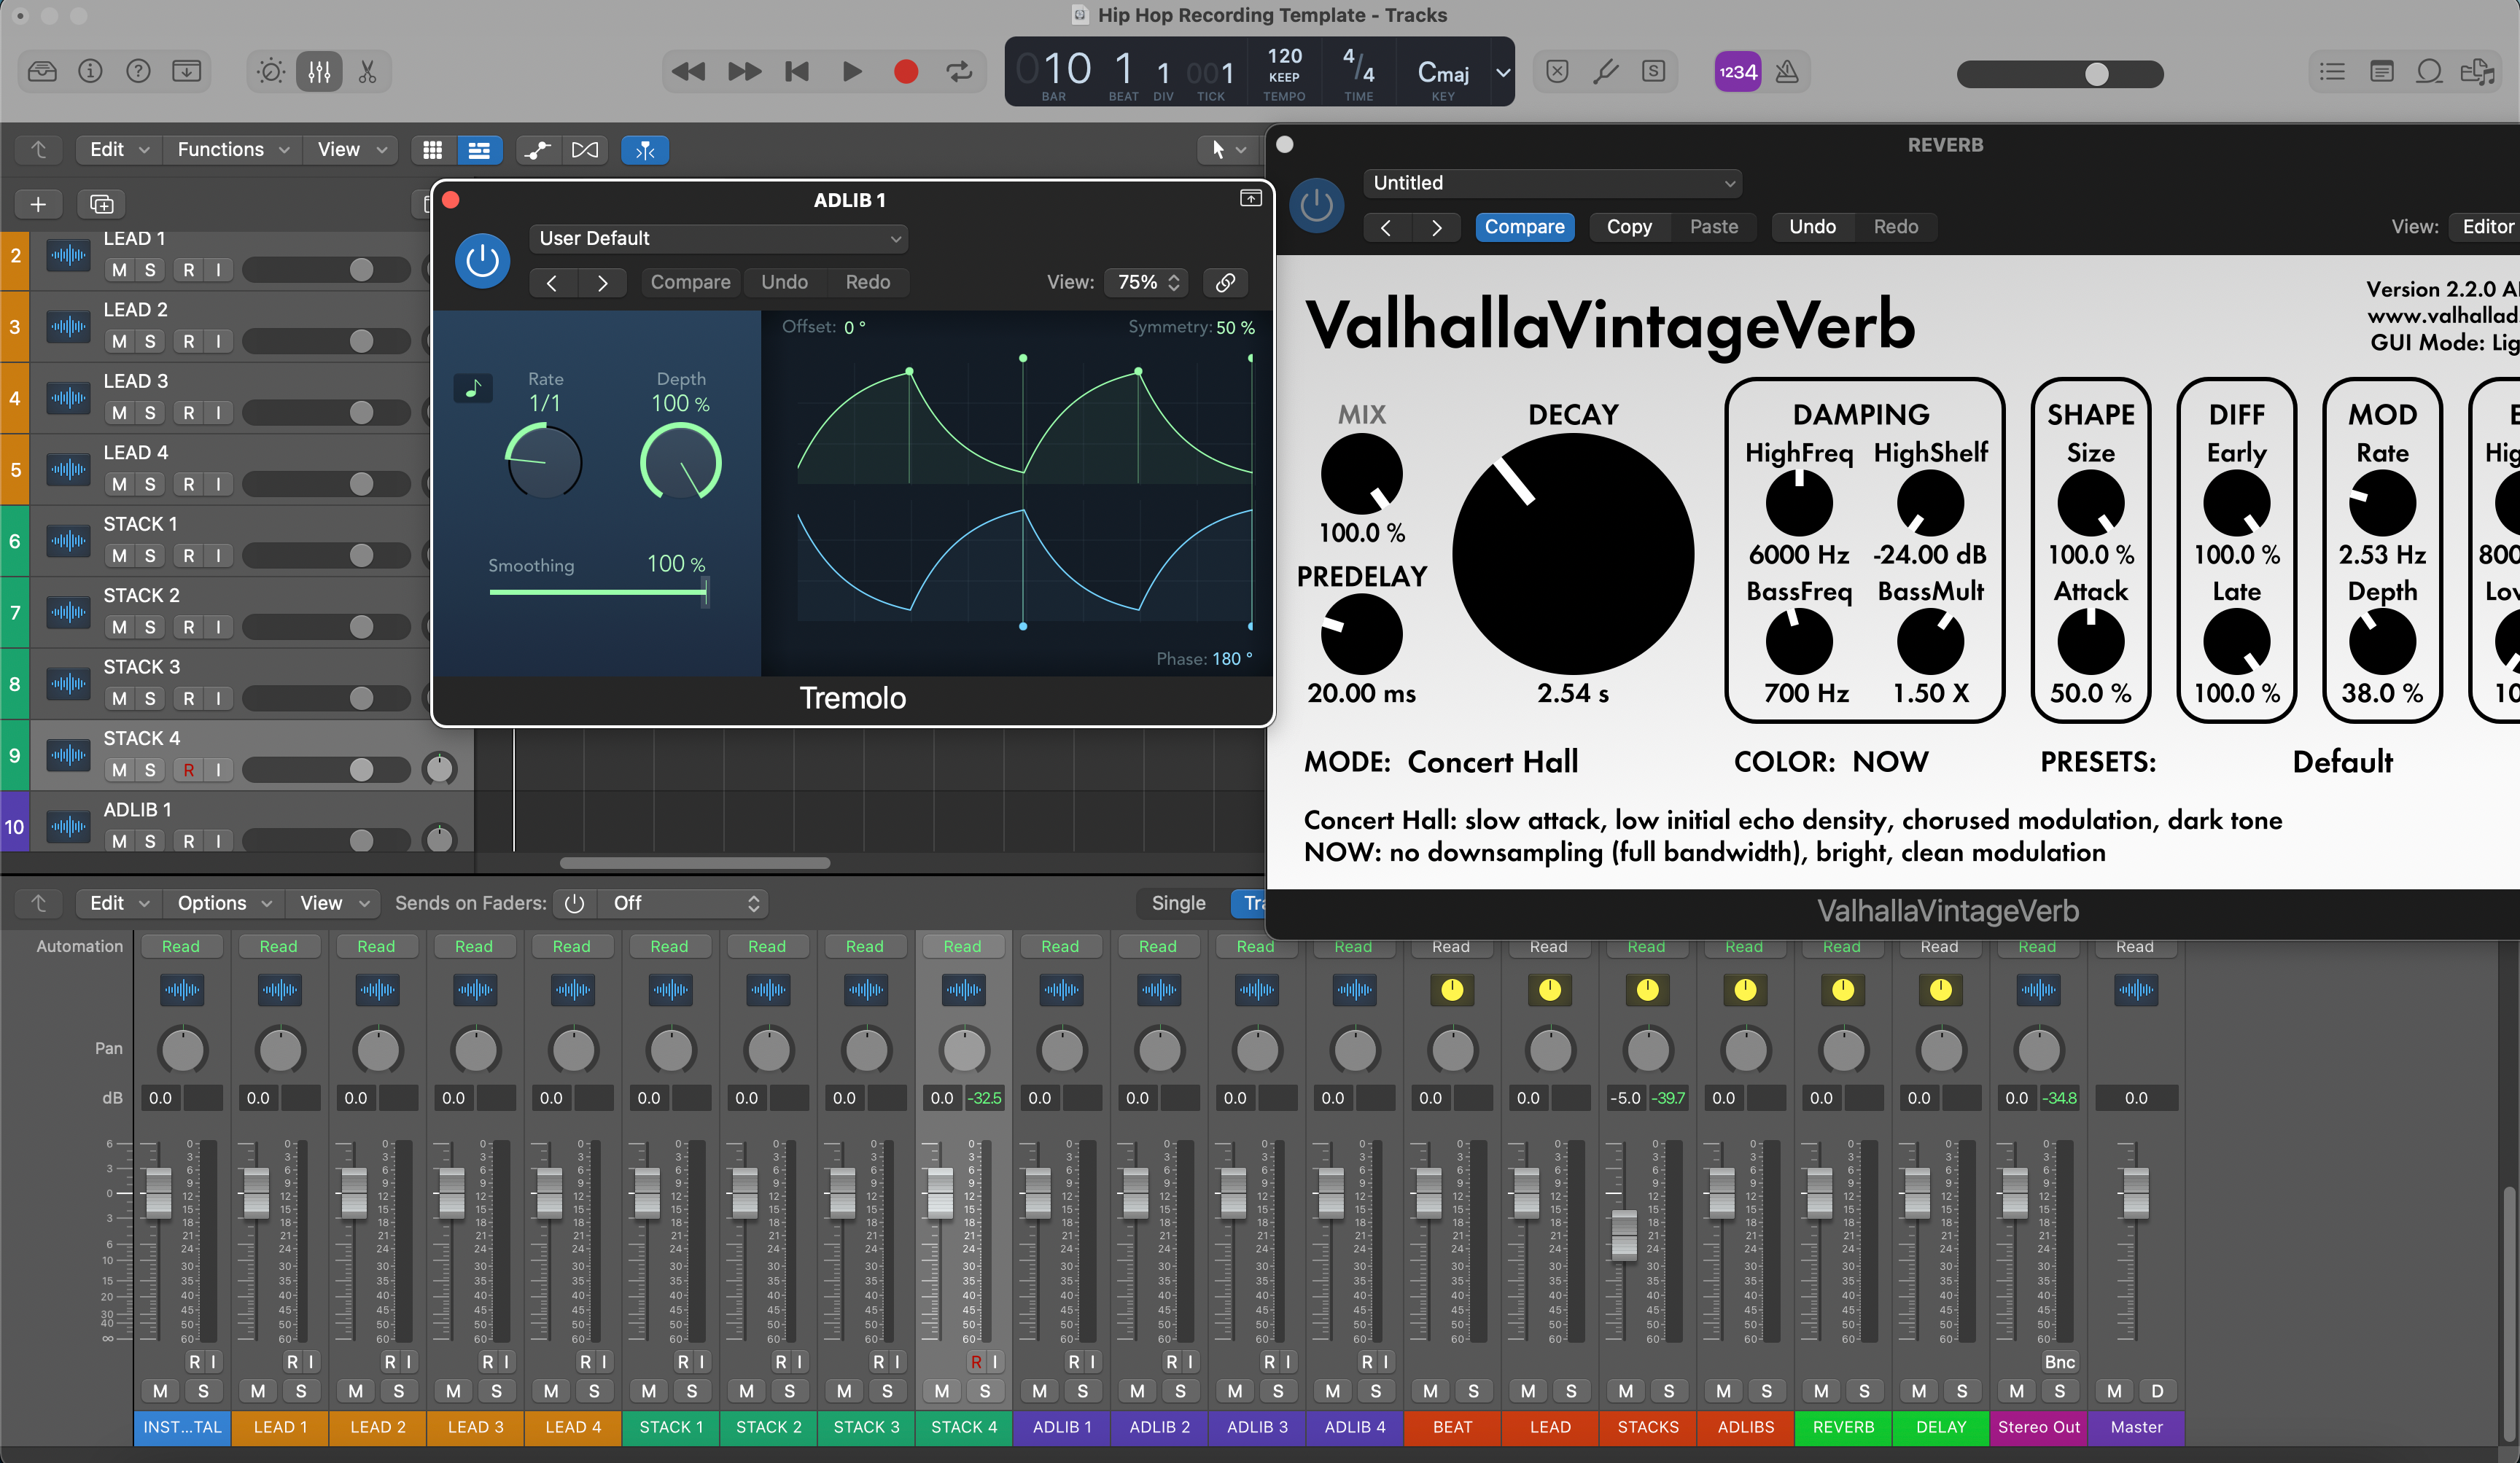
Cadeias apenas com recursos padrão usam processadores internos como EQ de Canal, Compressor, De-Esser, Noise Gate, ChromaVerb/Space Designer e Tape Delay/Echo. São portáteis, econômicos em CPU e abertos em qualquer Mac com Logic—ideais para colaboração e setups móveis.
Cadeias premium adicionam Audio Units de terceiros selecionados (se você já os possui) para cor ou controle extra—EQ dinâmico, compressores com caráter, saturação avançada, reverbs especiais ou afinação dedicada. Muitos artistas mantêm ambos: uma cadeia padrão para gravação em qualquer lugar e uma premium para polimento em casa.
Escolha rápida: novo em presets? Comece com uma cadeia limpa para “vocais claros”. Já sabe seu estilo? Carregue uma cadeia ajustada para o estilo (rap, R&B, pop, rock) e faça pequenos ajustes em vez de reconstruir do zero.
Instalação & Início Rápido (Passo a Passo)
- Crie e nomeie as faixas. Adicione faixas de áudio para Lead, Doubles, Harmonias e Ad-libs. Codifique-as por cor e, se preferir controle agrupado, direcione para um simples Bus Vocal ou Pilha de Soma.
- Configure a entrada e o monitoramento. Escolha a entrada da interface na faixa Lead. Grave uma frase de teste curta e ajuste o pré-amplificador para que os picos fiquem seguros abaixo do clipping. Se o monitoramento parecer atrasado, reduza o tamanho do buffer de I/O e ative o Modo de Baixa Latência durante a gravação; reative as cadeias completas para a mixagem. (Veja as dicas de latência da Apple no link abaixo.)
- Carregue a cadeia de presets. Na faixa do canal, insira EQ de Canal → Compressor (suave) → De-Esser → Compressor (rápido/limpo) → Saturação opcional → envios para Delay/Reverb. Mantenha os inserts principalmente secos durante a gravação; use envios para espaço para que a latência e a dicção permaneçam limpas.
- Regule os limiares e envios. Mire em alguns dB de redução de ganho nas linhas mais altas sem causar pumping. Se adicionar ar, revise o de-esser para que o “s” continue suave. Use um pequeno delay sincronizado ao tempo e uma reverberação curta; automatize os envios para aumentar nos refrões.
- Salve sua configuração. Armazene a cadeia como um patch de usuário ou configuração de strip de canal. Salve um template de projeto para que toda sessão abra com roteamento, headroom e cores consistentes.
Notas sobre ganho: grave com headroom saudável (picos em torno de −10 a −6 dBFS no medidor da faixa); evite luzes vermelhas na interface — clipping não pode ser corrigido. Se o ganho de compensação elevar demais os níveis, reduza a saída do clipe ou efeito em vez de forçar o próximo processador. Mantenha os picos da mixagem bruta sensatos para não correr atrás do volume durante a gravação.
Opções de afinação: para correção suave, experimente o plug-in Pitch Correction no início da cadeia (antes do de-ess). Para edições cirúrgicas, use o Flex Pitch nas tomadas após a gravação. Verifique novamente a sibilância se você clarear a voz depois.
Referências úteis (após colar este artigo): Guias da Apple sobre gerenciamento de latência de entrada, EQ de canal e Flex Pitch.
Receitas de Estilo & Correções Rápidas (Rap, R&B, Pop, Rock/Alternativo, Cantor-Compositor/Podcast, Afinação em Primeiro Plano)
Voz Principal de Rap (punch moderno) — Dois compressores leves em série mantêm a dinâmica controlada sem matar os transientes. Foque a inteligibilidade entre 2–5 kHz; corte pequenos espaços no instrumental em vez de aumentar demais a voz. Adicione um slap curto ou uma pequena placa para energia sem wash. Realce os refrões automatizando o envio do delay em vez de aumentar demais o nível úmido do insert.
Rap Melódico / Trap — Busque um topo brilhante, mas suave. Um toque de saturação antes do de-ess adiciona mordida; siga com o de-ess para que as consoantes não fiquem espirradas. Para ad-libs, aumente um pouco o filtro passa-alto e o de-ess para manter as camadas organizadas. Amplie os hooks com um pouco mais de feedback de delay e pré-delay na placa.
R&B / Soul — Ataque/liberação suave, prateleira de ar suave, ambiente mais amplo. Se os aumentos adicionarem chiado, reduza o brilho ou adicione um segundo de-ess mais suave. Use filtro passa-alto nos fundos e delays estéreo lentos que fiquem atrás da voz principal para que a letra fique em destaque. Para camadas exuberantes, experimente um pré-delay mais longo e um nível de envio mais baixo para que a cauda da reverberação não encubra as palavras.
Pop — Agudos polidos com de-ess cuidadoso, delays sincronizados ao tempo para espaço rítmico e uma sala muito curta para “cola.” Tome decisões com volume igualado para que “mais alto” não influencie seus testes A/B. Em arranjos densos, corte 2–4 kHz em guitarras/sintetizadores para manter as palavras inteligíveis.
Rock / Alternativo — Mantenha o vocal em destaque sem aspereza: compressão moderada com um pouquinho de saturação, depois de-ess. Para energia, use reverberação curta de sala/placa e um slap mono entre 80–120 ms. Se os pratos competirem com o brilho vocal, corte um pouco do high-shelf no bus de bateria em vez de exagerar no de-ess da voz.
Cantor-Compositor / Podcast (voz clara) — Priorize inteligibilidade e controle de ruído: compressão transparente, de-ess moderado e um toque de ambiência curta se o som seco parecer artificial. Técnica vence—distância constante do microfone, filtro pop e um ambiente silencioso superam efeitos pesados sempre. Se respiração/ruído for problema, automatize o ganho do clipe ao redor das respirações em vez de usar gate rígido.
Afinação em destaque (hooks & pop hiperlimpo) — Defina a tonalidade/escala da música primeiro. Use quantidades moderadas de retune para um feeling natural ou pressione mais forte deliberadamente para o tom robótico. Após clarear, verifique novamente o de-ess e ajuste os limiares para que a sibilância fique suave.
Correções comuns:
- Sibilância áspera “s/t”: reduza um pouco a faixa de agudos e/ou alivie o limiar do de-esser para que ele atue apenas nas sibilantes.
- Medios graves embolorados: cortes pequenos e estreitos entre 150–350 Hz; aplique filtro passa-alto em doubles/harmonias mais alto que o lead.
- Vocal enterrado na batida: crie pequenos espaços nos instrumentos concorrentes (2–5 kHz) ou aumente o bus vocal em cerca de 1 dB nos refrões.
- Espaço excessivo: comece com envios baixos; automatize nos refrões em vez de manter reverb/delay alto o tempo todo.
- Latência durante a gravação: reduza o buffer e ative o Modo de Baixa Latência; grave com uma cadeia enxuta, adicione os aprimoramentos depois.
Presets vs. Templates de Gravação (Fluxo de Trabalho que Escala)
Presets vocais moldam o tom e a dinâmica em uma faixa ou bus. Templates de gravação oferecem todo o layout da sessão—faixas pré-nomeadas (Lead, Doubles, Harmonias, Ad-libs), codificação por cores, roteamento de bus, mixagem de referência básica e envios prontos—para que você possa passar da ideia à gravação em segundos e manter sessões grandes organizadas.
- Abra seu template para garantir que headroom, medidores e roteamento estejam consistentes de música para música.
- Carregue a cadeia de presets que combina com o estilo (Rap, R&B, Pop, Rock), depois salve sua versão ajustada como seu ponto de partida “voz”.
- Use uma Pilha de Soma ou um Bus Vocal dedicado para polimento criativo (exciter, compressão leve tipo cola, modulação), mantendo os ajustes corretivos nas faixas.
Se você colaborar, compartilhe um template compacto e um ou dois patches principais para que todos ouçam equilíbrios semelhantes mesmo em computadores diferentes. Quando quiser um ponto de partida organizado desde o primeiro dia, navegue pelas opções atuais aqui: Templates de Logic Pro & Presets Vocais.
Dentro do DAW: Configurações do Template do Logic Pro (Capturas de Tela)
Veja como nossos templates do Logic Pro carregam vocais principais, dublagens e cadeias de bus. Essas capturas de tela mostram a roteação e o processamento iniciais para que você possa abrir a sessão e ajustá-la para sua voz, microfone e ambiente.