Pro Tools has the tools to make vocals sound like records—if you wire your session smartly and make deliberate moves. This guide shows an end-to-end workflow you can reuse on any project: clean setup, fast comping, stock-plugin chains that translate, sidechain tricks for intelligibility, and exports that keep headroom for mastering. Everything here uses built-in Pro Tools features, so you can mix confidently without third-party plugins.
I. What a finished vocal really sounds like in Pro Tools
A finished vocal sits forward and clear, controlled but alive, with space that flatters the lyric instead of blurring it. In Pro Tools that typically means: playlist-comped takes feeding a dedicated vocal track (or a small group of tracks), tone-shaped with Avid Channel Strip or EQ3 7-Band, leveled with Dyn3 Compressor/Limiter or Pro Compressor, sibilance controlled by a de-esser, and ambience managed on separate send returns (D-Verb and Mod Delay III). Under the hood, the audio engine, buffer size, Low Latency Monitoring (where available), send topology, and Automatic Delay Compensation keep timing tight while you work.
II. Why this workflow matters
- Clarity that survives small speakers: Subtractive EQ and controlled presence create intelligible consonants without harshness.
- Level control without pumping: Correct attack/release choices keep phrases steady but retain natural transients.
- Space that helps the lyric: Time-synced delays and short plates add depth; sidechain-ducking lets words lead without muting FX.
- Speed and repeatability: Playlists, Clip Gain, sends, and Track Presets (or template sessions) make good decisions faster.
- Confidence for artists: Low-latency monitoring and sensible cue mixes reduce timing issues and improve performances.
Want a head start for routing and naming? Drop in our Pro Tools recording templates and customize once—then reuse forever.

III. Quick-start (copy these steps)
- Set audio & latency: In Setup → Playback Engine, choose your interface driver (ASIO/CoreAudio). Track at small buffers (64–128 samples on capable systems). If you use Pro Tools | Carbon, enable DSP Mode for near-zero-latency monitoring on armed tracks. When you begin mixing, raise the buffer (512/1024) to free CPU.
- Comp clean takes with Playlists: Record multiple passes to take playlists on one track. Solo lanes, audition quickly, and promote the best phrases to the main playlist. Name the final comp “Lead Vox Comp.” Save the raw takes on hidden playlists for safety.
- Establish gain structure with Clip Gain: Show the Clip Gain line and smooth out inconsistent words before compression. Aim for consistent peaks so inserts behave predictably; convert problematic volume automation to Clip Gain where needed so the compressor isn’t “fighting” big level swings.
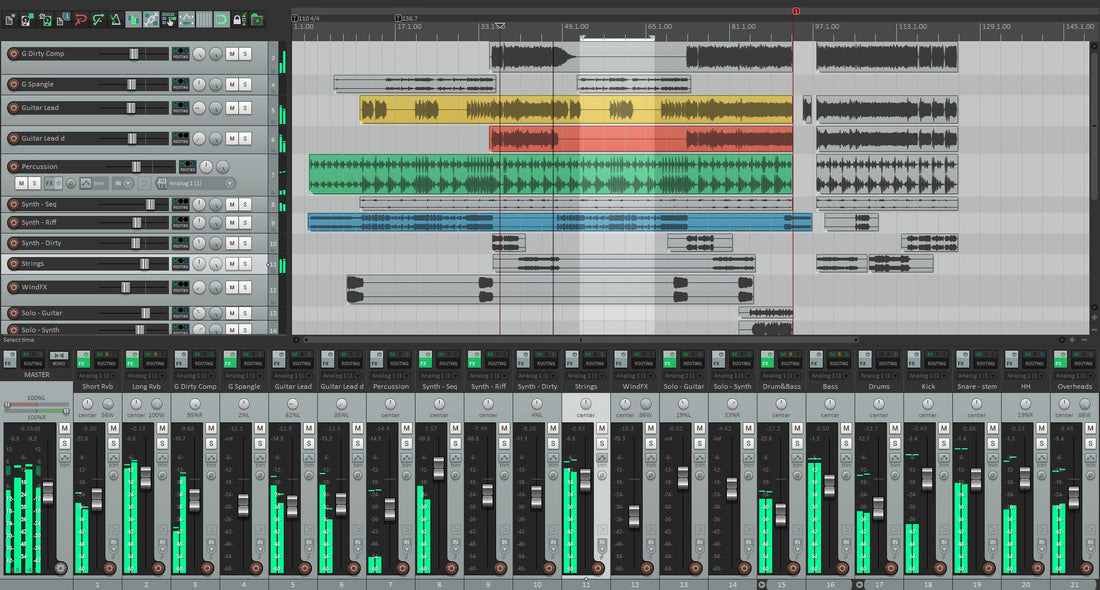
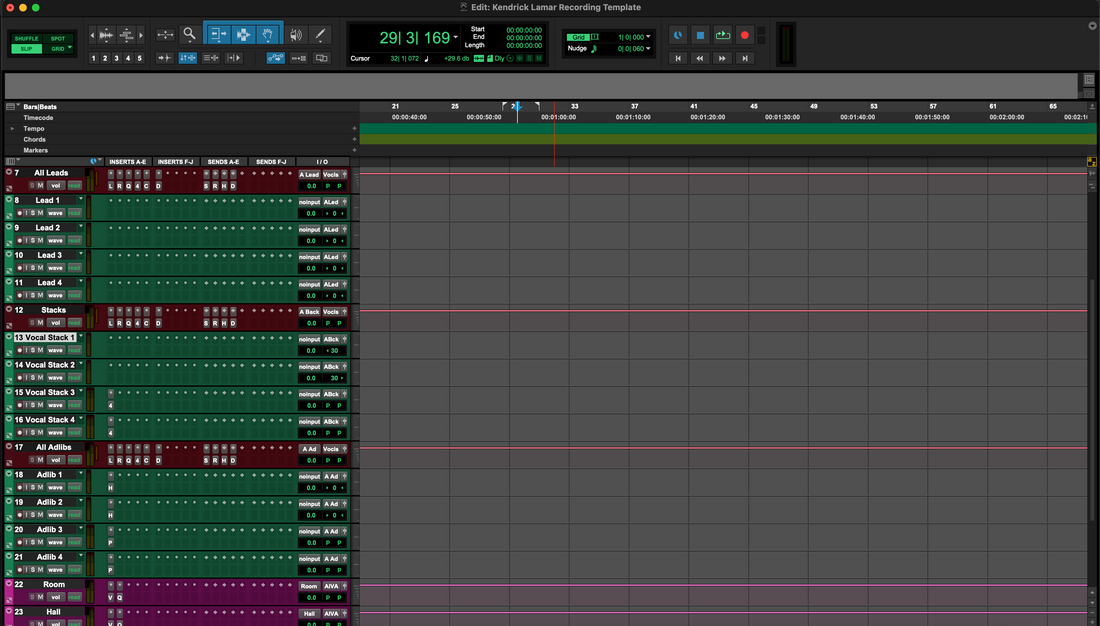
- Route smartly: Put Lead, Doubles L/R, and Ad-libs on their own tracks feeding a Vocal Bus aux. Create two FX returns: Vox Verb (D-Verb) and Vox Delay (Mod Delay III). Make sure Delay Compensation is on.
- Build a stock vocal chain: Start with Avid Channel Strip or EQ3 7-Band for tone, then Dyn3 Compressor/Limiter (COMP) for leveling, and Dyn3 De-Esser for sibilance. Keep it light while you dial balances.
- Shape ambience and intelligibility: Send post-fader to verb/delay; low-cut the verb, low-pass the delay repeats. Duck the returns with sidechain compression keyed from the lead, so the space blooms between phrases, not on top of them.
IV. Style/use-case recipes (copyable chains)
Rap — upfront, consonant-forward
- EQ: High-pass around 80–100 Hz to remove rumble; notch 250–350 Hz if the beat is dense; add a narrow 3–5 kHz lift only if diction needs help; be cautious above 10 kHz unless the mic is dark.
- Compression: On Dyn3 Compressor/Limiter, try ratio 3:1, attack 15–25 ms to let consonants speak, release 80–150 ms for groove, 3–6 dB gain reduction on peaks.
- De-ess: Target 5–8 kHz; use the wide band when esses are broad, split band when it’s a narrow spike.
- FX: Short plate (0.7–1.1 s) plus slap-back or 1/8 delay tucked low. Sidechain-duck the delay return from the dry lead.
- Stacks: Hard-pan doubles ~6–10 dB under the lead; nudge consonants to avoid flams; keep wideners on the bus sparingly and check mono.
Melodic rap / R&B — smooth, airy
- EQ: High-pass 70–90 Hz; a small cut 250–400 Hz for clarity; optional shelf +1–2 dB at 10–12 kHz for sheen.
- Compression: Two light stages (serial). First, gentle leveling (2:1, 1–2 dB GR). Second, slightly faster for peaks (3:1, 1–3 dB GR).
- FX: D-Verb plate 1.4–2.2 s with 20–40 ms pre-delay; Mod Delay III dotted-eighth wide and low; both returns ducked by the lead.
- Tuning: Comp first; clean surgically in Elastic Audio (Elastic Pitch) or Pitch II for subtle correction; keep real-time tuning tasteful.
Pop — wide, polished, competitive
- EQ: Subtractive moves around 180–350 Hz to leave room for bright synths; a precise 2–4 kHz presence touch for diction.
- Compression: Serial (slow, then fast). Keep per-stage GR modest to avoid fatigue; let buses provide extra density.
- FX: Dual delays (1/4 + 1/8) with high-cut repeats; early reflections for closeness. Any widening happens on the vocal bus; check mono after each change.
- Stacks: Harmonies grouped to an HARM bus feeding the Vocal Bus; treat consonants surgically to avoid “splatter” on hooks.
Spoken word / podcast — natural and steady
- EQ: High-pass ~80 Hz; small 3–4 kHz lift for articulation; watch 6–7 kHz lisps.
- Compression: 2:1–3:1, slow attack/medium release for consistency without hype.
- FX: Minimal reverb; prefer short early reflections or a tiny room if completely dry feels unnatural.

V. Troubleshooting & fast fixes
- Latency throws off timing: Track at small buffers with your interface driver. If you have Carbon, enable DSP Mode. Avoid look-ahead/linear-phase processors while recording; add them at mix time.
- Performer hears a double voice: Low Latency Monitoring (LLM) mutes record-enabled track outputs on some systems so the direct input is all you hear. If you’re not on supported hardware, mute the DAW return in your cue path and monitor through the interface’s mixer instead.
- FX move when you ride the vocal fader: That’s post-fader send behavior. Open the send window and switch to Pre for headphone confidence verb, or automate the send amount separately from the track fader.
- Sibilance gets worse after “air” boost: Ease the high shelf and let the de-esser do event-based work around 5–8 kHz. Keep it transparent; esses should tuck, not vanish.
- FX smear words: Sidechain-duck the reverb/delay return using Dyn3 Compressor/Limiter or Pro Compressor keyed from the lead. Set a quick attack so consonants cut, and a musical release so space breathes between phrases.
- Phasey doubles or stacks: Slip-edit consonants, trim and align breaths, and reduce wideners on hard-panned doubles—let panning and timing create width.
- Timing feels off after adding a heavy plugin: Confirm Automatic Delay Compensation is enabled. If one path still drifts, apply Manual ADC adjustment on the affected track or print/process offline and realign.
- Recording armed but you get silence: Verify the track input, check that the Recording filter includes Audio, and confirm OS microphone permissions. If you see input but no print, make sure you’re not monitoring exclusively through the interface with LLM muting the DAW return.
- Export sounds quieter than playback: Monitor volume doesn’t affect the bounce. Watch the Master peak level, leave a few dB of headroom, and prefer lossless bounce for finals.
VI. Advanced / pro tips
- Clip Gain first, compression second: Use Clip Gain to pre-level the performance so your compressor works in a comfortable range. You’ll get steadier GR and fewer artifacts.
- Channel Strip as a “one-stop” tool: Avid Channel Strip (from the System 5 console) gives you filters, EQ, compression, and gate/expander in one insert with consistent metering—great for fast revisions and repeatability.
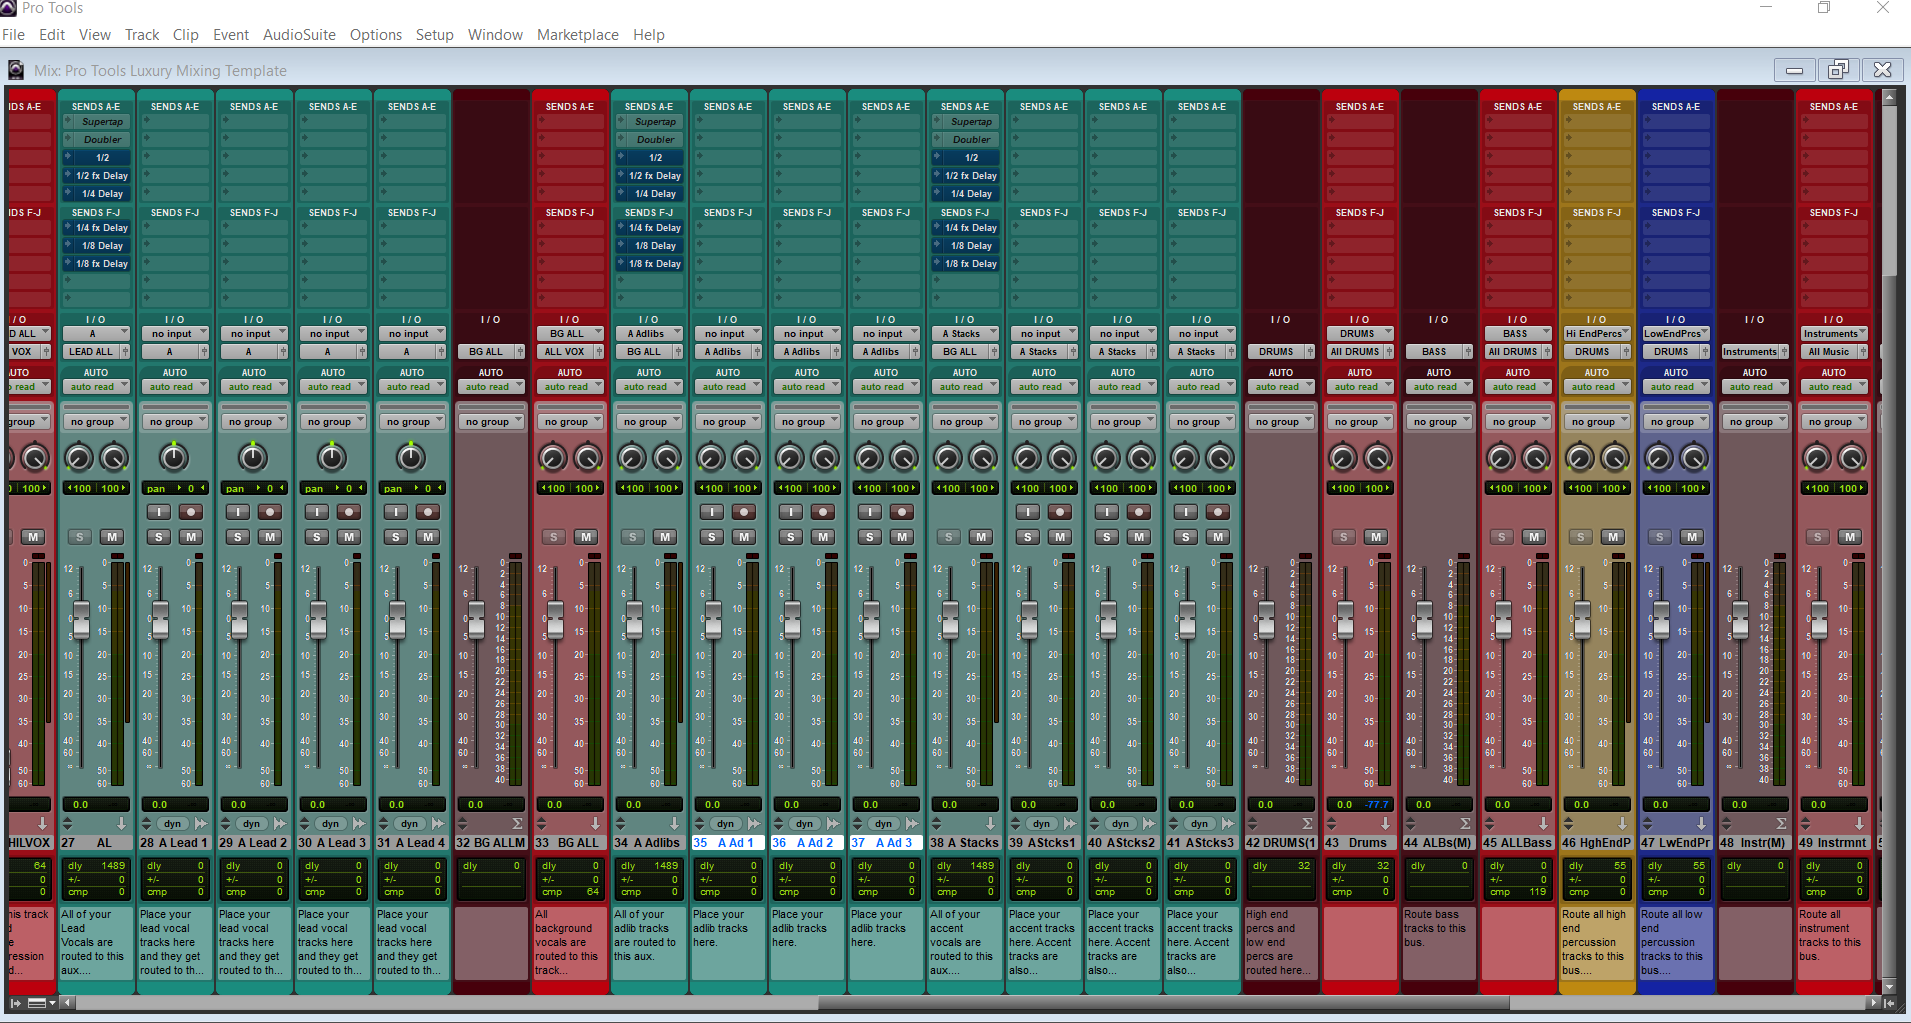
- Build a modular bus core: Route Lead, Doubles, and Harmonies to their own sub-buses feeding the main Vocal Bus. Create “Print” buses (Lead Print, BGV Print, FX Print) for stem exports in a single pass.
- Sidechain delays for groove: Key only the mid band of a multiband compressor on the delay return from the lead, so consonants remain crisp while tails keep their air.
- Elastic timing before tuning: Use Elastic Audio to slip phrasing into the pocket first, then apply Elastic Pitch or Pitch II lightly. Less pitch work is needed when timing feels right.
- Track Presets and templates: Save your vocal track (or bus stack) as a Track Preset, including inserts, sends, I/O and comments. Keep genre and mic variants so you can recall a perfect starting point in seconds.
- PDC sanity: Watch the delay indicators in the Mix Window. If a creative chain adds too much latency on the vocal path, move heavy processors to a bus to keep the record path light, or print effects and re-insert.
- Headroom that masters well: Keep the Vocal Bus and Master below clipping with a couple of dB margin (e.g., peaks under −3 dBFS). Use a safety limiter only for roughs; print mix passes lossless for mastering.
- Automation that sounds musical: Ride phrases into hooks, dip breaths between lines, throw delays on end-words. Fewer, smarter rides beat extra processors.
VII. FAQs
What buffer size should I use while recording?
Use small buffers (often 64–128 samples) with your interface driver. If you have Pro Tools | Carbon, enable DSP Mode for near-zero-latency monitoring. Raise the buffer for mixing.
How do I set pre-fader sends for consistent headphone verb?
Open the send window and click Pre so the send ignores the track fader. Use post-fader for mix FX that should follow your vocal rides.
What’s the best stock de-esser?
Dyn3 De-Esser is simple and effective. Start in the 5–8 kHz range and adjust threshold until esses tuck back naturally. For very specific issues, a narrow EQ dip automated on problem words can help.
Should I use Channel Strip or EQ3 + Dyn3?
Both work. Channel Strip is fast and consistent (filters, EQ, dynamics, gate in one insert). EQ3 + Dyn3 gives you separate modules if you prefer a modular chain.
NewTone/Pitcher equivalents in Pro Tools?
Use Elastic Audio/Elastic Pitch or the Pitch II plugin for note fixes; keep real-time correction subtle so performance still feels human.
Do monitor and export levels match?
No. Headphone/monitor volume doesn’t change what’s printed. What you bounce depends on Mixer gain and processing. Leave headroom on the Master for mastering.
Final thought: The best mixes are deliberate. Keep the chain lean while tracking, shape tone with restraint, let sidechain-ducked FX create space, and save your winning layout as a preset so every new session starts strong.