


How to Install Recording Templates in Logic Pro (Mac Shortcuts & Pro Workflow)
Logic Pro can open straight into a studio that’s already wired: labeled vocal lanes, Summing Stacks, filtered returns, and a headphone-friendly chain. This guide shows how to install and manage templates the right way—where files live, how to save them so they appear in the Project Chooser, and how to build a vocal-first layout that records fast and exports clean. The steps are translation-friendly and rely on Logic’s stock tools. If you also want an instant tone base, audition curated Logic Pro vocal presets and then fine-tune thresholds, de-ess bands, and sends to your mic and room.
I. First principles: a template that does one job well
A great recording template is a decision reducer. It preloads tracks by role (Lead, Boost, Ad-libs, Harmonies), puts sends and returns in place, and provides clear metering. It does not hard-commit to a sound that will fight the next artist. Keep the tracking chain lean, and save “sweetening” for mix time. You can keep several purpose-built templates (Two-Track Vocals, Full Stems, Podcast Dual Mic) and grab the right one in seconds.
II. Where Logic templates live (and how to make them appear)
Logic reads your templates from a specific folder. Files saved there appear in the Project Chooser under “My Templates.”
- Save as Template: open your master project → File → Save as Template…. Give it a clear name and confirm it’s saved inside the Project Templates directory.
-
Default path (user):
~/Music/Audio Music Apps/Project Templates/. Create the folder if it doesn’t exist. -
Subfolders become categories: if you make
Vocal/andPodcast/inside Project Templates, those appear as groups in the Chooser. - Startup action: in Logic Pro → Settings → General → Project Handling, set Startup Action to “Create New Project.” Your templates will be on screen at launch.
Tip: keep the template file small and uncluttered—fast loads encourage you to use it every time.
III. Three on-ramps to reuse (and when to use each)
- Project Template (full studio shell). Best when starting from zero. It preloads tracks, busses, returns, and markers.
- Channel Strip / Patch (single lane or stack). Save the Lead Vox strip or an entire Vocal Stack as a Patch in the Library so you can inject it into any session without switching projects.
- Track Stacks as modular inserts. Keep a “Vocal Stack” project on hand, then drag the stack into any open song to drop in the whole rig (lanes + routing) at once.
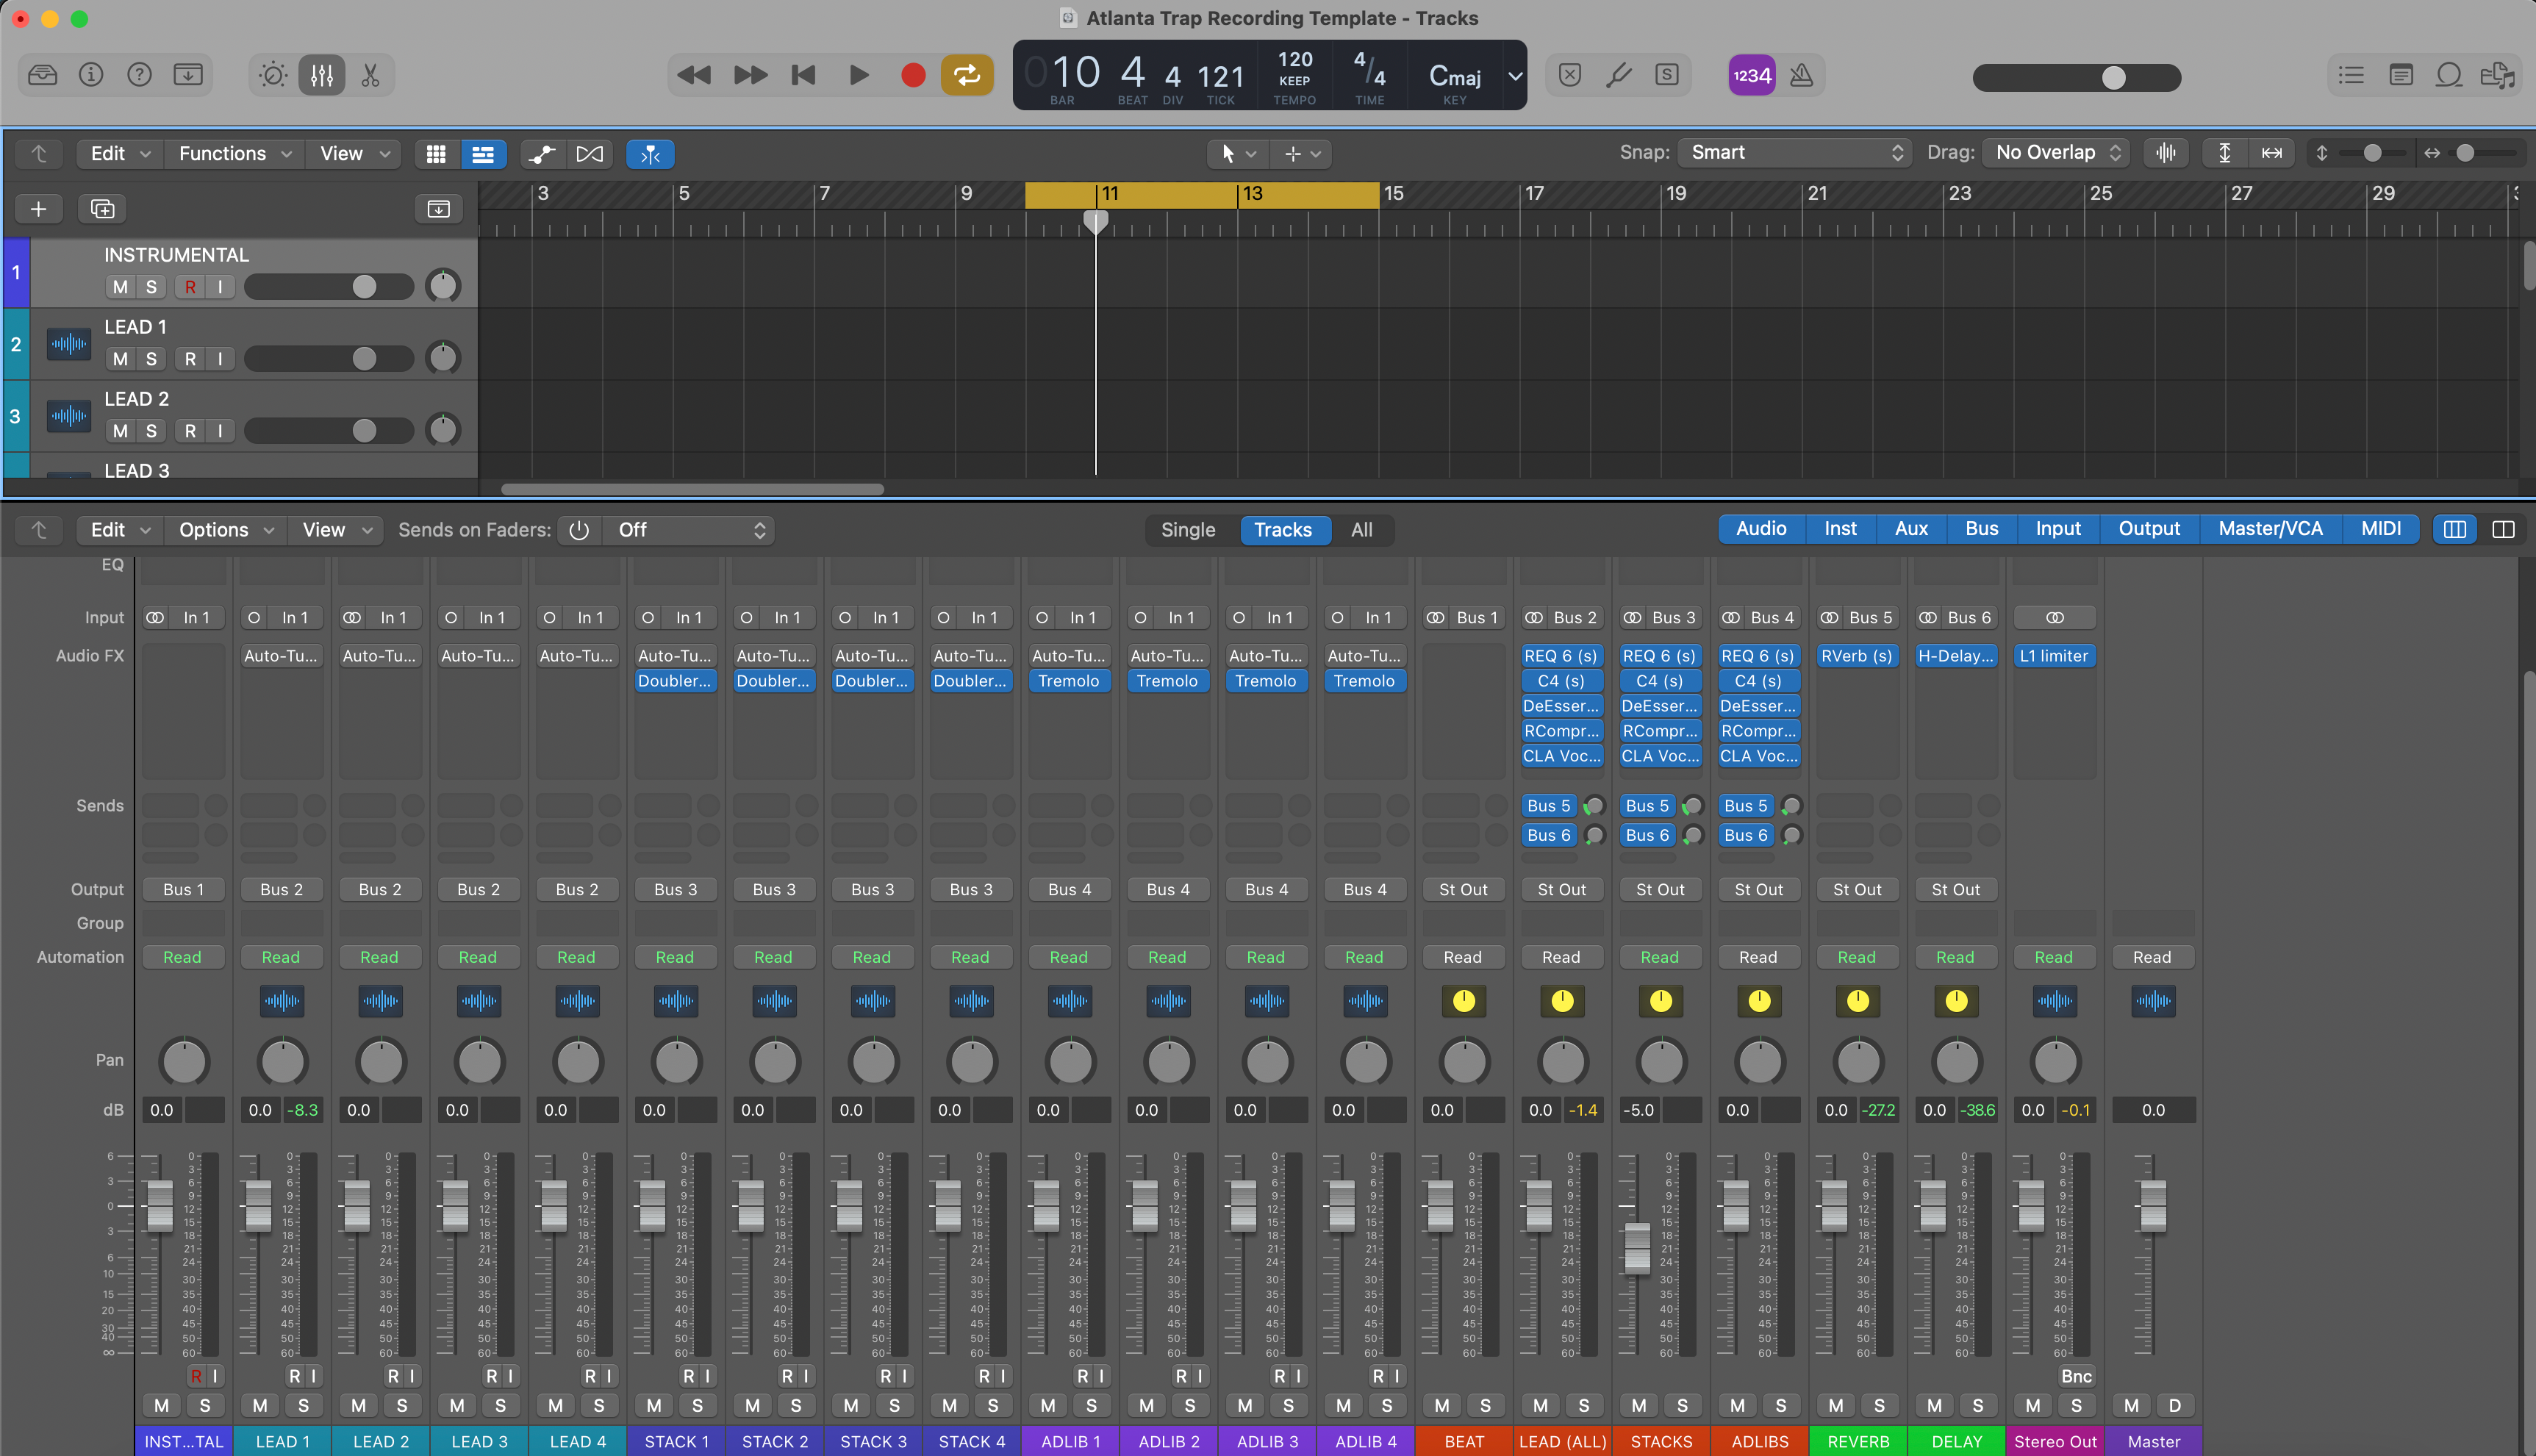
IV. Build the vocal spine with Summing Stacks
Summing Stacks give you a tidy submix with shared processing and simple control. They’re perfect for vocals.
- Lead Vox (mono) → sends to Room/Slap; inserts: HPF, Comp A, De-ess (light), optional color, Comp B (peak catcher).
- Boost Lines (mono) → slightly higher HPF, more de-ess, tucked −6 to −9 dB under Lead.
- Ad-libs (mono) → band-limited (HPF ~200 Hz, LPF ~8–10 kHz), a touch more Slap, panned per section.
- Harmonies (stereo or dual mono) → darker EQ and wider pan, minimal air.
- Vocal Bus (stack output) → gentle glue and broad final de-ess; leave the Stereo Out clean while tracking.
How: select the vocal tracks → Track → Create Track Stack… → Summing. Name the stack “Vocal Stack.” Add a level meter or LUFS meter on the stack output for quick checks.
V. Returns that keep singers confident (and mixes clean)
Returns should energize without haze. Filter aggressively and keep sends modest during tracking.
- Room (0.4–0.8 s), HPF ~150 Hz, LPF ~6–7 kHz.
- Slap (mono 90–120 ms), filtered like the Room; place in the center.
- Tempo Echo (1/8 or dotted-eighth) with low feedback; key ducking from Lead if you use a dynamics plug-in post-delay.
Label returns and color them as a family, so your eyes find them instantly when you ride a send.
VI. Low-latency tracking that still sounds like you
“Feel” beats features. Keep the tracking chain lean; add polish later. Turn on Low Latency Mode (Control Bar button or Settings → Audio → General) if needed. It temporarily bypasses heavy look-ahead devices and keeps timing intact.
- Input discipline: raw peaks around −12 to −8 dBFS. If a shout leaps out, clip-gain it later—don’t clamp the whole chain.
- Two-compressor logic: Comp A for shape (2–3 dB on phrases, 10–30 ms attack, 80–160 ms release). Comp B for spikes (1–2 dB only).
- De-ess before air: S’s first, sheen second. Raise the air shelf after the de-esser, not before.
VII. Two-track instrumental survival kit (vocals over a stereo beat)
When stems aren’t available, the vocal must read against a dense stereo file. Keep a separate two-track template variant:
- Tracks: Beat (stereo), Vocal Stack (Lead/Boost/Ad-libs/Harmonies), returns, and markers.
- Beat control: automate region gain or a pre-fader gain plugin to ride intros/choruses without crushing the master later.
- Space choice: smaller Room, lower returns; dry-leaning verses keep diction sharp. A tiny throw into each hook sells size without smearing words.
VIII. Color, naming, and markers that keep sessions calm
Clarity reduces mistakes. Use a stable palette and predictable names across every template.
- Palette: Lead = gold, Boost = orange, Ad-libs = blue, Harmonies = teal, Returns = purple, Stack = dark gold.
- Names: “Lead Vox,” “Boost Lines,” “Ad-libs L/R (by section),” “Harmonies.” Avoid cryptic labels.
- Markers: drop “Verse,” “Pre,” “Hook,” and “Bridge,” plus a 1-bar count-in region for quick punches.
IX. Library power: save strips and stacks as Patches
Templates aren’t the only reuse trick. Save channel strips and full stacks as Patches in the Library so you can inject them into any project.
- Save strip: on Lead, open the Library → choose “Save…” to store a User Patch (includes inserts, sends, Smart Controls).
- Save stack: select the Summing Stack → Library → “Save…” to preserve the whole vocal rig (lanes + routing).
- Recall fast: in any project, select a track or stack and load your User Patch; Logic wires the sends/returns automatically when possible.
X. File hygiene: portable and future-proof
Templates pay off when they open cleanly on every rig.
- Self-containment: keep custom IRs, samples, and notes in a sibling “Template Assets” folder. Avoid references to removable drives.
-
Backups: mirror
~/Music/Audio Music Apps/Project Templates/and your User Patches folder regularly. -
Variants: keep
_44kand_48ktemplate versions if you bounce between music and video work.
XI. Ten-minute build you can copy now
- New Project. Name it “Template — Vocal Record — 48k.” Set BPM/key if helpful.
- Add tracks: Lead (mono), Boost (mono), Ad-libs (mono), Harmonies (stereo). Select and make a Summing Stack named “Vocal Stack.”
- Returns: add three Auxes: Room, Slap, Tempo Echo. Insert stock tools; filter returns (HPF ~150 Hz, LPF ~6–7 kHz).
- Lead chain: HPF → Comp A → De-ess → (optional color) → Comp B → small presence lift only if diction hides.
- Sends: Lead small Room+Slap; Boost a touch more Slap; Ad-libs a little more Room and occasional Echo throw.
- Markers: Verse / Pre / Hook / Bridge + 1-bar count-in.
- Colors & order: apply the palette; stack at the top, returns at the bottom; add a meter on the stack out.
-
Save as Template. File → Save as Template… → put it in
~/Music/Audio Music Apps/Project Templates/. Done.
XII. Troubleshooting atlas (symptom → one move)
-
Template not in Project Chooser: confirm it’s inside
Project Templates(user path), not your desktop. Restart Logic. - Double/chorus monitoring: you’re hearing hardware and software. Mute one path or enable Low Latency Mode; keep tracking chains light.
- Click prints in bounce: turn off the metronome; don’t route the click to Stereo Out. Check that a “Click” aux isn’t active on the print path.
- S’s are sharp on earbuds: widen the de-ess band slightly; back off any air shelf 0.5 dB; low-pass delay returns to ~6–7 kHz.
- Hook collapses in mono: center Lead; keep width in doubles/ad-libs; avoid stereo wideners on the main lane.
- Beat overpowers voice (two-track): trim Beat region −1 to −2 dB; raise Lead +0.5 dB; avoid over-compressing the vocal to “keep up.”
- Latency spikes mid-session: bypass heavy analyzers; re-enable Low Latency Mode; raise I/O buffer slightly and print heavy FX later.
- Template got messy: never record into the master. Open → Save As… new song → work there.
XIII. Export logic: pass checks the first time
Keep printing simple and consistent across songs.
- Heads/tails: trim silence and add short fades. Leave clean reverb tails.
- Alternates: bounce Main, Instrumental, and A Cappella with identical starts and tails so versions line up in any DAW.
- Format: WAV, 24-bit at session rate. Dither only if reducing bit depth for a specific deliverable.
XIV. Template variants that earn their keep
Keep a small, purposeful library—not a junk drawer. Examples:
- Vocal over Two-Track — tighter sends, modest Room, careful Echo throws; Beat track at −1 dB headroom.
- Full Stems, Pop — widen only above the presence band; protect the center for lead and snare.
- Podcast Dual Mic — two mono lanes with gates/expanders, light EQ, and a mono bus for consistent loudness.
XV. Where structure meets sound (next logical read)
Once your Logic template is installed and stable, take five minutes to lock down your handoff process. Clean stem exports save hours later and keep collaborators happy. Here’s a concise walkthrough tailored to Logic users: export stems from Logic Pro. Pair that with your template and you’ll deliver stems that drop into any mix without surprises.
XVI. Closing thoughts: build once, sing sooner
Logic Pro templates are about attention, not automation. Label lanes, filter returns, and commit to a lean tracking chain. Save the result as a true Logic Template so it’s one click away every time you open the app. With a tidy Summing Stack and a few sensible sends, sessions start calm, comping is faster, and final bounces pass QC on the first try. If you want tone that loads in a single click, drop in Logic Pro vocal presets, tweak them to your mic, and re-save your template so great recording days are the default—not the exception.


