


BandLabのボーカルプリセットは、一度に読み込める保存されたFXチェーンです。このガイドでは、適切なチェーンの選び方、健全なゲイン設定、マイクに合わせたトーン調整、リターンのルーティング、シーンの自動化、そして信頼できるMy Presetsの保存方法を紹介します。これにより、ボーカルがスマホ、イヤホン、大型スピーカーでしっかり伝わります。数秒で開ける実績のあるスタートポイントが欲しいですか?厳選されたBandLabボーカルプリセットを閲覧し、しきい値やセンドを声に合わせて微調整しましょう。
I. BandLabでボーカルプリセットを使う意味
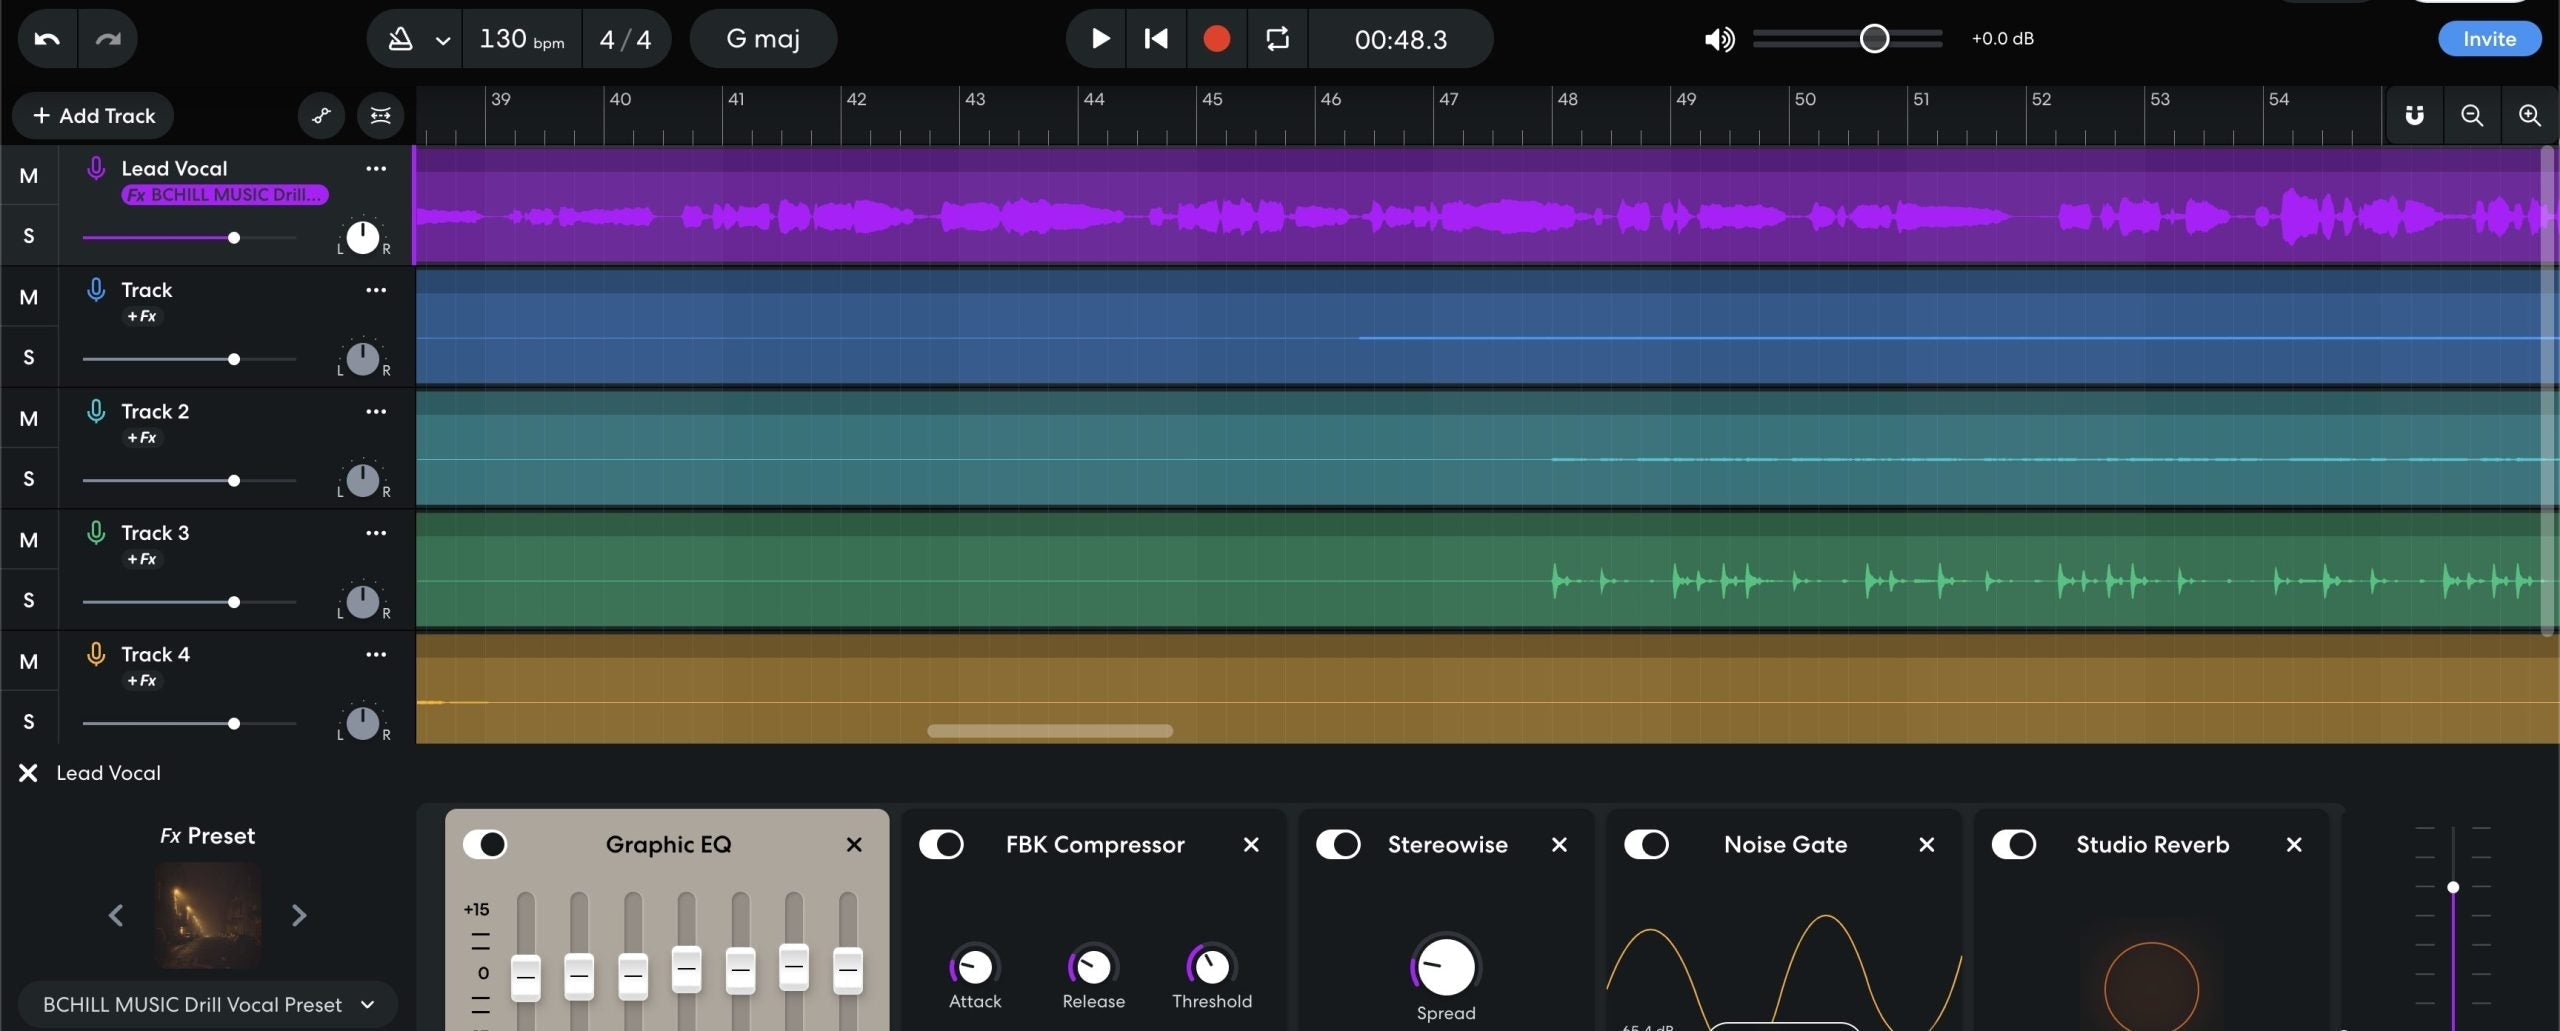
BandLabでは、ボーカルプリセットはMy Presetsに保存されたトラックFXチェーンです。以下を含むことができます:
- ランブルコントロール、ロー・ミッドのクリーンアップ、プレゼンス、エアのためのEQ。
- 形作りとピークコントロールのための1つまたは2つのコンプレッサー。
- 発音を損なわずにシビランスを抑えるディエッサー。
- 密度のためのサチュレーション、空間のためのディレイとリバーブ。
VST/AUプラグインはありません。すべてブラウザまたはモバイルアプリでネイティブに動作します。プリセットはアカウントに同期され、ログインしたどのデバイスでも使用可能です。
II. プレフライト:セッションの準備を整える
- 最新のChrome/Edge/Safariブラウザまたはモバイルアプリを使用してください。
- マイク/インターフェースを接続し、トラックで正しい入力を選択します。
- ヘッドホンを装着してください。スピーカーでのモニタリングは音漏れを防ぐため避けてください。
- Lead Voxという名前のオーディオトラックを1つ作成し、他はミュートにして調整します。
- 実際のパフォーマンス音量で歌い、FX前の生入力ピークを−12〜−8 dBFS程度に目指します。
III. プリセットを読み込む3つの方法(それぞれの使いどころ)
1) テンプレートを複製し、それをプリセットとして保存する(最も安全)
- クリエイターが提供したプリセット/テンプレートリンクを開き、スタジオで開くまたはコピーを共有をクリックします。
- ミックスエディターでボーカルトラックを選択し、エフェクトを開きます。
- EQ → コンプレッサー → ディエッサー →(サチュレーション)→ ディレイ → リバーブが表示されていることを確認してください。
- プリセットメニューをクリックし、保存または新しいプリセットとして保存を選択します。わかりやすい名前を付けてください。例:Lead — Clean Pop (ST)。
理由: テンプレートから正確なデバイスの順序とルーティングを保持し、マイプリセットに保存されます。
2) BandLabの組み込みから始めて、カスタマイズし、保存する
- ボーカルトラックを追加し、FXプリセットタイルをクリックしてカテゴリ(クリーン、ラップ、ポップなど)を閲覧します。
- ターゲットに最も近いベースサウンドを選んでください。まだ完璧を追い求めないでください。
- セクションV〜VIIIのステップで調整し、新しいプリセットとして保存してください。
理由: 外部テンプレートがなくても、素早くスタートしたいときに最適です。
3) 設定から手動で構築し、保存
- ボーカルトラックにはこの順でFXを追加します:EQ → コンプレッサー → ディエッサー → (コンプレッサー2) → サチュレーション → ディレイ → リバーブ。
- セクションVIIIの「安全なチェーン」を調整し、役割+雰囲気の名前でプリセットを保存します。
理由: 完全なコントロールと各デバイスの動作の完全な理解。
IV. 正しい方法で試聴:迅速で正直なテスト
- 10〜20秒のフレーズをループし、静かな部分と大きな部分の両方を含めます。
- レベルマッチしてから判断してください。音が大きいほど「良く」聞こえることがほとんどです。
- プリセットを切り替えて、翻訳(イヤホンや小型スピーカー)を聴き、「輝き」だけでなく確認しましょう。
- お気に入りを保存してマイプリセットに入れ、使わないものは削除しましょう。
V. ゲインステージング:成功か失敗かの分かれ目
プリセットはレベルの悪さを直せません。ヘッドルームはクリーンで予測可能に保ちましょう:
- まずインターフェースのゲイン: マイクプリアンプを未処理のピークが−12〜−8 dBFSに達するように設定します。
- コンプレッサー1のターゲット: 定常的な圧縮ではなく、フレーズで約3〜5 dBのゲインリダクション(形作り)。
- コンプレッサー2(オプション): ピークで1〜2 dBの速いキャッチャー。センドを安定させます。
- ポストFXのピーク: 約−6〜−3 dBFSに保ちます。ラウドネスはマスタリング用に残してください。
VI. プリセットを自分のものにする(小さな動きが反映される)
まずは広く穏やかな動きを使いましょう。狭く急激な動きは翻訳に悪影響を与えることが多いです。
- ディエッサー (6–8 kHz): イヤホンが不快に感じなくなるまで調整します。子音がぼやける前に止めてください。
- ボディ (120–200 Hz): 薄い場合は温かみを加えます。ブースが「箱っぽく」聞こえる場合は、250–350 Hzを減らしてください。
- プレゼンス(3〜4kHz): 発音が隠れる場合のみ+0.5〜1dBのワイドブースト。ハイハットが明るい場合は声ではなくビートを削る。
- エア(10〜12kHz): シビランス制御後に微細なシェルフ。
- FXバランス: スラップバック90〜120ms、ショートプレート0.7〜1.0秒(プリディレイ20〜50ms)。ヴァースはドライめ、フックはオープン。
VII. Lead対スタック: クローンではなく“ファミリー”を作る
- Lead: モノラル真ん中;最小限のワイドニング;ストーリーを前に進めるためにボリュームを調整。
- ダブルズL/R: Leadより高めのハイパス、やや多めのディエス、6〜9dB下げてタック;マイクロパンで左右に。
- ハーモニー: ダークなEQ;ダブルより広め;必要なら微細な5kHzのシマー。
- アドリブ: 狭い帯域幅(HPF約200Hz、LPF約8〜10kHz);サイドパン;トランジションで短いスローエコー。
役割ごとにプリセットを1つずつ保存(Lead — Clean、Double — Tight、Harmony — Wide、Ad-Lib — Phone)して即座に呼び出せるように。
VIII. 数分で作れるストックの“セーフチェーン”
- EQ: HPF80〜100Hz;ボクシーな場合は250〜350Hzで−1〜−2dBのワイドカット;鼻声なら1kHz付近にタイトなディップをオプションで。
- コンプレッサーA(シェイプ): 約2:1〜3:1;アタック10〜30ms;リリース80〜160ms;フレーズで3〜5dBのゲインリダクションを目指す。
- ディエッサー: 6〜8kHzに設定;イヤホンでS/T/SHが心地よくなるまで減らす。
- コンプレッサーB(キャッチャー): ピークで1〜2dBのゲインリダクションを狙ったより速い動作。
- サチュレーション(オプション): 密度のために低めのミックス;“ラウダーバイアス”を避けるために出力を合わせる。
- EQポリッシュ: 発音が隠れる場合のみ3〜4kHzで+0.5〜1dBのワイドブースト;最後に微細なエアシェルフ。
- ディレイ&リバーブ: スラップバック90〜110ms(150Hz〜6kHzフィルター付き);明るいショートプレート(0.7〜1.0秒;プリディレイ20〜50ms);リターンにフィルター。
Lead — Stock Clean (ST)として保存し、異なる曲用に軽め/重めのバージョンを作成します。
IX. 時間と空間: ミキサーのようにセンドを使う
BandLabには従来のオックスバスはありませんが、ミキサーのようにFXを管理することは可能です:
- トラックチェーンにディレイとリバーブを残し、それらのミックスコントロールをセンドのように扱ってください。
- オートメーション:フック部分でディレイ/プレートを1〜2dB上げ、早口言葉部分では下げてください。
- リターンは約6〜7kHzにフィルターし、テールがイヤホンでヒスを足さないようにします。
X. 2トラックビートの生存術(明るいハイハット、重いサブ)
- 戦わずに削る:リードのAirは控えめにし、ディレイやプレートのリターンをフィルターして、シンバルのスプラッシュがボーカルの明るさと重ならないようにしてください。
- サブの共存:808のテールで音節が消える場合はバースをドライに保ち、重いコンプの代わりに小さなプレゼンスリフトを加えてください。
- モノチェック:スマホでプレビューし、ストーリーが伝われば選択は正しいです。
XI. モバイルワークフロー(iOS/Android)
- お気に入りのリードチェーンでスターターソングを作成し、わかりやすく名前を付けてください。
- 新しいプロジェクトごとにスターターを複製し、チェーンを事前に読み込んでおきましょう。
- スマートコントロールは軽く調整し、新しい設定がより良ければ更新版を保存してください。
モバイルはブラウザとよく連携しますが、レイテンシーが増える場合は軽めのFXでトラックしてください。テイク後に仕上げを加えましょう。
XII. 時間を節約する整理術
-
並べ替え可能な名前:
リード — クリーン,リード — Air+,ラップ — パンチ,ハーモニー — ワイドソフト,アドリブ — 電話. - 役割ごとに一つ:リードプリセットをダブルやハーモニーで使い回さないでください。
- LiteとFullの使い分け:トラッキング用に低レイテンシーの“Lite”版を、ミキシング用に“Full”版を保持してください。
- 不要なものを削除:使わないプリセットを削除してください。選択肢が少ないほど作業は速くなります。
XIII. トラブルシューティング(問題 → 集中した対処)
- プリセットは保存されたが見えない場合:トラックFXタイルを開き → My Presets。すべてのデバイスで同じアカウントにログインしていることを確認してください。
- 明るくした後のきついS音:ディエスを少し上げ、エアシェルフを約0.5dB下げ、FXリターンをローパスしてください。
- ビートの下でボーカルが沈む場合:バースはドライに保ち、プレゼンスを少し上げ、ディレイフィードバックを減らし、同じトラックに似たプリセットを重ねていないか確認してください。
- トラッキング時のレイテンシー:Liteチェーンを使用し、バックグラウンドアプリを閉じ、バッファーやデバイスの負荷を下げてからミキシングのために品質を回復させてください。
- A/Bテストでレベルがジャンプする場合:判断前に出力レベルを合わせましょう。大きい音は錯覚を招くことがあります。
- モバイルは音が異なります:入力ゲインとヘッドホンの音量を確認し、システムレベルで余計なリバーブを追加しないようにしましょう。
XIV. キャプチャが重要(あなたのプリセットが感謝します)
良いプリセットは良い録音で輝きます。部屋を整え、ノイズをコントロールし、マイクの位置を一定に保ちましょう。この実用的なホームボーカルスタジオガイドは、チェーンの前にトーンを安定させる迅速な方法を示しており、プリセットが後で大きな調整を必要としなくなります。
XV. クイックFAQ
プリセットはオートチューンの前に読み込みますか、それとも後ですか?
ピッチ補正を最初にかけて、ダイナミクスとディエッシングが安定した信号を受け取るようにしましょう。
ミックス中のボーカルの音量はどのくらいが適切ですか?
ポストFXのピークは−6〜−3 dBFS付近に保ち、マスタリングのためのヘッドルームを残しましょう。
プリセットに特別なマイクは必要ですか?
いいえ。プリセットは出発点です。Trim、De-Ess、Body、Presence、FXを自分の声とマイクに合わせて調整してください。
プリセットを共有できますか?
はい—チェーンがロードされたテンプレート曲を共有できます。コラボレーターは複製してMy Presetsに保存可能です。
XVI. クイックアクションプラン(コピー可能)
- 入力レベルは生のピークが−12〜−8 dBFSに収まるように設定しましょう。
- プリセットを読み込み、レベルを合わせてから判断してください。
- ディエスは「ソフトで明るい」設定にし、発音が隠れる場合のみわずかにプレゼンスを加え、エア感は控えめに保ちます。
- スラップ+ショートプレートを使い、リターンをフィルターし、フック部分で自動化して上げましょう。
- My Presetsに役割別バージョン(リード、ダブル、ハーモニー)を保存しましょう。
うまく使えば、ボーカルプリセットは信頼できるショートカットであり、頼り切りではありません。ヘッドルームを十分に保ち、小さな調整を行い、重要な部分を自動化すれば、声は厳しさなく前に出ます—曲ごとに。これらのルールに従った迅速なスタート地点が欲しい場合は、BandLabプリセットを試し、自分に合った“ベストフィット”バージョンをロックして繰り返し使いましょう。


