


1 The Critical Importance of A/B Comparison
A/B comparison is one of the most valuable skills in audio production, yet it's often overlooked by beginners. The ability to instantly switch between two audio sources reveals differences that are impossible to judge when listening sequentially. Our auditory memory is short—within seconds, we forget the exact character of what we just heard, making comparisons unreliable without instant switching.
Professional engineers use A/B comparison constantly: comparing processed to unprocessed audio, comparing mixes to reference tracks, evaluating plugin choices, and making mastering decisions. This technique removes subjectivity and ego from the equation, letting you make decisions based on what actually sounds better rather than what you think should sound better.
The psychological phenomenon known as "confirmation bias" affects all of us. When we apply processing, we expect it to improve the sound, so we hear improvement even when none exists—or when the processing actually makes things worse. A/B comparison cuts through this bias by providing immediate, objective feedback.
Beyond mixing decisions, A/B comparison accelerates learning. By rapidly switching between professional references and your own work, you train your ears to recognize the specific differences in EQ balance, dynamics, stereo width, and overall polish that separate amateur and professional productions.
2 The Essential Art of Loudness Matching
Before any A/B comparison, you must match perceived loudness between your tracks. This is not optional—it's absolutely essential for meaningful comparison. Louder always sounds "better" to human ears, regardless of actual quality. A 1-2dB difference is enough to bias your judgment completely.
Why Louder Sounds Better
The Fletcher-Munson curves demonstrate that our perception of frequency balance changes with volume. At louder levels, we hear more bass and treble relative to midrange. This makes louder sources sound fuller, more exciting, and more impressive—even if the actual quality is identical or worse.
This loudness bias is so strong that it has been exploited throughout audio history: radio stations compress to be louder, mastering has gotten progressively louder over decades, and plugin demos are often slightly louder to seem better. Awareness of this bias is the first step to overcoming it.
How to Match Loudness
Use a loudness meter (LUFS measurement) rather than peak meters. Aim for matching integrated loudness within 0.5 LUFS. If using our comparison tool, adjust the volume slider until both tracks feel equally loud during the loudest sections. When in doubt, make the track you're evaluating slightly quieter—this biases against it, so if it still sounds better, you know the improvement is real.
3 Using Reference Tracks Effectively
Reference tracks are professionally mixed and mastered songs that represent your target sound. Comparing your work against references throughout the mixing process keeps you on track and prevents the drift that happens when you mix in isolation for hours.
Choosing References
Select references that match your target genre and era. A modern trap beat shouldn't be referenced against a 1970s rock mix. Choose 2-3 references with different strengths: one for low end balance, one for vocal treatment, one for overall punch and energy. Know your references intimately—listen to them hundreds of times so you understand every detail.
What to Compare
Don't try to compare everything at once. Focus on specific elements: just the low end, just the vocal presence, just the stereo width. Toggle between reference and your mix while focusing on one element. This focused comparison reveals specific actionable differences rather than vague impressions.
Our Frequency Analyzer can help visualize differences you're hearing, but trust your ears first. Visual analysis confirms what you hear—it shouldn't replace critical listening.
4 A/B Testing in the Mixing Process
Every mixing decision benefits from A/B comparison. Before committing to any processing, compare the processed signal against the original. Ask yourself: does this actually improve the sound, or am I just making it different?
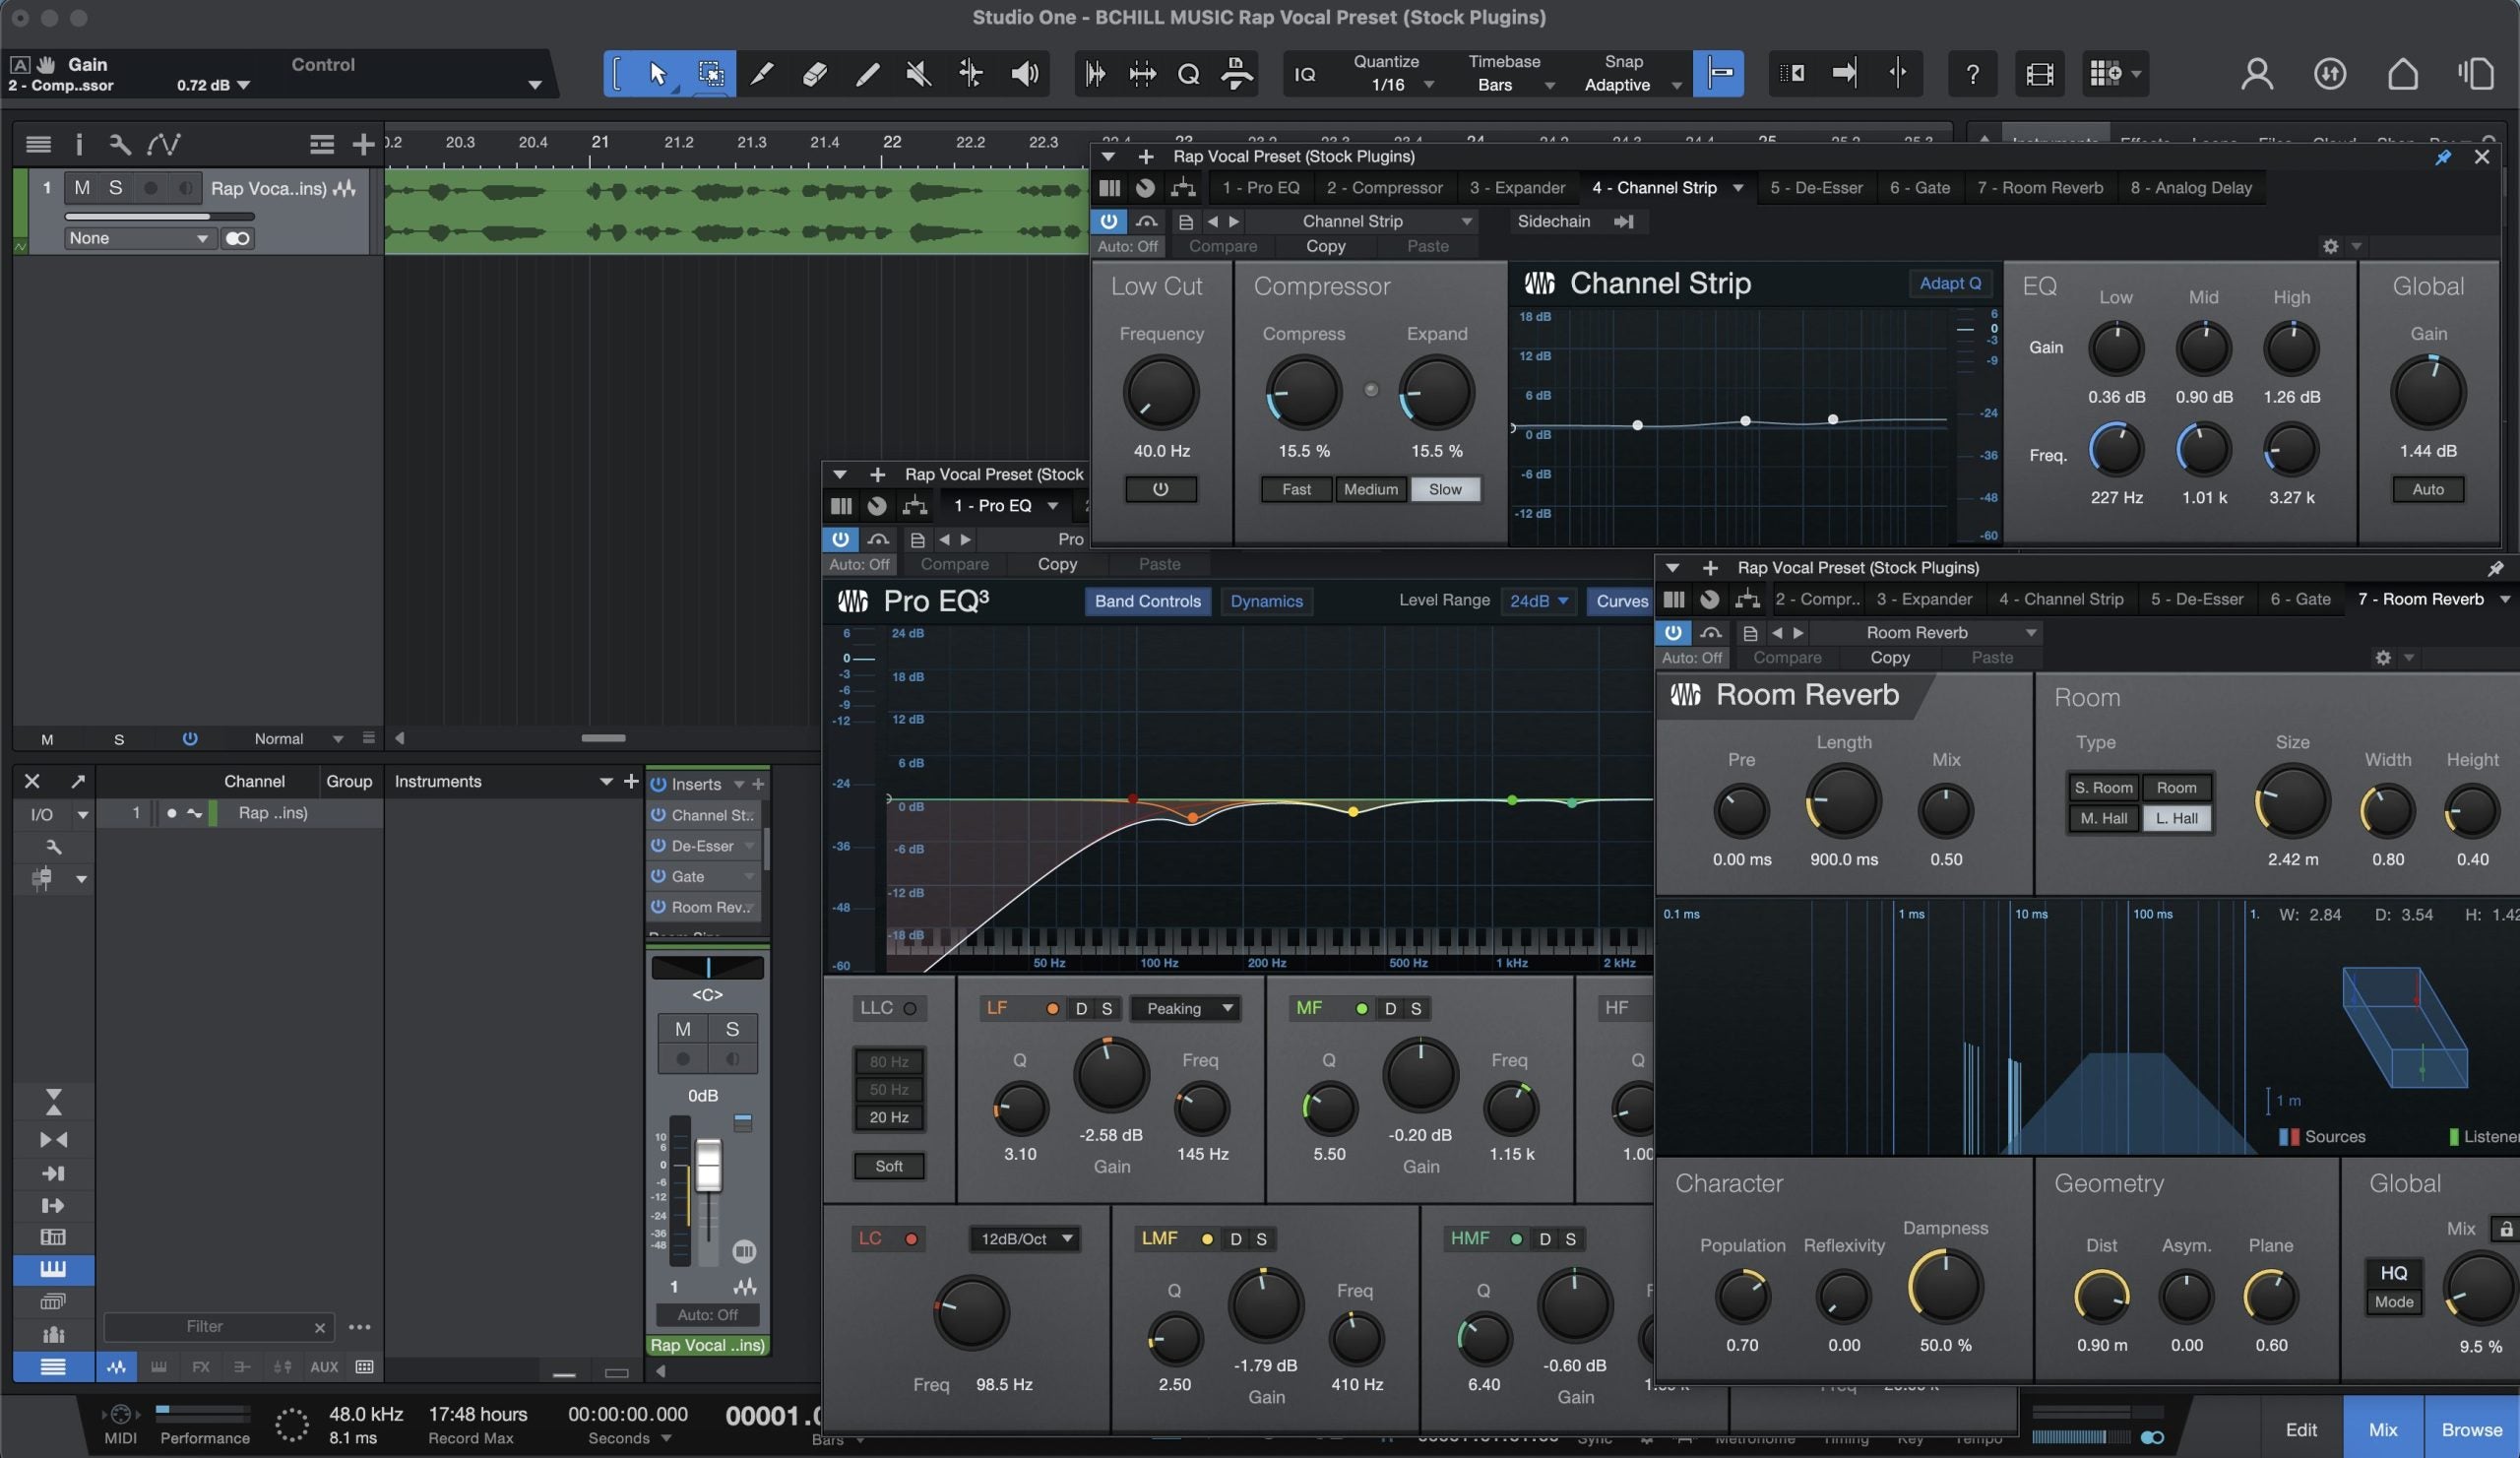
EQ Decisions
Apply your EQ, then bypass it and listen to the original. Toggle back and forth rapidly. Does the EQ'd version serve the song better? Sometimes cuts are more effective than boosts. Sometimes the original was better. A/B comparison reveals the truth quickly.
Compression Decisions
Compression changes dynamics and often adds subtle coloration. Compare compressed to uncompressed at matched loudness (crucial—compressors usually increase perceived loudness). Use our Attack/Release Calculator to find musical starting points, then A/B to confirm improvements.
Effect Decisions
Reverb, delay, and other effects can enhance or muddy a mix. A/B the dry signal against the processed version. Also compare different effect settings against each other: which reverb type, which delay time? The best choice isn't always what sounds impressive in isolation—it's what serves the mix.
5 A/B Comparison in Mastering
Mastering decisions require even more careful A/B comparison than mixing because changes are often subtle and affect the entire program material. What seems like an improvement on the first listen might reveal problems over repeated playback.
Comparing Master to Mix
Always compare your master against the unmastered mix at matched loudness. The master should sound better in every way—more polished, more cohesive, more exciting. If the master sounds different but not clearly better, question whether your processing is helping or just changing things.
Comparing to Commercial Releases
Reference your master against commercial releases in the same genre. Focus on specific qualities: loudness (using LUFS), tonal balance, dynamic range, stereo image. Commercial references reveal whether your master will compete on streaming platforms and playlists.
Translation Testing
Compare how your master sounds across different playback systems. Use A/B comparison between your studio monitors and consumer speakers, headphones, car systems, and phone speakers. A good master translates well everywhere.
6 Evaluating Plugins and Gear
A/B comparison is essential when evaluating plugins, hardware, or any audio equipment. Marketing hype and visual design can bias perception—only blind A/B comparison reveals actual sonic differences.
Plugin Shootouts
When comparing plugins, match settings as closely as possible and level-match outputs precisely. Compare stock DAW plugins against expensive third-party options. You might be surprised how often the differences are minimal—and how often your money could be better spent elsewhere.
Analog vs. Digital
The analog versus digital debate is best settled with careful A/B comparison rather than ideology. Record the same source through both signal paths, level-match, and compare blind. Let your ears decide, not your preconceptions about what "should" sound better.
Before You Buy
Demo plugins extensively before purchasing. Use A/B comparison against your existing tools. Does the new plugin offer something you can't achieve with what you already have? The answer is often no, saving you money and simplifying your workflow.
7 A/B Comparison as Ear Training
Regular A/B comparison trains your ears to recognize subtle differences that initially seem imperceptible. This skill develops over months and years of practice, eventually allowing you to hear things that elude untrained listeners.
Frequency Recognition
Compare audio with and without specific frequency adjustments. Start with obvious 6dB boosts and cuts, then gradually work toward hearing 1-2dB changes. Over time, you'll identify problem frequencies by ear without needing analyzers.
Dynamic Differences
Compare different compression settings to train your ears for dynamic changes. Learn to hear the difference between 2:1 and 4:1 ratios, between fast and slow attack times, between subtle and heavy compression. This training accelerates all future mixing decisions.
Spatial Awareness
Compare mono to stereo, narrow to wide stereo images, dry to reverberant signals. Develop your spatial hearing so you can instantly assess and correct stereo image problems.
8 Professional A/B Workflow
Incorporate A/B comparison systematically into your production workflow for consistent, professional results.
Regular Reference Checks
Set a timer to compare against references every 20-30 minutes during mixing. This prevents the gradual drift that happens when you mix in isolation. Our tool makes these checks quick and easy.
Fresh Ears Protocol
After breaks or at the start of a new session, use A/B comparison to reorient your ears. Compare yesterday's mix against your reference before making any changes. This prevents the common mistake of "fixing" things that weren't broken.
Client Communication
When working with clients, use A/B comparison to demonstrate improvements. "Here's before, here's after" is more convincing than any verbal explanation. This builds trust and helps clients understand the value of professional mixing.
For professional mixing and mastering with meticulous A/B comparison at every stage, explore our Mixing Services. We'll help your music compete with commercial releases.