


News

How to Mix Vocals in Ableton Live: Complete Guide
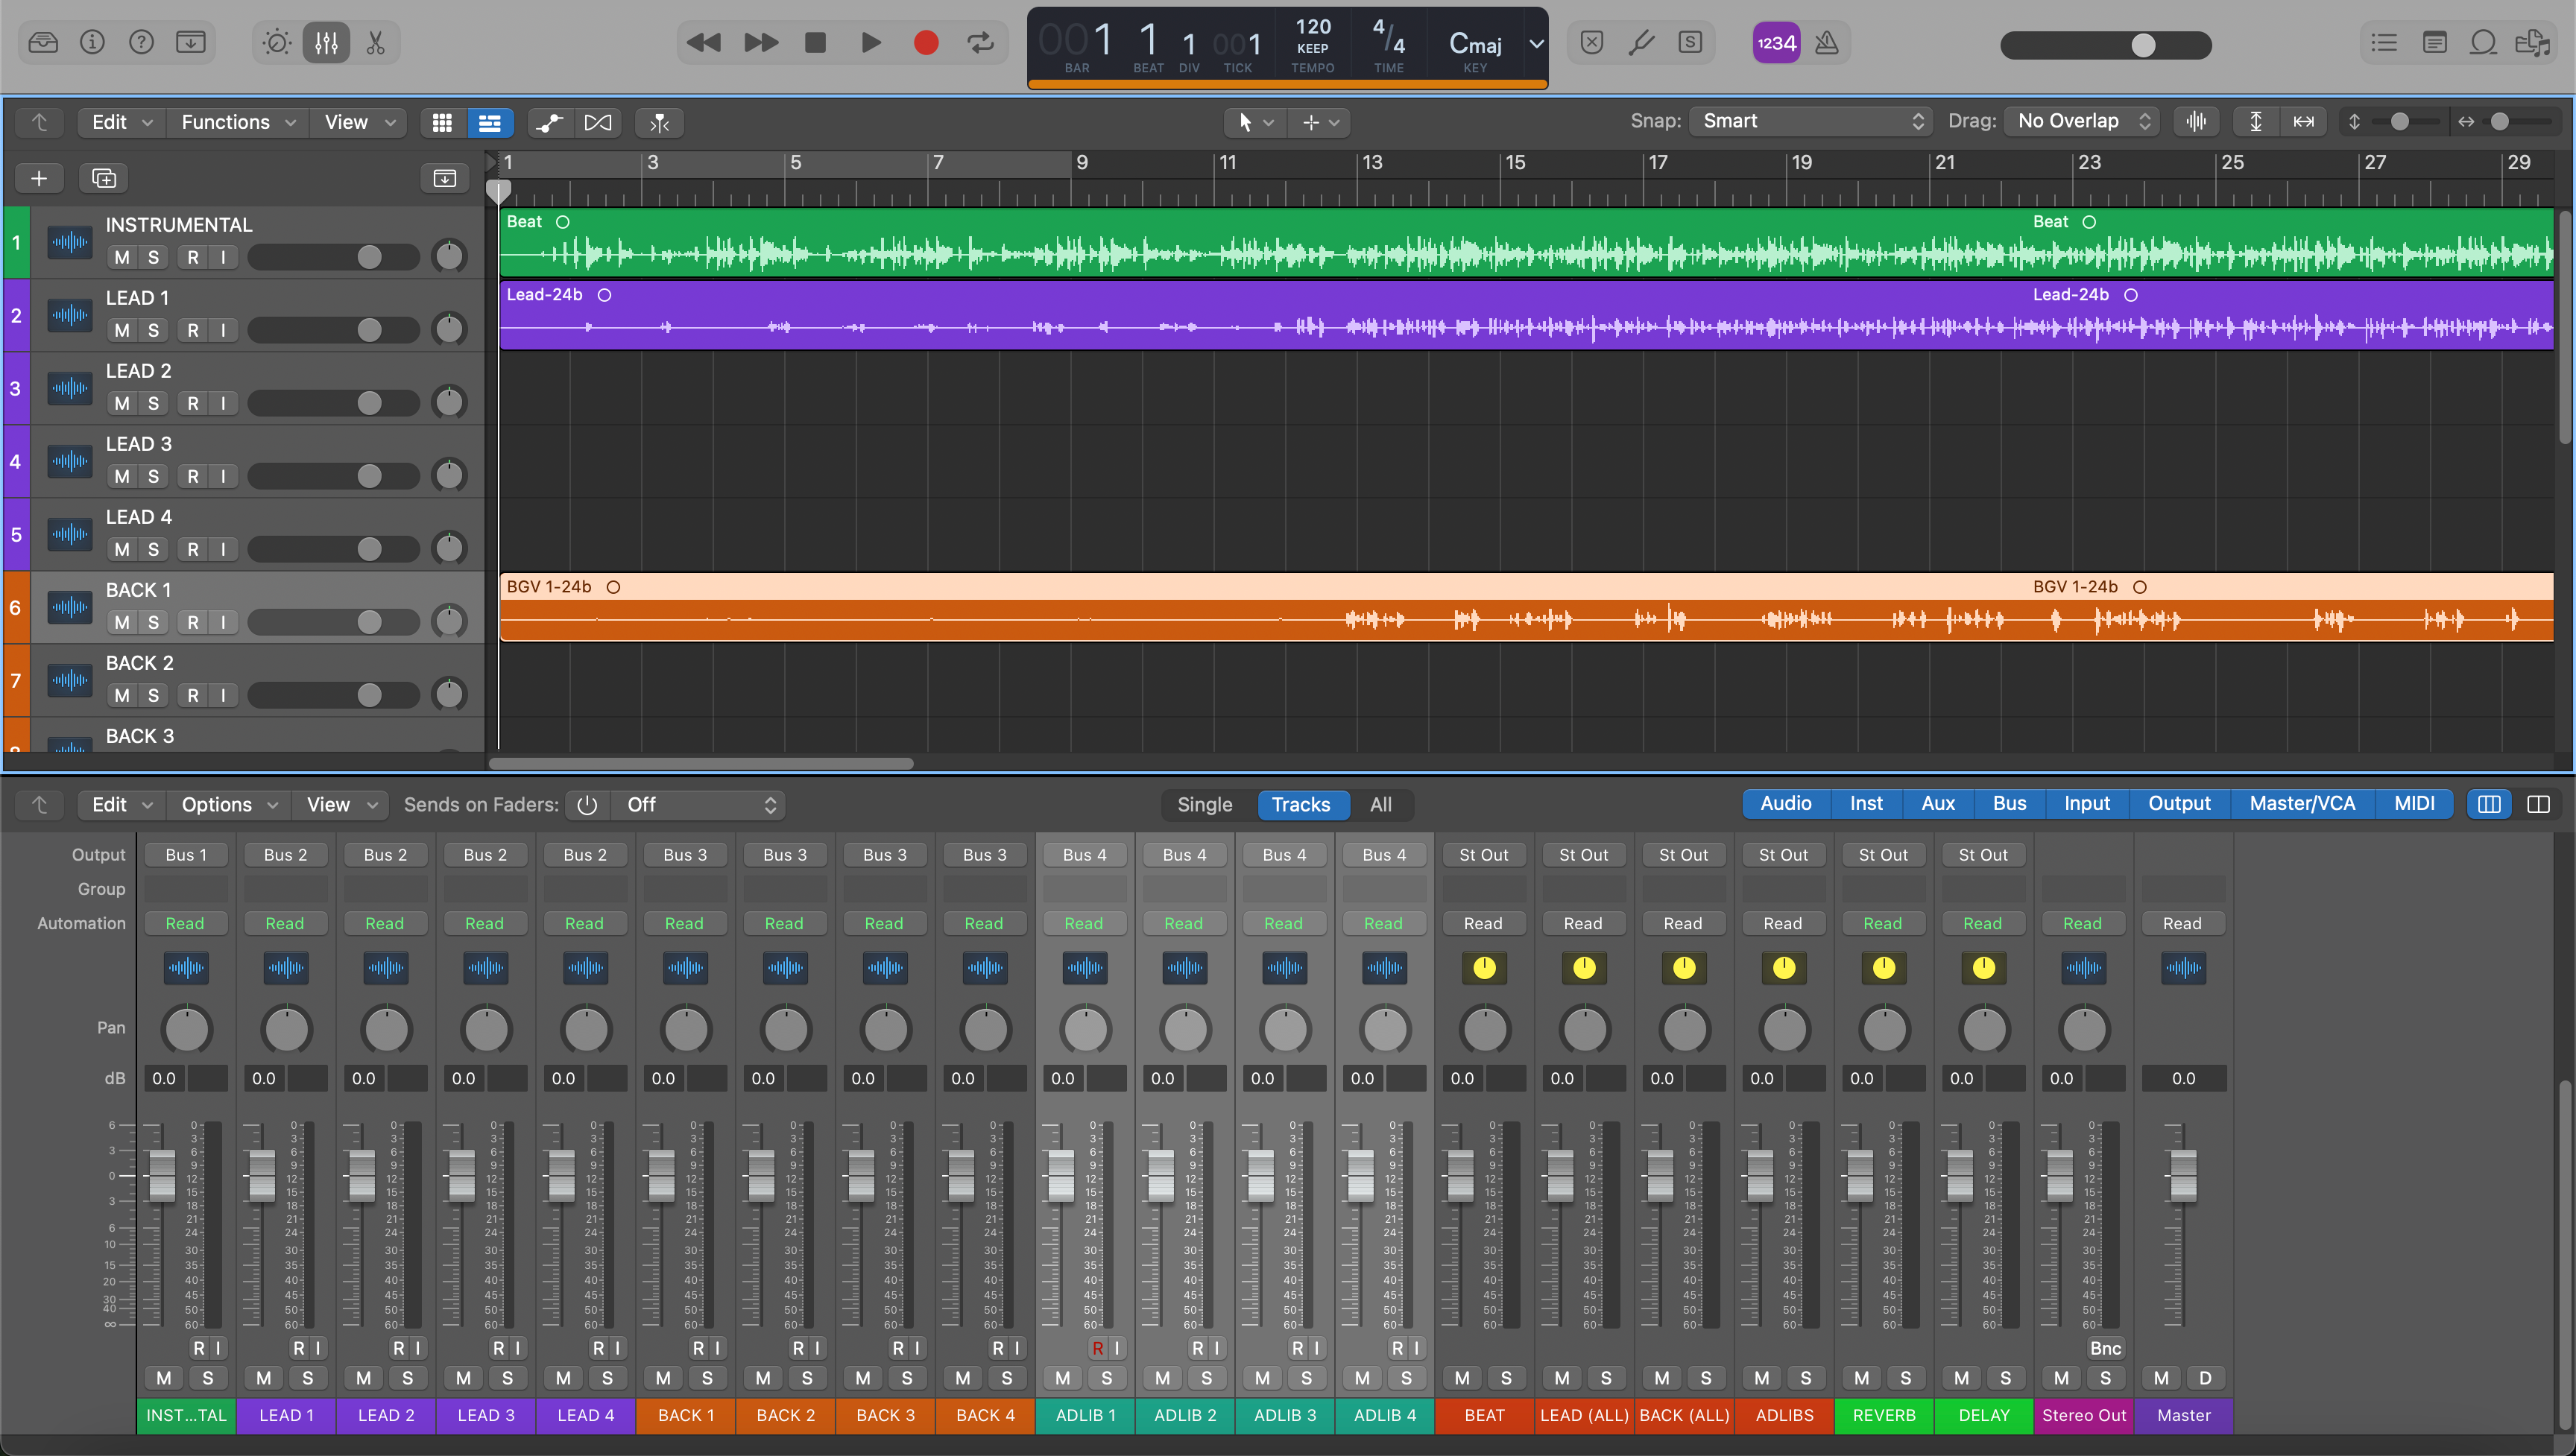
When a vocal is mixed well in Ableton Live, it feels close, confident, and intelligible—on earbuds, studio monitors, and phone speakers alike. This guide takes you through a modern, stock-plugin workflow that scales from scratch demos to release-ready mixes. You’ll set up clean monitoring, route tracks the “mix engineer” way, shape tone with EQ Eight, control dynamics with Compressor/Glue, de-ess without third-party plugins, build tasteful ambience on returns, and finish with headroom that masters well. Everything here is DAW-native and repeatable. I. Setting up Ableton Live for clean, low-latency tracking Open Preferences → Audio and select an appropriate driver: Core Audio on macOS, or ASIO on Windows (your interface’s ASIO driver is best). ASIO/Core Audio drivers allow smaller buffer sizes and fewer dropouts, which keeps the vocalist in time and in tune. Start tracking at a small buffer (often 64–128 samples); raise it during mixing as sessions grow. If round-trip latency creeps up, freeze heavy tracks and avoid look-ahead/linear-phase devices while recording. Two reliability tools are worth enabling while tracking: Reduced Latency When Monitoring (Live removes PDC that has nothing to do with the monitored signal) and, if your interface supports it, direct monitoring in the interface mixer. Reduced Latency keeps “feel” intact even when the Set contains high-latency devices elsewhere; direct monitoring removes the computer from the headphone path altogether. Now save this as your Default Set with basic routing in place (lead vocal channel, returns created, color coding). You can also save Default Audio Track and Default Return presets so new tracks arrive with your favorite inserts already loaded. Starting from a familiar canvas is half the battle. II. Why this workflow matters Clarity first: Subtractive EQ before boosts reveals diction and removes mud so presence doesn’t get harsh. Controlled dynamics: Proper attack/release settings keep phrases steady while preserving transients and expression. Ambience that supports lyrics: Time-synced delays and short plates add depth; sidechain-ducked FX let words lead, not wash out. Repeatable speed: A small set of returns, a vocal bus, and track/return defaults let you move fast on every song. Low-latency confidence: Correct driver/buffer choices and Reduced Latency When Monitoring keep performances tight. Prefer a head start? Our ableton recording template drops a ready-to-track layout into Live—routes, returns, and sensible meters—so you can focus on takes instead of wiring. III. Quick-start (six steps you can copy) Route the voice: Create a Lead Vox audio track. Add Double L, Double R, and an Ad-libs track if needed. Group them into a Vocal Bus (Group Track). Create two Return tracks: Vox Verb and Vox Delay. Gain stage with Clip Gain: Before any inserts, even out obvious word-to-word level jumps using Clip Gain. Compressors work better when input is in the ballpark. Shape with EQ Eight: On the Lead track, high-pass 70–100 Hz to remove rumble, check 200–400 Hz for boxiness, add a gentle 2–5 kHz presence lift if diction needs help, and consider a subtle 10–12 kHz shelf only if the mic is dark. Level with Compressor or Glue: Start with Compressor (ratio 2–4:1; slow-ish attack to keep consonants; medium release; 2–6 dB GR). If you want “mix-bus style” cohesion on the Vocal Bus, add Glue Compressor there with low ratios and modest GR. Build returns: On Vox Verb, use Reverb/Hybrid Reverb with short decays (0.8–2 s) and filter lows/highs within the device so the tail stays clean. On Vox Delay, use Echo or Delay tempo-synced (1/8 or 1/4) with a low-pass on repeats. Send from the vocal post-fader for mix moves. Duck the space: Insert Compressor on each return, enable Sidechain, choose the Lead vocal as the input, and set a gentle threshold/ratio to dip FX during phrases and bloom between lines—intelligibility without dryness. IV. Style/use-case recipes (copyable chains) Rap — upfront and consonant-forward EQ Eight: HPF ~90 Hz; subtract 2–3 dB around 250–300 Hz if the beat is thick; touch 3–5 kHz for diction; avoid aggressive “air” boosts unless the mic is very dark. Compressor: Attack ~15–25 ms so consonants “speak”; release 80–150 ms for bounce; 3–6 dB GR on peaks. De-ess: Two stock approaches: (a) Compressor with sidechain EQ listening to a band-passed sibilant range (5–8 kHz) so only esses trigger gain reduction; (b) Multiband Dynamics with the high band threshold set just below sibilants. Keep it event-driven and transparent. FX: Short plate (0.7–1.1 s) + slap or 1/8 delay tucked low. Sidechain-duck the delay so the end of bars stays crisp. Stacks: Hard-pan doubles ~6–10 dB below the lead; slip-edit consonants to avoid flams; keep wideners on the bus and check mono. Melodic rap / R&B — smooth, airy EQ Eight: HPF 70–90 Hz; small dip 250–400 Hz for clarity; optional shelf +1–2 dB at 10–12 kHz for sheen if needed. Compression: Serial approach: first light leveling, second slightly faster for peaks; modest per-stage GR keeps it breathing. FX: Hybrid Reverb 1.4–2.2 s with 20–40 ms pre-delay; dotted-eighth delay placed wide and low; both returns ducked by the lead. Tuning: Live has no dedicated pitch-correction device; for stock-only fixes, use Warp (Complex Pro) with careful Transposition and Formants on short phrases, or re-sing lines. Always correct timing first; pitch edits are cleaner when phrasing is in the pocket. Pop — wide, polished, competitive EQ Eight: Tame 180–350 Hz so bright keys/synths have room; add a narrow 2–4 kHz diction bump only if needed; reassess sibilance after any air boost. [8] Glue on the Vocal Bus: Low ratios and gentle GR for cohesiveness; keep per-track compression moderate to avoid listener fatigue. [9] FX: Dual delays (1/4 + 1/8) with high-cut repeats; a short room for closeness; wideners on the bus only—verify mono frequently. Stacks: Group harmonies to an HARM Bus, then into the Vocal Bus; address consonants surgically to avoid “splatter” on hooks. Spoken word / podcast — natural and steady EQ Eight: HPF ~80 Hz; 3–4 kHz lift for articulation; watch 6–7 kHz lisps. Compressor: 2:1–3:1, slow attack/medium release; aim for consistent loudness, not hype. FX: Minimal reverb; if ultra-dry feels unnatural, add early reflections rather than long tails. V. Troubleshooting & fast fixes Latency throws off performance. Track at small buffers with ASIO/Core Audio; enable Reduced Latency When Monitoring. If the Set still feels sluggish, freeze heavy devices or bypass look-ahead processors while recording. Performer hears comb-filtered “double” voice. Avoid monitoring both the interface’s direct signal and Live’s return at once. If using direct monitoring, mute the track’s output in Live during takes. Reverb/delay jump when you ride the vocal fader. That’s post-fader send behavior. Either automate send amounts separately or set the Send to Pre for headphone “confidence” FX while mixing post on the returns. Sibilance gets worse after boosting “air.” Pull the shelf back and switch to event-driven control: Compressor sidechain EQ keyed to 5–8 kHz or Multiband Dynamics high-band compression. FX smear lyrics. Sidechain-duck both returns from the Lead track. Quick attack keeps consonants crisp; musical release lets the tail breathe between phrases. Phasey doubles/stack collapse in mono. Slip-edit consonants so they land together; let panning create width; keep chorus/Haas tricks subtle on already hard-panned doubles. Timing feels off after adding a heavy device. Live’s PDC generally aligns tracks, but if a route drifts, print the effect or simplify the path during recording, then re-enable the chain for mixing. Export sounds quieter than playback. Monitor/headphone volume doesn’t affect the bounce. Watch peaks on the Master, leave a couple of dB headroom, and export lossless for finals. VI. Advanced / pro tips Vocal Bus “core” + print buses: Sub-group Lead, Doubles, and Harmonies to their own groups feeding a main Vocal Bus; create “Print” buses (Lead Print, BGV Print, FX Print) for stem exports in one pass. Dynamic EQ without third-party plugins: Automate a narrow EQ Eight band on harsh phrases rather than pushing a compressor harder. For persistent ranges, Multiband Dynamics with a gentle high-band threshold acts like a transparent de-esser. Sidechain the midrange, not just level: On the delay return, put Multiband Dynamics and key only the mid band from the Lead so words stay clear while air remains. Warp-aware pitch nudges: If you must make stock-only pitch moves, split a phrase and use Transposition with Complex Pro; keep changes within semitones and preserve Formants for naturalness. Always fix timing first. Use Defaults to save time: Save Default Audio Track with EQ Eight+Compressor preloaded, Default Returns with your favorite reverb/delay settings, and a Default Set with routing and colors. One keystroke opens a mix-ready canvas. Headroom that masters well: Keep the Vocal Bus and Master peaking below clipping with a couple of dB margin (e.g., peaks under −3 dBFS). Use a safety limiter only for roughs; leave mastering room for the final. Automation that feels musical: Ride phrases into hooks, dip breaths between lines, throw delays on end-words. A few intentional rides often replace a pile of processors. VII. FAQs What buffer size should I use while recording?Small if your system allows—often 64–128 samples with ASIO/Core Audio. Enable Reduced Latency When Monitoring to keep “feel” intact during takes; raise the buffer for mixing. How do I create pre-fader verbs for headphones?Right-click a Send and switch it to Pre so vocal fader rides don’t affect the singer’s reverb level. Keep your mix returns post-fader for normal balancing. What’s the simplest stock de-esser?Use Compressor with sidechain EQ listening to 5–8 kHz so only sibilants trigger GR, or set Multiband Dynamics to compress the high band when esses appear. Keep gain reduction modest for natural brightness. Glue vs. Compressor on vocals?Use Compressor for per-track control with sidechain options. Glue can add bus “glue” and tone on the Vocal Bus with low ratios and gentle GR. Try both; keep gain reduction modest. How do I keep FX from blurring words?Sidechain-duck the delay/reverb returns from the Lead vocal so tails bloom between phrases. It’s the quickest clarity win for lyric-forward mixes. [10][11] For a faster jump-off point on any session, start with our recording templates. And if you’re weighing preset chains, this roundup of the best vocal presets is a great next read.
Learn more
How to Mix Vocals in Pro Tools (Start-to-Finish)
Pro Tools has the tools to make vocals sound like records—if you wire your session smartly and make deliberate moves. This guide shows an end-to-end workflow you can reuse on any project: clean setup, fast comping, stock-plugin chains that translate, sidechain tricks for intelligibility, and exports that keep headroom for mastering. Everything here uses built-in Pro Tools features, so you can mix confidently without third-party plugins. I. What a finished vocal really sounds like in Pro Tools A finished vocal sits forward and clear, controlled but alive, with space that flatters the lyric instead of blurring it. In Pro Tools that typically means: playlist-comped takes feeding a dedicated vocal track (or a small group of tracks), tone-shaped with Avid Channel Strip or EQ3 7-Band, leveled with Dyn3 Compressor/Limiter or Pro Compressor, sibilance controlled by a de-esser, and ambience managed on separate send returns (D-Verb and Mod Delay III). Under the hood, the audio engine, buffer size, Low Latency Monitoring (where available), send topology, and Automatic Delay Compensation keep timing tight while you work. II. Why this workflow matters Clarity that survives small speakers: Subtractive EQ and controlled presence create intelligible consonants without harshness. Level control without pumping: Correct attack/release choices keep phrases steady but retain natural transients. Space that helps the lyric: Time-synced delays and short plates add depth; sidechain-ducking lets words lead without muting FX. Speed and repeatability: Playlists, Clip Gain, sends, and Track Presets (or template sessions) make good decisions faster. Confidence for artists: Low-latency monitoring and sensible cue mixes reduce timing issues and improve performances. Want a head start for routing and naming? Drop in our Pro Tools recording templates and customize once—then reuse forever. III. Quick-start (copy these steps) Set audio & latency: In Setup → Playback Engine, choose your interface driver (ASIO/CoreAudio). Track at small buffers (64–128 samples on capable systems). If you use Pro Tools | Carbon, enable DSP Mode for near-zero-latency monitoring on armed tracks. When you begin mixing, raise the buffer (512/1024) to free CPU. Comp clean takes with Playlists: Record multiple passes to take playlists on one track. Solo lanes, audition quickly, and promote the best phrases to the main playlist. Name the final comp “Lead Vox Comp.” Save the raw takes on hidden playlists for safety. Establish gain structure with Clip Gain: Show the Clip Gain line and smooth out inconsistent words before compression. Aim for consistent peaks so inserts behave predictably; convert problematic volume automation to Clip Gain where needed so the compressor isn’t “fighting” big level swings. Route smartly: Put Lead, Doubles L/R, and Ad-libs on their own tracks feeding a Vocal Bus aux. Create two FX returns: Vox Verb (D-Verb) and Vox Delay (Mod Delay III). Make sure Delay Compensation is on. Build a stock vocal chain: Start with Avid Channel Strip or EQ3 7-Band for tone, then Dyn3 Compressor/Limiter (COMP) for leveling, and Dyn3 De-Esser for sibilance. Keep it light while you dial balances. Shape ambience and intelligibility: Send post-fader to verb/delay; low-cut the verb, low-pass the delay repeats. Duck the returns with sidechain compression keyed from the lead, so the space blooms between phrases, not on top of them. IV. Style/use-case recipes (copyable chains) Rap — upfront, consonant-forward EQ: High-pass around 80–100 Hz to remove rumble; notch 250–350 Hz if the beat is dense; add a narrow 3–5 kHz lift only if diction needs help; be cautious above 10 kHz unless the mic is dark. Compression: On Dyn3 Compressor/Limiter, try ratio 3:1, attack 15–25 ms to let consonants speak, release 80–150 ms for groove, 3–6 dB gain reduction on peaks. De-ess: Target 5–8 kHz; use the wide band when esses are broad, split band when it’s a narrow spike. FX: Short plate (0.7–1.1 s) plus slap-back or 1/8 delay tucked low. Sidechain-duck the delay return from the dry lead. Stacks: Hard-pan doubles ~6–10 dB under the lead; nudge consonants to avoid flams; keep wideners on the bus sparingly and check mono. Melodic rap / R&B — smooth, airy EQ: High-pass 70–90 Hz; a small cut 250–400 Hz for clarity; optional shelf +1–2 dB at 10–12 kHz for sheen. Compression: Two light stages (serial). First, gentle leveling (2:1, 1–2 dB GR). Second, slightly faster for peaks (3:1, 1–3 dB GR). FX: D-Verb plate 1.4–2.2 s with 20–40 ms pre-delay; Mod Delay III dotted-eighth wide and low; both returns ducked by the lead. Tuning: Comp first; clean surgically in Elastic Audio (Elastic Pitch) or Pitch II for subtle correction; keep real-time tuning tasteful. Pop — wide, polished, competitive EQ: Subtractive moves around 180–350 Hz to leave room for bright synths; a precise 2–4 kHz presence touch for diction. Compression: Serial (slow, then fast). Keep per-stage GR modest to avoid fatigue; let buses provide extra density. FX: Dual delays (1/4 + 1/8) with high-cut repeats; early reflections for closeness. Any widening happens on the vocal bus; check mono after each change. Stacks: Harmonies grouped to an HARM bus feeding the Vocal Bus; treat consonants surgically to avoid “splatter” on hooks. Spoken word / podcast — natural and steady EQ: High-pass ~80 Hz; small 3–4 kHz lift for articulation; watch 6–7 kHz lisps. Compression: 2:1–3:1, slow attack/medium release for consistency without hype. FX: Minimal reverb; prefer short early reflections or a tiny room if completely dry feels unnatural. V. Troubleshooting & fast fixes Latency throws off timing: Track at small buffers with your interface driver. If you have Carbon, enable DSP Mode. Avoid look-ahead/linear-phase processors while recording; add them at mix time. Performer hears a double voice: Low Latency Monitoring (LLM) mutes record-enabled track outputs on some systems so the direct input is all you hear. If you’re not on supported hardware, mute the DAW return in your cue path and monitor through the interface’s mixer instead. FX move when you ride the vocal fader: That’s post-fader send behavior. Open the send window and switch to Pre for headphone confidence verb, or automate the send amount separately from the track fader. Sibilance gets worse after “air” boost: Ease the high shelf and let the de-esser do event-based work around 5–8 kHz. Keep it transparent; esses should tuck, not vanish. FX smear words: Sidechain-duck the reverb/delay return using Dyn3 Compressor/Limiter or Pro Compressor keyed from the lead. Set a quick attack so consonants cut, and a musical release so space breathes between phrases. Phasey doubles or stacks: Slip-edit consonants, trim and align breaths, and reduce wideners on hard-panned doubles—let panning and timing create width. Timing feels off after adding a heavy plugin: Confirm Automatic Delay Compensation is enabled. If one path still drifts, apply Manual ADC adjustment on the affected track or print/process offline and realign. Recording armed but you get silence: Verify the track input, check that the Recording filter includes Audio, and confirm OS microphone permissions. If you see input but no print, make sure you’re not monitoring exclusively through the interface with LLM muting the DAW return. Export sounds quieter than playback: Monitor volume doesn’t affect the bounce. Watch the Master peak level, leave a few dB of headroom, and prefer lossless bounce for finals. VI. Advanced / pro tips Clip Gain first, compression second: Use Clip Gain to pre-level the performance so your compressor works in a comfortable range. You’ll get steadier GR and fewer artifacts. Channel Strip as a “one-stop” tool: Avid Channel Strip (from the System 5 console) gives you filters, EQ, compression, and gate/expander in one insert with consistent metering—great for fast revisions and repeatability. Build a modular bus core: Route Lead, Doubles, and Harmonies to their own sub-buses feeding the main Vocal Bus. Create “Print” buses (Lead Print, BGV Print, FX Print) for stem exports in a single pass. Sidechain delays for groove: Key only the mid band of a multiband compressor on the delay return from the lead, so consonants remain crisp while tails keep their air. Elastic timing before tuning: Use Elastic Audio to slip phrasing into the pocket first, then apply Elastic Pitch or Pitch II lightly. Less pitch work is needed when timing feels right. Track Presets and templates: Save your vocal track (or bus stack) as a Track Preset, including inserts, sends, I/O and comments. Keep genre and mic variants so you can recall a perfect starting point in seconds. PDC sanity: Watch the delay indicators in the Mix Window. If a creative chain adds too much latency on the vocal path, move heavy processors to a bus to keep the record path light, or print effects and re-insert. Headroom that masters well: Keep the Vocal Bus and Master below clipping with a couple of dB margin (e.g., peaks under −3 dBFS). Use a safety limiter only for roughs; print mix passes lossless for mastering. Automation that sounds musical: Ride phrases into hooks, dip breaths between lines, throw delays on end-words. Fewer, smarter rides beat extra processors. VII. FAQs What buffer size should I use while recording?Use small buffers (often 64–128 samples) with your interface driver. If you have Pro Tools | Carbon, enable DSP Mode for near-zero-latency monitoring. Raise the buffer for mixing. How do I set pre-fader sends for consistent headphone verb?Open the send window and click Pre so the send ignores the track fader. Use post-fader for mix FX that should follow your vocal rides. What’s the best stock de-esser?Dyn3 De-Esser is simple and effective. Start in the 5–8 kHz range and adjust threshold until esses tuck back naturally. For very specific issues, a narrow EQ dip automated on problem words can help. Should I use Channel Strip or EQ3 + Dyn3?Both work. Channel Strip is fast and consistent (filters, EQ, dynamics, gate in one insert). EQ3 + Dyn3 gives you separate modules if you prefer a modular chain. NewTone/Pitcher equivalents in Pro Tools?Use Elastic Audio/Elastic Pitch or the Pitch II plugin for note fixes; keep real-time correction subtle so performance still feels human. Do monitor and export levels match?No. Headphone/monitor volume doesn’t change what’s printed. What you bounce depends on Mixer gain and processing. Leave headroom on the Master for mastering. Final thought: The best mixes are deliberate. Keep the chain lean while tracking, shape tone with restraint, let sidechain-ducked FX create space, and save your winning layout as a preset so every new session starts strong.
Learn more
Mix Vocals in FL Studio: Complete Guide
Great vocals don’t happen by accident. They come from a clear plan: clean recording, smart routing, tasteful tone shaping, steady dynamics, and space that supports the lyric. The good news—you can do all of it in FL Studio with stock tools. This guide walks you, step by step, through a modern workflow that’s fast, repeatable, and flexible enough to handle rap, R&B, pop, and spoken word. I. What a finished vocal really sounds like in FL Studio When people say “the vocals are mixed,” they mean the voice sits forward without harshness, the level is controlled without sounding squashed, the consonants are intelligible on small speakers, and the ambience feels like part of the record—not a cloud hiding the words. In FL Studio, you’ll get there by sending your recorded vocal clip or input to a dedicated Mixer track (often several for lead, doubles, and ad-libs), shaping tone with Fruity Parametric EQ 2, taming level with Fruity Limiter (COMP) or Maximus, and building space with Reeverb 2 and Delay 3. Under the hood, Audio settings, Mixer routing, post vs. pre-fader sends, and plugin delay compensation keep the timing and feel locked. This is the same core process whether you’re mixing a melodic chorus with stacked harmonies, a rapid-fire 16 over a two-track beat, or a dry podcast voice that has to sound natural. Once you learn the building blocks, you can scale up: more tracks, more stacks, and more automation—without losing control. II. Why this workflow matters Clarity that translates: Subtractive EQ removes mud and rumble before you add presence, so the vocal stays articulate on phones, laptops, and cars. Level control without pumping: The right compression timing (attack and release) preserves consonants and keeps phrases steady, even when the beat is loud. Space that supports the lyric: Time-synced delays and short plates add depth, while sidechain-ducking keeps words intelligible. Repeatable speed: Clear routing, sends, and a small set of channel presets mean you spend time deciding, not wiring. Low-latency confidence: Proper driver and buffer choices make tracking comfortable and keep performances on time. If you want a shortcut for tone and dynamics, you can start from a curated chain and then tweak to your mic and voice. Our Vocal Presets drop straight onto a vocal channel or bus and give you a head start while staying easy to customize. III. Quick-start (copy these six steps) Set audio & latency: In Options → Audio, choose your interface’s ASIO driver (or FL ASIO). Track at a small buffer for responsive monitoring; 64–128 samples is a sensible starting point. If round-trip creeps up as the project grows, freeze or disable heavy look-ahead/linear-phase plugs while tracking, then raise the buffer for mixing. Route the vocal: Send your vocal clip or input to a dedicated Mixer track named Lead Vox. Create additional tracks for Double L, Double R, and Ad-libs. For centralized control, route these to a Vocal Bus before the Master. Color-code and group so navigation stays fast. Build a clean chain (stock-only): Slot 1: Fruity Parametric EQ 2 — High-pass 70–100 Hz to remove rumble; look for boxiness 200–400 Hz and pull a few dB; add presence 2–5 kHz only as needed; consider a gentle air shelf 10–12 kHz if the mic is dark. Slot 2: Compressor — Fruity Limiter in COMP mode, ratio 2–4:1, slower attack so consonants “speak,” medium release so phrases recover musically. Aim for 2–6 dB of gain reduction on peaks. Slot 3: De-esser — Use Maximus as a band-limited compressor in the 5–8 kHz region. Keep it event-driven: esses tuck back, brightness remains. Add space & timing: Create two FX returns: Vox Verb (Reeverb 2, decay 0.8–2.0 s, low-cut below ~120 Hz, soften highs) and Vox Delay (Delay 3, tempo-sync 1/8 or 1/4; low-pass repeats). Use the Mixer’s send switches for post-fader sends. If you need “confidence reverb” for the performer that doesn’t change when you ride the vocal fader, insert Fruity Send early for a pre-fader route. Sidechain for clarity: On each FX return, insert Fruity Limiter (COMP), set the vocal channel as sidechain input, and compress the return so it dips during phrases and blooms in the gaps. Intelligibility improves without killing vibe. Tune as needed: Comp your takes, then open NewTone for surgical note moves and transparent timing fixes. For light, real-time polish or harmonies, use Pitcher—often on ad-libs or stacks. Once this works for your voice and mic, save the entire layout as a channel preset or Mixer state so every new session starts at “almost finished.” IV. Style / use-case recipes you can paste into sessions Rap — upfront, intelligible, fast EQ: HPF around 90 Hz; subtract 2–4 dB at 250–300 Hz if the beat is dense; add a narrow presence touch in the 3–5 kHz range if diction is buried; avoid over-brightening 10–12 kHz unless the mic is very dark. Compression: Limiter (COMP) with attack ~15–25 ms so consonants snap, release 80–150 ms for bounce, 3–6 dB GR. If ad-libs spike, add a fast secondary compressor just on that track. FX: Short plate (0.7–1.1 s) plus a tucked slapback or 1/8-note delay. Sidechain-duck the delay a few dB during syllables. Stacks: Keep doubles 6–10 dB below the lead; hard-pan L/R and trim consonants so timing lands together. Melodic rap / R&B — smooth, airy, emotive EQ: HPF 70–90 Hz; gentle dip 250–400 Hz for clarity; optional shelf +1–2 dB at 10–12 kHz for sheen. Compression: Two light stages: first for macro leveling (2:1, 1–2 dB GR), second slightly faster to catch peaks (3:1, 1–3 dB GR). FX: Plate or hall 1.4–2.2 s with 20–40 ms pre-delay; dotted-eighth delay placed wide and low; sidechain both FX. Tuning: NewTone for note-by-note honesty; Pitcher lightly on harmonies if you want silky blend. Pop — wide, polished, competitive EQ: Tame 180–350 Hz to leave room for synths; add a precise 2–4 kHz bump for diction; check sibilance after any “air” boost. Compression: Serial approach—slower attack first for shape, faster second for density. Keep GR modest per stage to avoid fatigue. FX: Dual delays (1/4 + 1/8) with high-cut repeats; short early reflections for closeness; wideners on the bus only. Always check mono, especially on stacked hooks. Spoken word / podcast — natural and steady EQ: HPF ~80 Hz; a small lift around 3–4 kHz helps articulation; watch 6–7 kHz lisps. Compression: 2:1–3:1 with slow attack and medium release for consistent loudness without hype. FX: Minimal reverb; if it feels too dry, add a touch of early reflections instead of a long tail. V. Troubleshooting & fast fixes Latency throws off performance. Track at a small buffer with an ASIO driver. If the project is heavy, disable high-latency FX during takes or make “tracking” and “mixing” versions of your chain. Printed effects by accident. Keep heavy processing on the bus and record the insert channel dry. If you need pre-fader verb in headphones, use Fruity Send so the performer hears space while you keep the recording clean. Sends feel unpredictable. Post-fader sends rise and fall with the vocal fader. For independent FX levels, tap pre-fader with Fruity Send or adjust the send knob when you automate the channel. Sibilance leaps out after “air.” Ease the shelf, then de-ess with Maximus in a narrow sibilant band (5–8 kHz). Aim for a couple of dB only on esses and tees. FX smear words. Sidechain-duck the reverb and delay returns using the dry vocal as the key. Set attack fast enough to get out of the way of consonants and release so the tail breathes between phrases. Phasey doubles or stacks. Slip-edit consonants, trim breaths, and hard-pan doubles. Avoid stacking wideners on top of hard-panned doubles; let panning and timing do the width. Timing feels off after adding a look-ahead plugin. FL Studio’s Auto-PDC usually handles it; if a route still drifts, apply Manual PDC on the affected track or print the effect and realign. Recording armed, but you hear silence. Check the Mixer track input, confirm the Recording filter includes Audio, and make sure your OS has granted microphone permission to FL Studio. Export sounds quieter than playback. Monitor volume doesn’t affect renders. Watch the Master peak level, avoid clipping, and leave a couple of dB of headroom for mastering. VI. Advanced / pro tips Build a bus “core” and print buses. Route Lead, Doubles, and BGVs to their own sub-buses feeding a main Vocal Bus. Create Print buses (Lead Print, BGV Print, FX Print) for one-pass stem exports at the end of the mix. Dynamic EQ with Parametric EQ 2. Instead of heavy multiband, automate a narrow bell only where harshness appears—fast, transparent, and CPU-light. Pair with a light de-ess so brightness stays musical. Pre-fader cue verbs that ignore fader rides. Put Fruity Send in Slot 1 of the vocal channel and route to a Cue reverb return. The singer’s space stays constant while you automate the vocal fader freely. Elastic editing before tuning. Comp your takes in the Playlist, slip-edit breaths and consonants, then tune the comp in NewTone. You’ll need less pitch correction and the results will sound more natural. PDC sanity check. After creative processing (pitch shifters, spectral tools), glance at the Mixer Track Properties. If Manual PDC is lit, confirm offsets are still correct after arrangement changes. Export-ready gain structure. Keep the Master peaking below about −3 dBFS. Use a safety limiter only for roughs; for finals, leave headroom and print lossless (WAV/FLAC). Mix bus vs. vocal bus decisions. If the vocal loses presence when you engage the mix bus chain, rebalance at the vocal bus first—small level and EQ trims there usually beat pushing into the limiter harder. Automation that feels musical. Ride phrases into hooks, dip breaths between lines, and throw delays on end-words. A few targeted rides often replace extra processors. Template once, tweak forever. Save this whole setup as a Mixer state. Keep genre variants (Rap / R&B / Pop) and mic variants (dynamic vs. condenser) so you can switch flavors instantly. VII. FAQs What buffer size should I use while recording?Use an ASIO driver and keep the buffer small while tracking—commonly 64–128 samples on a capable system. Raise the buffer when you mix larger projects. How do I make a pre-fader reverb send?FL Studio’s Mixer send switches are post-fader by default. To keep the effect level independent of your vocal fader rides, insert Fruity Send early on the vocal channel and route it to your reverb or delay return. What’s the simplest way to de-ess with stock tools?Use Maximus as a band-limited compressor in the 5–8 kHz region so only sibilants are reduced, not the entire top end. Should I tune with NewTone or Pitcher?NewTone is surgical and offline—ideal for transparent fixes after comping. Pitcher is real-time—useful for subtle glue during writing or for MIDI-driven harmonies. Many mixers comp → NewTone → optional light Pitcher. Why did my FX get louder when I rode the vocal fader?Post-fader sends follow the channel fader. For independent FX levels, create a pre-fader send with Fruity Send or automate the send amount separately. Do monitor and render levels match?No. Headphone/monitor volume doesn’t change what you print. Rendered level depends on Mixer gain and processing. Leave clean headroom on the Master for best results. What if timing feels off after adding certain plugins?Some processors add latency. FL Studio’s Auto-PDC usually aligns tracks, but if one path drifts, apply Manual PDC on the affected route or print the effect and realign. Any advice for noisy home recordings?Cut sub-rumble, use gentle gating on breaths between phrases, and try short early reflections instead of long reverb tails. Dense noise usually hides in 100–300 Hz and 6–8 kHz; treat surgically and don’t over-brighten. Final thought: Keep it simple. A focused chain, good gain structure, and tasteful space do more than a rack of heavy processors. Save the wins as presets so every session starts strong.
Learn more
Build a Vocal Recording Template in 10 Minutes
I. Definition / Core concept A vocal recording template is a prebuilt session you can open and record into immediately. It includes named tracks (Lead, Doubles, Ad-libs), a Vocal Bus, cue sends for headphones, a light tracking chain, color coding, markers, and a tidy folder structure. The goal is less setup and fewer mistakes. Every major DAW lets you save a user template or set a default starting session, so you don’t rebuild routing every time you open a project. II. Why it matters (benefits & when it helps) Speed: Open, arm, record. A template removes repetitive tasks so ideas become takes fast. Consistency: Track names, buses, and gain targets stay the same across songs, which makes roughs and hand-offs clean. Better monitoring: Templates can bake in low-latency settings or a direct-monitor path, so singers hear themselves in time. Fewer errors: Pre-routed cue mixes, input selections, and “record safe” tracks reduce the chance of printing effects or clipping. Faster mixes: Organized sessions export stems quickly and translate well to outside engineers. Use a template whenever you’re recording vocals, doing quick ideas, or collaborating with others who need consistent session structure. If you want a head start without building from scratch, our Recording Templates are tuned for modern vocal workflows. III. Quick-start (6 steps you can copy) Set the project format. Choose 24-bit for headroom. Use 44.1 kHz for music releases or 48 kHz if the project targets video. Save these as your defaults. [2] Lower latency for tracking. Start at a 64–128 sample buffer. Enable your DAW’s Low Latency mode while recording, or use your interface’s direct monitoring to hear near-zero-latency input. Raise the buffer later for mixing. [1][6] Build the track list. Create: Lead Vox (record-enabled), Double L, Double R, Ad-libs, and an optional Talkback. Add two aux returns: Vox Verb (plate/room) and Vox Delay (tempo-sync). Route all vocal tracks to a Vocal Bus. Create a headphone cue. Add a pre-fader send from the Vocal Bus and from the instrumental/beat to a dedicated Cue output. Keep reverb low in the cue; keep the click lower still. Light tracking chain. On the Vocal Bus only (not the recording track), add: a high-pass filter (~80 Hz), a gentle compressor (2:1, slow attack, medium release), a de-esser if needed. Avoid high-latency plug-ins while recording. Gain targets. Adjust preamp/interface so typical phrases sit near −18 dBFS average, with peaks around −10 to −6 dBFS. This leaves headroom for clean edits and later processing. Save as a template named “Vocal Tracking — {Mic/Interface} — {SR}”. Prefer to skip setup? Drop in a starting chain from our Vocal Presets and customize the template once—then reuse it forever. IV. Style / use-case recipes Rap (tight & upfront) Tracks: Lead, Double L/R (−6 to −10 dB below lead), Ad-libs. Sends: Short plate (0.7–1.2 s), 1/8-note slap. Predelay 10–20 ms to keep lyrics forward. Bus notes: HPF 80–100 Hz, fast compressor (4:1) for 2–4 dB GR, de-esser on 5–8 kHz. R&B (smooth & airy) Tracks: Lead, Harmony 1/2, optional breathy doubles. Sends: Plate or hall 1.5–2.2 s with 20–40 ms predelay; dotted-eighth delay tucked low. Bus notes: Serial compression: first stage 2:1 (1–2 dB GR), second stage 3–4:1 (1–2 dB GR). Gentle 10–12 kHz shelf for sheen. Pop (wide & polished) Tracks: Lead, Double L/R (hard-panned), 2–4 harmonies, FX throws track. Sends: Dual delays (1/4 + 1/8) tempo-synced; early reflections for presence. Bus notes: Two-stage compression for stability; keep wideners subtle and check mono. Spoken word / podcast Tracks: Host, Guest, Room Tone. Sends: Usually none; absorb room with short plate if needed. Bus notes: HPF 70–90 Hz; de-esser ~4–6 kHz; aim for consistent LUFS and low noise floor. V. Troubleshooting & fast fixes Latency throws off timing. Reduce buffer (64–128). Enable your DAW’s low-latency mode, or switch to direct monitoring on the interface. Latency above roughly 10–15 ms is noticeable for vocalists; keep it under that while tracking. Clipping on loud notes. Lower interface/preamp gain until peaks live around −10 to −6 dBFS. Leave headroom; you can add level later. Doubles sound phasey. Tighten timing: nudge in milliseconds, slip-edit consonants, and keep doubles 6–10 dB under the lead. Avoid chorus/wideners on doubles; keep those on the bus. Printed effects by mistake. Keep plug-ins on the Vocal Bus only. Record tracks stay dry; monitoring stays inspiring. Headphone bleed. Use closed-back cans, drop the click, and high-pass the reverb send. Messy sessions. Color-code tracks and create a “00-IMPORTS” folder. Save the cleaned session as your default template so the fix sticks. VI. Advanced / pro tips Multiple templates: Keep genre-specific and mic-specific versions (e.g., SM7B vs. condenser). Swap by mood and singer—no re-routing required. Cue snapshots: Store go-to headphone balances (Lead +3 dB vs. beat; click −12 dB) if your DAW/interface supports it. Print stems fast: Pre-create “Lead Print,” “BGV Print,” and “FX Print” buses, routed to a Stems output—export in one pass at the end of a session. Low-latency safety: Put any look-ahead/linear-phase plug-ins on the mix bus and bypass them while recording; your DAW’s low-latency mode will temporarily disable high-latency paths during takes. Template hygiene: Before saving, remove unused audio from the pool/clip list so your template stays small and loads instantly. VII. FAQs What sample rate and bit depth should I use?Use 24-bit. Choose 44.1 kHz for music or 48 kHz for video-focused work. Both are widely accepted and efficient for modern production. What buffer size is best for tracking vocals?Start at 64–128 samples. Turn on low-latency mode or direct monitoring while recording; raise the buffer when you mix with heavier plug-ins. Should my template include plug-ins?Yes—keep the tracking chain light (HPF, gentle compression, de-esser). Avoid high-latency processors while recording; add them back for mixing. How loud should my input be?Aim around −18 dBFS average, with peaks roughly −10 to −6 dBFS. This preserves headroom and keeps edits and tuning clean.
Learn more
Top 10 BandLab Vocal Presets for Every Genre and Style
I. IntroductionA. Importance of choosing the right vocal presets for different genres and stylesIn the diverse and ever-evolving world of music production, finding the perfect vocal preset for your unique style and genre is essential. The right preset can elevate your sound, showcase your voice’s strengths, and create a polished final product.B. Overview of the top 10 BandLab vocal presets offered by BCHILL MUSICWe’ve compiled a list of the top 10 BandLab vocal presets from BCHILL MUSIC that cater to various genres and styles. From crisp clear vocals to the emotive sound of Juice Wrld, our selection covers a wide spectrum of musical preferences.II. Clear Vocals Preset {"dataProduct":{"id":"gid://shopify/Product/8781017022613","title":"Clear Vocals Preset BandLab","currencyCode":"USD","amountMax":"39.95","amountMin":"39.95","price":"39.95","compareAtPrice":"99.95","imagesUrl":"https://cdn.shopify.com/s/files/1/0708/8953/7685/files/Clear-Vocals-Preset-Adobe-Audition-Stock-Plugins-BCHILL-MIX-35027697762453.png?v=1749836297&width=600","urlStore":"https://bchillmix.com/products/clear-vocals-preset-bandlab","altImage":""},"isHidePrice":false,"isHideVariant":false,"isHideDescription":true,"labelButton":"Buy now","ATCLabelButton":"Add to cart","locale":"en","colorTitleProduct":{"hue":0,"saturation":0,"brightness":0},"colorBNButton":{"hue":0,"saturation":0,"brightness":1},"colorATCButton":{"hue":157.87,"saturation":1,"brightness":0.4784,"alpha":1},"colorBNText":{"hue":0,"saturation":0,"brightness":0},"colorPrice":{"hue":0,"saturation":0,"brightness":0},"colorATCText":{"hue":0,"saturation":0,"brightness":1},"ATCClickButton":"ATC","clickButton":"buyNow","id":"Avada-Tool_ProductDetail-10","hidden":false,"locked":false,"blockName":"Product details"} Add to cart Buy now Clear Vocals Preset BandLabA. Ideal applications and genres for this presetThe Clear Vocals Preset is a versatile choice, perfect for any genre. Whether you’re recording a pop ballad or an acoustic performance, this preset ensures your vocals sound crisp and clean.B. Features and benefits of the Clear Vocals PresetOur Clear Vocals Preset offers EQ and compression settings that highlight the clarity and natural tone of your voice. Subtle effects enhance your vocal performance without overpowering the mix.C. Tips for optimizing the preset to suit individual voicesExperiment with EQ settings to find the sweet spot that complements your voice. Adjust the compression to maintain dynamic control while preserving your vocal’s unique character.III. Juice Wrld Vocal Preset {"dataProduct":{"id":"gid://shopify/Product/8781017251989","title":"Juice Wrld BandLab Vocal Preset","currencyCode":"USD","amountMax":"39.95","amountMin":"39.95","price":"39.95","compareAtPrice":"99.95","imagesUrl":"https://cdn.shopify.com/s/files/1/0708/8953/7685/files/Juice-Wrld-BandLab-Vocal-Preset-BCHILL-MIX-35027738525845.png?v=1749836562&width=600","urlStore":"https://bchillmix.com/products/juice-wrld-bandlab-vocal-preset","altImage":""},"isHidePrice":false,"isHideVariant":false,"isHideDescription":true,"labelButton":"Buy now","ATCLabelButton":"Add to cart","locale":"en","colorTitleProduct":{"hue":0,"saturation":0,"brightness":0},"colorBNButton":{"hue":0,"saturation":0,"brightness":1},"colorATCButton":{"hue":157.87,"saturation":1,"brightness":0.4784,"alpha":1},"colorBNText":{"hue":0,"saturation":0,"brightness":0},"colorPrice":{"hue":0,"saturation":0,"brightness":0},"colorATCText":{"hue":0,"saturation":0,"brightness":1},"ATCClickButton":"ATC","clickButton":"buyNow","id":"Avada-Tool_ProductDetail-11","hidden":false,"locked":false,"blockName":"Product details"} Add to cart Buy now Juice World Vocal Preset BandLabA. Emulating the late Juice Wrld’s distinct soundInspired by the late Juice Wrld, our preset captures the emotive and melodic essence of his music. This preset is ideal for those looking to infuse their tracks with a heartfelt and captivating sound.B. Benefits and features of the Juice Wrld Vocal PresetThe Juice Wrld Vocal Preset offers custom reverb and EQ settings, carefully designed to emulate the late artist’s signature sound. This preset delivers an emotional depth that resonates with listeners.C. Customization tips for achieving a unique soundExperiment with reverb settings and mix levels to find the perfect balance for your track. Tweak the EQ to emphasize the nuances of your voice and create a personalized sound.IV. Drill Vocal Preset {"dataProduct":{"id":"gid://shopify/Product/8781017186453","title":"Drill Vocal Preset BandLab","currencyCode":"USD","amountMax":"39.95","amountMin":"39.95","price":"39.95","compareAtPrice":"99.95","imagesUrl":"https://cdn.shopify.com/s/files/1/0708/8953/7685/files/Drill-Vocal-Preset-BandLab-BCHILL-MIX-35027697959061.png?v=1749836568&width=600","urlStore":"https://bchillmix.com/products/bandlab-drill-vocal-preset","altImage":""},"isHidePrice":false,"isHideVariant":true,"isHideDescription":true,"labelButton":"Buy now","ATCLabelButton":"Add to cart","locale":"en","colorTitleProduct":{"hue":0,"saturation":0,"brightness":0},"colorBNButton":{"hue":0,"saturation":0,"brightness":1},"colorATCButton":{"hue":157.87,"saturation":1,"brightness":0.4784,"alpha":1},"colorBNText":{"hue":0,"saturation":0,"brightness":0},"colorPrice":{"hue":0,"saturation":0,"brightness":0},"colorATCText":{"hue":0,"saturation":0,"brightness":1},"ATCClickButton":"ATC","clickButton":"buyNow","id":"Avada-Tool_ProductDetail-12","hidden":false,"locked":false,"blockName":"Product details"} Add to cart Buy now BandLab Drill Vocal PresetA. Capturing the aggressive and hard-hitting sound of drill musicDrill music is known for its aggressive and hard-hitting vocals. Our BandLab Drill Vocal Preset is designed to help you achieve that signature intensity and make your voice stand out in the mix.B. Features of the Drill Vocal PresetThe Drill Vocal Preset offers tailored EQ settings, compression, and saturation effects that emphasize the raw power of your voice. This preset is perfect for those looking to create an authentic drill sound.C. Tips for fine-tuning the preset to suit your styleAdjust the saturation levels and compression settings to match your desired level of intensity. Experiment with EQ adjustments to bring out the unique characteristics of your voice and create a sound that’s unmistakably yours.V. R&B Vocal Preset {"dataProduct":{"id":"gid://shopify/Product/8781017120917","title":"R&B Vocal Preset BandLab","currencyCode":"USD","amountMax":"39.95","amountMin":"39.95","price":"39.95","compareAtPrice":"99.95","imagesUrl":"https://cdn.shopify.com/s/files/1/0708/8953/7685/files/R-B-Vocal-Preset-Adobe-Audition-Stock-Plugins-BCHILL-MIX-35027699794069.png?v=1749836303&width=600","urlStore":"https://bchillmix.com/products/rb-vocal-preset-bandlab","altImage":""},"isHidePrice":false,"isHideVariant":false,"isHideDescription":true,"labelButton":"Buy now","ATCLabelButton":"Add to cart","locale":"en","colorTitleProduct":{"hue":0,"saturation":0,"brightness":0},"colorBNButton":{"hue":0,"saturation":0,"brightness":1},"colorATCButton":{"hue":157.87,"saturation":1,"brightness":0.4784,"alpha":1},"colorBNText":{"hue":0,"saturation":0,"brightness":0},"colorPrice":{"hue":0,"saturation":0,"brightness":0},"colorATCText":{"hue":0,"saturation":0,"brightness":1},"ATCClickButton":"ATC","clickButton":"buyNow","id":"Avada-Tool_ProductDetail-13","hidden":false,"locked":false,"blockName":"Product details"} Add to cart Buy now R&B Vocal Preset BandLabA. Delivering smooth, sultry, and soulful vocalsR&B music is known for its smooth, sultry, and soulful vocals. Our BandLab R&B Vocal Preset is designed to help you achieve that captivating sound, drawing your listeners in with every note.B. Benefits and features of the R&B Vocal PresetThe rnb preset bandlab provides a blend of EQ, compression, and reverb settings that enhance your vocal’s warmth and depth. This preset is perfect for delivering a polished R&B sound that will leave your audience spellbound.C. Customization ideas to create a distinct R&B soundExperiment with reverb settings and delay effects to find the perfect ambience for your track. Tweak the EQ and compression to accentuate your voice’s unique tone, ensuring your R&B sound stands out from the crowd.VI. Atlanta Trap Vocal Preset {"dataProduct":{"id":"gid://shopify/Product/8781016989845","title":"Atlanta Trap Vocal Preset BandLab","currencyCode":"USD","amountMax":"39.95","amountMin":"39.95","price":"39.95","compareAtPrice":"99.95","imagesUrl":"https://cdn.shopify.com/s/files/1/0708/8953/7685/files/Atlanta-Trap-Vocal-Preset-BandLab-BCHILL-MIX-35027698647189.png?v=1749836586&width=600","urlStore":"https://bchillmix.com/products/atlanta-trap-vocal-preset-bandlab","altImage":""},"isHidePrice":false,"isHideVariant":false,"isHideDescription":true,"labelButton":"Buy now","ATCLabelButton":"Add to cart","locale":"en","colorTitleProduct":{"hue":0,"saturation":0,"brightness":0},"colorBNButton":{"hue":0,"saturation":0,"brightness":1},"colorATCButton":{"hue":157.87,"saturation":1,"brightness":0.4784,"alpha":1},"colorBNText":{"hue":0,"saturation":0,"brightness":0},"colorPrice":{"hue":0,"saturation":0,"brightness":0},"colorATCText":{"hue":0,"saturation":0,"brightness":1},"ATCClickButton":"ATC","clickButton":"buyNow","id":"Avada-Tool_ProductDetail-14","hidden":false,"locked":false,"blockName":"Product details"} Add to cart Buy now Atlanta Trap Vocal Preset BandLabA. Perfecting the trap sound from Atlanta’s music sceneThe Atlanta Trap Vocal Preset is designed to help you capture the essence of the city’s thriving music scene. This preset is ideal for those looking to create an authentic trap sound that’s true to its roots.B. Features of the Atlanta Trap Vocal PresetThis preset offers customized EQ, compression, and saturation settings that emphasize your voice’s grit and energy. With the Atlanta Trap Vocal Preset, you’ll be able to create a sound that’s unmistakably trap.C. Tips for making the preset work for your unique voiceAdjust the saturation and compression levels to suit your desired intensity. Experiment with EQ settings to highlight the unique characteristics of your voice and create a sound that’s truly your own.VII. NBA Youngboy Vocal Preset {"dataProduct":{"id":"gid://shopify/Product/8781017350293","title":"NBA YoungBoy Vocal Preset BandLab","currencyCode":"USD","amountMax":"39.95","amountMin":"39.95","price":"39.95","compareAtPrice":"99.95","imagesUrl":"https://cdn.shopify.com/s/files/1/0708/8953/7685/files/NBA-YoungBoy-Vocal-Preset-BandLab-BCHILL-MIX-35027698352277.png?v=1749836548&width=600","urlStore":"https://bchillmix.com/products/nba-youngboy-vocal-preset-bandlab","altImage":""},"isHidePrice":false,"isHideVariant":false,"isHideDescription":true,"labelButton":"Buy now","ATCLabelButton":"Add to cart","locale":"en","colorTitleProduct":{"hue":0,"saturation":0,"brightness":0},"colorBNButton":{"hue":0,"saturation":0,"brightness":1},"colorATCButton":{"hue":157.87,"saturation":1,"brightness":0.4784,"alpha":1},"colorBNText":{"hue":0,"saturation":0,"brightness":0},"colorPrice":{"hue":0,"saturation":0,"brightness":0},"colorATCText":{"hue":0,"saturation":0,"brightness":1},"ATCClickButton":"ATC","clickButton":"buyNow","id":"Avada-Tool_ProductDetail-15","hidden":false,"locked":false,"blockName":"Product details"} Add to cart Buy now NBA YoungBoy Vocal Preset BandLabA. Reproducing the sound of NBA Youngboy’s energetic rap styleThe NBA Youngboy Vocal Preset is designed to help you capture the energetic and passionate rap style of NBA Youngboy. This preset is perfect for those looking to create a dynamic and powerful sound in their tracks.B. Benefits and features of the NBA Youngboy Vocal PresetWith tailored EQ, compression, and saturation settings, the NBA Youngboy Vocal Preset accentuates your voice’s power and presence. It’s designed to bring out the best in your rap performance, making your vocals truly shine.C. Customization ideas to make the preset fit your styleExperiment with the saturation and compression levels to achieve your desired intensity. Play with EQ adjustments to emphasize the unique qualities of your voice and create a one-of-a-kind sound.VIII. Rap Vocal Preset {"dataProduct":{"id":"gid://shopify/Product/8781017088149","title":"Rap Vocal Preset BandLab","currencyCode":"USD","amountMax":"39.95","amountMin":"39.95","price":"39.95","compareAtPrice":"99.95","imagesUrl":"https://cdn.shopify.com/s/files/1/0708/8953/7685/files/Rap-Vocal-Preset-Adobe-Audition-Stock-Plugins-BCHILL-MIX-35027698483349.png?v=1749836311&width=600","urlStore":"https://bchillmix.com/products/rap-vocal-preset-bandlab","altImage":""},"isHidePrice":false,"isHideVariant":false,"isHideDescription":true,"labelButton":"Buy now","ATCLabelButton":"Add to cart","locale":"en","colorTitleProduct":{"hue":0,"saturation":0,"brightness":0},"colorBNButton":{"hue":0,"saturation":0,"brightness":1},"colorATCButton":{"hue":157.87,"saturation":1,"brightness":0.4784,"alpha":1},"colorBNText":{"hue":0,"saturation":0,"brightness":0},"colorPrice":{"hue":0,"saturation":0,"brightness":0},"colorATCText":{"hue":0,"saturation":0,"brightness":1},"ATCClickButton":"ATC","clickButton":"buyNow","id":"Avada-Tool_ProductDetail-16","hidden":false,"locked":false,"blockName":"Product details"} Add to cart Buy now Rap Vocal Preset BandLabA. Achieving a versatile rap sound for various stylesThis is one of the best BandLab preset for rap. The Rap Vocal Preset is designed to provide a versatile sound that works well with various rap styles. Whether you’re into old-school or new-wave rap, this preset will help you deliver an impactful performance.B. Features of the BandLab Rap PresetsThe Rap Vocal Preset offers a combination of EQ, compression, and saturation settings that emphasize the clarity and power of your voice. This preset is perfect for achieving a polished and professional rap sound.C. Tips for fine-tuning the preset to match your flowAdjust the EQ settings to bring out the unique tonal qualities of your voice. Tweak the compression and saturation levels to match your desired intensity and create a sound that’s truly your own.IX. The Kid Laroi Vocal Preset {"dataProduct":{"id":"gid://shopify/Product/8781017284757","title":"The Kid Laroi Vocal Preset BandLab","currencyCode":"USD","amountMax":"39.95","amountMin":"39.95","price":"39.95","compareAtPrice":"99.95","imagesUrl":"https://cdn.shopify.com/s/files/1/0708/8953/7685/files/The-Kid-Laroi-Vocal-Preset-BandLab-BCHILL-MIX-35027698548885.png?v=1749836554&width=600","urlStore":"https://bchillmix.com/products/the-kid-laroi-vocal-preset-bandlab","altImage":""},"isHidePrice":false,"isHideVariant":false,"isHideDescription":true,"labelButton":"Buy now","ATCLabelButton":"Add to cart","locale":"en","colorTitleProduct":{"hue":0,"saturation":0,"brightness":0},"colorBNButton":{"hue":0,"saturation":0,"brightness":1},"colorATCButton":{"hue":157.87,"saturation":1,"brightness":0.4784,"alpha":1},"colorBNText":{"hue":0,"saturation":0,"brightness":0},"colorPrice":{"hue":0,"saturation":0,"brightness":0},"colorATCText":{"hue":0,"saturation":0,"brightness":1},"ATCClickButton":"ATC","clickButton":"buyNow","id":"Avada-Tool_ProductDetail-17","hidden":false,"locked":false,"blockName":"Product details"} Add to cart Buy now The Kid Laroi Vocal Preset BandLabA. Capturing The Kid Laroi’s emotive and melodic soundThe Kid Laroi Vocal Preset is designed to help you emulate the emotive and melodic sound of The Kid Laroi. This preset is perfect for those looking to create a heartfelt and powerful performance in their tracks.B. Benefits and features of The Kid Laroi Vocal PresetWith custom EQ, compression, and reverb settings, the Kid Laroi Vocal Preset enhances your voice’s emotional depth and resonance. It’s designed to help you create a captivating and memorable sound that leaves a lasting impression.C. Customization tips for creating your unique soundExperiment with reverb settings to find the perfect ambience for your track. Adjust the EQ and compression settings to emphasize the unique characteristics of your voice, ensuring your sound stands out from the rest.X. Yeat Vocal PresetA. Replicating Yeat’s distinctive vocal styleThe Yeat Vocal Preset is designed to help you capture the distinctive vocal style of Yeat. This preset is perfect for those looking to create a standout sound that’s sure to turn heads.B. Features of the Yeat Vocal PresetThis preset offers customized EQ, compression, and saturation settings that emphasize the unique qualities of your voice. With the Yeat Vocal Preset, you’ll be able to create a sound that’s unmistakably your own.C. Tips for optimizing the preset to suit your voiceAdjust the saturation and compression levels to match your desired intensity. Experiment with EQ adjustments to bring out the unique characteristics of your voice and create a sound that’s truly one-of-a-kind.XI. Hyperpop PresetA. Perfect for the growing hyperpop genreThe Hyperpop Preset is designed for artists looking to create music in the rapidly growing hyperpop genre. This preset is perfect for those who want to create a futuristic and energetic sound that stands out in today’s music landscape.B. Benefits and features of the Hyperpop PresetThe Hyperpop Preset offers customized EQ, compression, and modulation settings that help bring your vocals to life. With this preset, your voice will cut through the mix, creating an unforgettable sound that will captivate your audience.C. Customization ideas to make the preset work for youExperiment with the modulation and pitch correction settings to create a unique and futuristic sound. Adjust the EQ and compression settings to emphasize the specific characteristics of your voice, ensuring that your vocals stand out in the mix.XII. ConclusionA. Recap of the top 10 BandLab vocal presets for different genres and stylesIn this article, we’ve explored the top 10 BandLab vocal presets offered by BCHILL MUSIC, perfect for various genres and styles. With presets tailored for clear vocals, Juice Wrld, drill, R&B, Atlanta trap, NBA Youngboy, rap, The Kid Laroi, Yeat, and hyperpop, there’s something for everyone.B. Encouragement to explore and customize the presets to create a unique soundWe encourage you to explore and customize these BandLab presets to create a sound that’s uniquely your own. Experiment with the various settings and effects to find the perfect combination that brings out the best in your voice.C. Final thoughts on the versatility and effectiveness of BCHILL MUSIC’s BandLab vocal presetsBCHILL MUSIC’s BandLab vocal presets are a powerful tool for artists and producers looking to achieve a professional sound with ease. With a range of presets suited for different genres and styles, you’re sure to find the perfect match for your next project. We also offer vocal presets and recording templates for other DAWS such as Logic Pro vocal presets , FL Studio Vocal Presets and Pro Tools Presets that you can check out as well. Happy recording!
Learn more
Top 10 Pro Tools Vocal Presets for Professional Music Production
I. Introduction A. The Significance of Pro Tools Vocal Presets in Music Production When it comes to music production, achieving a professional-quality sound can be a challenging and time-consuming process. This is where Pro Tools vocal presets come in. These presets are designed to save time and effort in the production process, while still achieving a high level of sound quality. B. Overview of BCHILL MUSIC’s Products and Services BCHILL MUSIC is a brand that offers a range of products and services to help music producers achieve a professional sound. These include recording templates and vocal presets for various digital audio workstations, including Pro Tools, Ableton, FL Studio, and more. C. Benefits of Using Pro Tools Vocal Presets Using Pro Tools vocal presets can offer a range of benefits for music producers. These include consistency in sound quality, efficiency in workflow, and versatility in customization. Additionally, using presets can help address common concerns or misconceptions about using presets, such as the fear of sacrificing creativity or originality. II. The Benefits of Using Pro Tools Vocal Presets Pro Tools Mixing Template A. The Concept of Vocal Presets In music production, vocal presets are pre-designed settings that can be applied to a vocal track to achieve a desired sound. These settings can include EQ, compression, reverb, and other effects. Vocal presets can save time and effort in achieving a professional-quality sound, allowing producers to focus on the creative aspects of music production. B. The Benefits of Pro Tools Vocal Presets Pro Tools vocal processing presets offer several benefits, including: Consistency in Sound Quality: Using a vocal preset can ensure a consistent sound quality across all vocal tracks in a project, regardless of the recording environment or equipment used. Efficiency in Workflow: Vocal presets can save time and effort in achieving a desired sound, allowing producers to focus on the creative aspects of music production. Versatility in Customization: Pro Tools vocal presets can be customized to fit the specific needs of the vocal track, allowing producers to experiment with different settings to achieve the desired sound. C. Addressing Concerns about Using Vocal Presets There are common concerns or misconceptions about using vocal presets, such as the fear of sacrificing creativity or originality. However, using Pro Tools plugin presets does not limit creativity. Producers can still customize settings and experiment with different presets to achieve the desired sound for their specific project. It is important to choose a preset that is appropriate for the specific vocal track and to customize settings as needed. III. Top 10 Best Pro Tools Vocal Presets I. Custom Pro Tools Recording Template Custom Pro Tools Recording Preset A. Boost your audio quality with customized plugins. The Custom Pro Tools Recording Template offers tailored plugins that enable users to create a unique audio experience. With personalized plugins, users can achieve high-quality sound without compromising on their individual style, making it a popular choice for music producers of all levels. B. Intuitive organization for efficient workflow. The template’s color-coded tracks and clear labeling allow for easy navigation, creating a seamless and efficient workflow. The user-friendly design ensures that both beginners and professionals can work efficiently, increasing productivity and reducing frustration. C. Create a personalized sound with customizable settings. The customizable settings of the template provide flexibility for users to create their own personalized sound. By offering complete control over every aspect of the audio, users can experiment with different settings to achieve the perfect sound for their project. This feature sets the Custom Pro Tools Recording Template apart, making it an ideal choice for those looking for a unique sound. II. The Exclusive Pro Tools Recording Template (Waves Plugins) Pro Tools Waves Preset A. Elevate your sound quality with professional Waves plugins. The Exclusive Pro Tools Recording Template with Waves Plugins delivers a premium audio experience by incorporating high-quality Waves plugins. With its user-friendly interface, the template provides seamless integration of Waves plugins, ensuring a hassle-free recording experience. B. Smooth navigation with organized color-coded tracks and detailed labeling. The tracks within the template are color-coded and labeled with detailed descriptions, ensuring efficient navigation for beginners and professionals alike. The color-coded tracks allow for easy identification of the desired track, while the detailed labeling ensures that users can quickly identify its purpose. C. Enhance your production process with a comprehensive vocal preset package. The template includes a comprehensive Pro Tools vocal preset package that encompasses lead vocals, backing vocals, and adlibs, streamlining the production process and allowing users to focus on creating music. With the lead vocal, backing vocal, and adlibs already set up, users can quickly start producing quality music without having to set up tracks from scratch. III. NBA YoungBoy Pro Tools Template NBA Youngboy Pro Tools Preset A. The NBA YoungBoy Pro Tools Template: The Perfect Choice for Hip-hop and Rap Artists The NBA YoungBoy Pro Tools Template is specifically designed to capture the essence of NBA YoungBoy’s unique sound and style. This template is perfect for hip-hop and rap artists who want to create high-quality music that stays true to their sound. B. Streamlined for Efficient Use with Pro Tools This template is streamlined for efficient use with Pro Tools, making it easy to integrate into your music production process. Whether you’re a seasoned pro or a beginner, the NBA YoungBoy Pro Tools Template is designed to make the production process smoother and more efficient. C. Elevate Your Music with High-Quality Sound With the NBA YoungBoy Pro Tools Template, you can elevate your music to the next level. It’s the perfect tool for hip-hop and rap artists looking to create high-quality music that stands out from the crowd. The template is designed to help you achieve the sound you’re looking for while saving time and effort in the production process. IV. Lil Durk Pro Tools Template Lil Durk Pro Tools Preset A. Elevate your music production with the Lil Durk Pro Tools Template This preset is designed specifically for artists who want to create music in the style of Lil Durk. It includes a comprehensive range of plugins and settings that help achieve the signature sound associated with this artist, making it a popular choice for those looking to elevate their music production. B. Range of plugins and settings to achieve Lil Durk’s signature sound The Lil Durk Pro Tools Template offers a range of plugins and settings that help users achieve the signature sound associated with Lil Durk’s music. It includes customized EQ and compression settings, as well as a range of effects, including reverb and delay, making it a time-efficient choice for users. C. Perfect for achieving professional-quality sound in the Lil Durk style The Lil Durk Pro Tools Template is an ideal choice for R&B artists and producers looking to achieve a professional-quality sound in the Lil Durk style, without requiring extensive audio engineering knowledge or experience. With this preset, users can create and produce music that is true to their style while still achieving high-quality results. V. Pro Tools R&B Recording Template R&B Pro Tools Vocal Preset A. Achieve a Unique R&B Sound with the Perfect Combination of Plugins The Pro Tools R&B Recording Template is equipped with a carefully curated selection of stock and Waves plugins, designed to help you achieve a unique R&B sound that’s both polished and professional. Whether you’re a seasoned producer or just starting out, this template will provide you with the tools you need to create music that stands out. B. Intuitive Interface for Efficient Workflow Navigating through the different tracks in a session can be a daunting task, especially when you’re working on a tight deadline. But with the Pro Tools R&B Recording Template, you’ll have an intuitive interface that makes it easy to navigate through the tracks and customize settings to your liking. This means you can spend less time searching for the right track and more time focusing on the creative process. C. Perfect for R&B Artists and Producers The Pro Tools R&B Recording Template is specifically designed for R&B artists and producers who are looking to achieve a professional sound. With pre-set tracks for lead vocals, backing vocals, drums, and more, you can spend less time setting up tracks and more time creating music that sounds polished and ready for release. Whether you’re a beginner or a seasoned pro, this template will provide you with a solid foundation to create your best work yet. VI. Dancehall Pro Tools Template Dancehall Pro Tools Preset A. Dancehall Pro Tools Template The Dancehall Pro Tools Template is specifically designed for artists creating music in the dancehall genre, offering a range of tools to help achieve the classic dancehall sound. B. Range of plugins and settings for classic dancehall sound The preset includes a range of plugins and settings that enable users to achieve the classic dancehall sound, characterized by crisp, clear vocals and a strong bassline. The customized EQ and compression settings help to bring out the best in vocals and other elements, while a range of effects, including reverb and delay, add depth and dimension to the sound. C. Ideal for artists looking to create authentic dancehall music With the Dancehall Pro Tools Template, artists can create authentic dancehall music with ease, without the need for extensive audio engineering knowledge or experience. The preset provides a solid foundation for artists to build upon, allowing them to focus on creating and producing high-quality music. VII. Juice Wrld Pro Tools Template Juice Wrld Pro Tools Preset A. Elevate your sound quality with custom Juice Wrld plugins and settings The Juice Wrld Pro Tools Template provides a unique set of plugins and settings that help to achieve the signature sound associated with the late artist. This preset is designed specifically for artists creating in the style of Juice Wrld, providing a solid foundation to create and produce music that captures his sound. B. Streamlined workflow with easy-to-use plugins and effects The Juice Wrld Pro Tools Template comes equipped with a range of plugins and effects, including customized EQ and compression settings, as well as reverb and delay, making it an ideal choice for artists looking to streamline their workflow. With its user-friendly design, the template allows for easy navigation and customization. C. Achieve professional-grade sound in the style of Juice Wrld With the Juice Wrld Pro Tools Template, artists and producers can achieve a professional-grade sound that is true to the late artist’s style. This makes it a popular choice for those looking to create music that captures the essence of Juice Wrld’s music. VIII. Drake Pro Tools Template Drake Pro Tools Vocal Preset A. Elevate your sound with the Drake Pro Tools Template. The Drake Pro Tools Template is specifically designed for artists creating in the style of Drake. This preset includes a range of plugins and settings that help to achieve the signature sound associated with this artist. With its customized EQ and compression settings, as well as a range of effects including reverb and delay, users can create high-quality music that aligns with Drake’s unique sound. B. Seamless integration with Pro Tools for an efficient workflow. The Drake Pro Tools Template is compatible with Pro Tools, ensuring seamless integration and a hassle-free experience. With its easy-to-use interface, this preset allows for an efficient workflow, allowing users to focus on creating music. C. Ideal for achieving a professional sound in the style of Drake. For artists and producers looking to achieve a professional sound in the style of Drake, the Drake Pro Tools Template is the perfect tool. With its range of plugins and settings, users can create music that is true to Drake’s sound, while still maintaining their own unique style. IX. The Weeknd Pro Tools Recording Template The Weeknd Pro Tools Preset A. Elevate your sound with The Weeknd’s signature style The Weeknd Pro Tools Template is designed to help artists create music in the style of The Weeknd. The template includes a variety of plugins and settings that help to achieve The Weeknd’s signature sound, making it a popular choice for producers and musicians alike. B. Customized EQ and compression settings for a professional sound The template includes customized EQ and compression settings that help to achieve a professional sound with crisp, clear vocals and a strong bassline. With its range of effects, including reverb and delay, users can create a unique sound that is true to The Weeknd’s style. C. Perfect for artists creating music in The Weeknd’s style The Weeknd Pro Tools Template is a popular choice for artists creating music in The Weeknd’s style. With its range of plugins and settings, artists and producers can achieve a professional sound without extensive audio engineering knowledge or experience. X. The Kid LAROI Pro Tools Template The Kid LAROI Pro Tools Preset A. Elevate your sound quality with customized plugins. The Kid LAROI Pro Tools Template is specifically designed for artists who create music in the style of The Kid LAROI. It offers tailored plugins that enable users to achieve a unique audio experience that aligns with the signature sound of this artist. B. Intuitive organization for efficient workflow. The template’s color-coded tracks and clear labeling allow for easy navigation, creating a seamless and efficient workflow. The user-friendly design ensures that both beginners and professionals can work efficiently, increasing productivity and reducing frustration. C. Create a personalized sound with customizable settings. The customizable settings of the template provide flexibility for users to create their own personalized sound. By offering complete control over every aspect of the audio, users can experiment with different settings to achieve the perfect sound for their project. This feature sets The Kid LAROI Pro Tools Template apart, making it an ideal choice for those looking for a unique sound. IV. How to Use Pro Tools Vocal Presets Pro Tools Mixing Template A. Step-by-Step Guide for Using Pro Tools Vocal Presets Using Pro Tools vocal presets is a quick and efficient way to achieve a professional sound without spending hours tweaking settings. To use a vocal preset in Pro Tools, first, select the vocal track you want to apply the preset to. Next, navigate to the vocal processing plugin you want to use, and open the preset menu. Choose the preset you want to use, and adjust any settings as needed to fit the specific needs of your project. B. Addressing Common Troubleshooting Issues While Pro Tools vocal presets can save time and effort in achieving a professional sound, there may be some troubleshooting issues that arise. Common issues include compatibility issues with certain plugins, incorrect settings, or the preset not achieving the desired sound. To troubleshoot these issues, it is recommended to refer to the plugin manual, reach out to the plugin manufacturer for support, or experiment with different presets or settings to achieve the desired sound. V. Frequently Asked Questions about Pro Tools Vocal Presets Pro Tools Vocal Preset A. Are Pro Tools Vocal Presets Only for Beginners? No, Pro Tools vocal presets can be used by both beginners and experienced music producers. Presets can save time and effort in achieving a professional-quality sound, allowing producers to focus on the creative aspects of music production. B. Can I Still Be Creative While Using Pro Tools Vocal Presets? Yes, using Pro Tools vocal presets does not limit creativity. Producers can still customize settings and experiment with different presets to achieve the desired sound for their specific project. C. Are Pro Tools Vocal Presets Customizable? Yes, Pro Tools vocal presets can be customized to fit the specific needs of the vocal track. Producers can adjust settings such as EQ, compression, and effects to achieve the desired sound. D. Do Pro Tools Vocal Presets Work with All Types of Vocals? Pro Tools vocal presets can work with a wide range of vocal types and styles. However, it is important to choose a preset that is appropriate for the specific vocal track and to customize settings as needed. E. How Do I Choose the Right Pro Tools Vocal Preset for My Project? Consider the style and genre of the project, as well as the specific needs of the vocal track. Experiment with different presets to find the one that works best for your specific needs. F. Can I Create My Own Pro Tools Vocal Presets? Yes, producers can create their own custom Pro Tools vocal presets by saving settings as a preset. This can be a useful way to achieve a consistent sound quality across all vocal tracks in a project. G. How Do I Add Vocal Presets to Pro Tools? To add vocal presets to Pro Tools, open the plugins section of the vocal track and select the desired vocal processing plugin. Click on the preset menu and select “Import Preset” or “Load Preset” depending on the plugin. Navigate to the folder where the preset is saved and select it. The preset will now be applied to the track. H. What is the Best Vocal Preset? The best vocal preset will depend on the specific needs of the vocal track and the style of the project. Producers can experiment with different presets to find the one that works best for their specific needs. I. Does Pro Tools Have Presets? Yes, Pro Tools has a range of presets for various plugins, including vocal processing plugins. These presets can save time and effort in achieving a professional-quality sound. J. Can You Use Autotune on Pro Tools? Yes, autotune can be used on Pro Tools using plugins such as Antares Auto-Tune. K. Can You Master Audio with Pro Tools? Yes, Pro Tools can be used for mastering audio using plugins such as iZotope Ozone or Waves L3 Multimaximizer. However, mastering is a complex process that requires specialized skills and knowledge, so it is recommended to work with a professional mastering engineer for the best results. Pro Tools mastering presets can help engineers as a good starting point for mastering. VI.Conclusion A. Summary of Benefits of Using Pro Tools Vocal Presets Pro Tools vocal presets can significantly enhance the sound quality of your vocal tracks, regardless of your level of experience in music production. The range of options available through BCHILL MUSIC allows for a customized approach to achieving a professional-quality sound. B. Encouragement to Try Different Presets and Customize for Unique Sound. We encourage readers to experiment with different Pro Tools vocal presets and customize them as needed to achieve a unique, high-quality sound for their projects. With the help of vocal presets, you can focus on the creative aspects of music production and let the presets take care of the technical details.
Learn more
The Essential Guide to BandLab Vocal Presets for Professional Sound
I. Introduction A. Importance of professional sound in music production Ever wondered why some tracks make you feel like you’re front row at a concert, while others sound more like you’re eavesdropping on a karaoke session in the apartment next door? That’s the difference professional sound makes. It’s the ‘secret sauce’ that sets apart the chart-toppers from the chancers. It’s the difference between serving your listeners a feast of audio delight or a soggy sandwich of sound. B. Overview of BandLab and its features Now, enter BandLab, the cloud-based DAW that’s been wooing audio aficionados worldwide. It’s like the Swiss Army Knife of audio production: packed with features, ready for any audio challenge, and it doesn’t come with an eye-watering price tag. From recording to mixing, BandLab is like a sonic playground for both newcomers and seasoned pros. C. Role of vocal presets in achieving a professional sound And, here’s the kicker: BandLab offers vocal presets. Think of them as your sonic cheat codes. These presets are like wise audio gurus, eager to share the secrets of top-notch sound quality with you. With their help, you can take your vocals from ‘meh’ to ‘marvelous’ without getting a PhD in audio engineering. BandLab Drill Vocal Preset II. What are BandLab Vocal Presets? A. Definition of vocal presets So, what are these magical creatures called vocal presets? Think of them as pre-cooked meals for your audio kitchen. These handy helpers come pre-set with an array of effects and parameters that can transform your raw vocal tracks into polished, professional recordings faster than you can say “auto-tune”. B. How they work in BandLab In BandLab, these presets are like your personal audio butlers, doing most of the grunt work for you. They tweak, polish, and fine-tune your vocals, leaving you free to focus on the creative stuff. And the best part? They don’t judge you for belting out your favorite tune at 3 am. C. Benefits of using presets in music production Whether you’re a bedroom producer or a Grammy-winning engineer, presets are like a secret weapon in your audio arsenal. They save time, reduce the learning curve, and help you achieve a consistent sound across your projects. Plus, they can give your creative juices a jolt, taking your tracks in directions you might never have imagined. III. Top BandLab Vocal Presets Clear Vocals Preset BandLab There are quite a bit of Bandlab Vocal Presets that are available out there so we have created a list of some of the best ones available for you to use including the Bandlab Vocal Presets and Bandlab Vocal Presets. A. Clear Vocals Preset: Our solution for crisp and clean vocal recordings, perfect for any genre Imagine if you could slice through the muddy audio fog and let your vocals shine like a beacon of sonic brilliance. That’s what our BandLab Clear Vocals Preset does. It’s like a sparkling, sonic detergent that scrubs away unwanted muck, leaving your vocals crisp, clean, and ready to captivate your audience. B. Juice Wrld Vocal Preset: Inspired by the late Juice Wrld, we’ve crafted a preset that captures the emotive and melodic essence of his sound If you want to channel the emotional intensity and melodic prowess of the late Juice Wrld, look no further than this Juice Wrld Bandlab vocal preset. It’s like a magic wand that infuses your vocals with that haunting, raw vulnerability that defined his music. One moment with this preset, and you’ll be swimming in a sea of feels. C. Drill Vocal Preset: Achieve the aggressive and hard-hitting vocals characteristic of the drill music genre with our specially designed preset Drill music isn’t for the faint of heart. It’s gritty, it’s intense, and it demands vocals that pack a punch. Our Drill Vocal Preset for Bandlab is like an audio battering ram, ensuring your voice cuts through the mix with razor-sharp precision. Unleash this preset, and watch your vocals transform into an unstoppable force of nature. D. R&B Vocal Preset: Our R&B Vocal Preset is perfect for delivering smooth, sultry, and soulful vocals that will captivate your audience Ready to seduce your listeners with buttery-smooth R&B vocals? The r&b vocal preset for BandLab is your ticket to the land of sensual soundscapes. It wraps your voice in a velvety cloak of audio goodness, making every word you sing drip with emotion. With this preset, your vocals will be smoother than a Barry White pick-up line. IV. Customizing BandLab Vocal Presets for Your Unique Voice A. Tips for adjusting EQ and compression settings Now, Vocal Presets are a great starting point, but to truly make them sing (pun intended), you need to tailor them to your unique voice. Fear not, we’re here to help. Start by tweaking the EQ and compression settings, ensuring your vocals are sitting pretty in the mix, like a well-placed cherry on top of an audio sundae. B. Fine-tuning reverb and delay effects Reverb and delay can be your best friends or your worst enemies. Too little, and your vocals might sound like they’re trapped in a shoebox; too much, and you risk drowning them in a cavernous echo chamber. The key is to find that Goldilocks zone: just enough to add depth and space without going overboard. C. Using pitch correction and harmonization creatively Pitch correction and harmonization can be fantastic tools when used sparingly and creatively. They can tighten up your vocals, add lush harmonies, or even create otherworldly effects. Just remember: with great power comes great responsibility, so don’t go full-on T-Pain unless that’s the vibe you’re going for. D. Adding character with modulation and saturation effects Lastly, don’t be afraid to experiment with modulation and saturation effects. These can add warmth, character, or even a touch of vintage charm to your vocals. Think of them as the audio equivalent of your favorite Instagram filter: a subtle enhancement that makes your voice truly stand out. V. How to Install and Use BandLab Vocal Presets Juice Wrld BandLab Vocal Preset A. Step-by-step guide to importing presets Download your desired vocal preset from our website. Open BandLab and create a new project or open an existing one Add a new vocal track or select the one you want to apply the preset to. Click the ‘Effects’ button on the track to open the effects panel. In the effects panel, click the ‘Import Preset’ button. Locate the downloaded preset file on your computer and click ‘Open’. Your preset is now imported and ready for use! B. Applying presets to your vocal tracks Now that your preset is imported, simply click on it in the effects panel to apply it to your vocal track. Like a master chef adding seasoning to a dish, your preset will instantly enhance your vocals with its carefully crafted settings. C. Adjusting presets to fit your mix Don’t be shy about tweaking your preset to suit your specific track. Adjust the various settings and effects to make sure it complements the rest of your mix like a well-choreographed dance routine. Remember, the preset is a starting point; it’s up to you to make it truly shine. VI. Tips for Achieving a Professional Sound with BandLab Vocal Presets A. Proper recording techniques for better results Garbage in, garbage out, as they say. Make sure your vocal recordings are as clean and high-quality as possible. Invest in a decent microphone, record in a quiet space, and practice good mic technique. This will ensure that your vocal presets have the best possible raw material to work with. B. Importance of mixing and mastering in the production process While presets can do wonders for your vocals, don’t forget the importance of mixing and mastering in achieving that professional sound. Balance your vocals with other elements in the mix, and ensure that your final track is polished, loud, and proud. C. Balancing vocals with other elements in the mix Vocals are the star of the show, but they can’t steal the spotlight if they’re being drowned out by other instruments or clashing with other elements. Make sure your vocals sit well within the mix, leaving space for other instruments to shine, while still maintaining a clear and impactful presence. VII. Conclusion A. Recap of the benefits and uses of BandLab vocal presets In summary, presets for BandLab are like the cheat codes of the audio world, helping you achieve a professional sound with minimal effort. They’re a fantastic starting point for crafting polished, captivating vocals that can elevate your tracks to new heights. B. Encouragement to explore presets and customization for optimal sound Don’t be afraid to dive in and explore the world of presets and customization. With a little experimentation, you can create a unique and engaging sound that showcases your individuality as an artist. C. Final thoughts on using BandLab vocal presets for professional sound So, go forth, my audio adventurer, and let BandLab vocal presets be your trusty companions on the journey to sonic success. With their help, you’ll be well on your way to crafting tracks that not only sound professional but also resonate with your audience on a deep, emotional level.
Learn more
Top 10 Vocal Presets for Every Recording Artist: Boost Your Studio’s Sound
I. Introduction A. Importance of vocal presets in music production Vocal presets play a crucial role in music production by providing a foundation for achieving professional-sounding vocals. They streamline the process of setting up effects chains, saving valuable time and ensuring consistency in your projects. B. Enhancing recordings with the right presets Choosing the right vocal presets can significantly enhance your recordings. By finding the perfect combination of effects tailored to your voice and genre, you can elevate your vocal tracks and create a polished, professional sound. C. Overview of the top 10 vocal presets from BCHILL MUSIC In this article, we will delve into the top 10 vocal presets offered by BCHILL MUSIC, providing an in-depth analysis of their features and benefits. These presets cater to various genres and DAWs, making them versatile tools for any recording artist, engineer, or producer. II. What are vocal presets and how can they enhance your recordings? Clear Vocals Preset BandLab A. Definition of vocal presets Vocal presets are pre-configured settings for audio effects, tailored to processing vocals in a specific style or genre. They are designed to work within a digital audio workstation (DAW) and can include settings for equalization, compression, reverb, delay, and other effects. B. Benefits of using vocal presets Utilizing vocal presets offers numerous advantages, such as: Streamlining the mixing process by providing a starting point for vocal processing. Ensuring consistency in your projects by applying the same effects chains across multiple tracks or sessions. Saving time by eliminating the need to configure each effect from scratch. Simplifying the learning curve for beginners by offering pre-configured settings that demonstrate how to process vocals effectively. C. Customizing vocal presets for unique styles and voices While vocal presets can be a valuable resource, it is essential to customize them to suit your unique style and voice. By adjusting parameters such as EQ settings, compression ratios, and reverb levels, you can fine-tune the presets to achieve the perfect sound for your particular project. Experimentation and trial-and-error are key to unlocking the full potential of vocal presets and making them work for you. III. Top 10 Vocal Presets I. The Exclusive Pro Tools Recording Template (Waves Plugins) Pro Tools Waves Template A. Provides a user-friendly experience with high-quality Waves plugins. The Exclusive Pro Tools Recording Template with Waves Plugins provides users with a hassle-free experience due to its easy-to-use interface and high-quality Waves plugins. The plugins are designed to enhance the quality of your sound recordings while providing a seamless production process. B. Tracks are color-coded and labeled with descriptions for easy navigation. The tracks within the template are color-coded and labeled with descriptions, allowing for easy navigation, making it a suitable choice for beginners or professionals. The color-coded tracks allow users to quickly find the track they need and easily differentiate between them. C. Comes equipped with lead vocal, backing vocals, and adlibs to enhance the production process. The template comes equipped with a pro tools vocal preset for lead vocals, backing vocals, and adlibs to streamline the production process, allowing users to focus on creating quality music. With the lead vocal, backing vocal, and adlibs already set up, users can quickly start creating and producing music without having to worry about setting up tracks from scratch. II. Logic Pro Stock Recording Template Logic Pro Stock Plugin Recording Template The Logic Pro Stock Recording Template utilizes the built-in stock plugins to produce quality sound recordings. Its straightforward workflow and user-friendly interface make it an ideal choice for both beginners and professionals. A. Utilizes built-in stock plugins for quality sound production. The built-in stock plugins provide users with quality sound production without the need to invest in expensive plugins. This makes it a cost-effective option for anyone looking to produce high-quality music. B. Workflow is straightforward and user-friendly. The straightforward workflow of the template means users can focus on the creative aspects of producing music instead of worrying about complex technical issues. C. Perfect for both beginners and professionals looking to produce high-quality music. This Logic Pro preset is suitable for both beginners and professionals as it provides a solid foundation for sound production that can be expanded upon as users become more experienced. III. Pro Tools R&B Recording Template R&B Recording Template for Pro Tools The Pro Tools R&B Recording Template is designed to achieve a unique R&B sound with the perfect combination of stock and Waves plugins. Its intuitive interface makes it easy to navigate, making it an ideal choice for R&B artists and producers looking to achieve a professional sound. A. Offers the perfect combination of stock and Waves plugins to achieve a unique R&B sound. The combination of stock and Waves plugins provides users with a unique R&B sound that is both high-quality and professional. This makes it a popular choice for R&B artists and producers. B. User interface is intuitive and easy to navigate. The intuitive interface of the template means users can quickly and easily navigate the different tracks, making it a time-efficient choice for users. C. Ideal for R&B artists and producers looking to achieve a professional sound. The template is specifically designed for R&B artists and producers, providing them with a solid foundation to create and produce professional-sounding music. IV. NBA YoungBoy Pro Tools Template NBA Youngboy Pro Tools Recording Template The NBA YoungBoy Pro Tools Template is specifically designed for NBA YoungBoy’s unique sound and style, making it a perfect choice for hip-hop and rap artists looking to create high-quality music. A. Specifically designed for NBA YoungBoy’s unique sound and style. The template is designed specifically for NBA YoungBoy’s unique sound and style, making it a popular choice for fans of his music. B. Compatible with Pro Tools for easy and efficient use. The compatibility of the template with Pro Tools means users can quickly and easily integrate it into their music production process. C. Perfect for hip-hop and rap artists looking to create high-quality music. The NBA YoungBoy Pro Tools Template is perfect for hip-hop and rap artists looking to create high-quality music that is true to their sound. V. Pro Tools Luxury Mixing Template Pro Tools Luxury Mixing Template The Pro Tools Luxury Mixing Template comes equipped with premium plugins from top brands, making it an ideal choice for achieving a professional-grade mix. Its color-coded tracks with descriptions and functions provide easy navigation, elevating the overall sound quality to a professional level. A. Equipped with premium plugins from top brands to achieve a professional-grade mix. The premium plugins from top brands within the template provide users with access to high-quality mixing tools that can significantly enhance the sound quality of their music. B. Tracks are color-coded and labeled with descriptions and functions for easy The color-coded tracks with descriptions and functions make it easy for users to navigate and quickly find the track they need. C. Elevates the overall sound quality to a professional level. The pro tools mixing template is designed to elevate the overall sound quality of the music to a professional level, making it an ideal choice for users looking to create high-quality music. VI. Clear Vocals Preset BandLab Clear Vocals Preset BandLab A. Enhances vocal clarity and presence to make your vocals stand out. Enhances vocal clarity and presence to make your vocals stand out. This preset is specifically designed to help your vocals cut through a mix and sound more present and clear. B. Compatible with BandLab for easy use and integration. Compatible with BandLab for easy use and integration. The preset can be easily loaded into BandLab’s audio editor, making it accessible to a wide range of users. C. Suitable for various music genres and styles, making it a versatile choice for any project This is one of the best BandLab vocal presets for clean and clear vocals. Suitable for various music genres and styles, making it a versatile choice for any project. Whether you’re producing pop, rock, hip-hop, or any other genre, the Clear Vocals Preset can help your vocals sound their best. VII. Drill Vocal Preset BandLab Drill Vocal Preset Bandlab A. Tailored to achieve the aggressive and powerful sound of drill music. The Drill Vocal Preset is specifically designed to achieve the aggressive and powerful sound of drill music. It features pre-configured settings that bring out the unique characteristics of drill vocals, including distortion, saturation, and compression. B. Compatible with BandLab for efficient use and integration. It’s compatible with BandLab for efficient use and integration, making it easy for artists and producers to create high-quality drill music. The preset can be applied to individual vocal tracks or to the entire mix. C. Perfect for artists and producers looking to create high-quality drill music. Perfect for achieving a professional sound, this preset is a must-have for anyone looking to produce drill music. This is one of the best bandlab presets for aggressive drill vocals and it can be customized to fit the specific needs of each project, allowing for greater flexibility and creativity. VIII. iZotope Ozone Mastering Preset Ozone Mastering Preset A. Professionally designed to provide a polished and finished sound to your tracks. The iZotope Ozone Mastering Preset is professionally designed to provide a polished and finished sound to your tracks. It features a comprehensive suite of tools, including EQ, dynamics, maximizer, and exciter, that can be easily adjusted to achieve the desired sound. B. Preconfigured with EQ, dynamics, maximizer, and exciter for optimal performance. Preconfigured with optimal settings, this preset saves you time and effort in the mastering process. It can be used to enhance the sound quality of individual tracks or to polish an entire album. C. Perfect for achieving a professional-grade sound with minimal effort. Ideal for achieving a professional-grade sound with minimal effort, this preset is a must-have for any serious music producer. It can help take your music to the next level by providing a polished and professional sound that stands out from the rest. IX. Juice Wrld FL Studio Vocal Preset Juice Wrld Vocal Preset FL Studio A. Uses FL Studio’s stock plugins to achieve Juice Wrld’s unique vocal style. The Juice Wrld FL Studio Vocal Preset uses FL Studio’s stock plugins to achieve Juice Wrld’s unique vocal style. It features pre-configured settings that emphasize the characteristically emotive and melodic sound of Juice Wrld’s vocals. B. Perfect for artists and producers looking to replicate Juice Wrld’s signature sound. Perfect for artists and producers looking to replicate Juice Wrld’s signature sound, this FL Studio vocal preset offers an easy-to-use template for FL Studio users. The preset can be easily customized to suit individual needs and preferences. C. Provides an easy-to-use template for FL Studio users. Whether you’re a fan of Juice Wrld’s music or just looking to experiment with different vocal styles, this preset is a great addition to your music production arsenal. It can help you achieve a unique sound that stands out in today’s music industry. X. Drake Vocal Preset Studio One Drake Vocal Preset Studio One A. Designed to create smooth and melodic vocals in the style of Drake. The Drake Vocal Preset for Studio One is designed to create smooth and melodic vocals in the style of Drake. It features pre-configured settings that highlight the characteristically warm and soulful tone of Drake’s vocals. B. Compatible with Studio One for easy integration and use. Compatible with Studio One for easy integration and use, this preset is perfect for artists and producers looking to achieve a professional-grade sound like Drake’s. It can be used to enhance individual vocal tracks or to create a cohesive sound for an entire project. C. Ideal for artists and producers looking to achieve a professional-grade sound like Drake’s. Whether you’re a fan of Drake’s music or just looking to experiment with different vocal styles, this preset is a great addition to your music production toolkit. It can help you achieve a polished and professional sound that captures the essence of Drake’s unique style. IV. Choosing the right vocal preset for your voice and genre A. Assessing your voice and music style To select the ideal vocal preset, start by analyzing your vocal range, tone, and timbre. Consider the genre you’re working in and the specific sound you want to achieve. This understanding will help you make an informed decision when selecting a preset that complements and enhances your vocal qualities. B. Importance of genre-specific presets Genre-specific presets are designed to cater to the unique characteristics of each genre, such as vocal effects, EQ settings, and compression techniques. By using a preset tailored to your genre, you can achieve an authentic sound that resonates with your target audience, while also streamlining your workflow and ensuring a consistent sound across your projects. C. Experimenting with different presets Don’t hesitate to experiment with various presets, as this process can help you discover new creative possibilities and identify the best fit for your specific needs. It’s important to remember that presets are a starting point, and customization is key. Tweaking the settings within a preset can lead to unique and personalized results that reflect your artistic vision. V. Saving time and effort with vocal presets A. Streamlined recording process Vocal presets can significantly streamline your recording process by providing pre-configured settings that cater to your specific needs. This enables you to focus on your performance, creativity, and artistic vision, rather than getting lost in technical details. B. Simplifying mixing and mastering tasks By using vocal presets, you can simplify the complex tasks of mixing and mastering, as they provide a solid foundation for processing your vocals. This allows you to achieve a professional sound more quickly and efficiently, while still allowing room for customization and fine-tuning. C. Focus on creativity Vocal presets enable you to spend less time on technical aspects and more time on your creative process. With the foundation laid by a preset, you can concentrate on refining your performance, exploring new ideas, and expanding your musical horizons. VI. Comparing vocal presets across different DAWs A. Quality and features in various DAWs When comparing vocal presets, it’s important to consider the quality and features offered by different DAWs. Some DAWs may have more advanced or specialized plugins, while others may prioritize ease of use or offer unique workflows. Keep these factors in mind as you choose the best vocal presets for your needs. B. Best vocal presets for beginners If you’re new to music production, look for vocal presets that are easy to use and understand, while still providing a professional sound. Presets that utilize stock plugins are often a good choice, as they don’t require additional purchases and are typically more accessible. C. Free vocal presets available for download There are numerous free vocal presets available online that can be downloaded and integrated into your DAW. These presets can be an excellent starting point for beginners or those looking to experiment with different sounds and settings. VII. Achieving a professional sound with vocal presets A. Importance of quality presets Investing in quality vocal presets can make a significant difference in the final sound of your recordings. High-quality presets are designed by experienced engineers and producers, incorporating industry-standard techniques and best practices to help you achieve a polished, professional sound. B. Customizing presets for a unique sound While presets offer a solid foundation, customizing them to suit your unique style and voice is essential. Tweaking settings such as EQ, compression, and effects can help you create a personalized sound that sets you apart from other artists. C. Integrating presets in your home studio setup To make the most of your vocal presets, ensure that your home studio setup is optimized for recording and processing vocals. This includes using a suitable microphone, proper acoustic treatment, and a high-quality audio interface. By integrating vocal presets into a well-designed home studio, you can maximize their potential and achieve professional-sounding results. XII. Conclusion A. Recap of the top 10 vocal presets from BCHILL MUSIC We have explored the top 10 vocal presets from BCHILL MUSIC, highlighting their features and benefits. These presets cover a wide range of genres and DAWs, making them valuable tools for any artist looking to enhance their vocal recordings. B. Encouragement to explore and experiment with vocal presets Don’t hesitate to explore and experiment with various vocal presets. This process will help you discover new creative possibilities, identify the best fit for your needs, and refine your sound to create a unique and captivating listening experience. C. Call to action: visit BCHILL MUSIC website for more information and to purchase vocal presets To learn more about the vocal presets mentioned in this article and to purchase them, visit the BCHILL MUSIC website. Empower your music production journey by harnessing the potential of vocal presets and achieving the professional sound you desire.
Learn more
The 5 Best Ableton Vocal Presets to Elevate Your Recordings
I. Introduction A. Explanation of the importance of vocal presets in music production If you’ve ever produced music, you know how much time and effort goes into getting the perfect sound. From tweaking the EQ to adjusting the compression, there are countless tools and techniques used to make sure every aspect of the recording sounds just right. This is where vocal presets come in. Vocal presets offer a shortcut to achieving a professional vocal sound, without the hassle of having to manually adjust all of the settings yourself. B. Brief overview of Ableton vocal presets and their benefits In particular, Ableton vocal presets are a game-changer for music production. Ableton vocal presets are pre-designed settings for vocal processing that can help anyone achieve a great sound. They’re easy to use for both beginners and professionals, and they can be customized to fit specific recording needs. Some of the benefits of using Ableton vocal presets include time savings, consistency in recording projects, and achieving a polished, professional sound. C. Brief explanation of the purpose of the article In this article, we’ll be exploring the five best Ableton vocal presets to help you elevate your recordings. We’ll provide in-depth descriptions of each preset, including key features and benefits, and we’ll even include tips on how to use and customize them to fit your specific needs. By the end of this article, you’ll be well-equipped to choose the best Ableton vocal preset for your music production needs. II. The 5 Best Ableton Vocal Presets A. Juice Wrld Ableton Vocal Preset Juice Wrld Ableton Vocal Preset If you’re looking for a vocal preset that will help you achieve the signature sound of the late Juice Wrld, the Juice Wrld Ableton Vocal Preset is a must-try. This preset is designed to help you achieve the emotive and melodic sound that Juice Wrld was known for. Some of the key features of this preset include the use of auto-tune, reverb, and EQ to create a polished, professional sound. It’s also fully customizable, so you can adjust the settings to fit your specific needs. B. Drake Vocal Preset Ableton Drake Vocal Preset Ableton Another great preset to check out is the Drake Vocal Preset Ableton. This preset is designed to help you achieve the smooth, sultry sound that Drake is known for. It uses a combination of compression, EQ, and reverb to create a sound that is both polished and emotive. With this preset, you’ll be able to achieve the signature sound of one of the most successful artists of our time. C. NBA Youngboy Vocal Preset Ableton NBA Youngboy Vocal Preset Ableton For those looking for a more energetic and dynamic sound, the NBA Youngboy Vocal Preset Ableton is a great choice. This preset is designed to help you achieve the hard-hitting, trap-inspired sound that NBA Youngboy is known for. It uses a combination of distortion, EQ, and compression to create a sound that is both gritty and polished. This preset is perfect for those looking to create high-energy, aggressive music. D. R&B Vocal Preset Ableton R&B Vocal Preset Ableton If you’re looking for a more soulful and emotive sound, the R&B Vocal Preset Ableton is a great choice. This preset is designed to help you achieve the smooth, melodic sound that is characteristic of R&B music. It uses a combination of reverb, EQ, and compression to create a sound that is both polished and emotive. With this preset, you’ll be able to create soulful and heartfelt music that will resonate with your listeners. E. Rap Vocal Preset Ableton Rap Vocal Preset Ableton Finally, the Rap Vocal Preset for Ableton is a versatile preset that is perfect for anyone looking to create polished, professional-sounding rap music. This preset uses a combination of compression, EQ, and reverb to create a sound that is both polished and hard-hitting. It’s fully customizable, so you can adjust the settings to fit your specific needs and create a sound that is uniquely your own. III. How to Choose the Best Ableton Vocal Preset for Your Needs Ableton Live Vocal Template A. Explanation of the factors to consider when choosing a preset When choosing an Ableton vocal preset, there are several factors to consider. First and foremost, you should consider the genre of music you’re producing. Different genres have different vocal styles, and certain presets may work better for certain genres. You should also consider the emotion and tone you want to convey in your music, as different presets will have different effects on the final sound. Additionally, you should consider the recording environment you’ll be using, as presets may work differently depending on the recording environment. B. Tips on how to match the preset to your recording style Once you’ve chosen a preset, it’s important to match it to your recording style. This means adjusting the preset to fit the specific characteristics of your voice. For example, you may need to adjust the EQ settings to enhance certain frequencies in your voice, or adjust the compression to achieve a smoother sound. It’s also important to adjust the settings to match the mood and emotion of the lyrics you’re singing. C. Tips on how to customize the preset to your liking Finally, it’s important to customize the preset to your liking. While presets can be a great shortcut to achieving a professional sound, they’re not a one-size-fits-all solution. You should experiment with different settings and make adjustments until you find a sound that works best for you. You can also combine presets and create your own custom settings to achieve a truly unique sound. By experimenting and customizing your presets, you’ll be able to create a sound that is uniquely your own. IV. Frequently Asked Questions About Ableton Vocal Presets Ableton Vocal Preset Template A. What are the benefits of using vocal presets in Ableton? There are several benefits to using vocal presets in Ableton. First and foremost, presets can help you achieve a polished, professional sound without spending hours tweaking settings. They can also help you experiment with different vocal styles and find new creative directions for your music. Additionally, presets can be a great learning tool, as they can help you understand how different effects and settings work together to create a specific sound. B. Can I use Ableton vocal presets with other DAWs? While Ableton vocal presets are specifically designed for use in Ableton, it is possible to use them with other DAWs. However, you may need to make some adjustments to the settings to ensure compatibility with your DAW. It’s also worth noting that different DAWs may have different effects and plugins, so the sound may not be exactly the same as it would be in Ableton. C. How do I install Ableton vocal presets? Installing Ableton vocal presets is a relatively simple process. First, download the preset file from the source. Then, open Ableton and navigate to the “Presets” folder. Drag and drop the preset file into the folder, and it should be available for use in Ableton. D. How do I know if a preset will work with my vocal recording? It can be difficult to know if a preset will work with your specific vocal recording, as every recording is different. However, there are a few things you can look for when choosing a preset. First, consider the genre and style of the preset, and whether it fits with the style of your music. You should also listen to the preset and compare it to your vocal recording to get a sense of how it will sound. Finally, don’t be afraid to experiment with different presets and make adjustments until you find a sound that works for you. E. Can I create my own vocal presets in Ableton? Yes, it is possible to create your own vocal presets in Ableton. To do so, start by selecting the effects and settings you want to use. Then, save the settings as a preset and give it a name. You can then use this preset in future recordings, or customize it further to create new sounds. Creating your own presets can be a great way to develop your own unique sound and style. V. Conclusion A. Summary of the article’s main points In this article, we’ve explored the importance of using vocal presets in music production and provided an overview of the benefits of Ableton vocal presets. We’ve also highlighted five of the best Ableton vocal presets, including Juice Wrld, Drake, NBA Youngboy, R&B, and Rap presets, and provided descriptions of each preset along with key features and benefits. We’ve also discussed how to choose the best Ableton vocal preset for your needs and provided tips on how to customize and match presets to your recording style. B. Final thoughts on the importance of using Ableton vocal presets in music production Overall, using Ableton vocal presets can be a game-changer for music production, helping you achieve a polished, professional sound quickly and easily. By using presets, you can save time and focus on the creative aspects of music production. Whether you’re a beginner or a seasoned pro, Ableton vocal presets can be a valuable tool in your arsenal. C. Call to action to try out the recommended presets We encourage you to try out the recommended presets and experiment with different settings to find the best sound for your music. By using presets and customizing them to fit your unique style, you can create a sound that is uniquely your own. Happy producing!
Learn more
Bandlab Mobile Recording: Creating Music on the Go
I. Introduction A. Bandlab Mobile Recording App If you’re a musician or a music enthusiast, you know that inspiration can strike at any time. Whether you’re walking down the street or sitting in a cafe, a melody can pop into your head, and you don’t want to miss the opportunity to capture it. That’s where the Bandlab Mobile Recording app comes in. B. Importance of Creating Music on-the-go Creating music on-the-go is becoming increasingly important for musicians and music producers. It allows you to be more productive with your time, giving you the ability to create music wherever you are. It’s a great way to capture ideas in the moment, and it can help you break out of creative ruts by giving you a change of scenery and new inspirations. C. BCHILL MUSIC and Products Offered If you’re looking to take your mobile music creation to the next level, BCHILL MUSIC has got you covered. We offer Recording Templates for Pro Tools & Logic Pro as well as vocal presets for Ableton, FL Studio, Cubase, Studio One, Garageband and BandLab presets. With these tools, you can take your Bandlab Mobile Recording projects to the next level and achieve professional-sounding results. II. Features of Bandlab Mobile Recording App Bandlab Mobile app A. User-friendly Interface The Bandlab Mobile Recording app has a user-friendly interface that allows you to start recording and creating music in just a few taps. The app features a sleek design that makes it easy to navigate, even for beginners. B. Multitrack Recording Capabilities One of the best features of the Bandlab Mobile Recording app is its multitrack recording capabilities. You can record up to 12 tracks at once, giving you the ability to create complex arrangements on-the-go. C. Audio Editing and Mixing Tools The Bandlab Mobile Recording app also comes with a range of audio editing and mixing tools that allow you to refine your recordings and create polished, professional-sounding tracks. You can adjust volume levels, add effects, and tweak your recordings to get the perfect sound. D. Collaboration Features Another great feature of the Bandlab Mobile Recording app is its collaboration features. You can invite other musicians to work on your project with you, making it easy to collaborate on music with people from all over the world. E. Compatibility with Different Devices and Operating Systems The Bandlab Mobile Recording app is compatible with both iOS and Android devices, making it accessible to a wide range of users. It’s also compatible with different operating systems, so you can use it on your smartphone, tablet, or laptop. F. Integration with Bandlab’s Online Community Finally, the Bandlab Mobile Recording app integrates seamlessly with Bandlab’s online community. You can share your music with other users, get feedback on your tracks, and even participate in contests and challenges. It’s a great way to connect with other musicians and get your music heard by a wider audience. III. Creating Music with Bandlab Mobile Recording App BandLab Vocal Preset A. Setting up a New Project To start creating music with the Bandlab Mobile Recording app, you’ll need to set up a new project. Simply open the app, tap on the “+” button, and choose “New Project”. From there, you can name your project and choose the BPM and time signature. B. Recording Audio and MIDI Tracks Once you’ve set up your project, you can start recording audio and MIDI tracks. To record audio, simply tap on the “Record” button and start singing or playing your instrument. To record MIDI, tap on the “Add Track” button and choose “MIDI”. You can then use your device’s virtual keyboard or an external MIDI controller to record MIDI notes. C. Editing and Mixing Tracks After you’ve recorded your tracks, you can edit and mix them using the app’s built-in tools. You can trim your recordings, adjust the volume levels, and apply effects to your tracks. You can also use the app’s mixing console to adjust the levels and pan of each track. D. Adding Effects and Using Vocal Presets The Bandlab Mobile Recording app also comes with a range of effects and vocal presets that you can use to enhance your recordings. You can add reverb, delay, and other effects to your tracks, and you can also use vocal presets to get the perfect sound for your vocals. E. Sharing and Collaborating on Projects Once you’ve finished your project, you can share it with other users and collaborate with them on new tracks. You can upload your tracks to the Bandlab community, where other users can listen to your music and provide feedback. You can also invite other musicians to work on your project with you, making it easy to collaborate with people from all over the world. IV. Advantages of Bandlab Vocal Presets A. What are Vocal Presets? Vocal presets are pre-made configurations of audio effects and settings that are designed to enhance the sound of a vocal recording. They can include settings for compression, EQ, reverb, and other effects that are commonly used in vocal production. B. Benefits of Using Vocal Presets Using vocal presets can offer several benefits for recording artists and music producers. For one, they can save time by eliminating the need to manually adjust every setting for a vocal recording. They can also provide consistency in sound, which can be especially helpful when recording a vocal performance over multiple takes or sessions. Vocal presets can also help achieve a professional-sounding result, even for those with less experience in vocal production. C. Best Bandlab Vocal Presets Available Bandlab offers a range of high-quality vocal presets that can be used in a variety of music production contexts. Some of the best Bandlab vocal presets include the “Warm & Wide Vocals” preset, which provides a rich, warm tone with a wide stereo image. The “Pop Vocal Mix” preset is also a popular choice for achieving a polished, modern pop sound. Additionally, the “Vocal Doubler” preset can be used to create doubled vocal tracks for a thicker, more impactful sound. D. Free Bandlab Vocal Presets and Packs Bandlab also offers a range of free vocal presets and packs, which can be a great way to experiment with different sounds and effects without spending any money. Some of the best free Bandlab vocal presets include the “Smooth R&B Vocals” preset, which provides a smooth, silky tone, and the “Hip Hop Ad-Libs” preset pack, which includes a range of ad-lib sounds commonly used in hip hop music. Incorporating Bandlab vocal presets into your music production workflow can offer several advantages, from saving time to achieving a professional-sounding result. With the range of high-quality presets available from Bandlab, there’s no reason not to experiment with them in your own music production. V. Questions and Answers A. How do I Export my Project from Bandlab Mobile Recording? Exporting your project from Bandlab Mobile Recording is easy. Simply go to the project screen, tap on the three dots in the top right corner, and choose “Export”. You can then choose the format and quality settings you want and export your project to your device or cloud storage. B. Can I Use Bandlab Mobile Recording with Other DAWs? Yes, you can use Bandlab Mobile Recording with other DAWs. Once you’ve exported your project from Bandlab Mobile Recording, you can import it into another DAW, such as Pro Tools or Logic Pro. This can be a great way to continue working on your project with more advanced tools and features. C. What is the Difference Between a Vocal Preset and a Vocal Processor? A vocal preset is a pre-made configuration of audio effects and settings that are designed to enhance the sound of a vocal recording. A vocal processor, on the other hand, is a piece of hardware or software that provides real-time processing of a vocal signal. While both can be used to enhance the sound of a vocal recording, vocal processors offer more flexibility and control over the sound, while vocal presets are designed to provide a specific sound with minimal tweaking. D. How do I Import my Own Samples into Bandlab Mobile Recording? Importing your own samples into Bandlab Mobile Recording is easy. Simply go to the project screen, tap on the “+” button, and choose “Import Audio”. You can then browse your device’s storage for the sample you want to import and add it to your project. E. How do I Collaborate with Other Musicians Using Bandlab Mobile Recording? Collaborating with other musicians using Bandlab Mobile Recording is easy. You can invite other musicians to work on your project with you by going to the project screen, tapping on the three dots in the top right corner, and choosing “Collaborators”. You can then invite other users to collaborate on your project by sending them an invite link. Once they’ve accepted the invite, they can contribute to the project by recording new tracks or editing existing ones. VI. Conclusion A. Recap of Bandlab Mobile Recording App and its Features In conclusion, the Bandlab Mobile Recording app is a powerful tool for musicians and music producers who want to create music on-the-go. Its user-friendly interface, multitrack recording capabilities, and collaboration features make it a great choice for anyone who wants to capture their musical ideas whenever and wherever they happen. Additionally, with the range of high-quality vocal presets available from Bandlab, users can achieve professional-sounding results with minimal effort. B. Call to Action to Try out the App and BCHILL MUSIC’s Products If you haven’t already, we encourage you to try out the Bandlab Mobile Recording app for yourself. Whether you’re a beginner or an experienced producer, this app can help you capture your musical ideas and create professional-sounding tracks on-the-go. Additionally, if you’re looking to take your mobile music creation to the next level, check out BCHILL MUSIC’s Recording Templates for Pro Tools & Logic Pro and vocal presets for Ableton, FL Studio, Cubase, Studio One, Garageband, and BandLab. These tools can help you achieve even better results with your Bandlab Mobile Recording projects. C. Closing Thoughts and Thank You Message In closing, we hope that this article has been informative and entertaining for you. We believe that creating music on-the-go is becoming increasingly important in today’s fast-paced world, and the Bandlab Mobile Recording app is a great tool for achieving this. We’d like to thank you for reading, and we encourage you to keep creating and exploring your musical ideas with the help of this app and BCHILL MUSIC’s products.
Learn more
Essential BandLab Mixing Techniques for a Polished Sound
Bandlab is a free and powerful digital audio workstation (DAW) that has become a popular choice for musicians, producers, and engineers around the world. With its intuitive interface and comprehensive set of features, Bandlab has revolutionized the way music is made and recorded. In this article, we will explore the essential Bandlab mixing techniques that will help you achieve a polished and professional sound in your music productions. Whether you are a beginner or a seasoned pro, mastering these techniques will take your music to the next level. By following the Bandlab mixing techniques outlined in this article, you will be able to create mixes that sound great on any sound system, from headphones to high-end studio monitors. You’ll learn how to use Bandlab’s powerful tools, including EQ, compression, reverb, delay, and automation, to create a balanced and cohesive mix that will make your music stand out. So, whether you’re a recording artist, engineer, or producer, read on to discover how Bandlab can help you take your music production skills to the next level! II. Understanding Bandlab Mixing Techniques Bandlab Mixing Techniques A. Explanation of the Importance of Mixing Techniques in Creating a Polished Sound Mixing is the process of balancing and blending individual tracks or instruments to create a cohesive and polished final mix. It involves techniques such as EQ, compression, reverb, delay, and automation, all of which are essential for achieving a professional sound in your music productions. B. Overview of Bandlab Mixing Techniques, Including EQ, Compression, Reverb, Delay, and Automation Bandlab offers a comprehensive set of mixing tools that allow you to achieve a polished and professional sound in your music productions. These tools include EQ, compression, reverb, delay, and automation. Understanding how to use these tools effectively is key to creating a balanced and cohesive mix. C. How to Apply These Techniques to Achieve the Desired Sound EQ Techniques EQ, or equalization, is the process of adjusting the balance of frequencies in a mix. Bandlab offers a powerful EQ tool that allows you to adjust the frequency response of individual tracks and instruments. To create a balanced mix using Bandlab’s EQ tool, try the following tips: a. Explanation of the Role of EQ in Mixing and Bandlab’s EQ Features EQ is an essential tool for creating a balanced mix. Bandlab’s EQ tool allows you to adjust the frequency response of individual tracks and instruments, allowing you to sculpt the sound and create a more balanced mix. b. Tips for Using Bandlab’s EQ to Create a Balanced Mix To create a balanced mix using Bandlab’s EQ tool, start by identifying any problem frequencies in the mix, such as harsh or boomy sounds. Use Bandlab’s EQ tool to cut or boost these frequencies as needed to create a more balanced and pleasant sound. c. How to Apply EQ to Individual Instruments and Tracks To apply EQ to individual tracks or instruments in Bandlab, simply open the EQ tool for the track or instrument you want to adjust, and use the controls to adjust the frequency response as desired. Compression Techniques Compression is the process of reducing the dynamic range of a track or instrument, making quiet sounds louder and loud sounds quieter. Bandlab offers a powerful compression tool that can be used to control dynamics and enhance the mix. To use Bandlab’s compression tool effectively, try the following tips: a. Explanation of the Role of Compression in Mixing and Bandlab’s Compression Features Compression is an essential tool for controlling dynamics and enhancing the mix. Bandlab’s compression tool allows you to adjust the level and dynamics of individual tracks and instruments, allowing you to create a more polished and professional sound. b. Tips for Using Bandlab’s Compression to Control Dynamics and Enhance the Mix To use Bandlab’s compression tool effectively, start by setting the threshold and ratio controls to the desired level. Use the attack and release controls to fine-tune the dynamics of the track or instrument, and use the makeup gain control to adjust the overall level. c. How to Apply Compression to Individual Instruments and Tracks To apply compression to individual tracks or instruments in Bandlab, simply open the compression tool for the track or instrument you want to adjust, and use the controls to adjust the dynamics as desired. Reverb Techniques Reverb is the process of simulating the sound of a room or space, adding depth and space to the mix. Bandlab offers a powerful reverb tool that can be used to create a more realistic and spacious sound. To use Bandlab’s reverb tool effectively, try the following tips: a. Explanation of the Role of Reverb in Mixing and Bandlab’s Reverb Features Reverb is an essential tool for adding depth and space to a mix. Bandlab’s reverb tool allows you to simulate the sound of different III. Essential Bandlab Mixing Tips Bandlab Presets A. Tips for Mixing Vocals, Drums, Guitars, Bass, and Synths Mixing different types of instruments requires different techniques to achieve a polished sound. Here are some tips for mixing common instruments using Bandlab: Vocals: Use EQ to remove any harsh frequencies and compression to control dynamics. Add reverb and delay to create depth and space. Drums: Use compression to control dynamics and add punch. Use EQ to emphasize the attack and body of each drum. Add reverb to create a sense of space. Guitars: Use EQ to cut any muddy frequencies and add clarity. Use compression to control dynamics and add sustain. Add reverb to create a sense of space. Bass: Use EQ to cut any rumbling frequencies and add definition. Use compression to control dynamics and add sustain. Add a touch of reverb to create a sense of space. Synths: Use EQ to cut any harsh frequencies and add warmth. Use compression to control dynamics and add sustain. Add reverb and delay to create a sense of space. B. Best Practices for Using Bandlab Plugins, Effects, and Levels Bandlab offers a wide range of plugins, effects, and levels to help you create a polished mix. Here are some best practices for using these tools: Plugins: Use only the plugins you need to achieve the desired sound. Avoid using too many plugins, as this can cause the mix to become muddy and cluttered. Effects: Use effects sparingly and only when necessary. Avoid adding effects just for the sake of it, as this can detract from the overall sound of the mix. Levels: Keep an eye on the levels of each track in the mix. Make sure none of the tracks are too loud or too quiet, as this can cause the mix to become unbalanced. C. Explanation of Common Mixing Tricks and Workflows Mixing can be a complex and challenging process which is why mixing services are available for those seeking professional engineers to help them polish their song but there are some common tricks and workflows that can help you achieve a polished sound. Here are a few to consider: Start with a good recording: A good mix starts with a good recording. Make sure to record each instrument or track as cleanly and clearly as possible to make the mixing process easier. Use reference tracks: Use reference tracks to compare your mix to other professionally produced tracks. This can help you identify any areas that need improvement and guide your mixing decisions. Mix in mono: Mixing in mono can help you identify any phase issues or imbalances in the mix. Once you have a balanced mix in mono, you can then switch back to stereo for a wider sound. Take breaks: Mixing can be a long and tiring process. Take breaks often to rest your ears and come back to the mix with fresh ears and perspective. By following these essential Bandlab mixing tips, you’ll be well on your way to creating a polished and professional mix in no time. IV. Essential Bandlab Mastering Techniques A. Explanation of Mastering and Its Importance in Creating a Polished Sound Mastering is the final step in the music production process, where the final mix is prepared for distribution. The goal of mastering is to enhance the overall sound and create a polished and professional final product. Mastering is essential for ensuring that your music sounds great on any sound system, from headphones to high-end studio monitors. B. Overview of Bandlab Mastering Techniques, Including EQ, Compression, and Limiting Bandlab offers a range of mastering tools that can help you achieve a professional-level master. These tools include EQ, compression, and limiting. Understanding how to use these tools effectively is key to creating a polished and cohesive final product. C. How to Use Bandlab to Achieve a Professional-Level Master To use Bandlab to achieve a professional-level master, follow these steps: Prepare the mix: Before mastering, make sure your mix is balanced and free from any major issues. Use the tips outlined in Section II to create a polished and cohesive mix. Create a new project: Start a new project in Bandlab specifically for mastering. Add the mix: Add your final mix to the new project, and make sure all the tracks are properly labeled and organized. Apply EQ: Use Bandlab’s EQ tool to make any final adjustments to the frequency response of the mix. Make sure to keep any adjustments subtle to avoid altering the balance of the mix. Apply Compression: Use Bandlab’s compression tool to control dynamics and add punch to the mix. Make sure to use compression sparingly and avoid over-compressing the mix. Apply Limiting: Use Bandlab’s limiting tool to ensure that the final mix does not clip or distort when played on any sound system. Make sure to use limiting sparingly to avoid squashing the dynamic range of the mix. Export the master: Once you are happy with the final master, export the mix as a high-quality audio file in the desired format. By following these Bandlab mastering techniques, you’ll be able to achieve a polished and professional final product that sounds great on any sound system. V. Bandlab Vocal Presets and Recording Tips Bandlab Vocal Preset A. Introduction to Bandlab’s Vocal Presets and Their Benefits Bandlab offers a range of vocal presets that can help you achieve a polished and professional vocal sound. These presets include settings for EQ, compression, reverb, and more, and are designed to work with a variety of vocal styles and genres. Using these presets can save you time and help you achieve a consistent vocal sound across multiple tracks. B. Tips for Setting Up a Recording Environment, Including Microphone Placement, Soundproofing, and Acoustic Treatment Setting up a good recording environment is key to achieving clear and professional-sounding vocals. Here are some tips for setting up a recording environment using Bandlab: Microphone Placement: Experiment with different microphone placements to find the sweet spot for your particular vocal style. Make sure to position the microphone away from any sources of noise or interference. Soundproofing: Use soundproofing materials to reduce any outside noise and prevent sound from leaking out of the recording space. This can include using acoustic panels, soundproof curtains, and even blankets. Acoustic Treatment: Use acoustic treatment materials to control the sound within the recording space. This can include using bass traps, diffusers, and acoustic foam to create a neutral and controlled sound. C. Best Practices for Recording Clear Vocals with Bandlab To record clear vocals with Bandlab, follow these best practices: Use a high-quality microphone: Use a microphone that is appropriate for your vocal style and genre, and that is capable of capturing a clear and detailed sound. Use pop filters and windscreens: Pop filters and windscreens can help reduce any plosive sounds or wind noise that can detract from the clarity of the vocals. Record at an appropriate level: Make sure to record at an appropriate level to avoid any clipping or distortion. Use the gain controls on your interface or mixer to set the appropriate level. Monitor the recording: Use headphones to monitor the recording in real-time, and make sure to listen for any unwanted noise or distortion. By following these Bandlab vocal presets and recording tips, you’ll be able to achieve a clear and professional vocal sound that will take your music to the next level. VI. People Also Ask (PAQ) Section A. What Are the Best Bandlab Plugins for Mixing and Mastering? Bandlab offers a range of plugins for mixing and mastering, each with its own unique features and benefits. Some of the best Bandlab plugins for mixing and mastering include the EQ, compressor, reverb, and delay plugins. These plugins can help you achieve a polished and professional sound, and are easy to use even for beginners. B. How Do I Use Bandlab for Noise Reduction? Bandlab offers a noise reduction tool that can help you reduce unwanted noise in your recordings. To use this tool, simply select the track or region that you want to reduce noise on, and then apply the noise reduction effect. Adjust the settings until you achieve the desired reduction in noise. C. What Is the Best Microphone for Recording Vocals with Bandlab? The best microphone for recording vocals with Bandlab depends on your particular vocal style and genre. However, some popular options include the Shure SM7B, the Audio-Technica AT4053B, and the AKG C414. These microphones are known for their clear and detailed sound, and are commonly used in professional recording studios. D. How Do I Set Up a Vocal Chain with Bandlab? To set up a vocal chain with Bandlab, start by selecting the appropriate microphone and positioning it correctly. Then, add any necessary preamps, EQ, compression, and reverb to create the desired vocal sound. Experiment with different settings and plugins to find the perfect vocal chain for your particular vocal style and genre. E. What Are Some DAW Alternatives to Bandlab for Recording and Mixing? There are many DAW alternatives to Bandlab for recording and mixing, each with its own unique features and benefits. Some popular alternatives include Ableton Live, Logic Pro, Pro Tools, and Cubase. These DAWs are commonly used by professionals in the music industry, and offer a range of tools and plugins for recording and mixing. VII. Conclusion In conclusion, Bandlab offers a range of powerful mixing and mastering tools that can help you achieve a polished and professional sound. By using techniques such as EQ, compression, reverb, delay, and automation, you can create a cohesive and balanced mix that sounds great on any sound system. In addition to mixing and mastering, Bandlab also offers a range of vocal presets and recording tips that can help you achieve clear and professional-sounding vocals. By following these tips and using Bandlab’s powerful tools, you can take your music to the next level. In summary, the essential Bandlab mixing and mastering techniques include understanding the importance of mixing techniques, applying EQ, compression, reverb, delay, and automation, using Bandlab plugins, effects, and levels, and mastering your final mix using Bandlab’s mastering tools. By experimenting with these techniques and tools, you can achieve a polished and professional sound that will impress your audience. We encourage you to continue exploring Bandlab and experimenting with these techniques to find the perfect mix for your particular musical style and genre. With a little practice and patience, you can achieve a polished and professional sound that will take your music to new heights.
Learn more
5 Best Cubase Vocal Presets for Recording
I. Introduction A. Embarking on a Vocal Preset Adventure Welcome to a captivating exploration into the realm of vocal presets. Today, we embark on a journey that will unveil the transformative power of these invaluable tools for your recording studio. Prepare to embark on a thought-provoking expedition that will forever change the way you approach vocal production. B. Introducing BCHILL MUSIC: Innovators in Recording Templates Before we dive deeper into the world of vocal presets, allow us to introduce BCHILL MUSIC, a distinguished brand at the forefront of recording templates. With their commitment to innovation, they have established themselves as industry leaders. Offering a diverse range of templates for Pro Tools and Logic Pro, they have also crafted vocal presets tailored to popular software platforms like Ableton, FL Studio, Cubase, Studio One, GarageBand, and BandLab presets. BCHILL MUSIC is a testament to the artistry and craftsmanship that elevates your studio experience. C. The Importance of Vocal Presets in Revolutionizing Your Studio Vocal presets play a pivotal role in reshaping the landscape of your studio. These remarkable tools hold the potential to revolutionize your vocal recordings. They bring efficiency and consistency to the production process, ensuring professional-grade results with remarkable ease. By harnessing the power of vocal presets, you can streamline your workflow, unlock new creative possibilities, and achieve pristine, radio-ready sound. Whether you’re an experienced recording artist or a burgeoning engineer, vocal presets are essential in optimizing your studio’s capabilities. With this foundation laid, we set forth on a journey to uncover the significance and impact of Cubase vocal presets. Prepare to delve into the intricacies of their application, as we unravel the mysteries that lie within. II. The Power of Cubase Vocal Presets A. Cubase Vocal Presets and Their Purpose Within the enchanting world of Cubase, vocal presets hold a special place. Let’s embark on a journey to uncover the purpose and magic behind these remarkable tools. Unleashing the Magic: Exploring the Purpose of Cubase Vocal Presets Cubase vocal presets are meticulously crafted to provide a shortcut to sonic excellence. They serve as preconfigured settings that instantly optimize various audio parameters, unleashing the full potential of your vocal recordings. By applying these presets, you unlock a world of creative possibilities and tap into the expertise of industry professionals. Elevating Your Recordings: How Vocal Presets Transform the Sound With Cubase vocal presets, you can effortlessly elevate the quality of your recordings. These presets are designed to enhance the characteristics of your vocals, from clarity and presence to warmth and depth. They bring out the nuances in your performances, ensuring your vocals shine through with exceptional clarity and impact. B. Enhancing the Recording Process: Unveiling the Potential Beneath the surface, Cubase vocal presets hold the power to revolutionize your entire recording process. Let’s explore the ways in which these presets enhance your creative journey. Unleashing Creativity: How Vocal Presets Inspire New Sonic Horizons Cubase vocal presets act as catalysts for creativity, igniting your imagination and expanding your sonic horizons. By providing a starting point infused with a particular style or character, they stimulate fresh ideas and encourage experimentation. You’ll find yourself delving into uncharted territories and discovering unique vocal textures that breathe life into your music. Time is of the Essence: Streamlining Workflow with Cubase Vocal Presets In the fast-paced world of music production, time is a precious commodity. Cubase vocal presets come to the rescue, offering a streamlined workflow that saves you valuable hours. Instead of painstakingly tweaking settings and plugins, you can focus on capturing the essence of your performance. With just a few clicks, you’ll be amazed at how efficiently you can achieve the desired sound. C. Benefits of Using Cubase Vocal Presets in Your Studio As you embark on your vocal production journey, the benefits of utilizing vocal presets for Cubase become abundantly clear. Let’s explore the advantages they bring to your studio. Professional-Grade Sound: Achieving Radio-Ready Quality with Ease Cubase vocal presets are your ticket to achieving a professional-grade sound with ease. They encapsulate the expertise and sonic finesse of top-notch audio engineers, allowing you to capture that coveted radio-ready quality. Regardless of your skill level, these presets provide a shortcut to exceptional sound, elevating your productions to new heights. Embracing Versatility: Adapting Vocal Presets for Different Genres One of the remarkable aspects of Cubase vocal presets is their versatility. They transcend genre boundaries, seamlessly adapting to suit various musical styles. Whether you’re working on pop, rock, hip-hop, or electronic music, these presets offer a flexible foundation that molds to your artistic vision. With Cubase vocal presets, your creative endeavors know no limits. As we uncover the power of Cubase vocal presets, we realize the transformative impact they have on our vocal recordings. From their purpose to their ability to inspire and streamline, these presets open doors to sonic excellence and creative liberation. So, brace yourself for an awe-inspiring journey of musical possibilities as we dive deeper into the revolutionary world of Cubase vocal presets. III. Top 5 Best Cubase Vocal Presets for Recording A. Juice Wrld Vocal Preset for Cubase Juice Wrld Vocal Preset for Cubase A. Dive into the World of Juice Wrld: Characteristics and Effects Step into the mesmerizing world of Juice Wrld with this extraordinary vocal preset designed specifically for Cubase. Let’s explore the defining characteristics and effects that make this preset a game-changer. B. Unleash the Emotion: How the Juice Wrld Preset Transforms Vocal Recordings With the Juice Wrld vocal preset, your vocal recordings undergo a profound transformation. This preset is carefully crafted to infuse your vocals with raw emotion, capturing the essence of Juice Wrld’s signature sound. Experience the magic as your voice soars with melancholic melodies, evoking a sense of depth and vulnerability that resonates with listeners. B. R&B Vocal Preset for Cubase R&B Vocal Preset for Cubase A. Immerse in Soulful Bliss: Characteristics and Effects of the R&B Preset Immerse yourself in soulful bliss with the R&B vocal preset tailored for Cubase. Let’s delve into the distinctive characteristics and effects that bring your R&B vocal recordings to life. B. Rhythm and Emotion: Elevating Your R&B Vocal Recordings in Cubase The R&B preset is your ticket to capturing the true essence of soulful music. Infused with silky-smooth textures, warm tones, and an irresistible groove, this preset enhances your R&B vocal recordings with unparalleled emotion and charisma. Elevate your performances to new heights as your voice dances effortlessly over captivating melodies. C. Rap Vocal Preset for Cubase Rap Vocal Preset for Cubase A. Characteristics and Effects of the Rap Vocal Preset The Cubase rap vocal preset redefines the boundaries of hip-hop excellence. Let’s uncover the distinctive characteristics and effects that make this preset a game-changer. B. From Ordinary to Extraordinary: Revolutionizing Rap Vocals in Cubase With the rap vocal preset, your rap recordings undergo a revolutionary transformation. Experience the power of crisp, punchy delivery, tight dynamics, and intelligible lyrics that cut through the mix. Elevate your rap game and leave an indelible mark as you unleash your lyrical prowess with confidence and precision. D. NBA YoungBoy Vocal Preset for Cubase NBA YoungBoy Vocal preset for Cubase A. Capture the Essence of NBA Youngboy: Characteristics and Effects Capture the essence of NBA Youngboy’s captivating sound with the Cubase vocal preset tailor-made for his style. Let’s explore the defining characteristics and effects that make this preset a must-have for aspiring artists. B. Elevating Energy: How the NBA Youngboy Preset Transforms Vocal Recordings The NBA Youngboy preset injects an electric energy into your vocal recordings. Experience the power and intensity as your voice takes on a larger-than-life presence, commanding attention with every word. From hard-hitting hooks to dynamic verses, this preset amplifies your vocal prowess and leaves a lasting impact on your listeners. E. Drake Vocal Preset Cubase Drake Vocal Preset for Cubase A. Discover the Drake Vibe: Characteristics and Effects of the Preset Discover the iconic Drake vibe with the Cubase vocal preset that encapsulates his signature sound. Let’s dive into the defining characteristics and effects that bring this preset to life. B. From Bedroom to Billboard: Transforming Your Vocals with the Drake Preset Experience the transformative power of the Drake vocal preset as it catapults your vocals from the confines of your bedroom to the grandeur of the billboard charts. Immerse yourself in lush harmonies, silky textures, and impeccable vocal processing that embody the essence of Drake’s inimitable style. IV. Revolutionize Your Recording Studio with Cubase Vocal Presets Cubase Vocal Presets A. Elevating Your Mix: From Average to Exceptional with Vocal Presets Prepare to witness the studio magic unfold as Cubase vocal presets take your mix from ordinary to extraordinary. Discover how these presets have a profound impact on the quality and sonic character of your recordings. Mastering Made Effortless: Achieving Professional Results with Ease Gone are the days of struggling with complex mastering processes. With Cubase vocal presets, achieving professional-level results becomes a breeze. Experience the joy of effortlessly refining your tracks, achieving optimal clarity, balance, and sonic perfection. Say goodbye to endless tweaking and welcome a newfound sense of mastery into your studio. B. Breaking the Boundaries: Adapting Vocal Presets to Various Genres In the realm of music, genre knows no boundaries, and Cubase vocal presets embrace this ethos wholeheartedly. Discover the versatility that allows these presets to transcend musical genres, seamlessly adapting to suit your artistic vision. Customization at Your Fingertips: Tailoring Presets to Your Unique Style While Cubase vocal presets offer a foundation of excellence, they also empower you to express your unique style. Unlock the ability to customize and tailor presets to suit your artistic vision. Whether you crave a touch of individuality or seek to push creative boundaries, Cubase vocal presets provide the tools to shape your own sonic identity. With Cubase vocal presets, you hold the keys to revolutionize your recording studio. From elevating your mix to achieving professional mastering results with ease, the impact of these presets is undeniable. Embrace the versatility that transcends genres, and unleash your creativity by customizing presets to match your unique style. It’s time to embrace the studio magic and transform your recordings into sonic masterpieces that captivate and inspire. V. Frequently Asked Questions about Cubase Vocal Presets Cubase Vocal Presets A. How can I easily install Cubase Vocal Presets? Installing Cubase vocal presets may seem daunting at first, but fear not! We have prepared a comprehensive step-by-step guide to make the process a breeze. Follow our instructions, and you’ll have your vocal presets up and running in no time. B. How can I unleash my creativity by customizing Cubase Vocal Presets? Customization is key to unlocking your creative potential with Cubase vocal presets. Dive into the realm of customization options and discover how you can adapt presets to suit your specific needs. Explore the various parameters and settings that allow you to shape your vocal sound and infuse it with your unique artistic vision. C. Are Cubase Vocal Presets compatible with different genres? Musical diversity knows no bounds, and Cubase vocal presets are no exception. Whether you’re working on pop, rock, hip-hop, or any other genre, these versatile presets are designed to adapt and complement your creative endeavors. Embrace the freedom to explore different musical styles and enjoy the compatibility that Cubase vocal presets bring to your productions. D. How can beginners effectively utilize Cubase Vocal Presets? Don’t fret if you’re new to the world of vocal presets! Cubase vocal presets are designed to cater to all skill levels, including beginners. Discover how even newcomers can effectively utilize these presets to enhance their vocal recordings. We’ll guide you through the process, ensuring that you harness the power of Cubase vocal presets to their fullest potential. E. How do Cubase Vocal Presets enhance the mixing and mastering process? Mixing and mastering are crucial stages in the production process, and Cubase vocal presets are here to elevate your final mix and master. Unveil the ways in which these presets enhance the overall sound, providing clarity, balance, and a professional finish to your tracks. Witness the transformation as your vocals take center stage, polished to perfection with the help of Cubase vocal presets. With these frequently asked questions answered, you now have a deeper understanding of Cubase vocal presets. From easy installation to customization, genre flexibility, and their suitability for all skill levels, Cubase vocal presets are versatile tools that can enhance your vocal recordings and streamline your creative process. Embrace the possibilities and let Cubase vocal presets take your music to new heights. VI. Conclusion A. Embrace the Vocal Preset Revolution: Recap of Benefits and Wonders In conclusion, the revolution of vocal presets has the power to transform your recordings and elevate your studio to new heights. We have explored the remarkable benefits of Cubase vocal presets, from saving time and achieving professional-grade sound effortlessly to inspiring creativity and adapting to various genres. Embrace this revolution and unlock the full potential of your vocal productions. B. Unleash Your Studio’s Potential: Explore BCHILL MUSIC’s Vocal Presets Now that you are armed with knowledge and inspired by the wonders of vocal presets, it’s time to dive deeper into the world of BCHILL MUSIC. Explore their collection of vocal presets, recording templates, and innovative offerings designed to enhance your studio experience. Unleash the full potential of your studio by incorporating the exceptional vocal presets crafted by BCHILL MUSIC. C. Time to Take Action: Try the Presets and Experience the Sonic Transformation The time for action has arrived! Don’t let this newfound knowledge and excitement fade away. Take the next step and try out the Cubase vocal presets offered by BCHILL MUSIC. Witness the incredible sonic transformation that awaits you as you apply these presets to your vocal recordings. Capture the essence of different styles, unleash your creativity, and elevate your productions to new heights. Remember, the vocal preset revolution is within your reach. Embrace the journey, explore the possibilities, and witness the remarkable transformation in your studio. It’s time to take action and experience the wonders of Cubase vocal presets. Let your music shine, and let your studio become a sanctuary of sonic excellence.
Learn more