Preajustes y Plantillas de Grabación
Optimiza tu flujo de trabajo con nuestra plantilla de grabación lista para usar y los ajustes preestablecidos vocales de stock.

Tipo: Plantilla de Grabación
Plantilla de grabación de Adobe Audition (Plugins de stock)
Tipo: Preset Vocal
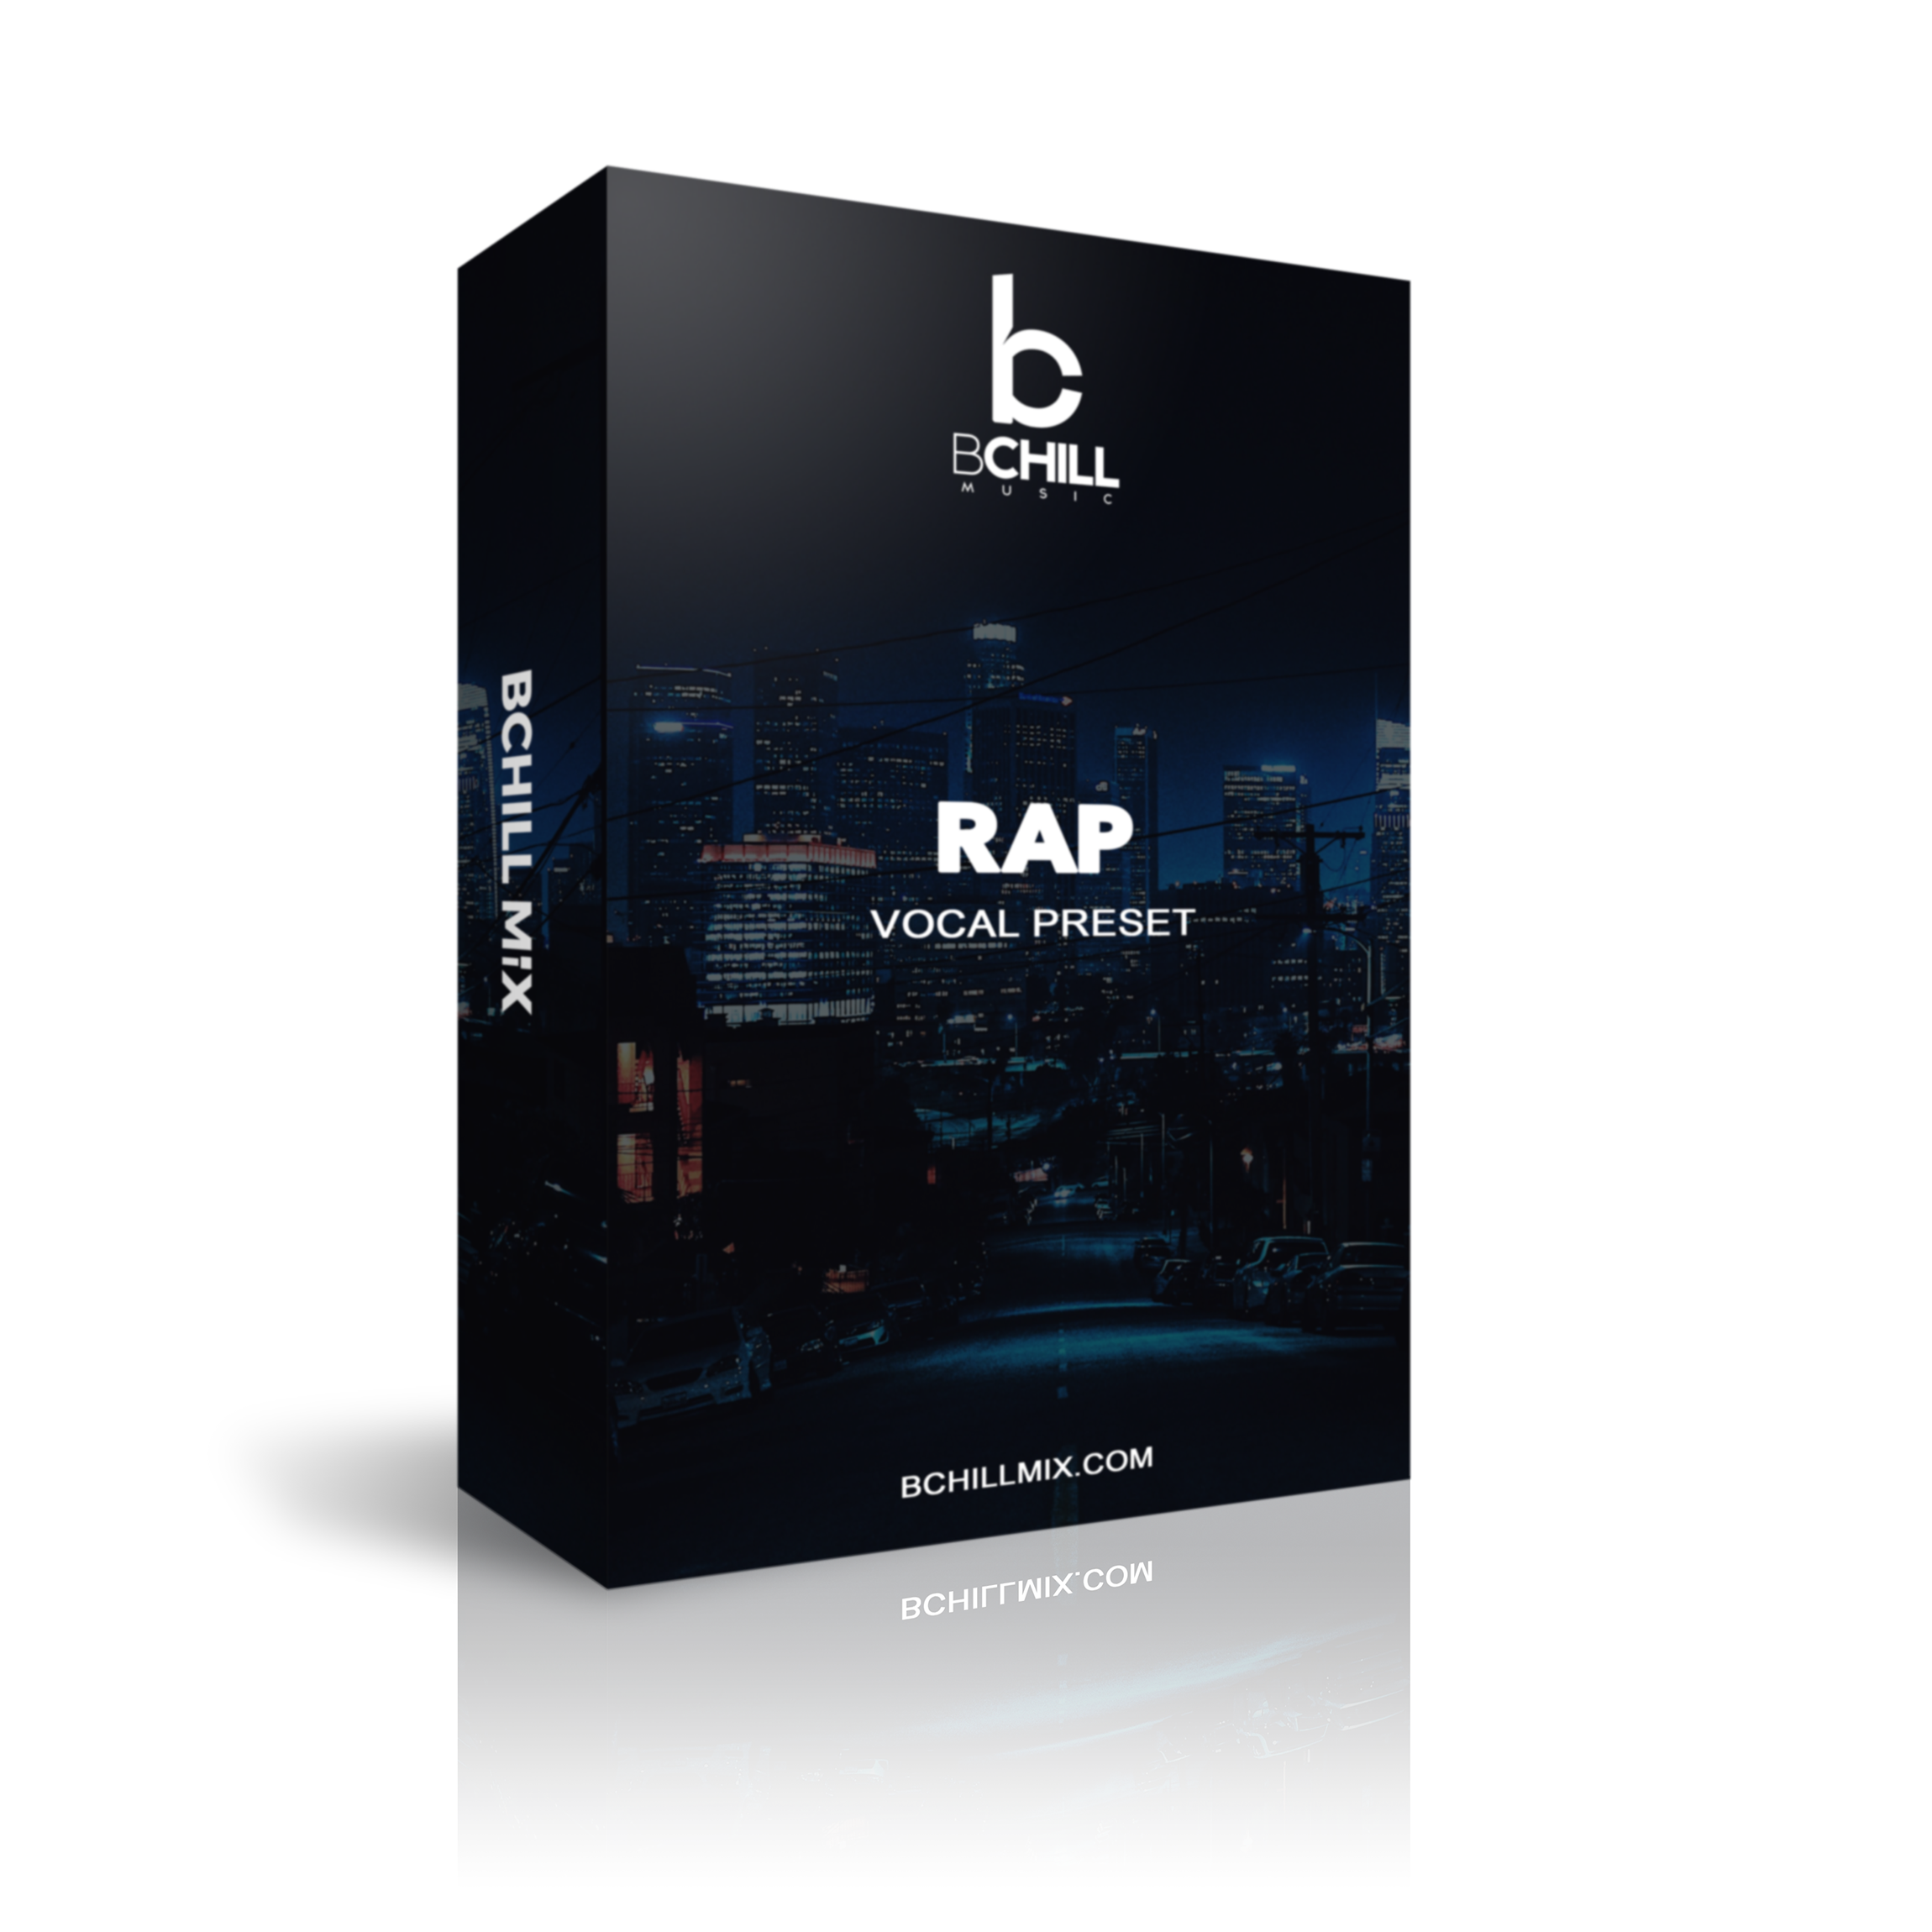
Preset de Voz Rap para Adobe Audition (Plugins de Stock)

Tipo: Preset Vocal
Preset Vocal R&B para Adobe Audition (Plugins de Stock)
Tipo: Preset Vocal
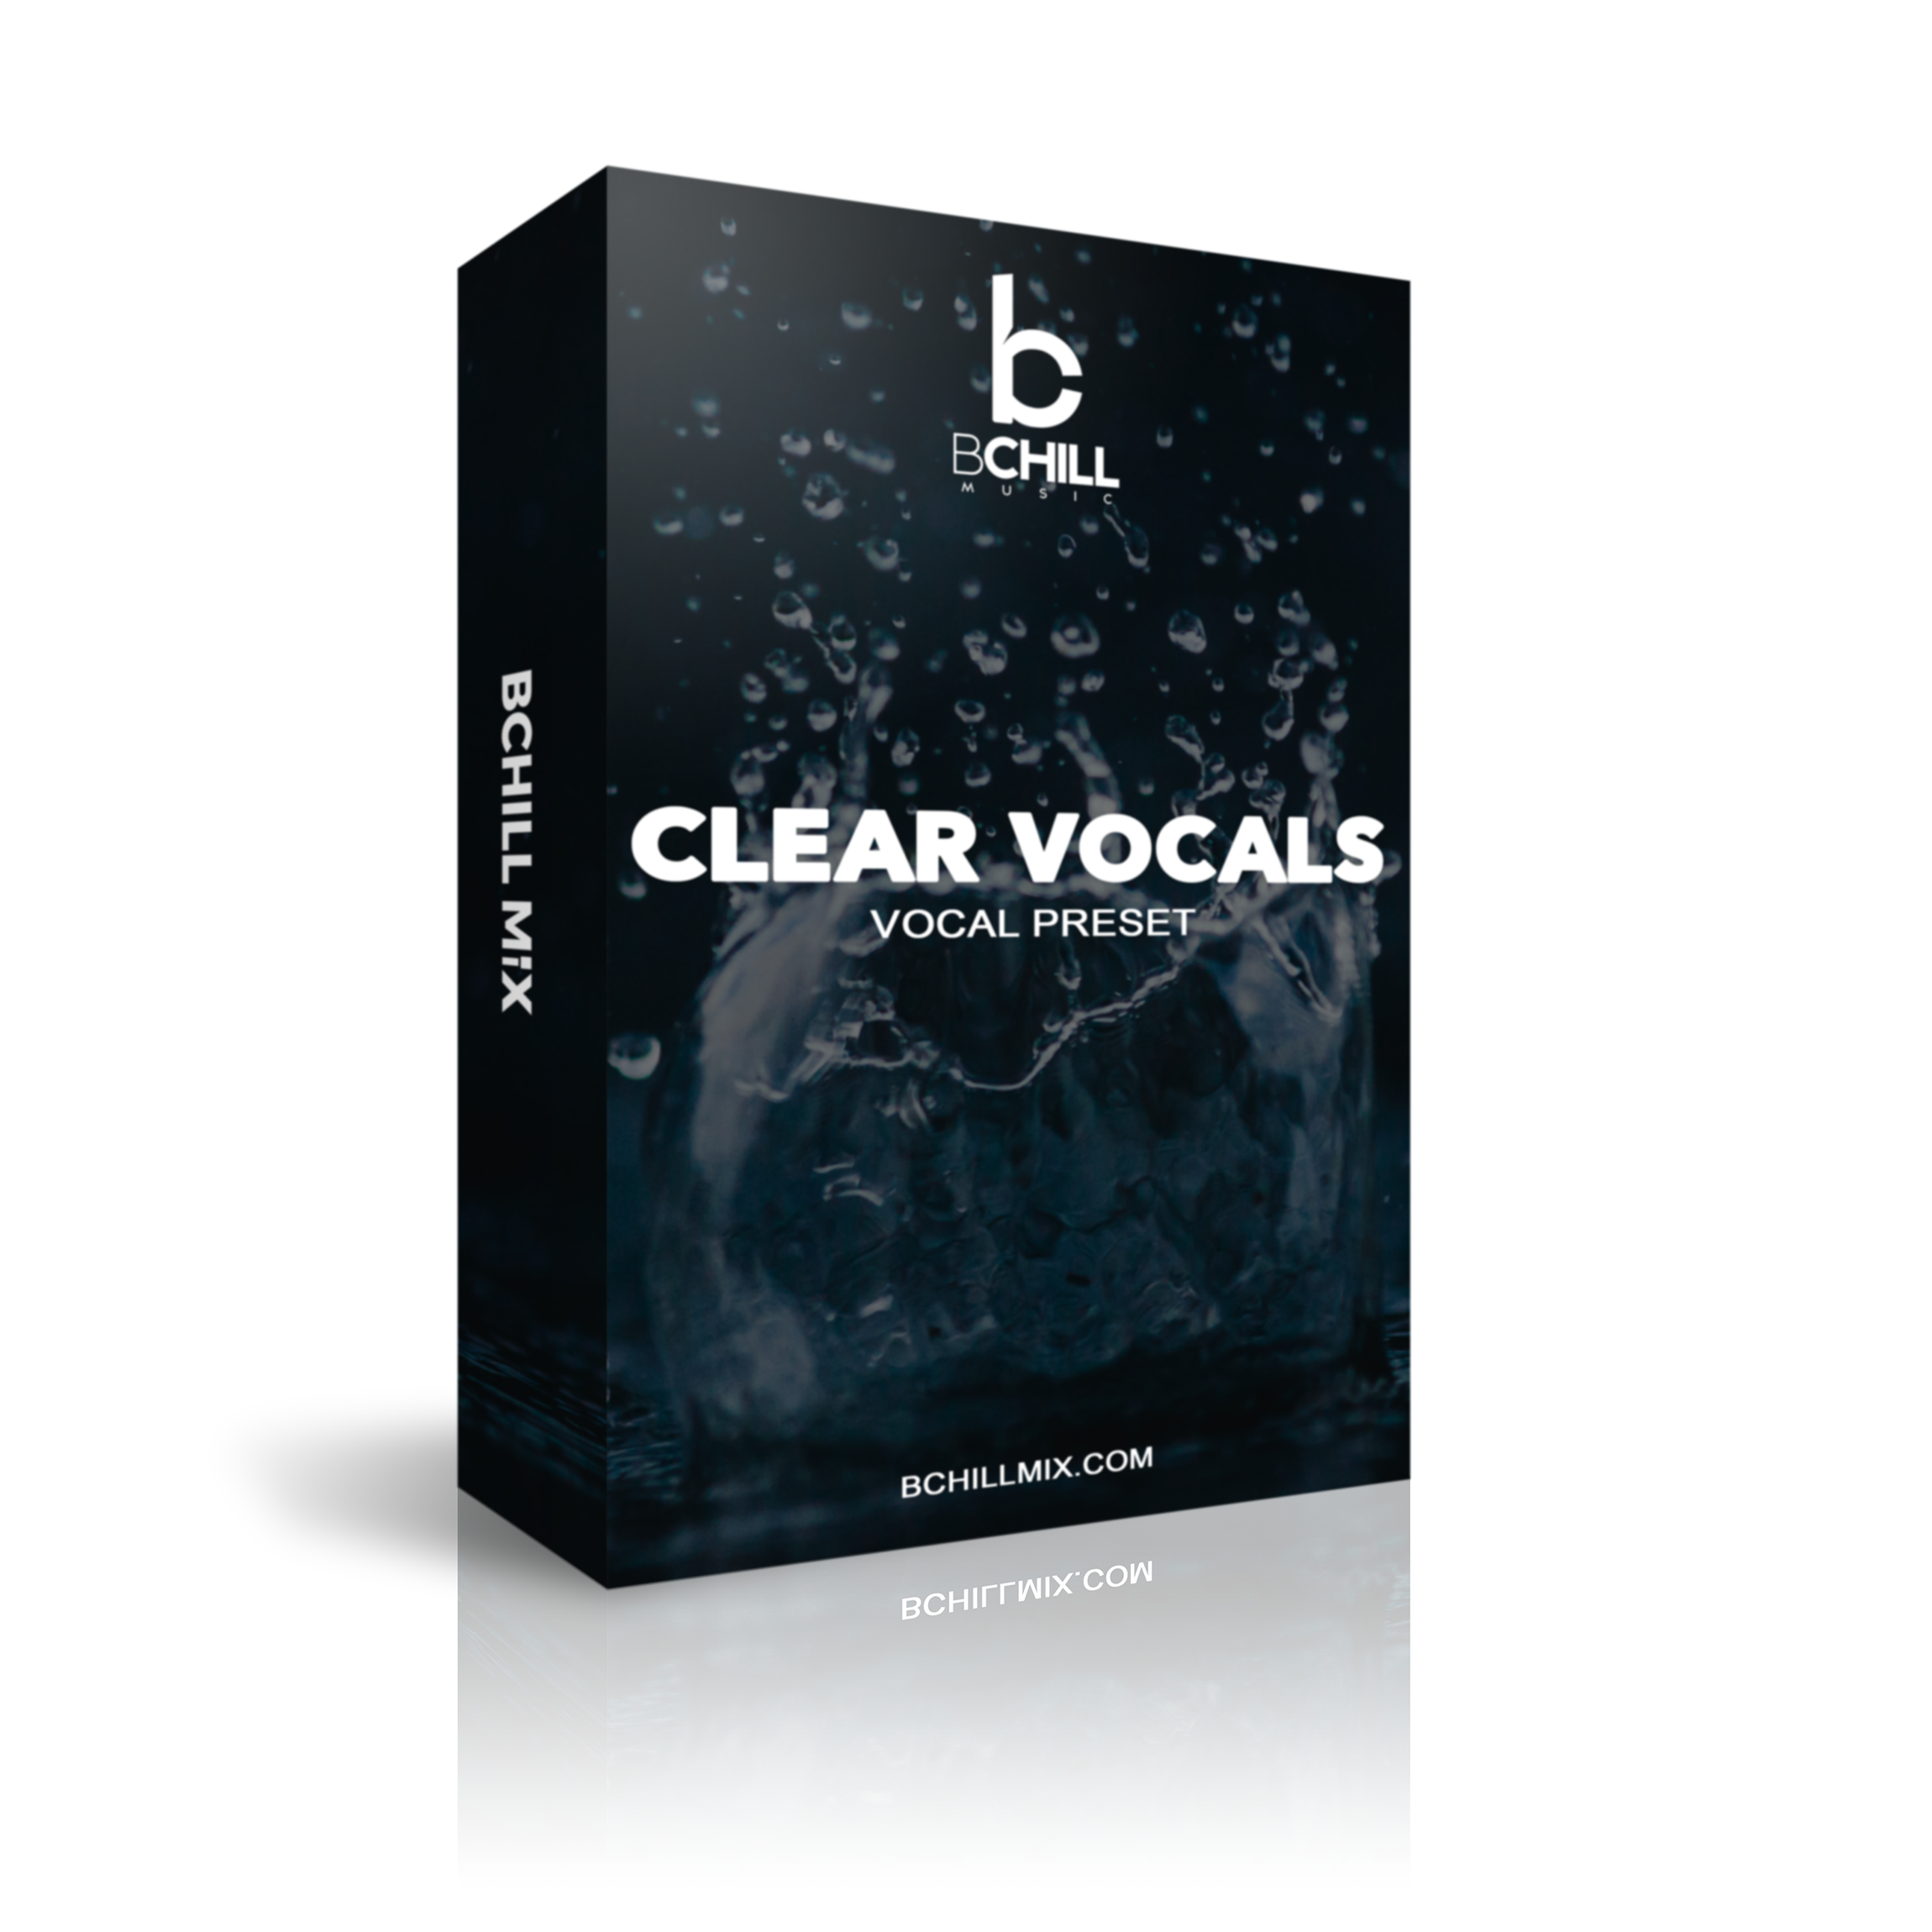
Preset de Voces Claras Adobe Audition (Plugins de Stock)
Construye Tu Propia Cesta


Transforma tu sesión en segundos
Configuración instantánea de sesión con nuestras plantillas de grabación y preajustes vocales listos para usar.

Créditos de la Industria

Westside Boogie

Shontelle

Jarren Benton

DJ Tunez

Vory

Caskey

Rittz

Nia Riley

Eugy

Q Parker
Acerca del Ingeniero

Acerca del Ingeniero
¡Hola! Soy Byron Hill, un productor musical profesional e ingeniero de mezcla con más de 15 años de experiencia, radicado en Atlanta, GA. He trabajado con miles de clientes en todo el mundo en una amplia variedad de géneros — desde artistas independientes hasta talentos de grandes discográficas. Mis créditos incluyen trabajos con Westside Boogie, Vory, Shontelle, DJ Tunez, Jarren Benton y Ritz, así como creadores y marcas como Daryl Mayes, SeanDoesMagic y Chubbies Clothing.
A lo largo de los años, he desarrollado un oído entrenado para crear cadenas vocales que ofrecen un sonido limpio, equilibrado y profesional — sin importar el género o la estación de trabajo de audio digital (DAW). Cada preset en esta colección está diseñado con el mismo objetivo: ayudarte a avanzar más rápido, sonar mejor y dar vida a tu voz con claridad, confianza e intención.
Escucha nuestro trabajo
R&B
Antes
Después
Rap
Antes
Después
Pop
Antes
Después
Alma
Antes
Después
Roca
Antes
Después
Latín
Antes
Después
Preguntas frecuentes
¿Qué son los ajustes preestablecidos vocales de Adobe Audition?
¿Qué son los ajustes preestablecidos vocales de Adobe Audition?
Los ajustes preestablecidos vocales de Adobe Audition son configuraciones listas para usar de procesamiento vocal para creadores que desean un punto de partida más limpio para grabaciones de música, palabra hablada, podcasts o locuciones dentro de Audition.
Son útiles cuando quieres claridad, control y un tono vocal más pulido sin tener que reconstruir la misma cadena cada vez.
¿Están diseñados para el Effects Rack, cadenas de efectos guardadas o plantillas completas de grabación?
¿Están diseñados para el Effects Rack, cadenas de efectos guardadas o plantillas completas de grabación?
Esta colección puede incluir flujos de trabajo de cadena de pista única y configuraciones más completas de plantillas estilo sesión, dependiendo del producto.
La página del producto debe dejar claro si estás comprando una cadena vocal para el Rack de Efectos o un flujo de trabajo de grabación más amplio.
¿Qué recibo después de comprar un preset o plantilla de Adobe Audition?
¿Qué recibo después de comprar un preset o plantilla de Adobe Audition?
Recibes el archivo digital de Audition o el formato de preset indicado en la página del producto, junto con cualquier guía de configuración incluida para cargarlo correctamente.
Esto te proporciona un punto de partida repetible para futuras sesiones en lugar de reconstruir desde cero la misma limpieza vocal y la cadena de tono.
¿Cuánto tiempo tarda en recibir los archivos de Adobe Audition después de la compra?
¿Cuánto tiempo tarda en recibir los archivos de Adobe Audition después de la compra?
Estos son descargas digitales, por lo que la entrega generalmente es inmediata después de la compra.
La mayoría de los clientes deberían tener acceso de inmediato a través del proceso de pedido y el correo electrónico de confirmación.
¿Necesito algún complemento de terceros para usar estos ajustes preestablecidos de Adobe Audition?
¿Necesito algún complemento de terceros para usar estos ajustes preestablecidos de Adobe Audition?
Algunos productos están diseñados en torno a las herramientas nativas de Audition, mientras que otros pueden depender de plugins externos para una modelación de tono más avanzada o efectos vocales.
La página del producto debe ser la revisión final antes de la compra si deseas confirmar una configuración solo con stock.
¿Son compatibles estos ajustes preestablecidos de Adobe Audition con las versiones actuales de Adobe Audition?
¿Son compatibles estos ajustes preestablecidos de Adobe Audition con las versiones actuales de Adobe Audition?
Están diseñados para los flujos de trabajo actuales de Audition en escritorio, pero la compatibilidad exacta siempre depende del tipo de archivo y de los procesadores utilizados en ese producto específico.
Si el archivo depende de un flujo de trabajo o conjunto de plugins en particular, la página del producto debería indicarlo.
¿Cómo instalo los ajustes preestablecidos o plantillas vocales de Adobe Audition?
¿Cómo instalo los ajustes preestablecidos o plantillas vocales de Adobe Audition?
En la mayoría de los casos, cargas la cadena en el flujo de trabajo de procesamiento de Audition o abres la estructura de plantilla/sesión y luego confirmas tus entradas, salidas y configuraciones de monitoreo.
Una vez cargada, puedes ajustar la cadena para que coincida con la grabación específica en la que estás trabajando.
¿Son estos ajustes preestablecidos de Adobe Audition adecuados para principiantes?
¿Son estos ajustes preestablecidos de Adobe Audition adecuados para principiantes?
Sí. Son especialmente útiles para creadores que desean un punto de partida más limpio para las voces sin tener que aprender cada plugin desde cero el primer día.
Como Audition se utiliza tanto para música como para contenido hablado, estos ajustes preestablecidos pueden ayudar a simplificar un flujo de trabajo que a menudo se siente demasiado manual al principio.
¿Puedo ajustar la cadena para que coincida mejor con mi micrófono, la sala o el tono vocal?
¿Puedo ajustar la cadena para que coincida mejor con mi micrófono, la sala o el tono vocal?
Sí. Debes ajustar la ganancia, el equilibrio de ecualización, la reducción de sibilancias, el ambiente y la dinámica para que se adapten a la grabación que realizaste.
El preset te acerca más rápido al resultado, pero los resultados finales mejoran cuando la cadena se ajusta a tu voz, habitación y micrófono.
¿Qué hace que estos sean mejores que los ajustes preestablecidos de voz integrados en Adobe Audition?
¿Qué hace que estos sean mejores que los ajustes preestablecidos de voz integrados en Adobe Audition?
Los ajustes preestablecidos integrados son útiles para experimentos rápidos, pero los productos BCHILL MIX están diseñados como puntos de partida más intencionados y reales para trabajos vocales terminados.
Están pensados para ayudarte a avanzar hacia un sonido final más sólido de manera más rápida, con más estructura y menos conjeturas.
Preajustes Vocales de Adobe Audition: Explicación y Características
Introducción a los presets vocales de Adobe Audition
Si quieres un sonido vocal moderno y consistente sin reconstruir la misma cadena en cada sesión, los presets vocales para Adobe Audition ofrecen un punto de partida rápido y confiable. Un preset carga una ruta completa de efectos—modelado de tono, dinámica, control de sibilancias y ambiente—para que puedas grabar con una señal equilibrada y hacer pequeños ajustes para tu voz, micrófono y canción.
En BCHILL MIX, el objetivo es práctico y repetible: cadenas que funcionen bien en auriculares, monitores de estudio y teléfonos, para que las mezclas preliminares se traduzcan bien y las mezclas finales se completen más rápido. Esta guía cubre qué son los presets, cuándo ayudan, opciones nativas vs. premium, pasos de configuración, consejos de estilo y cómo las plantillas de sesión complementan tu cadena vocal.
¿Qué son los presets vocales en Adobe Audition?
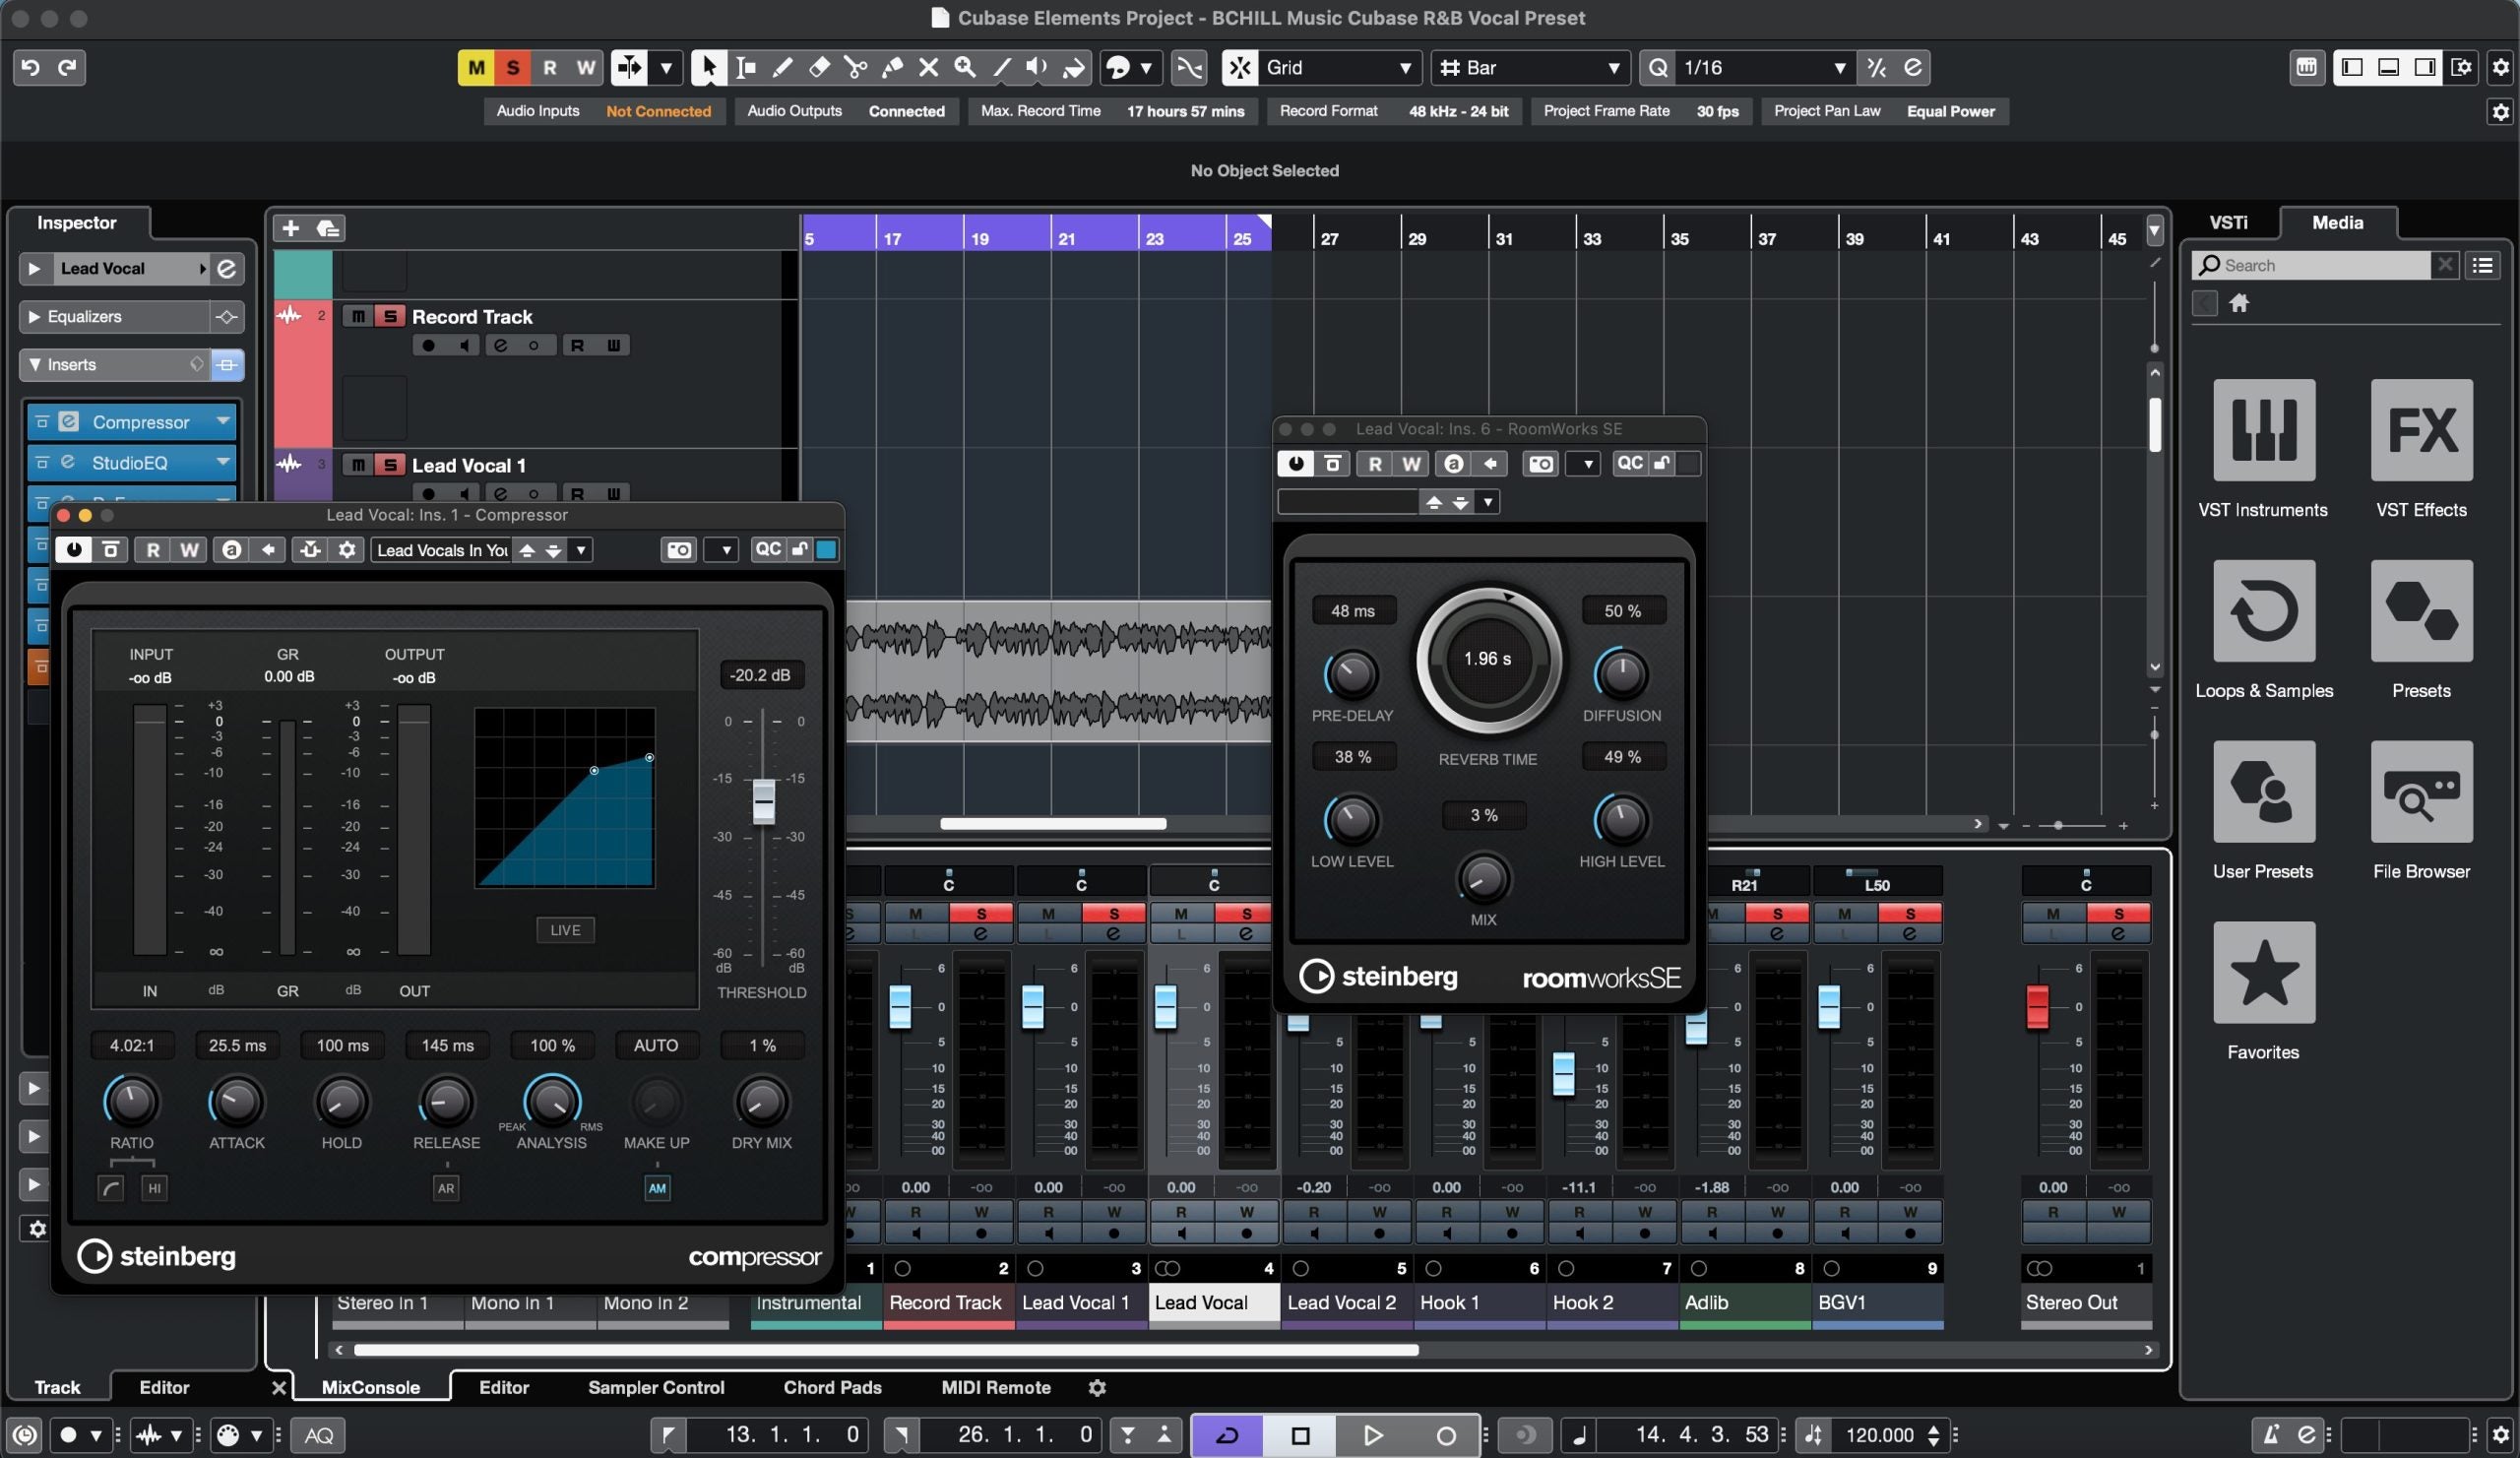
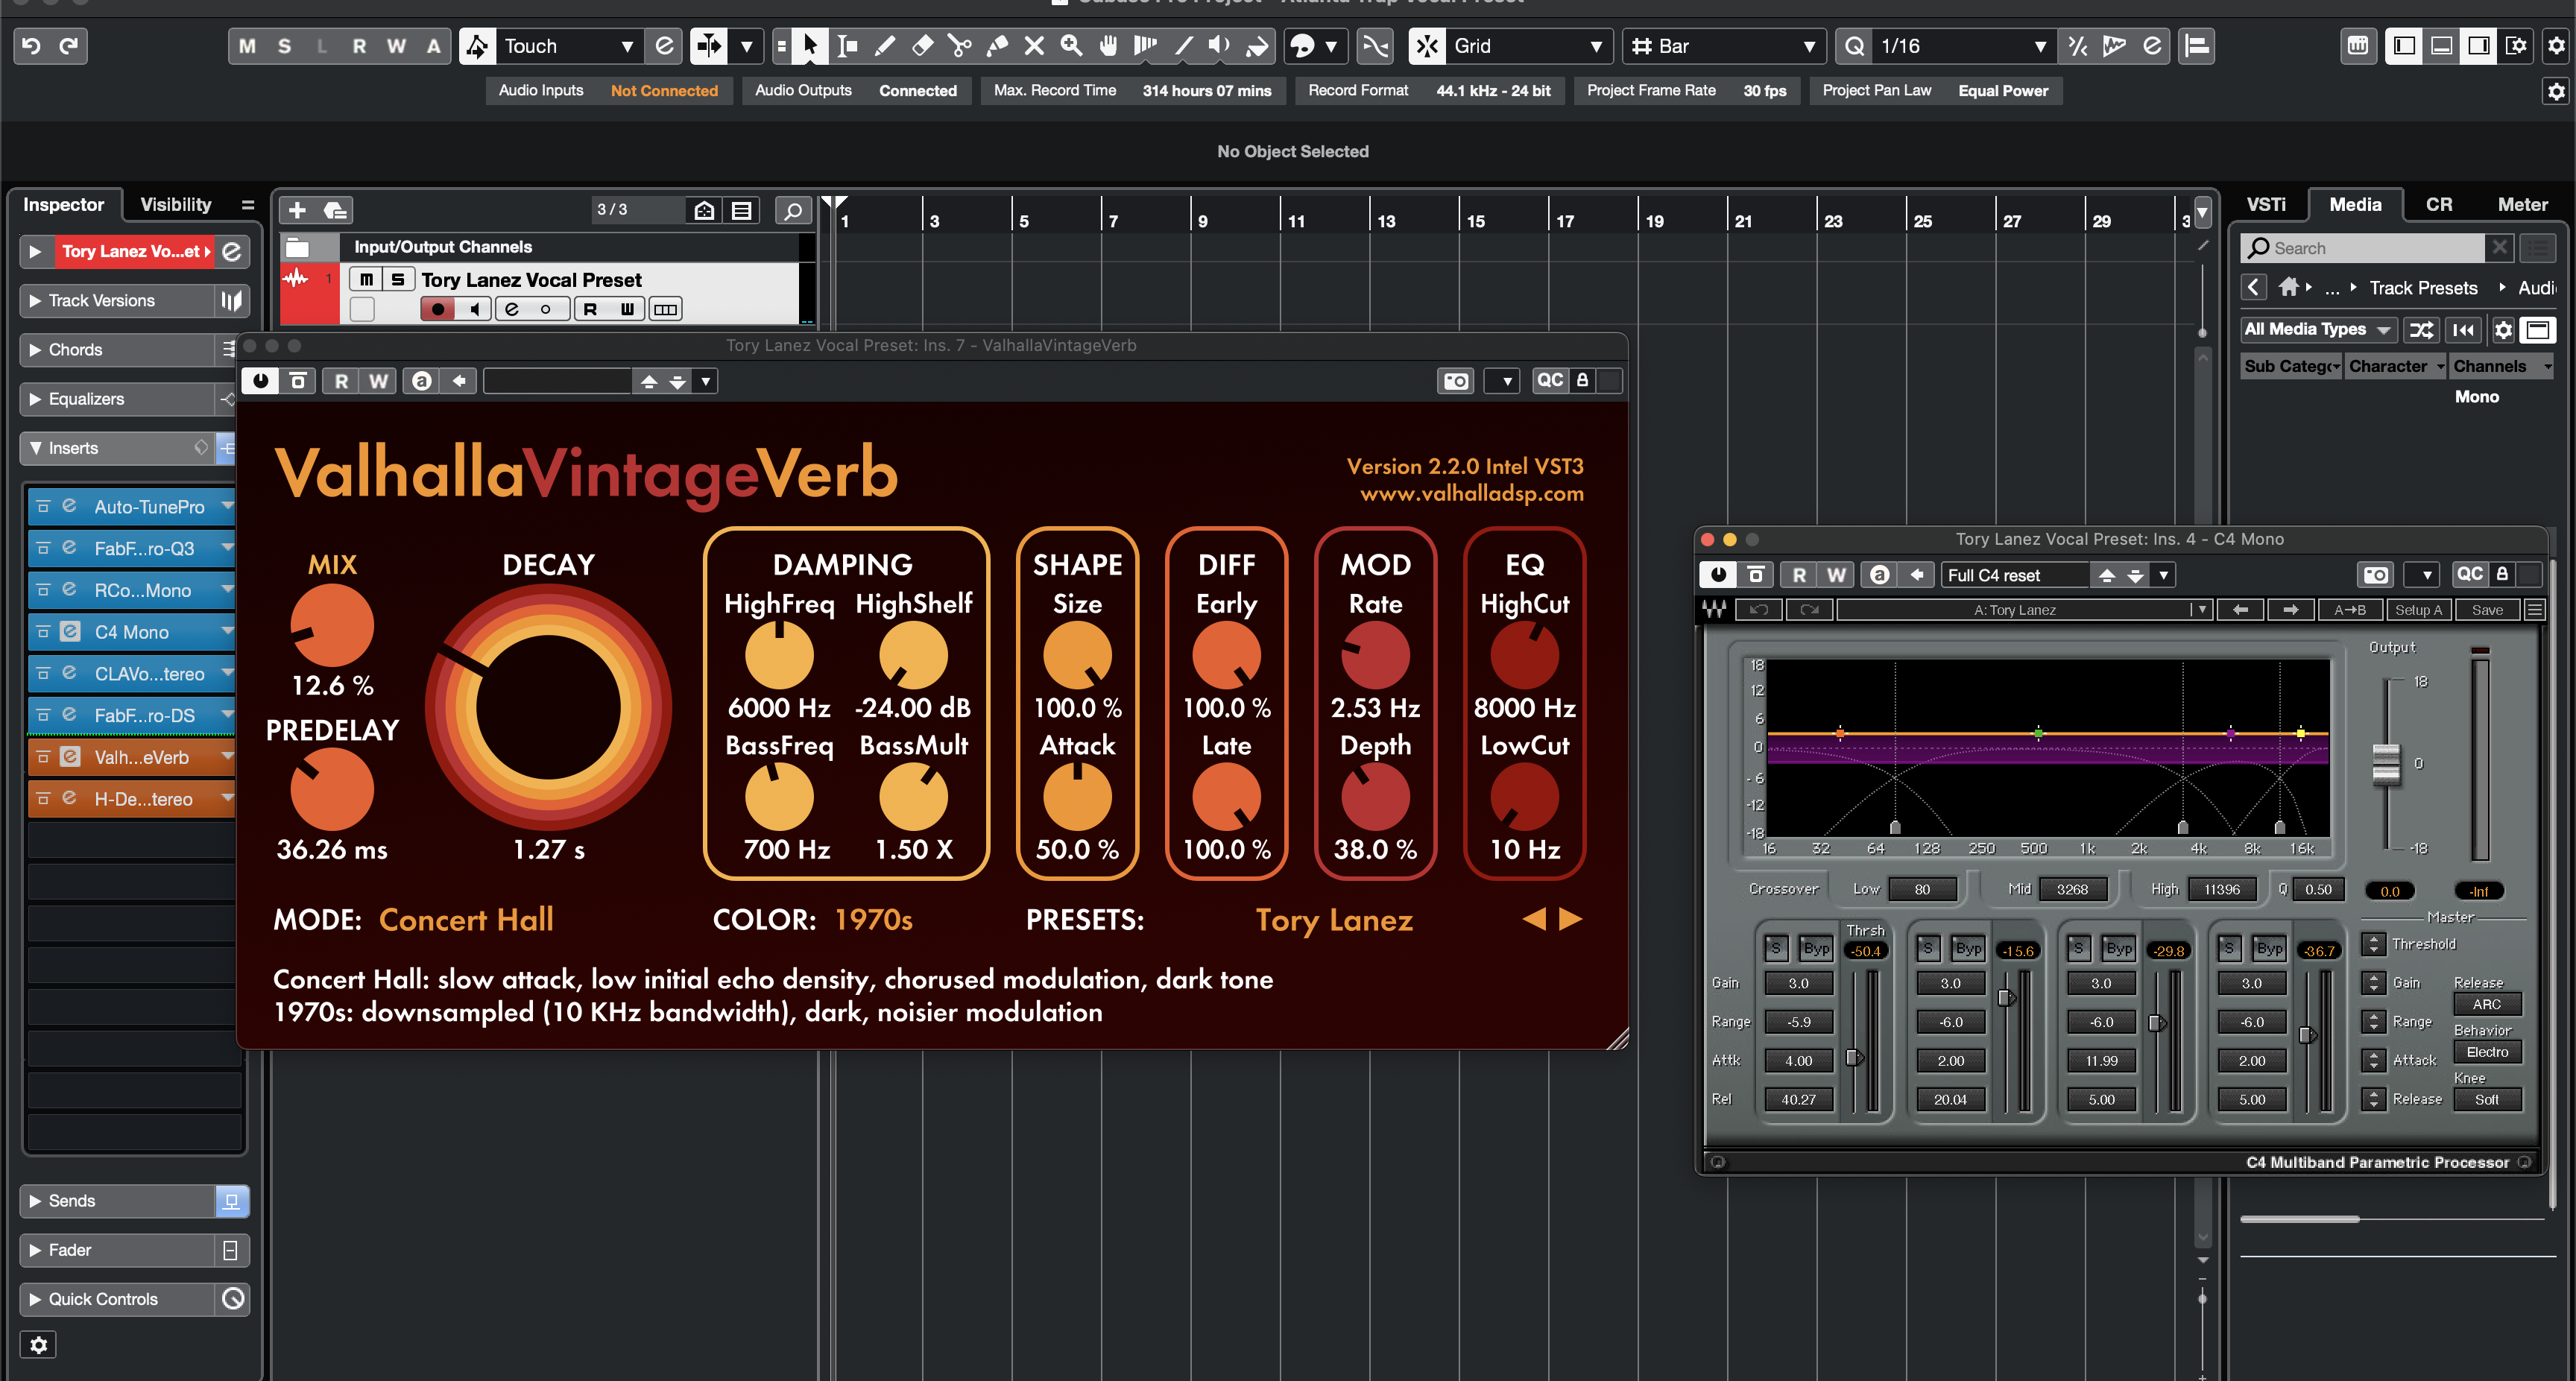
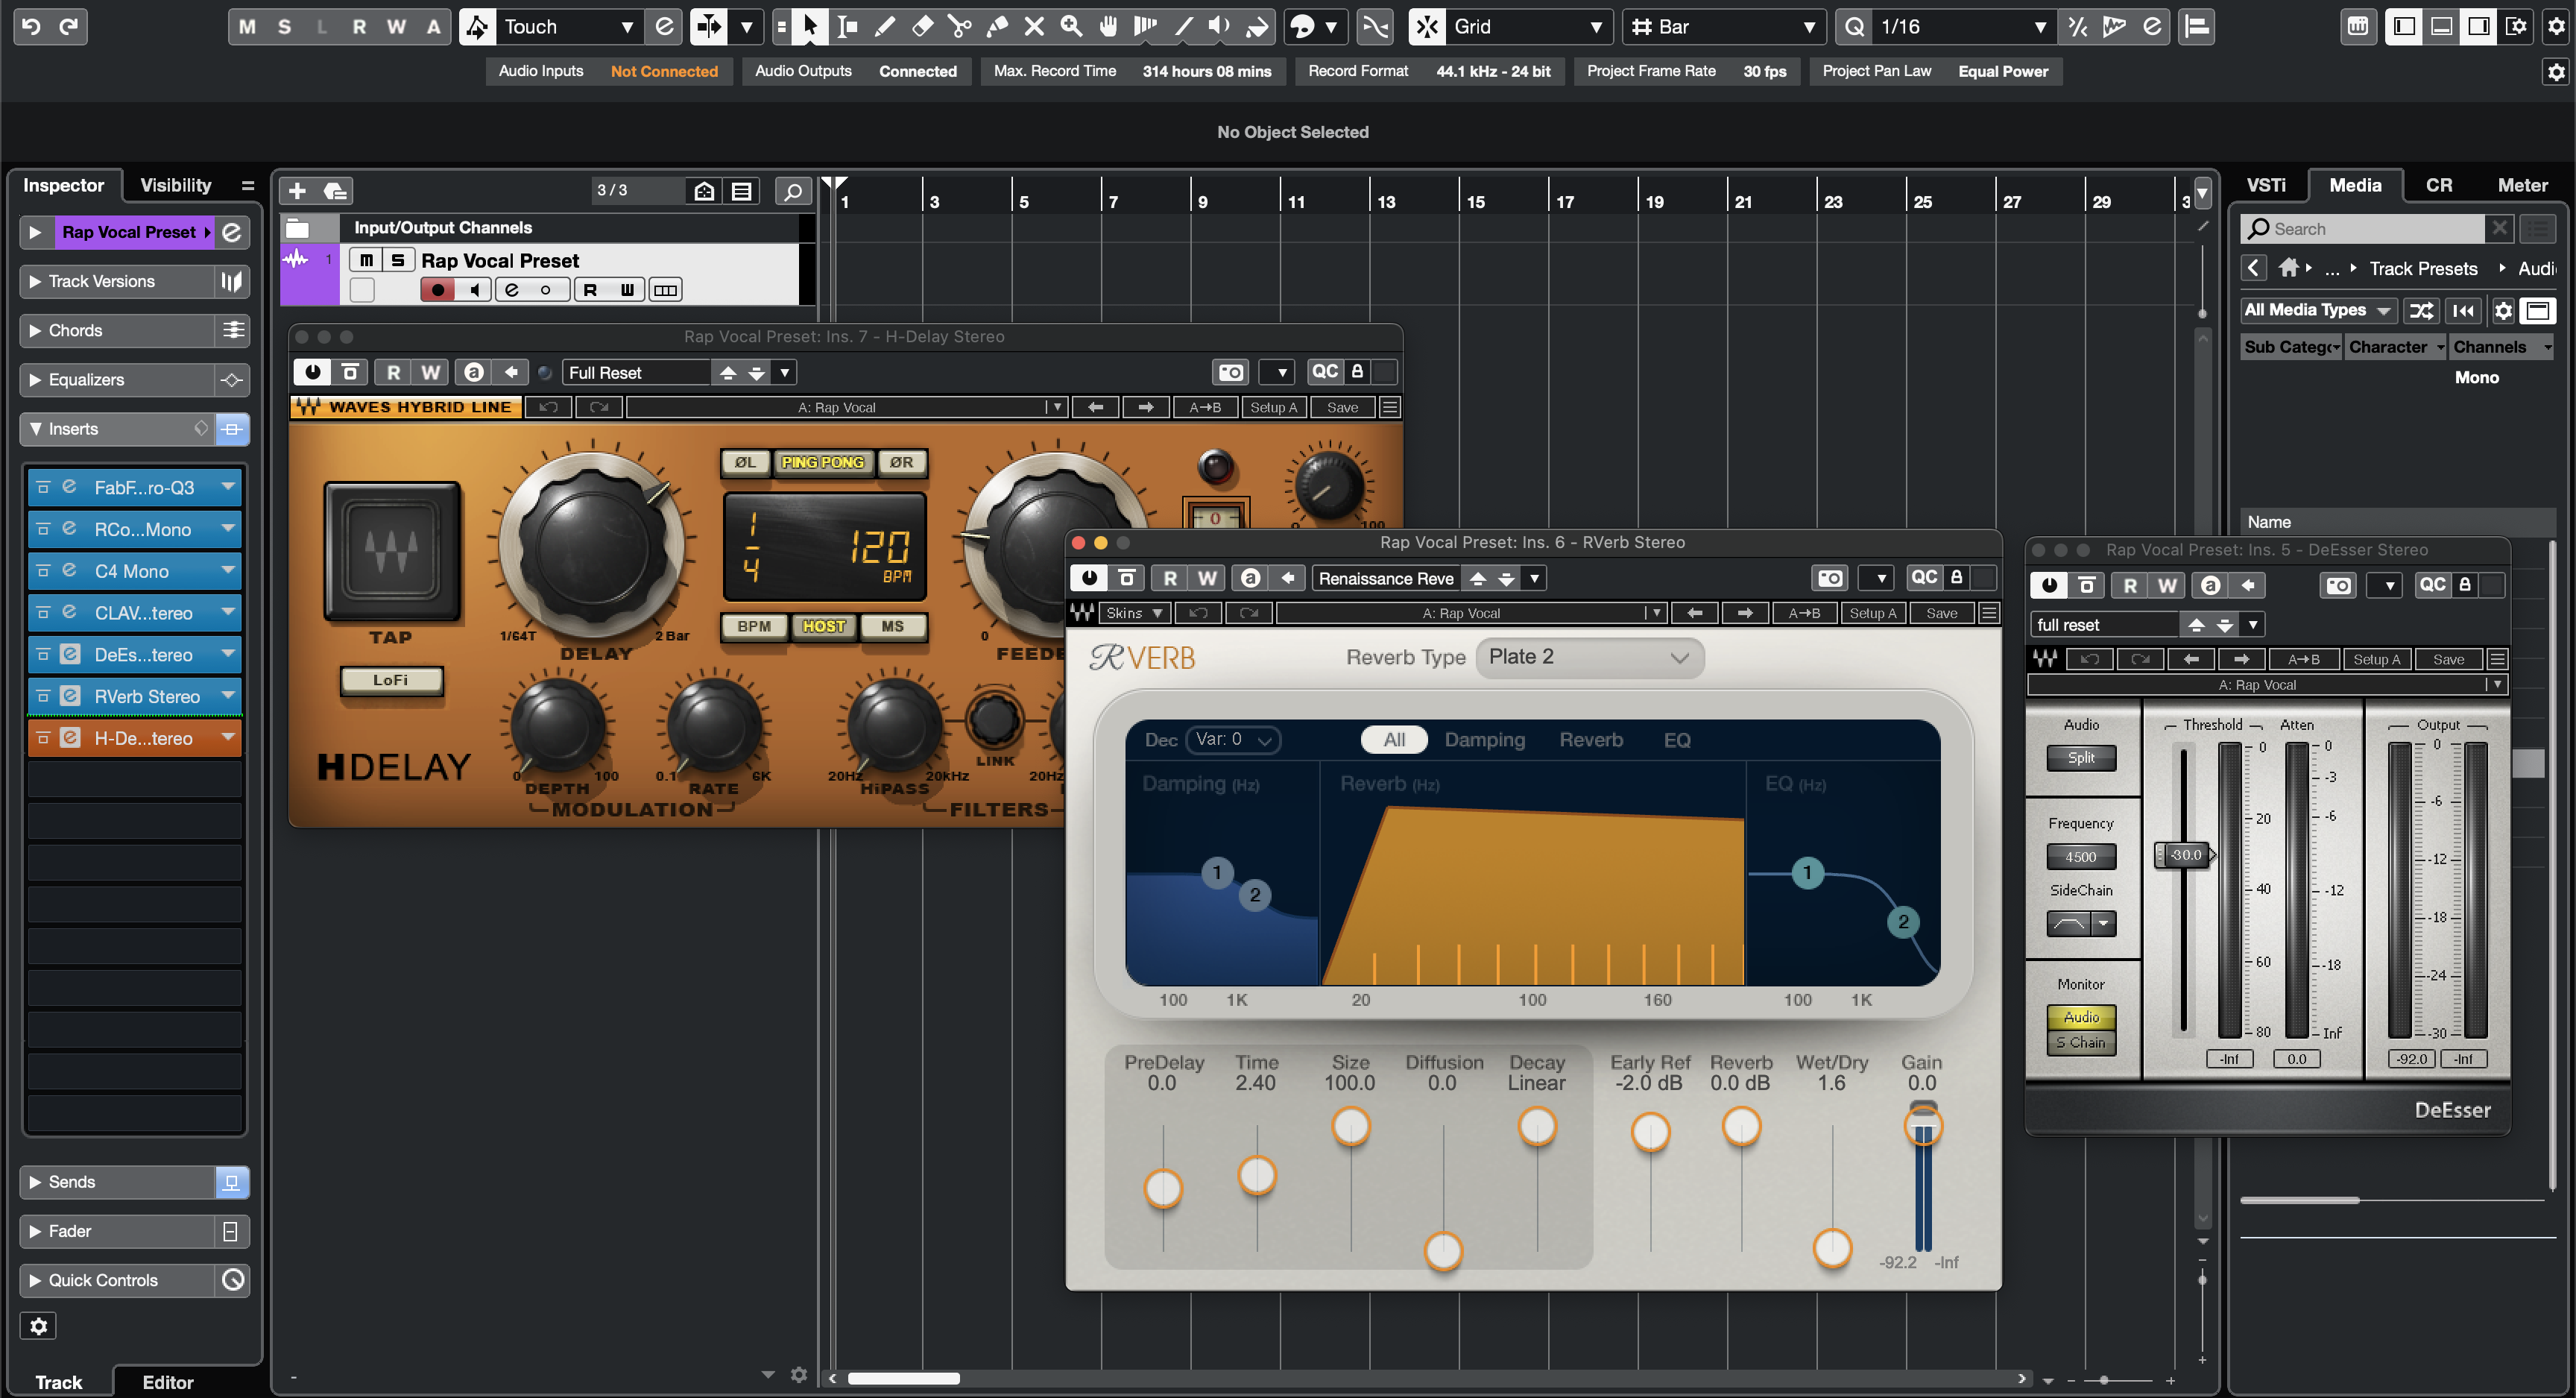
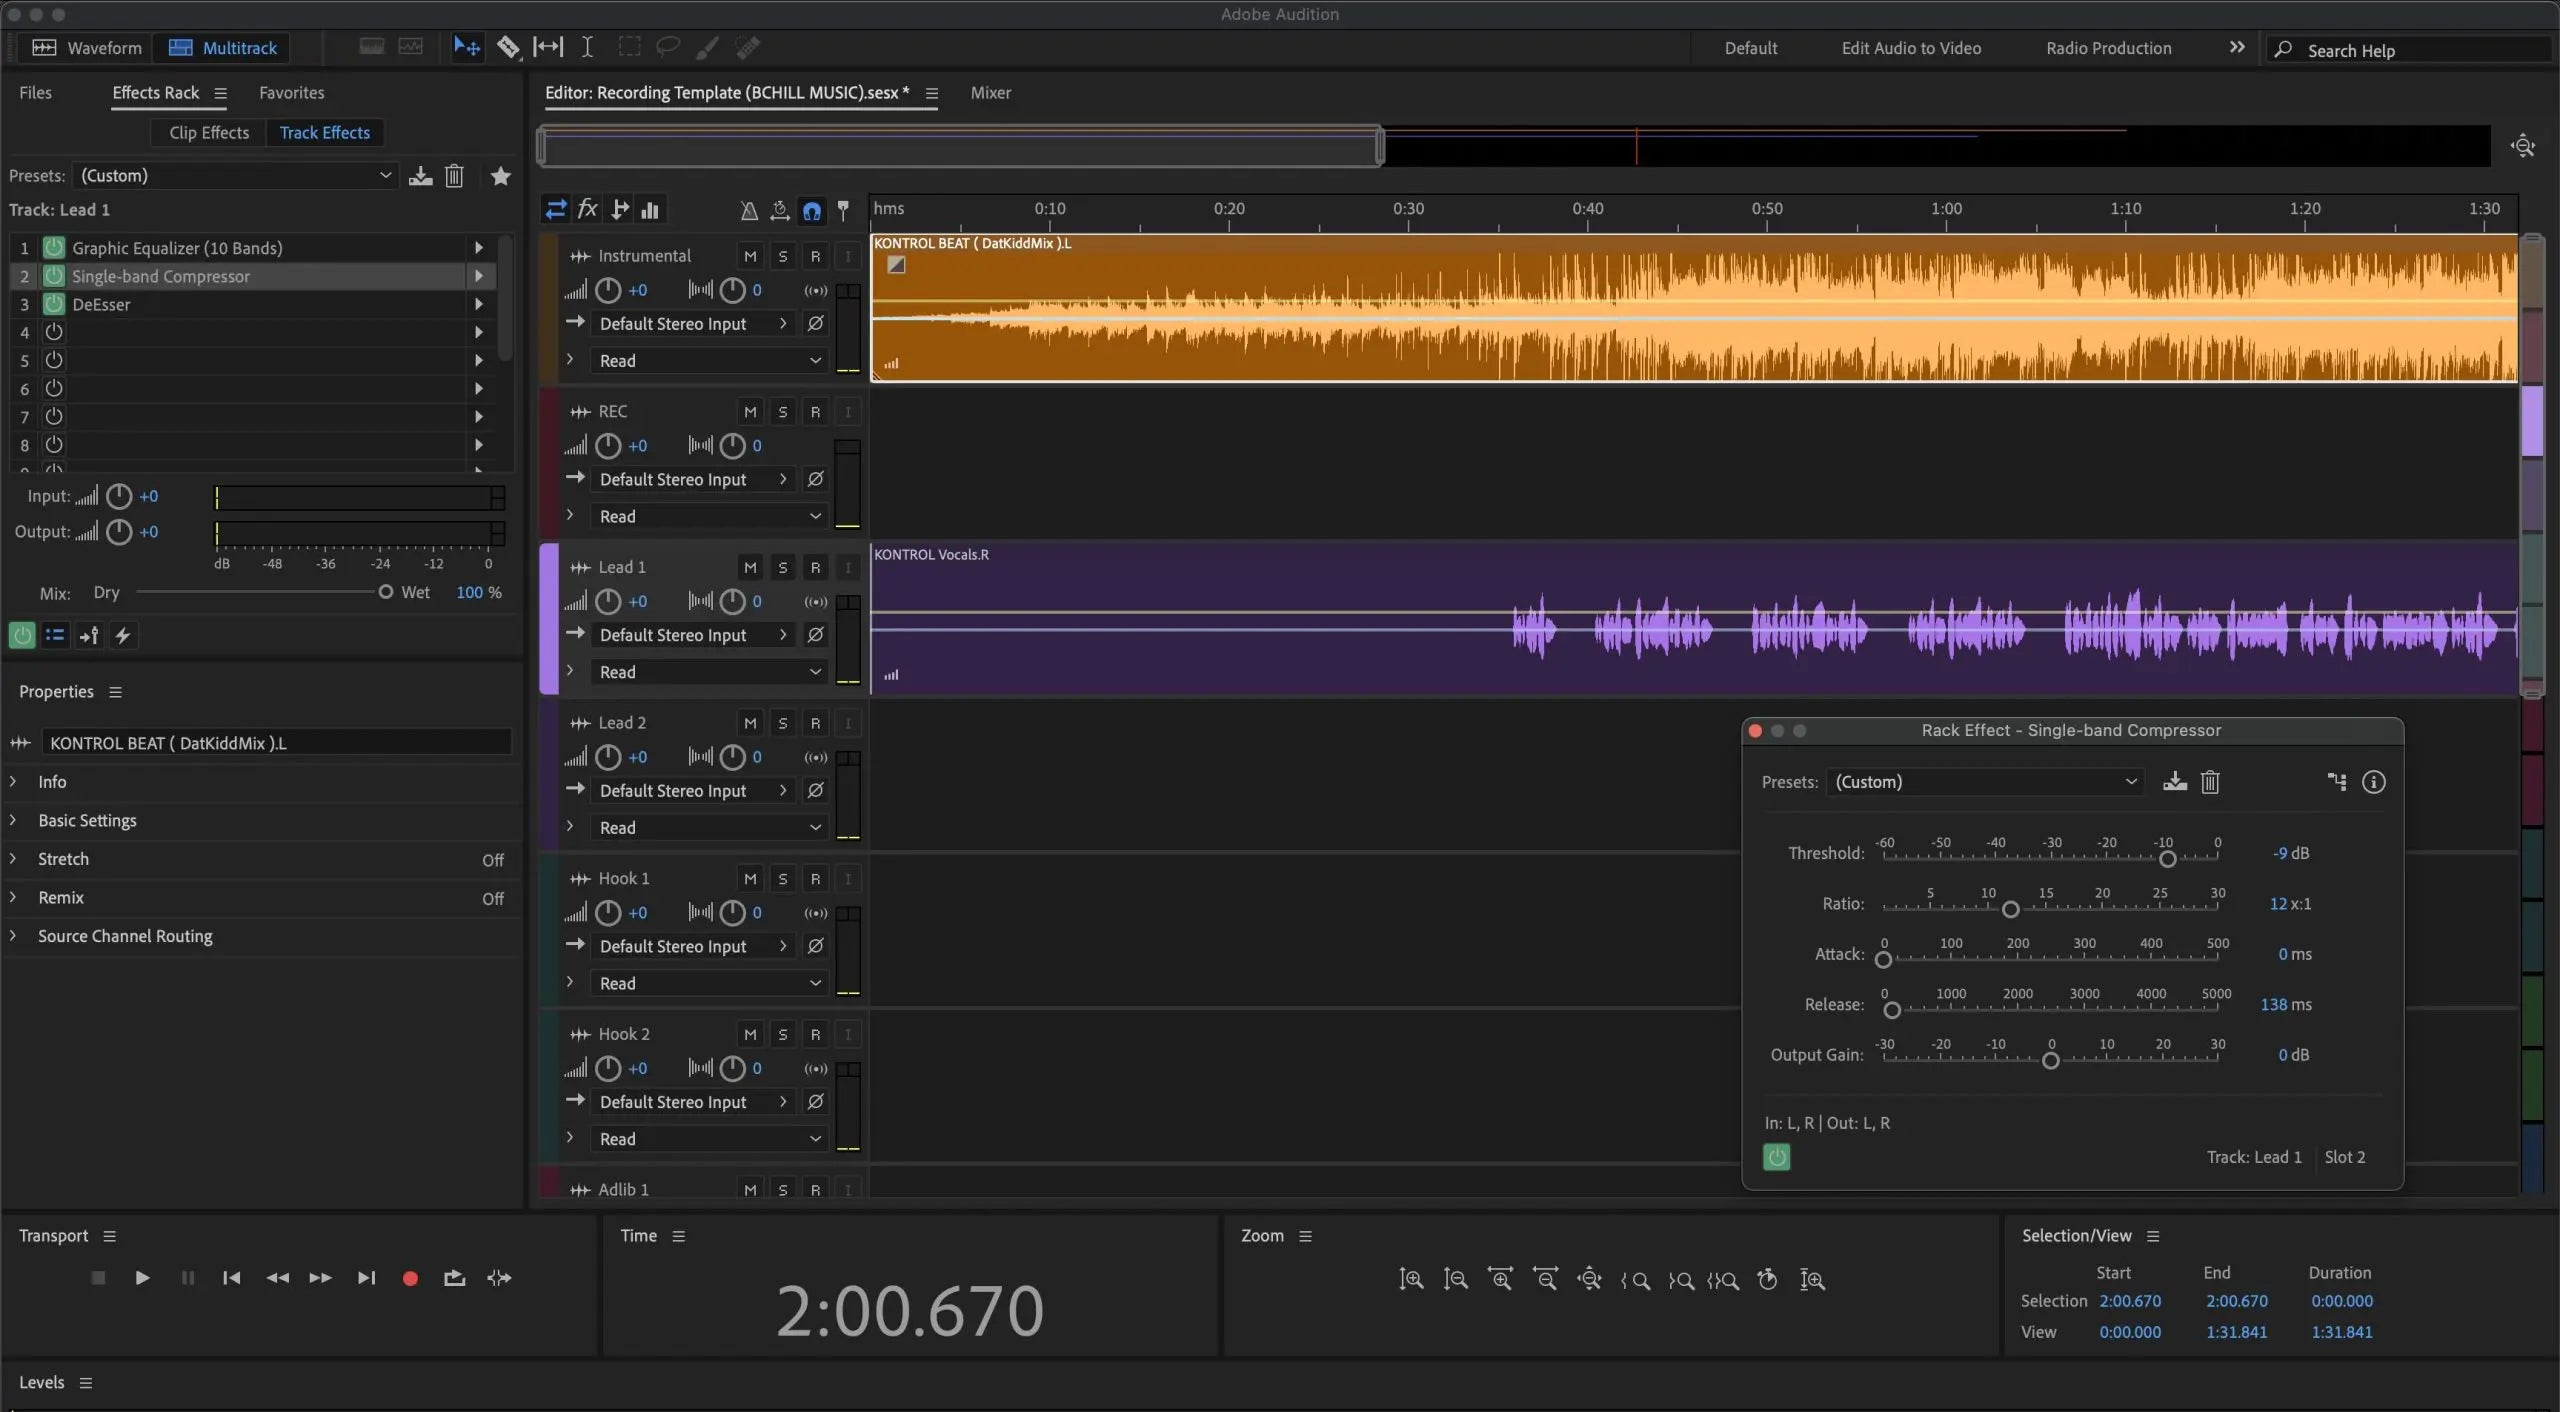
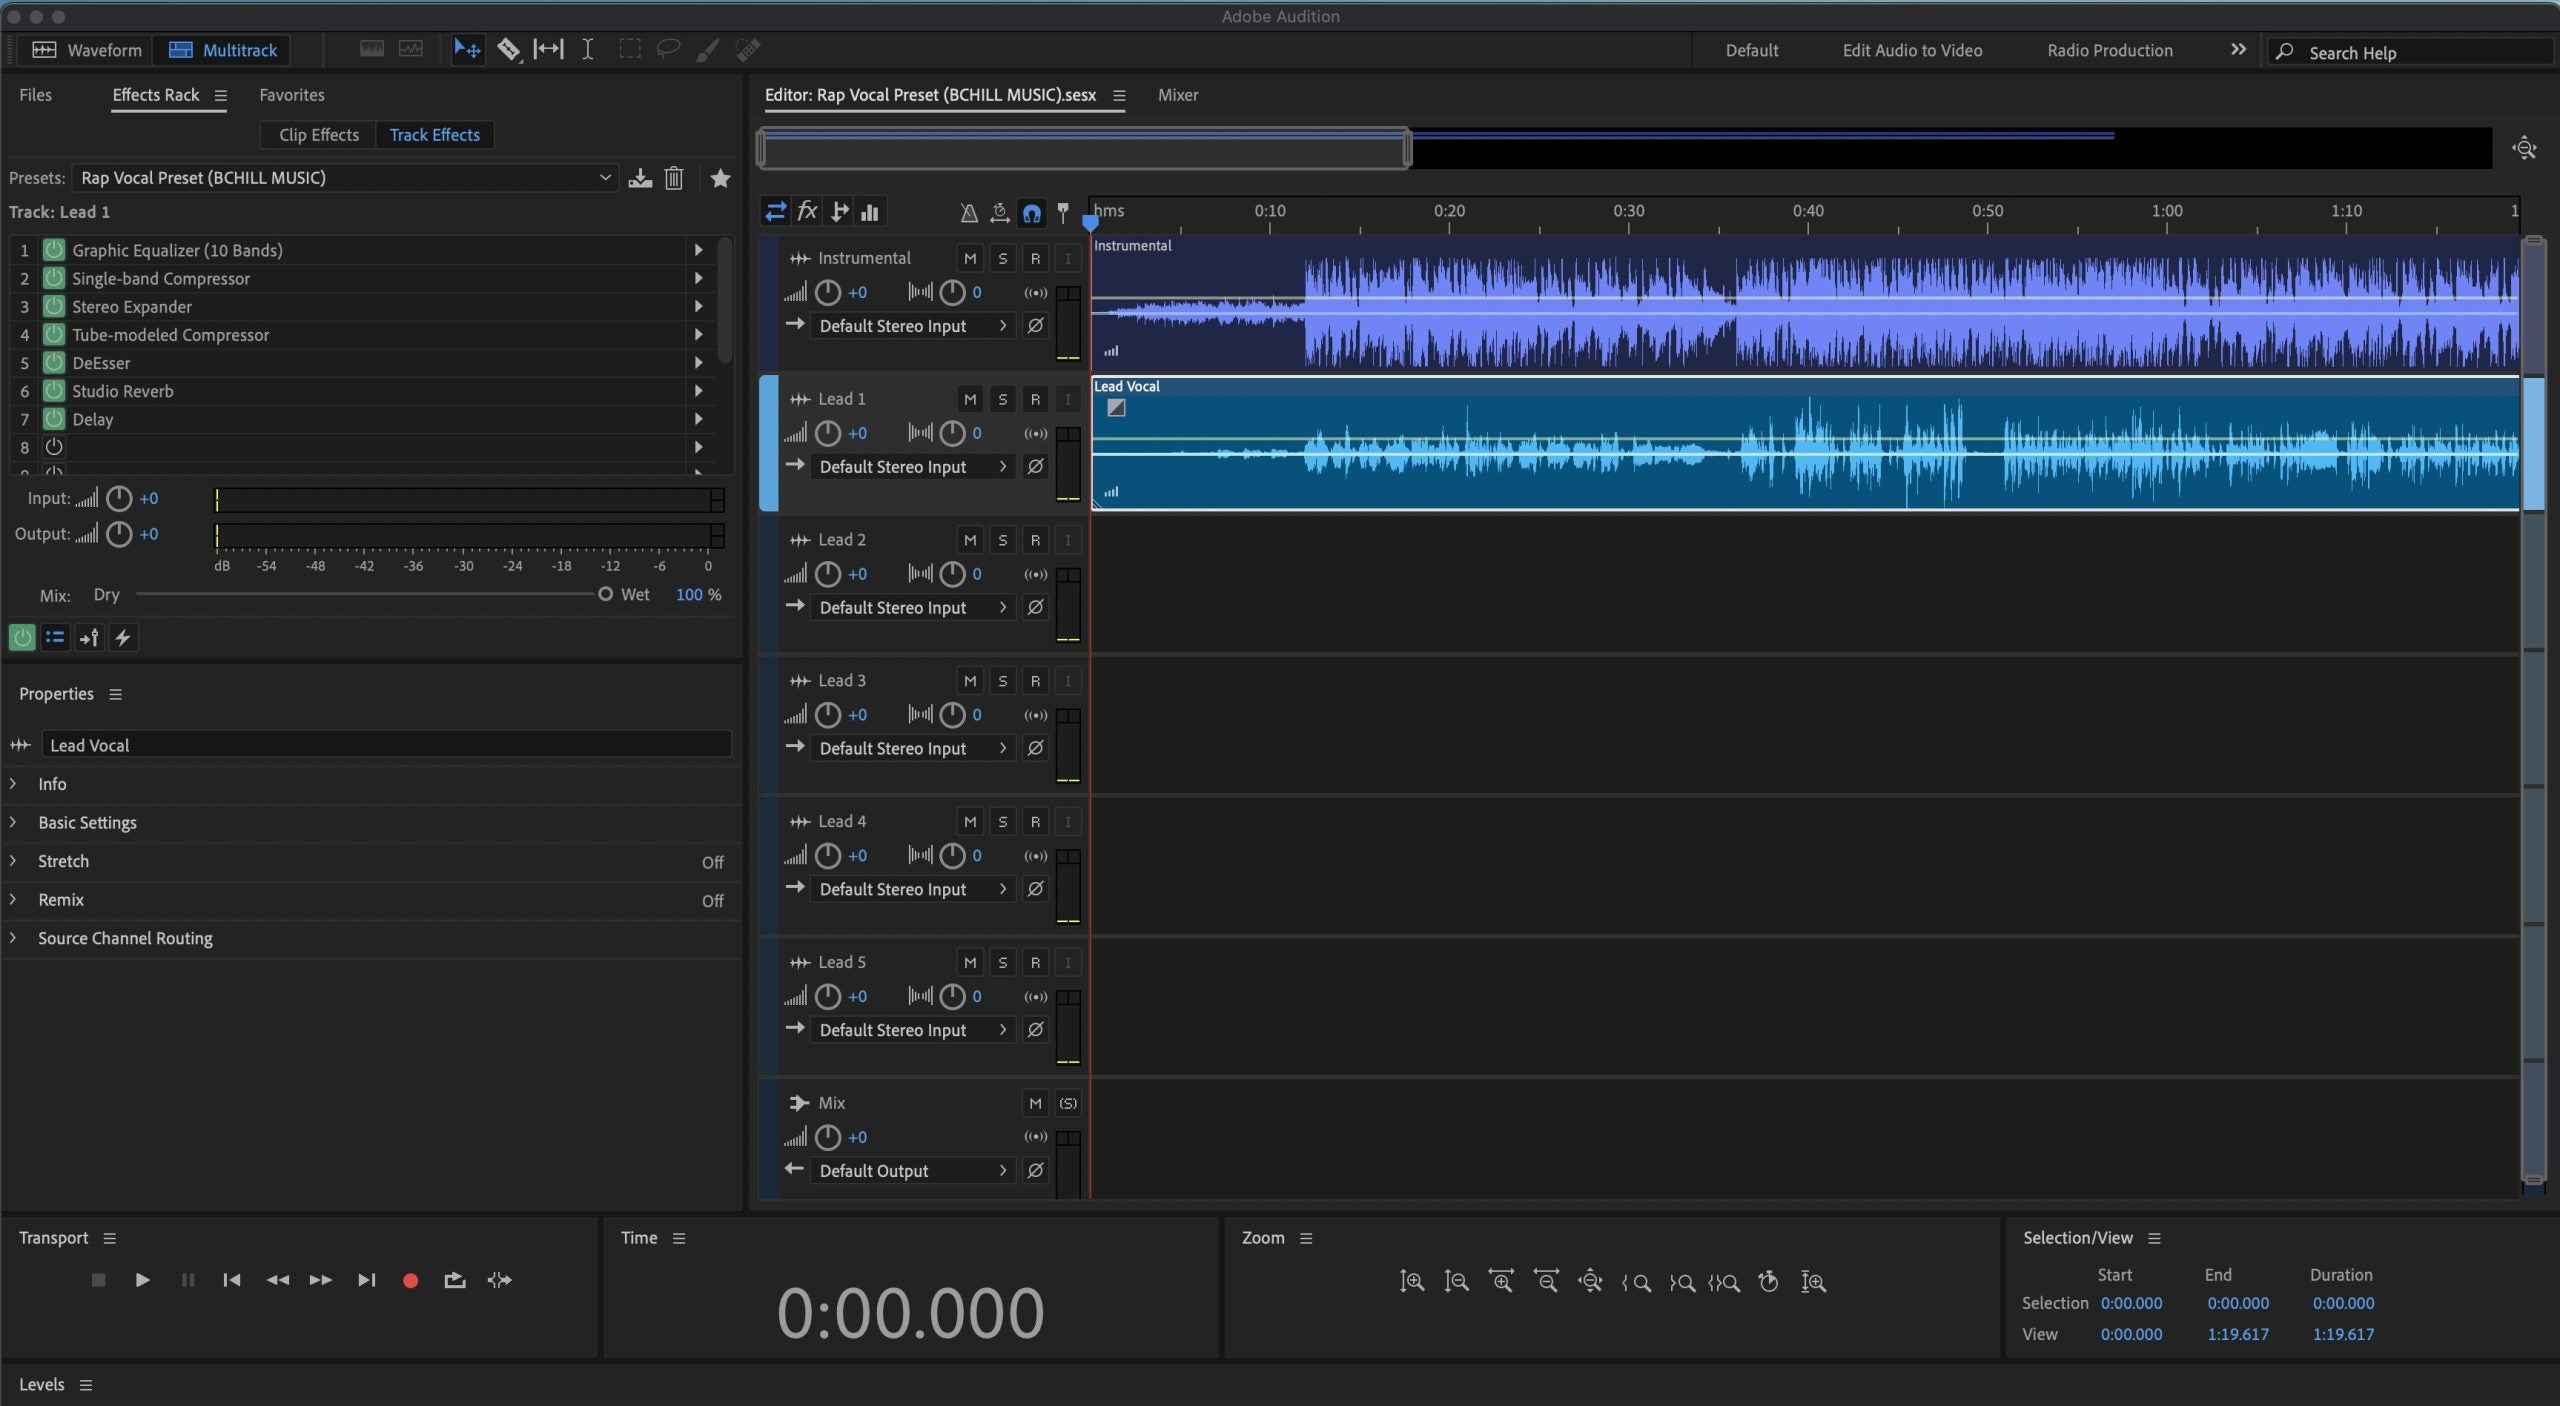
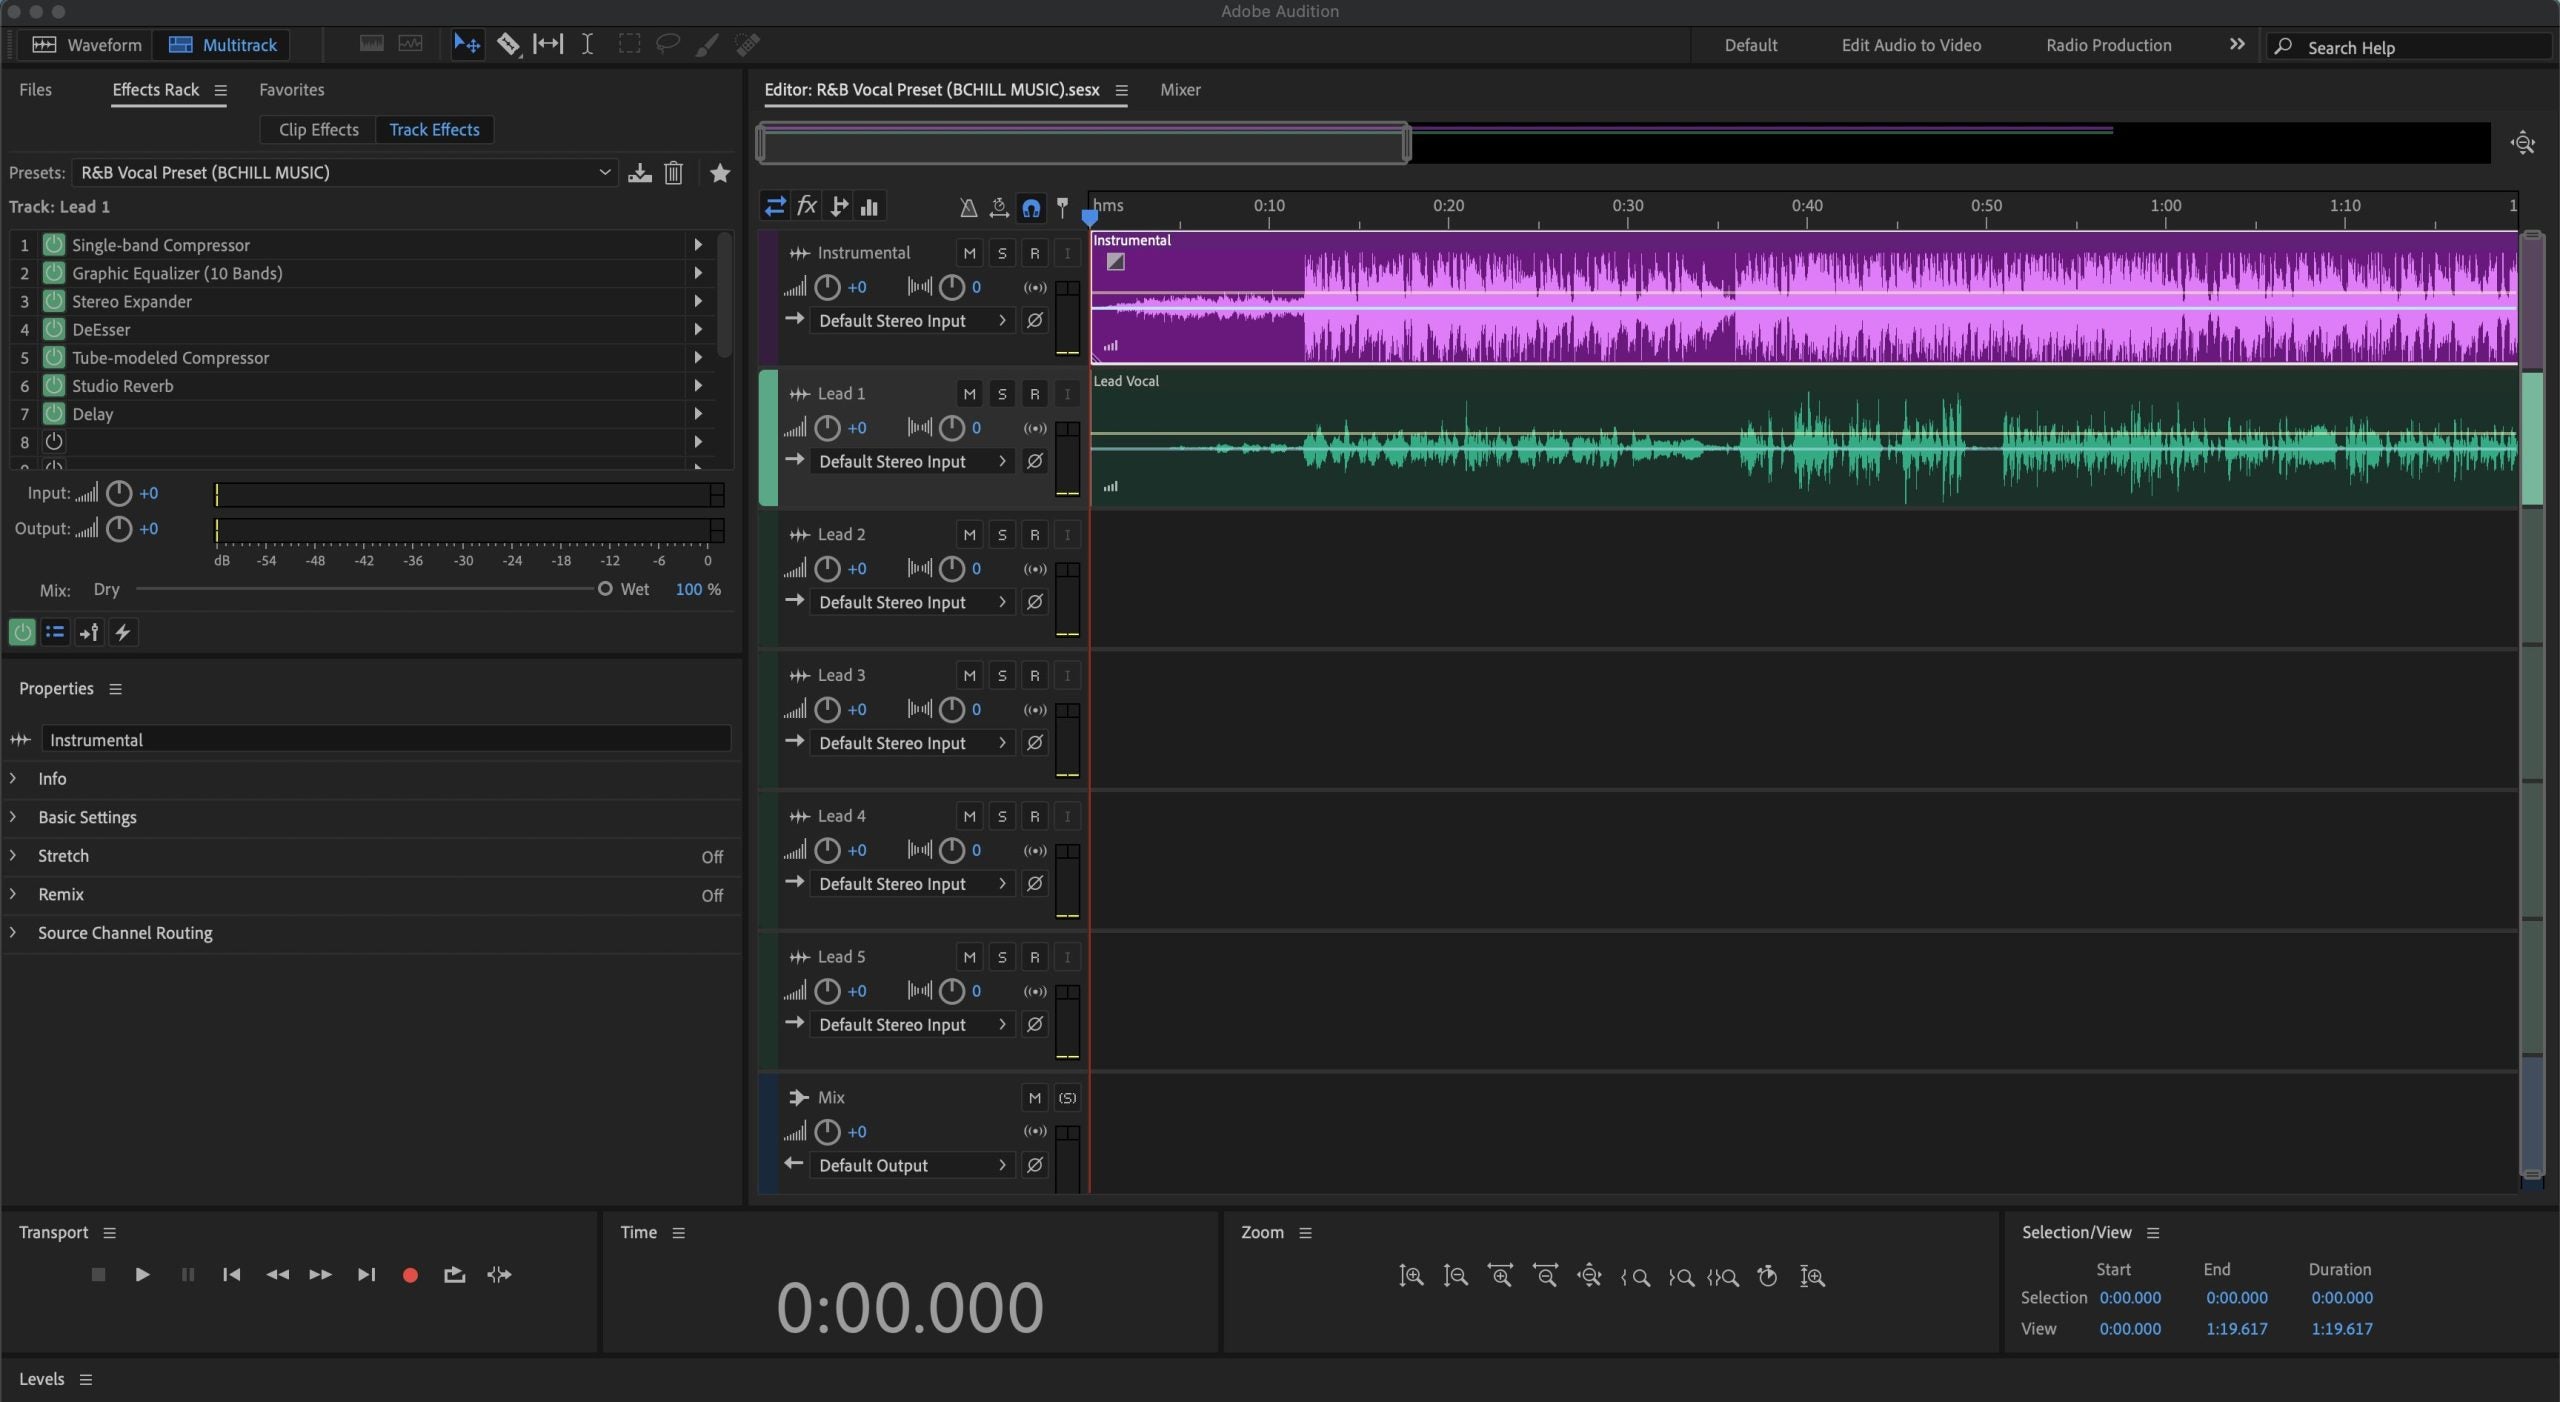
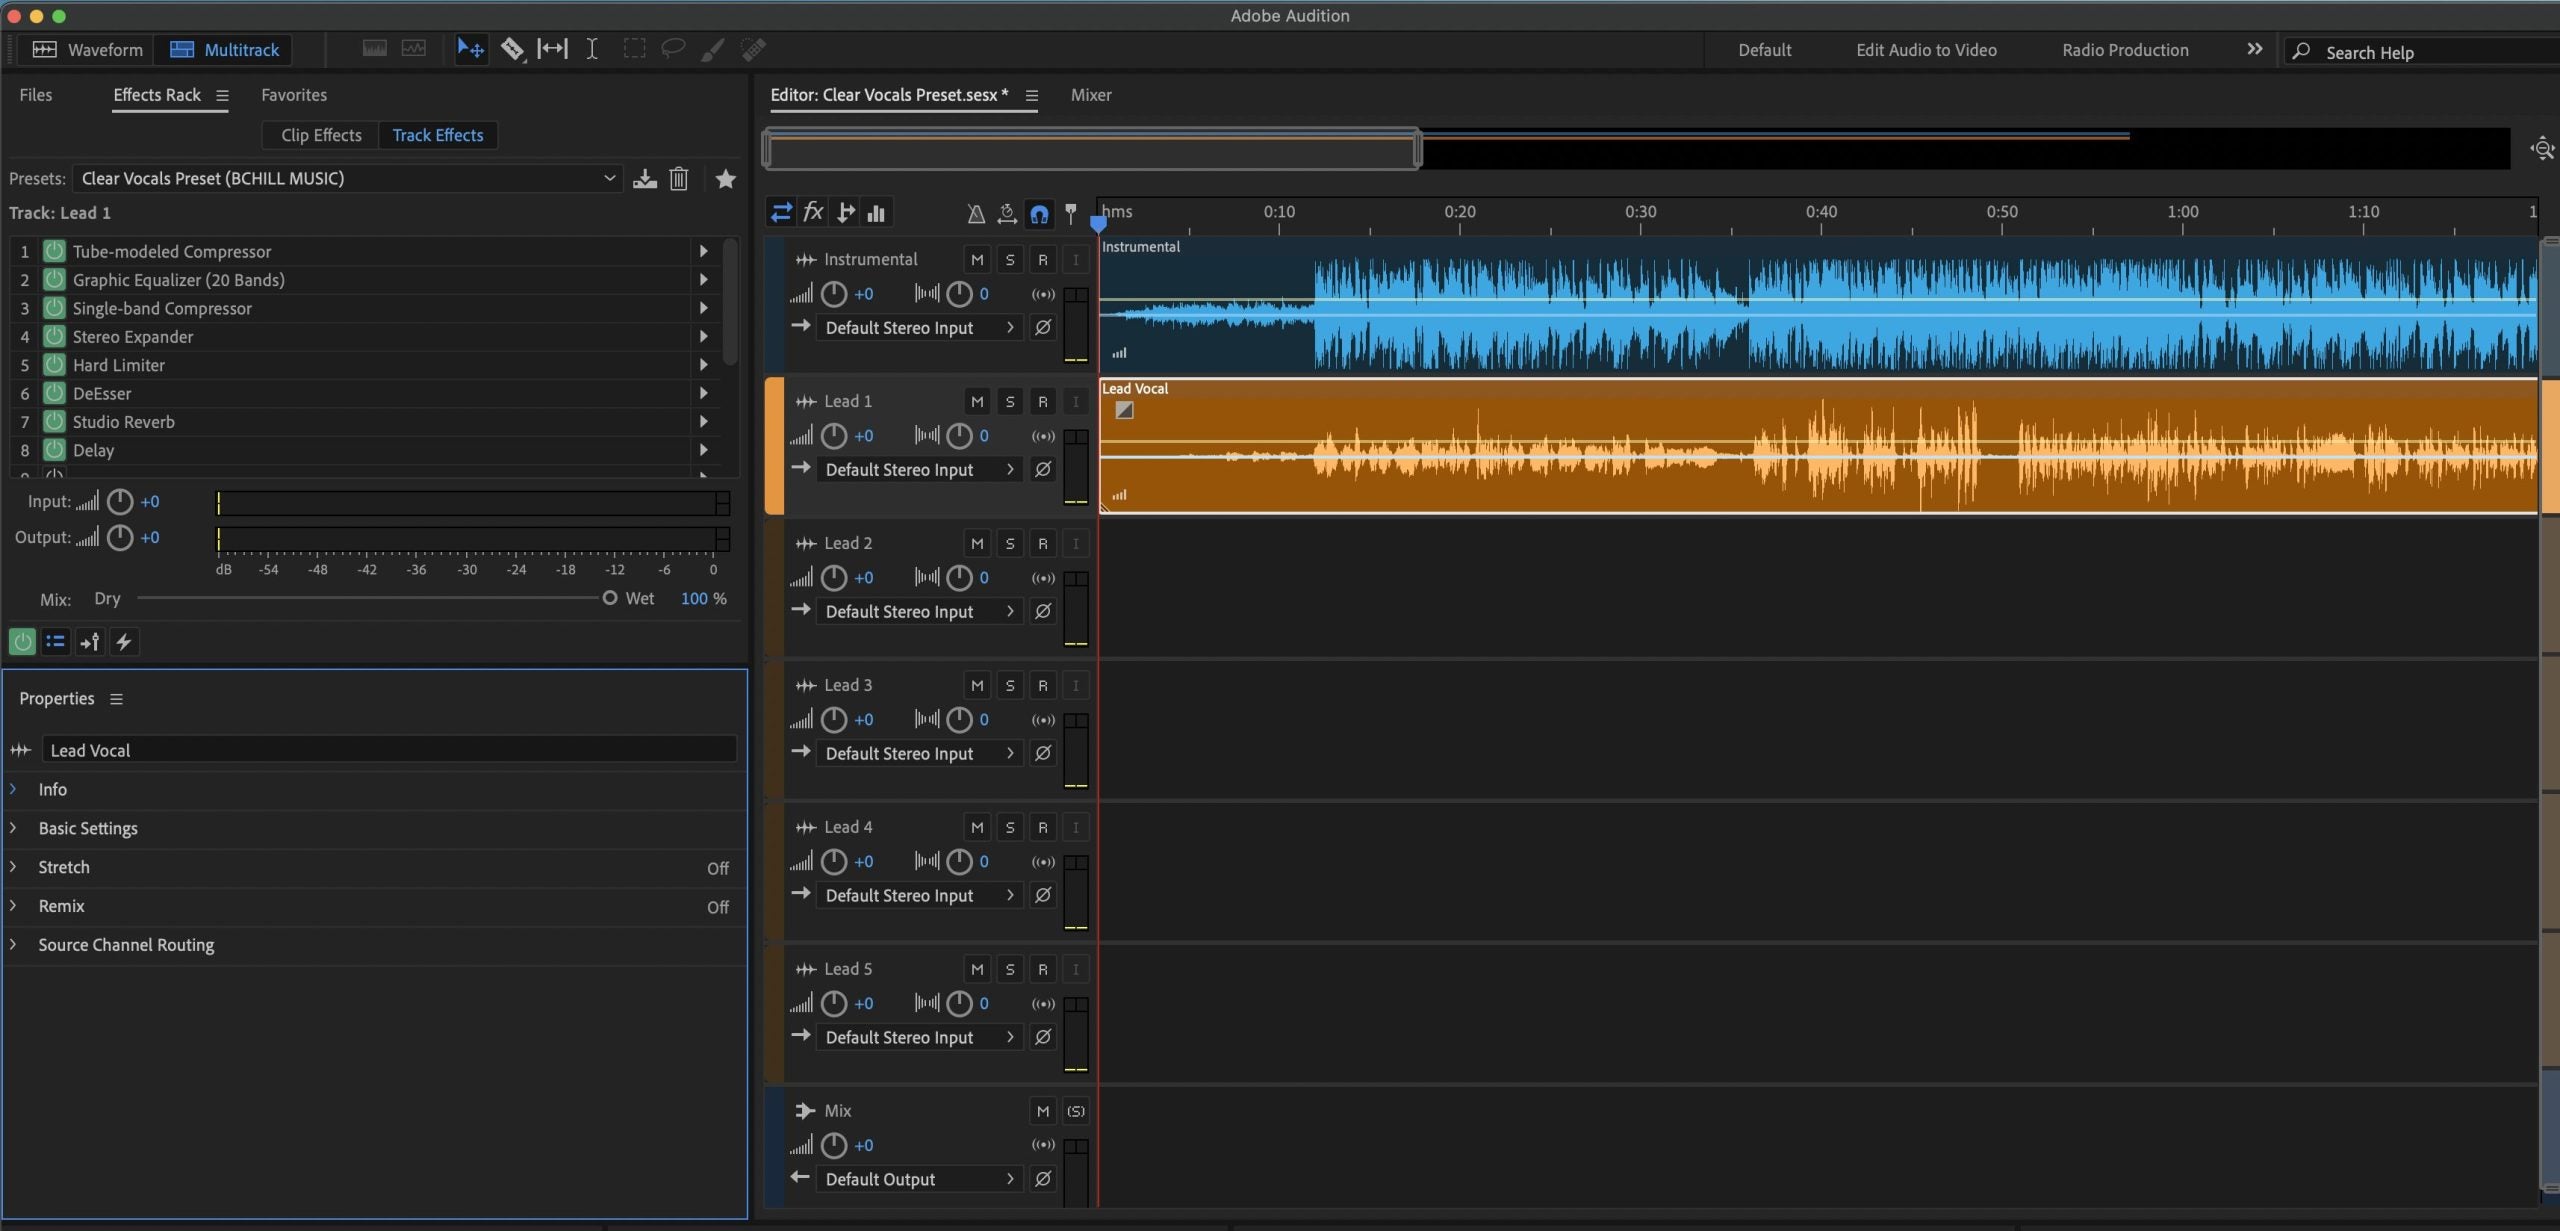
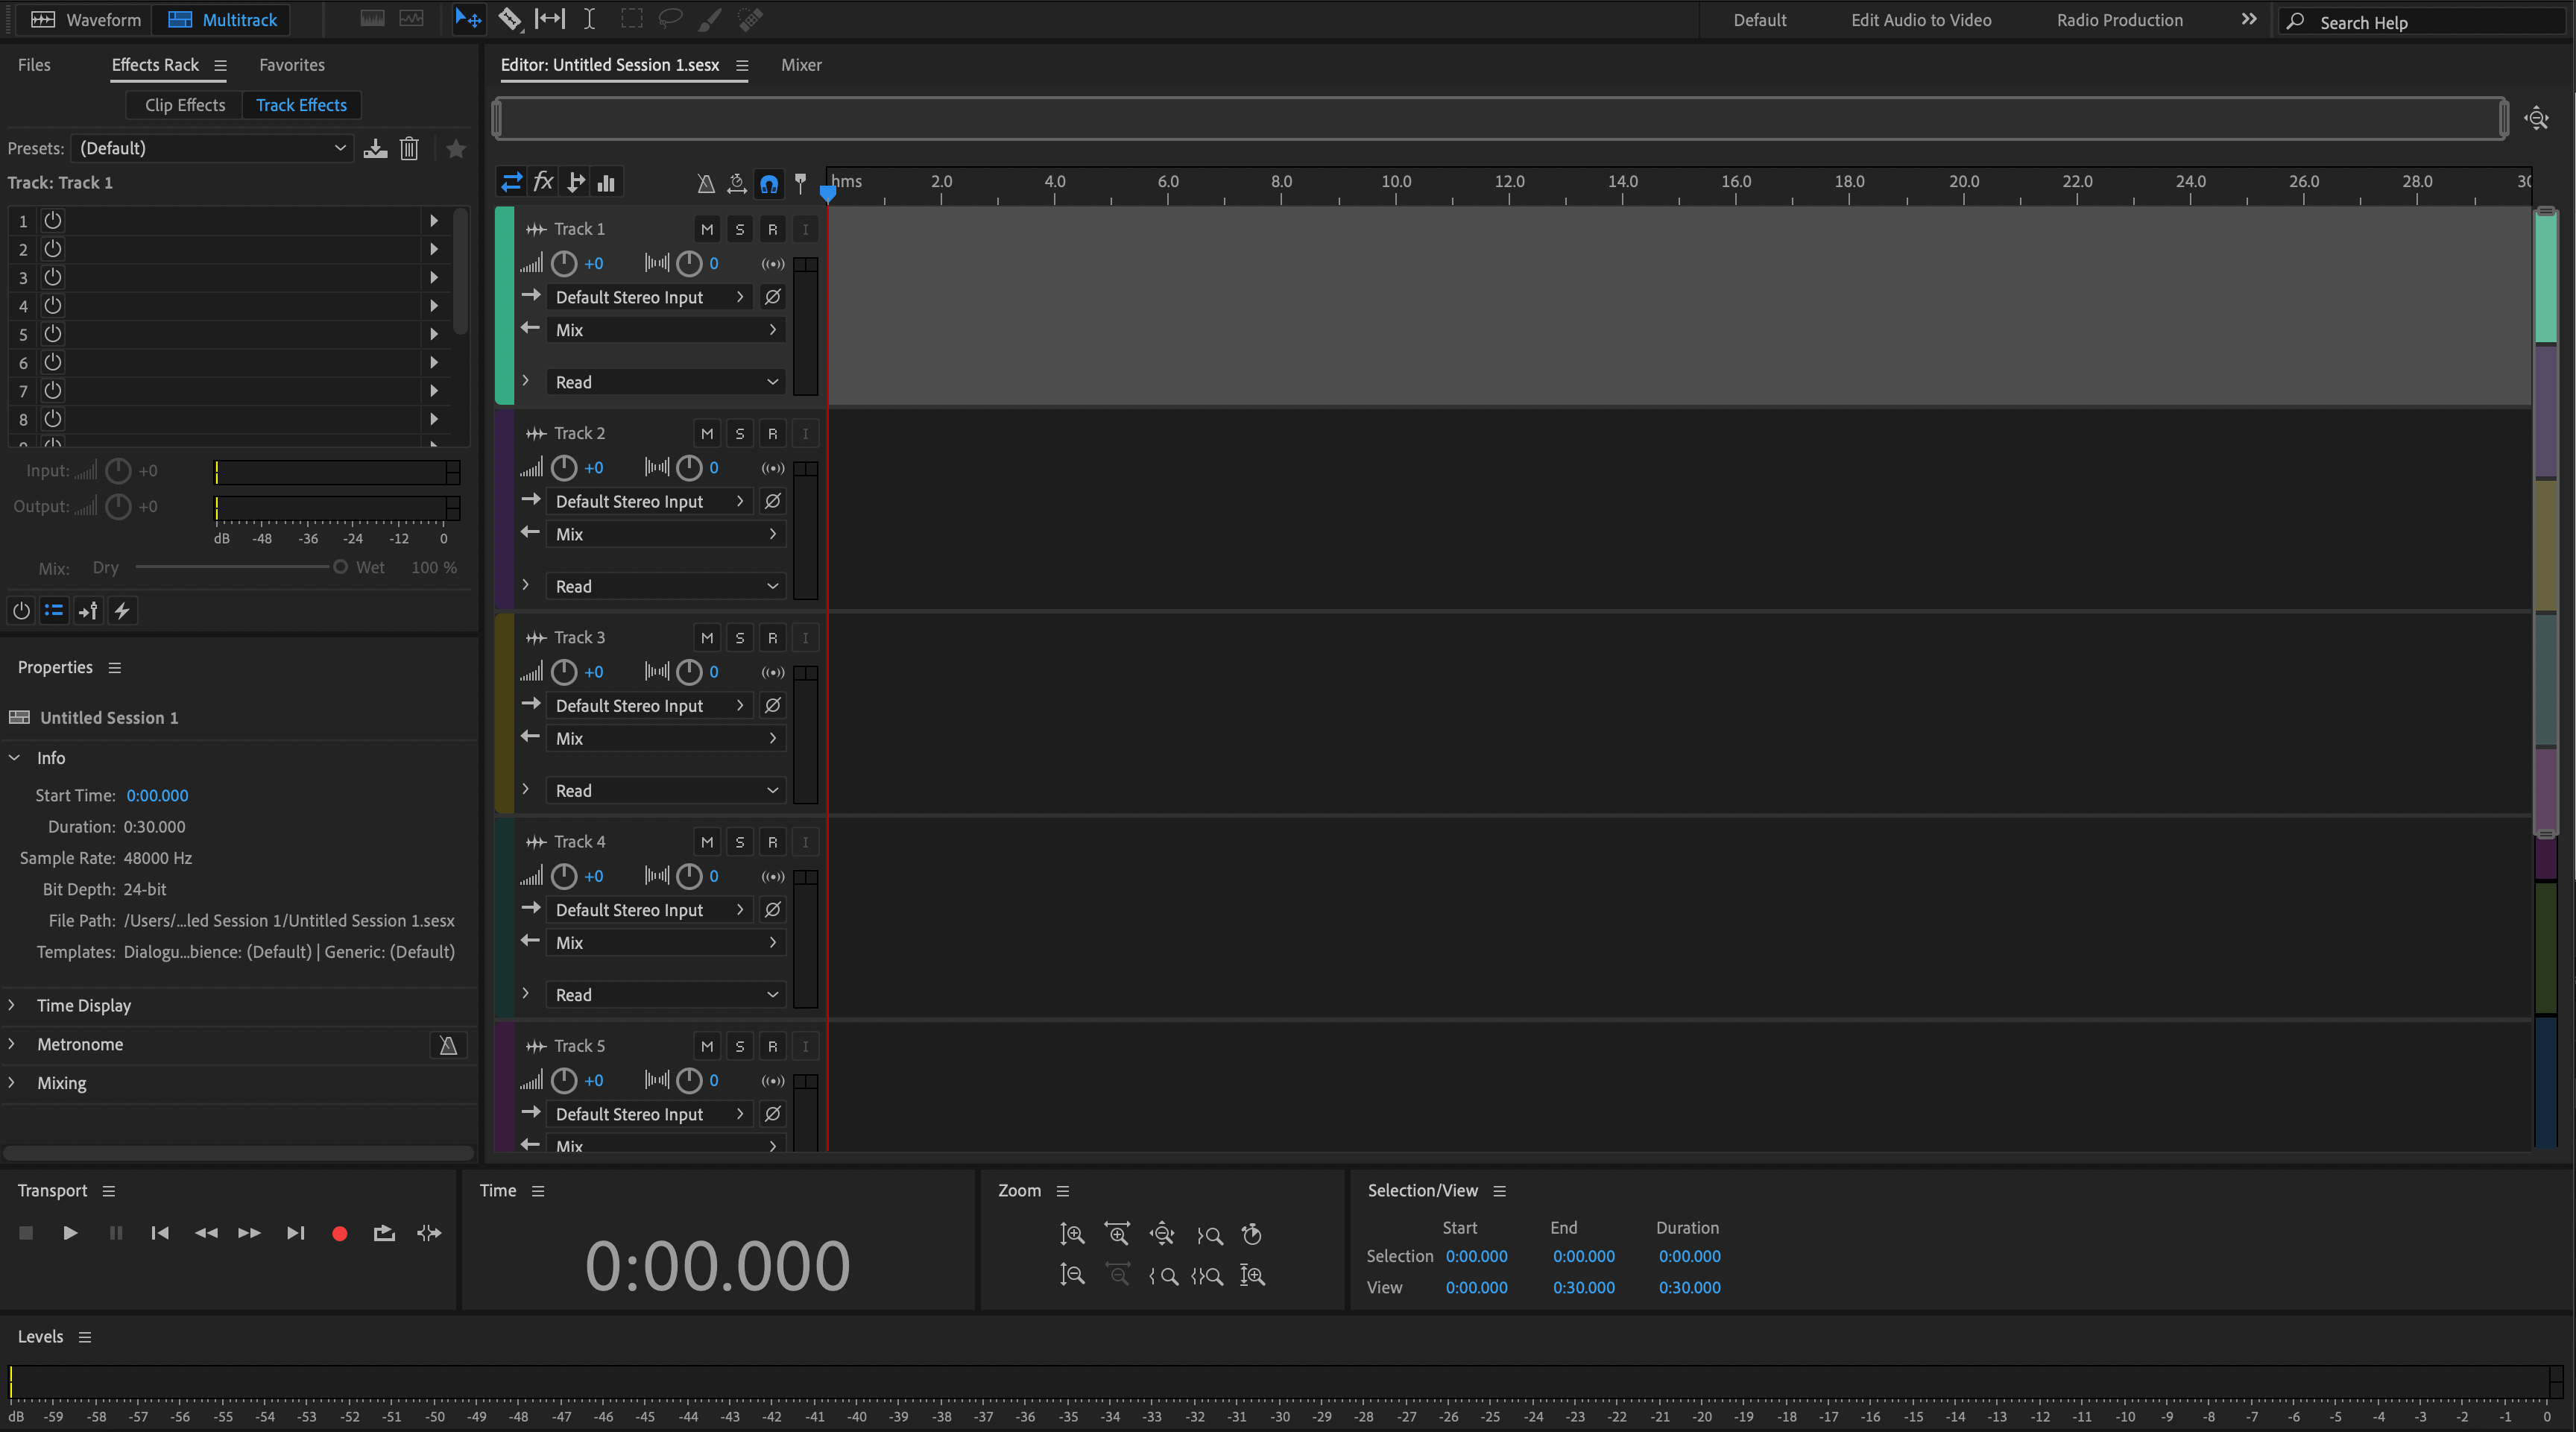
En Adobe Audition, un preset vocal es una configuración guardada del Effects Rack que aplica múltiples procesadores en un orden conocido. Una cadena bien diseñada típicamente incluye un filtro pasa-altos suave y pequeños ajustes de EQ para controlar el tono; uno o dos compresores para estabilizar el nivel; un de-esser colocado antes del brillo final para que los sonidos “s” se mantengan suaves; saturación opcional para presencia; y envíos a reverb y delay sincronizado al tempo.
Los presets pueden guardarse como presets de Rack que cargas en cualquier pista, integrados dentro de una plantilla de Sesión Multitrack, o documentados como configuraciones paso a paso. Sea como sea que los guardes, usar un preset significa que el enrutamiento técnico está listo antes de grabar—liberándote para concentrarte en tomas, dobles, armonías y ad-libs. Para colaboración, comparte el archivo del rack o abre una plantilla para que todos escuchen balances similares en diferentes computadoras.
¿Por qué usar presets en Audition? (Beneficios y cuándo ayudan)
- Velocidad: Evita configuraciones repetitivas y captura ideas mientras la inspiración está fresca.
- Consistencia: Una cadena calibrada mantiene el tono alineado desde el demo hasta el lanzamiento y reduce trabajo de corrección posterior.
- Enfoque: Con el procesamiento básico en su lugar, puedes priorizar la interpretación, el arreglo y las decisiones creativas.
- Traducción: Cadenas bien construidas se mantienen inteligibles en auriculares y teléfonos, así como en monitores de rango completo.
Cuándo ayudan más: sesiones rápidas de escritura; grabación remota y podcasting; tono consistente en una serie de sencillos; creación de contenido para shorts/reels; y cualquier flujo de trabajo donde necesites pasar de la idea a la toma en minutos.
Cadenas nativas vs. premium para Audition
Cadenas nativas (stock) usan solo los procesadores integrados de Adobe Audition. Se cargan en cualquier sistema—sin licencias adicionales—y son ideales si colaboras frecuentemente o cambias de máquina. Son livianas para la CPU y reducen problemas de “plug-in faltante”.
Cadenas premium añaden herramientas populares de terceros (por ejemplo, corrección de tono, EQ dinámico, compresores con carácter o saturación especializada). Estas pueden ofrecer un control más fino y un “color” específico, pero requieren que los plug-ins listados estén instalados y activados.
¿Cuál deberías elegir? Si la portabilidad y simplicidad son lo más importante, comienza con las nativas. Si tu equipo ya incluye plug-ins de terceros y quieres más opciones para moldear el tono, las premium pueden ser una gran opción. Muchos artistas usan ambas: una cadena nativa para grabar en cualquier lugar y una premium para pulir en el estudio. En todos los casos, mantén la ganancia consistente para que los presets sean predecibles entre proyectos.
Instalación y inicio rápido (paso a paso)
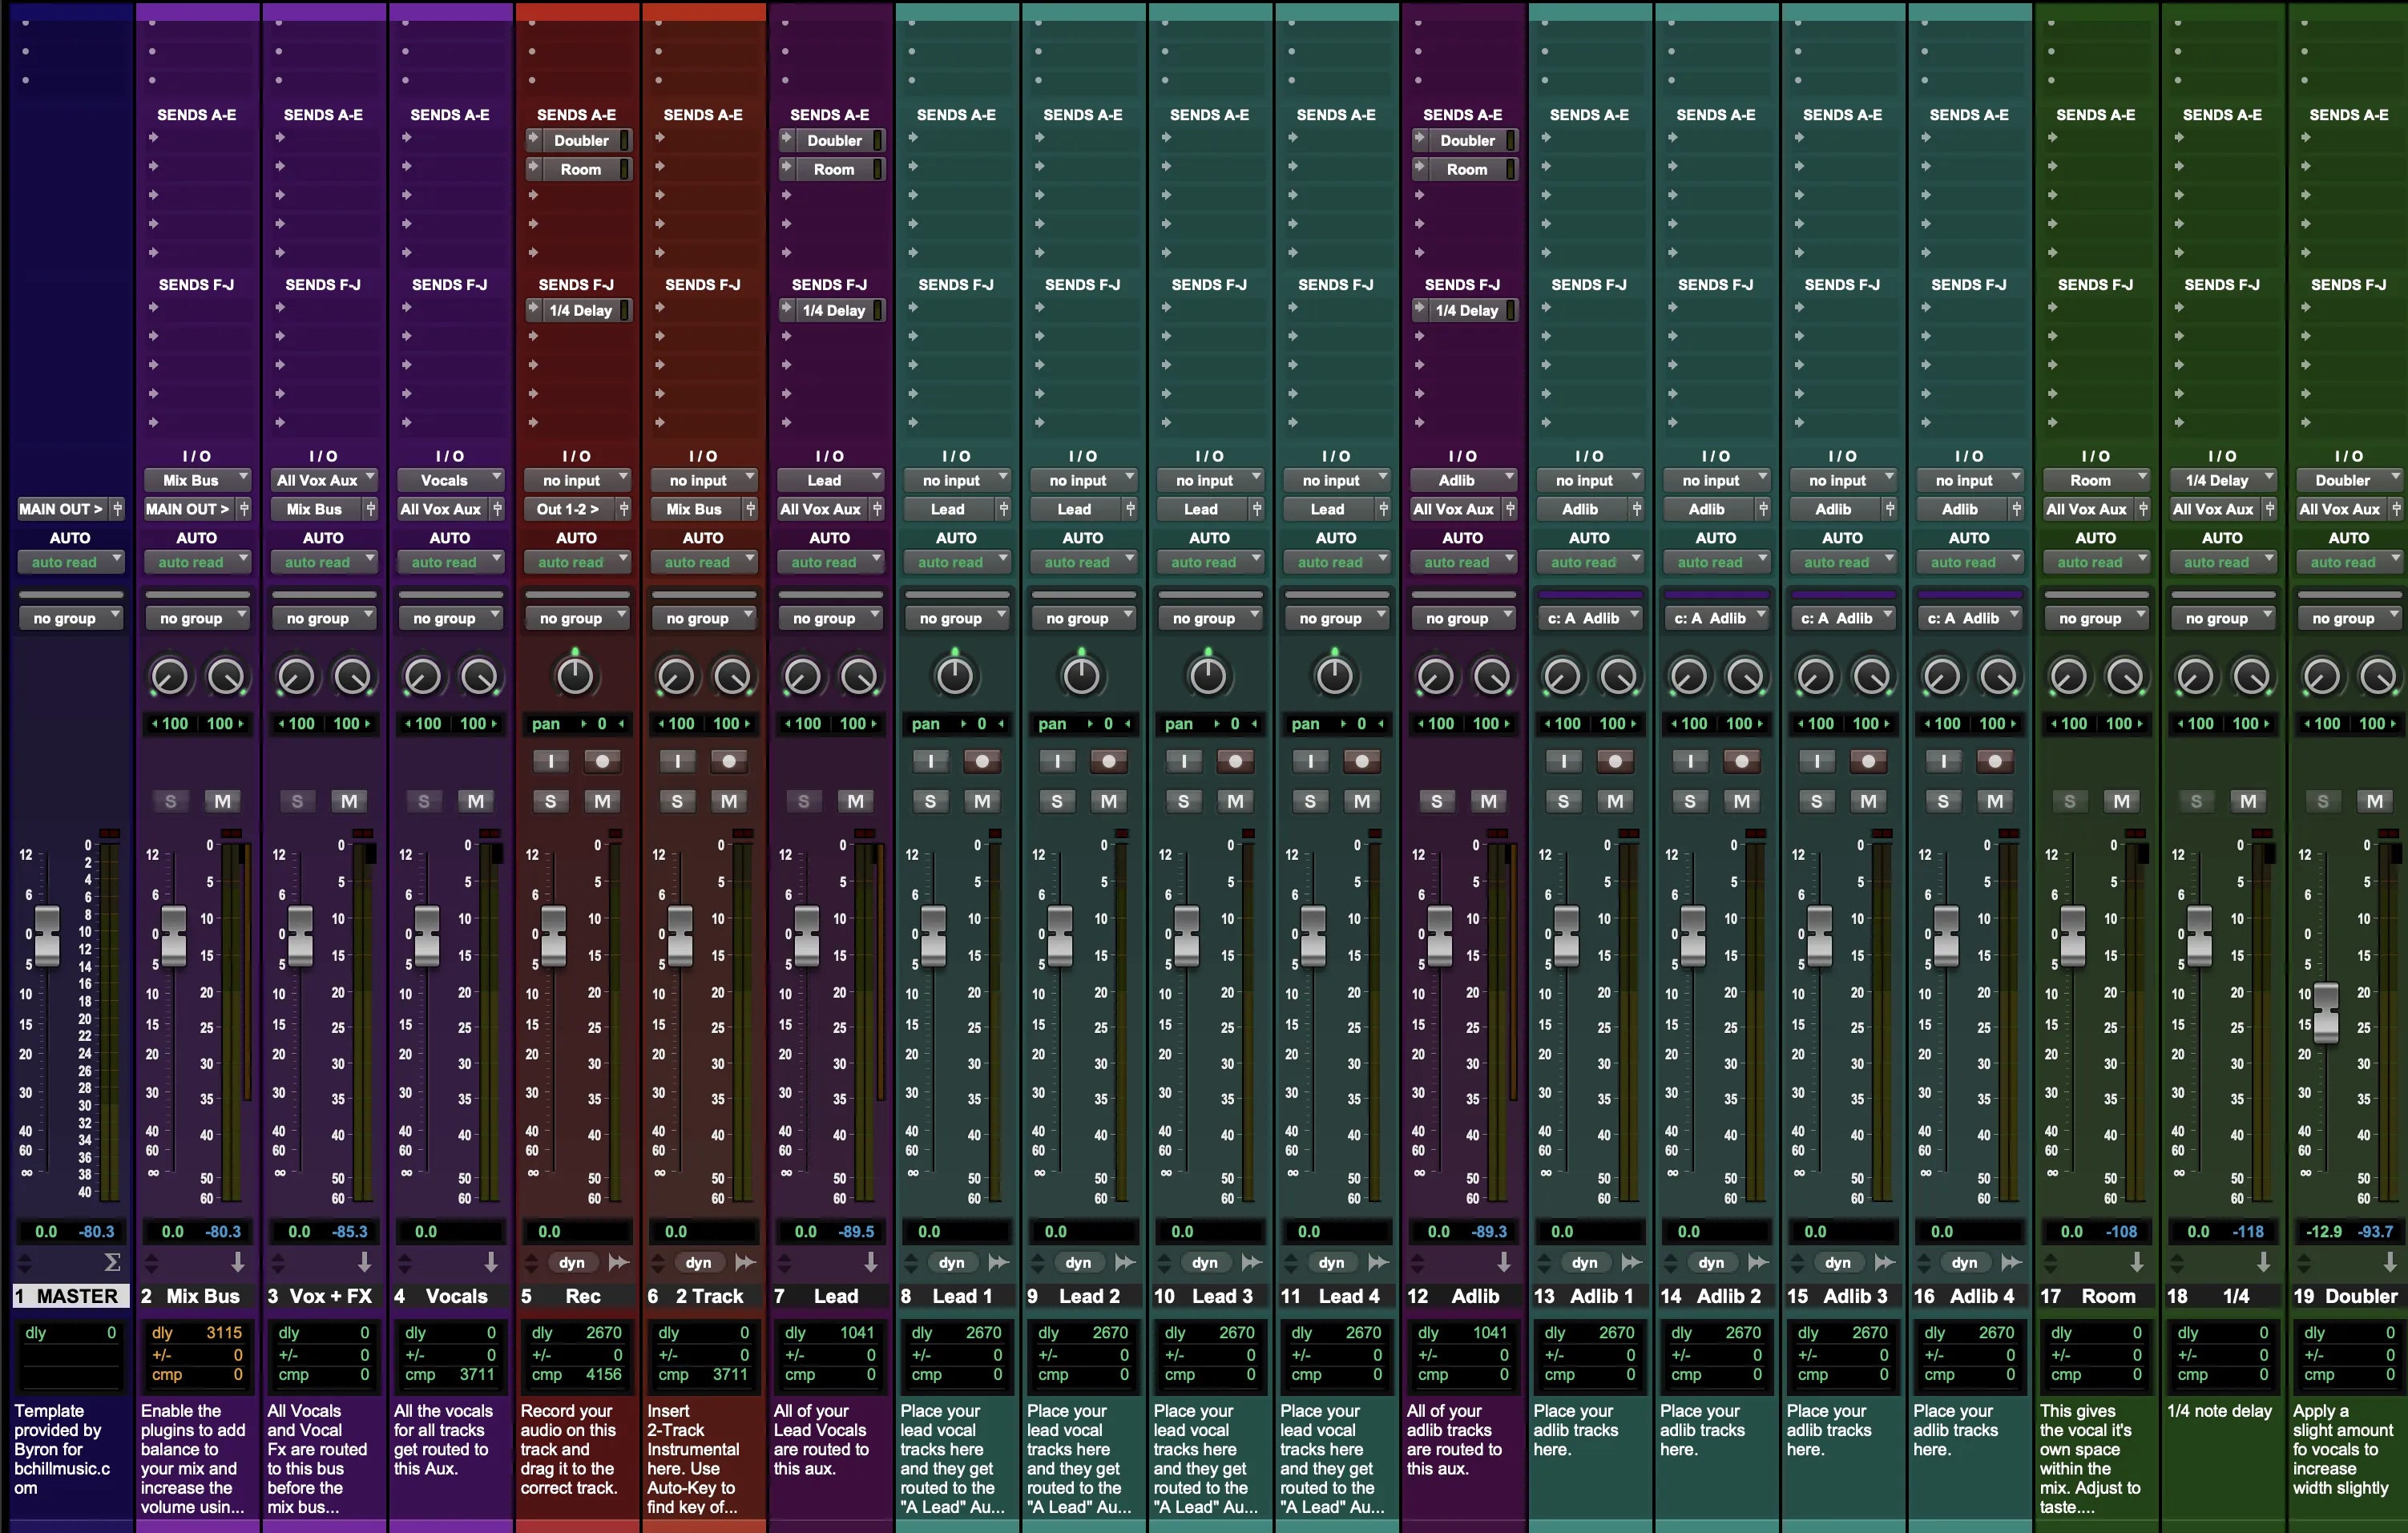
- Prepara tu sesión. Crea una nueva Sesión Multitrack. Añade una pista vocal dedicada (Lead) y pistas opcionales para Dobles, Armonías y Ad-libs. Nombra y codifica con colores las pistas; enruta a un bus vocal si procesas grupos.
- Configura entrada y niveles. Elige la entrada de tu micrófono. Graba una frase de prueba rápida y ajusta la ganancia de entrada para que los picos estén aproximadamente entre −10 y −6 dBFS. Evita saturar la interfaz—no se puede corregir después.
- Carga la cadena preset. Abre el Effects Rack en la pista vocal. Carga el preset de rack proporcionado o inserta los procesadores en este orden: EQ → Compresor 1 (suave) → De-esser → Compresor 2 (rápido/limpio) → Saturación (opcional) → Envios a Reverb/Delay. Si tu preset llega como plantilla .sesx, ábrela y copia la cadena a tu sesión actual.
- Ajusta umbrales y envíos. Baja los umbrales del compresor hasta que las líneas fuertes se reduzcan unos dB sin bombeo. Ajusta el de-esser para que las sibilancias sean suaves, no apagadas. Añade ambiente vía envíos; mantén los inserts mayormente secos durante la grabación para claridad y menor latencia.
- Guarda tu configuración. Guarda un preset de Rack para tu voz y guarda una plantilla de sesión para que cada nuevo proyecto abra con el mismo margen, enrutamiento, colores y disposición de pistas.
Ganancia avanzada y medición. Graba para que los picos vocales estén alrededor de −10 a −6 dBFS en el medidor de pista. Si la compensación del compresor eleva niveles, recorta con Clip Gain en lugar de saturar el siguiente procesador. Observa la salida del Rack y los medidores Master—apunta a picos master alrededor de −6 a −3 dBFS en mezclas preliminares para no perseguir volumen mientras grabas. Graba a 24-bit/48 kHz para un piso de ruido saludable y edición flexible. Si la latencia distrae al artista, baja el buffer y desactiva temporalmente procesadores pesados con look-ahead o fase lineal. Guarda esta sesión calibrada como plantilla para que cada proyecto comience con margen y enrutamiento predecibles.
Estilos y casos de uso (Rap, R&B, Pop, Claro/Podcast)
Rap lead. Objetivo: presencia contundente con dinámica ajustada. Usa dos compresores ligeros en serie para control sin artefactos; enfoca la presencia entre 2–5 kHz; añade un slap corto o una pequeña placa en un envío para energía sin saturación. Automatiza niveles de envío para destacar los coros. Para ad-libs, pasa un filtro pasa-altos un poco más alto que el lead y añade un poco más de de-ess para mantener consonantes limpias.
R&B lead. Objetivo: agudos suaves con profundidad y amplitud. Usa ataque/liberación más suaves, un estante de aire sutil y envíos de ambiente más amplios para espacio. Si aumentas aire después, revisa el umbral del de-esser o añade un segundo de-esser más suave para controlar sibilancias.
Vocal pop. Objetivo: brillante pero controlado con espacio rítmico. Mantén los agudos pulidos pero seguros; usa delays sincronizados al tempo para añadir amplitud; y de-essa cuidadosamente para que las “s” se mantengan suaves. Compara a volumen igualado al hacer A/B.
Claro/Podcast. Objetivo: inteligibilidad y neutralidad. Elige compresión transparente, de-ess moderado, bajo ruido y solo un poco de sala o placa si es necesario. La técnica (distancia al micrófono, filtro anti-pop, interpretación estable) importa tanto como el procesamiento.
Fondos, dobles, ad-libs. Compresión un poco más ajustada y un poco más de de-ess ayudan a que las capas se integren sin saturar. Sube el filtro pasa-altos en capas para reducir el enmascaramiento en medios bajos. Ambiente más amplio y largo separa los fondos del lead sin tapar palabras.
Errores comunes y soluciones rápidas.
- Exceso de de-essing: Si las “s” suenan apagadas o ceceantes, sube el umbral, estrecha la banda o mueve el de-esser más temprano en la cadena.
- Demasiada reverb/delay: Genial en solo, desordenado en contexto. Comienza con envíos bajos y automatiza para los coros.
- Saturación en la interfaz: Luces rojas en la entrada no se pueden rescatar. Baja el preamplificador y deja que la compresión trabaje en Audition.
- Niebla en medios bajos en capas: Pasa un filtro pasa-altos más alto en dobles/armonías que en el lead; añade un poco más de de-ess para que las capas se integren sin difuminar.
- Retraso en monitoreo: Graba con una cadena ligera (EQ/Comp/De-ess) y guarda los potenciadores pesados para la reproducción.
Plantillas de grabación vs. presets vocales en Audition
Los presets vocales moldean tono y dinámica en una sola pista o bus vocal. Las plantillas de grabación ofrecen un diseño completo de sesión—pistas pre-nombradas, enrutamiento de buses, colores, mezclas de cue y envíos listos—para que pases de la idea a la toma con mínima configuración y mantengas sesiones grandes organizadas.
- Usa una plantilla para abrir cada proyecto con estructura lista (Lead, Dobles, Armonías, Ad-libs, buses de FX) y margen predecible.
- Usa una cadena preset (nativa o premium) para definir tono, dinámica y espacio, luego ajusta umbrales y envíos para la voz, micrófono y arreglo.
Las plantillas son útiles para colaboración y contenido recurrente. Si grabas semanalmente, crea una sesión maestra con el orden correcto de pistas y objetivos de volumen, luego cambia la cadena preset cuando cambie el cantante o estilo. Para flujos de trabajo más amplios, explora cadenas y plantillas para otras plataformas y mantén tu tono consistente entre equipos: consulta Presets Vocales para Ableton, Presets Vocales para FL Studio, o el catálogo completo de Presets Vocales.
Dentro del DAW: Configuraciones de preajuste vocal de Adobe Audition
Ve exactamente cómo se carga nuestra cadena vocal de Adobe Audition en el Rack de Efectos y en los buses vocales. Estas capturas de pantalla muestran configuraciones iniciales para rap, R&B y pop para que puedas igualar rápidamente y ajustar según tu voz y micrófono.