Ajustes preestablecidos y plantillas vocales estándar
Optimiza tu flujo de trabajo con nuestra plantilla de grabación lista para usar y los ajustes preestablecidos vocales de stock.

Tipo: Plantilla de Grabación
Plantilla de grabación de Cubase (Plugins de stock)
Tipo: Preset Vocal
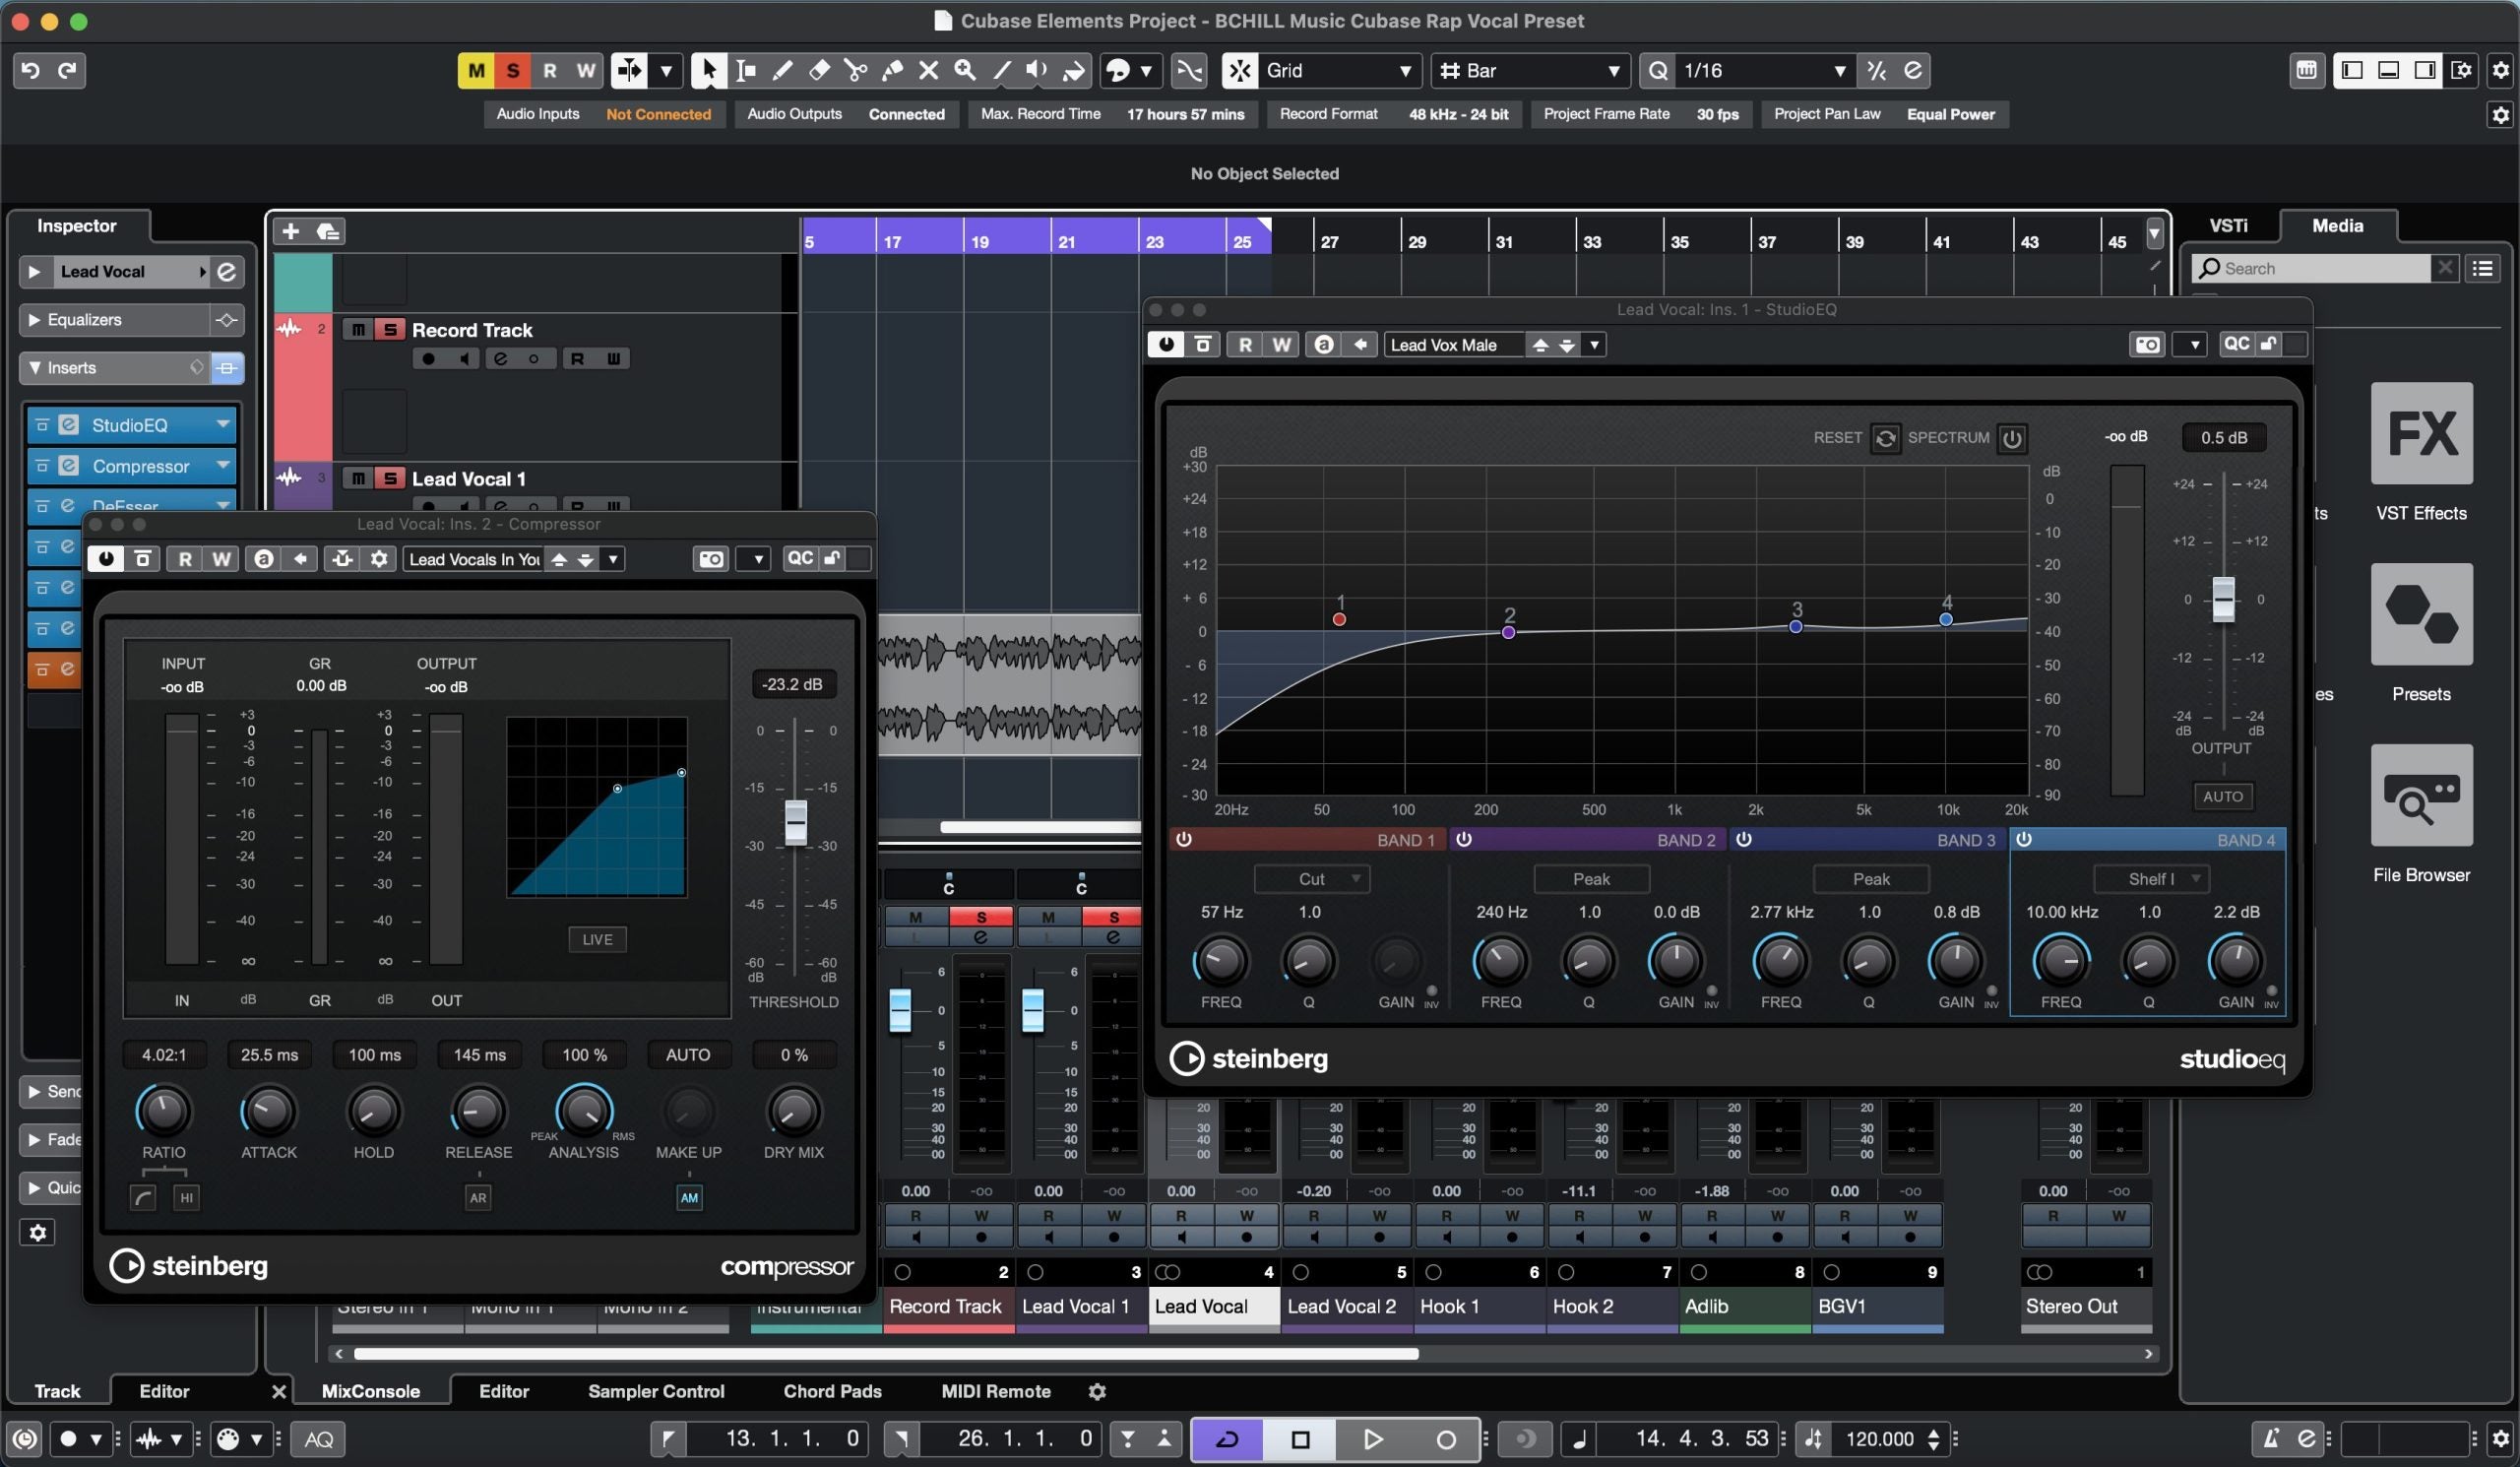
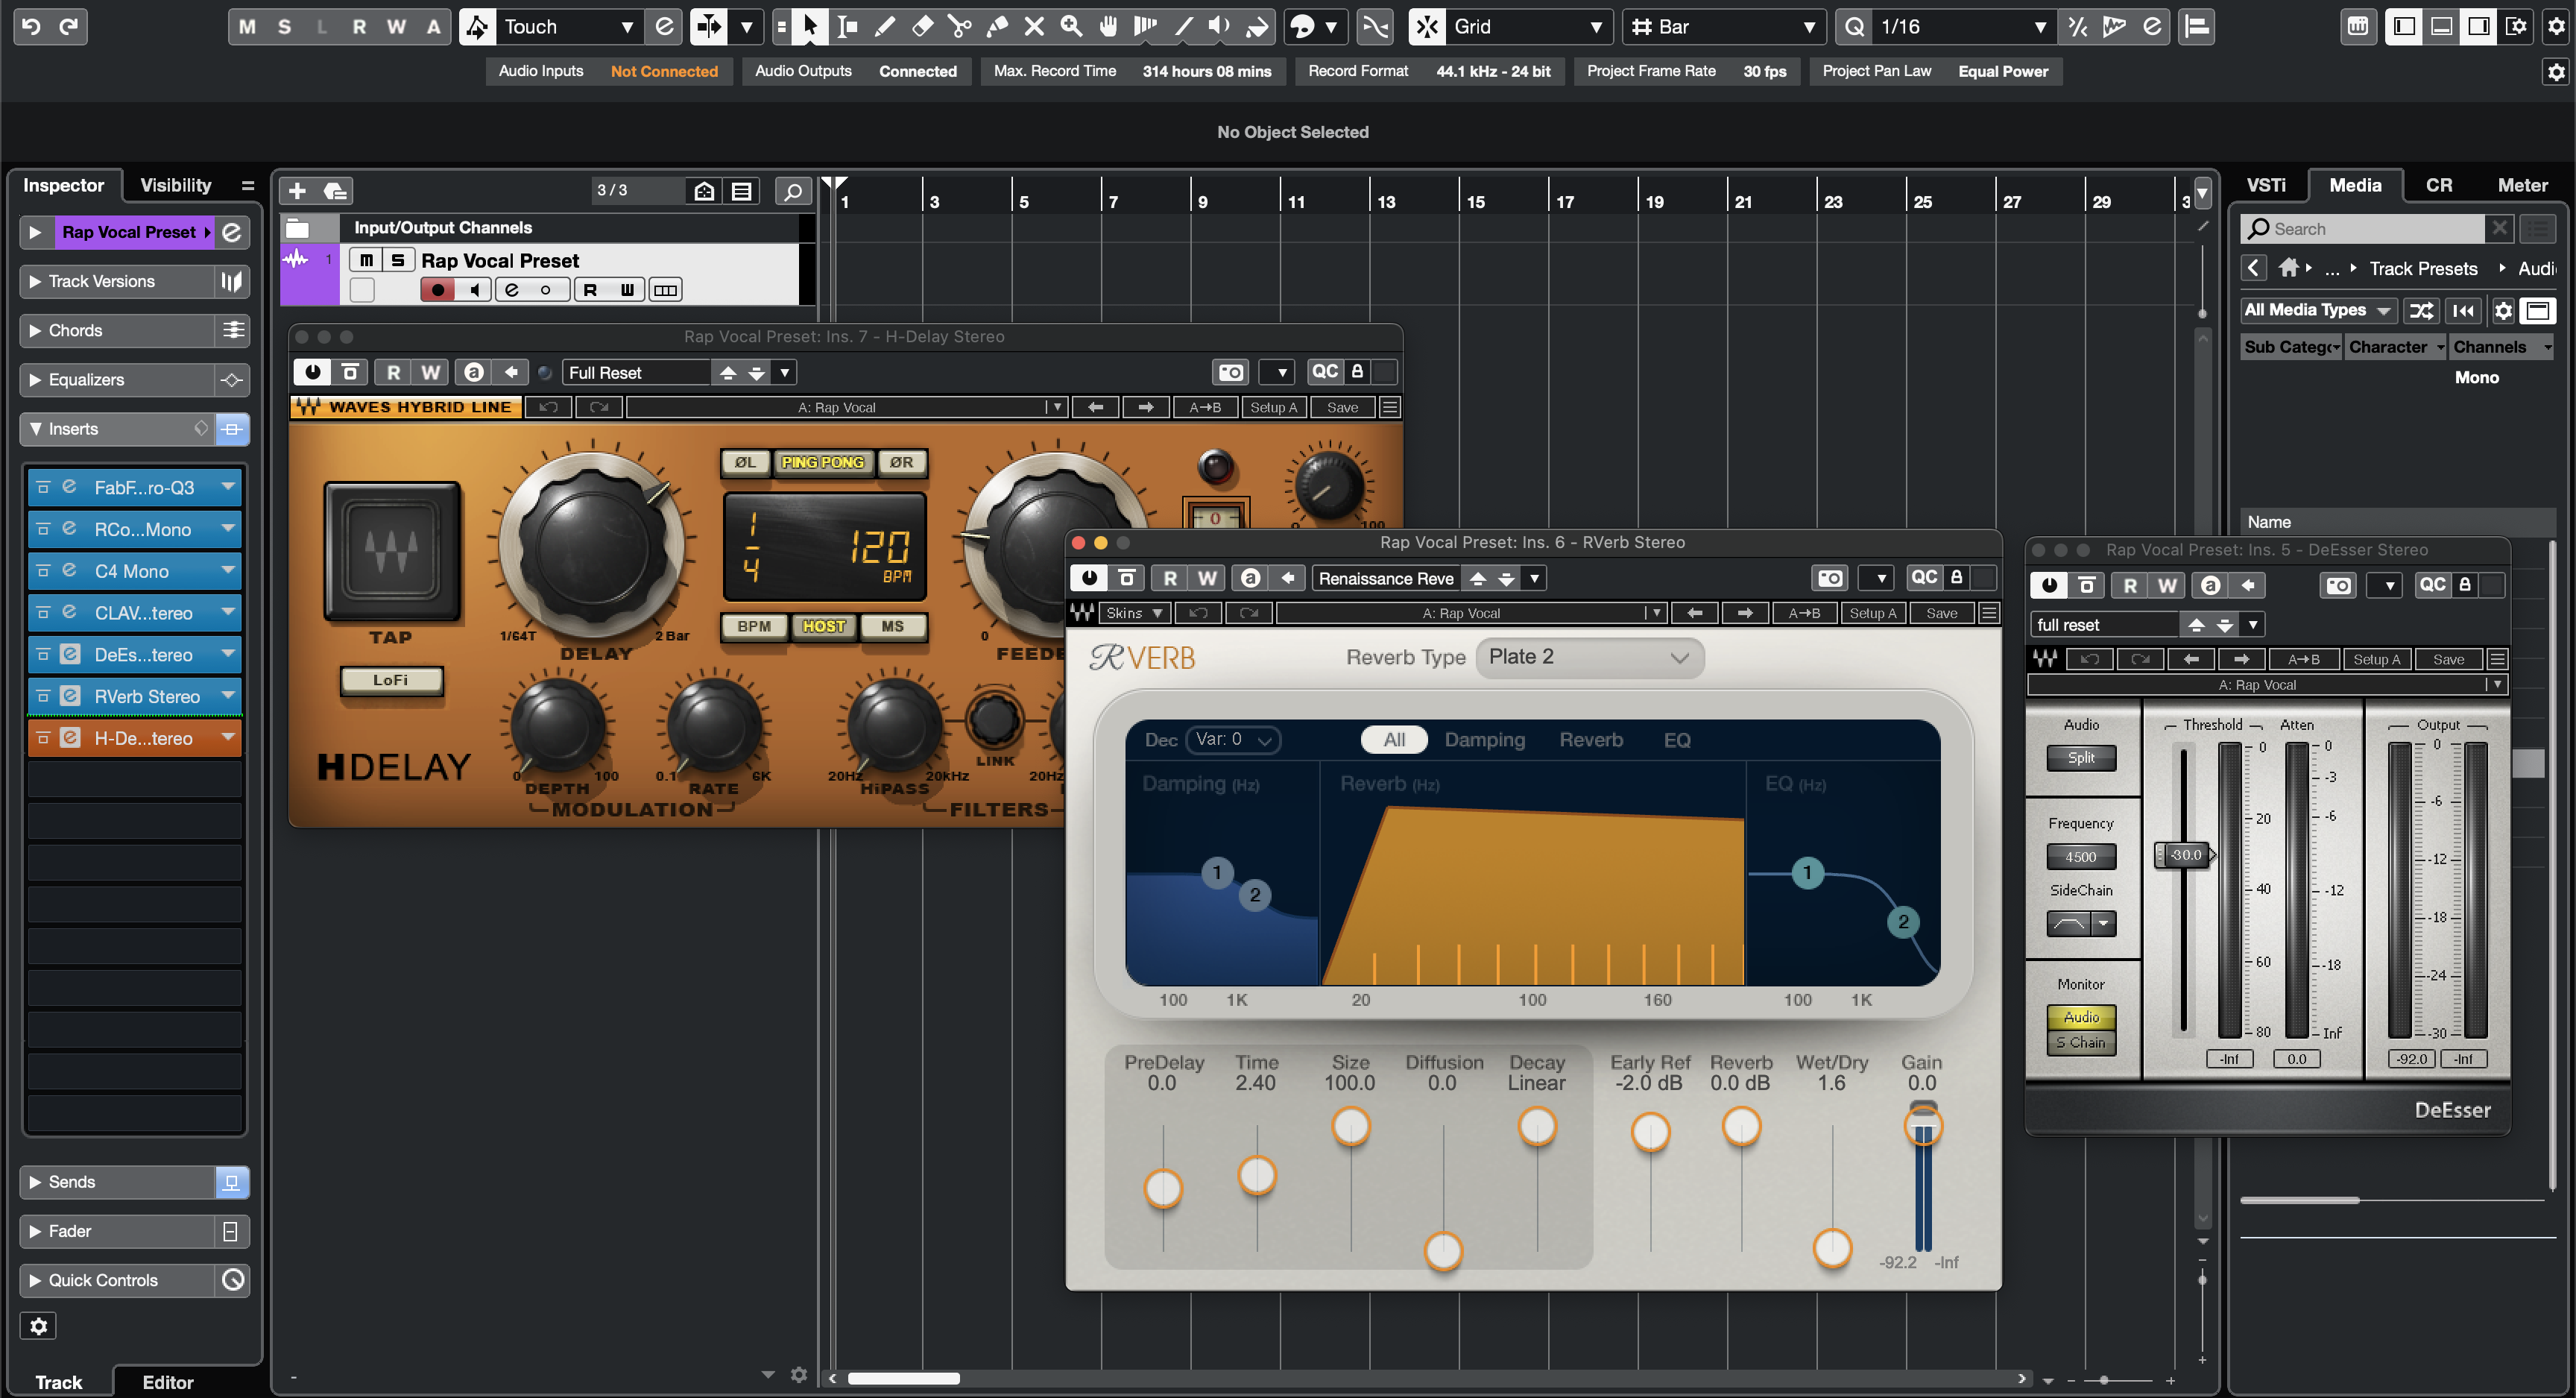
Preset de Vocal Rap para Cubase (Plugins de Stock)

Tipo: Preset Vocal
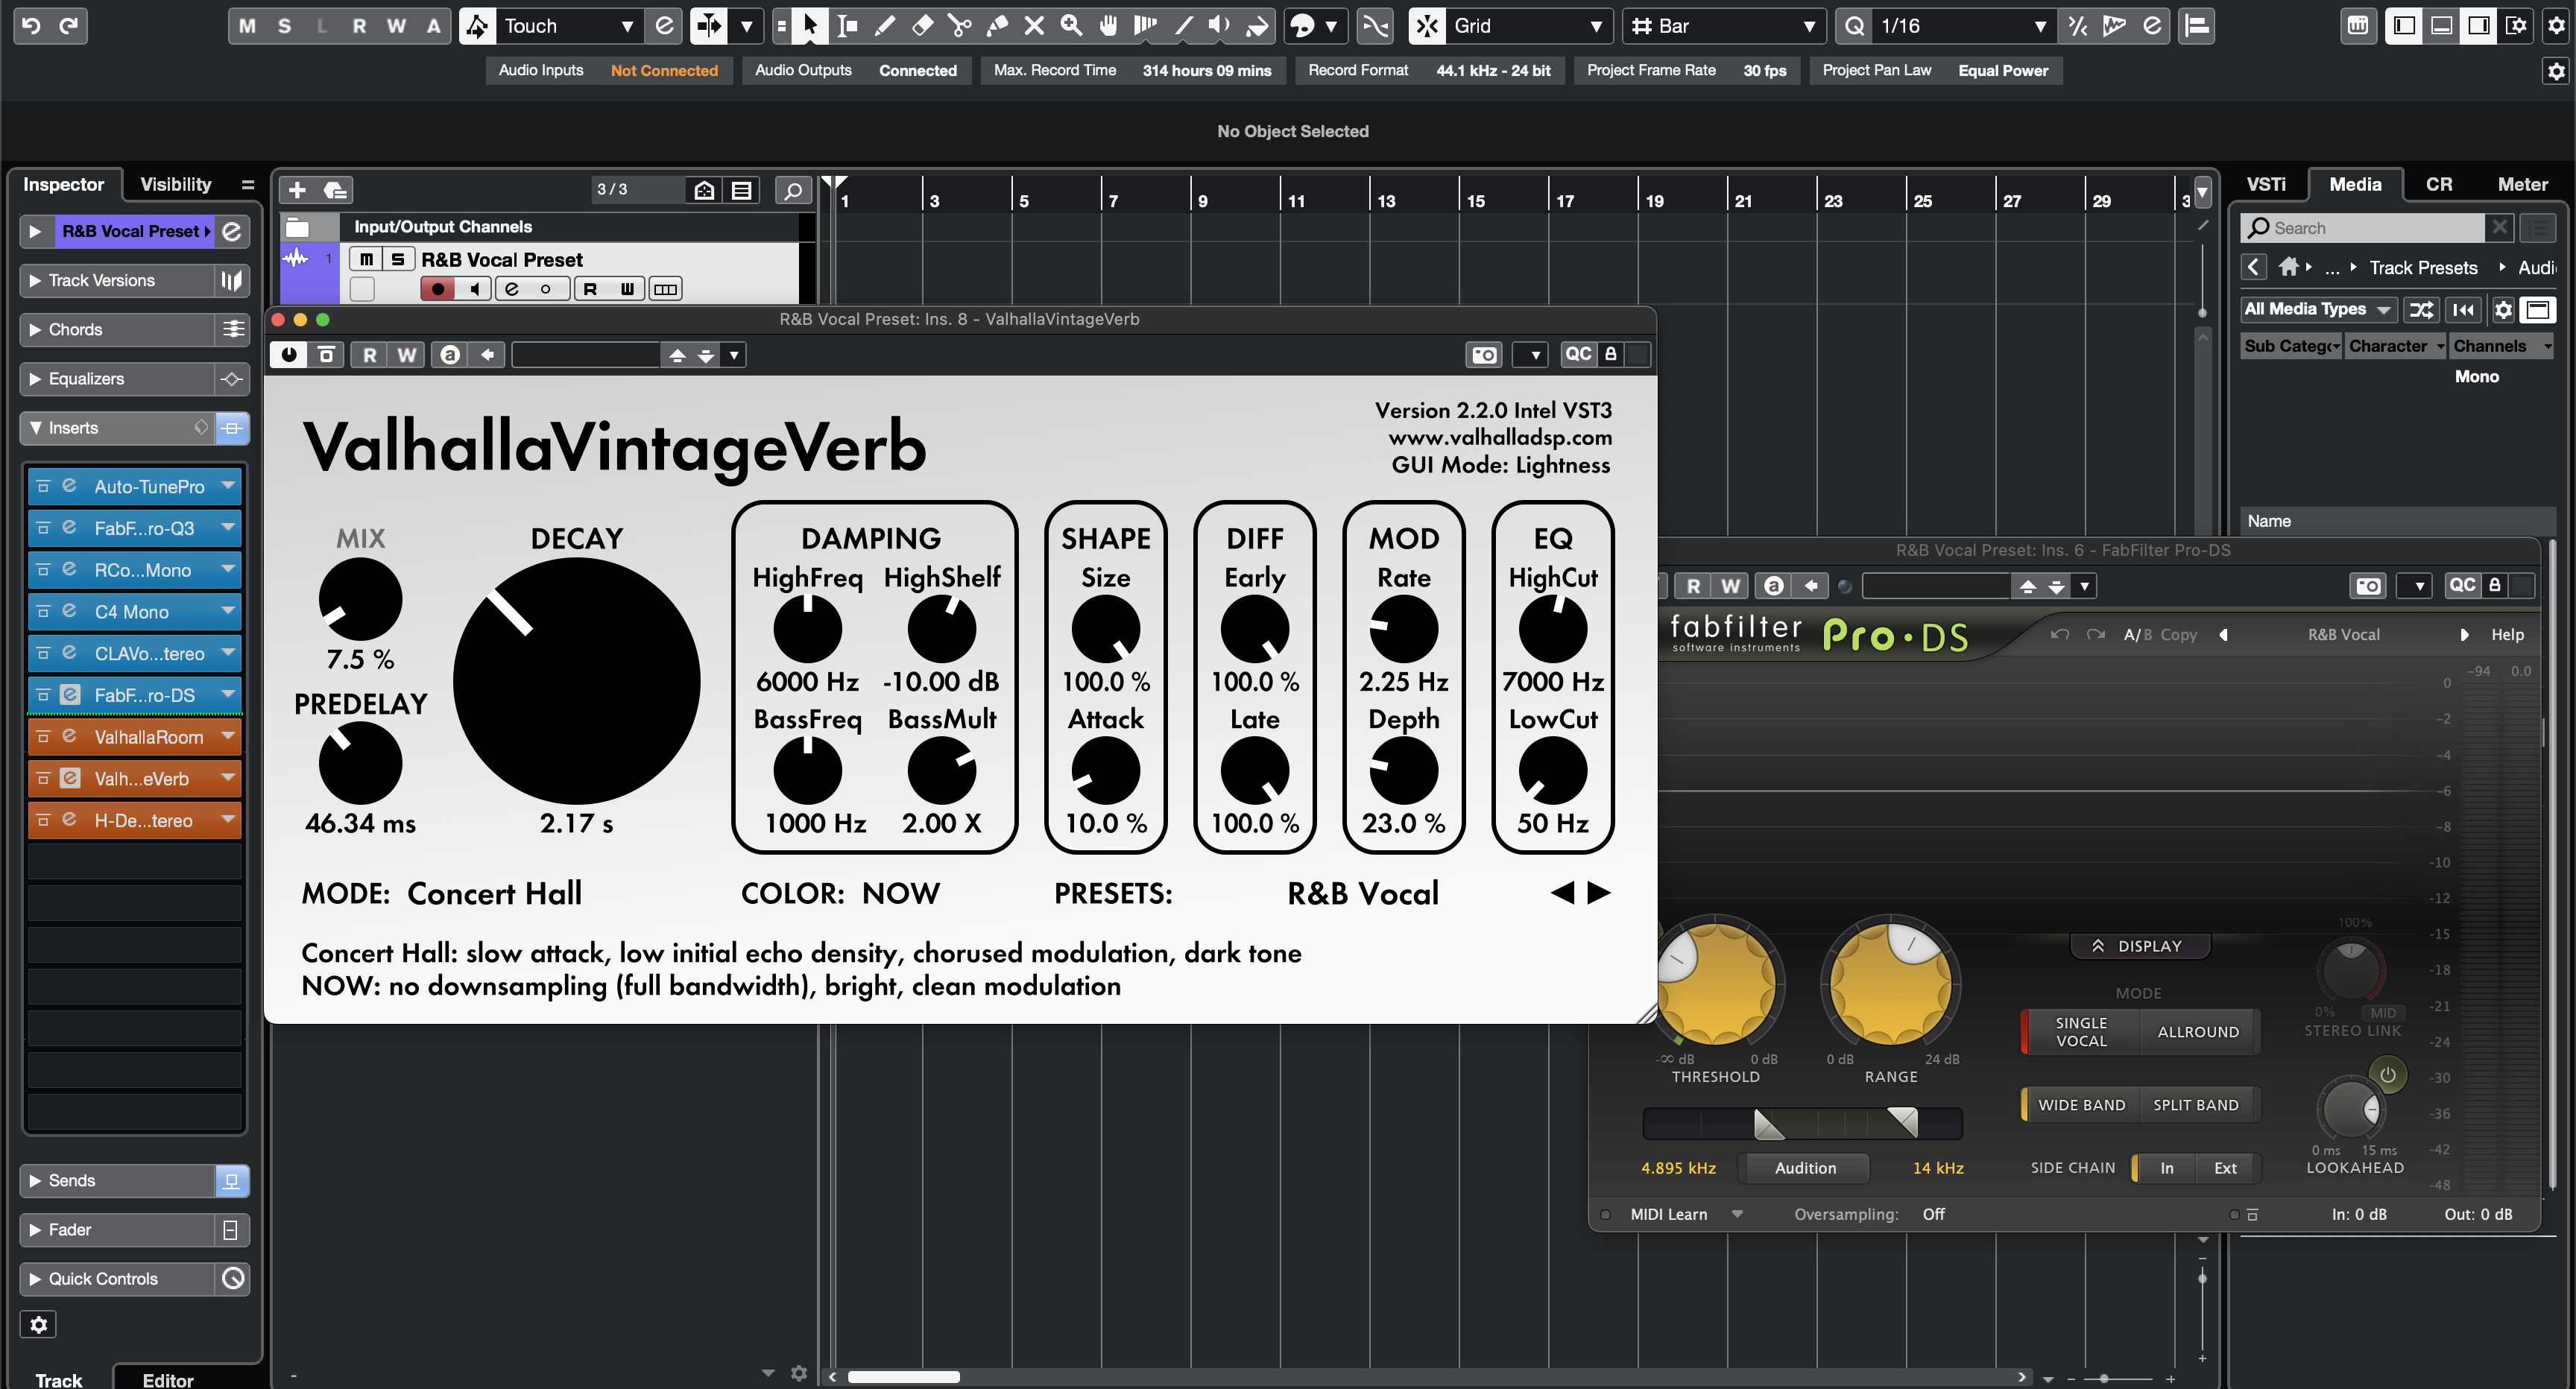
Preset Vocal R&B Cubase (Plugins de Stock)
Tipo: Preset Vocal
Preset de Voces Claras Cubase (Plugins de Stock)
Ajustes Vocales Premium
Experimenta una calidad de sonido inigualable con nuestros Presets Vocales Premium, elaborados con plugins de primera categoría.

Tipo: Preset Vocal
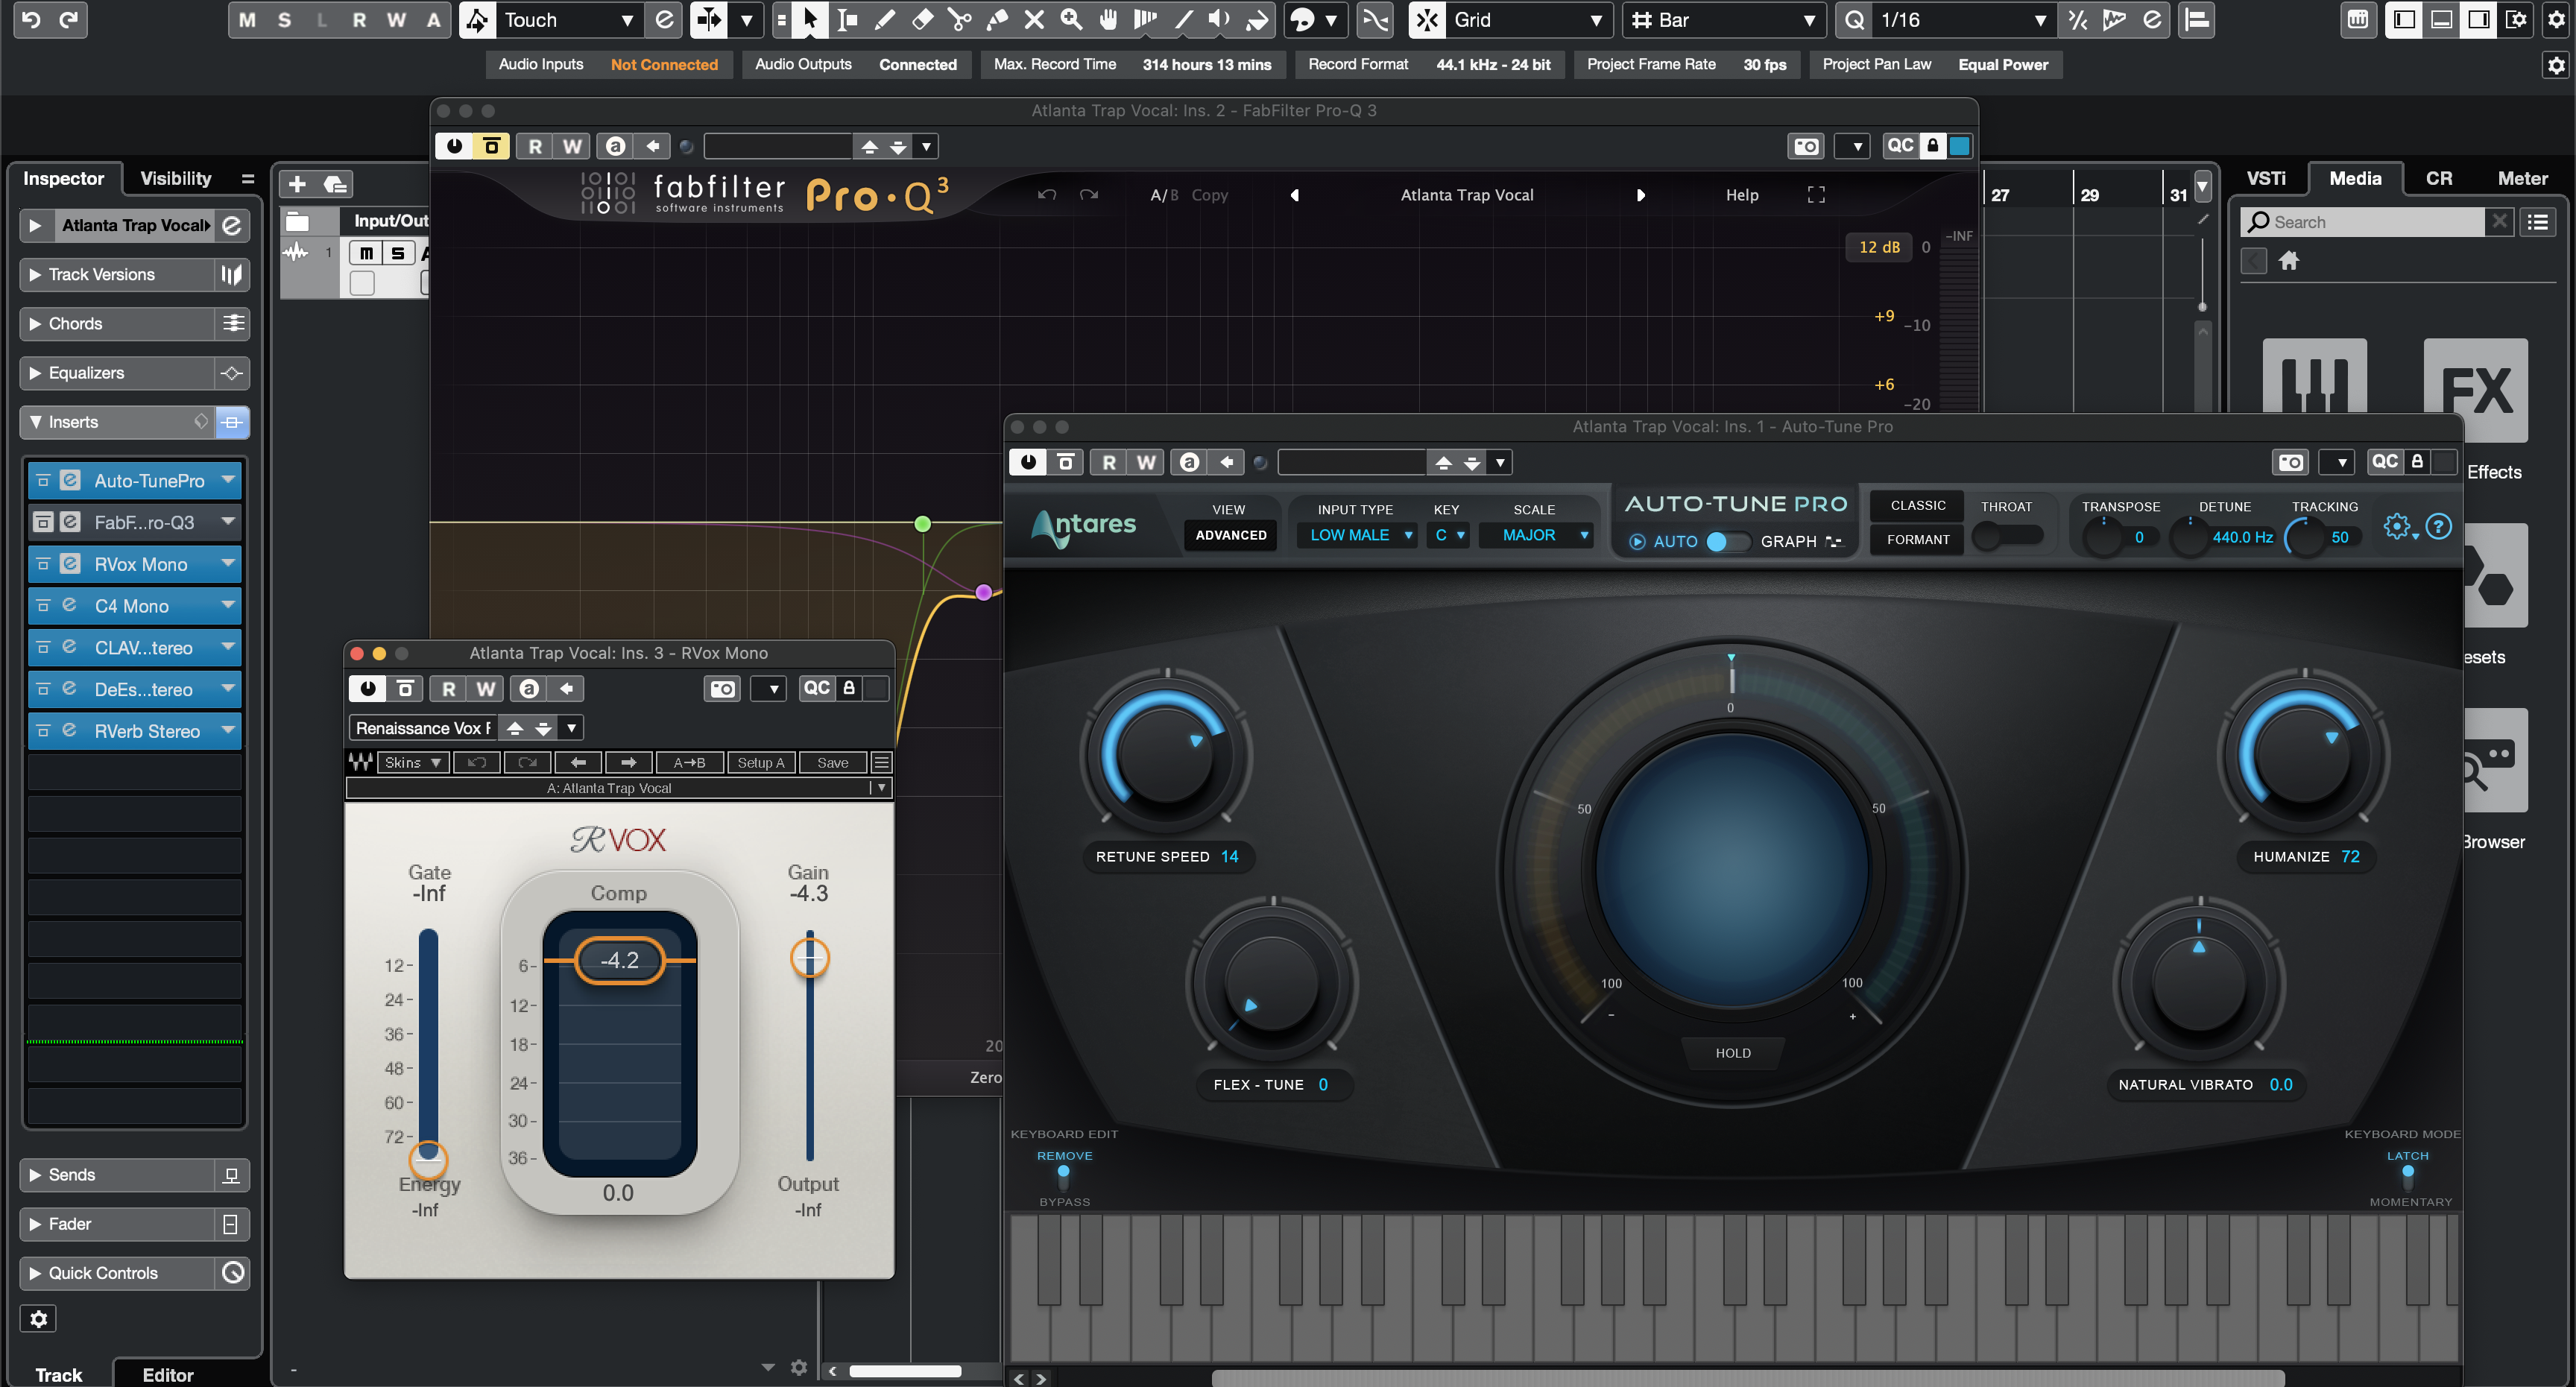
Preset Vocal Trap de Atlanta para Cubase
Tipo: Preset Vocal
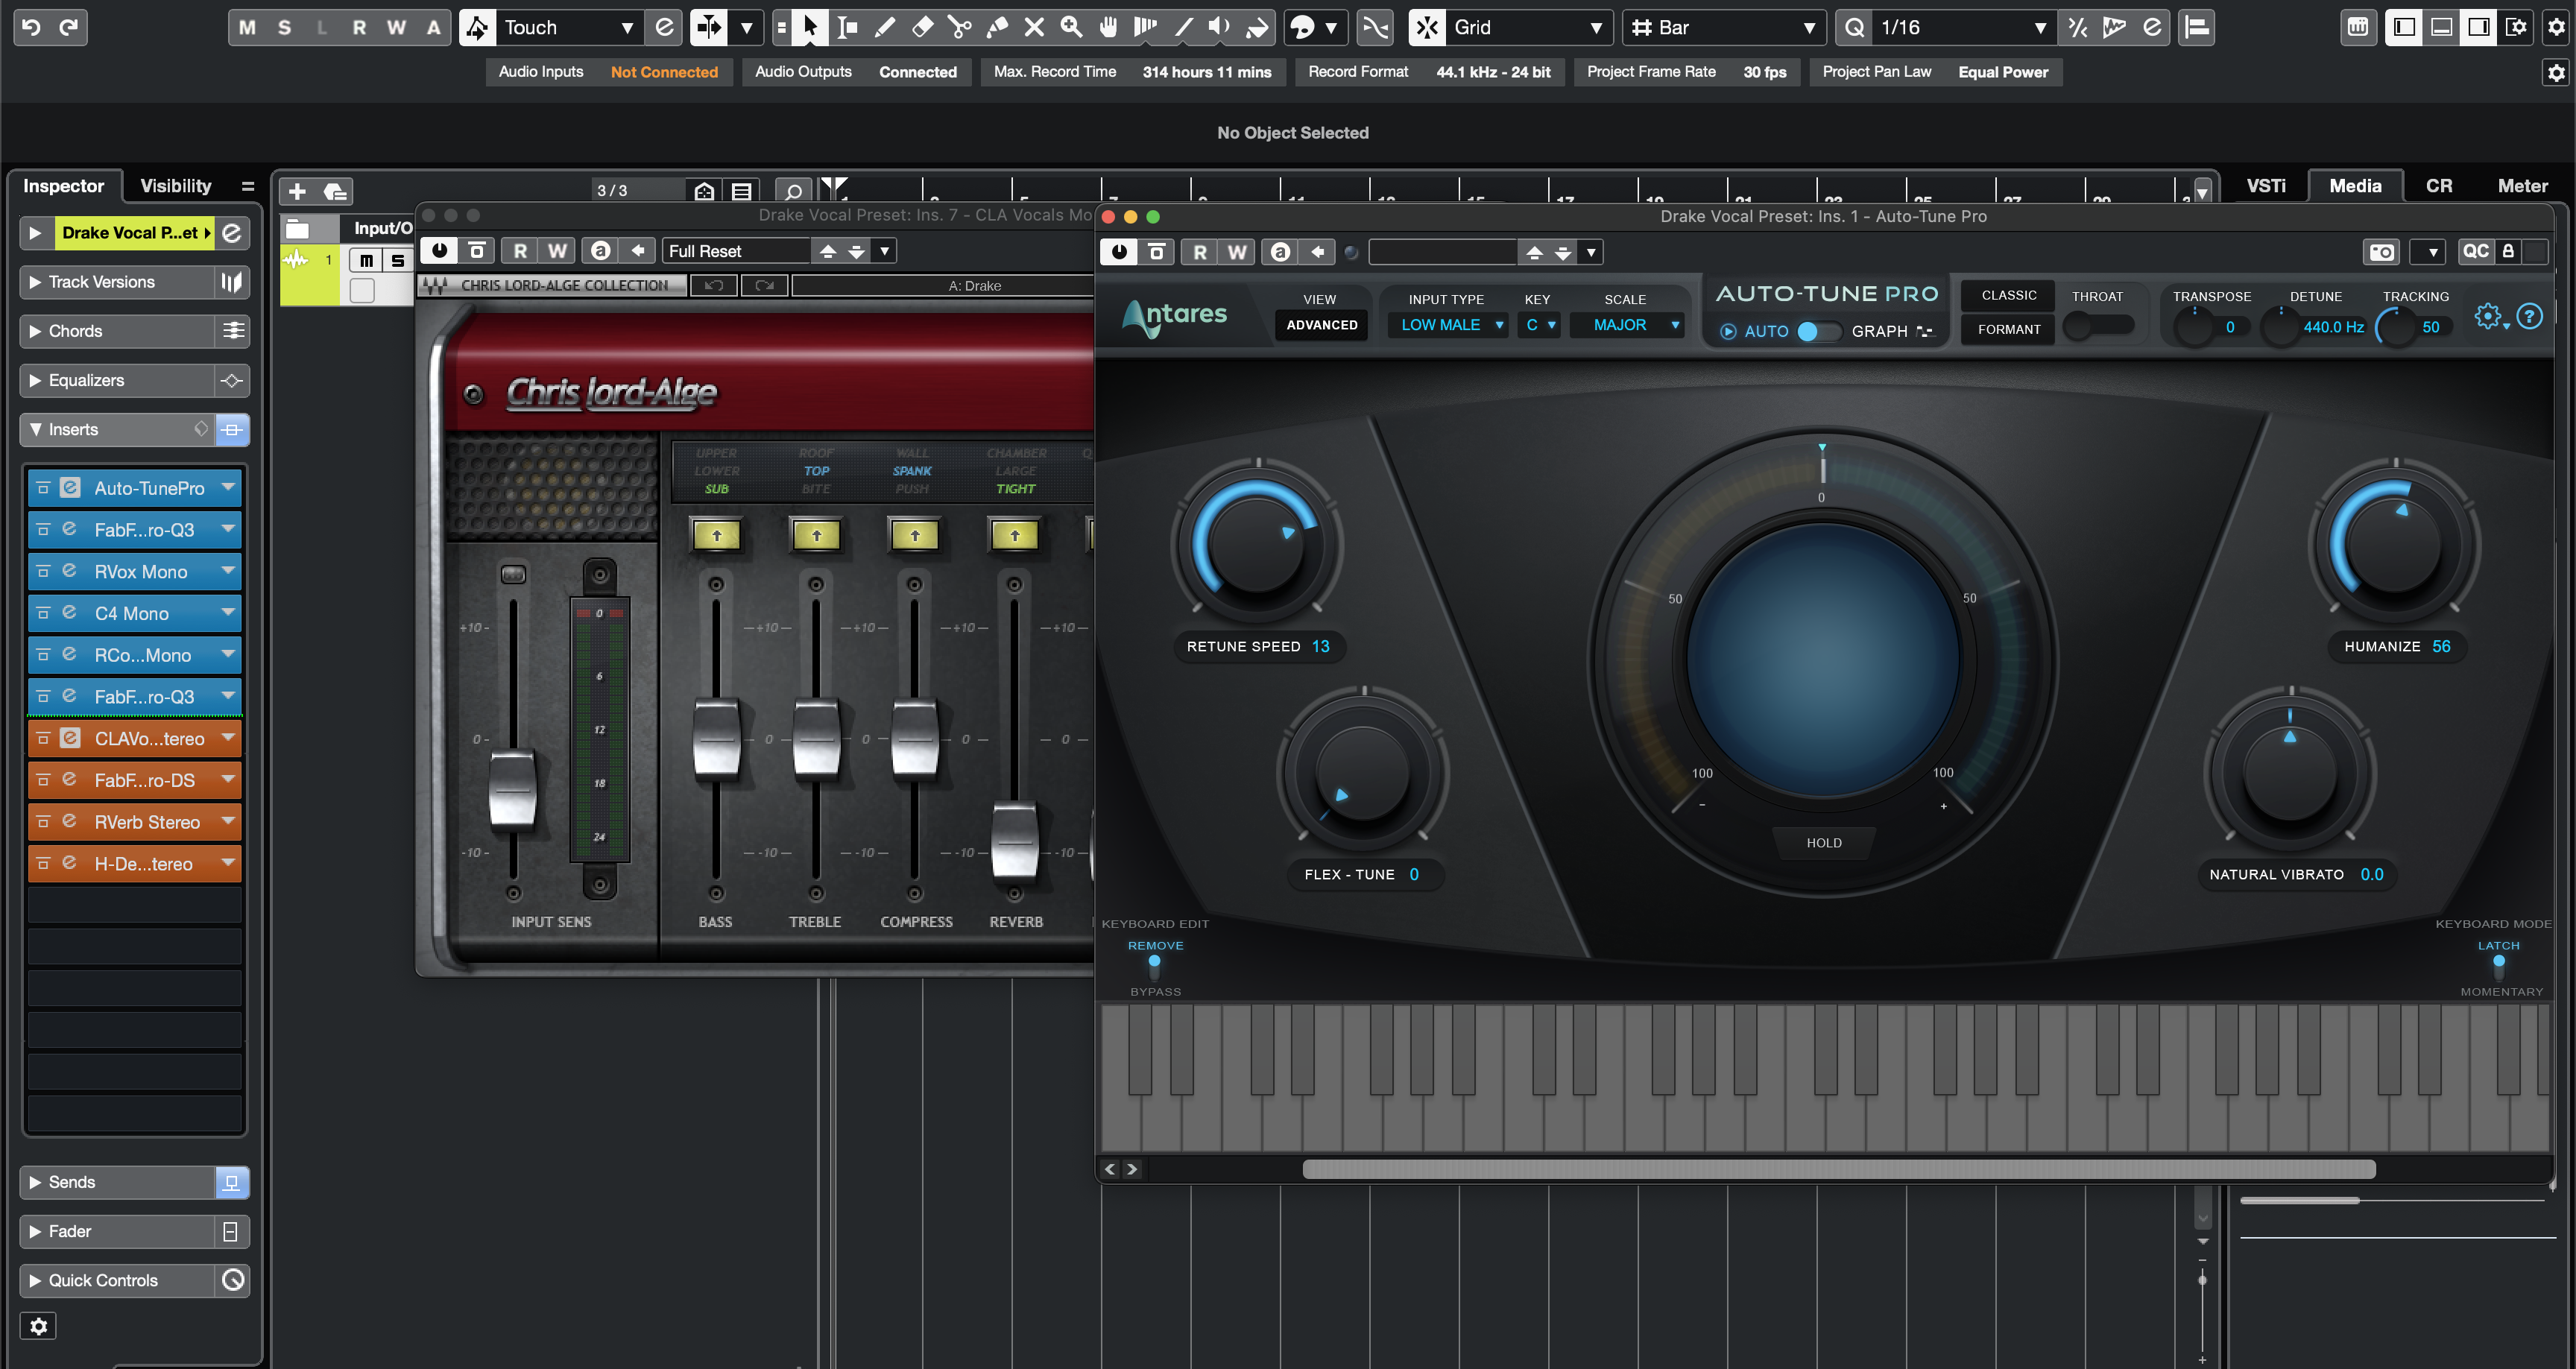
Preset Vocal de Drake para Cubase
Tipo: Preset Vocal
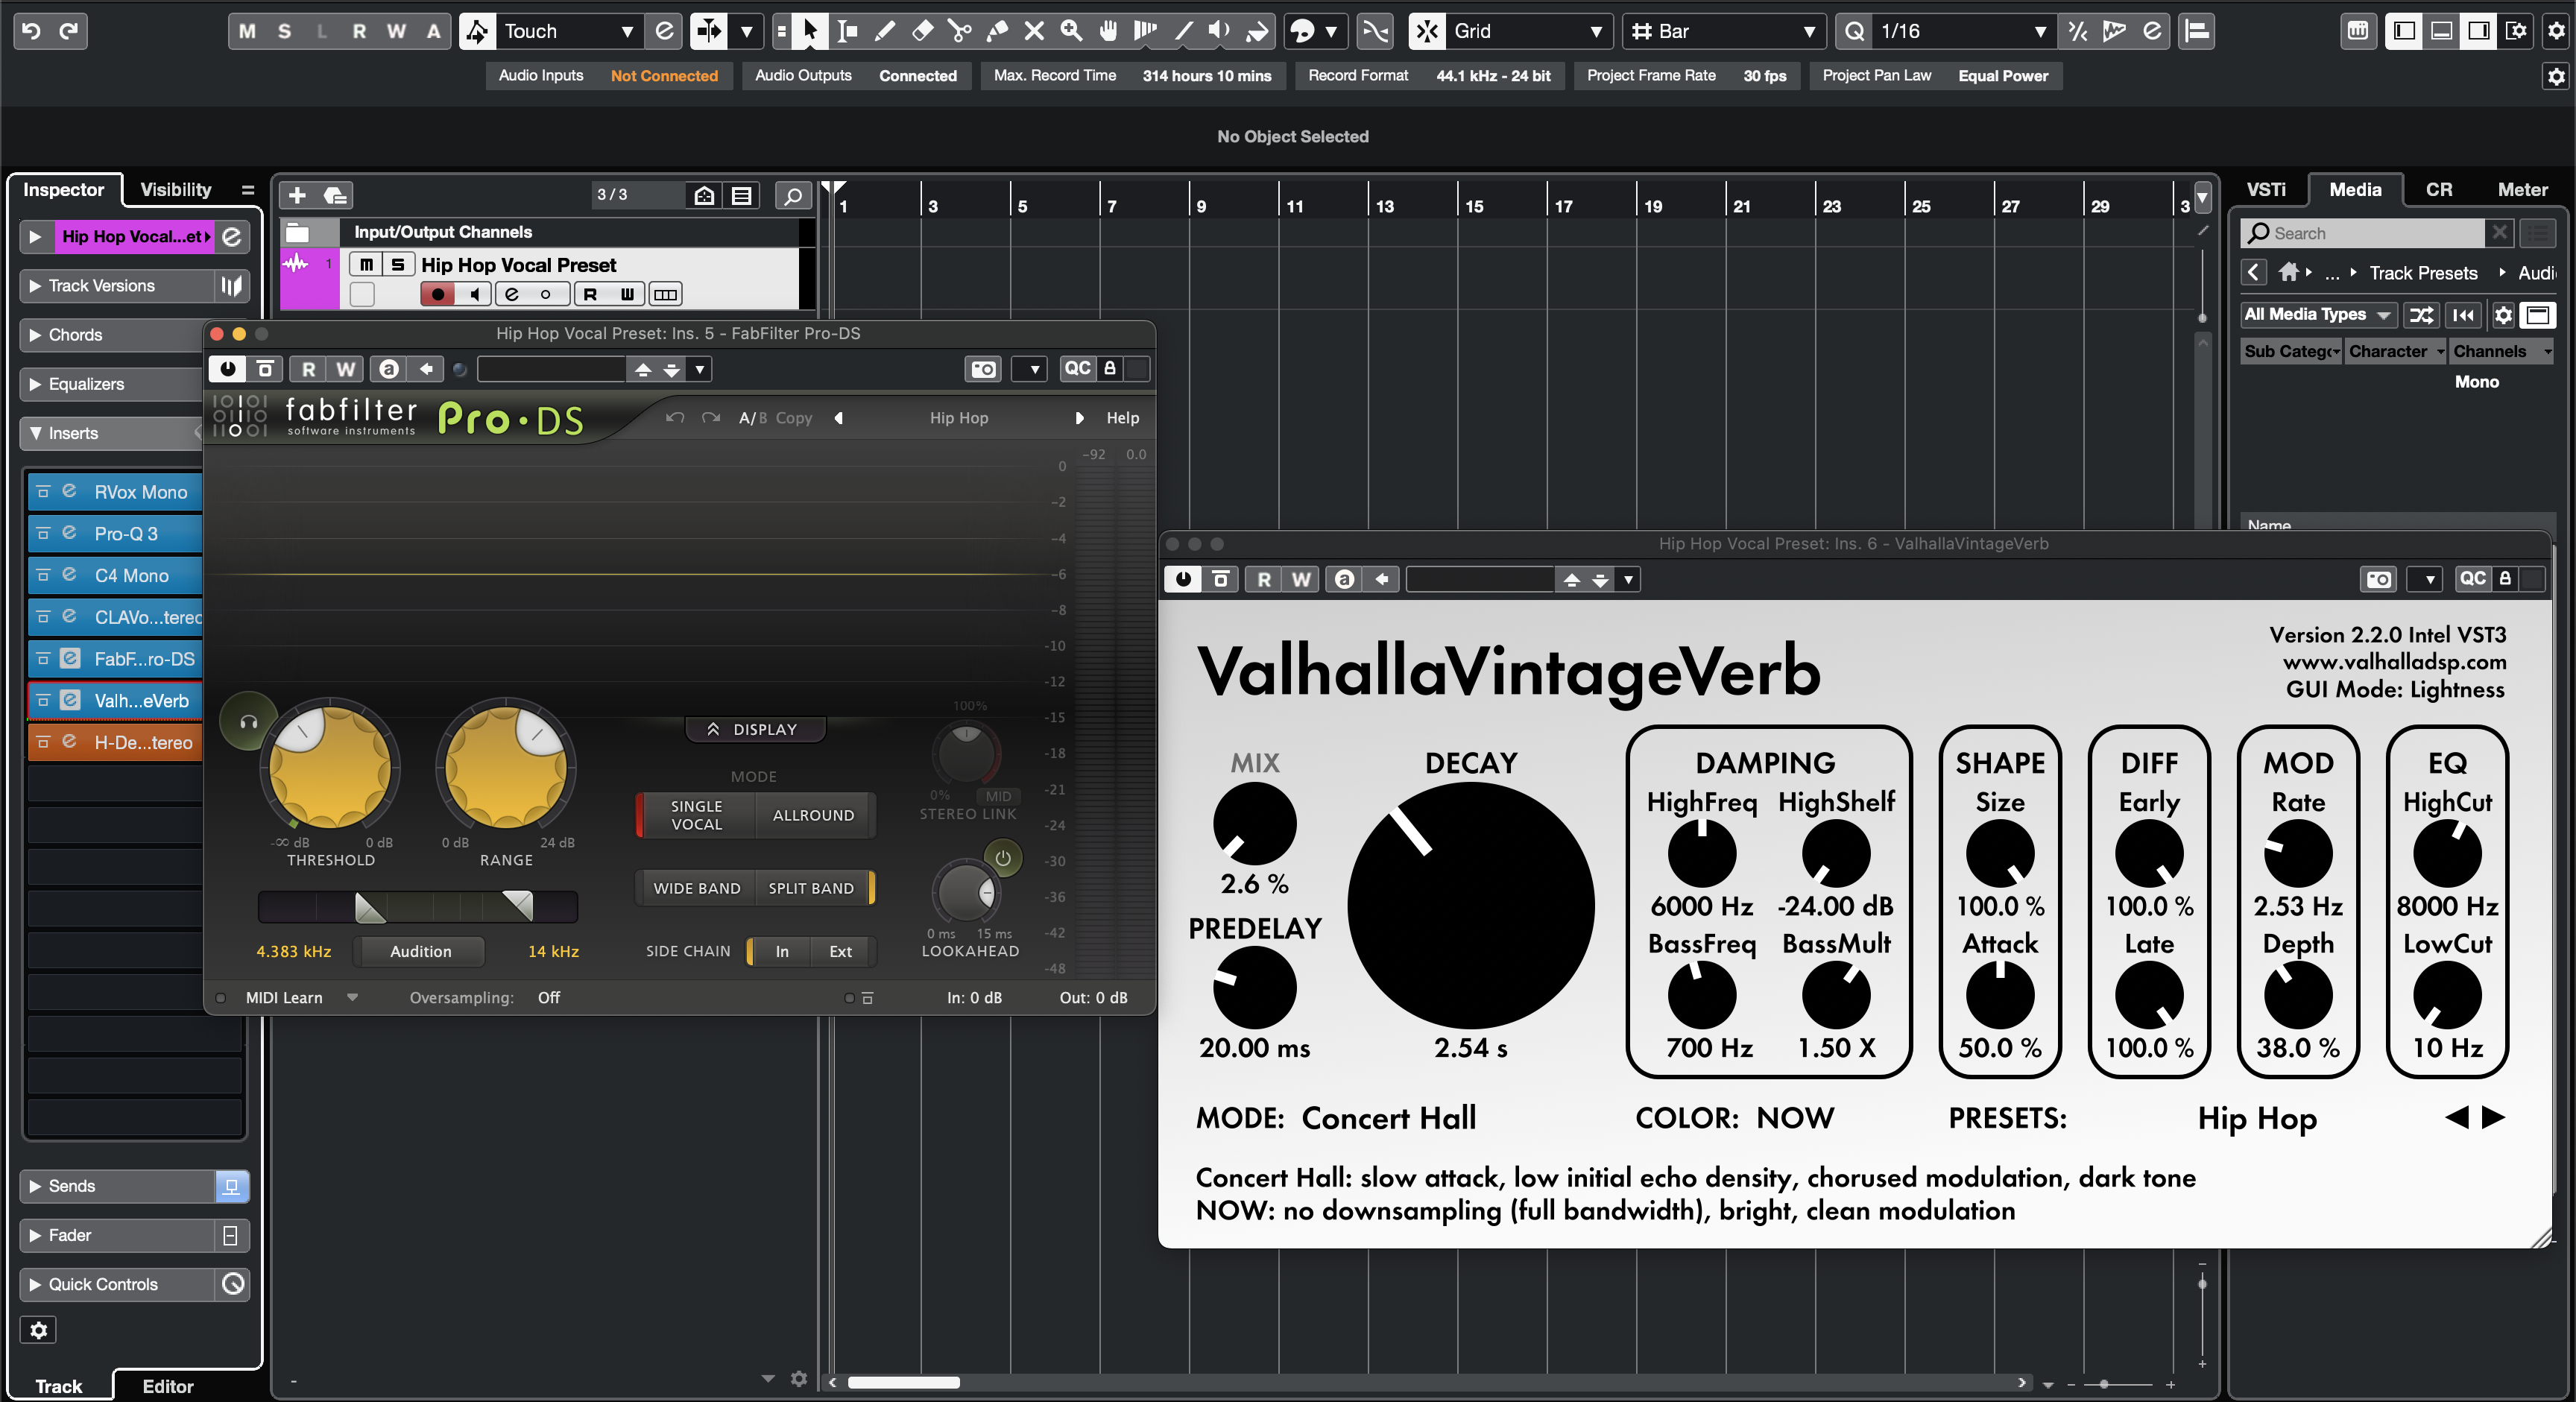
Preset Vocal de Hip Hop para Cubase
Tipo: Preset Vocal
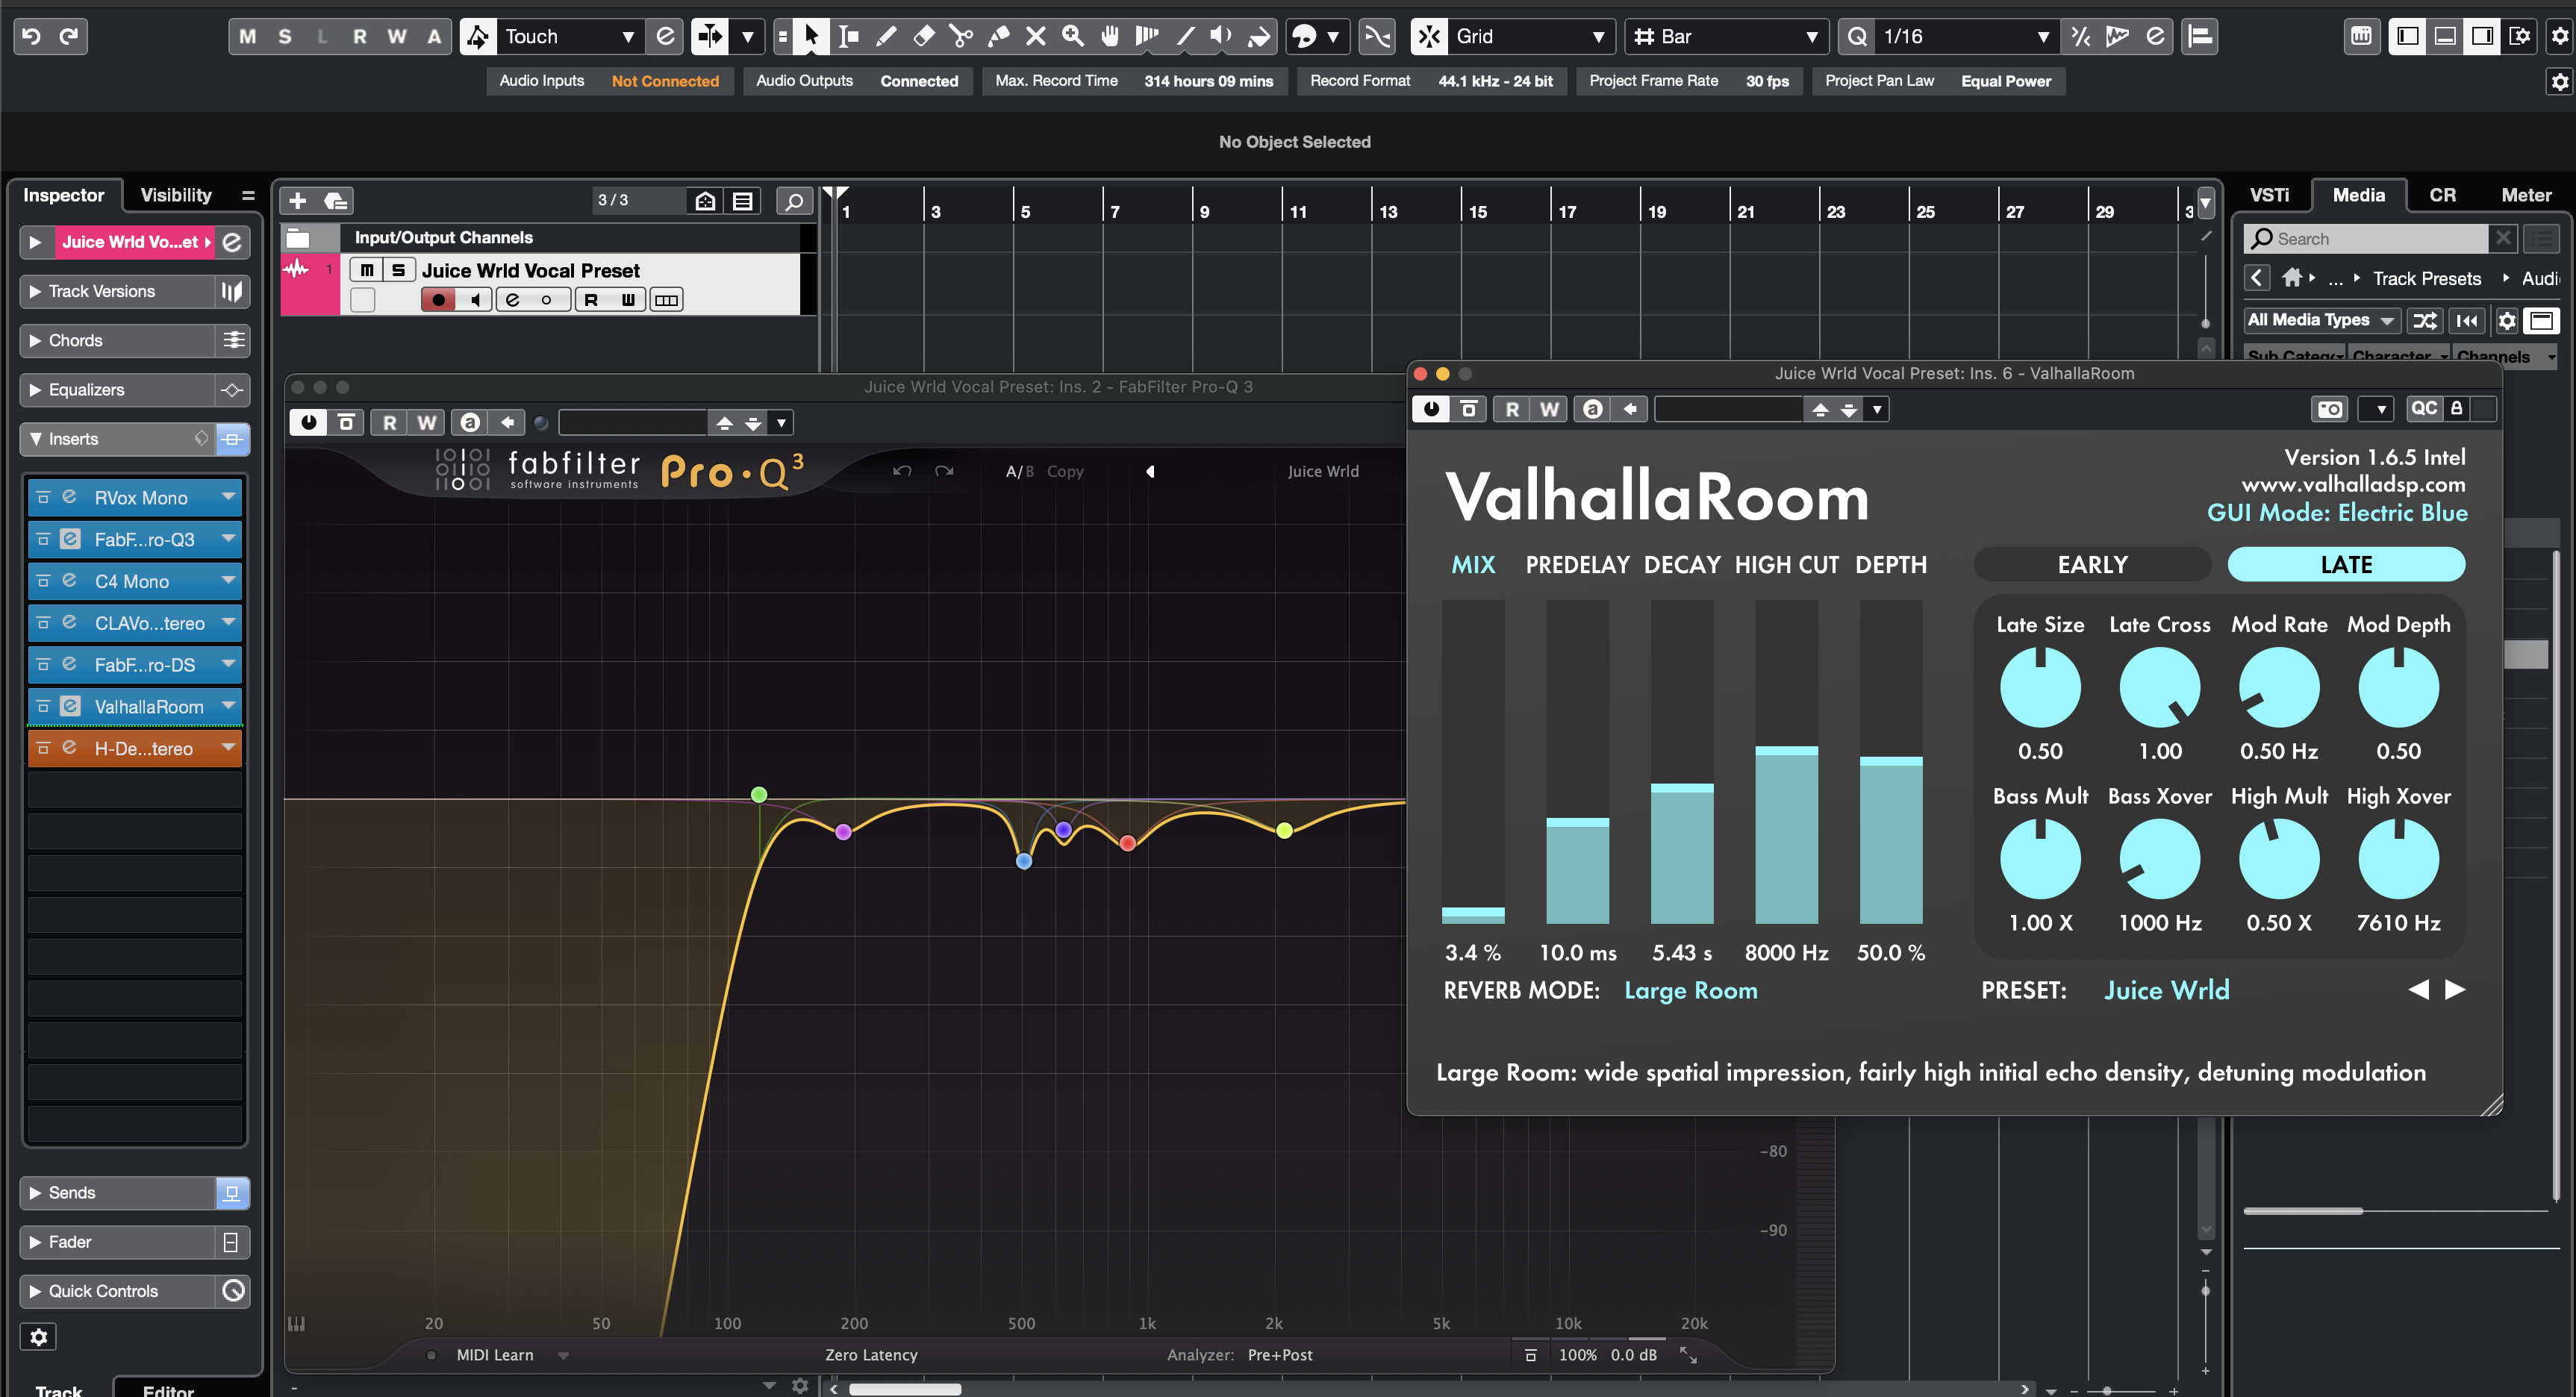
Preset Vocal de Juice Wrld para Cubase

Tipo: Preset Vocal
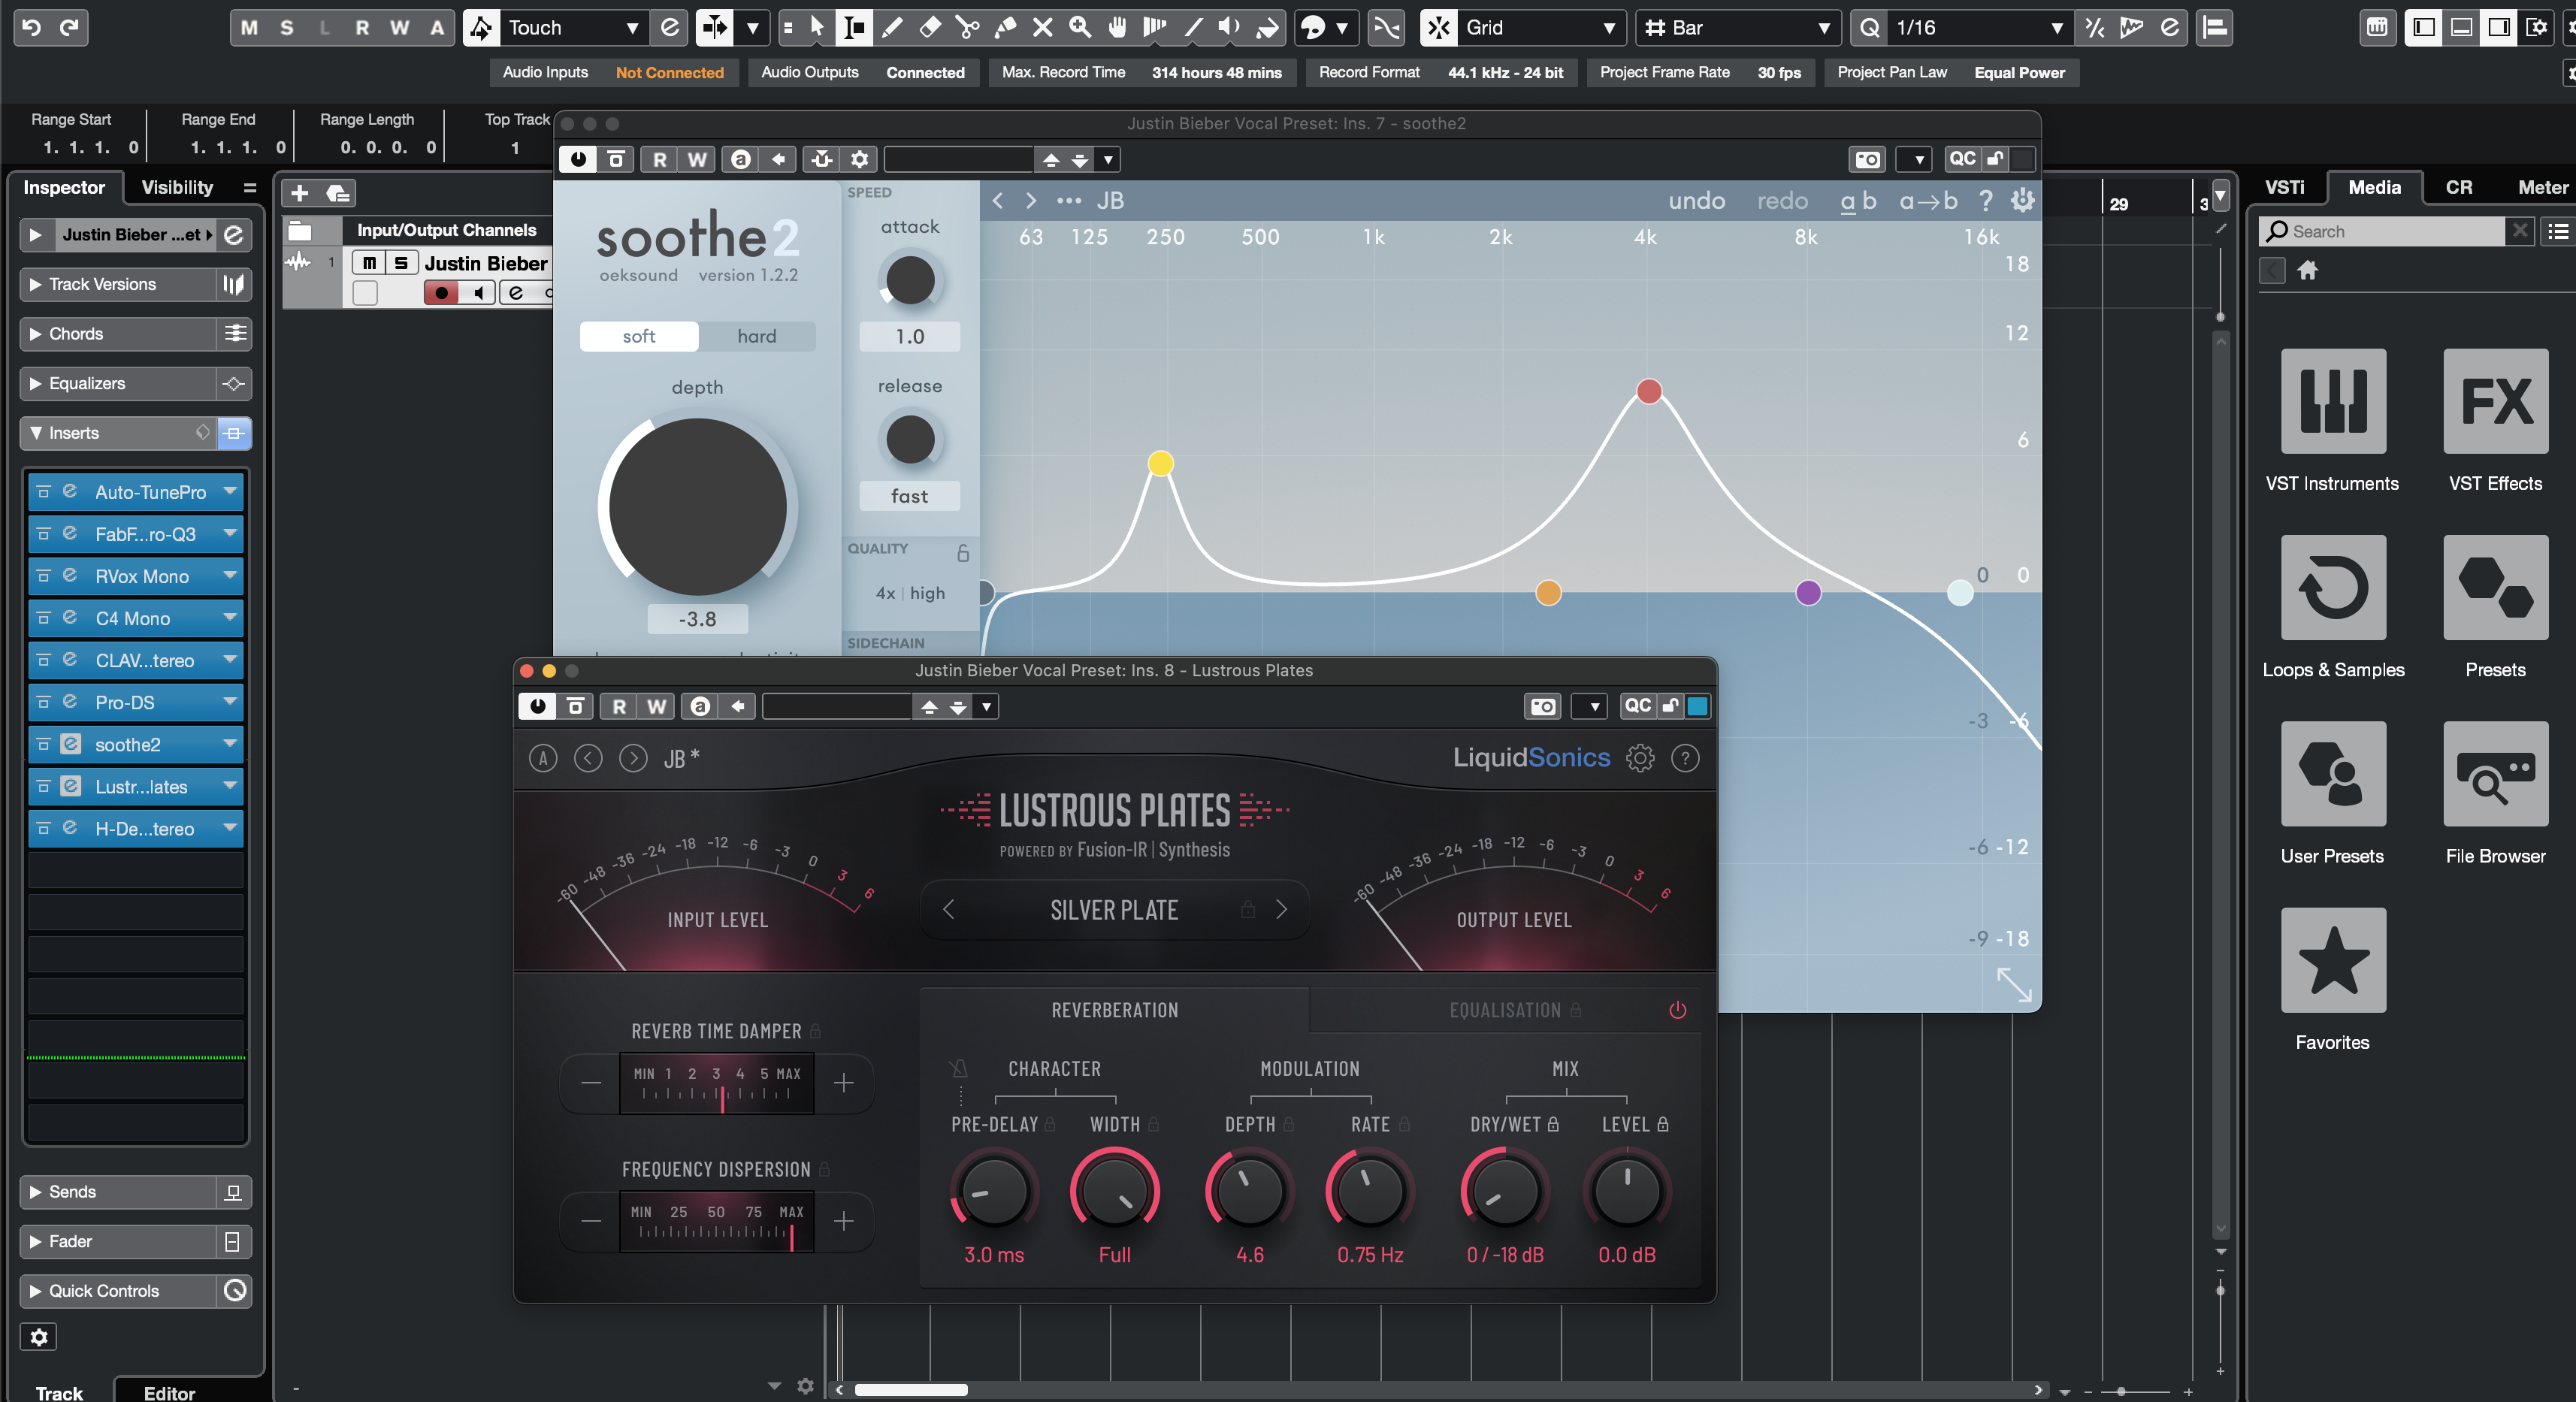
Preset Vocal de Justin Bieber para Cubase
Tipo: Preset Vocal
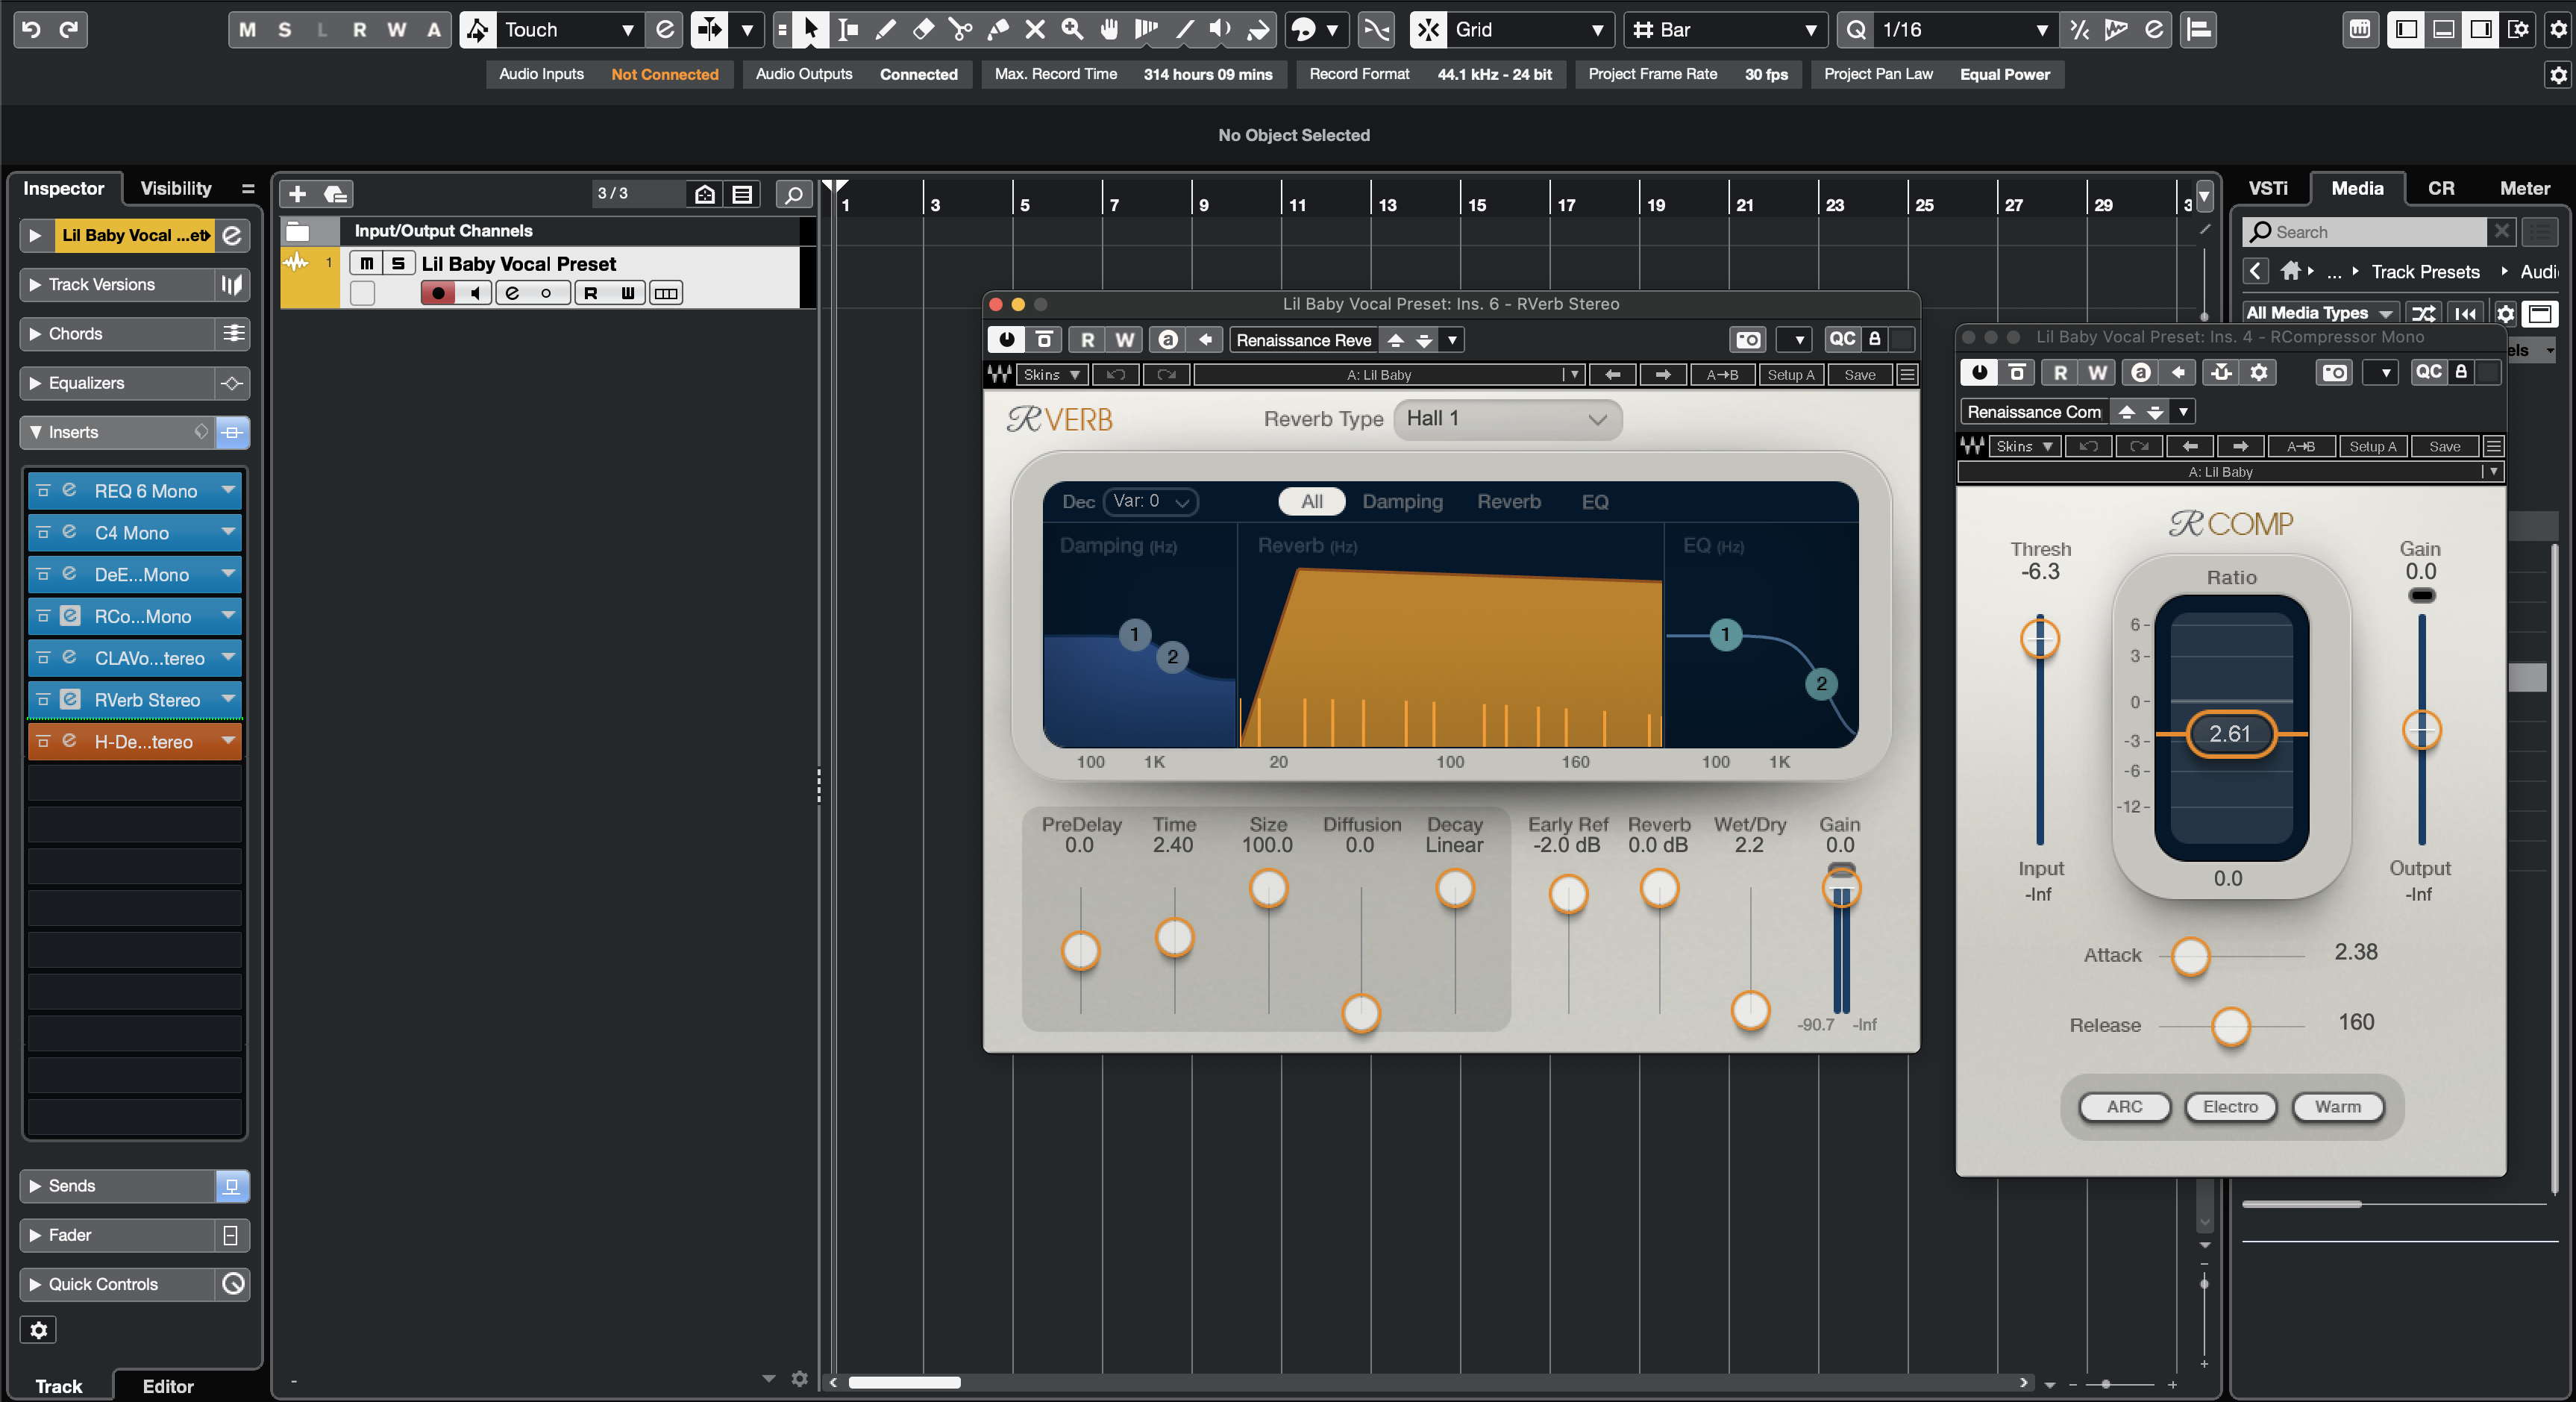
Preset Vocal de Lil Baby para Cubase
Tipo: Preset Vocal
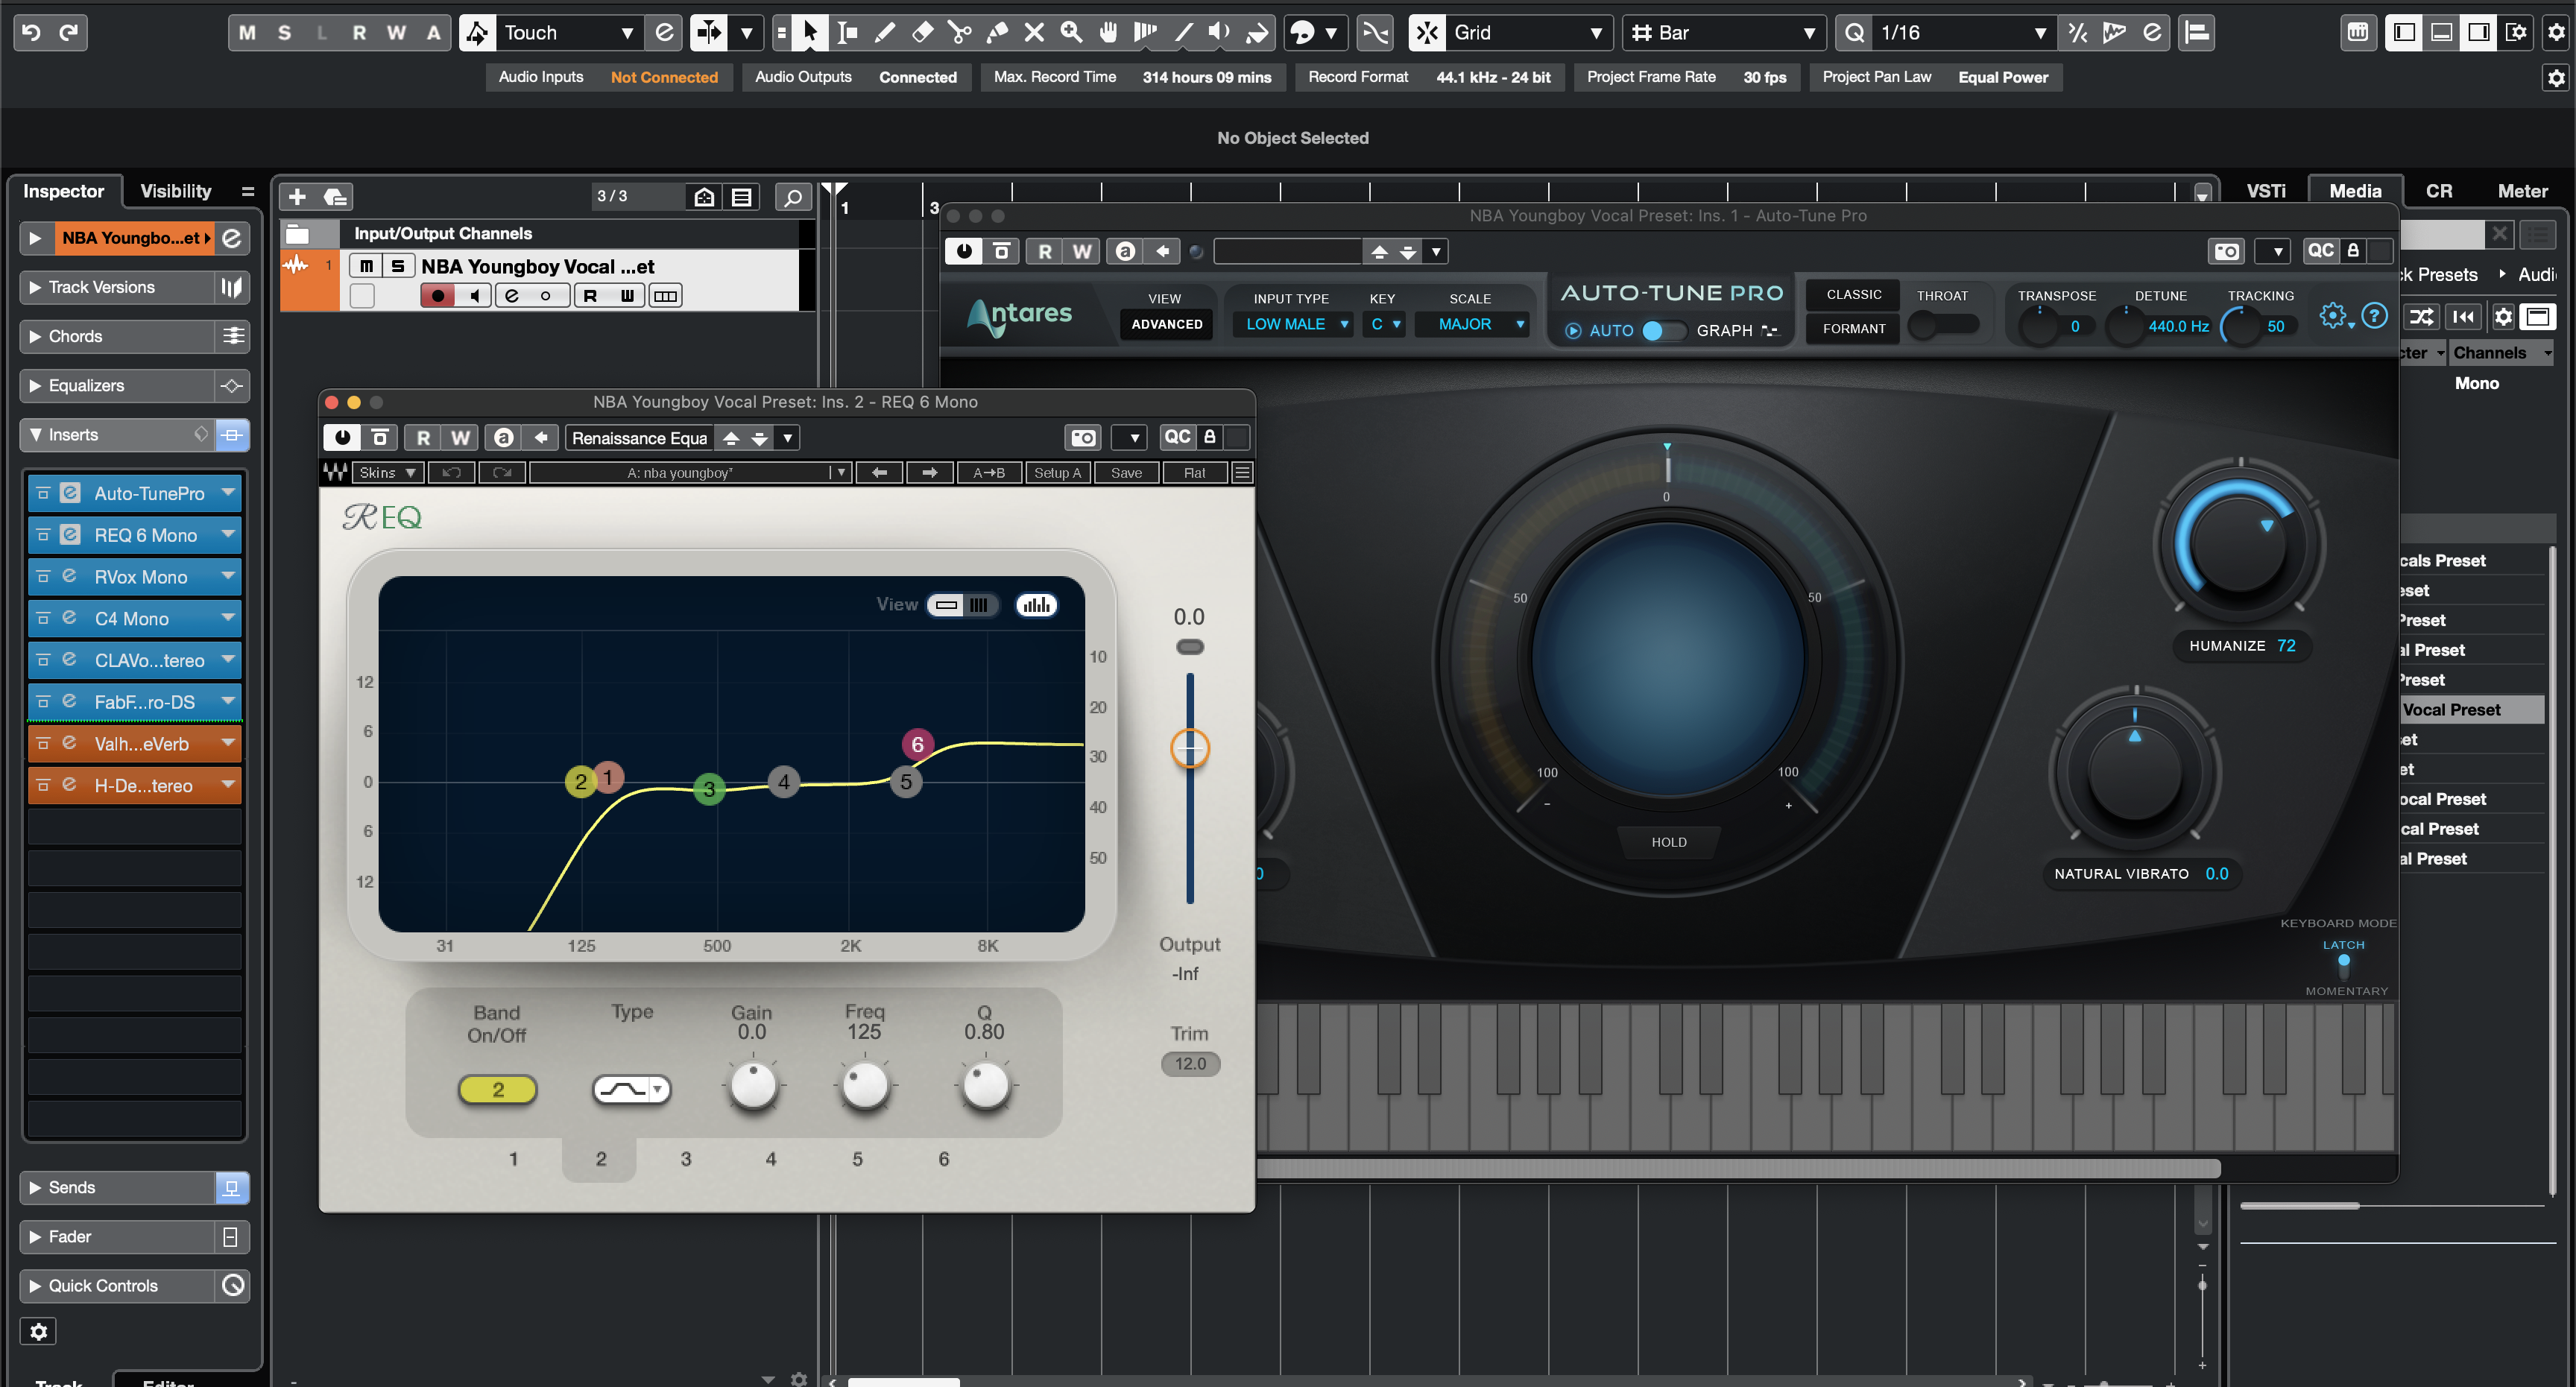
Preset Vocal de NBA YoungBoy para Cubase
Tipo: Preset Vocal
Preset de Voz Rap para Cubase
Tipo: Preset Vocal
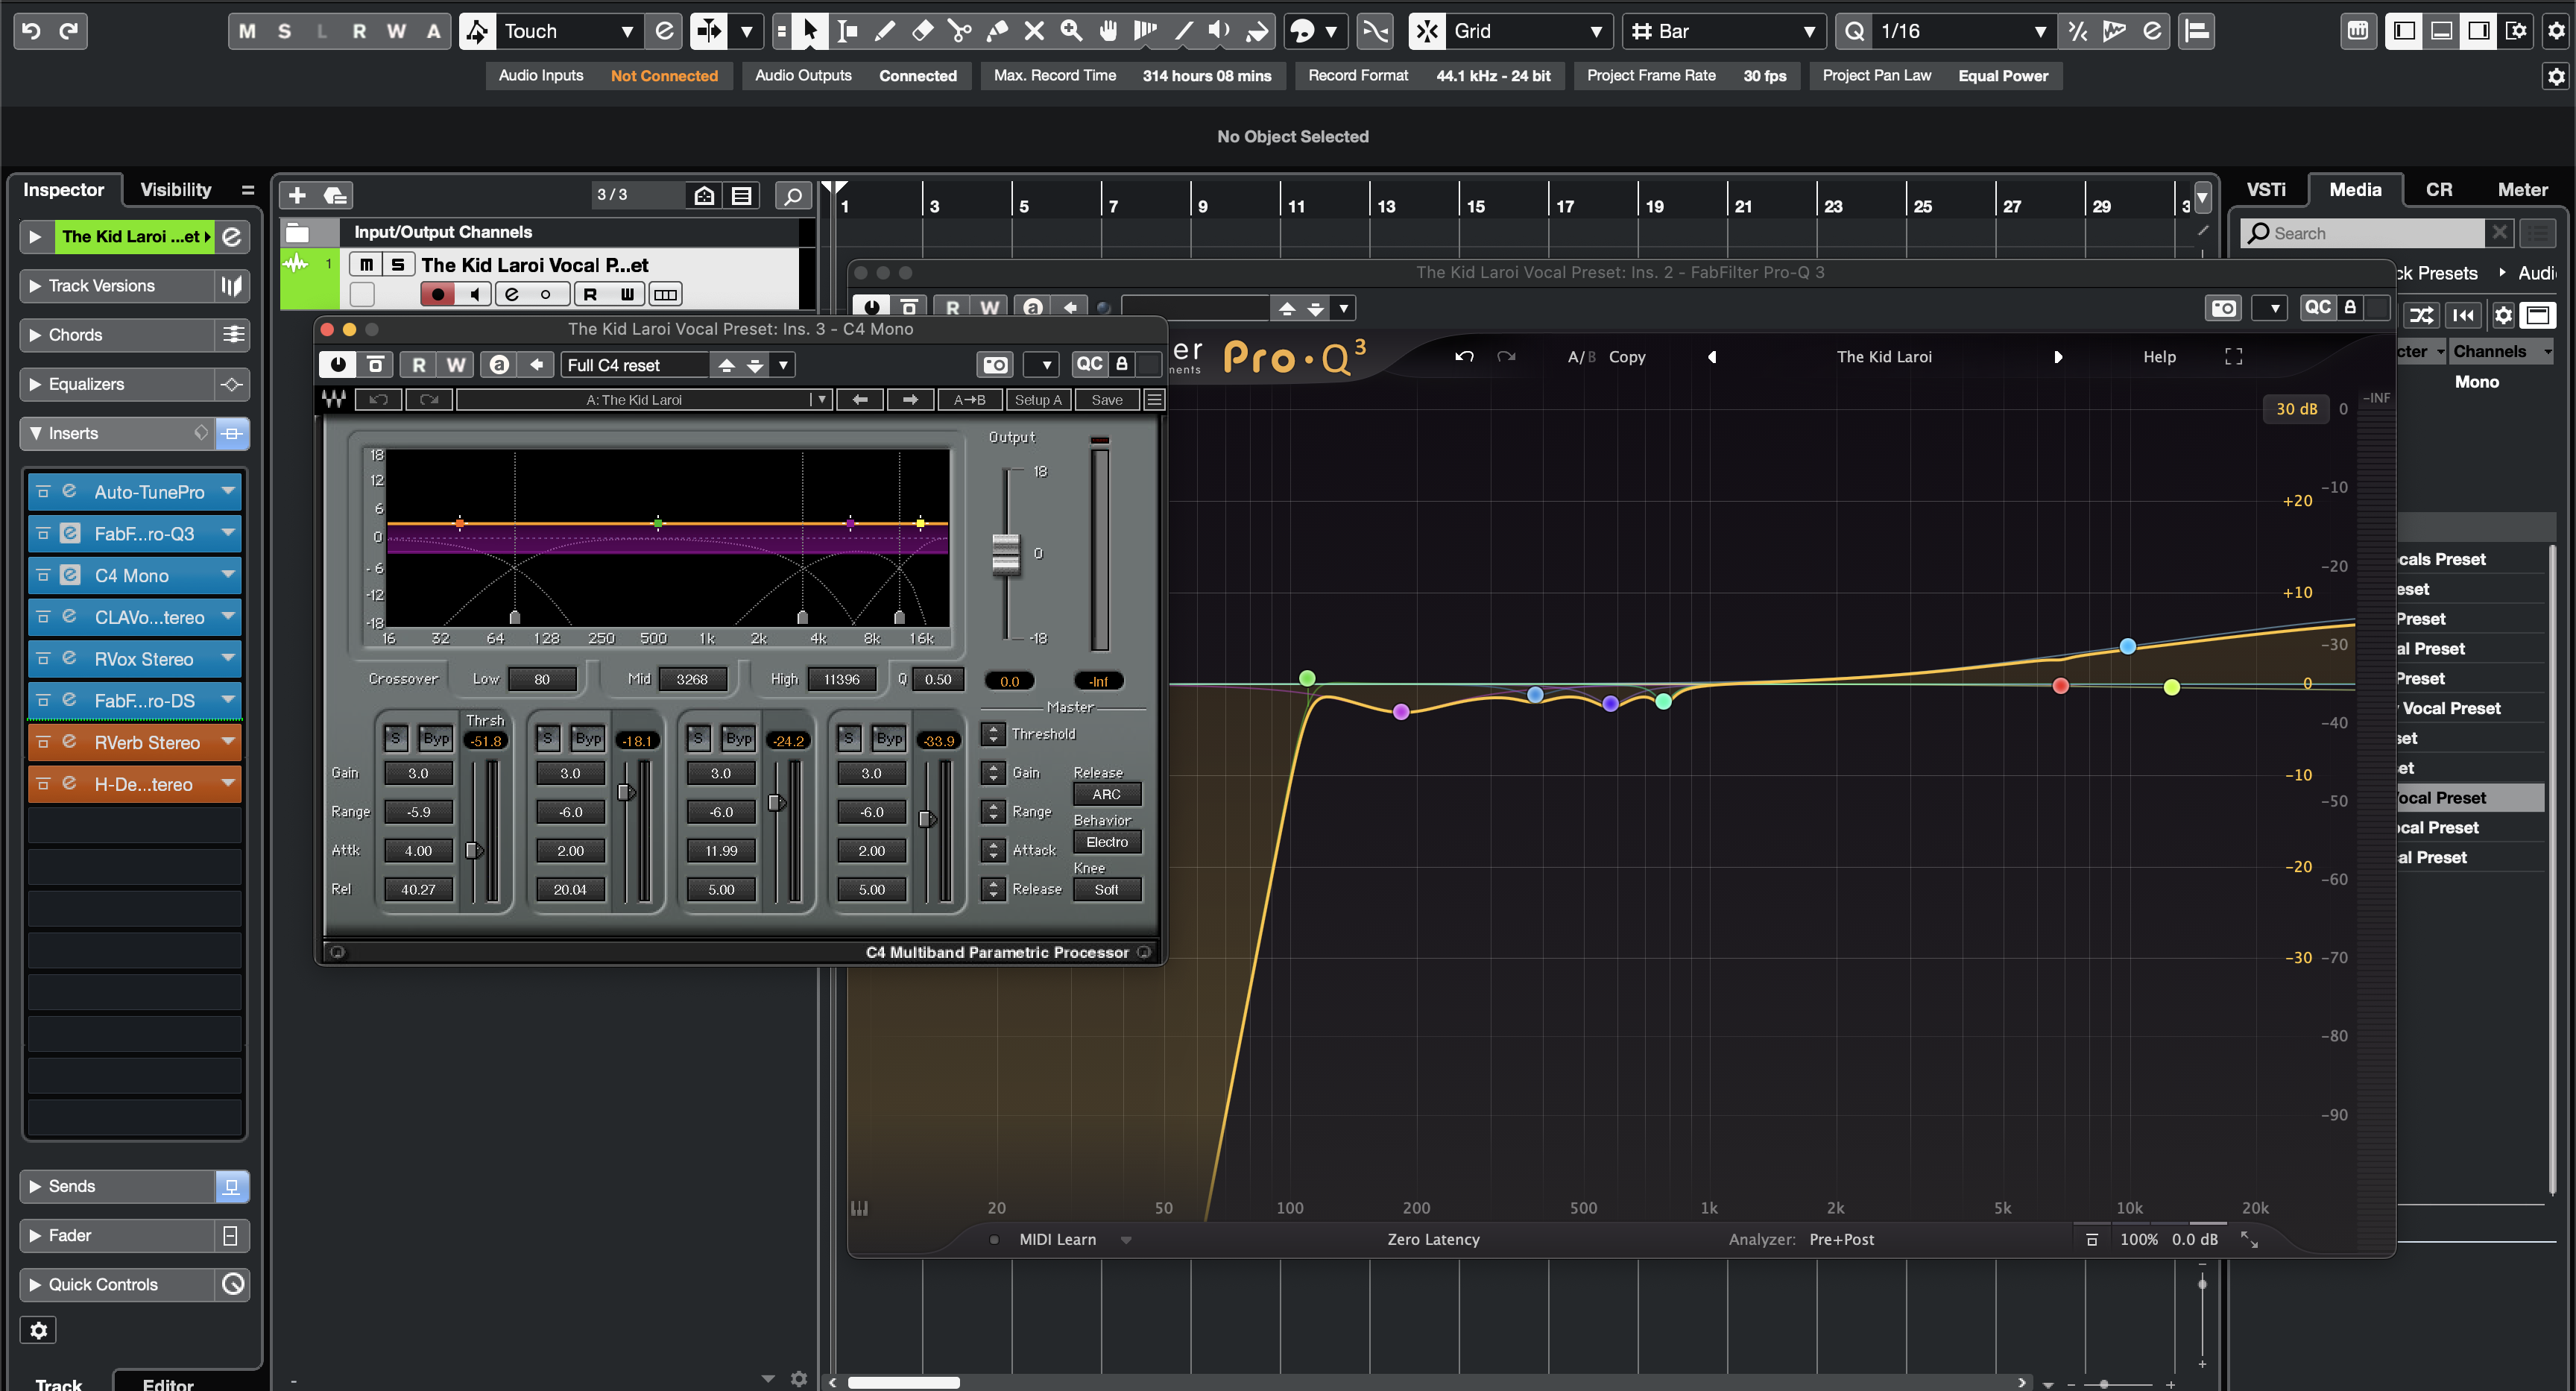
El Preset Vocal de The Kid Laroi para Cubase

Tipo: Preset Vocal
Preset Vocal de The Weeknd para Cubase
Tipo: Preset Vocal
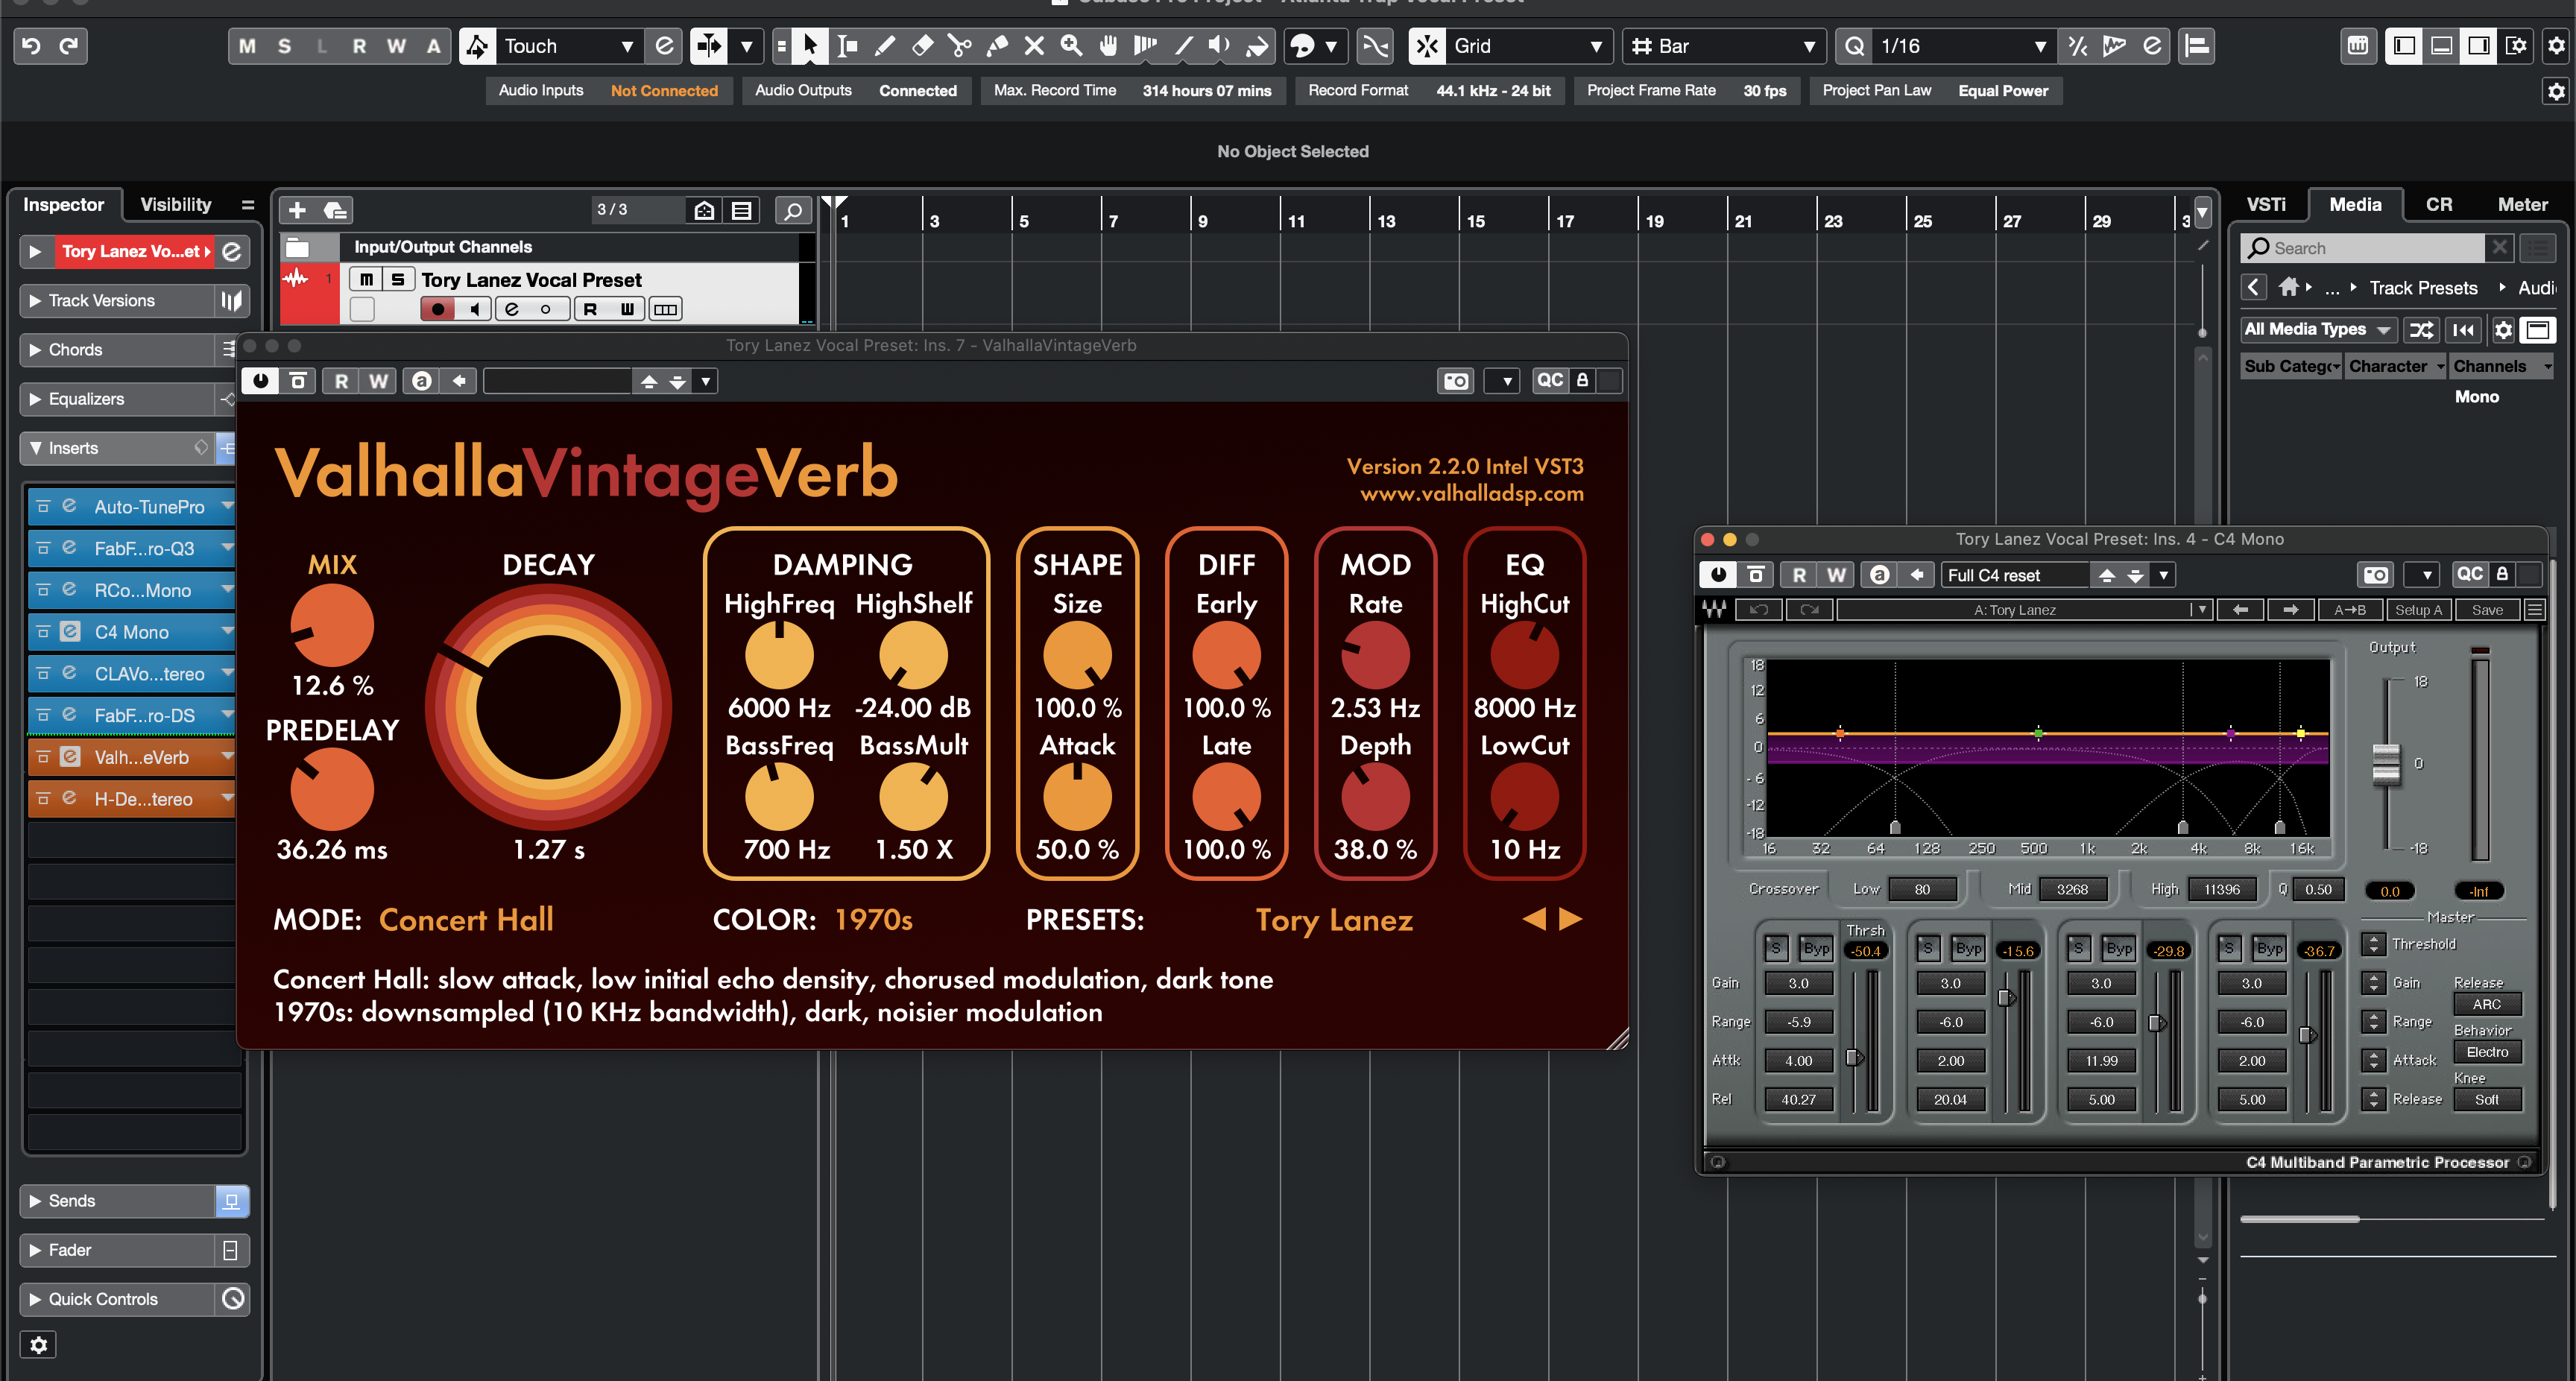
Preset Vocal de Tory Lanez para Cubase
Preguntas frecuentes
¿Qué son los ajustes preestablecidos de voz en Cubase?
¿Qué son los ajustes preestablecidos de voz en Cubase?
Los preajustes vocales de Cubase son configuraciones predefinidas de procesamiento vocal diseñadas para ayudarte a cargar una cadena más útil rápidamente en lugar de construir ecualización, compresión, de-essing y ambiente desde cero cada vez.
Están pensados para artistas y productores que desean una ruta más rápida hacia un flujo de trabajo vocal más limpio en Cubase.
¿Estos productos de Cubase son presets, cadenas de efectos, configuraciones de canal o plantillas completas de grabación?
¿Estos productos de Cubase son presets, cadenas de efectos, configuraciones de canal o plantillas completas de grabación?
Esta colección puede incluir productos de estilo preajustado de un solo canal, así como flujos de trabajo de plantillas más amplias listas para sesión, dependiendo del listado.
La página del producto debe aclarar si estás comprando una cadena enfocada, una configuración de canal guardada o un diseño de sesión más completo.
¿Qué obtengo después de comprar un preset o plantilla vocal de Cubase?
¿Qué obtengo después de comprar un preset o plantilla vocal de Cubase?
Recibes el formato de archivo que se indica en la página del producto, además de cualquier nota de configuración incluida necesaria para cargarlo correctamente en Cubase.
Eso generalmente significa un punto de partida más rápido para la grabación o mezcla y menos tiempo reconstruyendo manualmente la misma estructura básica.
¿Cuánto tiempo tarda en recibir los archivos de Cubase después de la compra?
¿Cuánto tiempo tarda en recibir los archivos de Cubase después de la compra?
Los productos de presets y plantillas de Cubase se entregan de forma digital, por lo que el acceso suele ser inmediato después de la compra.
La mayoría de los compradores deberían poder acceder a los archivos de inmediato a través del flujo normal de confirmación de pedido.
¿Necesito algún complemento de terceros para usar estos presets de Cubase?
¿Necesito algún complemento de terceros para usar estos presets de Cubase?
Algunos productos de Cubase están basados en herramientas estándar de Steinberg, mientras que las opciones premium pueden usar plugins de terceros para mayor control o coloración.
Siempre revisa la página del producto si quieres confirmar si un listado es solo con herramientas estándar o depende de plugins.
¿Son estos presets de Cubase compatibles con Cubase Elements, Artist y Pro?
¿Son estos presets de Cubase compatibles con Cubase Elements, Artist y Pro?
La compatibilidad depende del producto específico y de los procesadores o funciones de enrutamiento que utilice.
Las cadenas de stock más simples pueden funcionar de manera más amplia, mientras que los flujos de trabajo con plantillas más complejas suelen tener más sentido en Cubase Artist o Pro.
¿Cómo instalo los ajustes preestablecidos o plantillas vocales de Cubase?
¿Cómo instalo los ajustes preestablecidos o plantillas vocales de Cubase?
El flujo de trabajo habitual es cargar el preset o la configuración del canal en la pista vocal o abrir la plantilla como una sesión y luego confirmar tu enrutamiento, monitoreo y E/S.
Una vez cargado, puedes guardar tu propia versión para proyectos futuros si deseas una variación personal.
¿Son estos presets de Cubase adecuados para principiantes?
¿Son estos presets de Cubase adecuados para principiantes?
Sí. Son útiles para principiantes que quieren dejar de reconstruir una cadena vocal básica desde cero en cada sesión.
También son útiles para usuarios más experimentados de Cubase que desean una base para voces más rápida y repetible.
¿Puedo ajustar el preset o la plantilla de Cubase para que se adapten a mi voz y flujo de trabajo?
¿Puedo ajustar el preset o la plantilla de Cubase para que se adapten a mi voz y flujo de trabajo?
Sí. Puedes ajustar el ecualizador, la compresión, los efectos de envío, la ruta de la pista, la estructura del bus y la ganancia para que el archivo se adapte a tu propia voz y estilo de sesión.
Esta flexibilidad es importante porque ningún preset único debe considerarse una solución definitiva para cada cantante, rapero o sala.
¿Qué hace que estos sean mejores que los ajustes preestablecidos de voz predeterminados de Cubase?
¿Qué hace que estos sean mejores que los ajustes preestablecidos de voz predeterminados de Cubase?
Los ajustes predeterminados están bien para pruebas rápidas, pero los productos BCHILL MIX están diseñados como puntos de partida más completos y conscientes del flujo de trabajo.
Eso generalmente significa una ruta de señal más fuerte, mejor velocidad de sesión y menos tiempo dedicado a armar lo básico un plugin a la vez.

Construye Tu Propia Cesta

Transforma tu sesión en segundos
Configuración instantánea de sesión con nuestras plantillas de grabación y preajustes vocales listos para usar.


Créditos de la Industria

Westside Boogie

Shontelle

Jarren Benton

DJ Tunez

Vory

Caskey

Rittz

Nia Riley

Eugy

Q Parker
Escucha nuestro trabajo
R&B
Antes
Después
Rap
Antes
Después
Pop
Antes
Después
Alma
Antes
Después
Roca
Antes
Después
Latín
Antes
Después
Preajustes Vocales de Cubase: Explicación y Características
Introducción a los presets vocales de Cubase
Si grabas o mezclas voces en Cubase, un preset vocal te ofrece un sonido confiable y repetible sin tener que reconstruir la misma cadena en cada sesión. Un preset carga una cadena vocal completa: EQ para moldear el tono, compresión para control, de-essing para suavizar los sonidos “s” y un ambiente sutil, para que puedas capturar ideas rápido y mantener tu tono consistente desde la demo hasta el lanzamiento. En BCHILL MIX, cada preset y plantilla de Cubase está afinado para claridad, dinámica controlada y buena traducción en auriculares, monitores y teléfonos.
Puedes usar presets para rap, R&B, pop, trap melódico o voz hablada. Esta guía explica qué son los presets vocales en Cubase, cuándo ayudan, cómo instalarlos y ajustarlos, y cómo los presets vocales de Cubase y la plantilla de grabación de Cubase se complementan para un flujo de trabajo más rápido y organizado.
¿Qué son los presets vocales en Cubase?
En Cubase, un preset vocal es una cadena de efectos guardada o un preset de pista que aplica un orden conocido de procesadores con ajustes iniciales sensatos. Una cadena equilibrada suele incluir:
- Un filtro pasa altos suave y pequeños ajustes quirúrgicos de EQ para eliminar ruidos graves y domar asperezas.
- Uno o dos compresores en serie para suavizar frases fuertes y suaves sin bombeo.
- Un de-esser colocado antes del brillo final para que la sibilancia se mantenga suave.
- Saturación o excitador opcional para presencia.
- Delay sincronizado al tempo y una reverberación corta tipo plate o de sala para espacio.
Puedes construir cadenas con Inserts y los módulos integrados de Channel Strip, y luego guardarlas como presets para reutilizar en Lead, Doubles, Harmonías o un bus vocal. El objetivo es una ganancia predecible y un tono vocal limpio y moderno que puedas refinar rápido en lugar de reinventarlo cada sesión.
Por qué usar presets (beneficios y cuándo ayudan)
- Velocidad: Evita configuraciones repetitivas. Abre un proyecto, elige tu preset y graba mientras la inspiración está fresca.
- Consistencia: Una cadena calibrada mantiene el tono alineado entre canciones y sesiones, útil para singles, EPs y series de contenido.
- Enfoque: Con la parte técnica resuelta, puedes dedicar tiempo a la interpretación, dobles/ad-libs y arreglos.
- Traducción: Una buena cadena se mantiene inteligible en auriculares y teléfonos, así como en monitores de rango completo, para que las mezclas preliminares suenen bien en cualquier lugar.
- Baja fricción: Menos decisiones en el momento, especialmente útil al grabar en laptop o con poco tiempo.
Cuándo ayudan más: sesiones de escritura rápidas; colaboración remota; creación de contenido (shorts/reels); mantener un sonido consistente en una serie; y cualquier flujo de trabajo donde quieras pasar de la idea a la toma en minutos.
Enfoques Stock vs. Premium en Cubase
Cadenas stock usan los procesadores nativos de Cubase (Channel Strip, EQ/Compresor/De-Esser stock, Reverence/RoomWorks, etc.). Se cargan en cualquier sistema con Cubase, sin licencias de terceros, y son ideales si colaboras o cambias de máquina. Las cadenas stock consumen poca CPU y eliminan problemas de “plug-in faltante” en otro equipo.
Cadenas premium añaden herramientas de terceros para un control más fino o un color específico (por ejemplo, compresores con carácter, saturadores especializados o corrección de tono avanzada). Pueden sonar muy bien, pero requieren que los plug-ins listados estén instalados y activados en la máquina que abre la sesión.
¿Cuál elegir? Si la portabilidad y simplicidad son lo más importante, empieza con stock. Si tu equipo ya incluye plug-ins de terceros y quieres más opciones para moldear el tono, premium puede ser ideal. Muchos artistas usan ambos: una cadena stock para grabar en cualquier lugar y una premium para pulir en casa o en estudio. Sea cual sea tu elección, mantén la ganancia consistente para que los presets se comporten de forma predecible entre proyectos.
Instalación y inicio rápido (paso a paso)
- Crea y organiza. Inicia un proyecto nuevo. Añade pistas para Lead, Doubles, Harmonías y Ad-libs. Asignalas colores y configura salidas a un Bus Vocal para control agrupado.
- Configura entrada y buffer. Elige la entrada de micrófono en la pista Lead. Graba una frase corta de prueba y ajusta la ganancia del preamplificador/interfaz para que los picos estén entre −10 y −6 dBFS aproximadamente. Para grabar, usa un buffer ASIO/CoreAudio pequeño para baja latencia; para mezclar, súbelo para estabilidad. Consulta la guía de Steinberg sobre buffer/latencia aquí.
- Carga la cadena. Abre Inserts/Channel Strip en tu pista vocal. Carga el preset (Track Preset o .vstpreset) o inserta procesadores en este orden: EQ → Compresor 1 (suave) → De-Esser → Compresor 2 (rápido/limpio) → saturación opcional → envíos a reverberación/delay.
- Ajusta umbrales y envíos. Baja los umbrales del compresor hasta que las líneas más fuertes se reduzcan unos dB sin bombeo. Ajusta el de-ess para que las consonantes sean suaves, no apagadas. Añade ambiente con envíos; mantén los inserts mayormente secos durante la grabación para claridad y baja latencia.
- Guarda tu configuración. Guarda un Track Preset para tu voz y una Plantilla de Proyecto para que cada sesión abra con el mismo margen, ruteo y colores. ¿Prefieres un diseño listo? Prueba la Plantilla de Grabación de Cubase (Stock).
Opcional pero potente: configura la Control Room para monitoreo y cues precisos, usa Audio Alignment para ajustar dobles/harmonías, y usa VariAudio para corrección de tono donde esté disponible.
Estilos y casos de uso (Rap, R&B, Pop, Claro/Podcast)
Rap lead (golpe y claridad). Usa dos compresores ligeros en serie para control sin matar los transientes. Enfoca la inteligibilidad entre 2 y 5 kHz con EQ cuidadoso, y añade un slap corto o plate pequeño para energía sin lavado. Mantén los hooks más anchos automatizando un poco más el envío de delay en las líneas del coro. Si tu voz está muy centrada, prueba un doblador sutil para dar amplitud en los hooks.
Trap melódico / drill. Mantén el extremo superior brillante pero suave. Un toque de saturación antes del de-ess añade mordida; sigue con de-ess para que las consonantes no suenen escupidas. Superpone ad-libs con un filtro pasa altos un poco más alto y un poco más de de-ess para mantener las capas ordenadas. Para resultados rápidos, parte de una cadena estilo artista (por ejemplo, Preset Vocal Atlanta Trap o Preset Vocal NBA YoungBoy) y ajusta envíos/umbrales para tu voz.
R&B / soul (canto suave). Busca un agudo sedoso y un calor controlado en medios bajos. Usa ataque/liberación suaves, un estante de “aire” suave y ambiente más amplio para profundidad. Un pre-delay más largo añade espacio sin enmascarar palabras. En coros, usa delays ensanchados en estéreo y pasa altos para evitar niebla en medios bajos. Si tu micrófono es brillante, corta un poco de aspereza antes de la compresión para que no reaccione en exceso.
Pop. El pop moderno se beneficia de brillo y pulido. Añade un estante alto con gusto y controla la sibilancia con de-ess. Usa delays sincronizados al tempo para amplitud; una reverberación de sala muy corta puede “pegar” la voz sin sonar mojada. Compara opciones con volumen igualado: “más fuerte” suele sonar “mejor”, así que iguala niveles antes de decidir. En arreglos densos, talla cuidadosamente entre 2 y 4 kHz para que las palabras sigan inteligibles.
Voces claras / podcast / habla. Prioriza la inteligibilidad y el control de ruido. Usa compresión transparente, de-ess moderado y solo un toque de ambiente corto si lo seco suena antinatural. La técnica supera al procesamiento: distancia constante al micrófono, filtro anti-pop y una sala silenciosa superan a plug-ins pesados. Si grabas en un espacio vivo, prueba un denoise/dereverb suave antes de EQ y compresión.
Coros, dobles, ad-libs. Compresión un poco más ajustada y un poco más de de-ess ayudan a que las capas se asienten sin saturar. Sube un poco el filtro pasa altos en las capas para eliminar ruidos graves y niebla en medios bajos. Ambiente más amplio o más largo separa los coros del lead sin enmascarar palabras. Para ajustar la sincronía entre capas, usa Audio Alignment de Cubase donde esté disponible.
Plantillas de grabación vs. presets (flujo de trabajo)
Los presets vocales moldean tono y dinámica en una pista o bus vocal. Las plantillas de grabación ofrecen el diseño completo de la sesión: pistas pre-nombradas (Lead, Doubles, Harmonías, Ad-libs), codificación por colores, ruteo, mezclas de cue y envíos listos, para que pases de la idea a la toma con mínima configuración. Muchos creadores usan ambos:
- Una plantilla simple para que cada proyecto abra organizado y calibrado, y
- Un pequeño conjunto de presets—Brillante, Neutral, Suave—para que cada canción nueva empiece con el tono más cercano.
Si saltas entre laptops o estudios, guarda presets en tu biblioteca de usuario para que la misma cadena te acompañe. Para mezclas más profundas, prueba un flujo de trabajo con bus: pon procesamiento correctivo en la pista (EQ/Comp/De-ess) y pulido creativo en un bus vocal (exciter, compresión glue, efectos temporales). Así mantienes limpia la pista lead y puedes realzar coros manejando unos controles del bus en vez de cada insert.
Explora herramientas musicales relacionadas gratis en BCHILL MIX: la Plantilla de Grabación de Cubase (Stock), cadenas inspiradas en géneros/artistas como el Preset Vocal Rap para Cubase o navega la colección completa de Presets Vocales para Cubase.
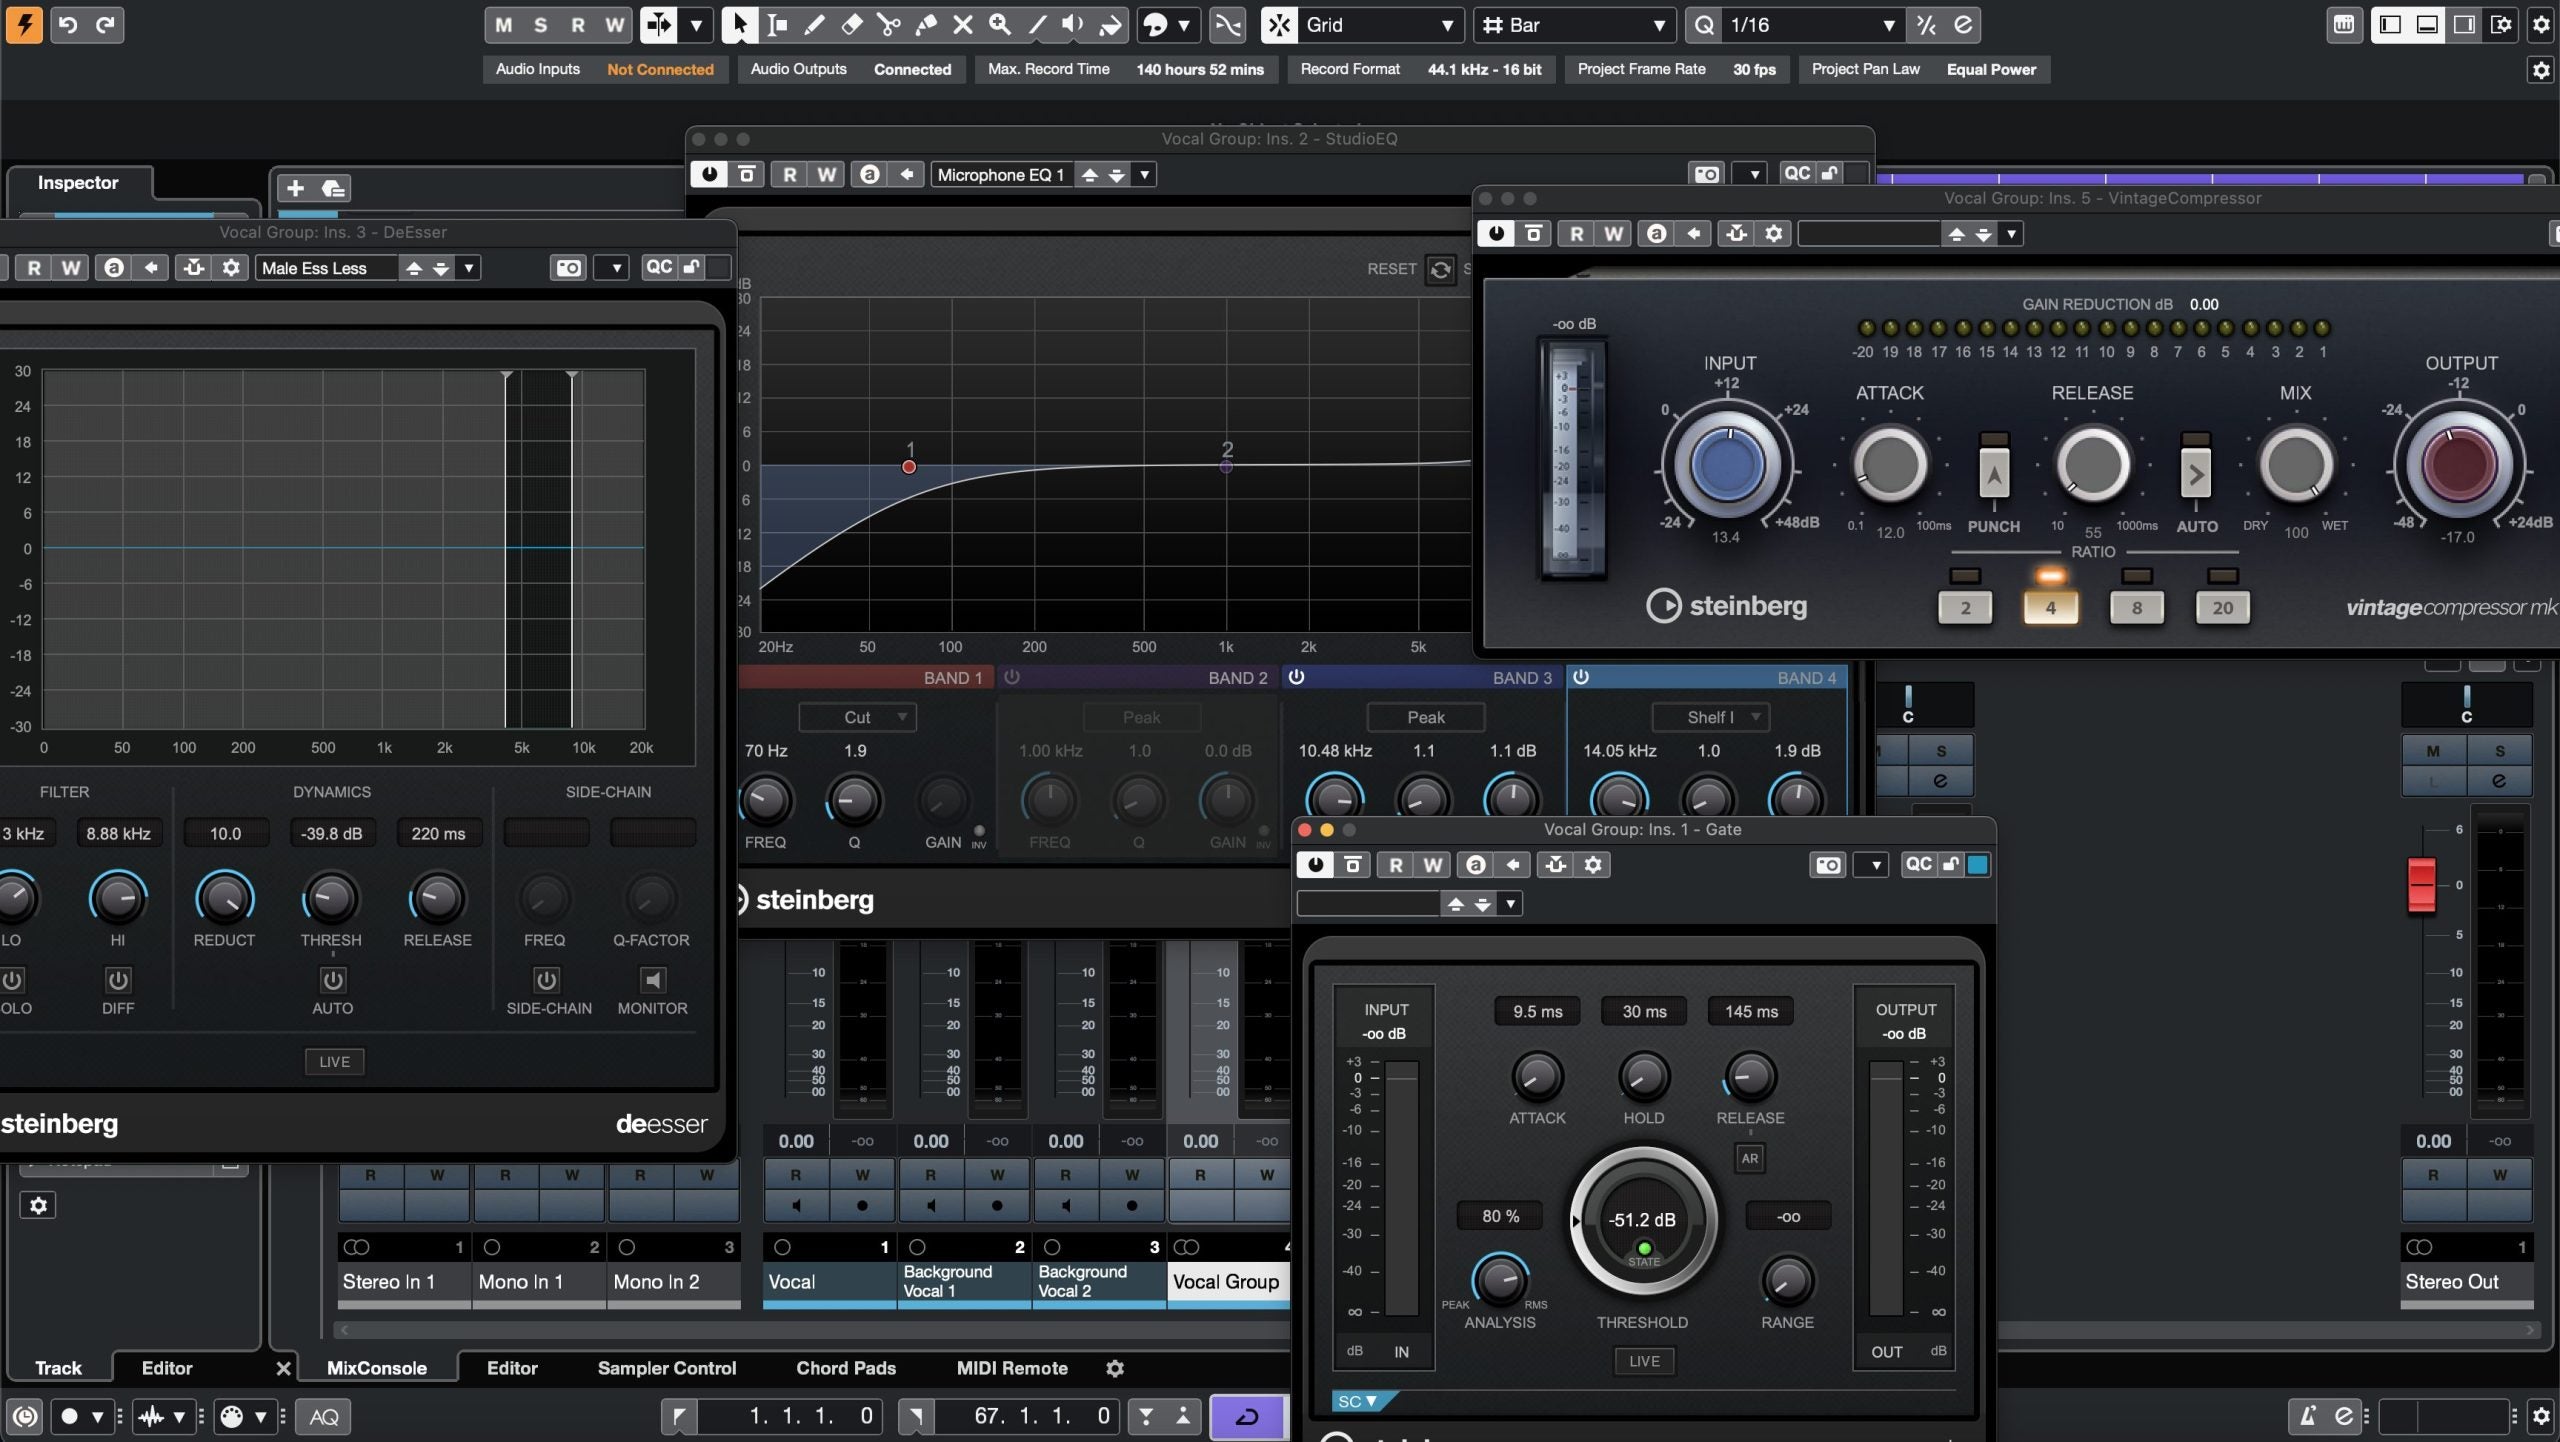
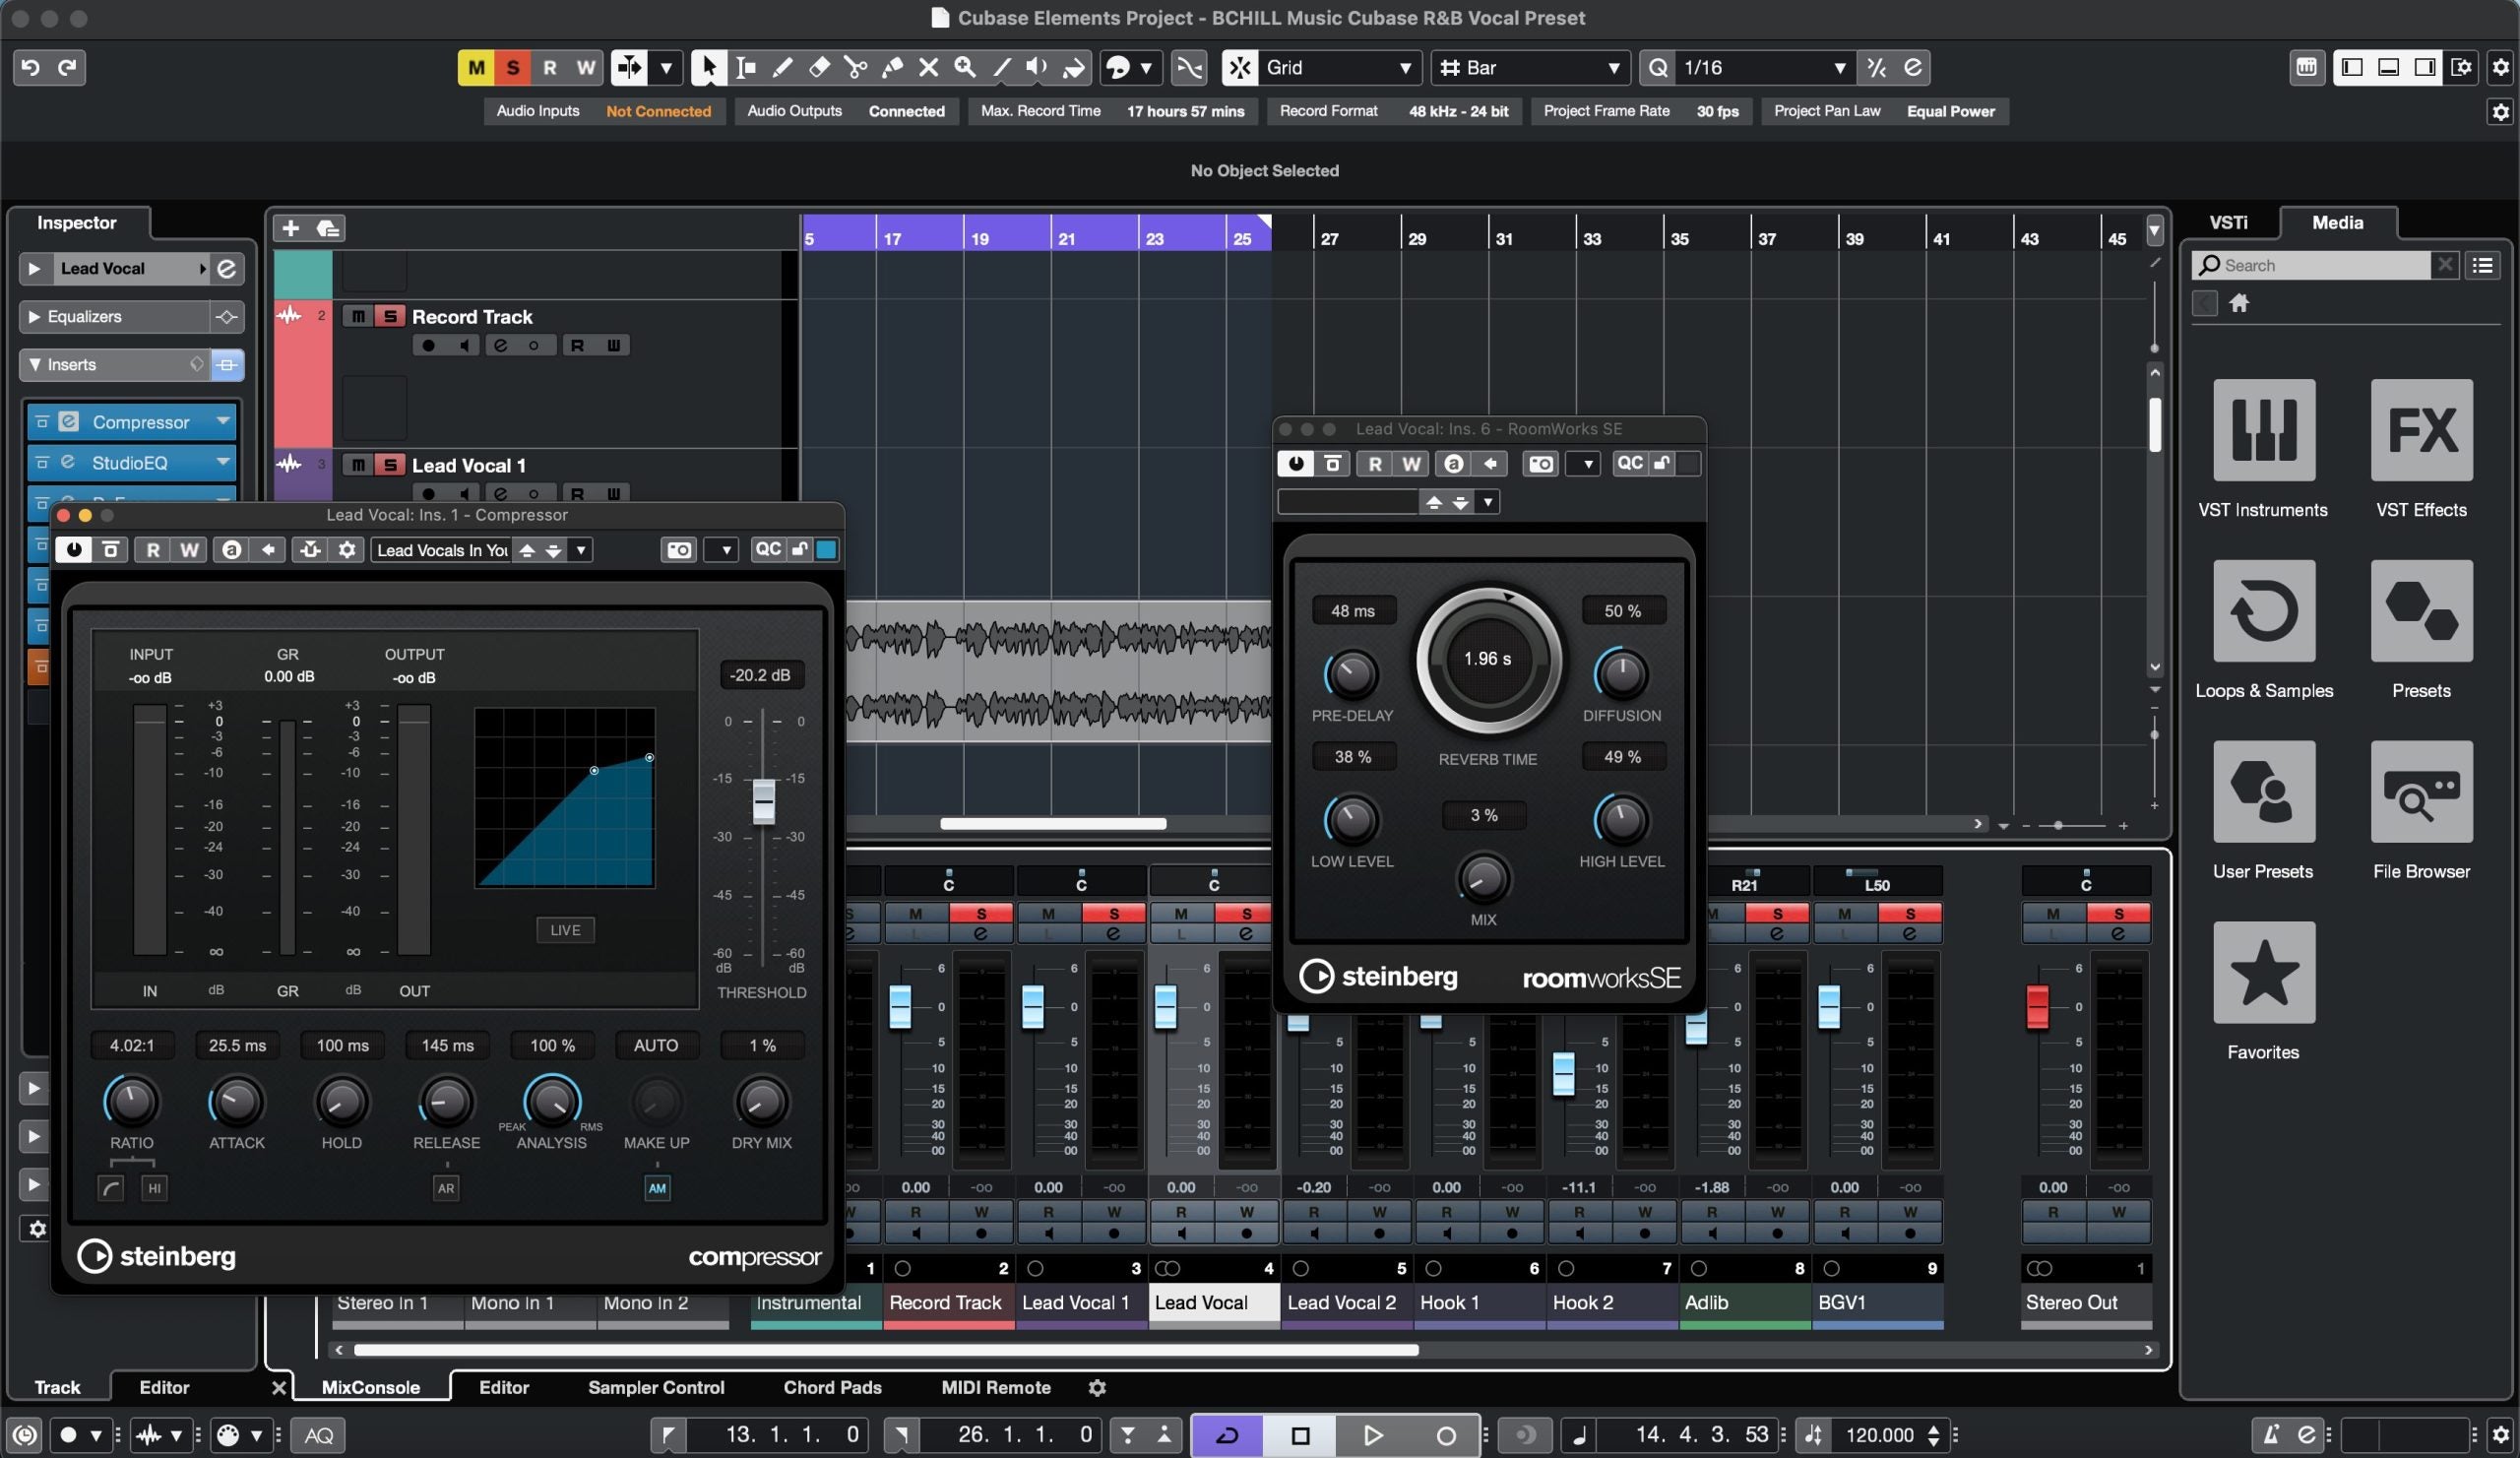
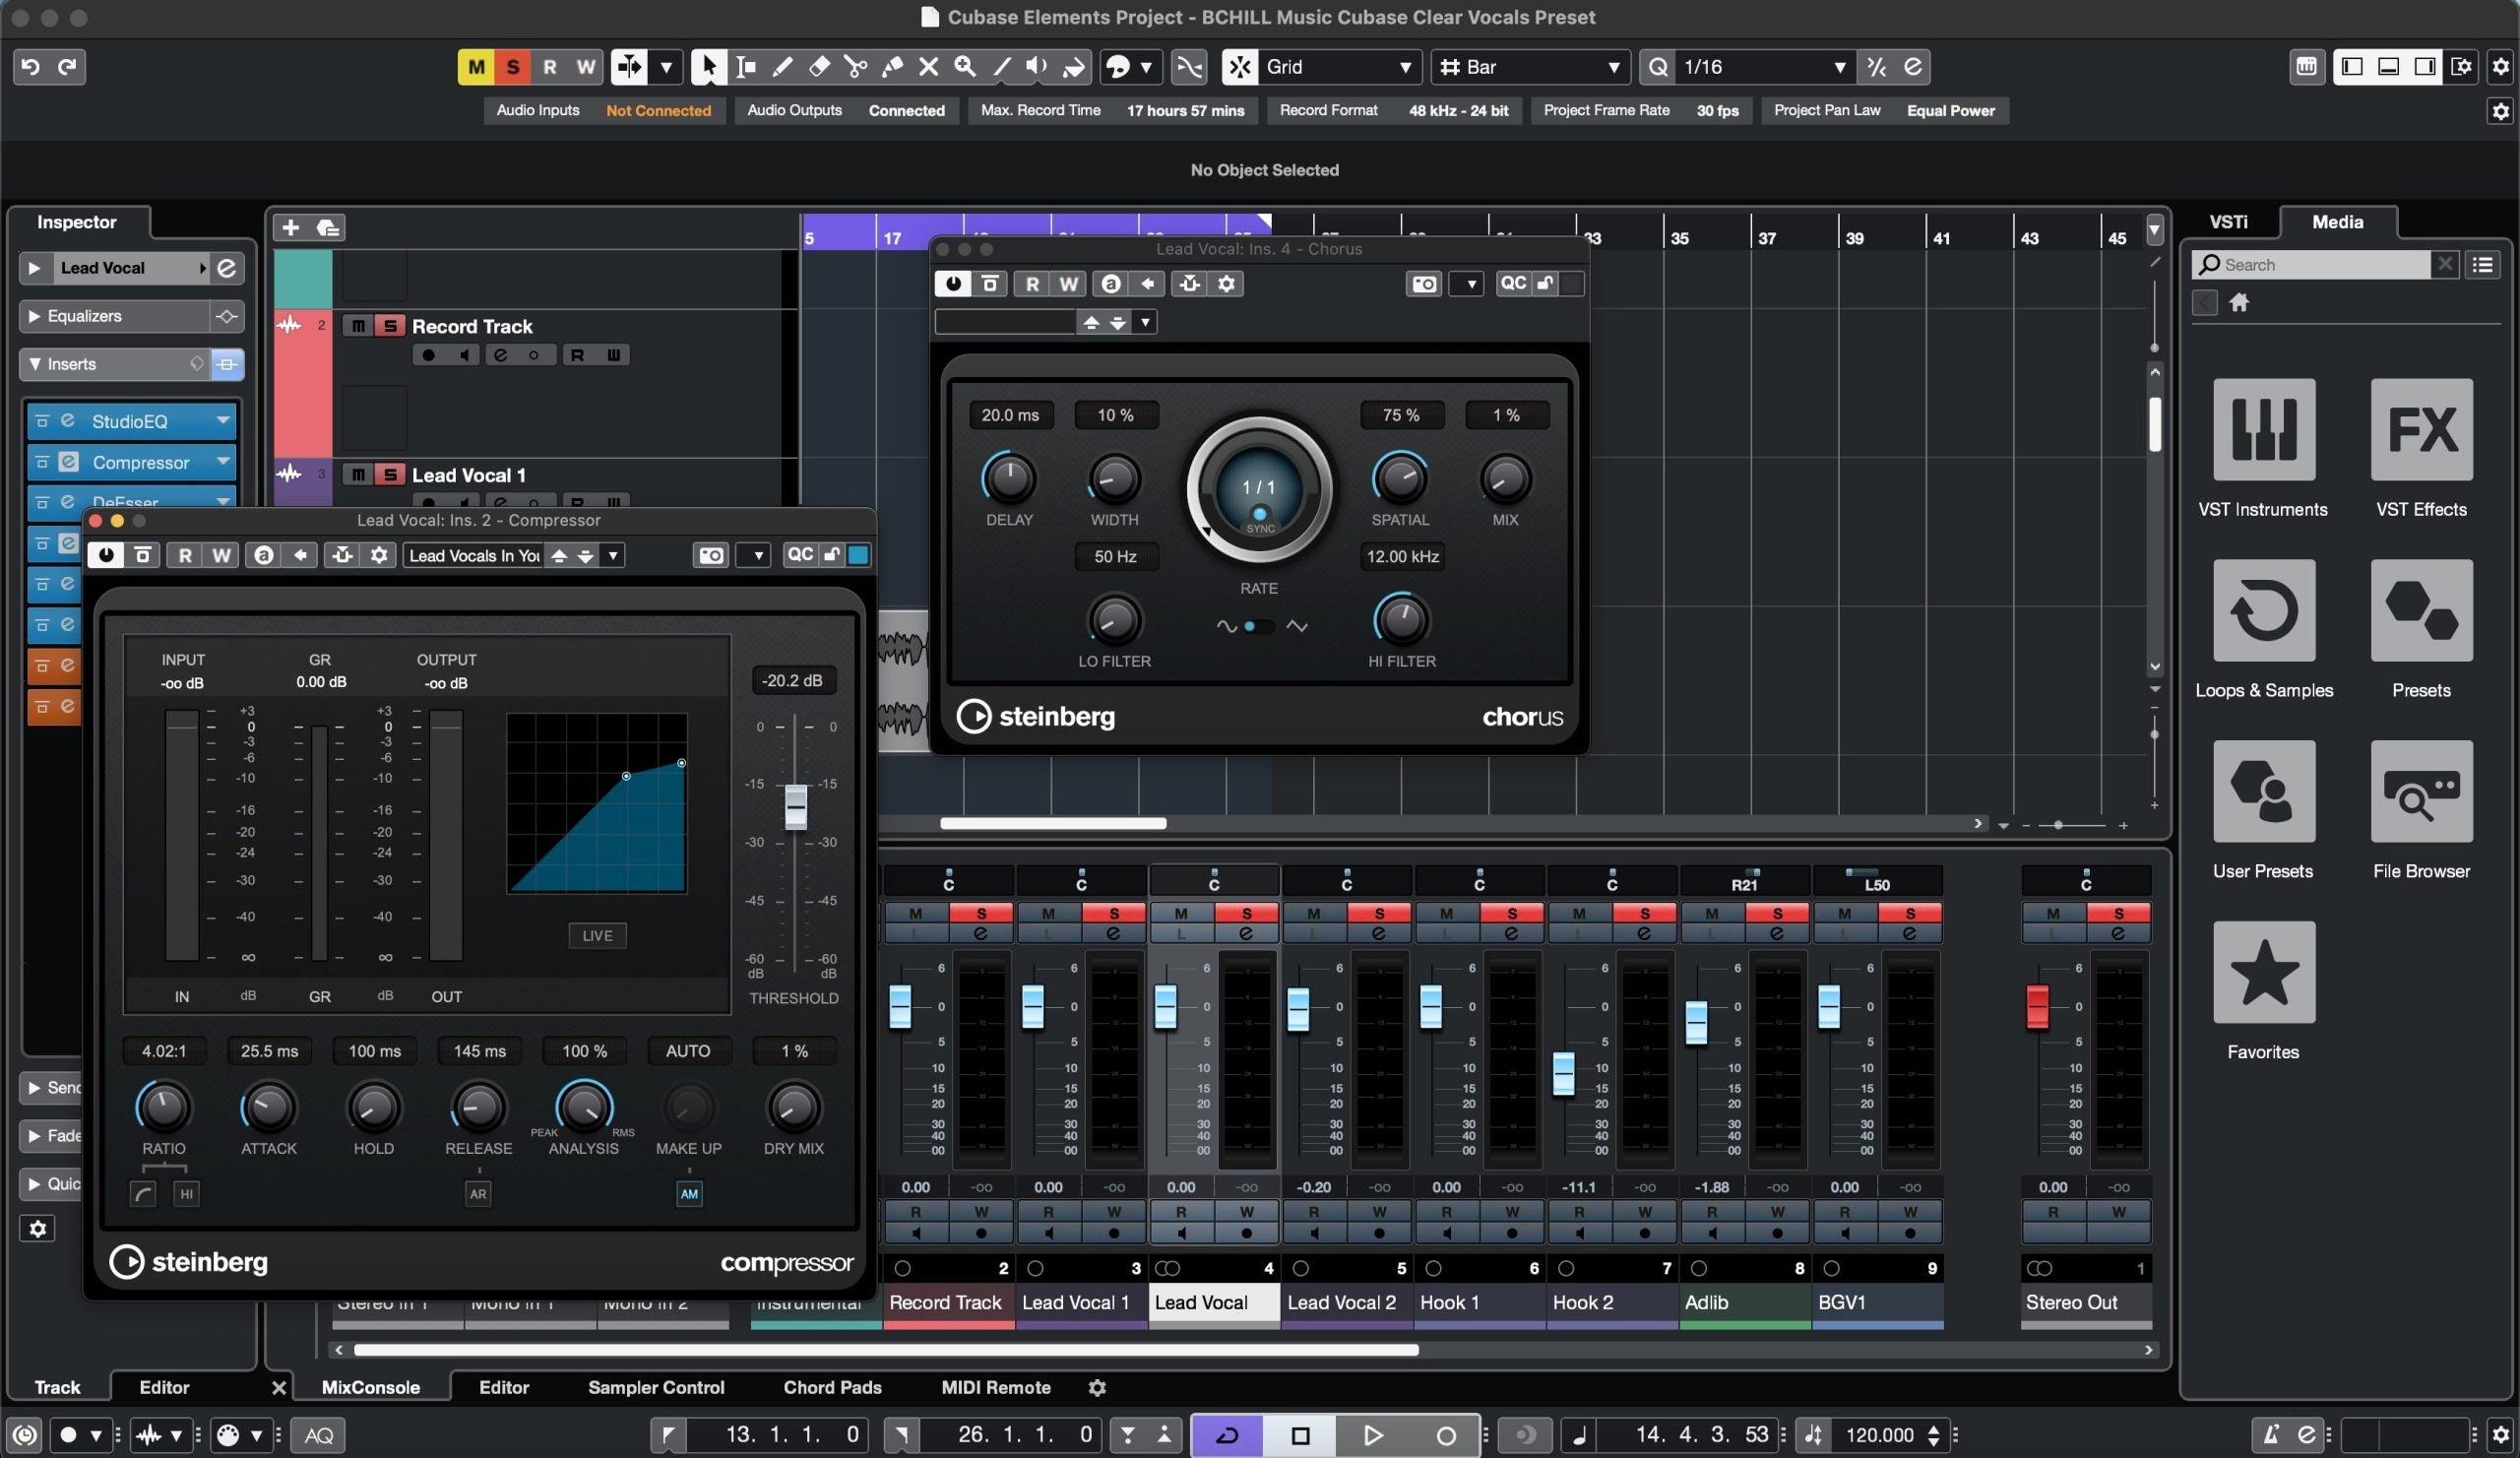
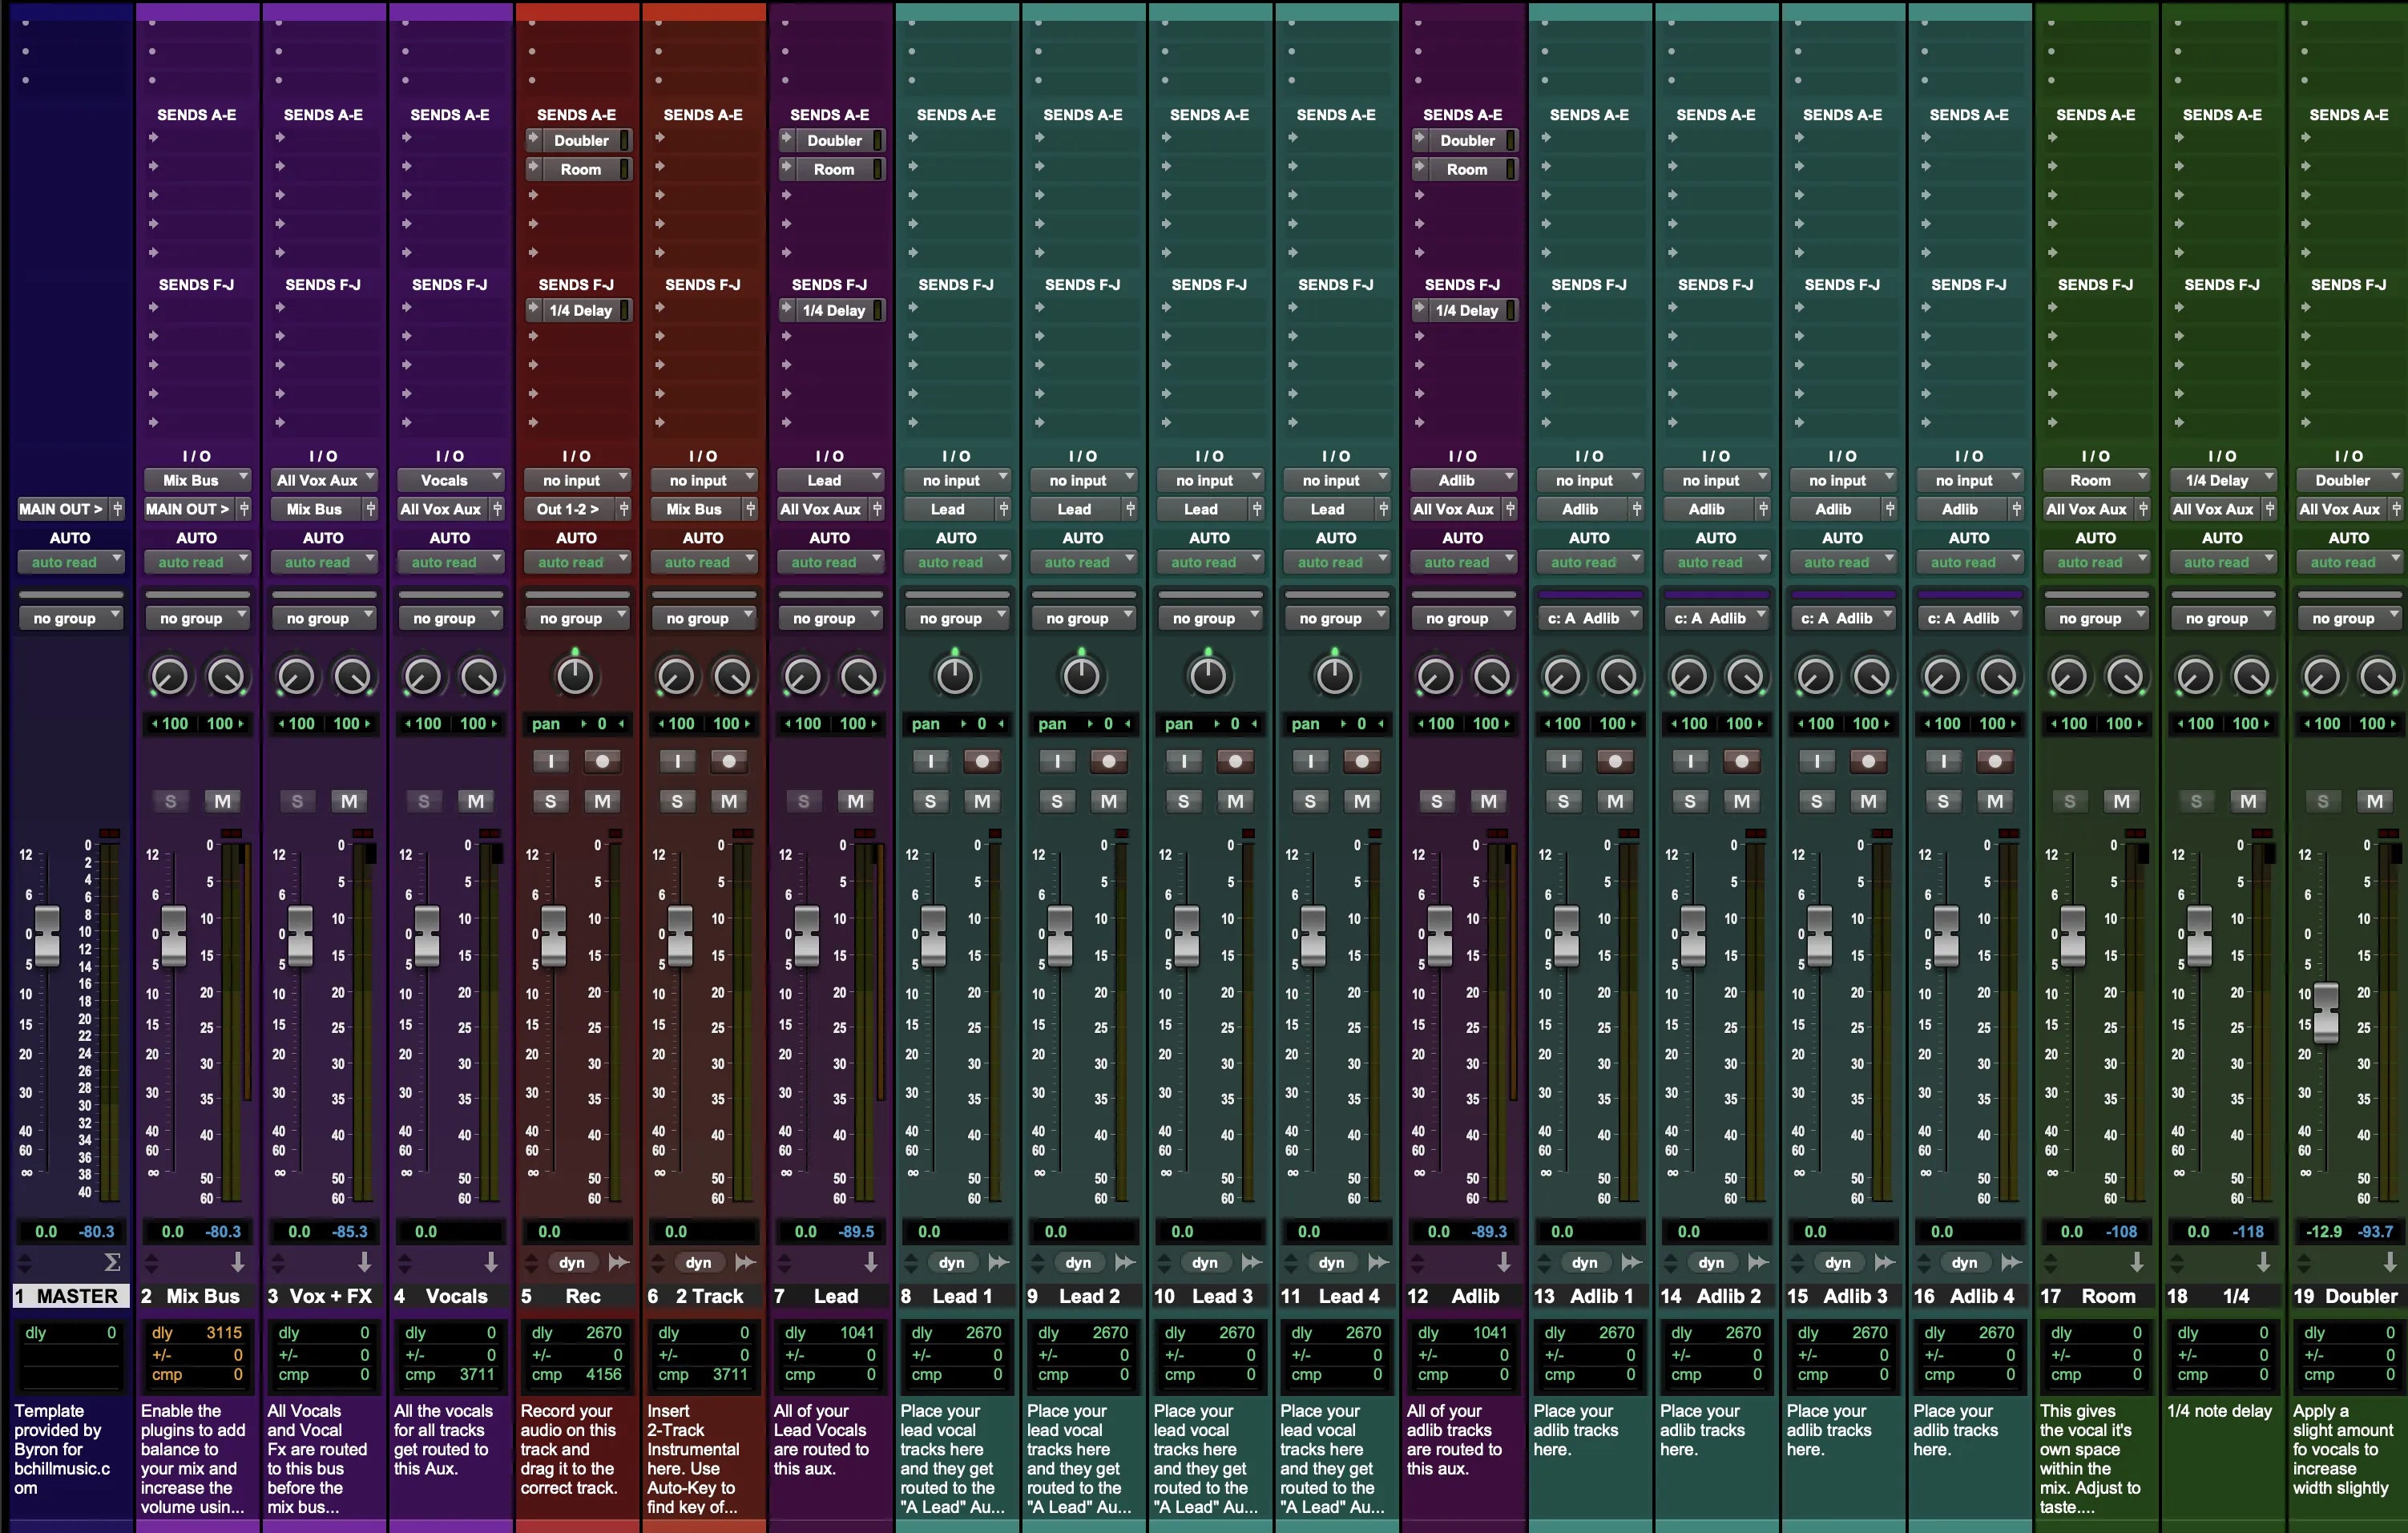
Dentro del DAW: Configuraciones de preajustes vocales de Cubase (Capturas de pantalla)
Vea cómo nuestra cadena vocal de Cubase se carga en pistas Lead y Bus. Estas capturas de pantalla muestran configuraciones iniciales para rap, R&B y pop, además de consejos rápidos para dobles/armonías con Alineación de Audio y VariAudio.