Stock Preajustes y Plantillas
Optimiza tu flujo de trabajo con nuestra plantilla de grabación lista para usar y los ajustes preestablecidos vocales de stock.
Tipo: Plantilla de Grabación
Plantilla de grabación de FL Studio (Plugins de stock)

Tipo: Preset Vocal
Preset Vocal R&B para FL Studio (Plugins de Stock)
Tipo: Preset Vocal
Preset de Rap Vocal para FL Studio (Plugins de Stock)
Tipo: Preset Vocal
Preset de Voces Claras para FL Studio (Plugins de Stock)
Ajustes Vocales Premium
Experimenta una calidad de sonido inigualable con nuestros Presets Vocales Premium, elaborados con plugins de primera categoría.

Tipo: Preset Vocal
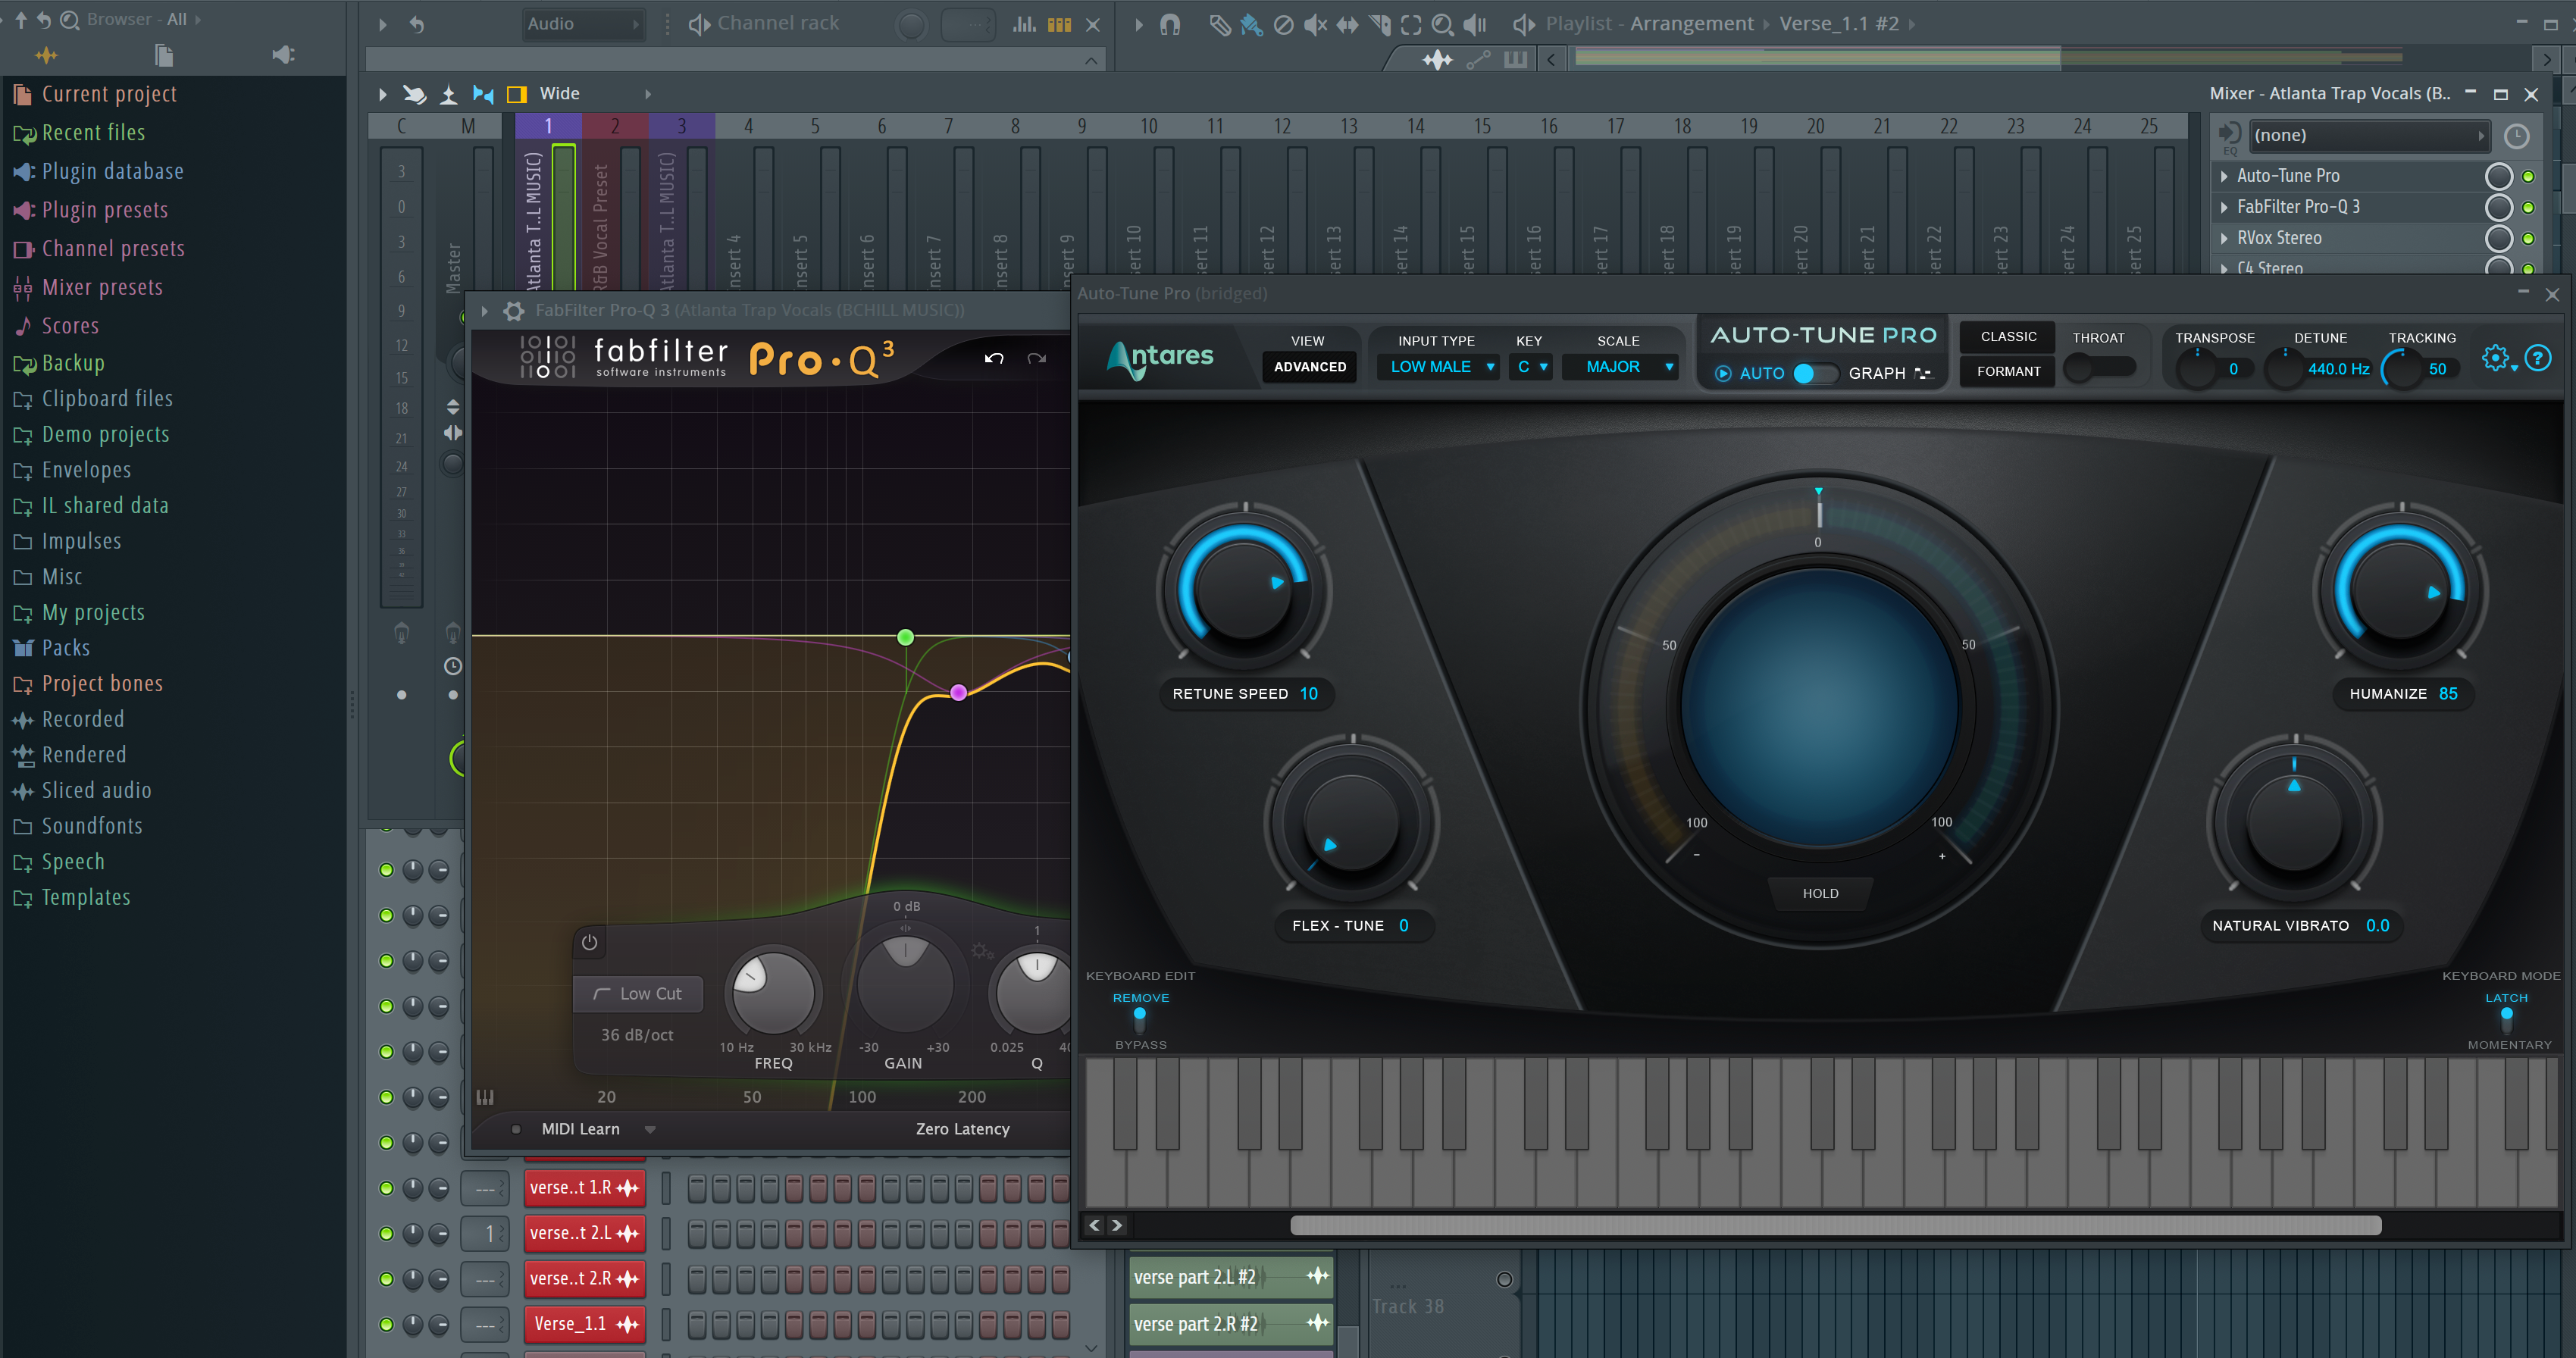
Preset Vocal de Trap de Atlanta para FL Studio
Tipo: Preset Vocal
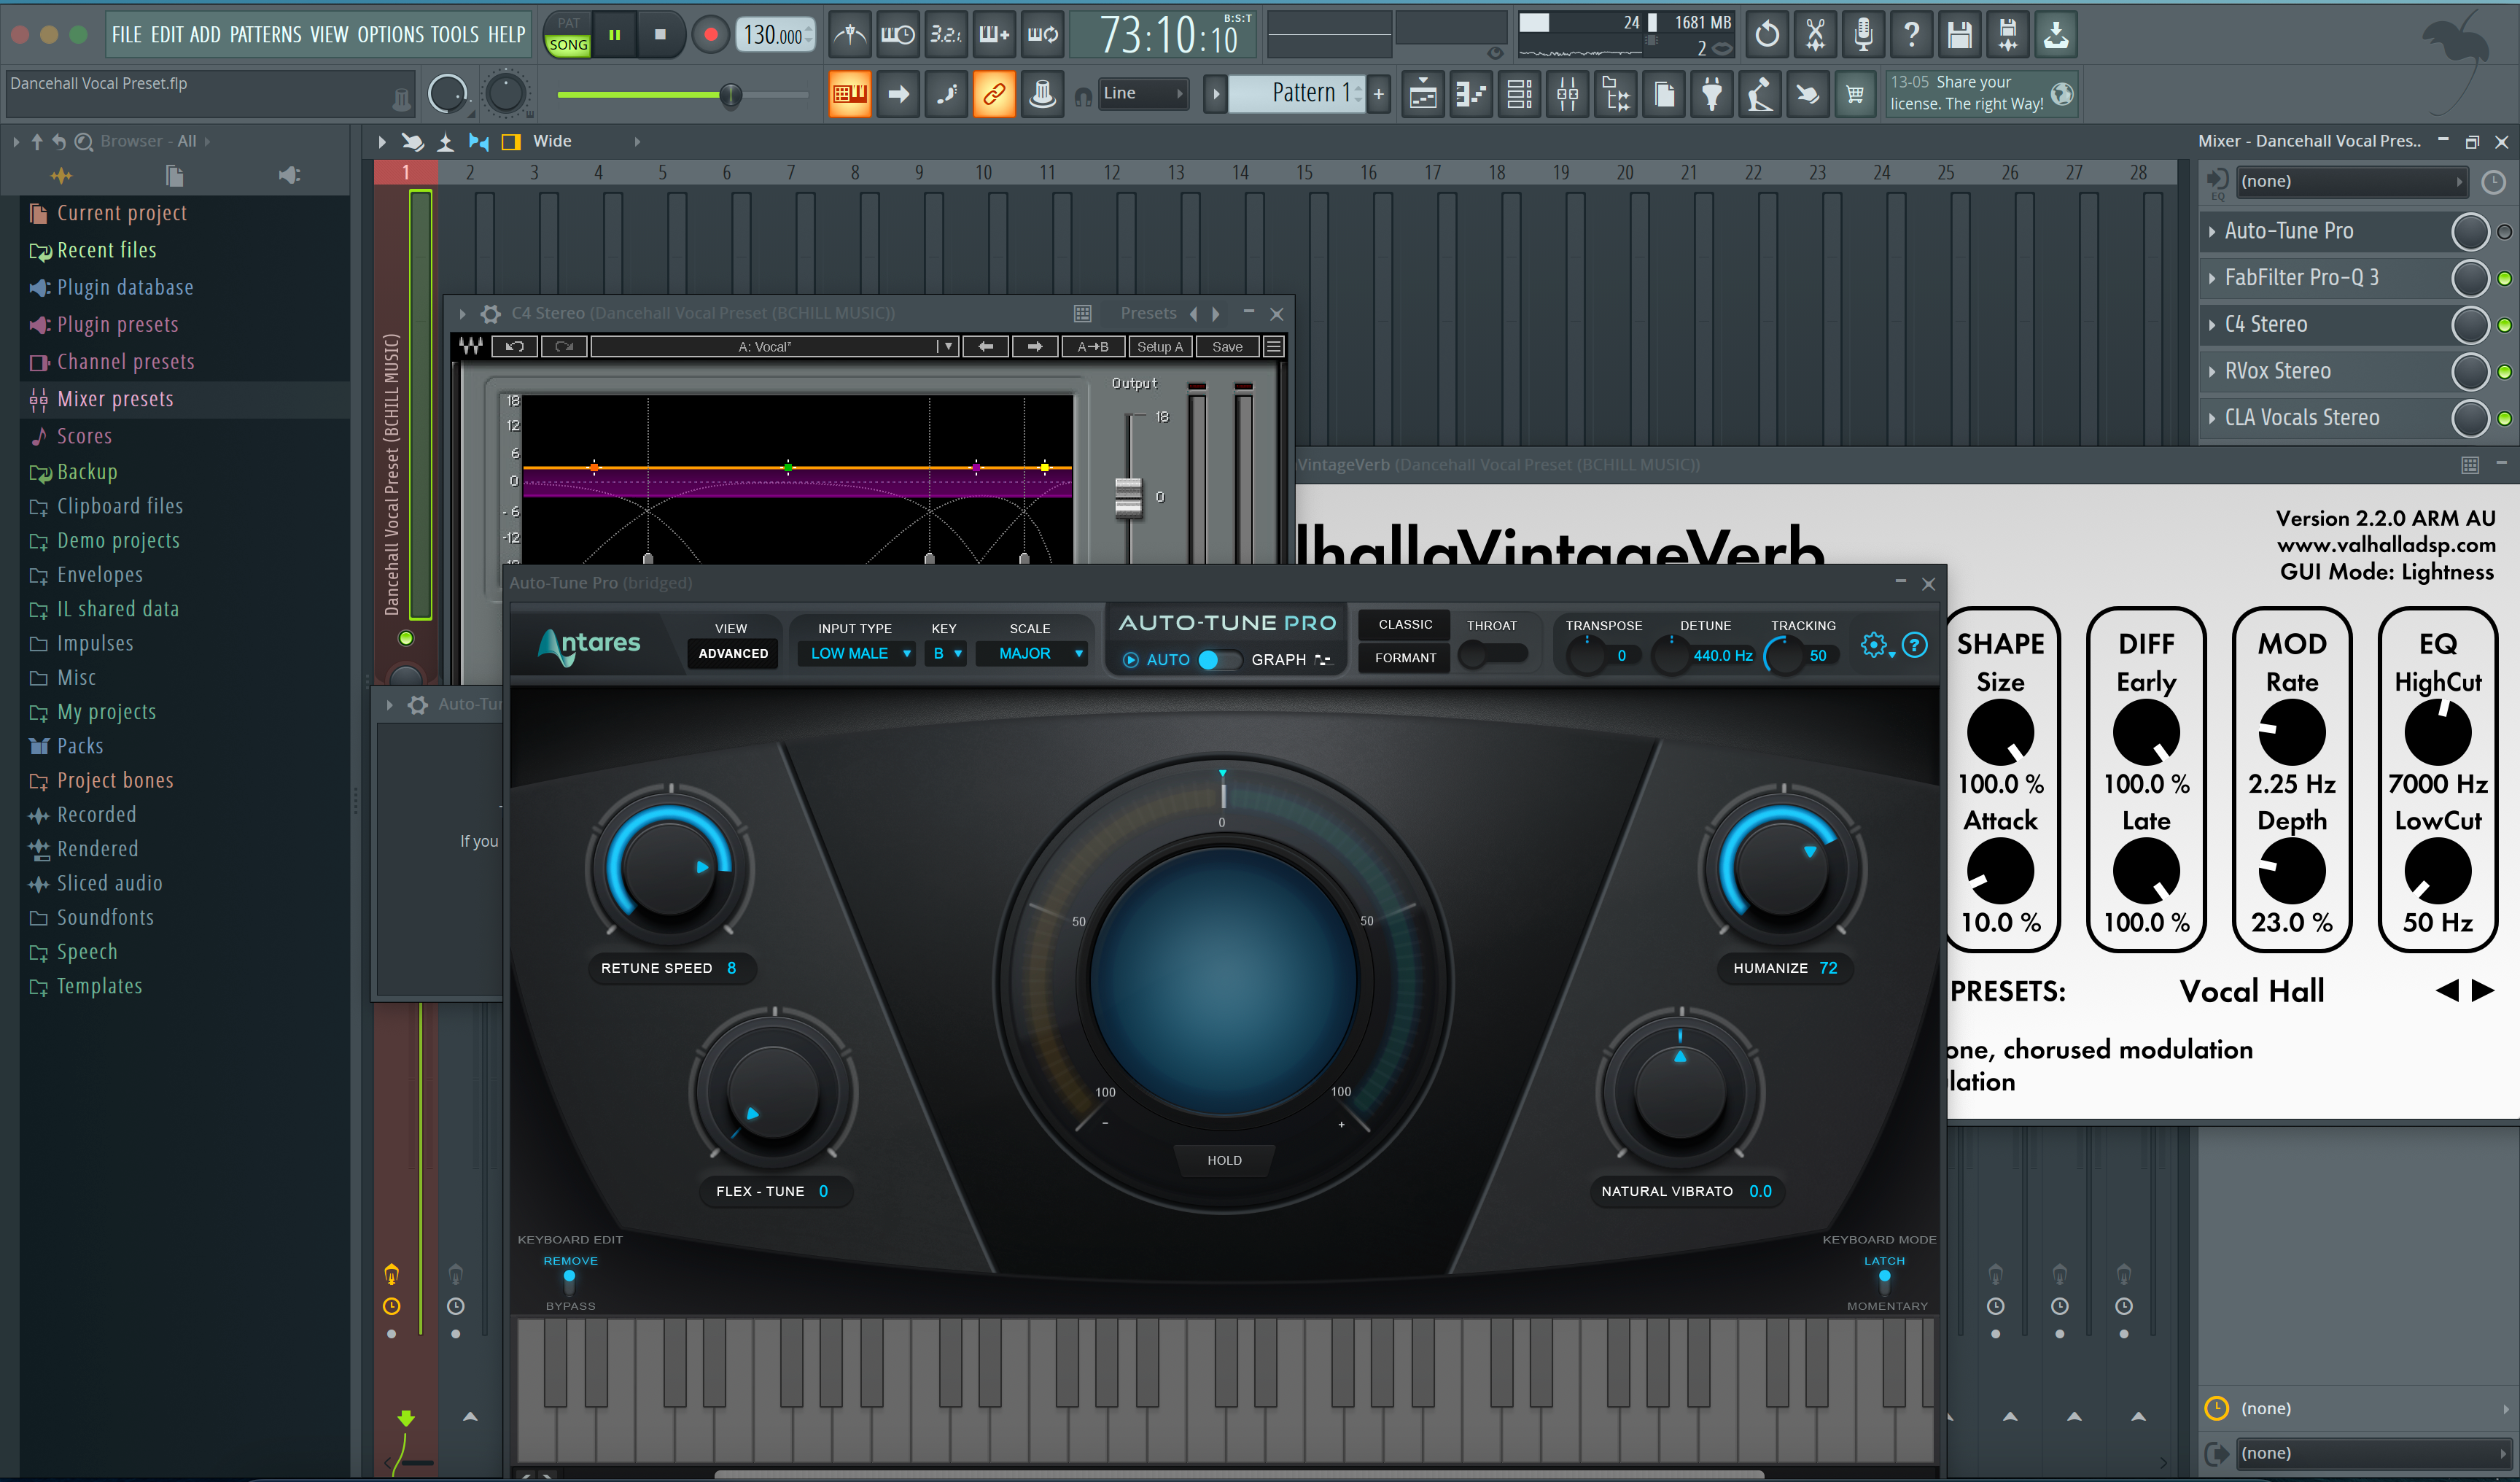
Preset Vocal de Dancehall para FL Studio
Tipo: Preset Vocal
Preset Vocal de Drake para FL Studio
Tipo: Preset Vocal
Preset Vocal de Gunna para FL Studio
Tipo: Preset Vocal
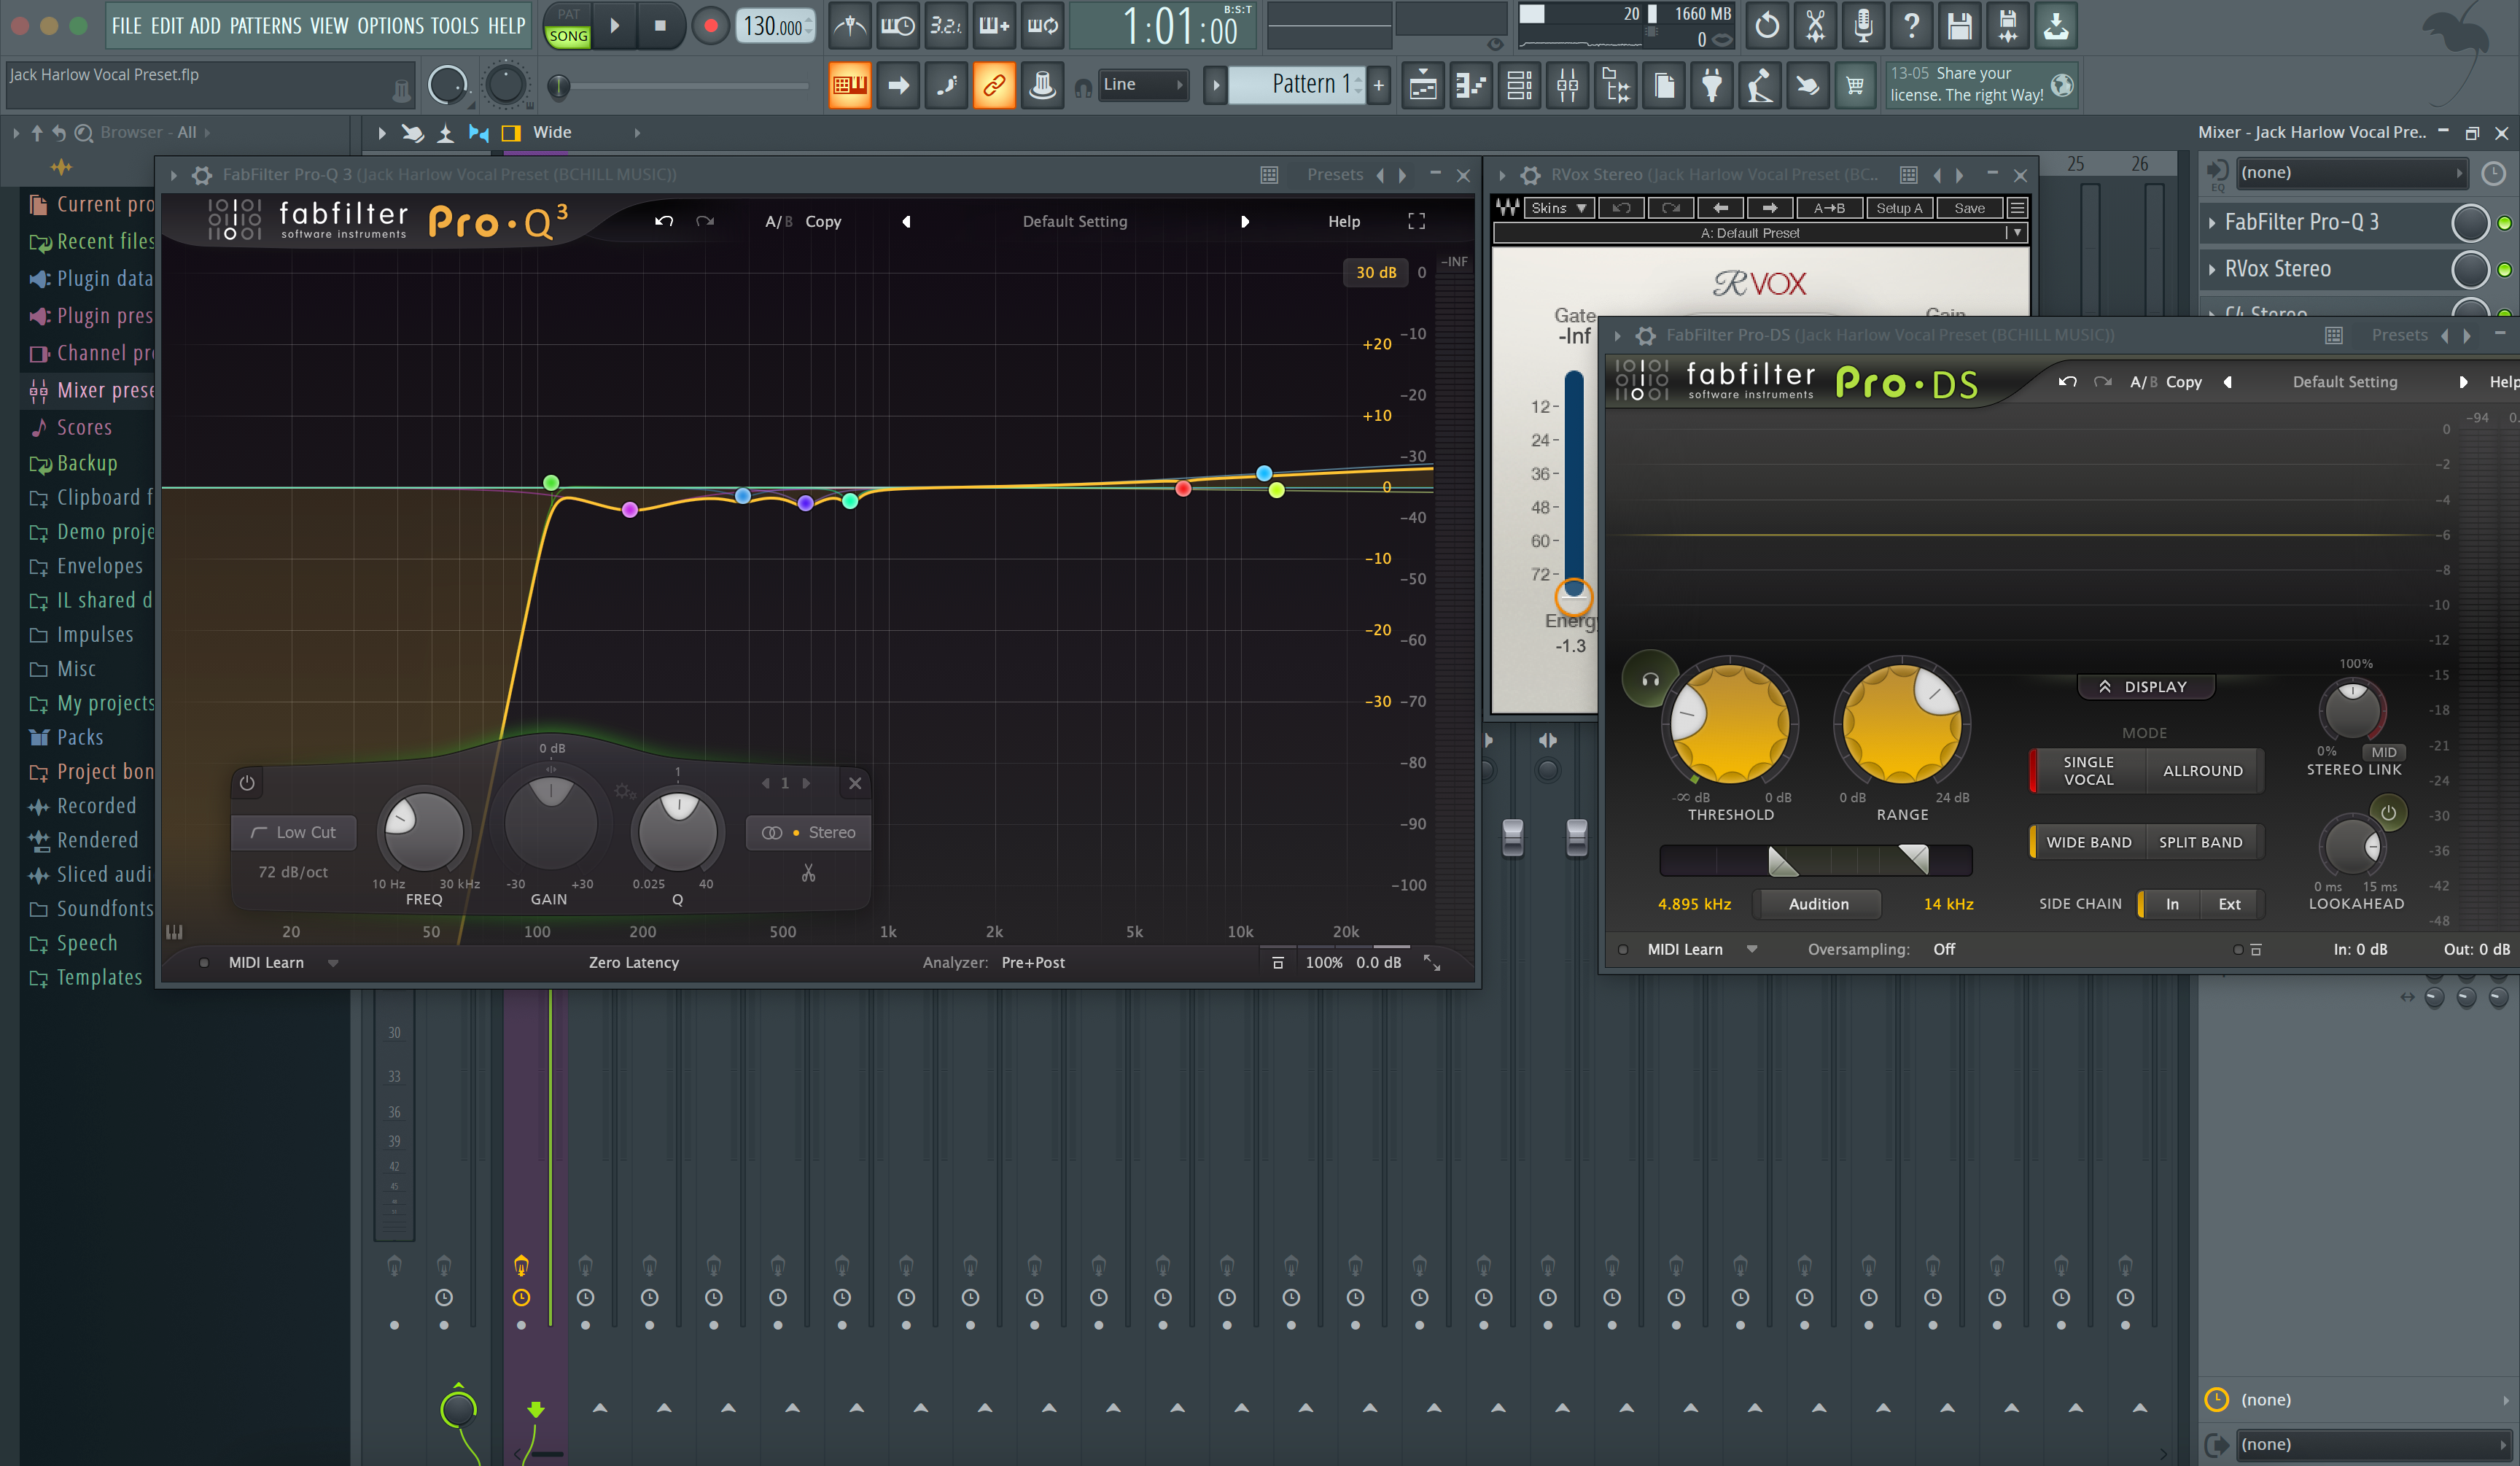
Preset Vocal de FL Studio de Jack Harlow
Tipo: Preset Vocal
Preset Vocal de Juice Wrld para FL Studio | Cadena Vocal de Juice Wrld (Plugins de Stock)
Tipo: Preset Vocal
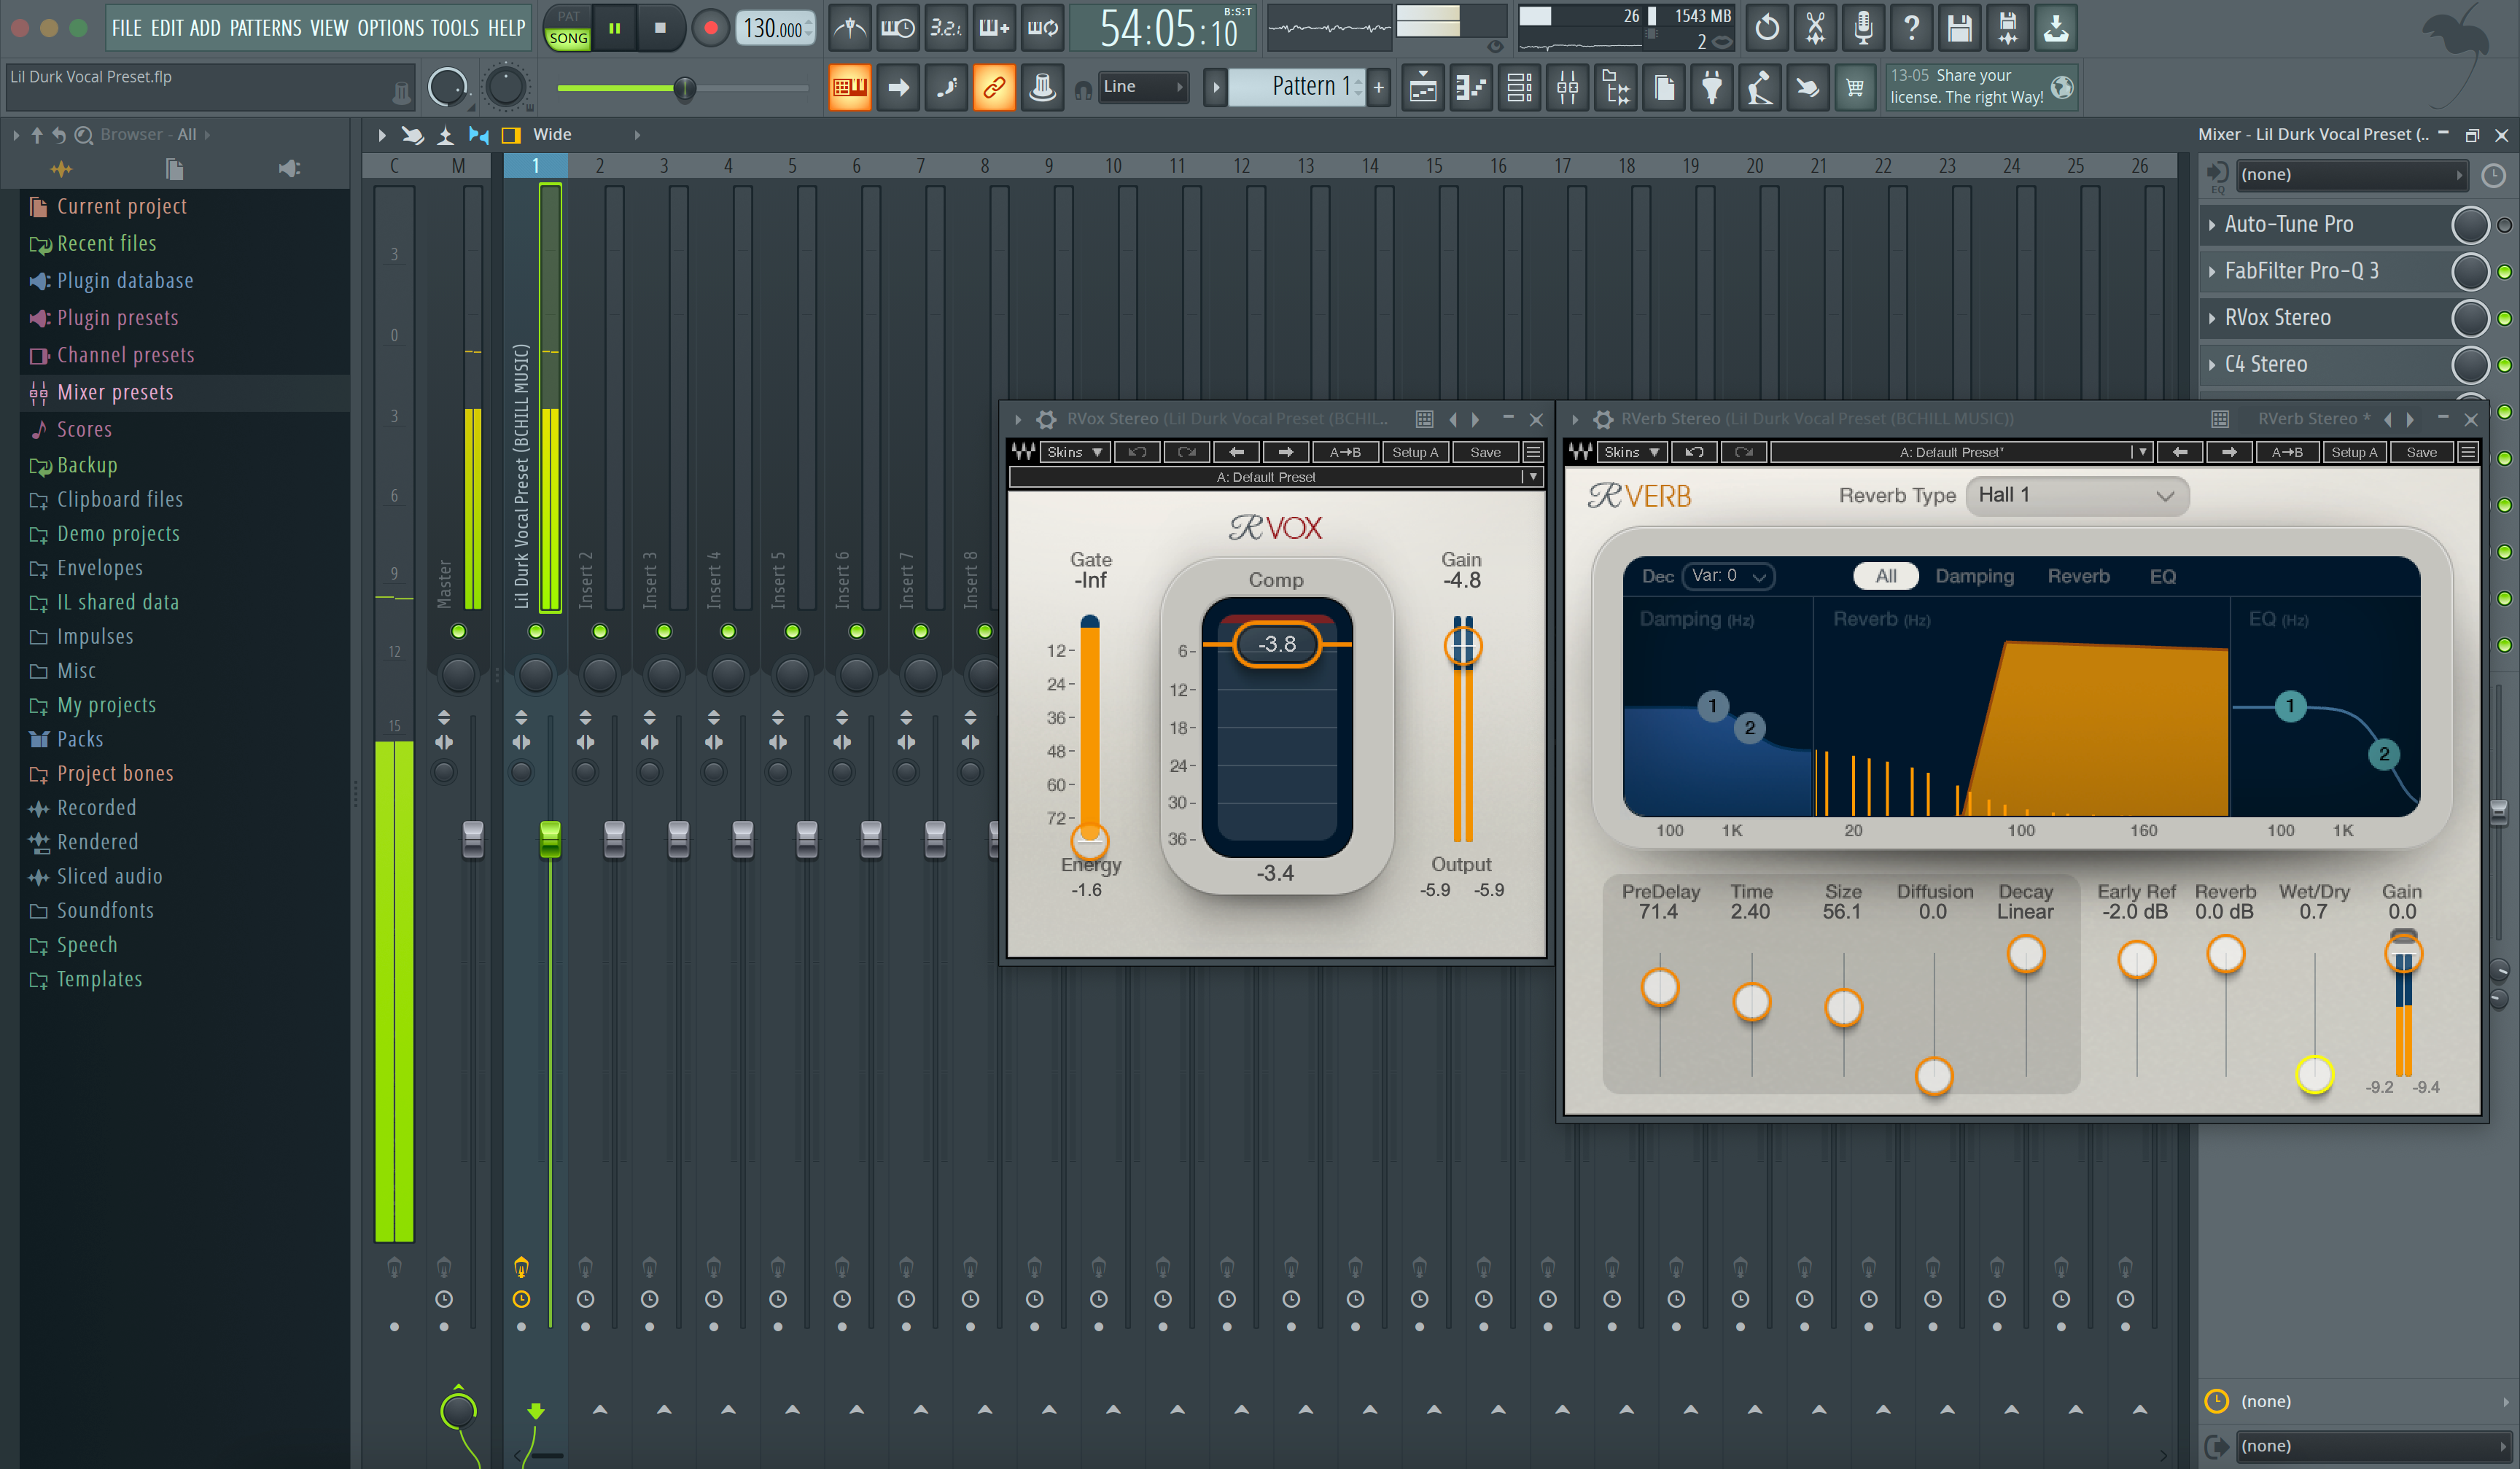
Preset Vocal de Lil Durk para FL Studio


Tipo: Preset Vocal
Preset Vocal de FL Studio de Megan Thee Stallion
Tipo: Preset Vocal
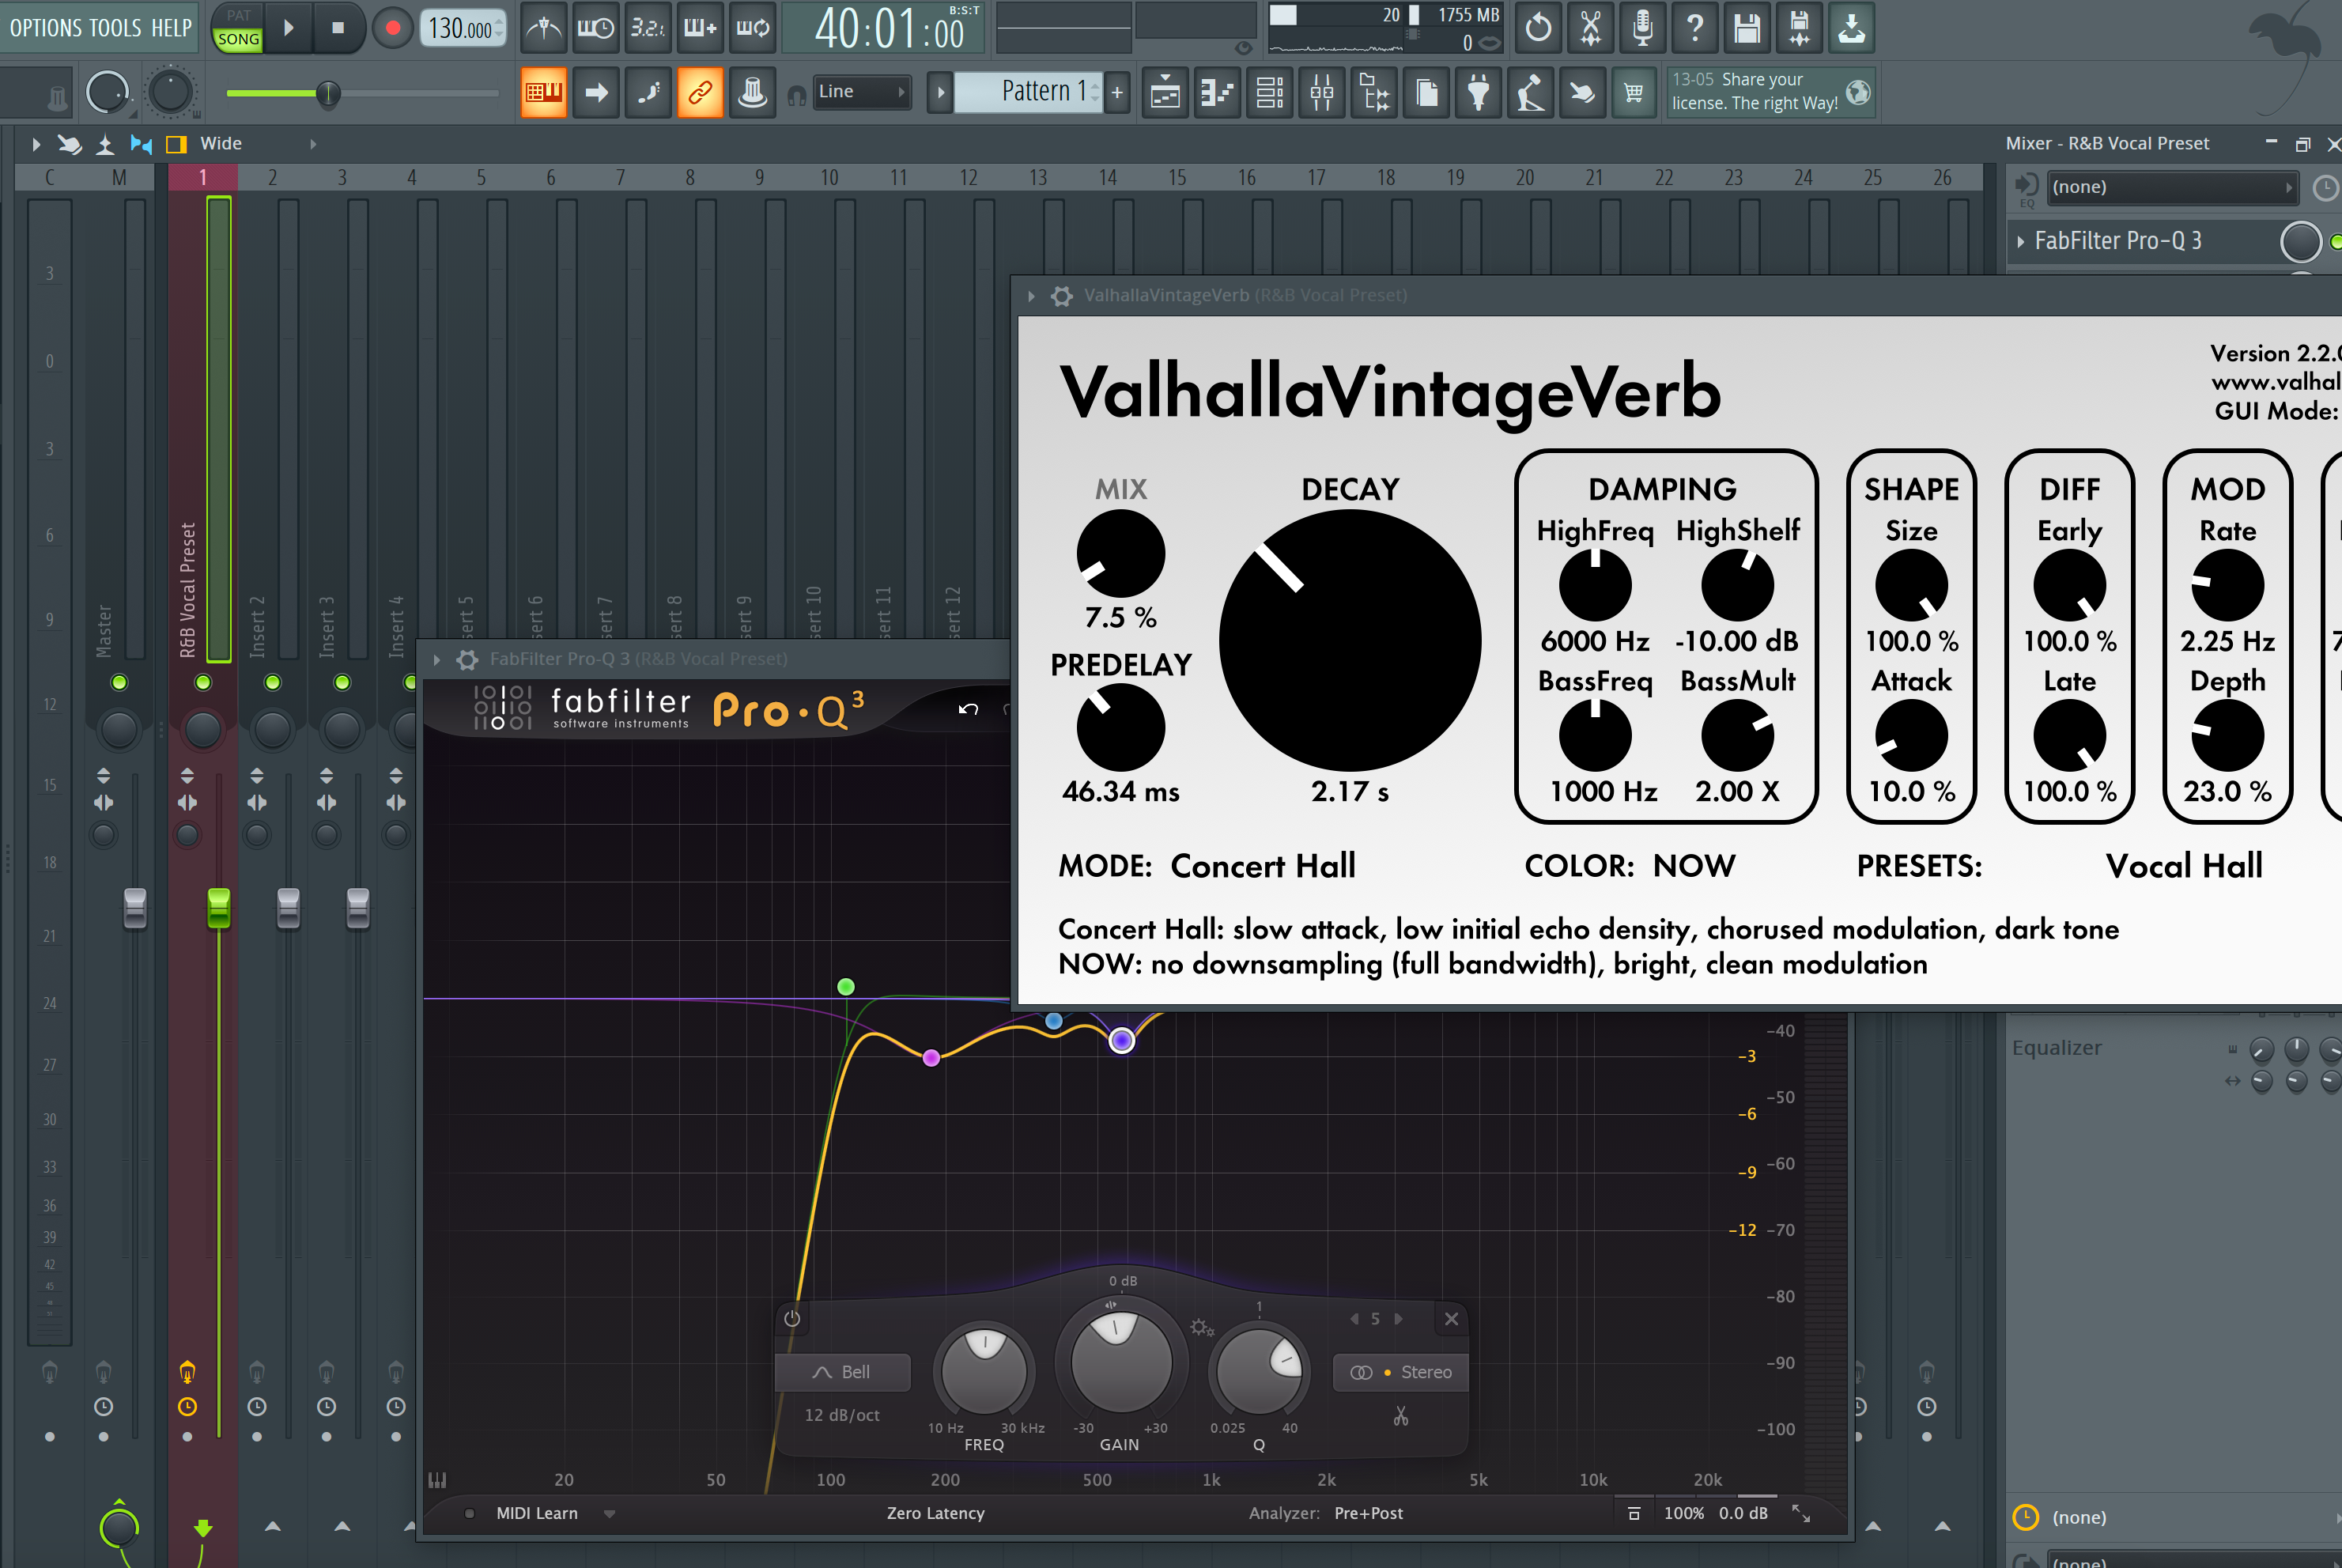
Preset Vocal de R&B para FL Studio
Tipo: Preset Vocal
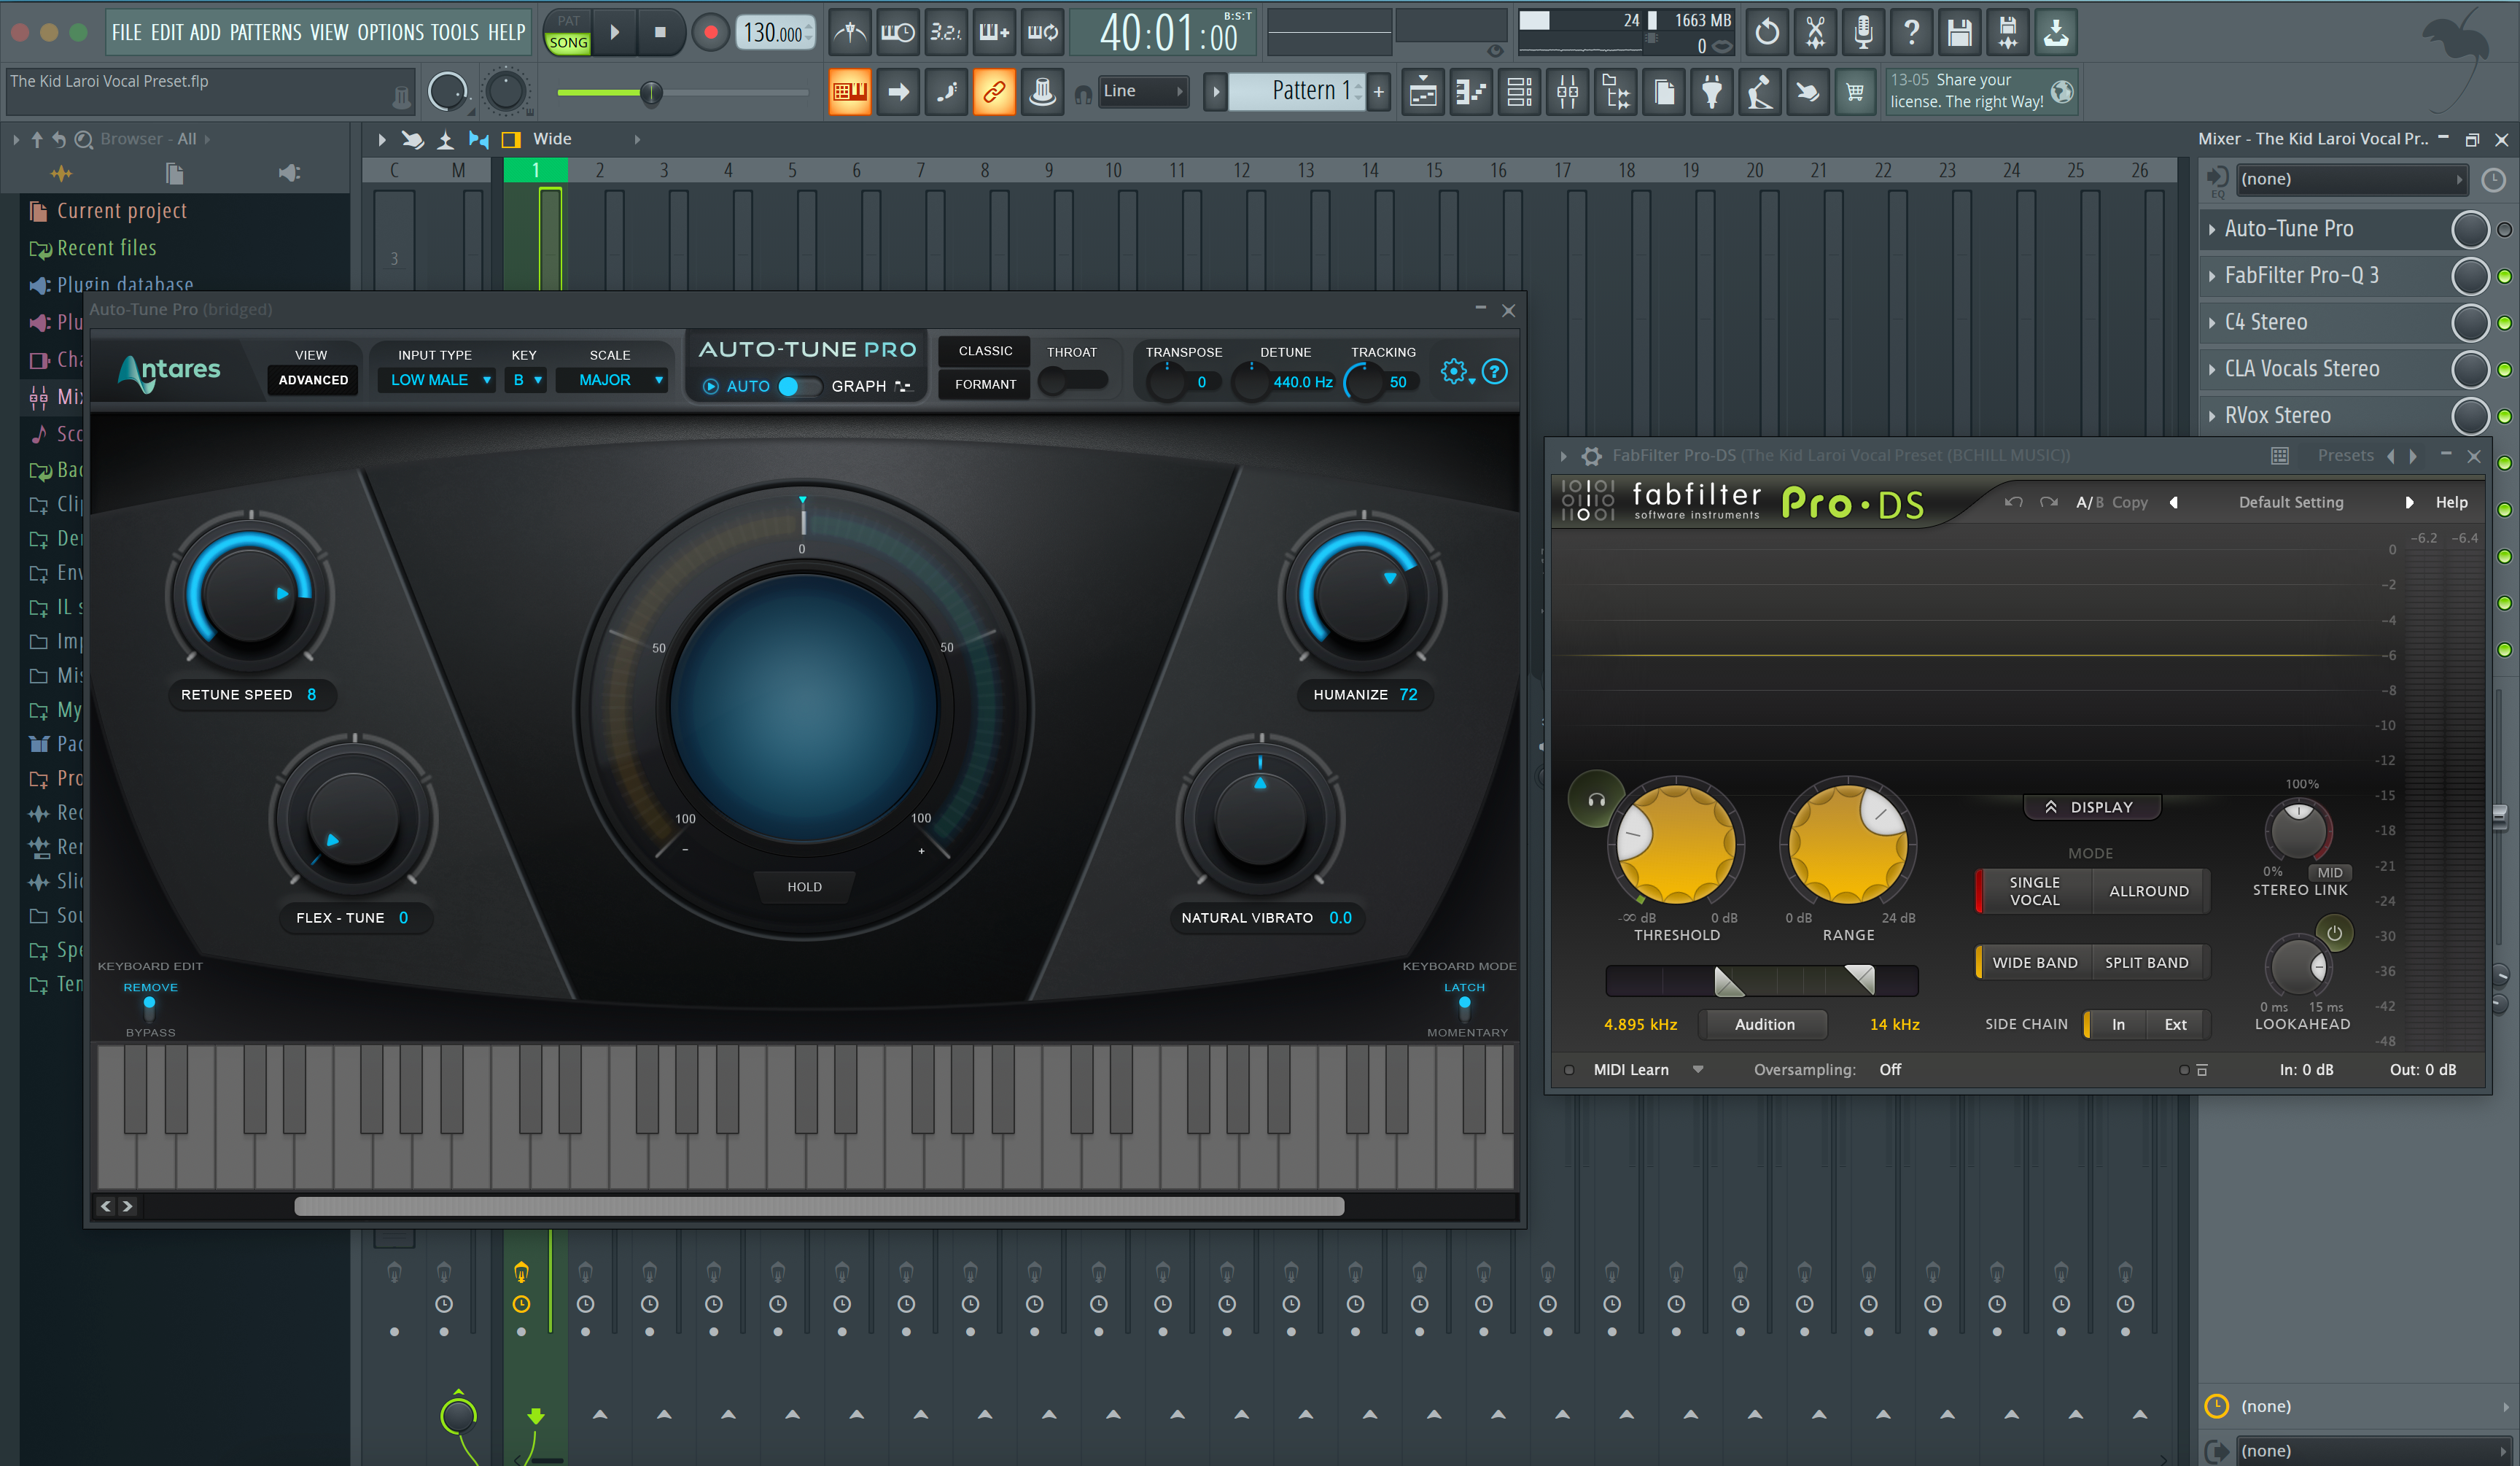
El Kid Laroi Preset Vocal de FL Studio
Tipo: Preset Vocal
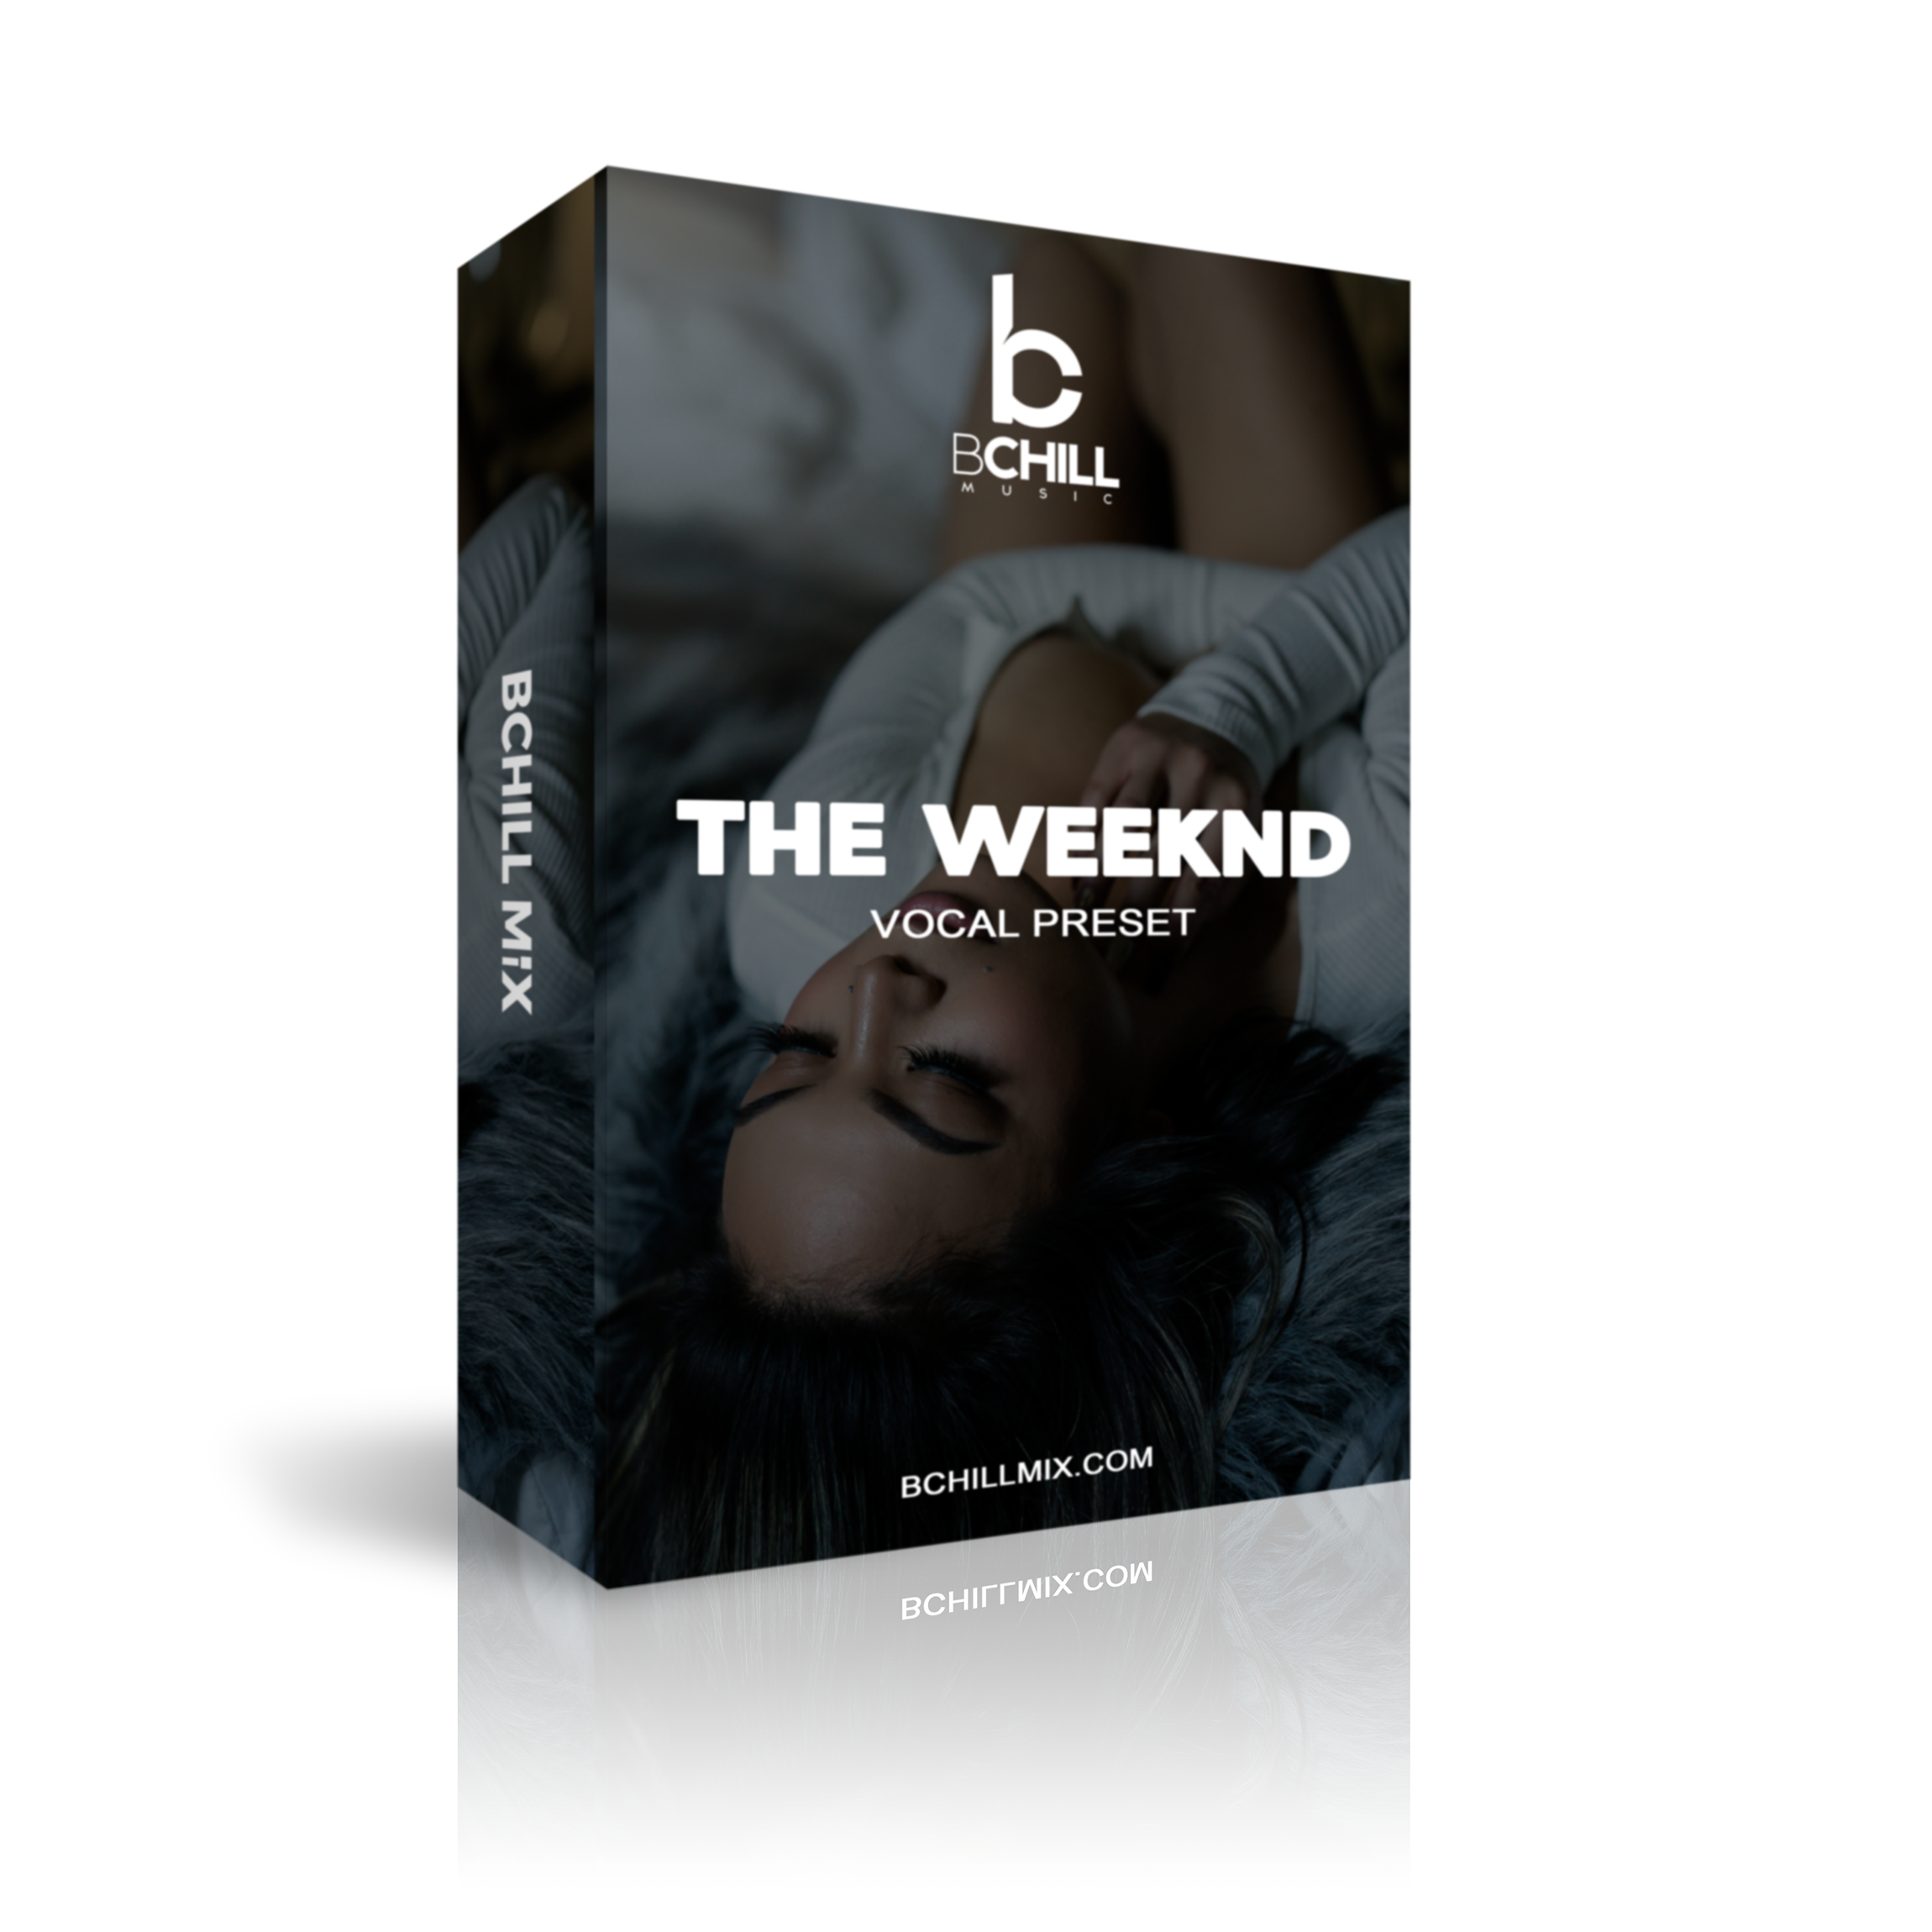
Preset Vocal de FL Studio de The Weeknd
Tipo: Preset Vocal
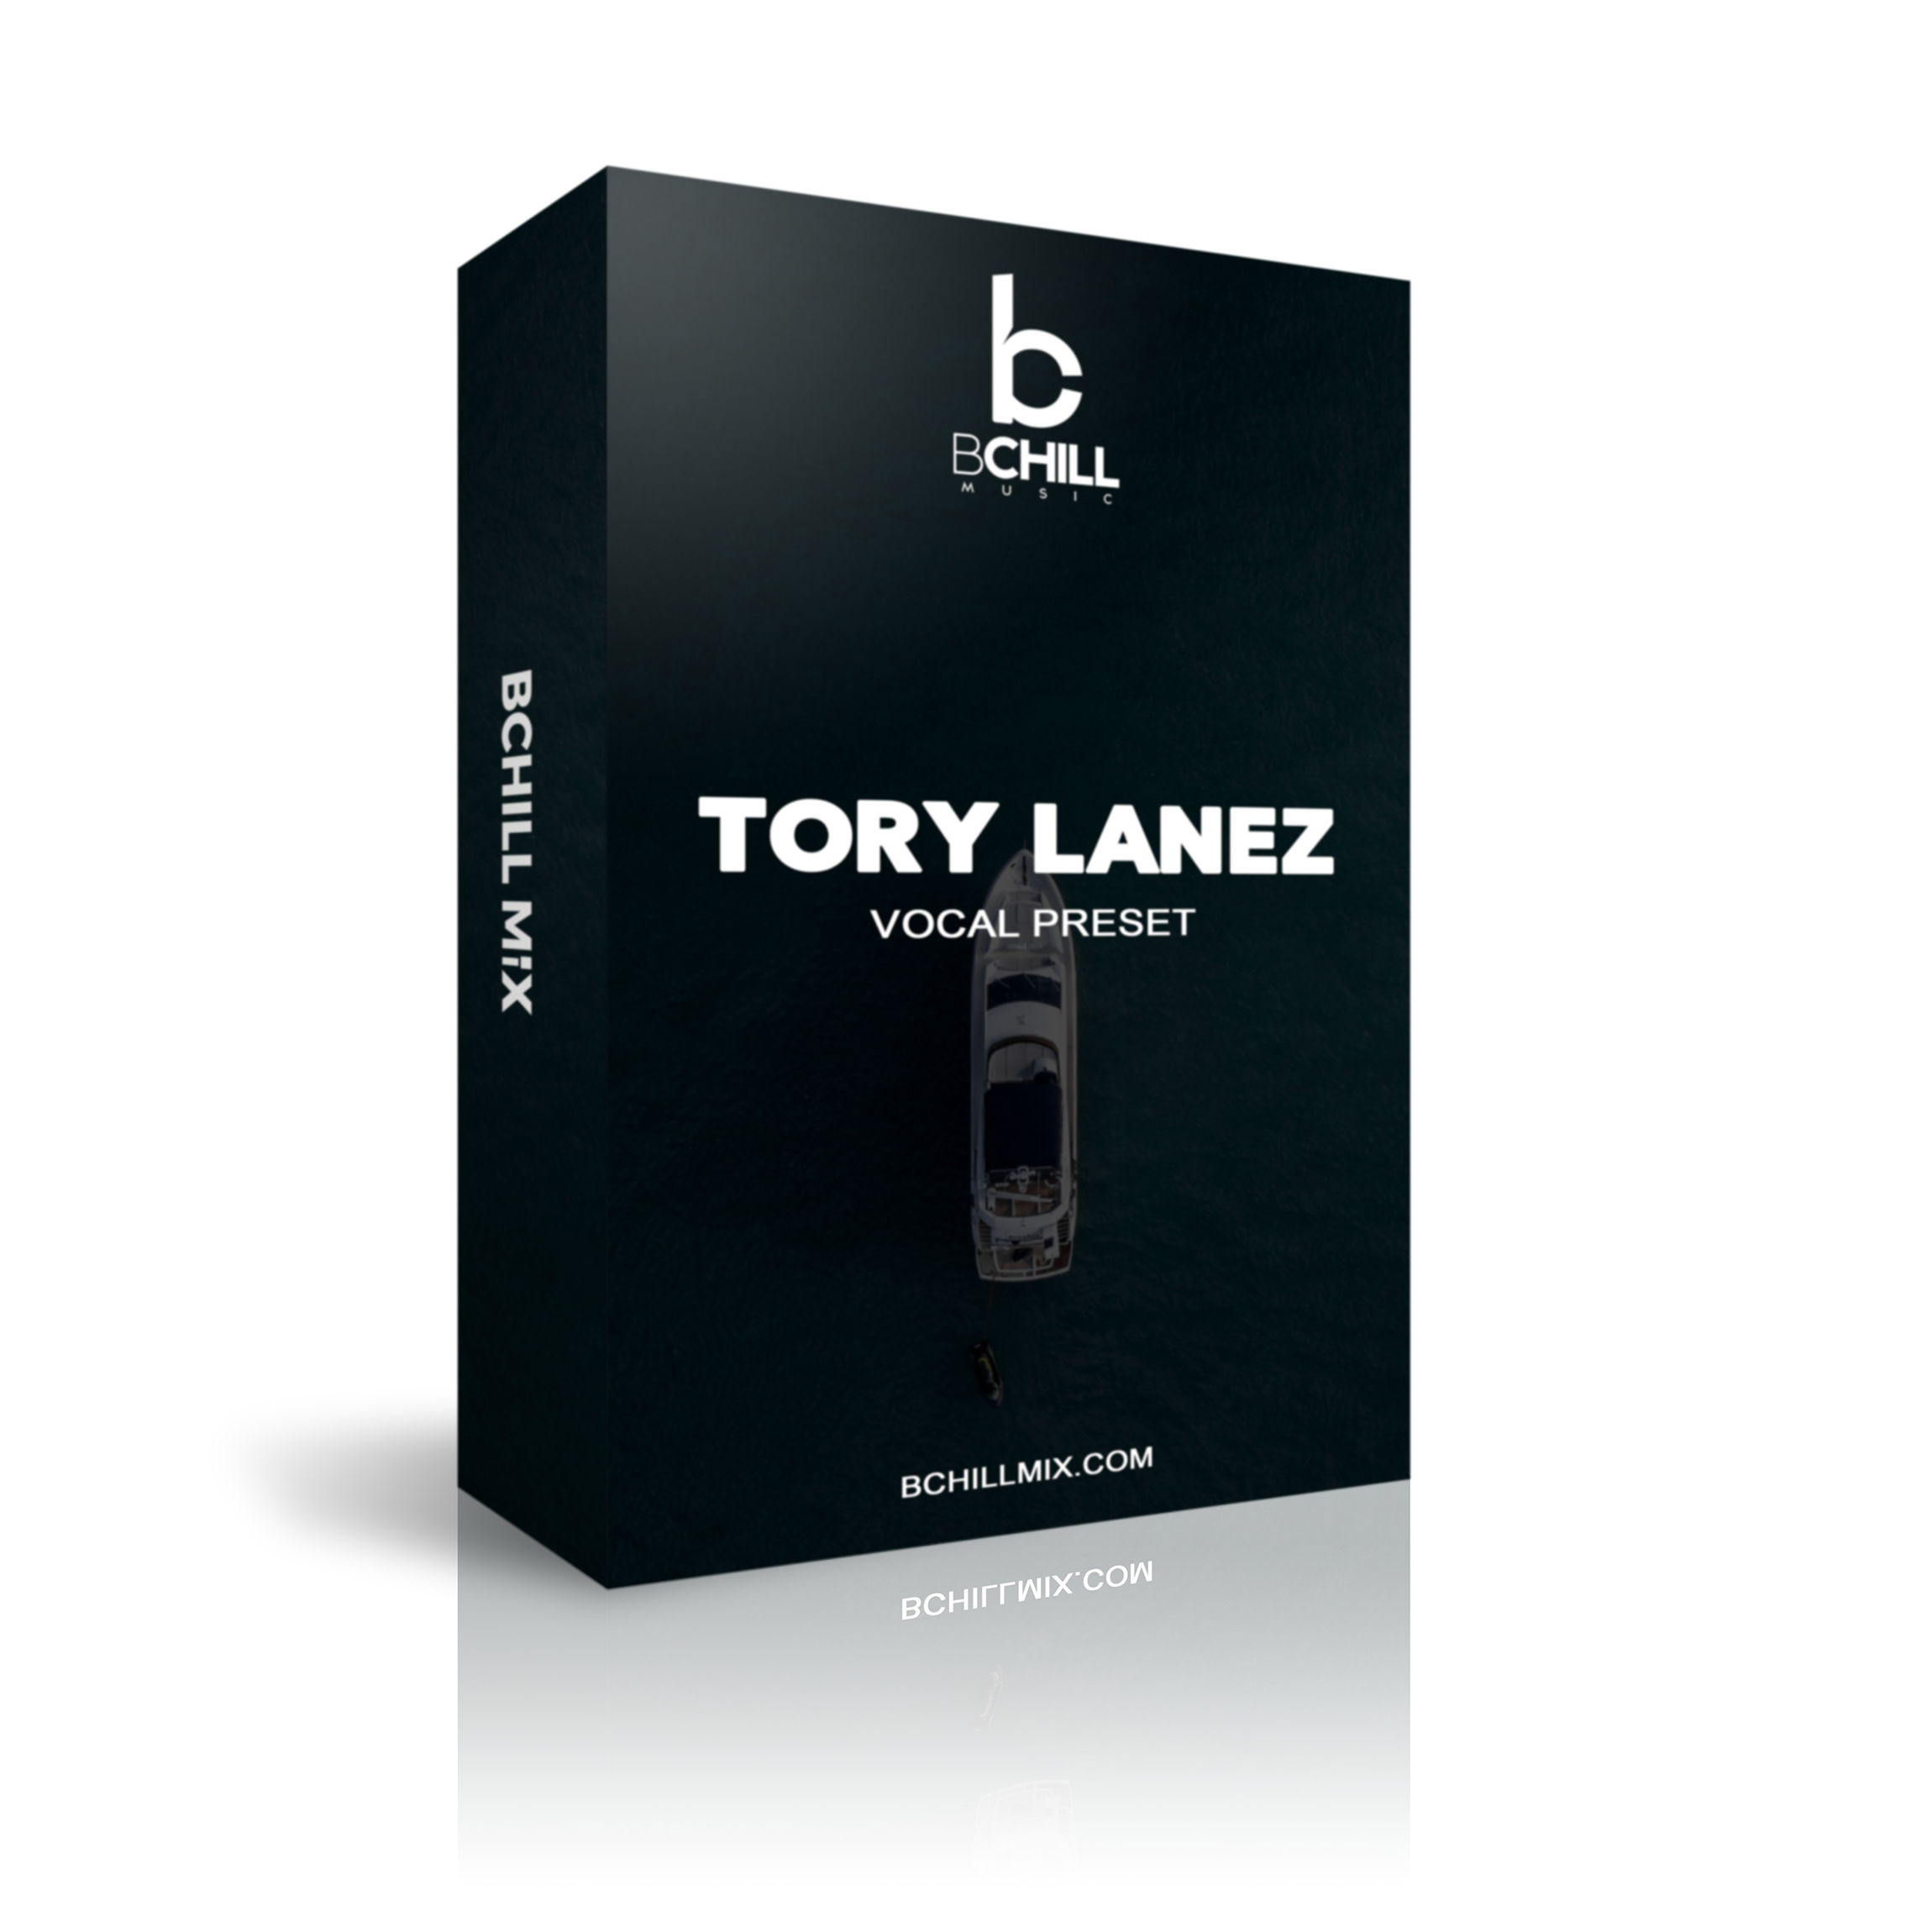
Preset de Vocal de FL Studio de Tory Lanez
Preguntas frecuentes
¿Qué son los ajustes preestablecidos de voz en FL Studio?
¿Qué son los ajustes preestablecidos de voz en FL Studio?
Los presets vocales de FL Studio son cadenas vocales preconfiguradas diseñadas para ayudarte a obtener un sonido más limpio y controlado sin tener que reconstruir la misma configuración de mezclador desde cero.
Son especialmente útiles para rap, R&B, pop, trap melódico, voces principales, estribillos, ad-libs y sesiones rápidas en estudios caseros.
¿Estos productos de FL Studio son presets de mezclador, cadenas de Patcher, presets vocales o plantillas completas de grabación?
¿Estos productos de FL Studio son presets de mezclador, cadenas de Patcher, presets vocales o plantillas completas de grabación?
Esta colección puede incluir cadenas de mezcladores de una sola pista, configuraciones basadas en Patcher y sesiones de estilo plantilla más completas, dependiendo del producto.
La página del producto debería indicarte si estás comprando una cadena vocal enfocada o una plantilla de grabación más amplia con el enrutamiento ya configurado.
¿Qué obtengo después de comprar un preset vocal o plantilla de FL Studio?
¿Qué obtengo después de comprar un preset vocal o plantilla de FL Studio?
Recibes el archivo digital en formato FL Studio que se indica en la página del producto, además de cualquier guía de instalación incluida necesaria para cargarlo correctamente.
Eso significa que puedes dedicar menos tiempo a reconstruir los insertos y más tiempo a grabar, arreglar y finalizar la pista.
¿Cuánto tiempo tarda en recibir los archivos de FL Studio después de la compra?
¿Cuánto tiempo tarda en recibir los archivos de FL Studio después de la compra?
Estos son productos digitales, por lo que la entrega suele ser inmediata después de la compra.
En la mayoría de los casos, los archivos deberían estar disponibles de inmediato a través del flujo de confirmación y el correo electrónico de compra.
¿Necesito algún complemento de terceros para usar estos presets de FL Studio?
¿Necesito algún complemento de terceros para usar estos presets de FL Studio?
No siempre. Algunos productos están diseñados alrededor de los plugins estándar de FL Studio, mientras que otros usan plugins externos para una configuración de sonido más especializada.
Si un preset necesita herramientas de terceros, la página del producto debería indicarlo claramente antes de la compra.
¿Son estos ajustes preestablecidos compatibles con todas las versiones actuales de escritorio de FL Studio?
¿Son estos ajustes preestablecidos compatibles con todas las versiones actuales de escritorio de FL Studio?
Están diseñados para los flujos de trabajo actuales de FL Studio en escritorio, pero la compatibilidad exacta depende del formato del mezclador, el conjunto de plugins y si el producto utiliza herramientas estándar más recientes o enrutamiento avanzado.
Revisar la página del producto es la forma más segura de confirmar la compatibilidad de la versión antes de comprar.
¿Cómo instalo los presets o plantillas vocales de FL Studio?
¿Cómo instalo los presets o plantillas vocales de FL Studio?
La mayoría de los productos de presets de FL Studio se cargan a través del mezclador, Patcher o una plantilla de sesión preparada, dependiendo del tipo de archivo.
Después de cargar, debes confirmar la entrada correcta, el nivel de ganancia y el comportamiento de envío para que la cadena reaccione adecuadamente a tu grabación real.
¿Son estos presets de FL Studio adecuados para principiantes?
¿Son estos presets de FL Studio adecuados para principiantes?
Sí. Son útiles para principiantes porque eliminan muchas conjeturas en la etapa inicial de configuración de una sesión.
También son útiles para usuarios experimentados de FL que desean recuperaciones más rápidas y puntos de partida más consistentes.
¿Puedo ajustar los preajustes para que se adapten mejor a mi voz, ritmo o proyecto?
¿Puedo ajustar los preajustes para que se adapten mejor a mi voz, ritmo o proyecto?
Sí. Aún debes ajustar el ecualizador, la compresión, el espacio, la saturación y los niveles de envío para que la cadena se adapte al ritmo, al tono vocal y a la calidad de la grabación.
El preset te brinda velocidad y estructura, pero el toque final sigue viniendo de adaptarlo a la canción.
¿Qué hace que estos sean mejores que los ajustes preestablecidos vocales o cadenas de mezcla predeterminados de FL Studio?
¿Qué hace que estos sean mejores que los ajustes preestablecidos vocales o cadenas de mezcla predeterminados de FL Studio?
Están diseñados para comportarse más como puntos de partida reales para sesiones vocales en lugar de ejemplos genéricos que sirven para todo.
Eso significa menos tiempo adivinando, menos clics de configuración y una impresión inicial más fuerte cuando comienzas a grabar o añades una toma.
Construye Tu Propia Cesta

Transforma tu sesión en segundos
Configuración instantánea de sesión con nuestras plantillas de grabación y preajustes vocales listos para usar.


Créditos de la Industria

Westside Boogie

Shontelle

Jarren Benton

DJ Tunez

Vory

Caskey

Rittz

Nia Riley

Eugy

Q Parker
Escucha nuestro trabajo
R&B
Antes
Después
Rap
Antes
Después
Pop
Antes
Después
Alma
Antes
Después
Roca
Antes
Después
Latín
Antes
Después
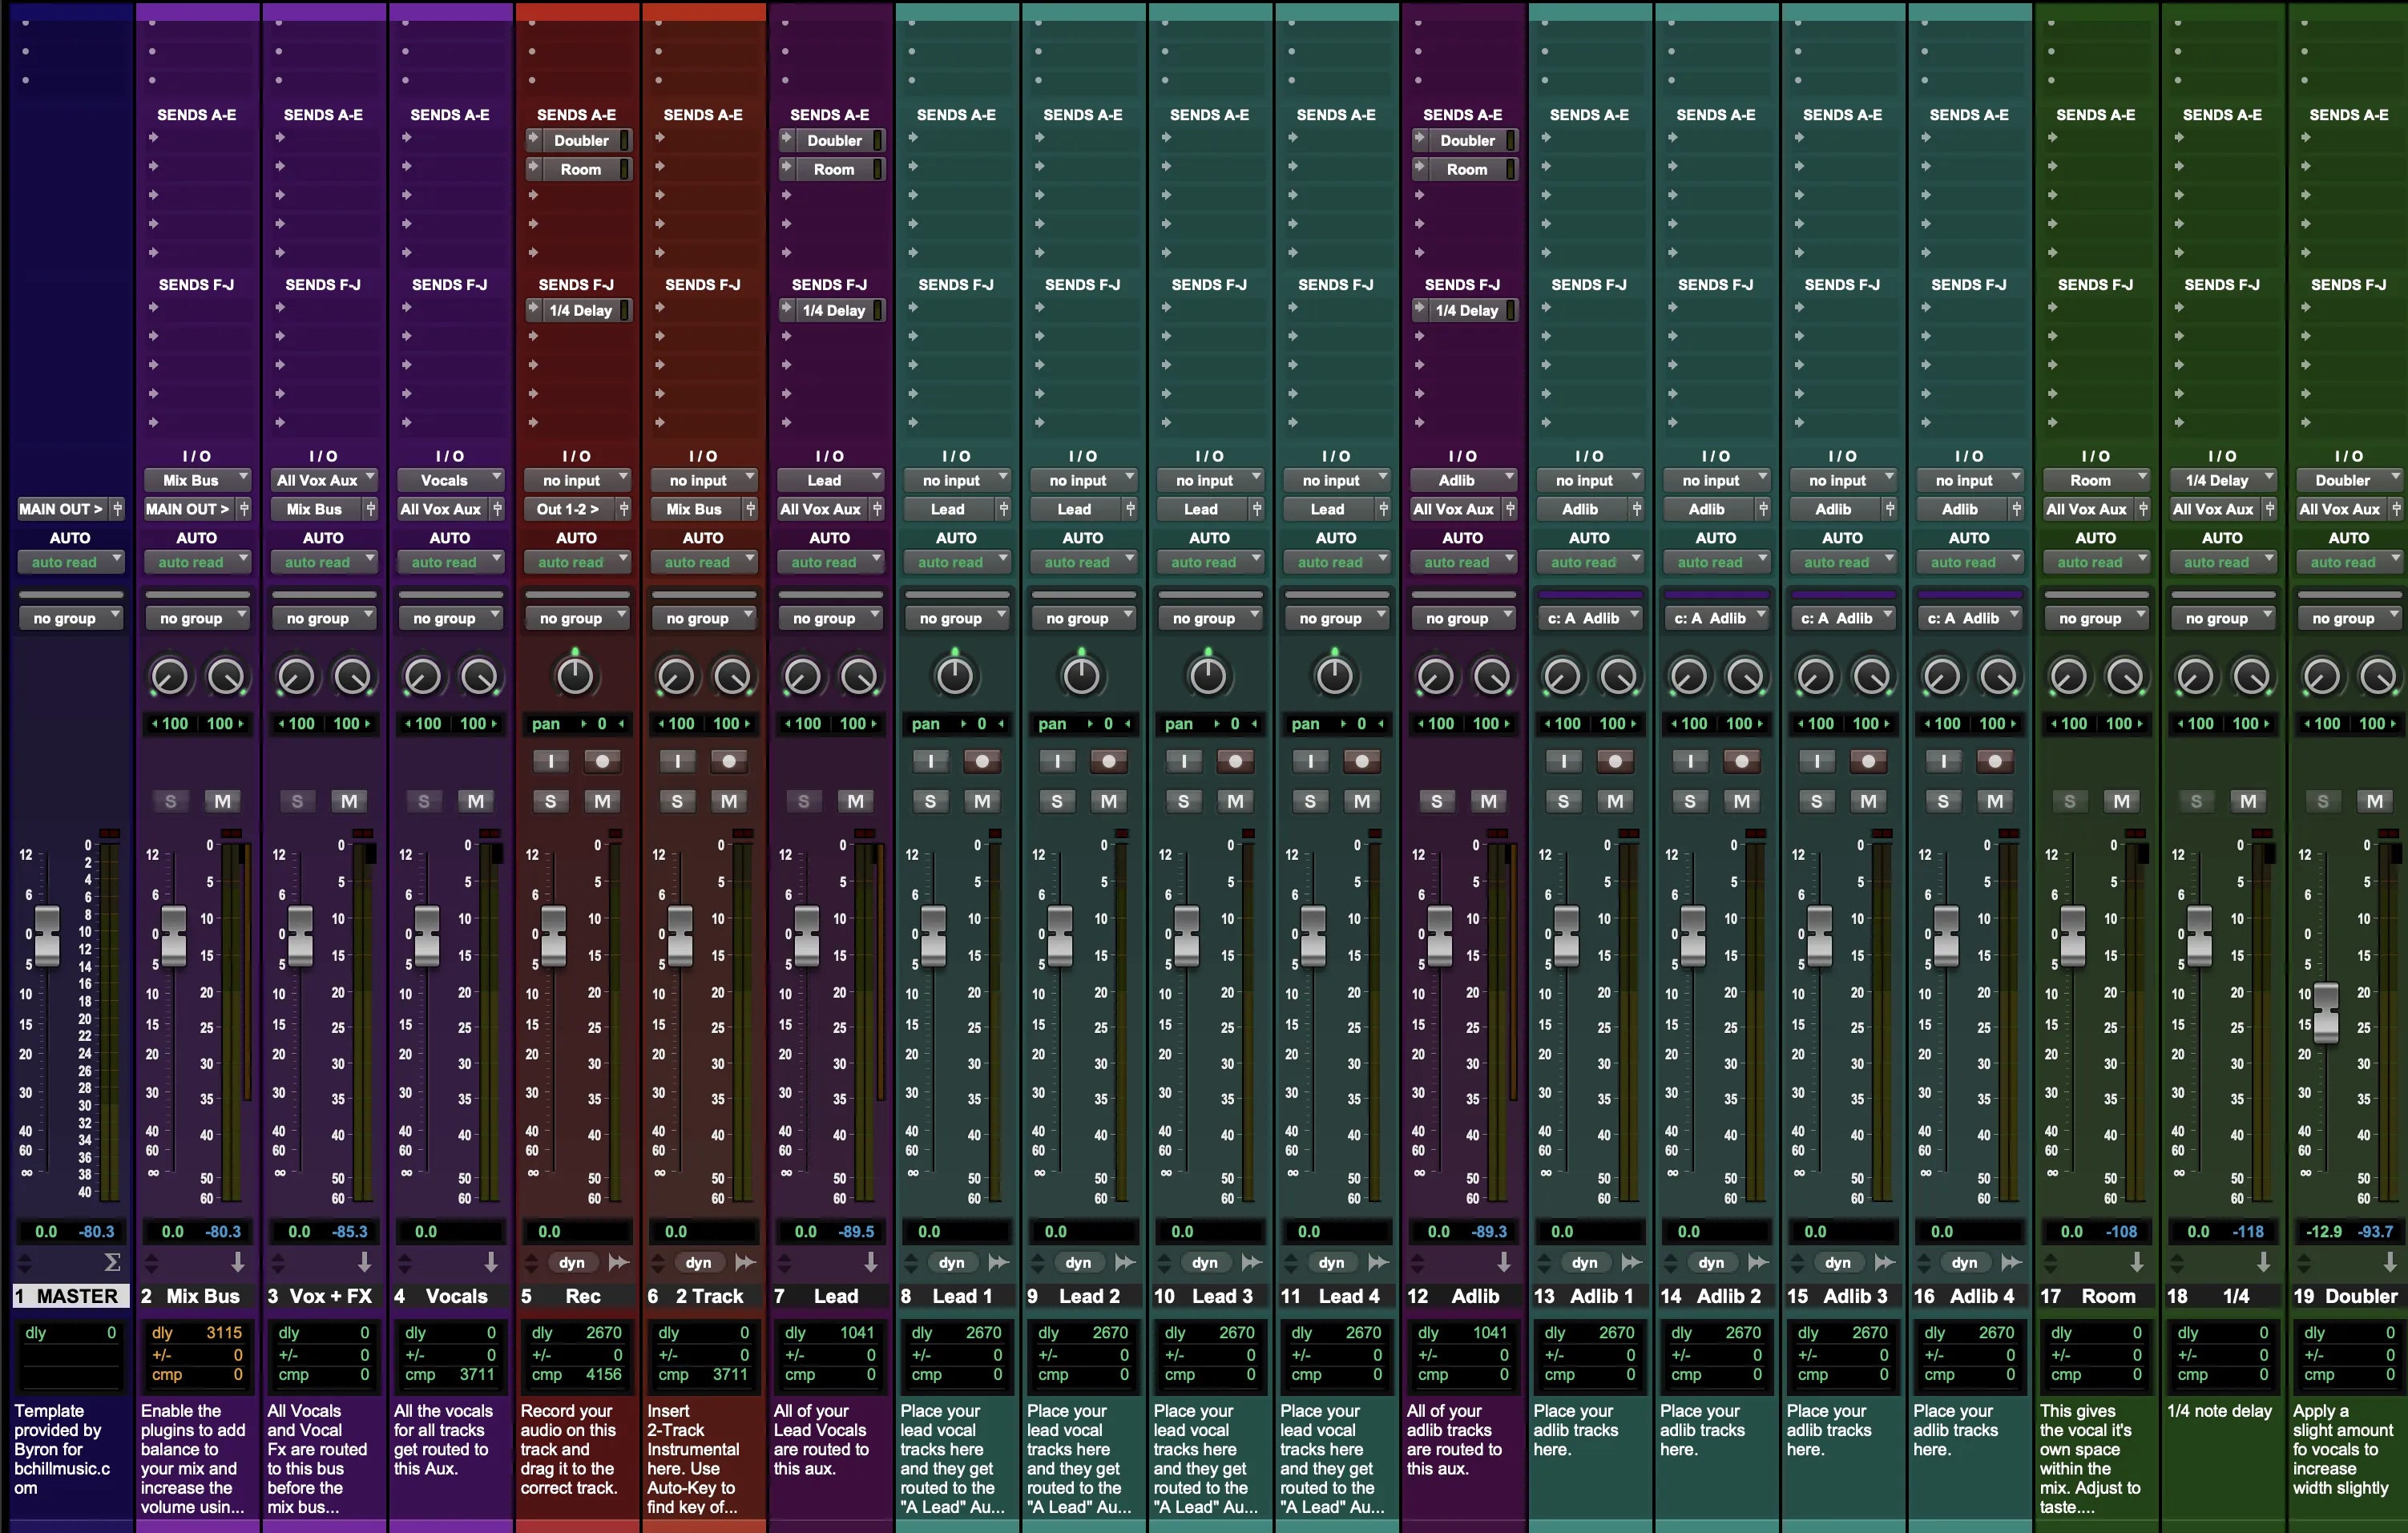
Preajustes Vocales de FL Studio: Explicación y Características
Introducción a los presets vocales de FL Studio
Si grabas o mezclas voces en FL Studio, un preset bien diseñado te ofrece un tono vocal moderno y repetible sin tener que reconstruir la misma cadena en cada sesión. Un preset carga una ruta equilibrada: EQ para el tono, compresión para el control, de-essing para suavizar las “s” y un ambiente con buen gusto, para que puedas capturar ideas rápidamente y mantener un sonido consistente desde la demo hasta el lanzamiento. En BCHILL MIX, nuestros presets vocales para FL Studio y flujos de trabajo basados en plugins nativos están ajustados para creadores reales: baja latencia durante la grabación, dicción clara en auriculares y buena traducción en monitores de estudio y teléfonos.
Esta guía explica qué es un preset vocal, cuándo ayuda, cómo instalarlo y ajustarlo, y consejos enfocados en estilos para rap, R&B, pop, hyperpop y canto/habla clara. También verás cómo las plantillas de grabación simples complementan los presets cuando quieres una sesión más rápida y organizada.
¿Qué es exactamente un preset vocal en FL Studio?
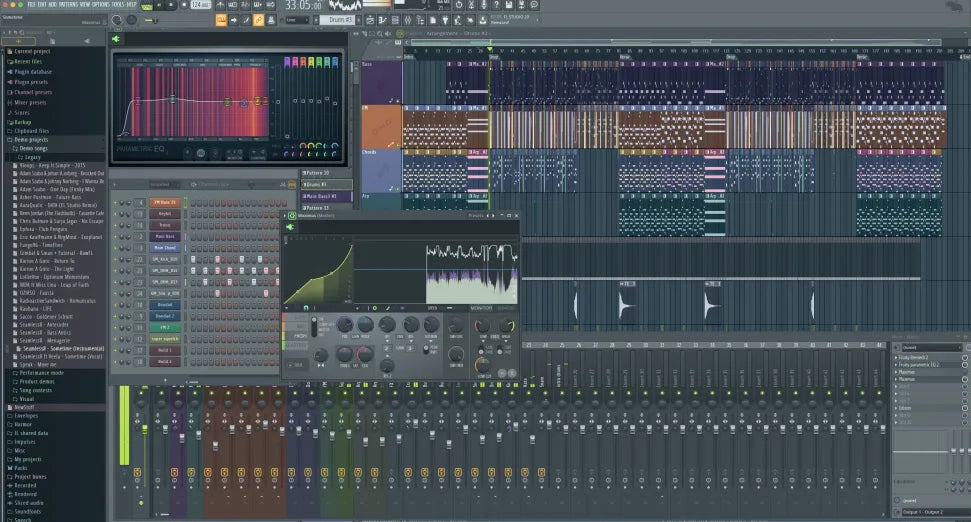
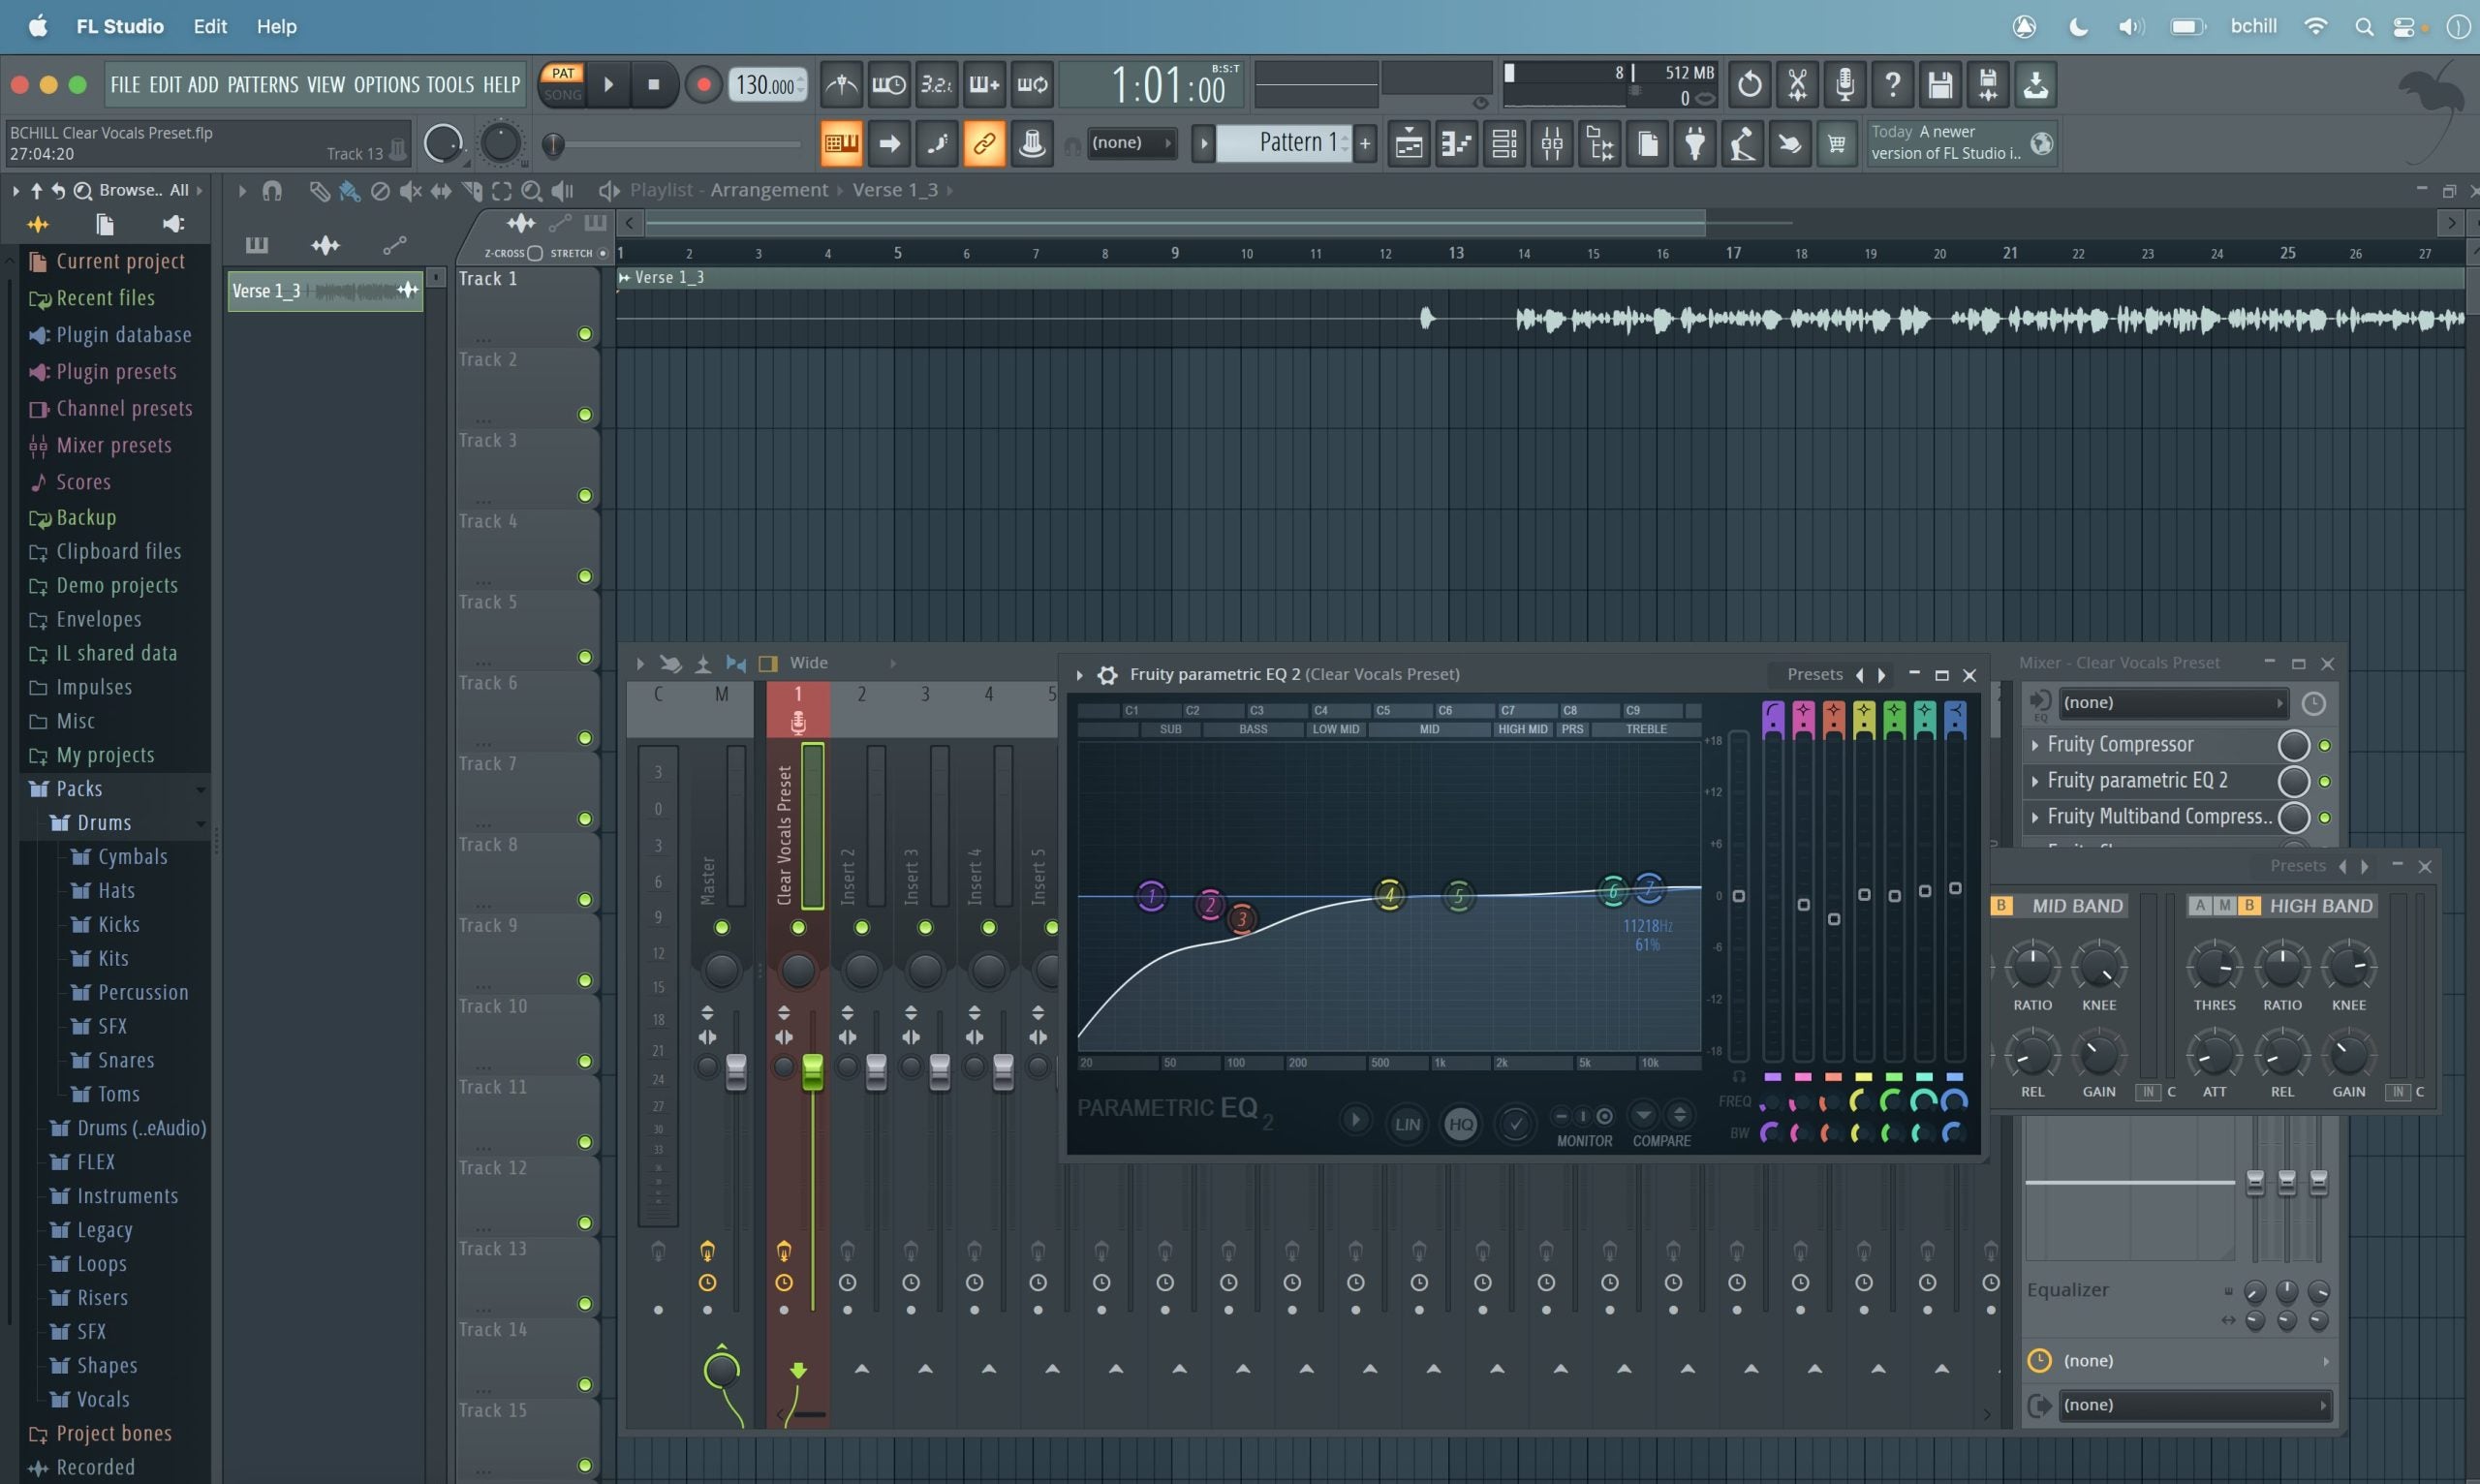
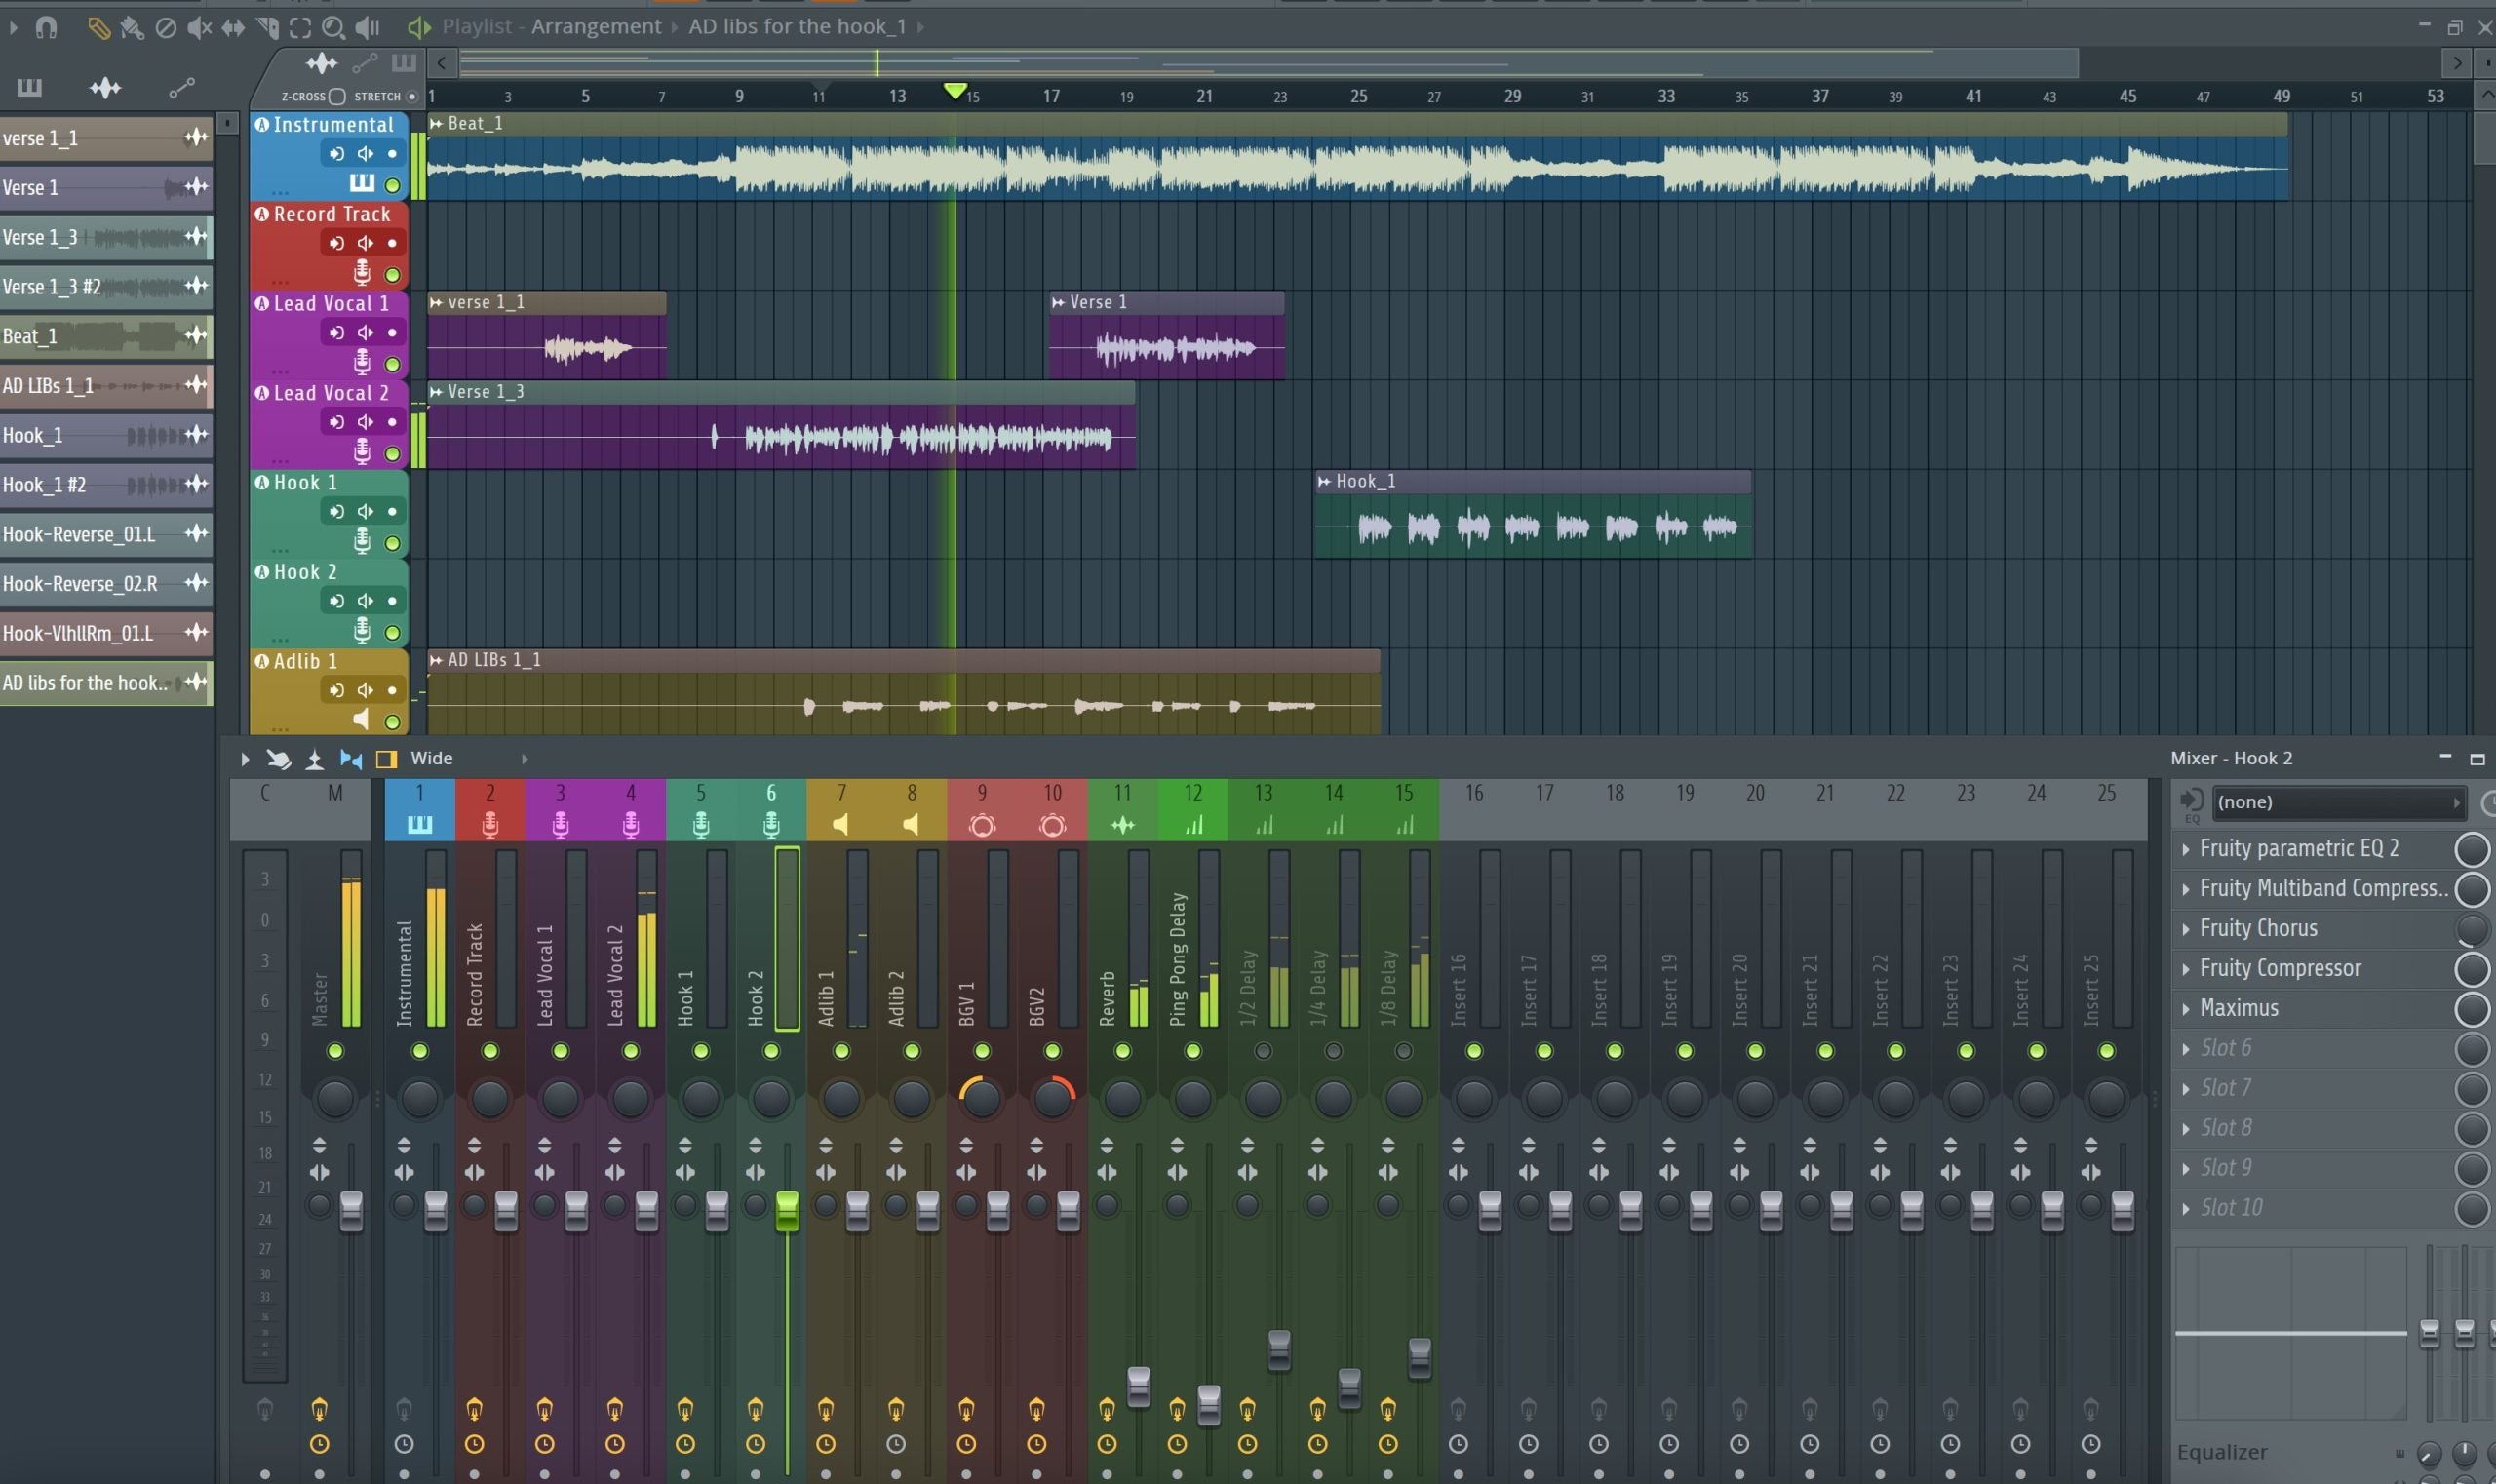
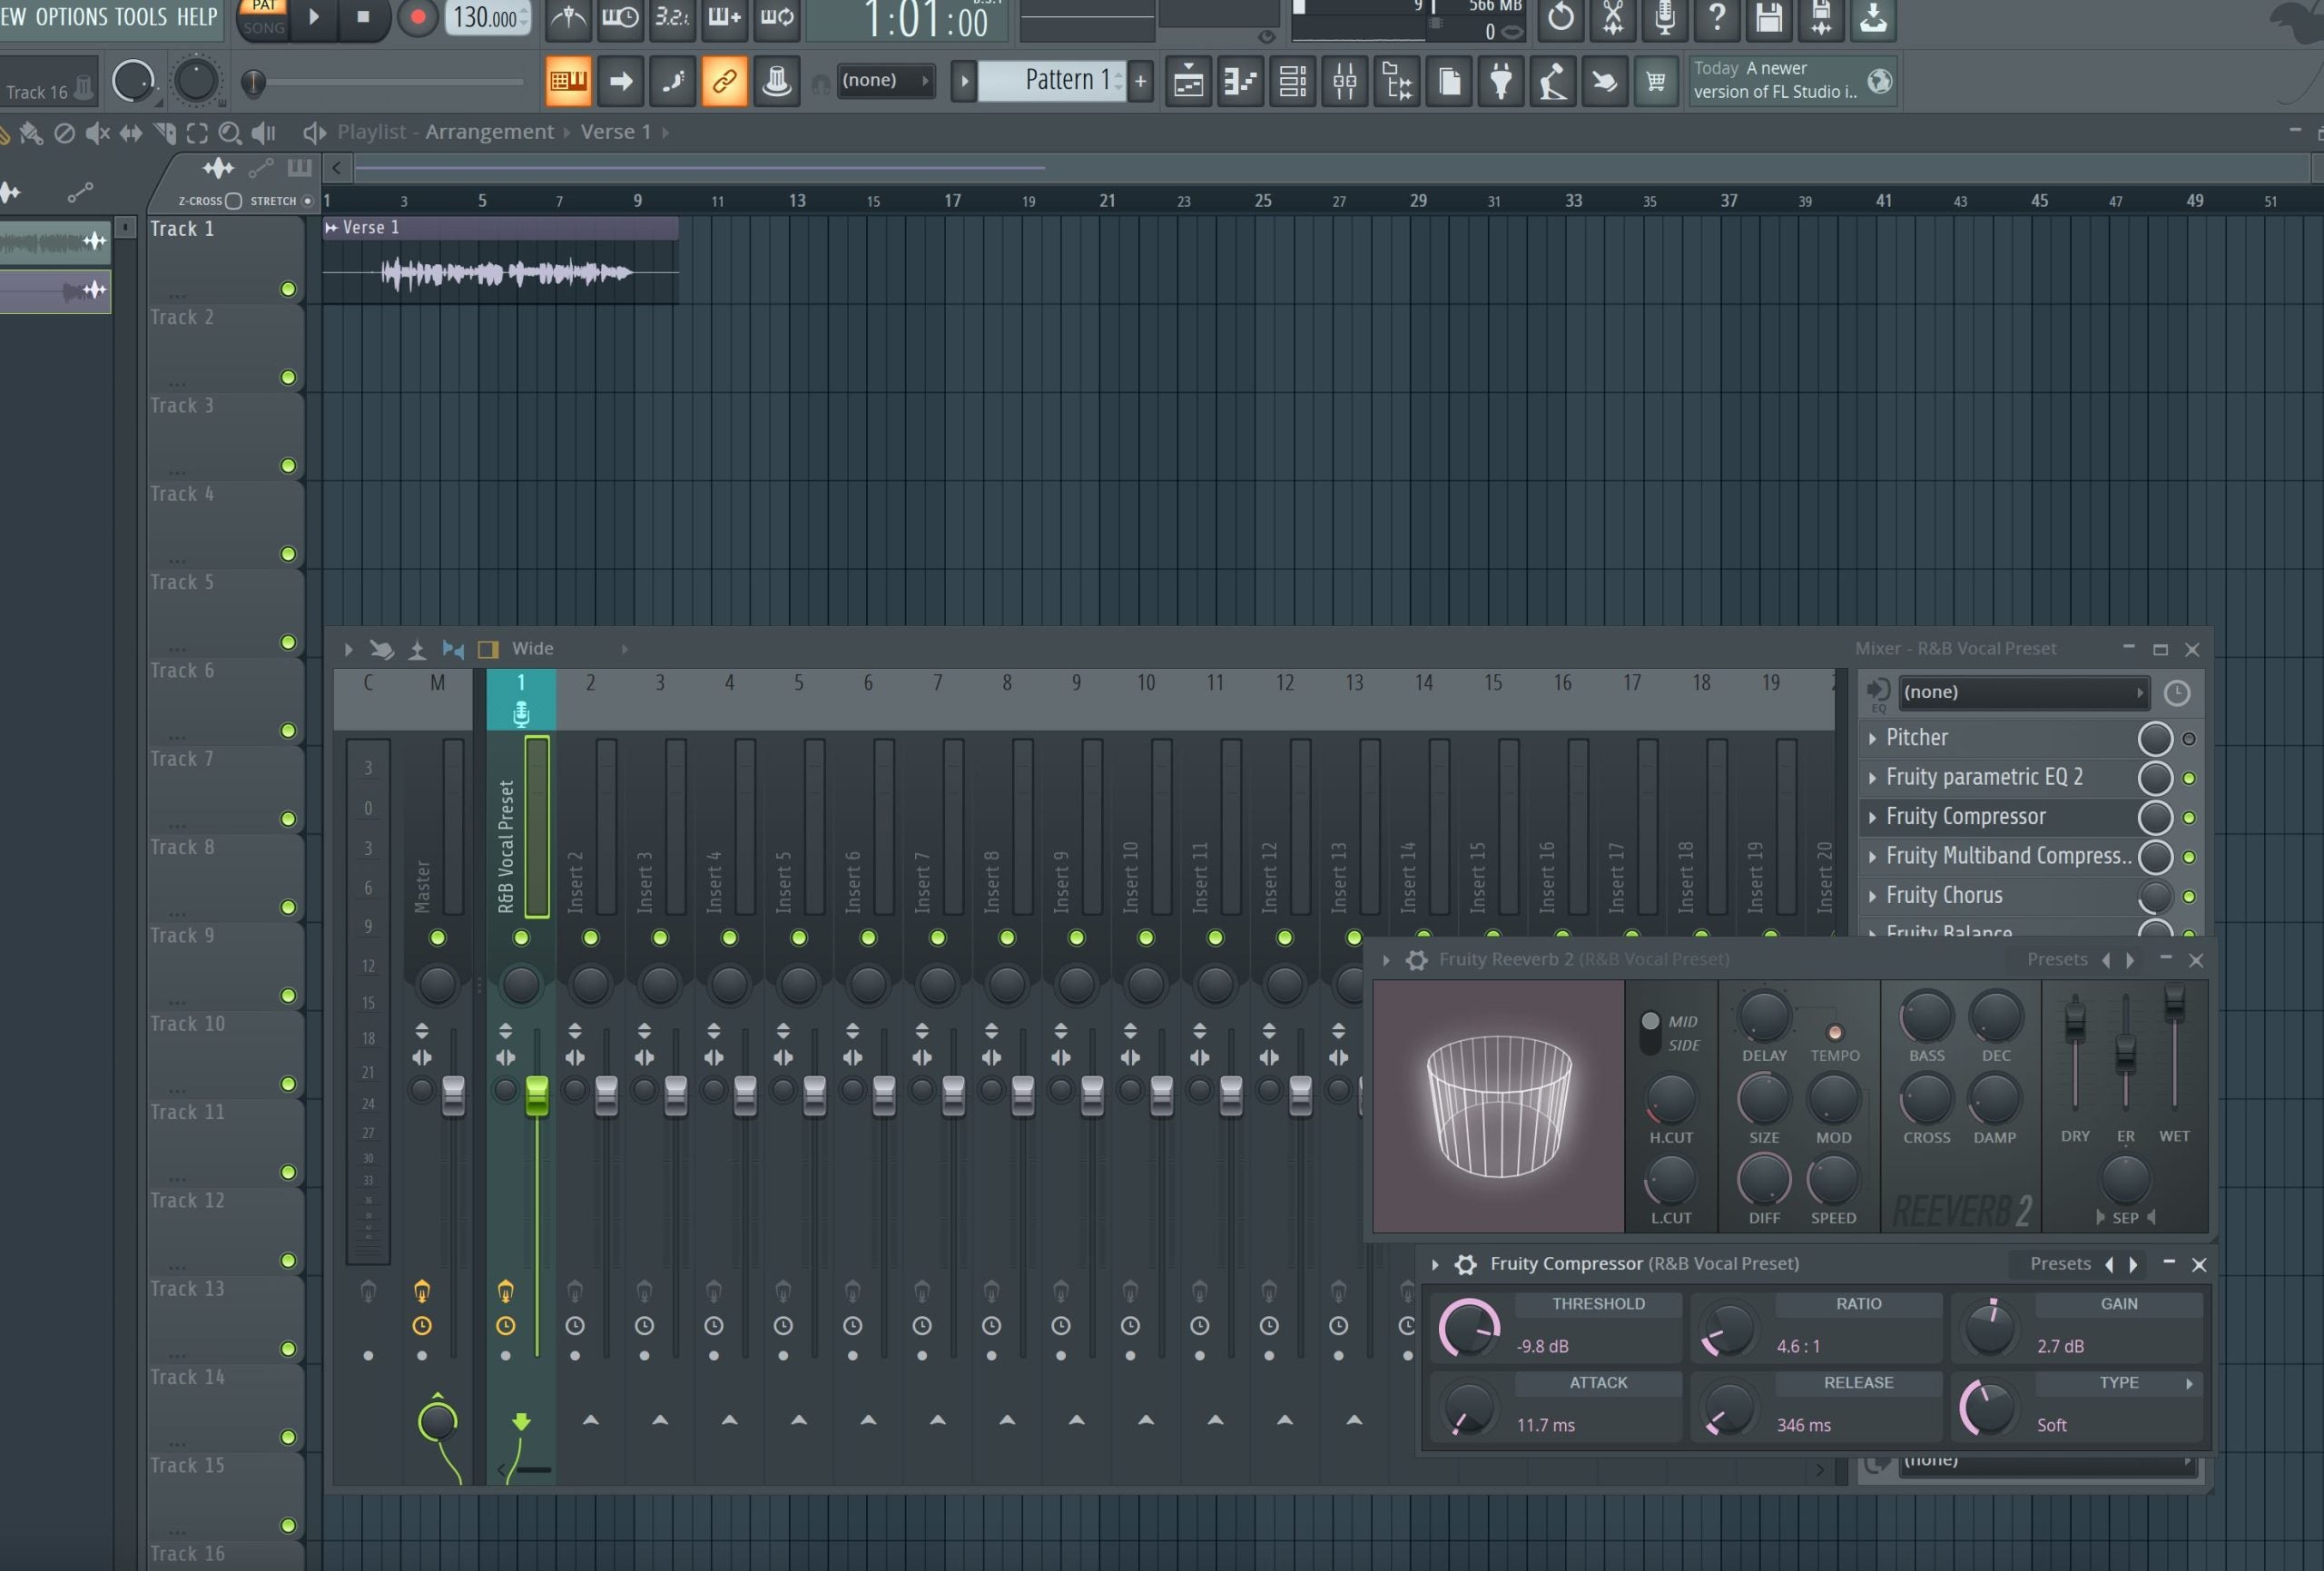
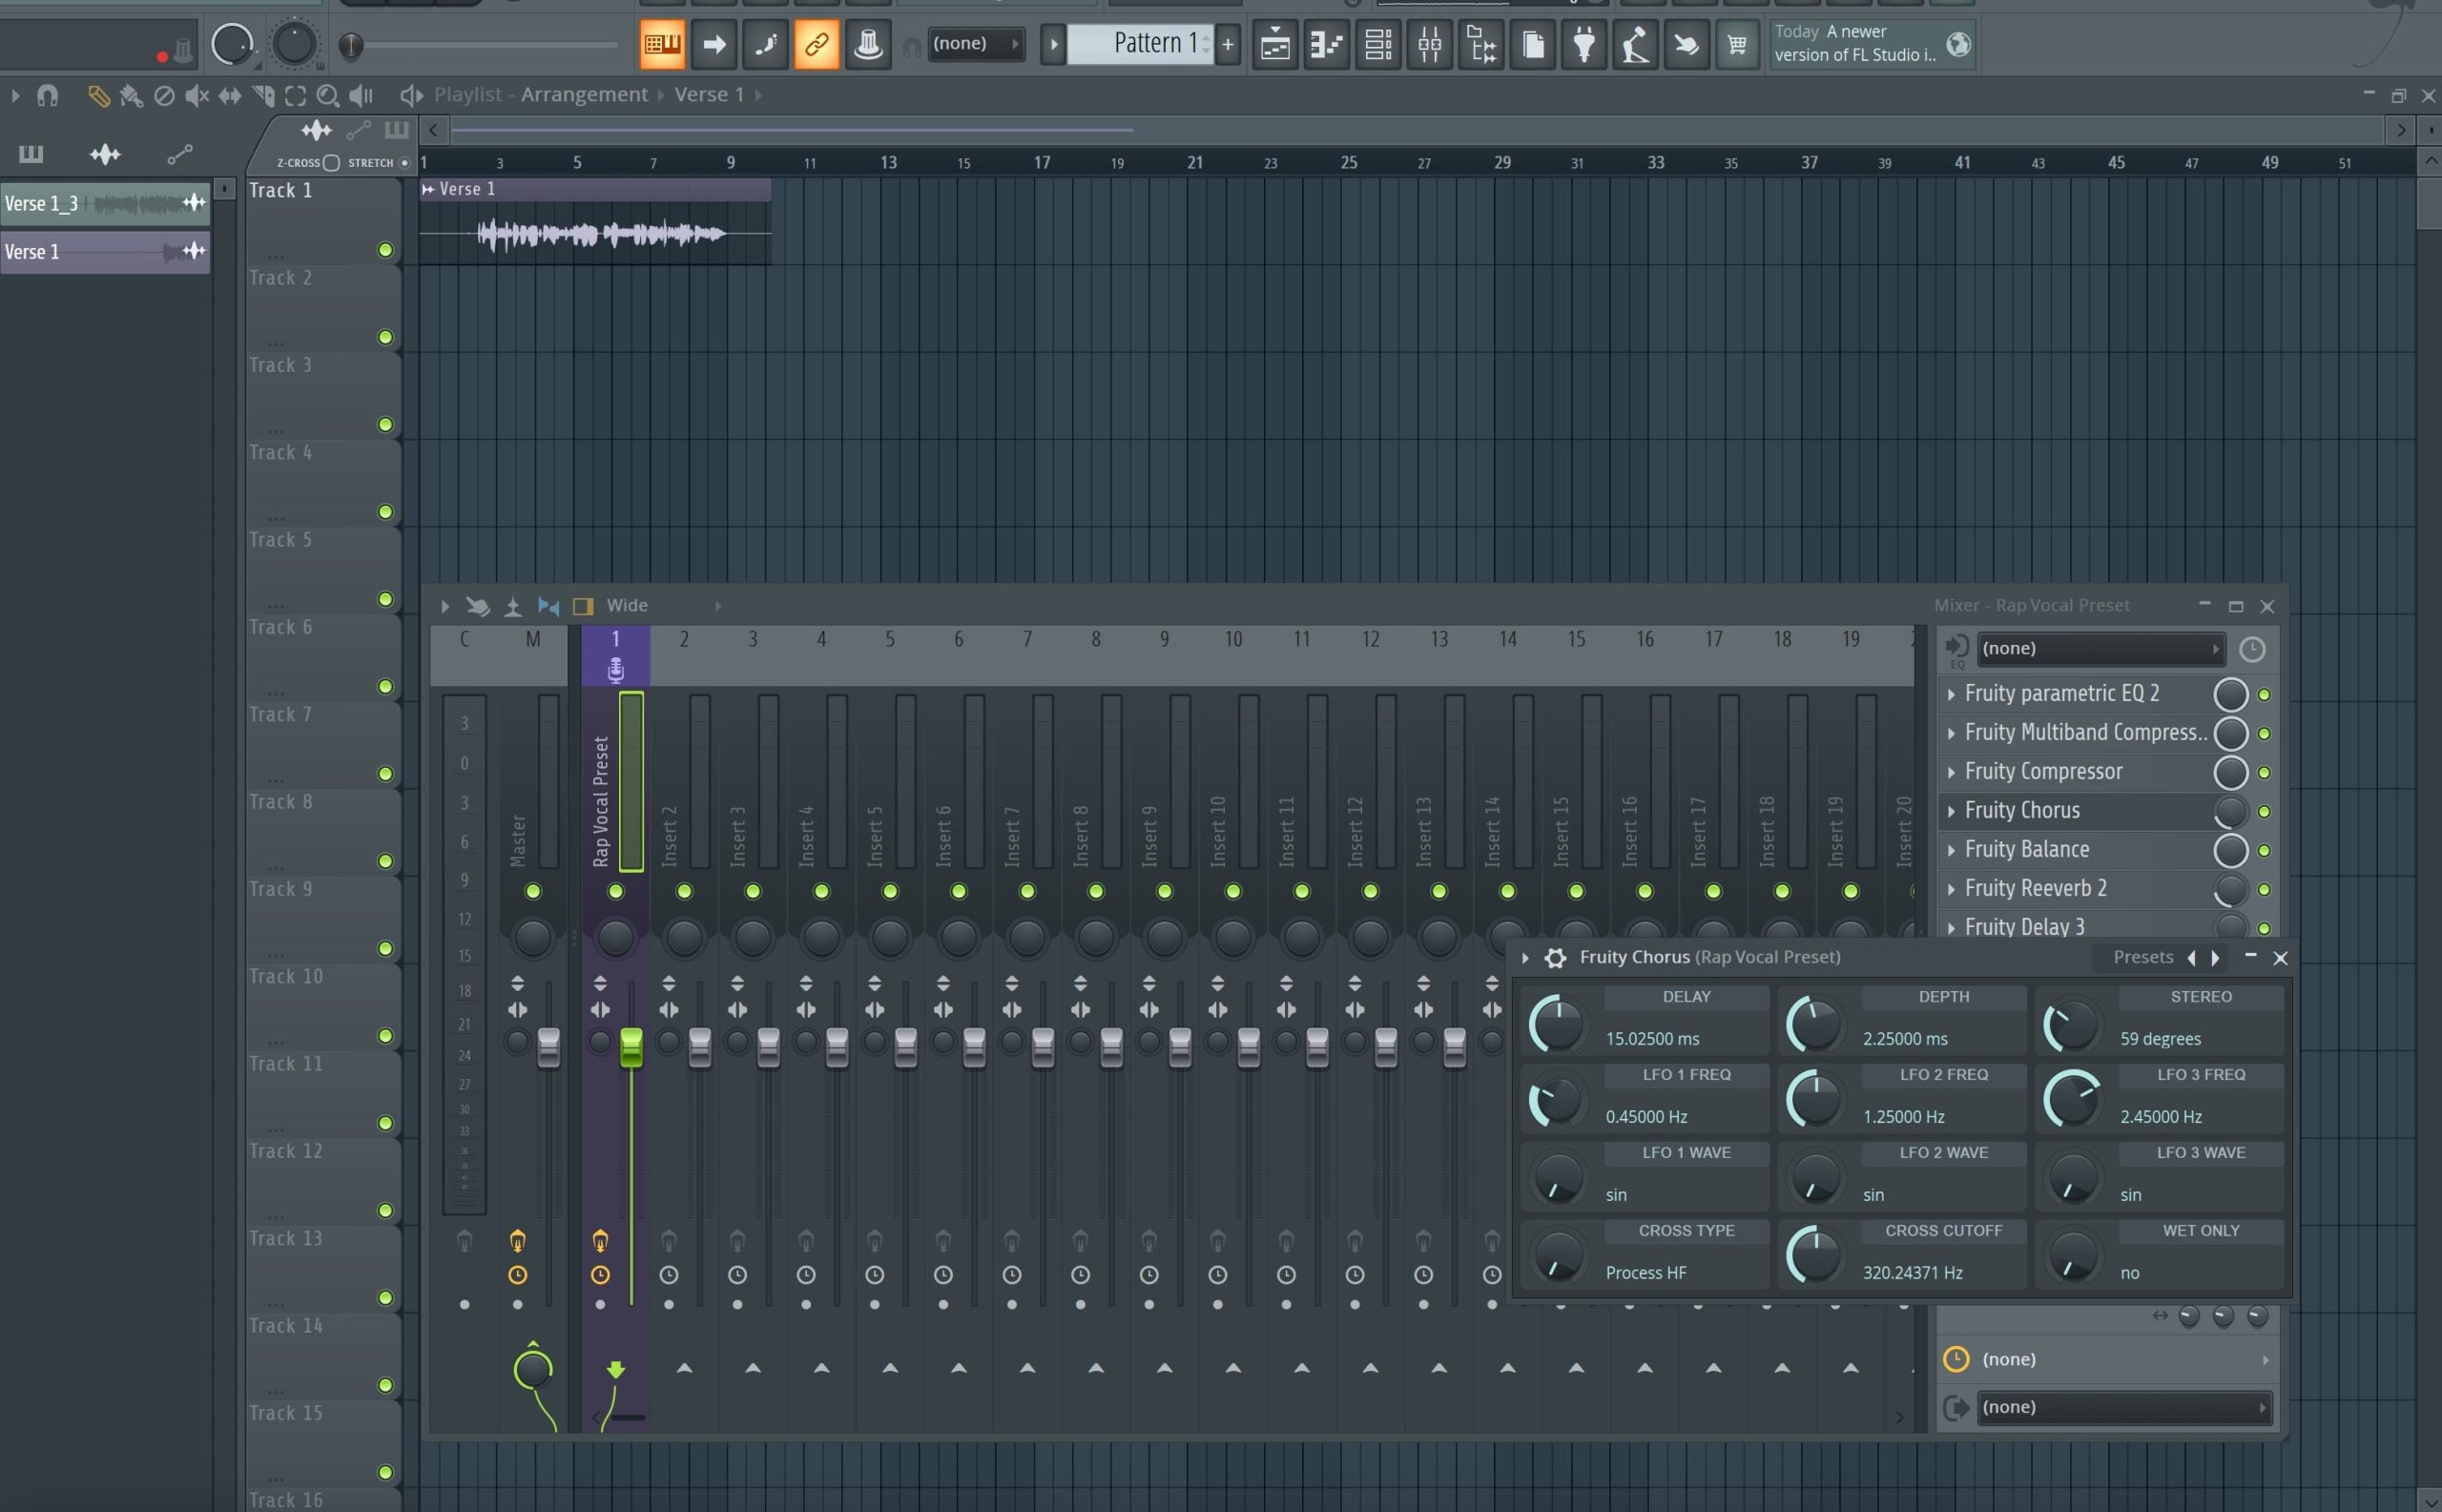
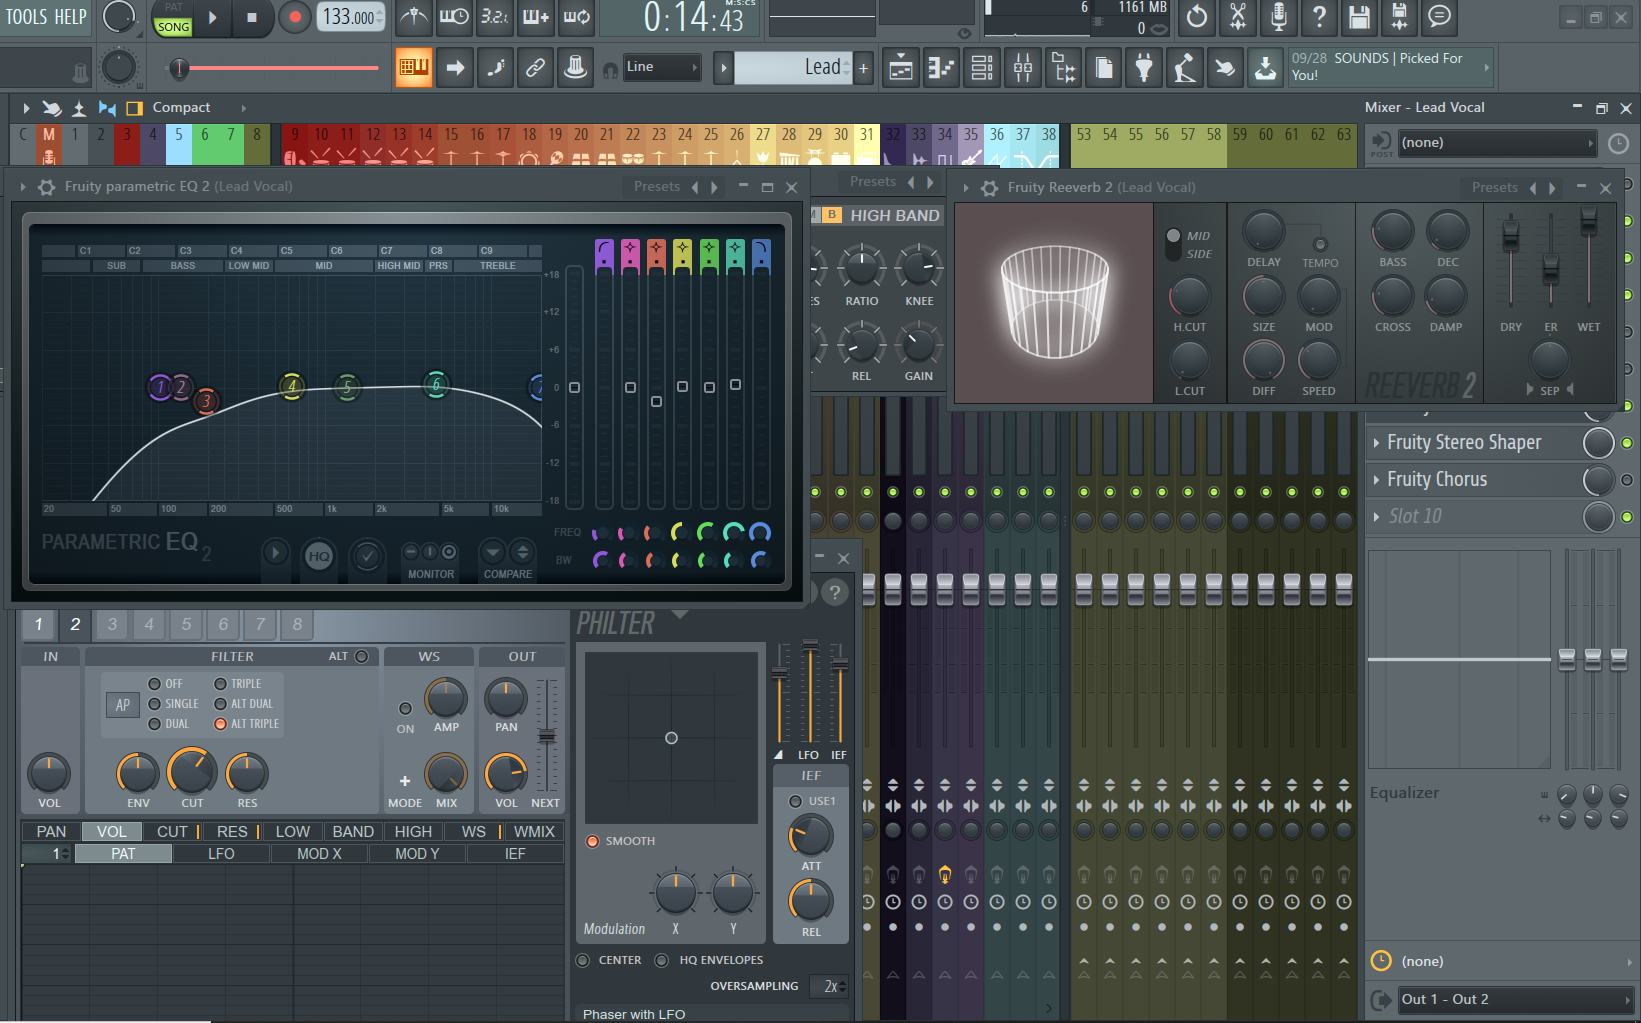
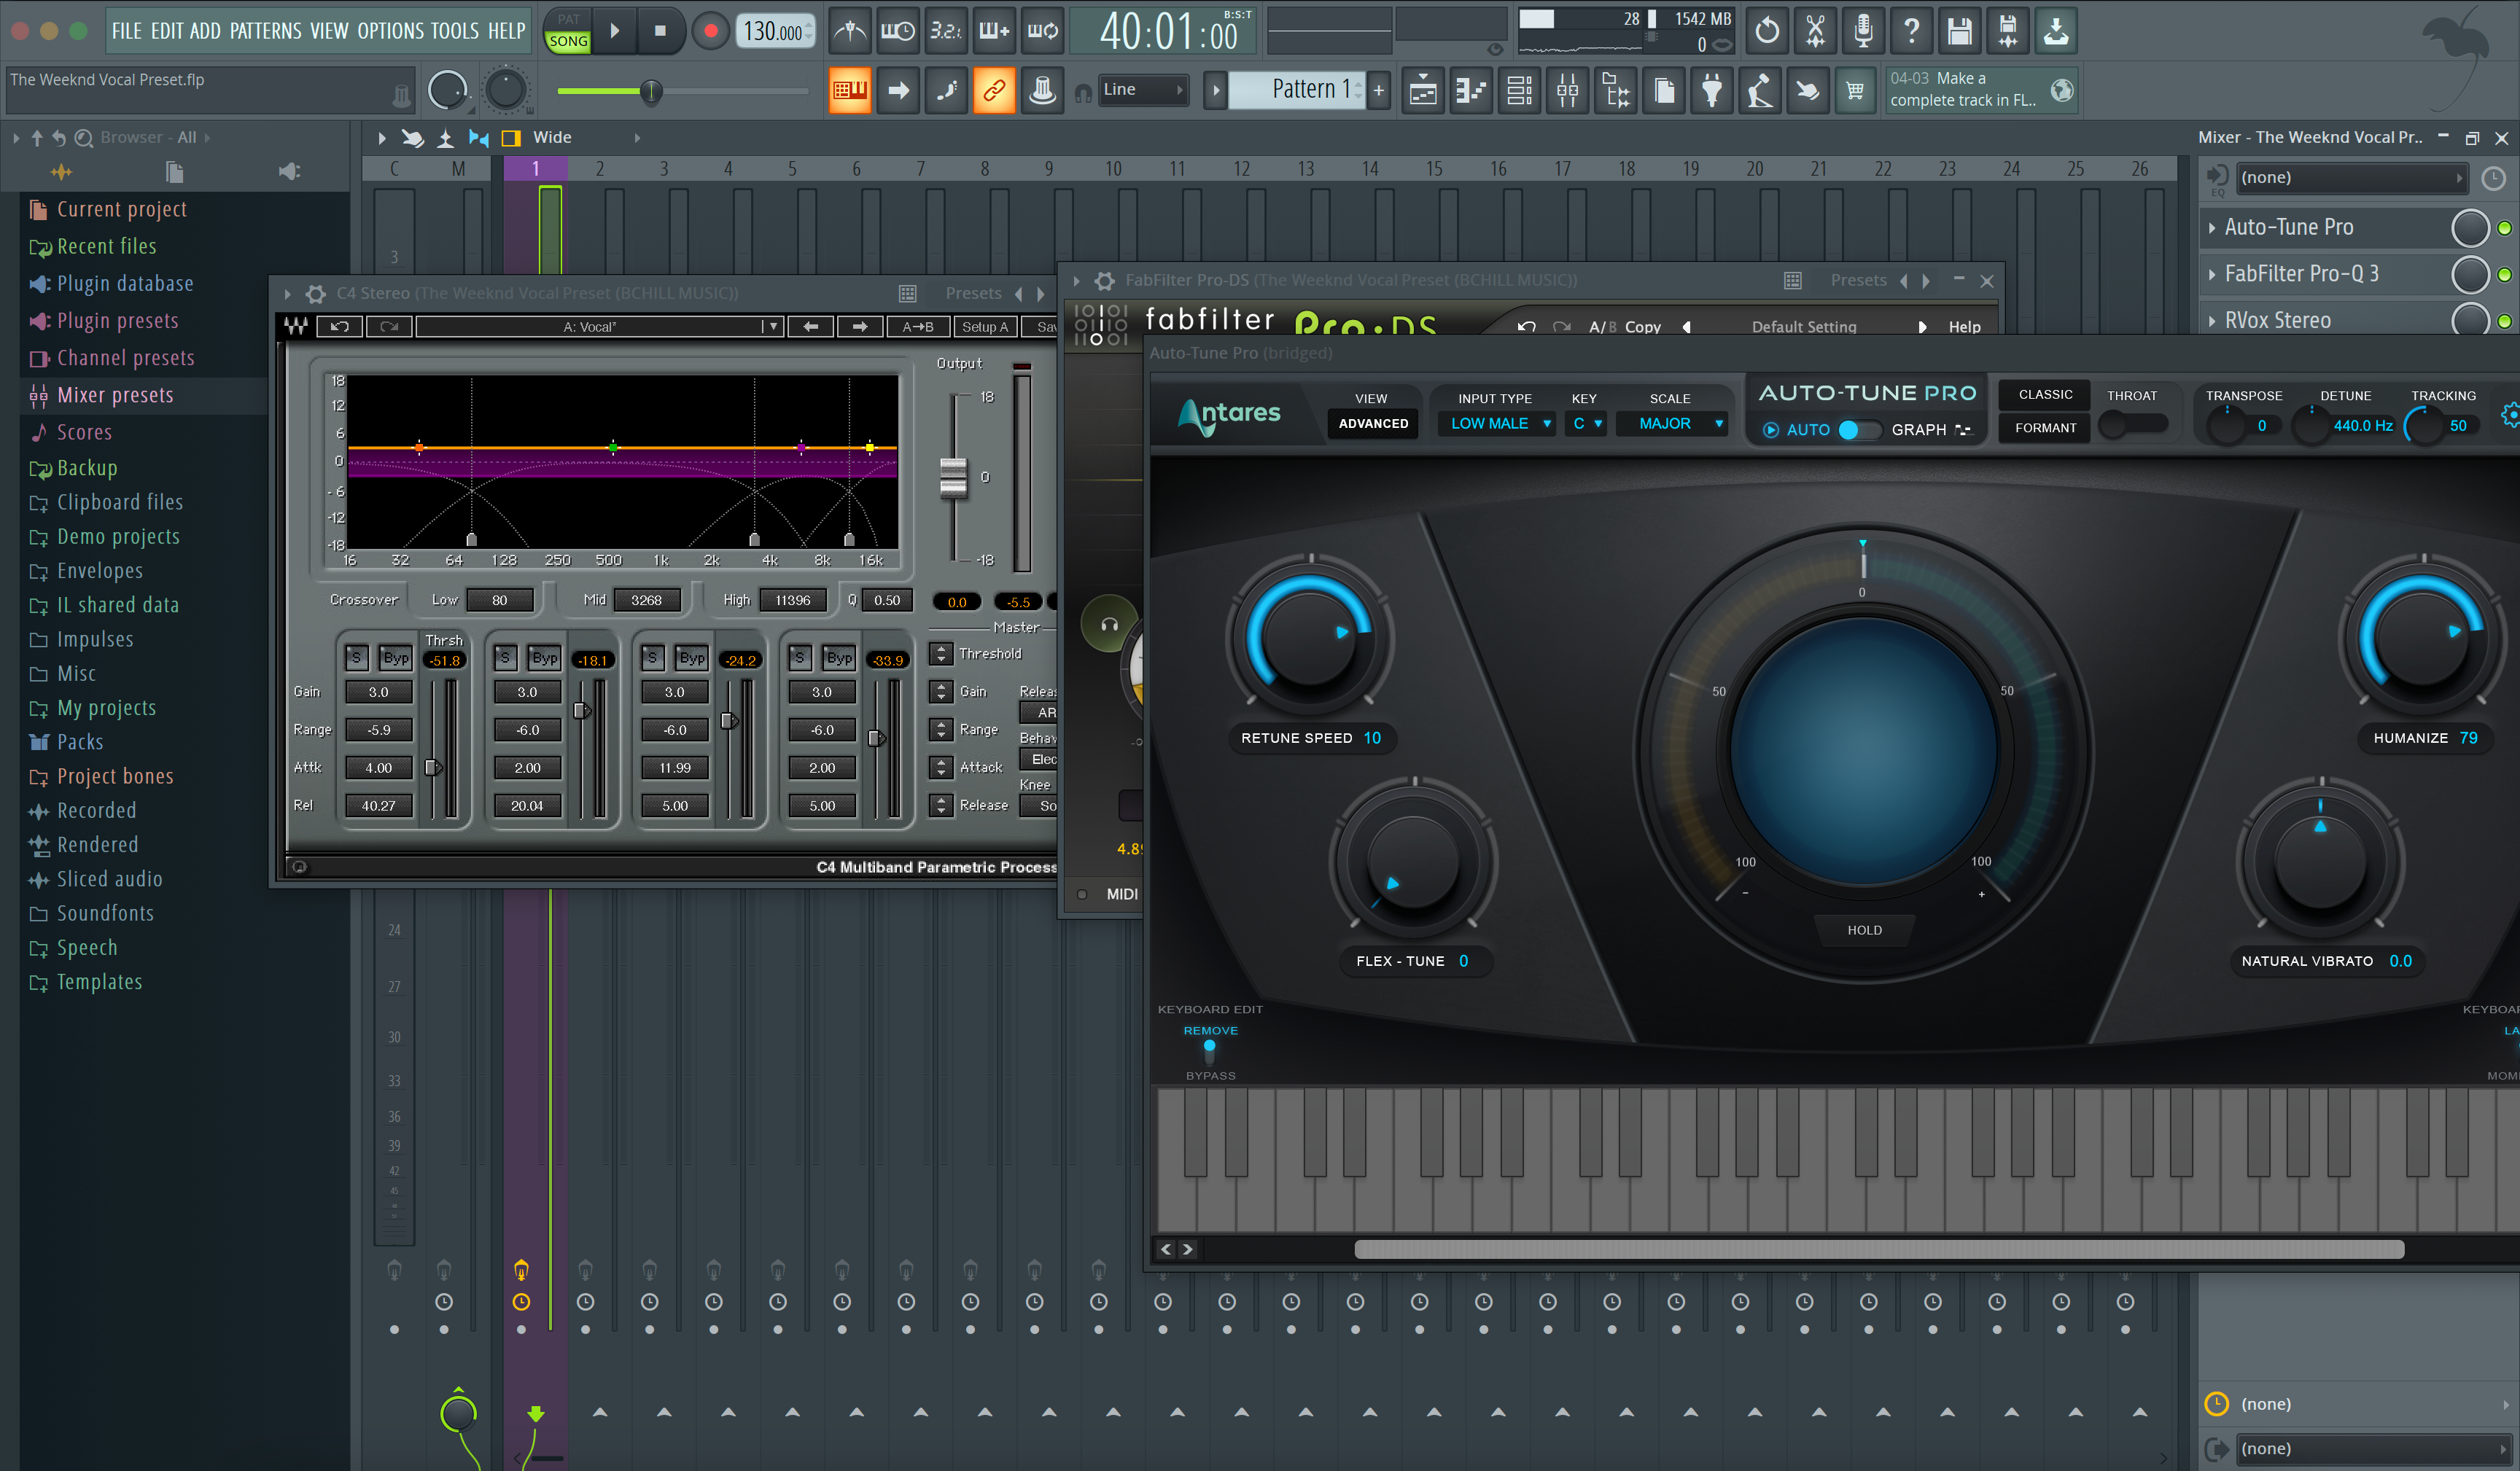
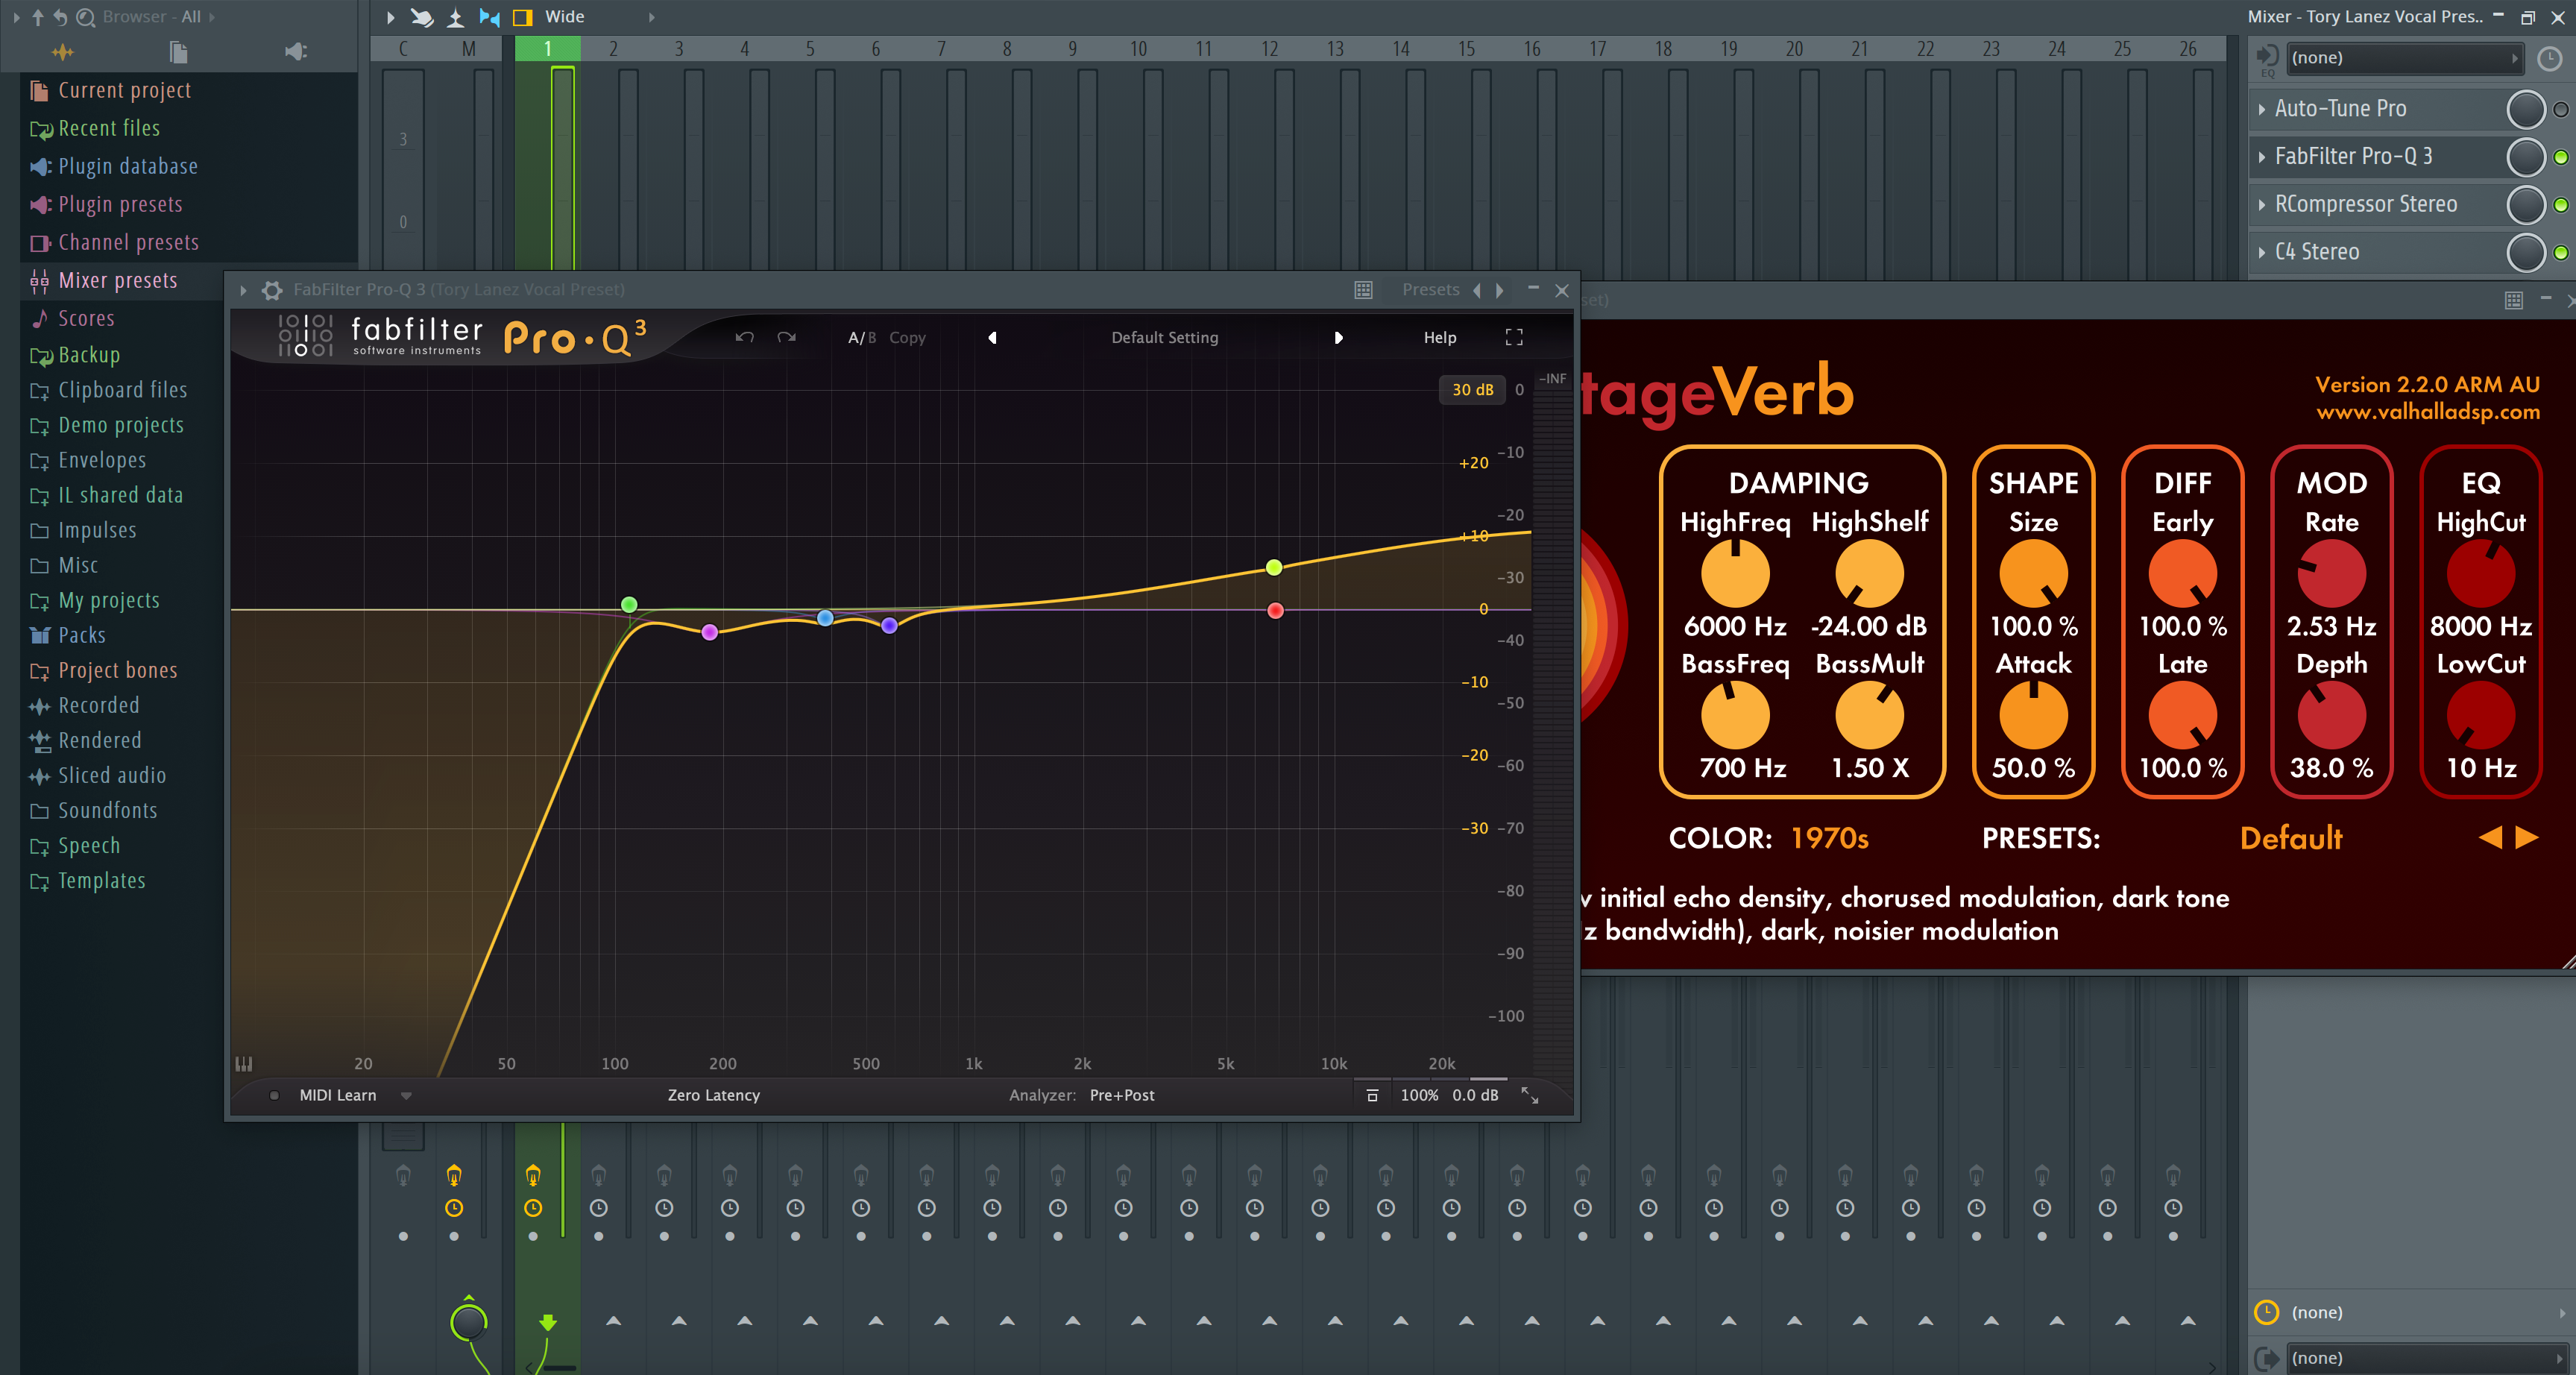
En FL Studio, un preset vocal es una cadena de efectos guardada en un inserto del mezclador (o bus) con ajustes iniciales sensatos para voces modernas. Una cadena inicial sólida suele incluir:
- Un filtro pasa altos suave más pequeños ajustes quirúrgicos de EQ para eliminar ruidos graves y domar asperezas.
- Dos compresores ligeros en serie para mantener el nivel estable sin bombeos evidentes.
- Un de-esser antes de cualquier realce para que las consonantes se mantengan suaves.
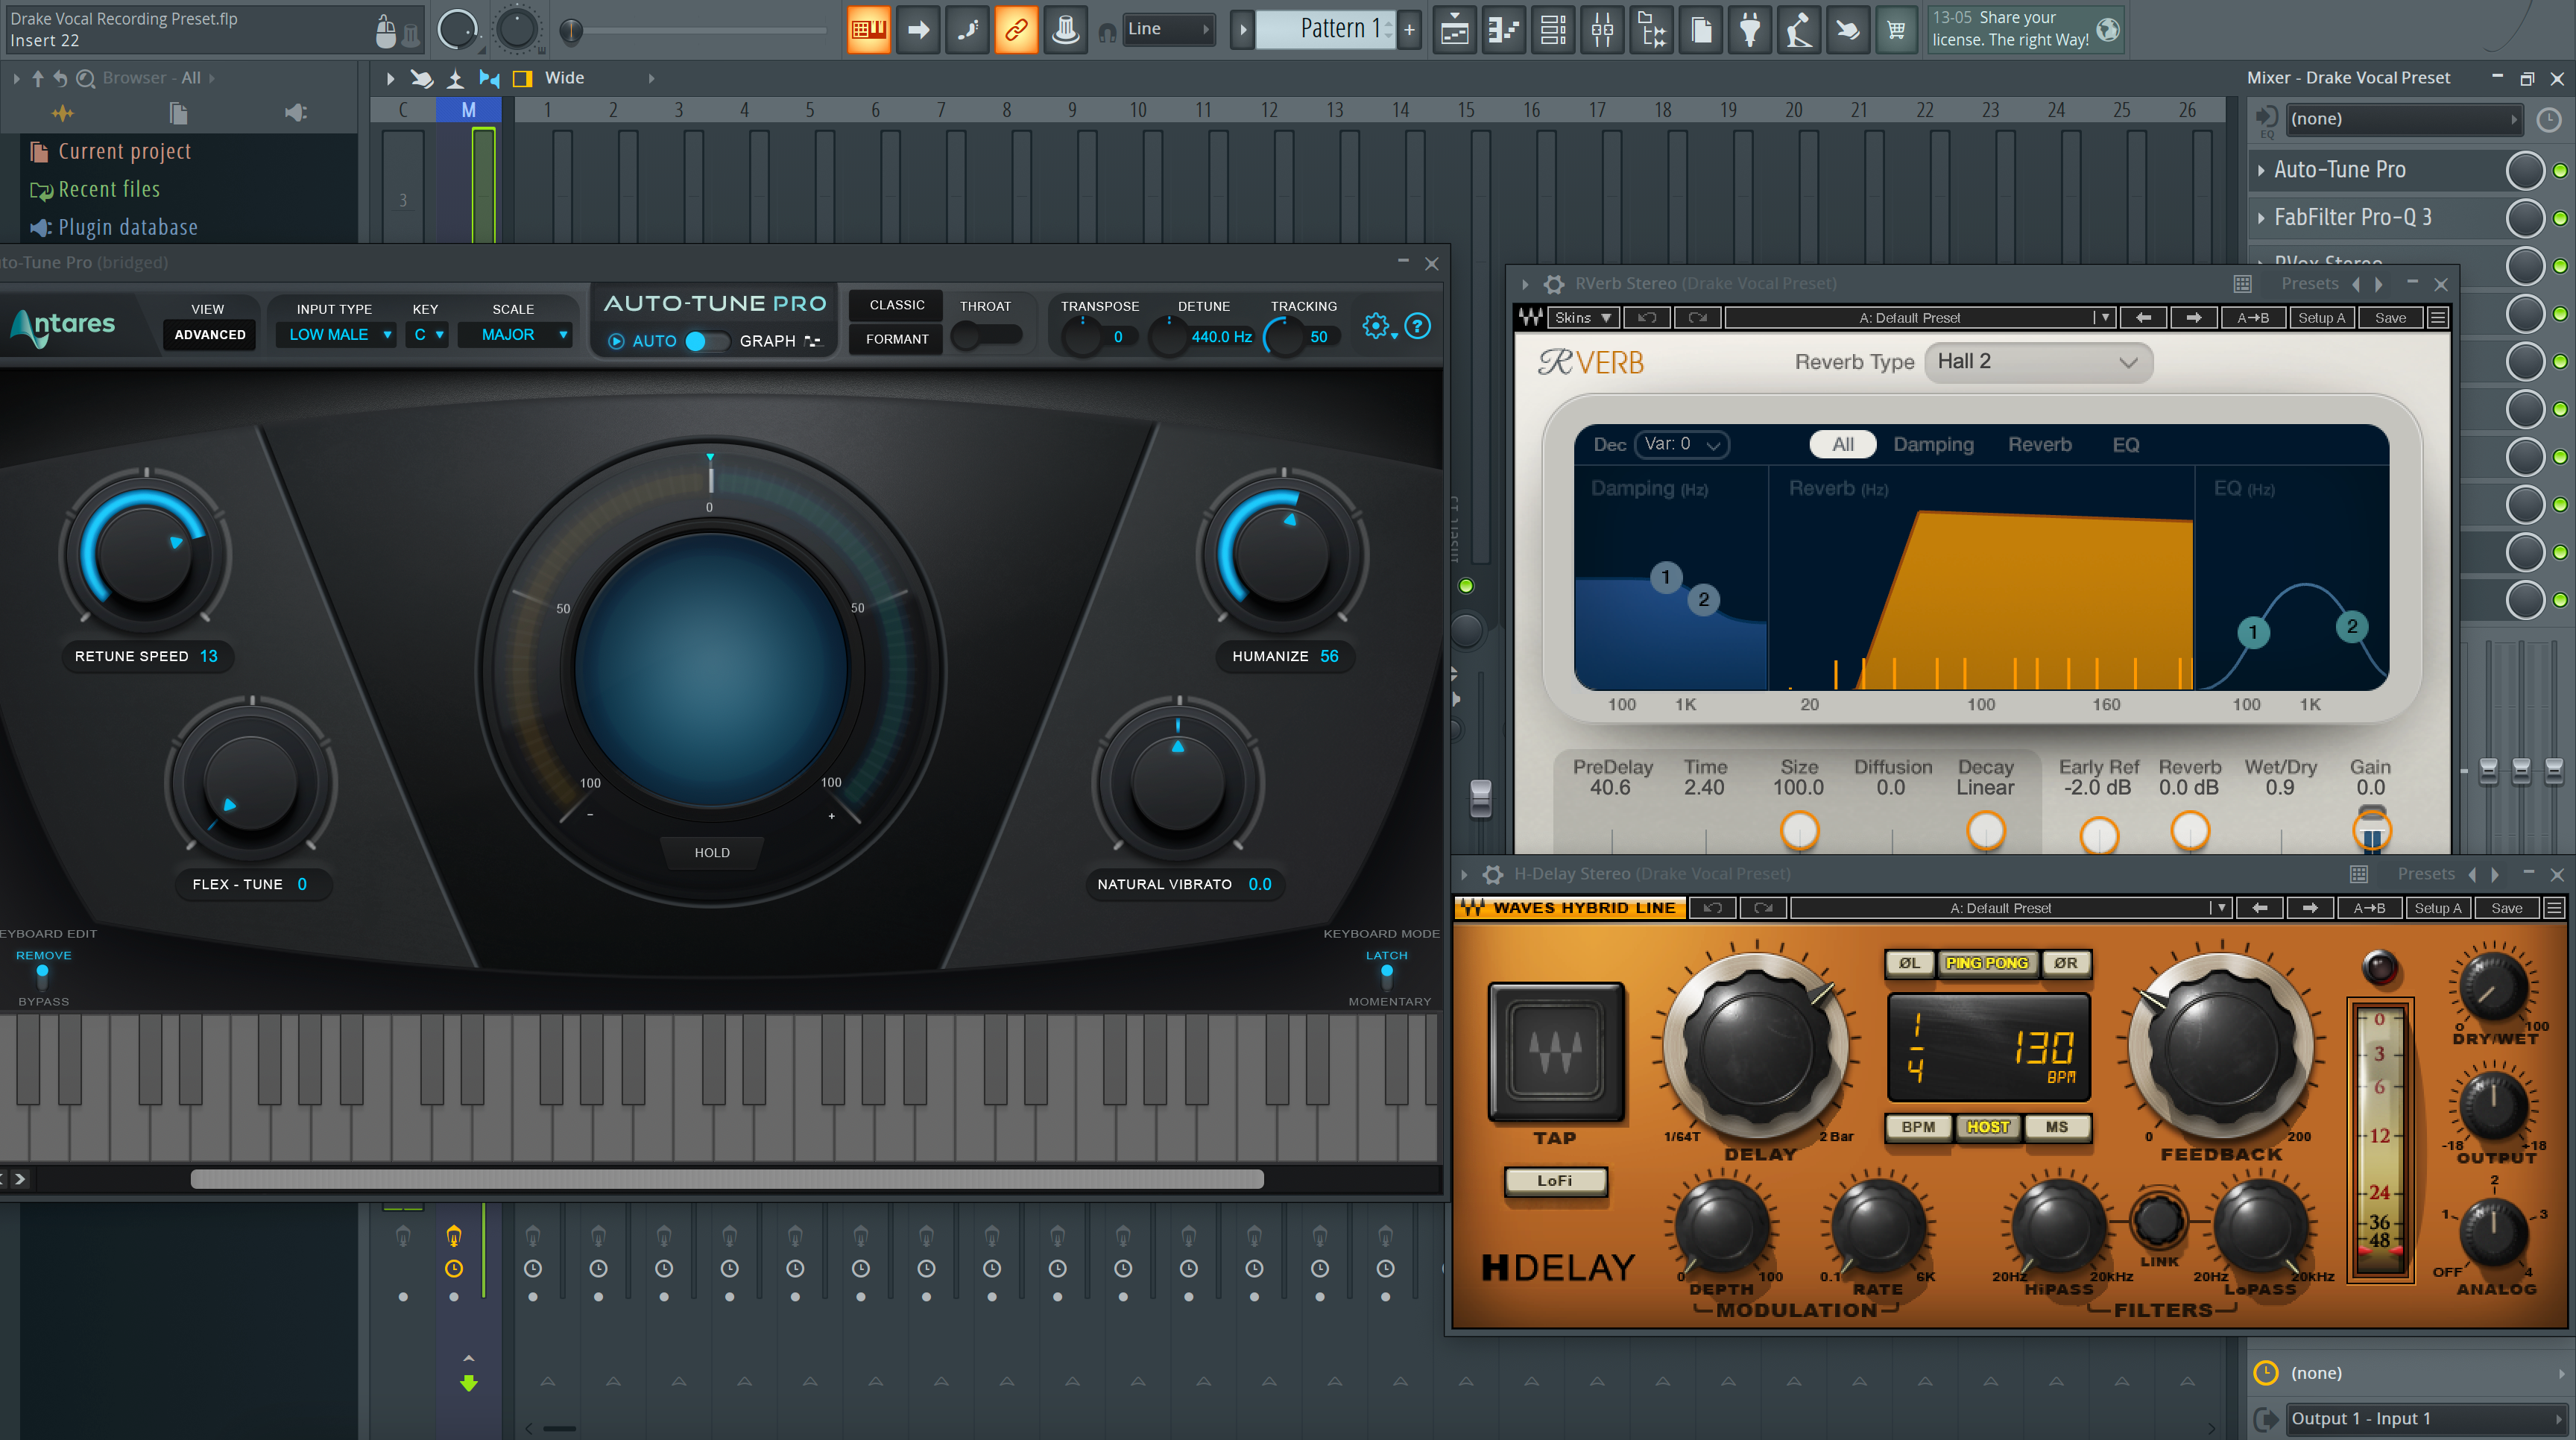
- Opcional saturación/excitador para presencia y carácter.
- Un delay sincronizado al tempo y una reverberación corta tipo plate/habitación para un espacio que apoye la letra.
Carga la cadena en tu pista principal, duplícala para dobles/armonías con umbrales ligeramente diferentes, o coloca procesamiento correctivo en la pista y pulido creativo en un bus vocal. Los presets son puntos de partida: graba a través de ellos, luego ajusta umbrales, cantidades de EQ y niveles de envío para tu voz, micrófono y canción. Cuando encuentres el punto ideal, guárdalo como tu propio preset para que futuros proyectos abran listos para grabar.
Por qué usar presets (beneficios y cuándo ayudan)
- Velocidad: Abre, elige un preset, presiona grabar. No más calentamientos de 20 minutos haciendo clic en plugins.
- Consistencia: Mantén el tono alineado entre canciones/EPs para que tu catálogo suene cohesivo.
- Enfoque creativo: Dedica tiempo a dobles, ad-libs y la interpretación, no a la configuración técnica.
- Traducción: Las cadenas están diseñadas para ser inteligibles en teléfonos y auriculares, así como en monitores.
- Baja fricción: Especialmente útil en laptops o equipos móviles donde el tiempo y la CPU son limitados.
Casos de uso ideales: sesiones de escritura rápidas, colaboraciones remotas, contenido (shorts/reels), lanzamientos semanales de singles o cualquier flujo donde quieras pasar de la idea a la toma en minutos.
Stock vs. Premium en FL Studio (lo que realmente necesitas)
Cadenas solo con plugins nativos usan plugins propios (por ejemplo, Parametric EQ 2, Fruity Compressor, Reeverb 2, Delay 3). Son portátiles, ligeros en CPU y funcionan en cualquier instalación de FL Studio, ideales para colaboración y equipos económicos. Si quieres cero dudas sobre ruteo y organización, comienza con una plantilla de sesión preconstruida basada en plugins nativos que nombra y codifica con colores las pistas, configura envíos y mantiene el margen de cabeza predecible. Para un diseño listo para grabar, consulta la Plantilla de grabación para FL Studio (Stock).
Cadenas premium combinan plugins nativos con herramientas de terceros selectas si ya las posees y quieres color extra (afinación, EQ dinámico, saturación especializada). Muchos artistas usan ambos: stock para grabar en cualquier lugar y una cadena premium para pulir en casa.
Selección rápida: ¿nuevo en presets? Comienza con una cadena limpia de “voces claras”. ¿Conoces tu estilo? Usa una cadena ajustada al estilo (rap, R&B, trap) y haz pequeños ajustes en lugar de reconstruir desde cero.
Instalación y inicio rápido (paso a paso)
- Crea una sesión: Abre un proyecto nuevo. Rutea tu micrófono a un inserto dedicado del mezclador. Nombra y colorea las pistas (Lead, Doubles, Ad-libs) y, si quieres, crea un bus vocal para control agrupado.
- Configura entrada y niveles: Graba una frase de prueba corta y ajusta la ganancia para que los picos estén seguros por debajo del clipping. Si el monitoreo se siente con retardo, reduce el tamaño del buffer en las configuraciones de audio de FL Studio y graba con una cadena ligera (EQ → compresión ligera → de-ess); añade el pulido durante la reproducción.
- Carga la cadena: Inserta el preset en tu pista vocal (o abre una plantilla donde el ruteo/envíos ya estén preconfigurados). Mantén los insertos mayormente secos durante la grabación; usa envíos para reverb/delay para mantener baja la latencia y clara la dicción.
- Ajusta umbrales y envíos: Busca unos pocos dB de reducción de ganancia limpia en las líneas más fuertes sin bombeo. Si realzas, revisa el de-esser para que las “s” sigan suaves. Usa un delay pequeño sincronizado al tempo y una reverberación corta tipo plate; automatiza los envíos para los coros.
- Guarda tu configuración: Guarda el estado del canal como tu propio preset y guarda una plantilla para que cada proyecto nuevo abra con la misma organización, margen de cabeza y ruteo. Para consejos más profundos de grabación, revisa la guía de grabación de audio de Image-Line.
Notas sobre ganancia: Graba a 24 bits con margen saludable; evita luces rojas en la interfaz (el clipping no se puede arreglar). Si la ganancia de compensación sube demasiado los niveles, recorta la salida del clip o efecto en lugar de forzar el siguiente procesador. Mantén los picos de mezcla preliminar sensatos para no perseguir volumen mientras grabas.
Recetas de estilo y soluciones rápidas (Rap, R&B, Pop, Hyperpop, Claro)
Rap Lead (punch moderno): Dos compresores ligeros en serie mantienen la dinámica controlada sin matar los transientes; enfoca la inteligibilidad en los medios altos; añade un slapback corto o una reverberación plate pequeña para energía sin lavado. Eleva los coros automatizando un poco más el envío de delay en lugar de subir el nivel húmedo del inserto.
Rap melódico / Trap: Busca un agudo brillante pero suave. Un toque de saturación antes del de-ess añade mordida; sigue con el de-ess para que las consonantes no se vuelvan escupidas. Superpone ad-libs con un pasa altos un poco más alto y un poco más de de-ess para mantener las capas ordenadas. Amplía los coros con un poco más de retroalimentación de delay y pre-delay en la reverberación plate.
R&B / Soul: Usa ataque/liberación más suaves, un estante de aire suave y ambiente más amplio. Si los realces añaden siseo, reduce el brillo o añade un segundo de-ess suave. Pasa altos los fondos y usa delays estéreo lentos que queden detrás del lead para que la letra se mantenga al frente.
Pop: Agudos pulidos con de-ess cuidadoso, delays sincronizados al tempo para espacio rítmico y una habitación muy corta para “pegamento”. Toma decisiones con volumen igualado para que “más fuerte” no sesgue tus comparaciones A/B. En arreglos densos, recorta 2–4 kHz para que las palabras sigan inteligibles.
Hyperpop / Afinación avanzada: Combina tu cadena con tu herramienta de afinación preferida para un efecto “en tono” obvio. Elige la clave/escala correcta, ajusta la cantidad de retune con buen gusto (o intencionalmente extremo) y revisa la sibilancia después de cualquier realce.
Canto claro / Podcast: Prioriza la inteligibilidad y el control de ruido. Usa compresión transparente, de-ess moderado y solo un toque de ambiente corto si lo seco suena artificial. La técnica supera al procesamiento: distancia constante al micrófono, filtro anti-pop y una habitación silenciosa.
Soluciones comunes:
- S “s” o “t” ásperas: reduce un poco el brillo y/o suaviza el umbral del de-esser para que actúe solo en sibilantes.
- Capas embarradas: pasa altos dobles/armonías un poco más alto que el lead y aplica más de-ess.
- Demasiado espacio: comienza con envíos bajos; automatiza en los coros en lugar de poner reverb/delay alto todo el tiempo.
- Latencia al grabar: graba con una cadena ligera y un buffer pequeño; añade mejoras en la reproducción.
- Voces enterradas en la mezcla: recorta instrumentos que compiten entre 2–5 kHz o sube el bus vocal ~1 dB en los coros.
Presets vs. plantillas de grabación (flujo de trabajo escalable)
Los presets vocales moldean el tono y la dinámica en una pista o bus. Las plantillas de grabación te dan todo el diseño de la sesión: pistas pre-nombradas (Lead, Doubles, Harmonies, Ad-libs), codificación por colores, ruteo de buses, mezclas de cue y envíos listos, para que pases de la idea a la toma en segundos y mantengas sesiones grandes organizadas.
- Abre tu plantilla para garantizar que el margen de cabeza, medidores y ruteo sean consistentes de canción en canción.
- Carga una cadena preset que coincida con el estilo, luego guarda tu versión ajustada como tu punto de partida “de voz”.
Si trabajas entre varias máquinas, guarda tu preset y plantilla en una carpeta sincronizada para que la cadena viaje contigo. Para una sesión preorganizada lista desde el primer día, usa la Plantilla de grabación para FL Studio (Stock), luego cambia al preset que encaje con la canción. Cuando necesites variedad, guarda tres variantes—Brillante, Neutral, Suave—y elige la más cercana para cada pista nueva.
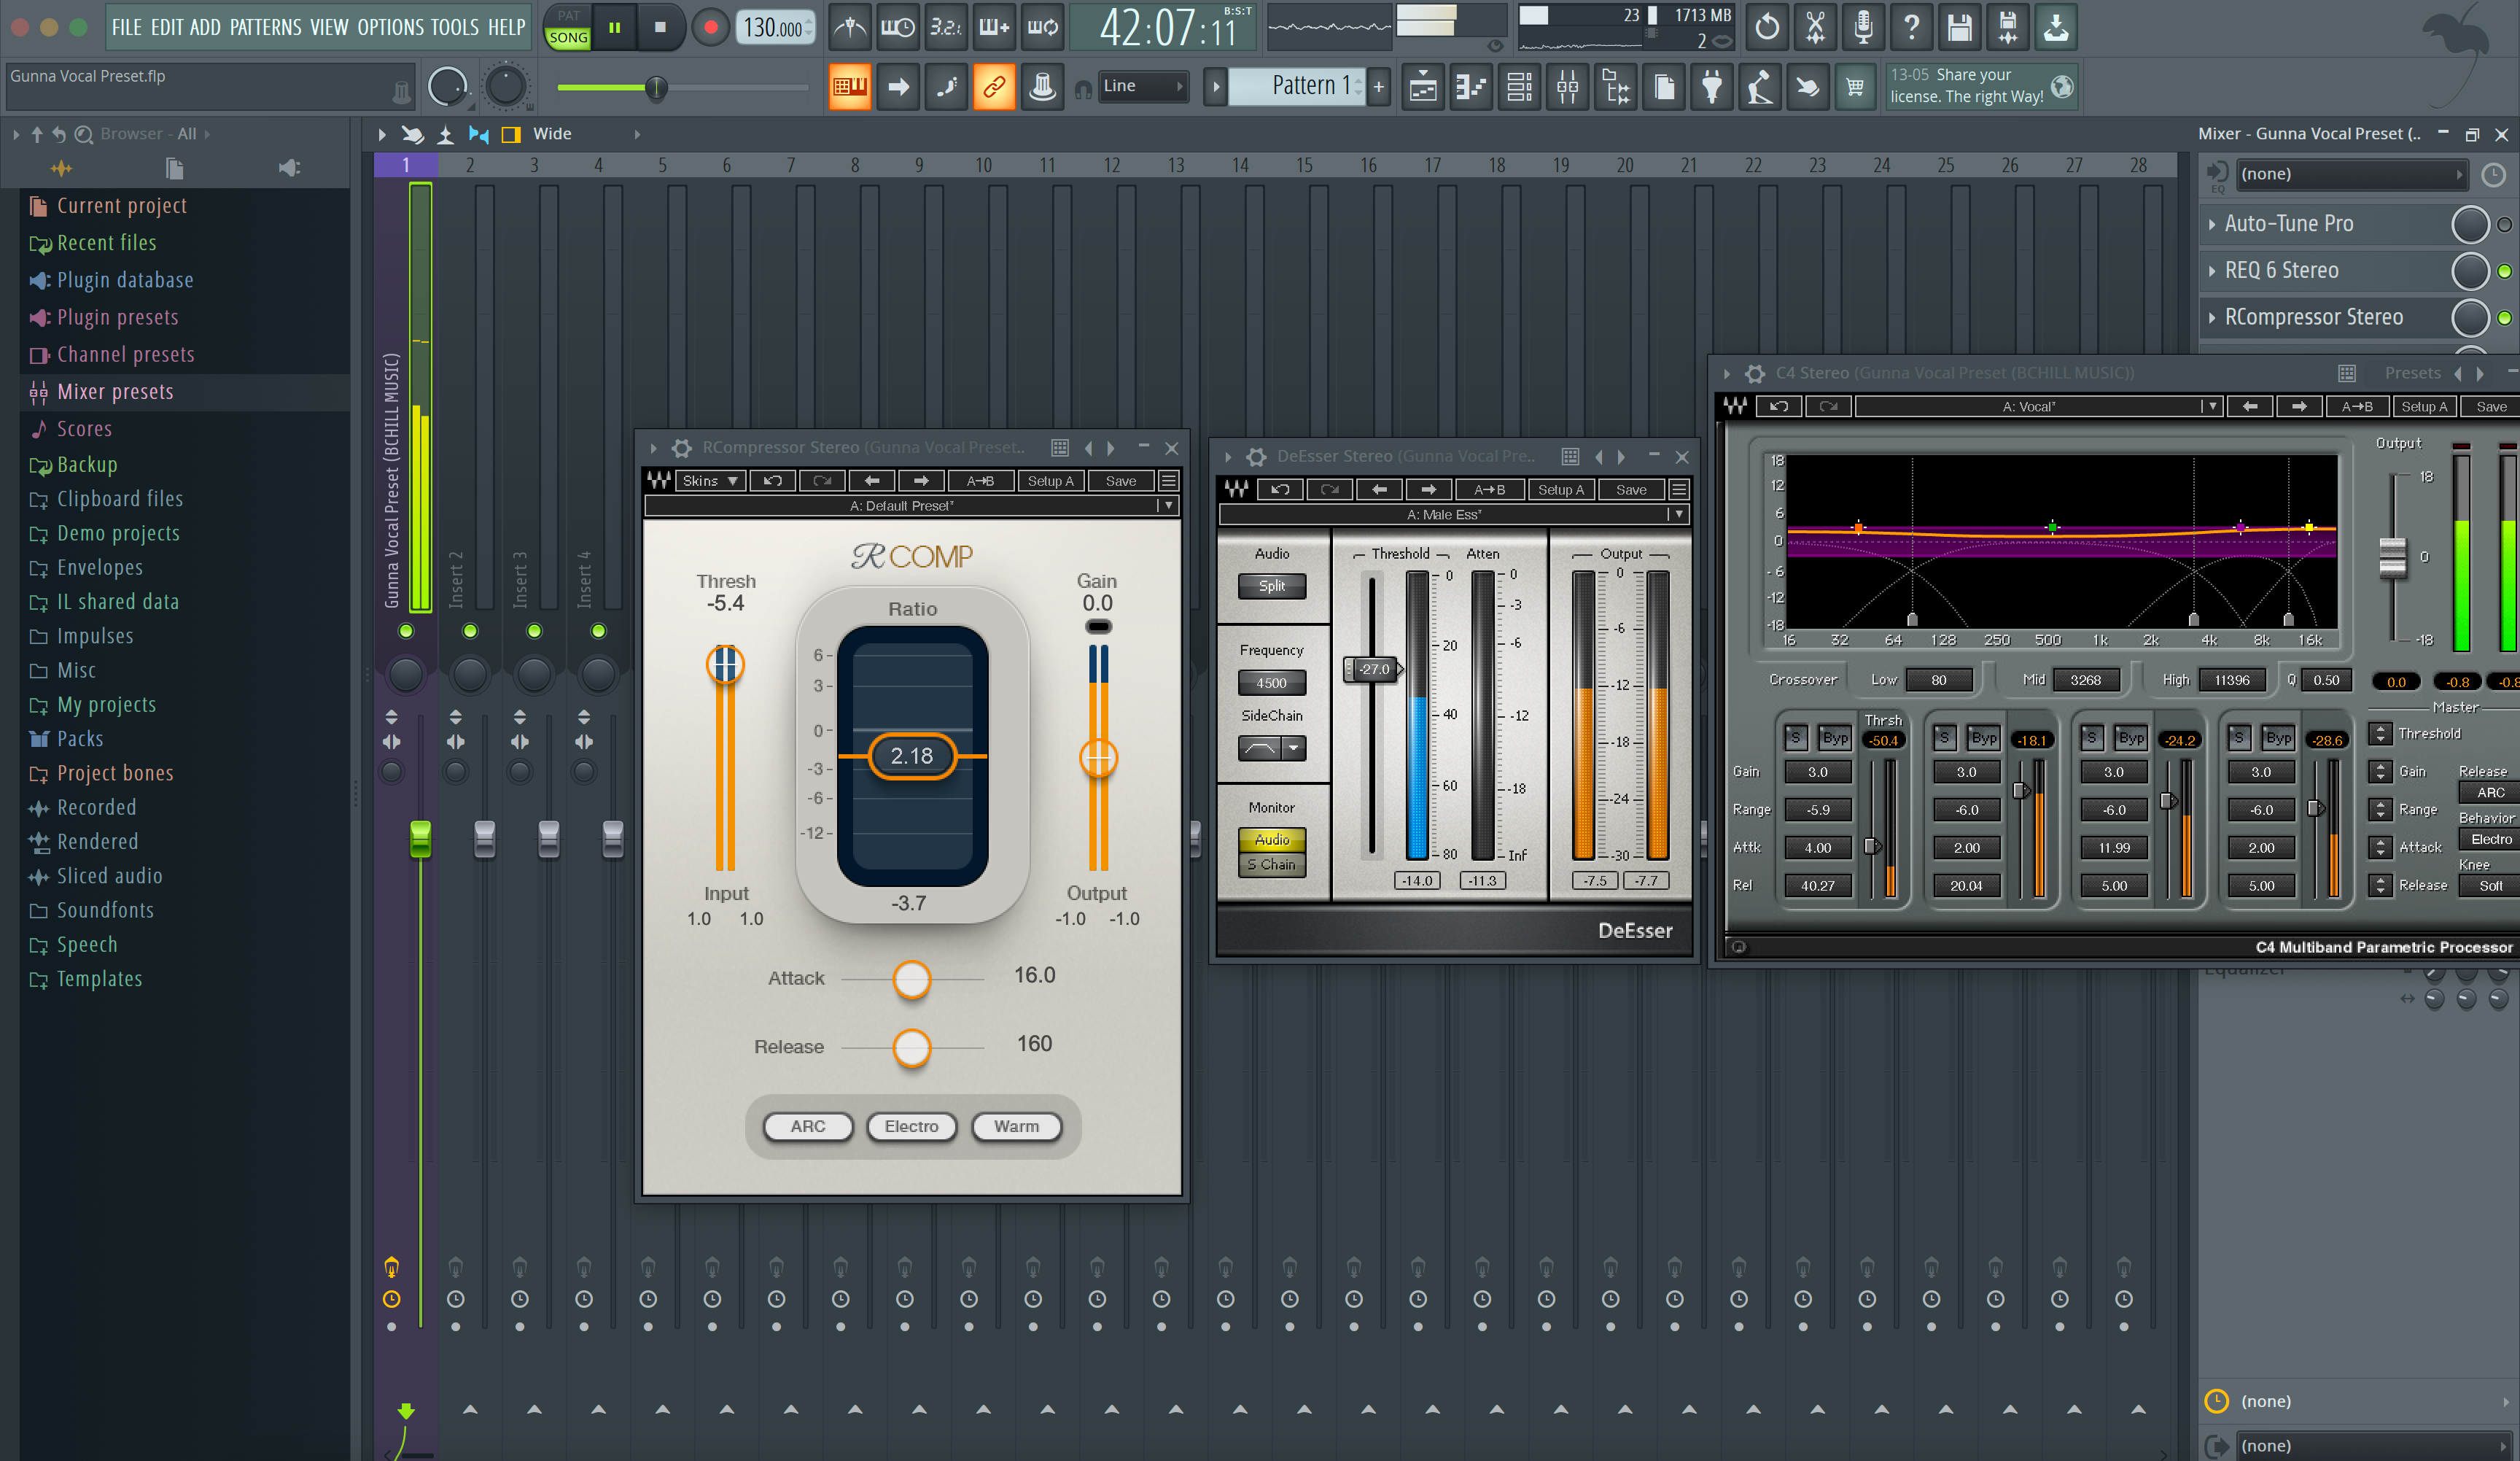
Dentro del DAW: Configuraciones de preajustes vocales de FL Studio (Capturas de pantalla)
Ve cómo nuestra cadena vocal de FL Studio se carga en pistas Lead, Doubles y Bus. Estas capturas de pantalla muestran configuraciones iniciales para rap, R&B, pop e hyperpop; ajusta los umbrales y envíos para que coincidan con tu voz y micrófono.