Stock Preajustes y Plantillas
Optimiza tu flujo de trabajo con nuestra plantilla de grabación lista para usar y los ajustes preestablecidos vocales de stock.
Tipo: Plantilla de Grabación
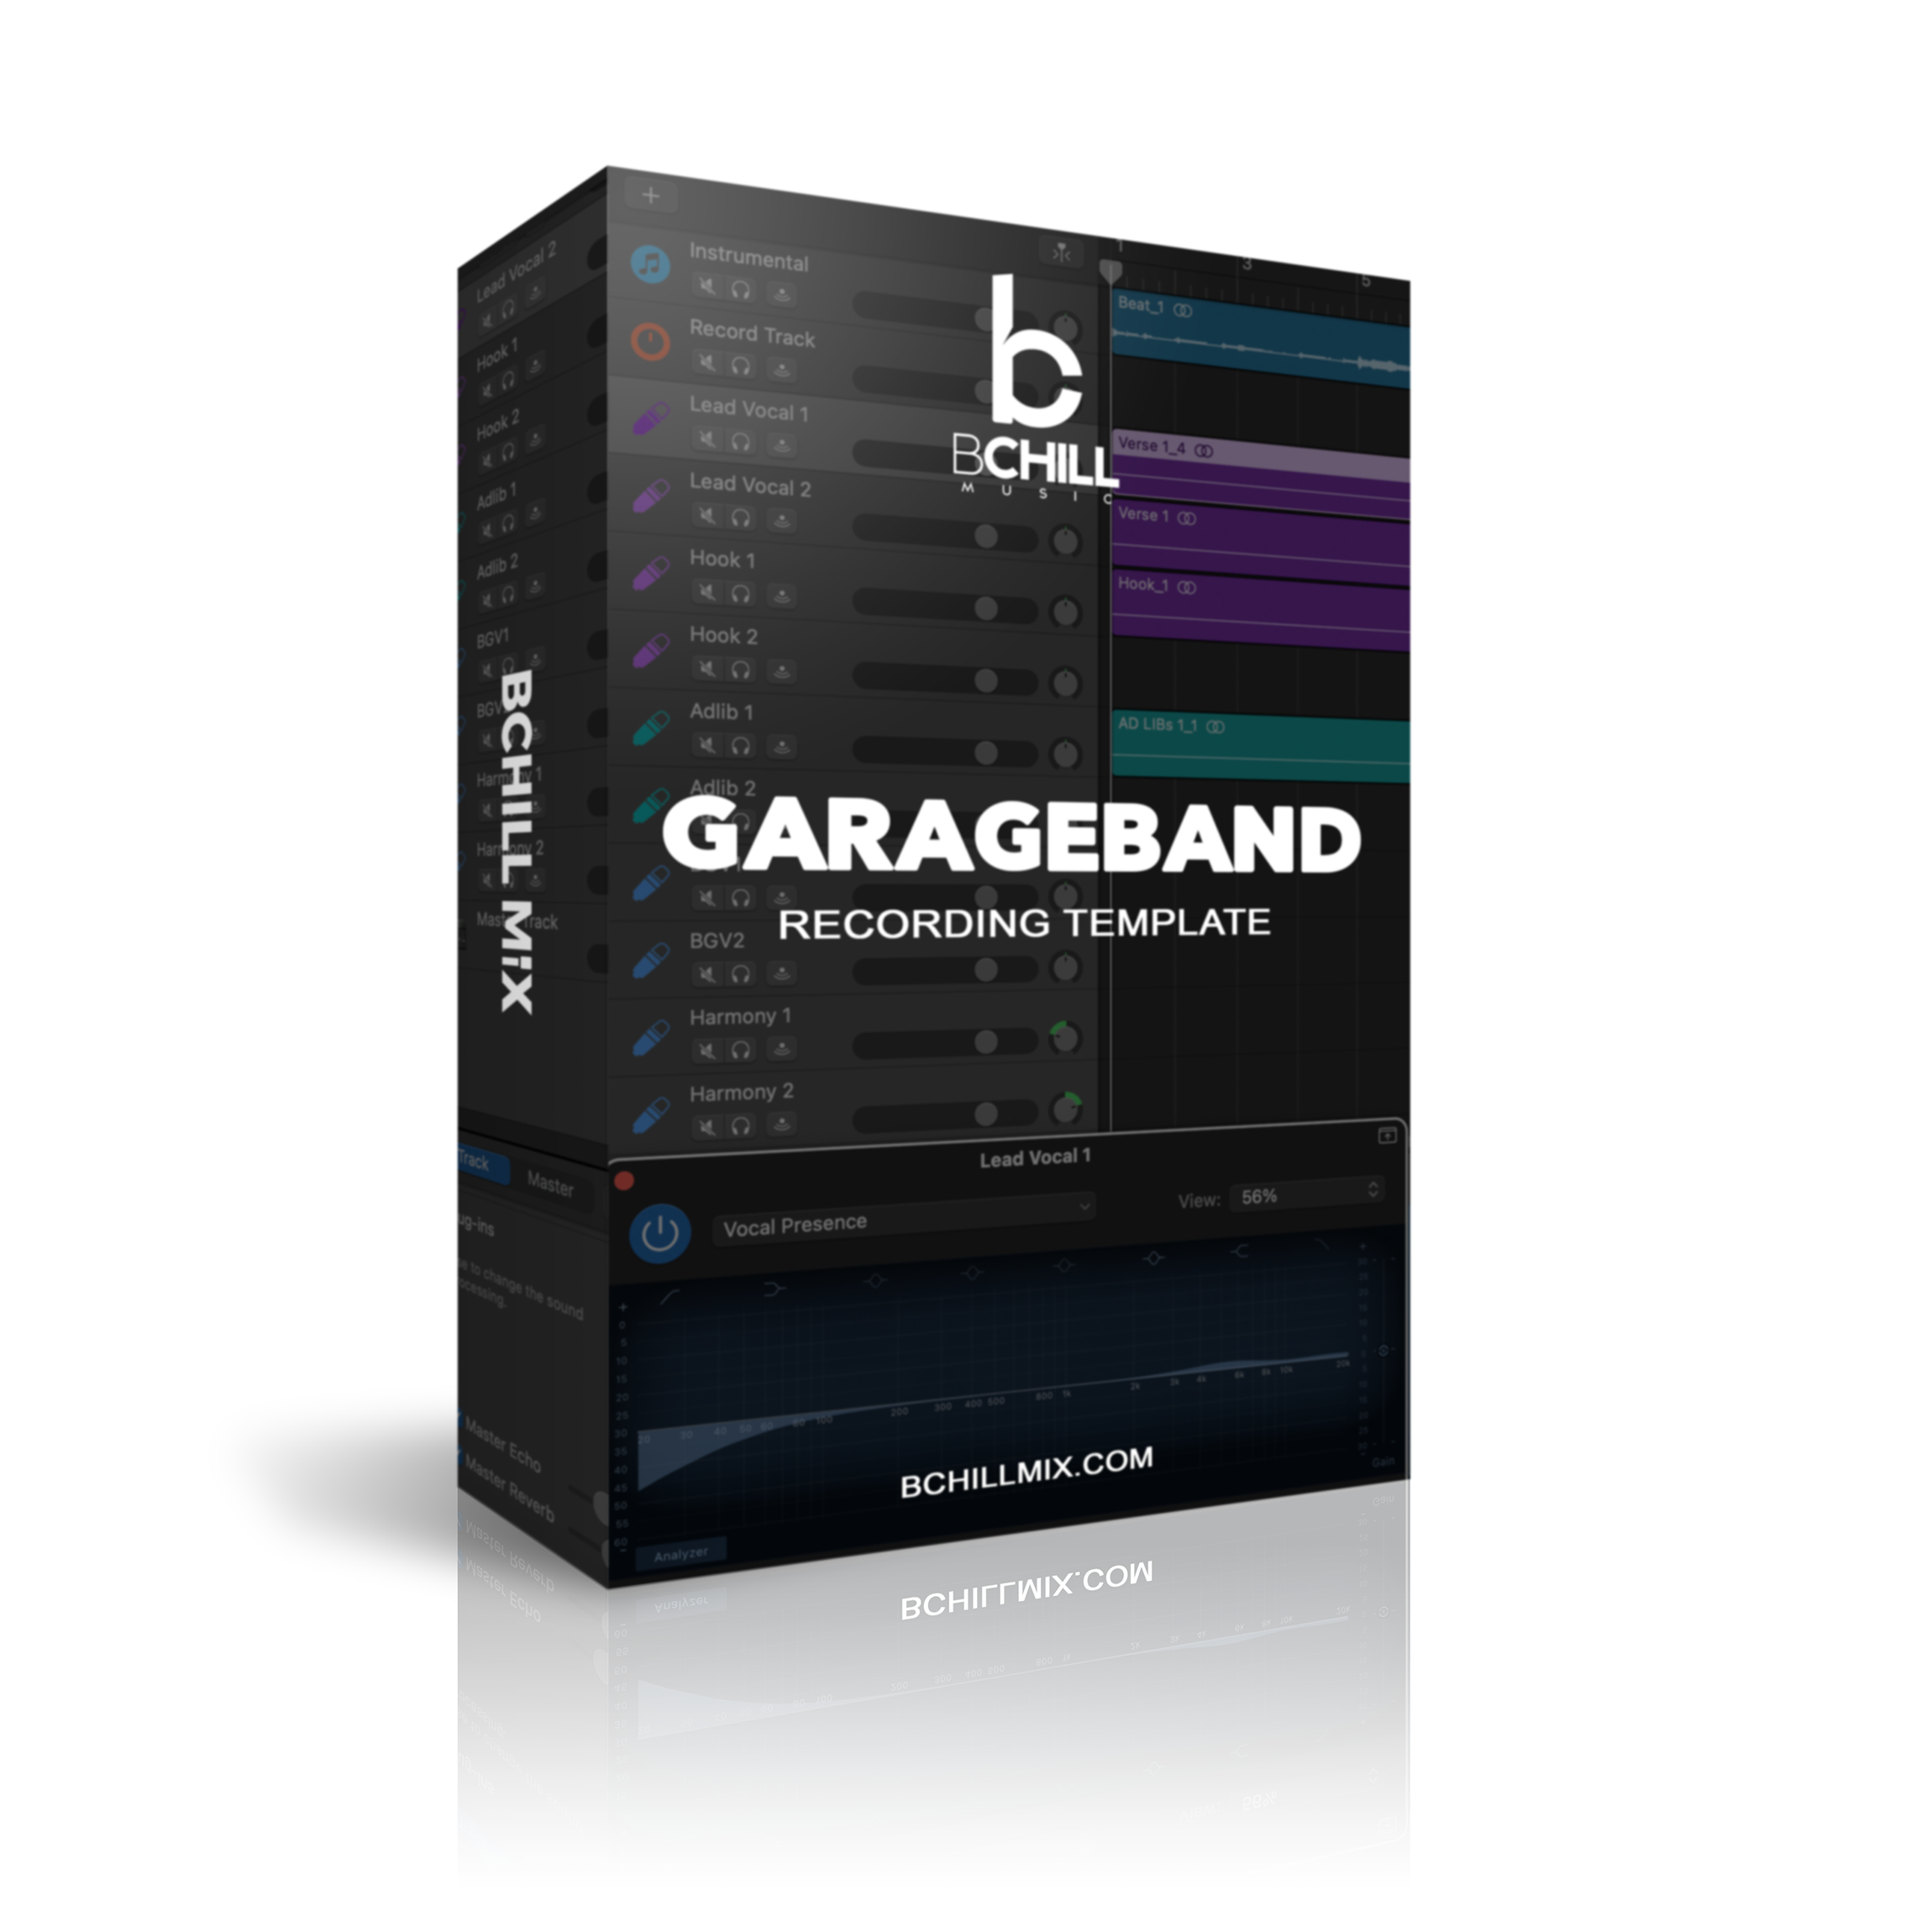
Plantilla de grabación de GarageBand (Plugins de stock)
Tipo: Preset Vocal
Preset de Voz Rap para GarageBand (Plugins de Stock)

Tipo: Preset Vocal
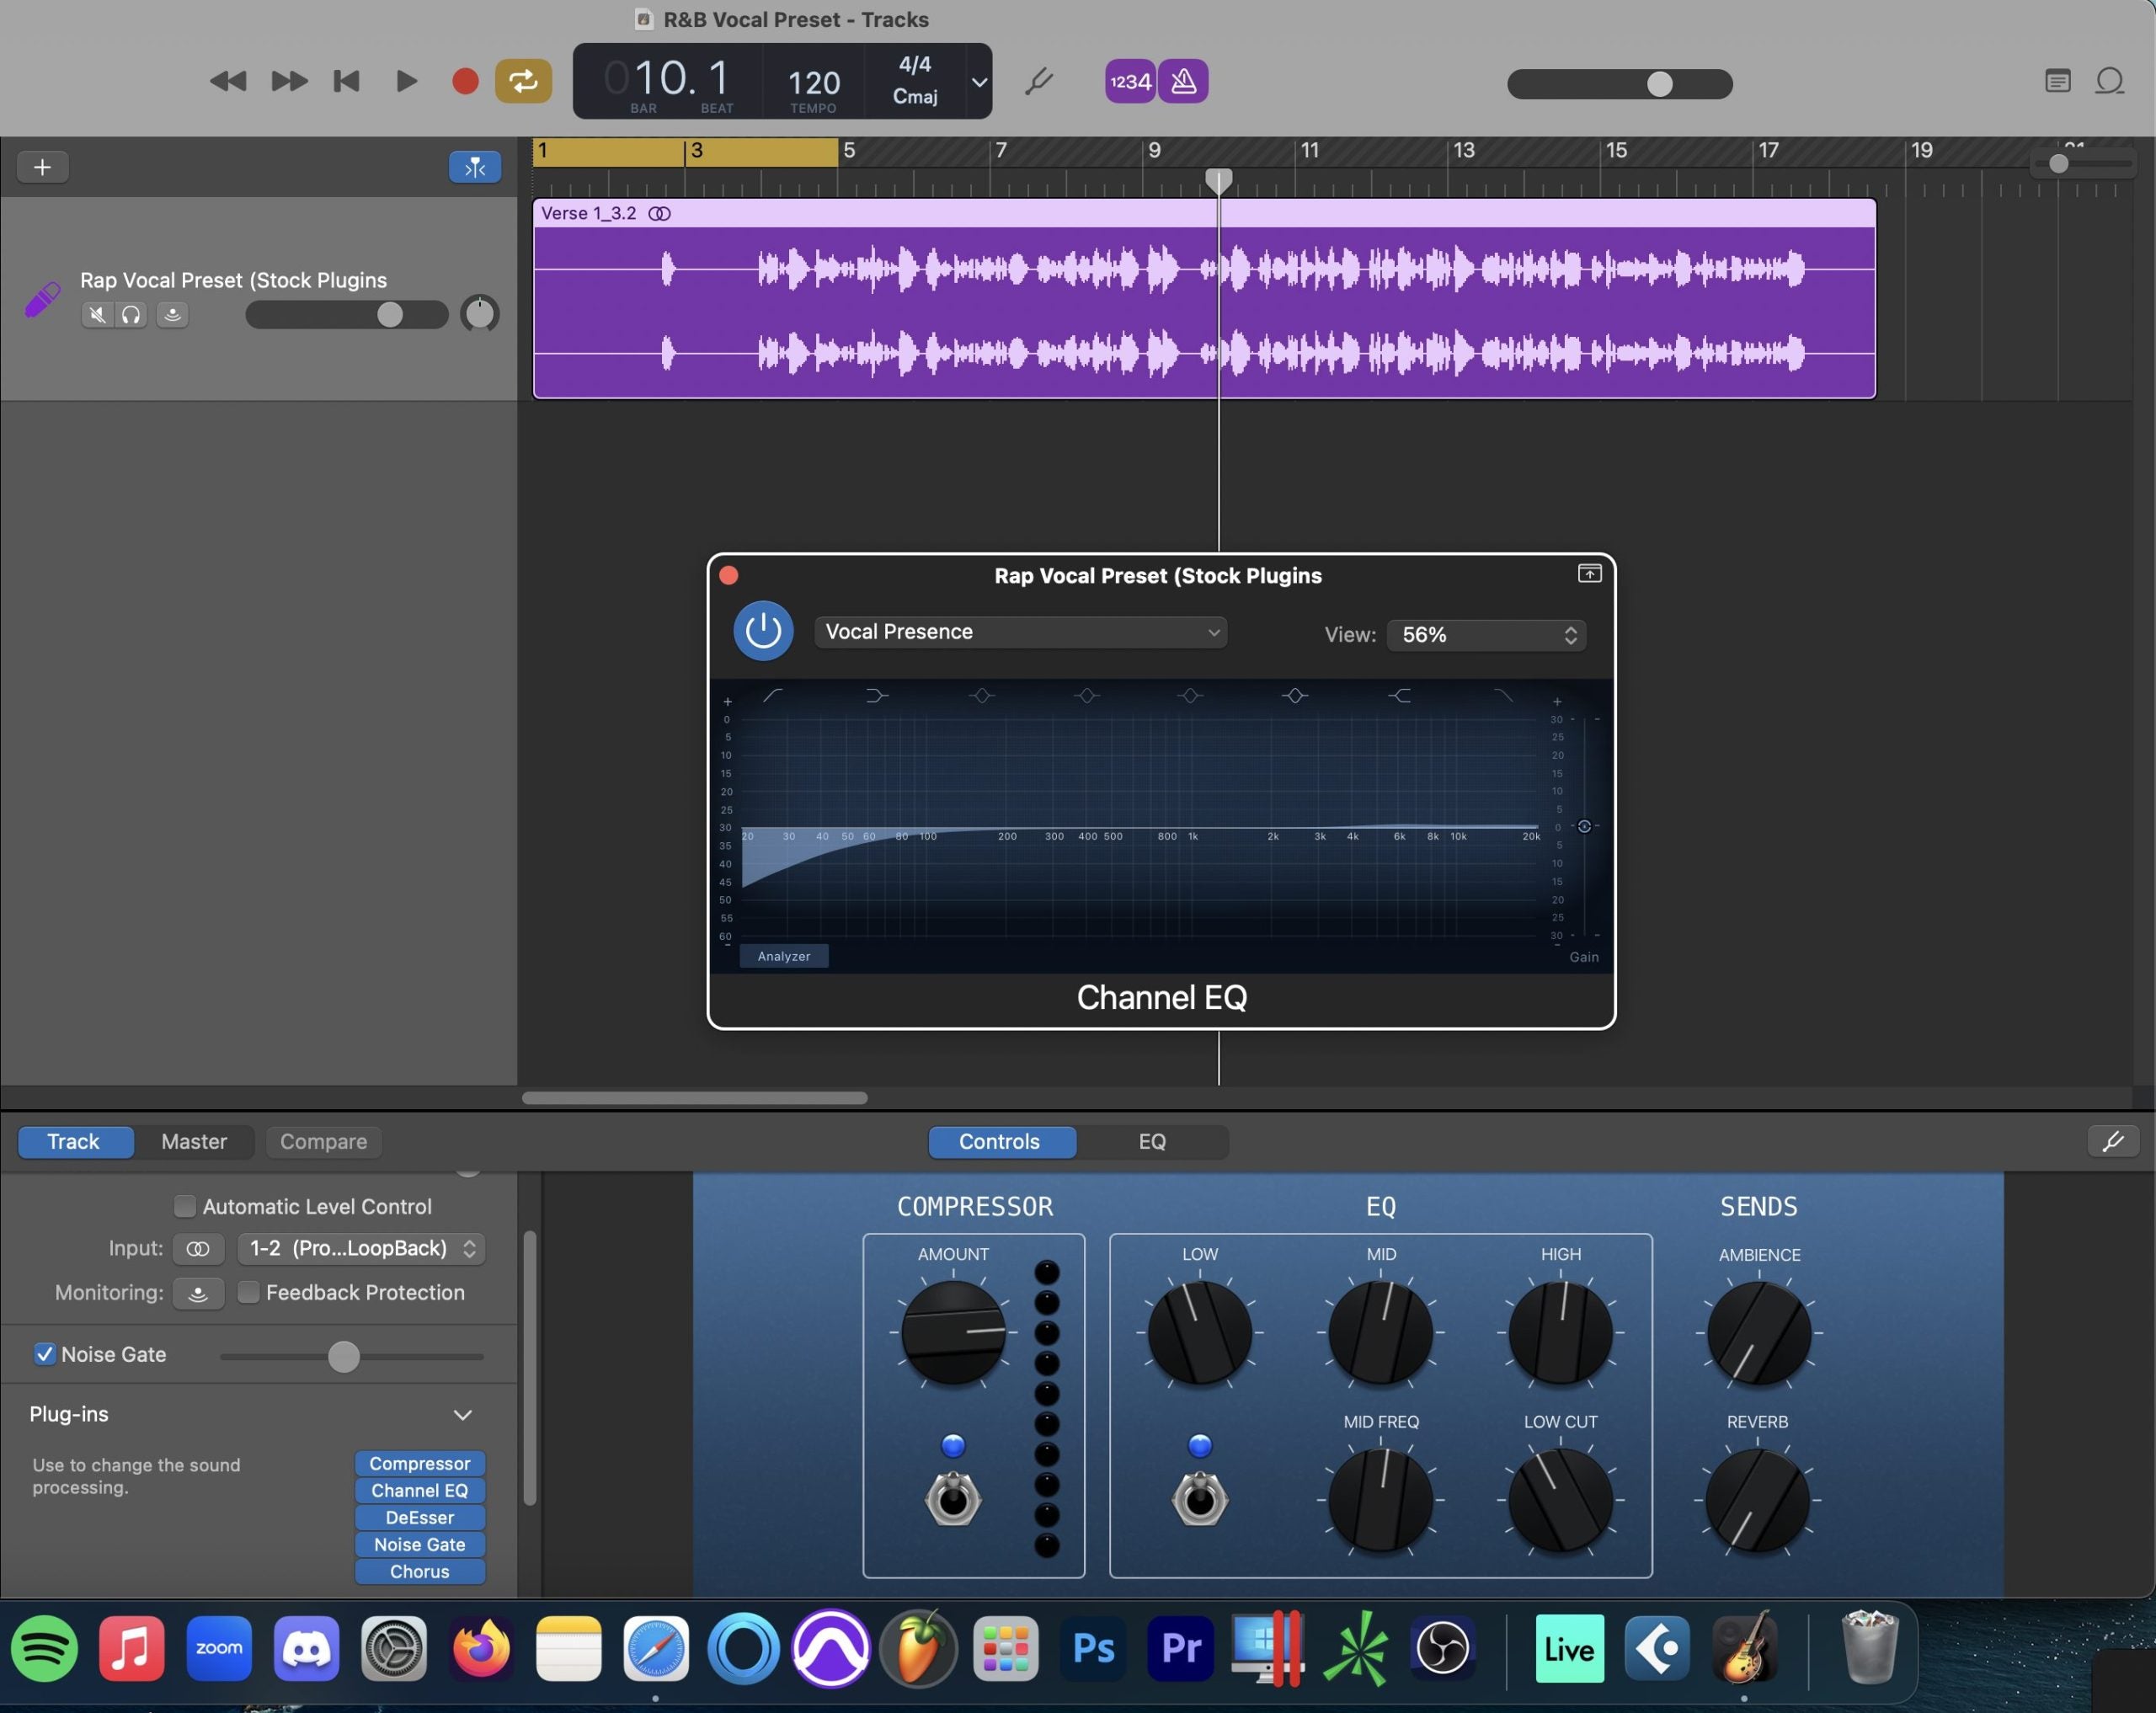
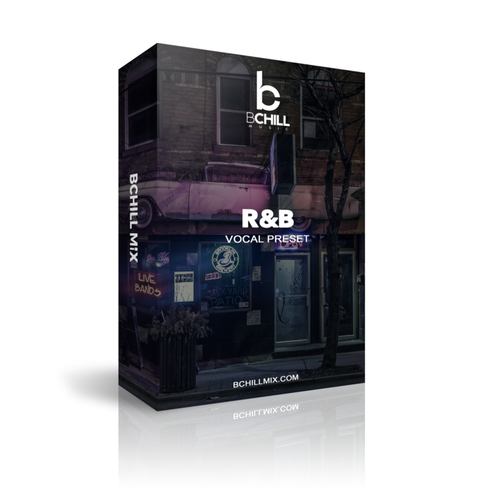
Preset Vocal R&B para GarageBand (Plugins de Stock)
Tipo: Preset Vocal
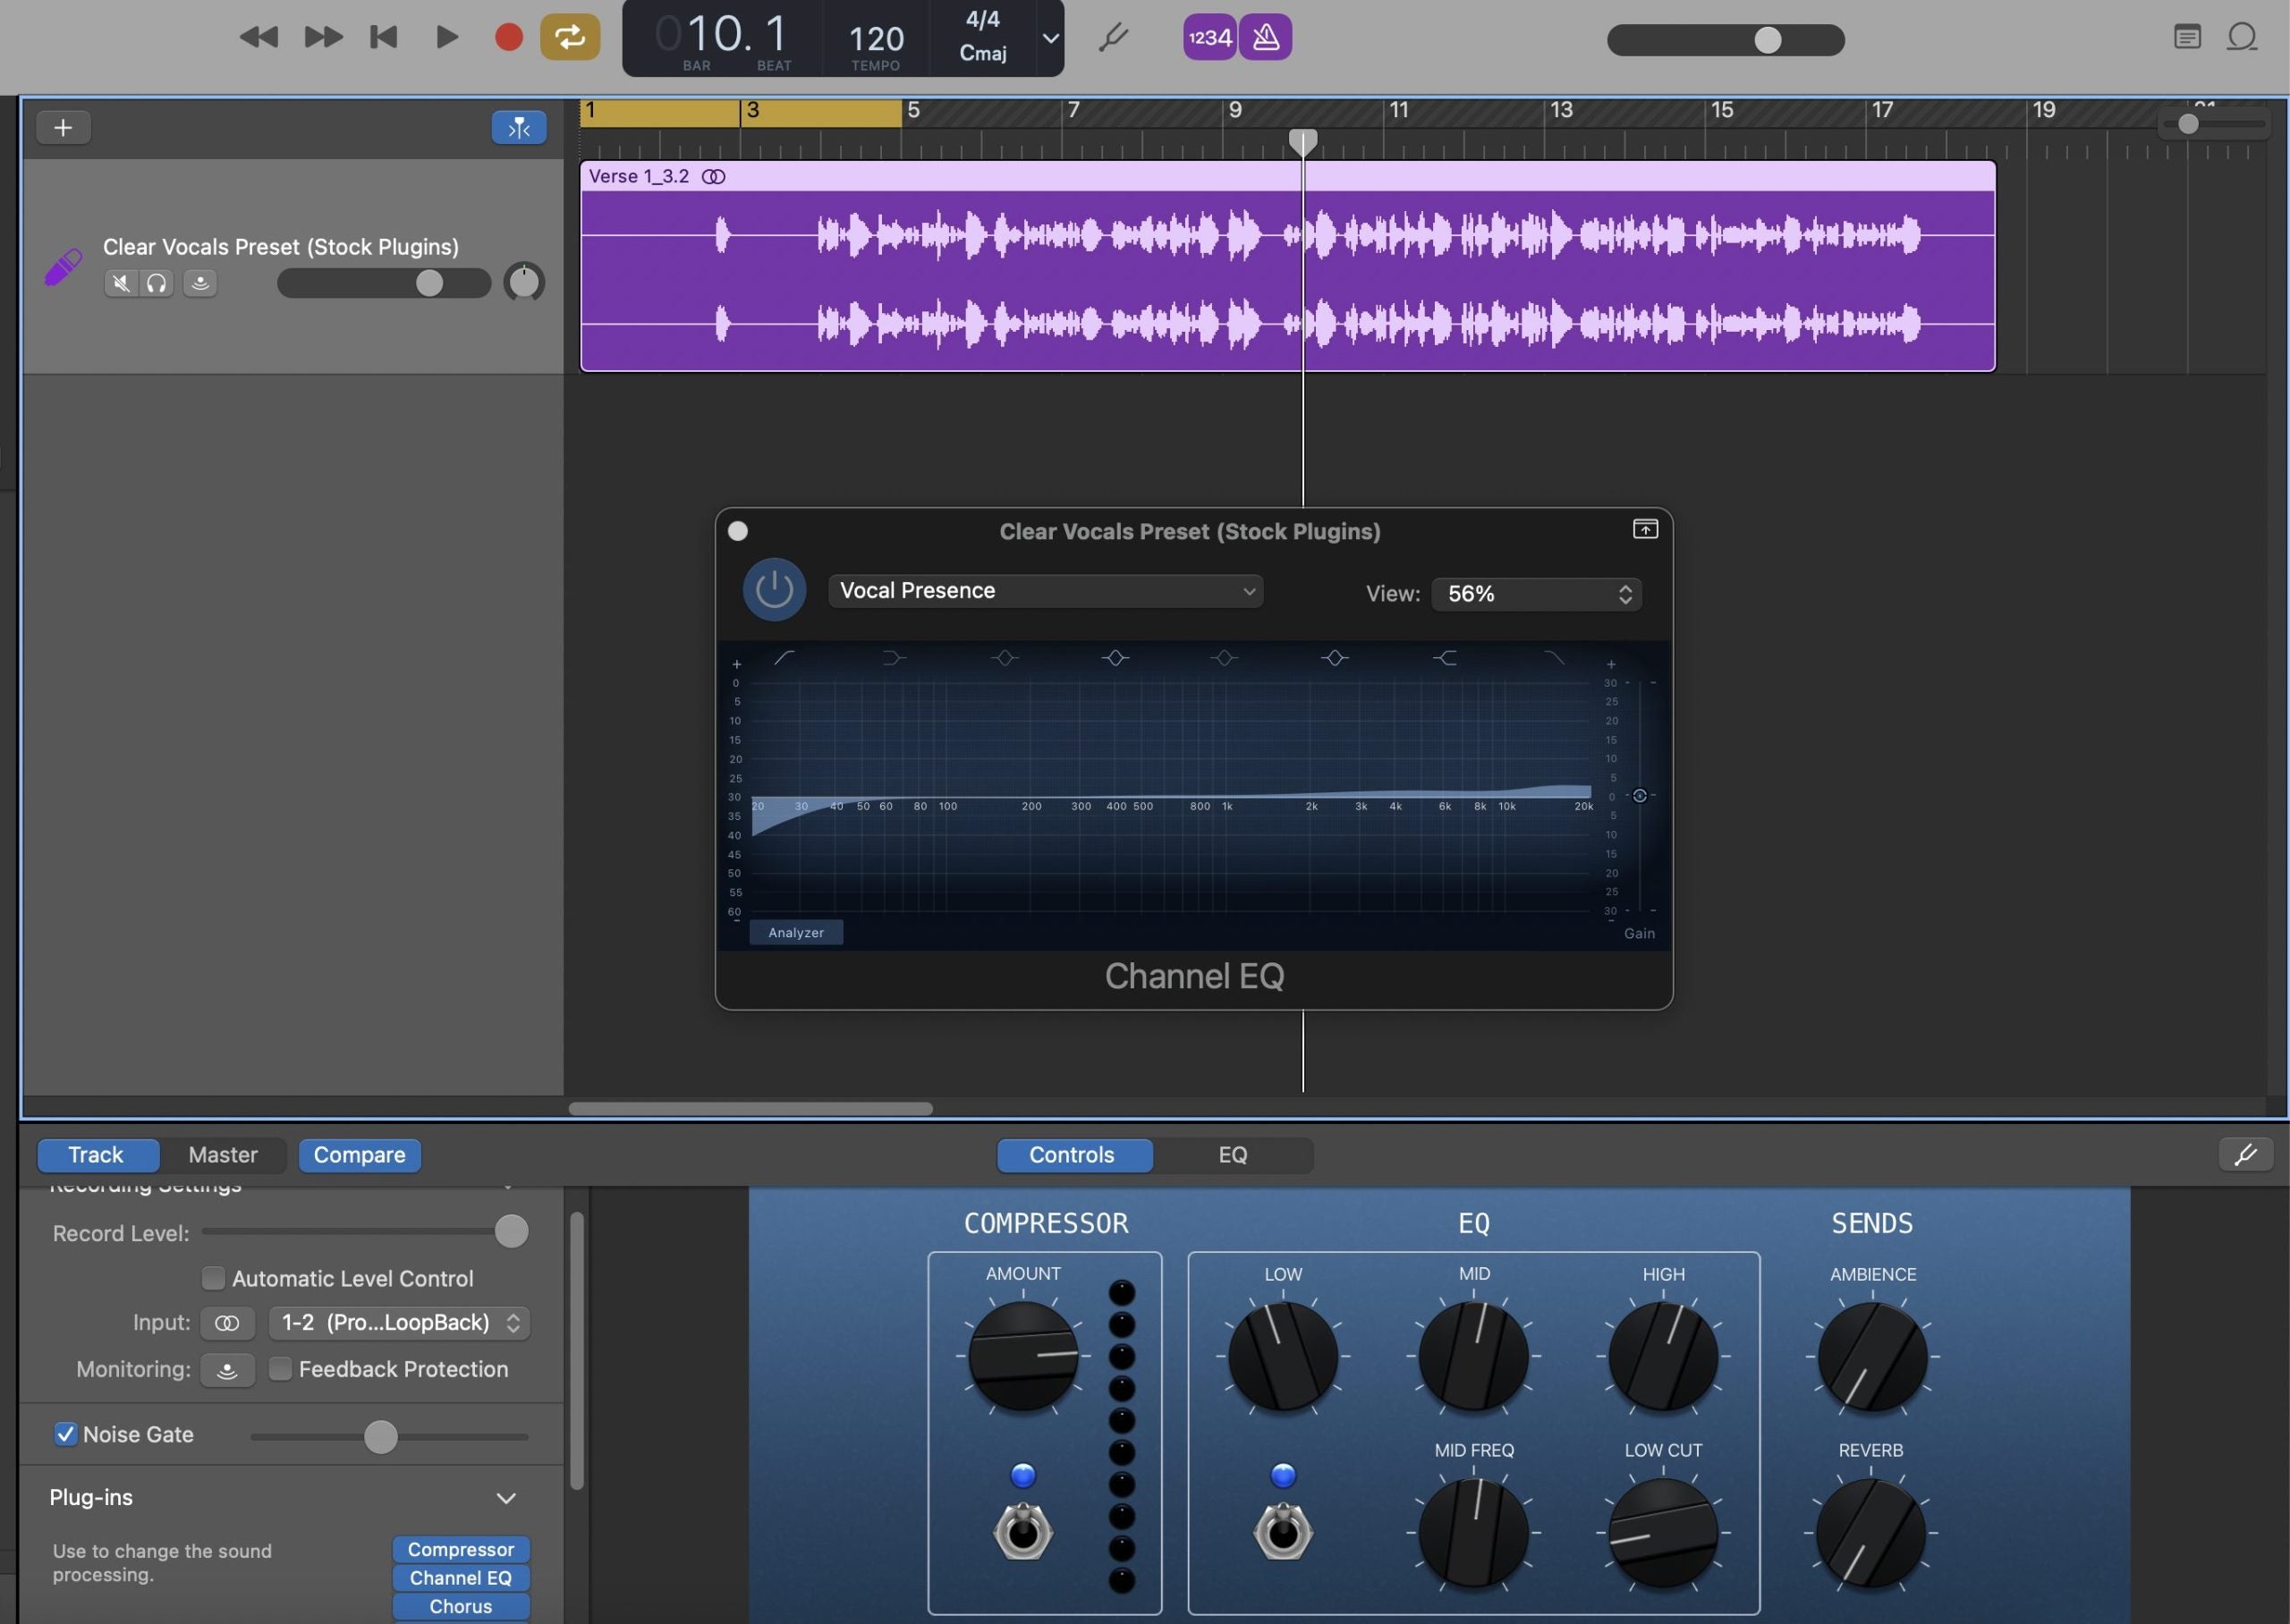
Preset de Voces Claras para GarageBand (Plugins de Stock)
Ajustes Vocales Premium
Experimenta una calidad de sonido inigualable con nuestros Presets Vocales Premium, elaborados con plugins de primera categoría

Tipo: Preset Vocal
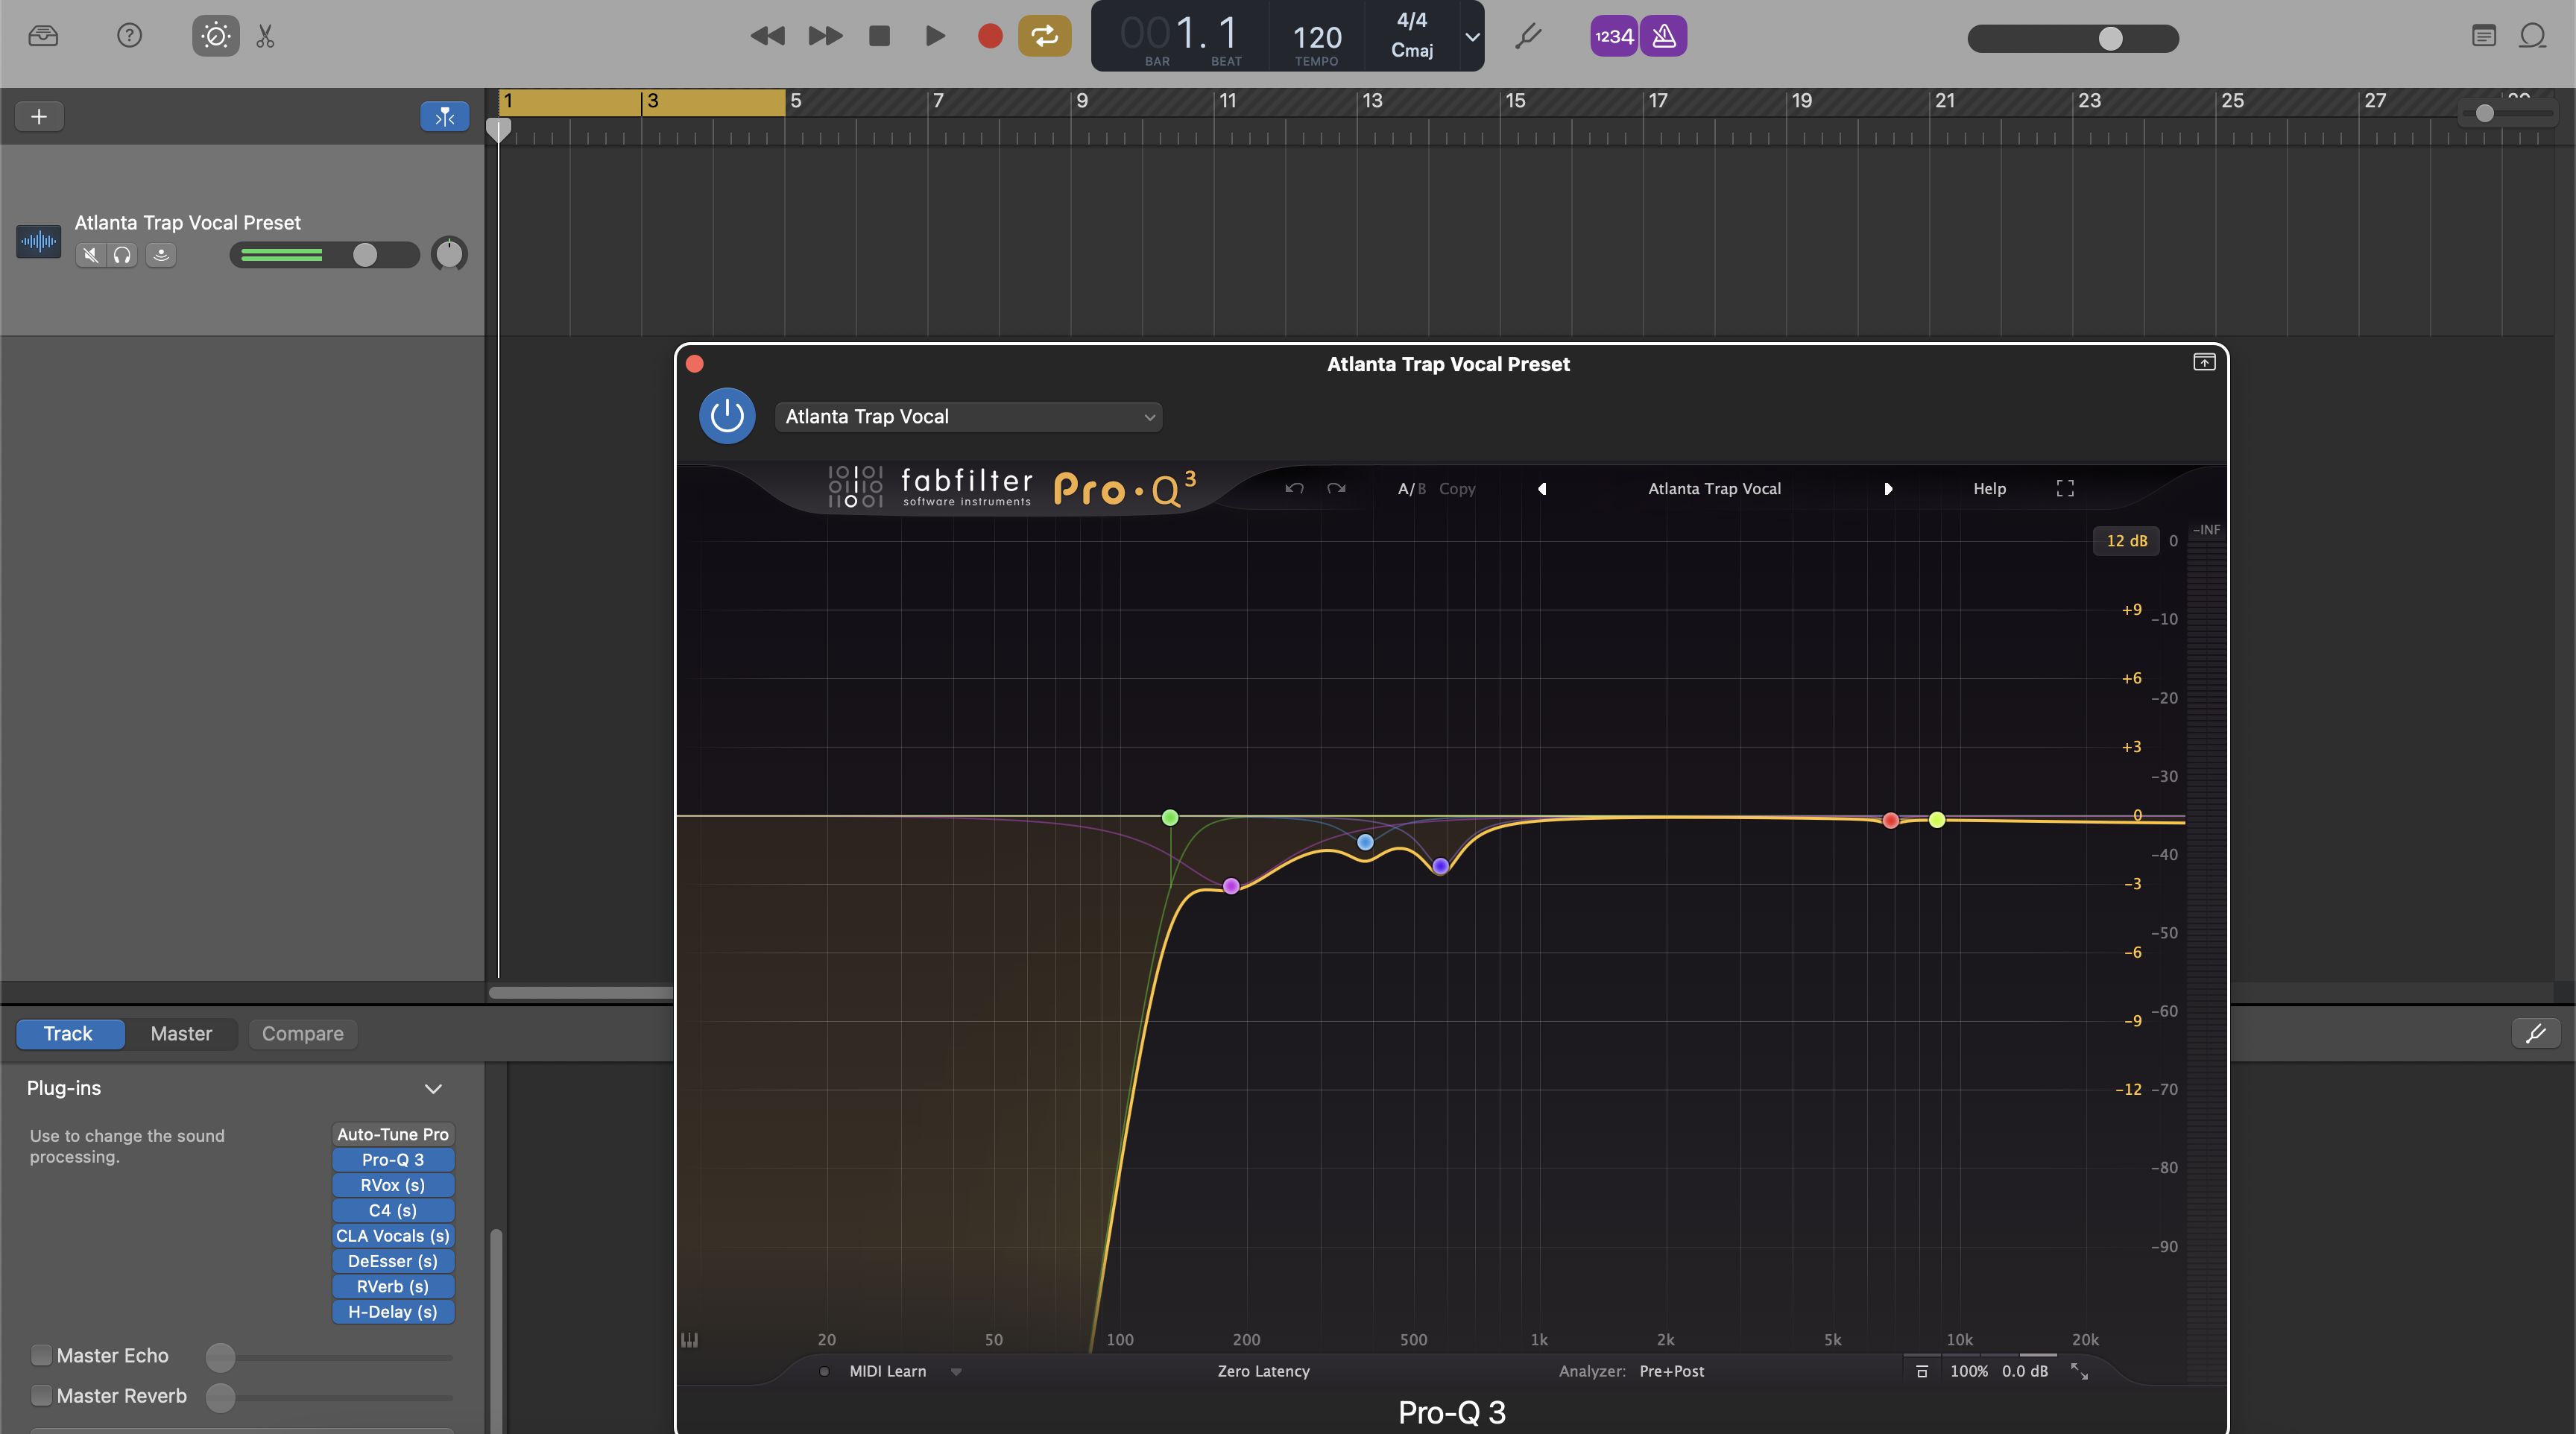
Preset de Vocal Trap de Atlanta para GarageBand | Cadena de Vocal Trap de Atlanta
Tipo: Preset Vocal
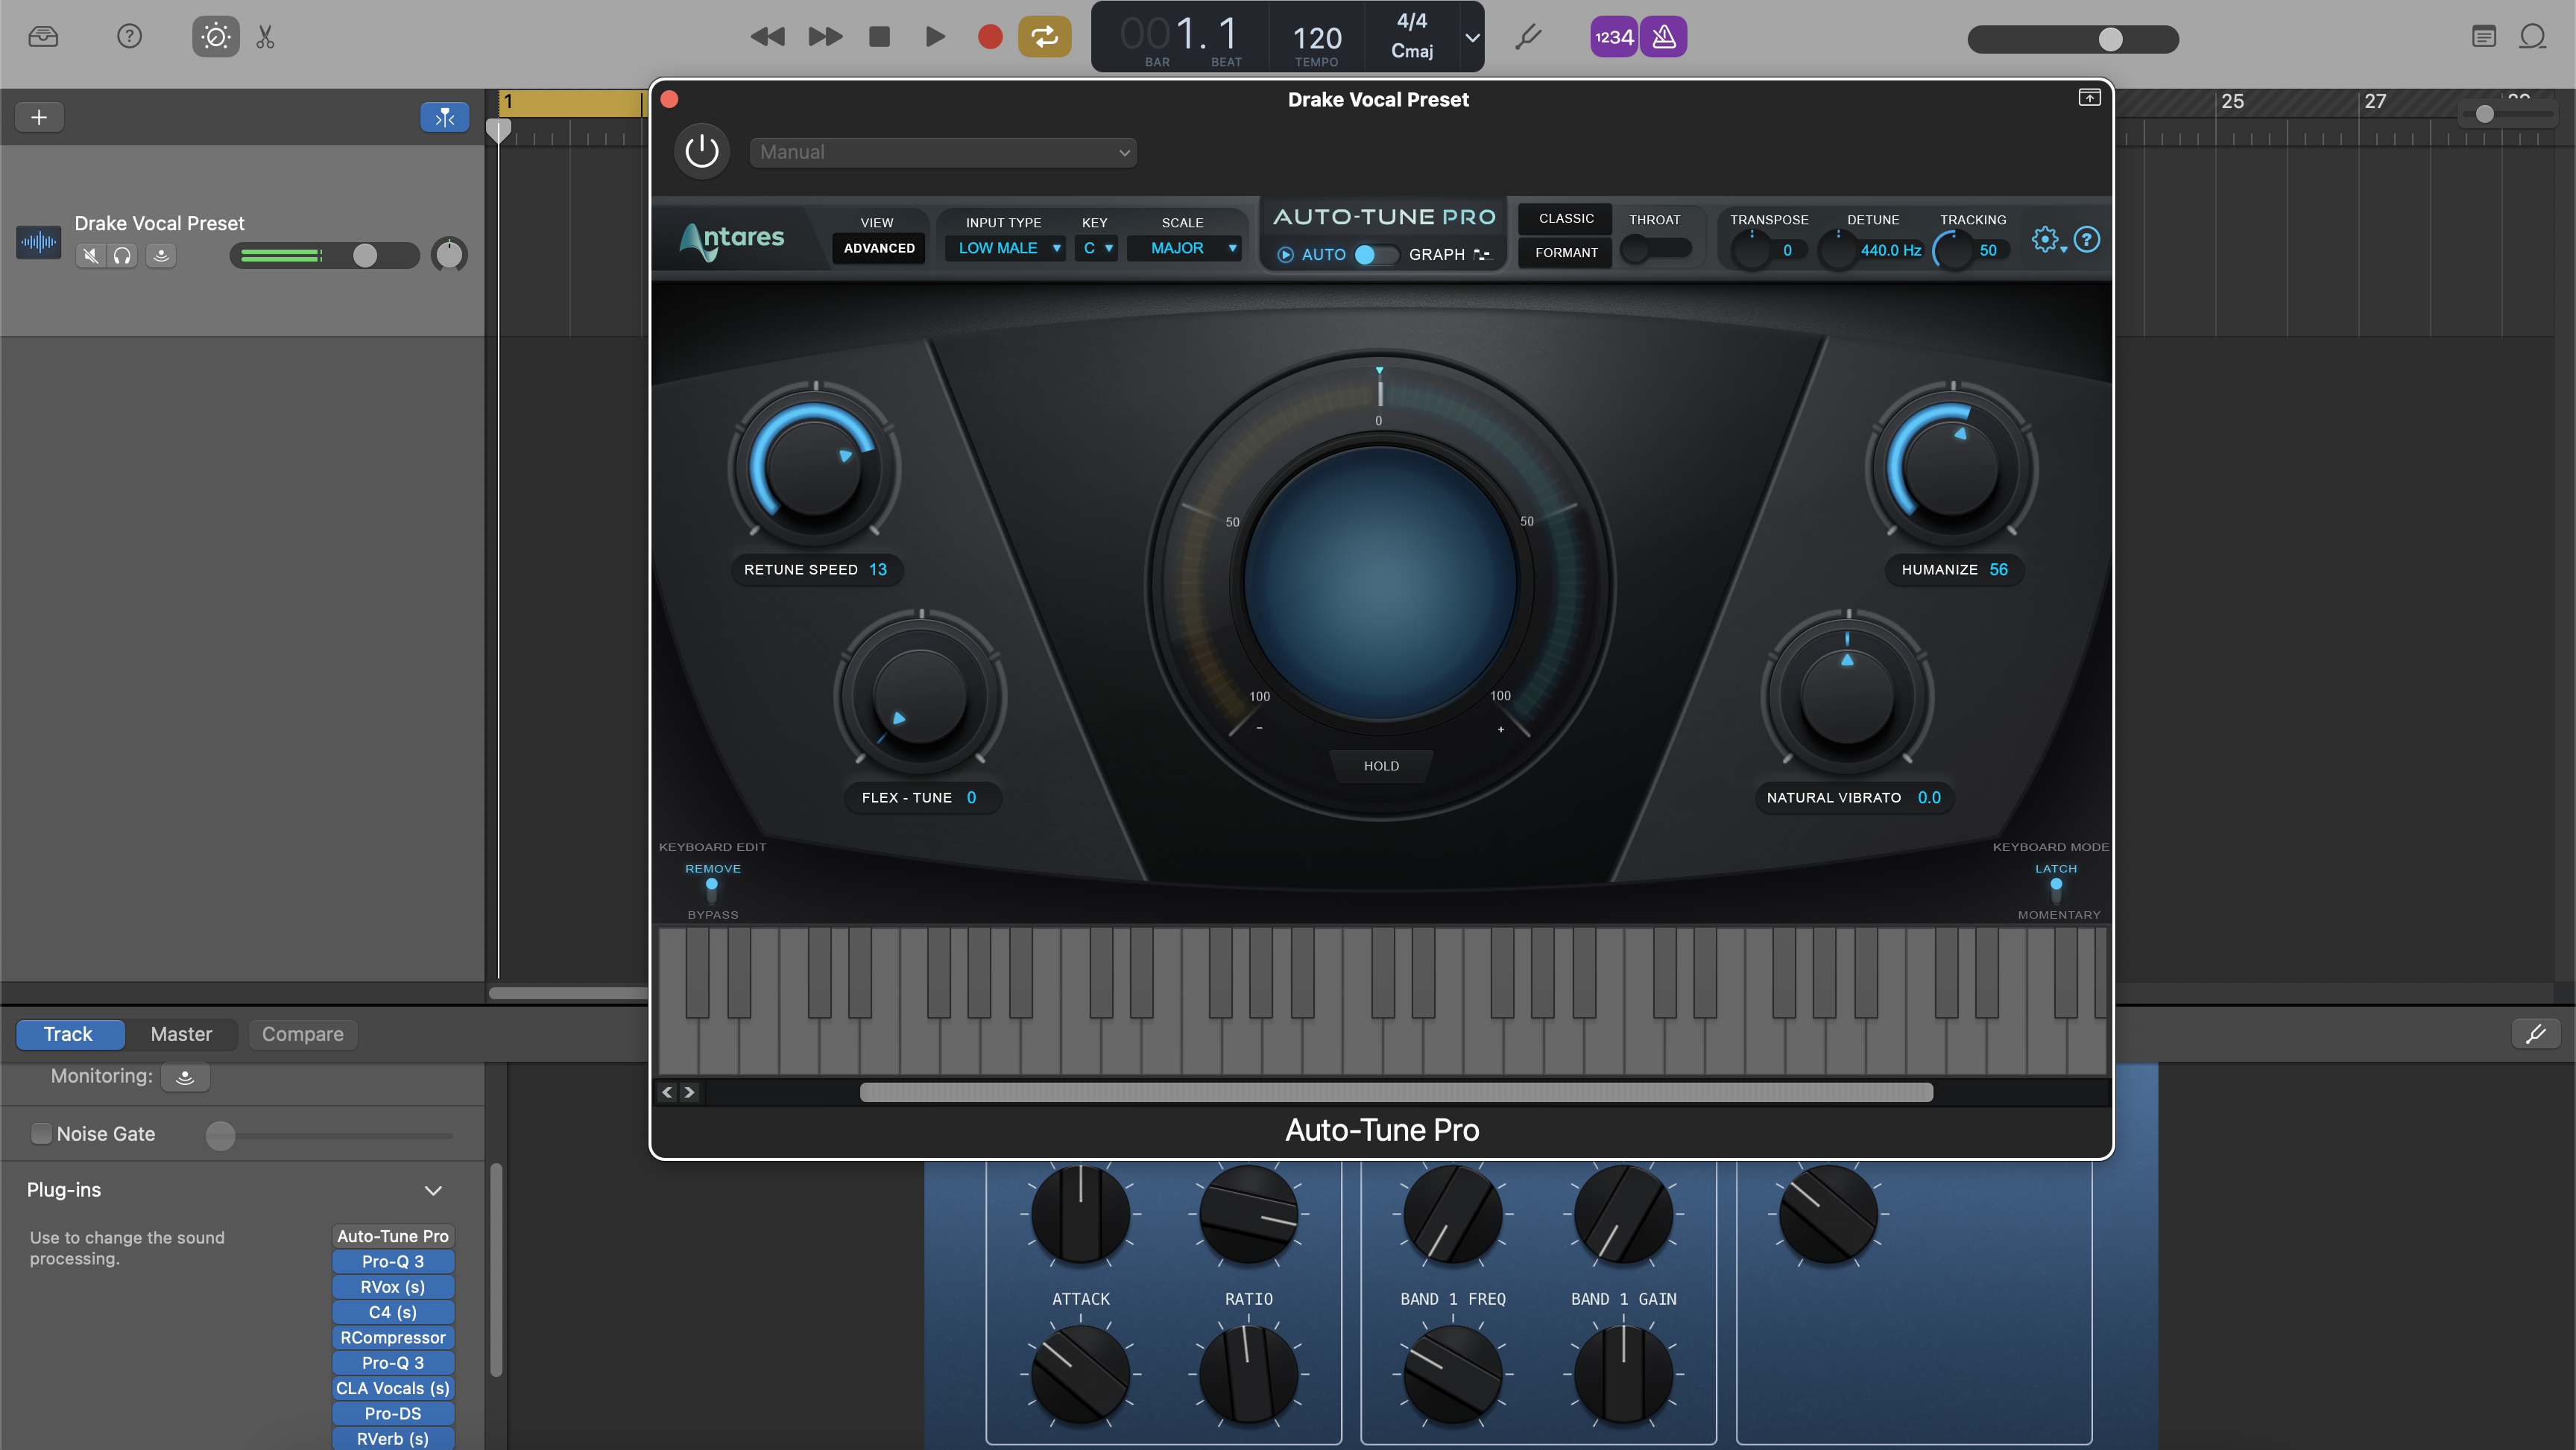
Preset Vocal de Drake para GarageBand
Tipo: Preset Vocal
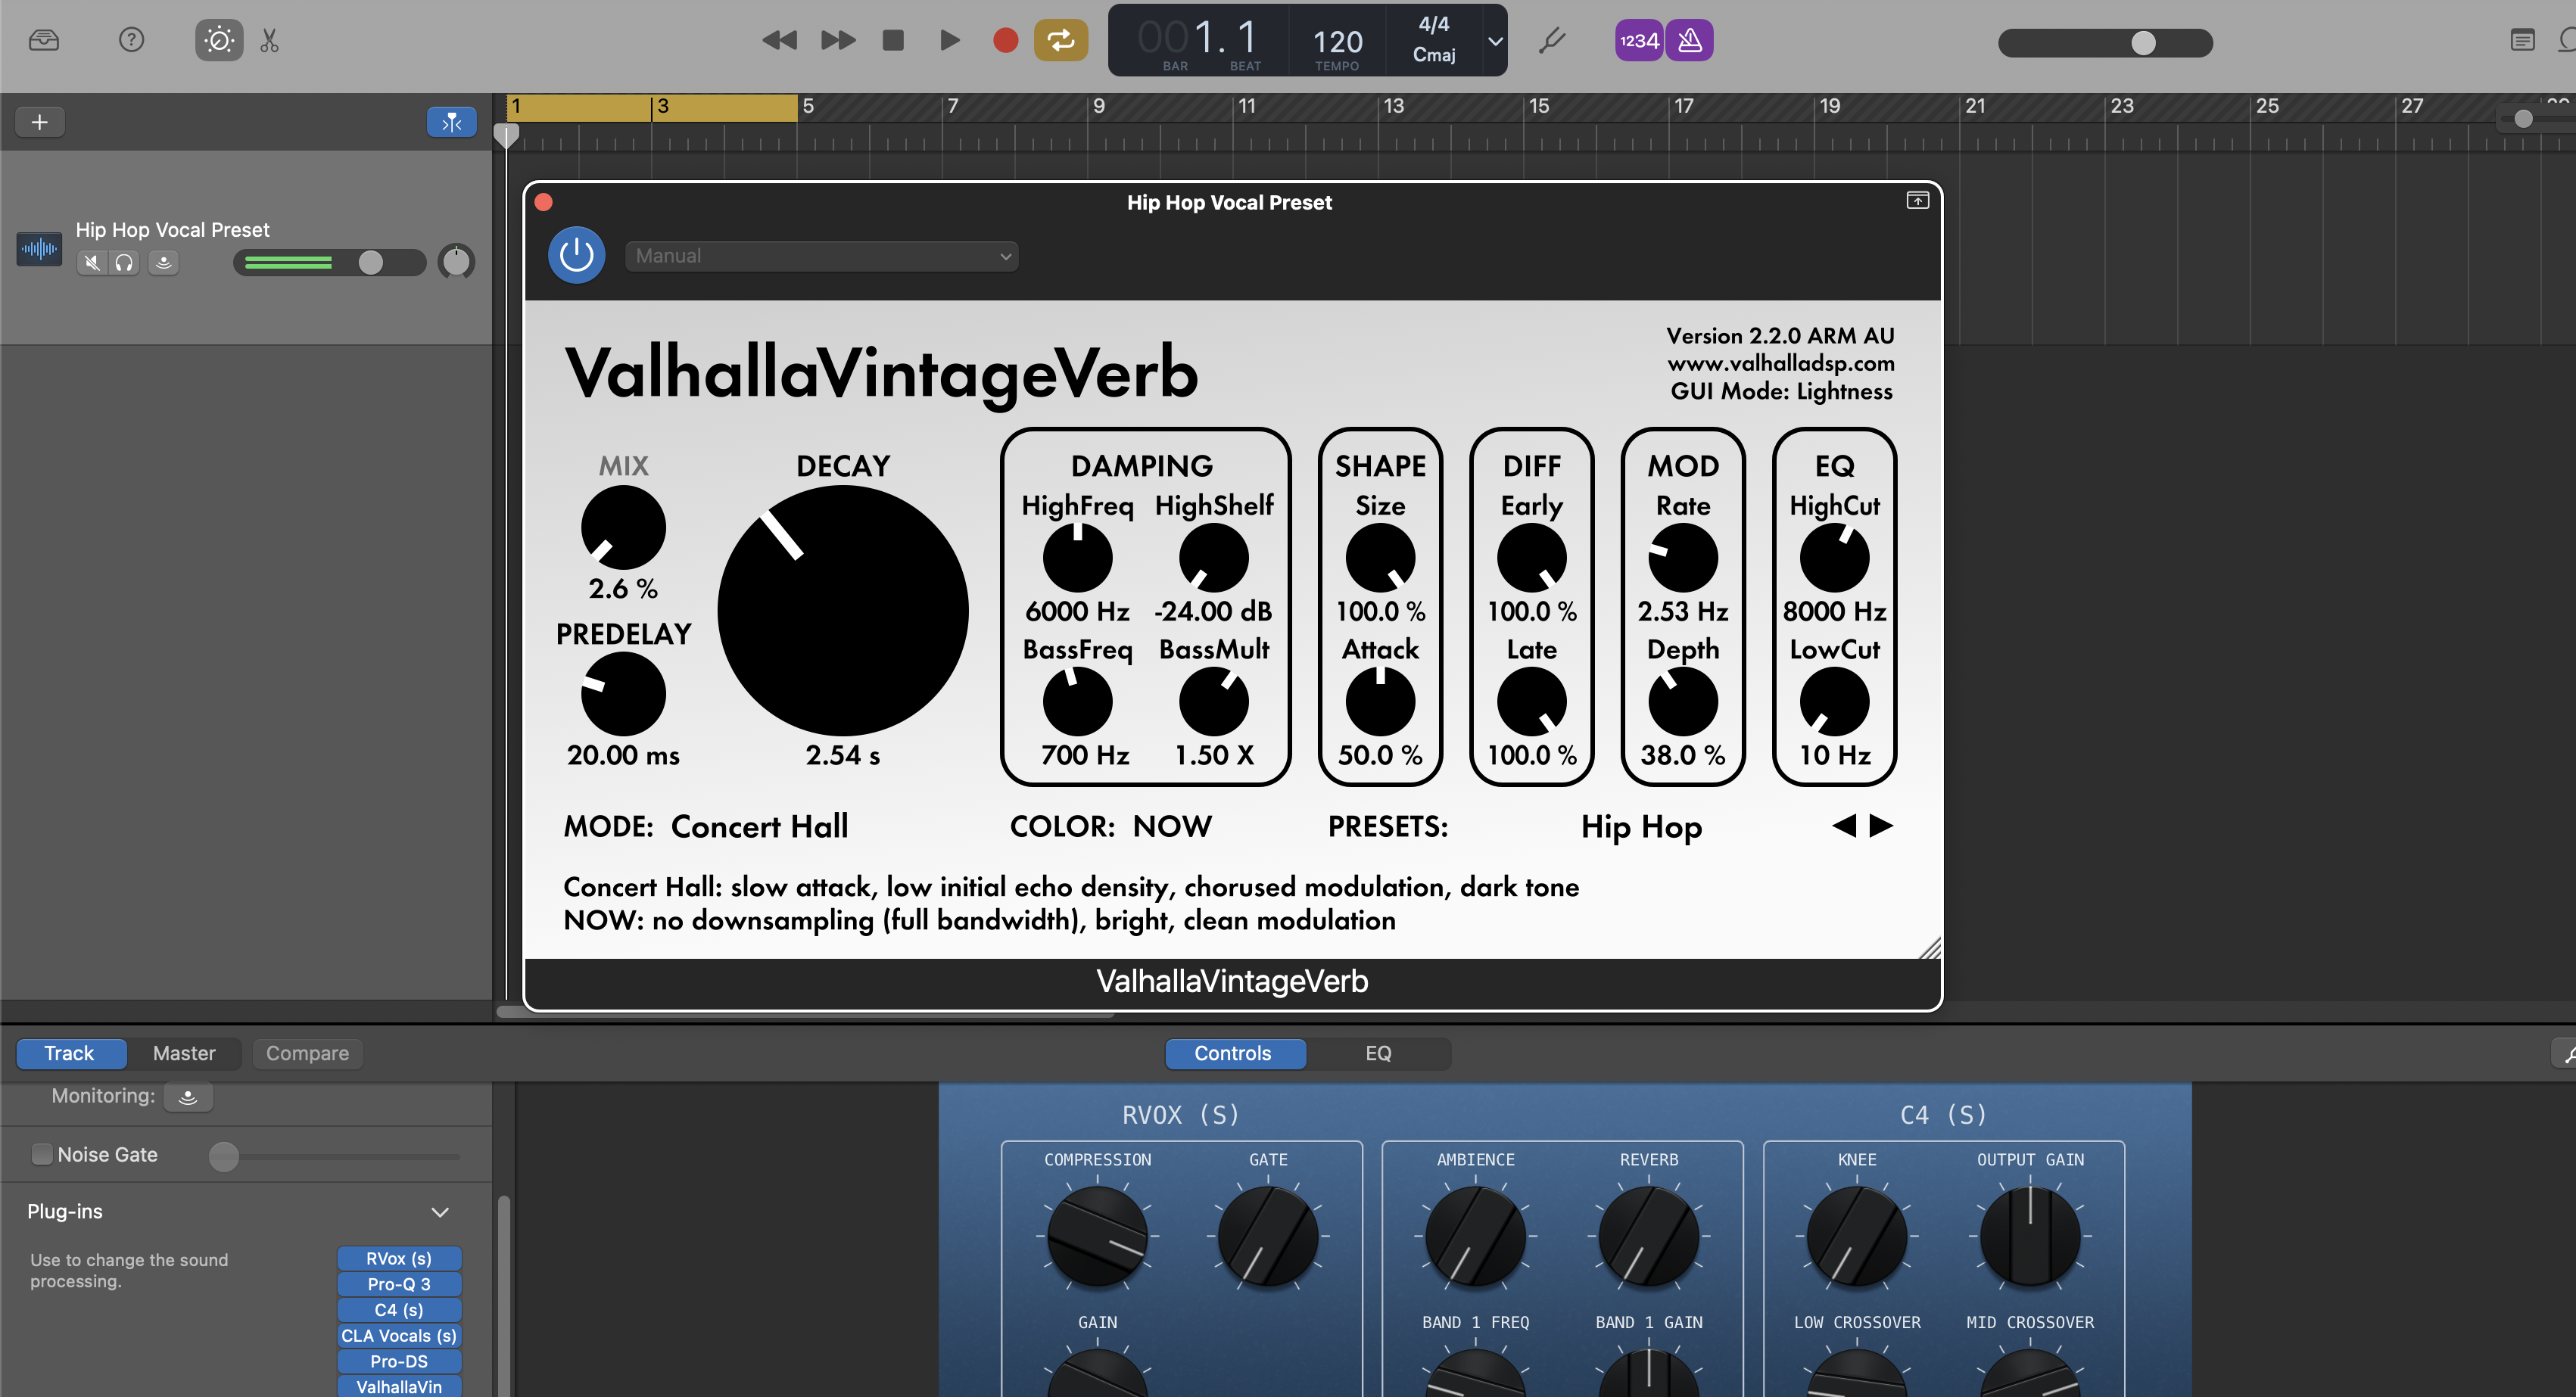
Preset Vocal de Hip Hop para GarageBand
Tipo: Preset Vocal
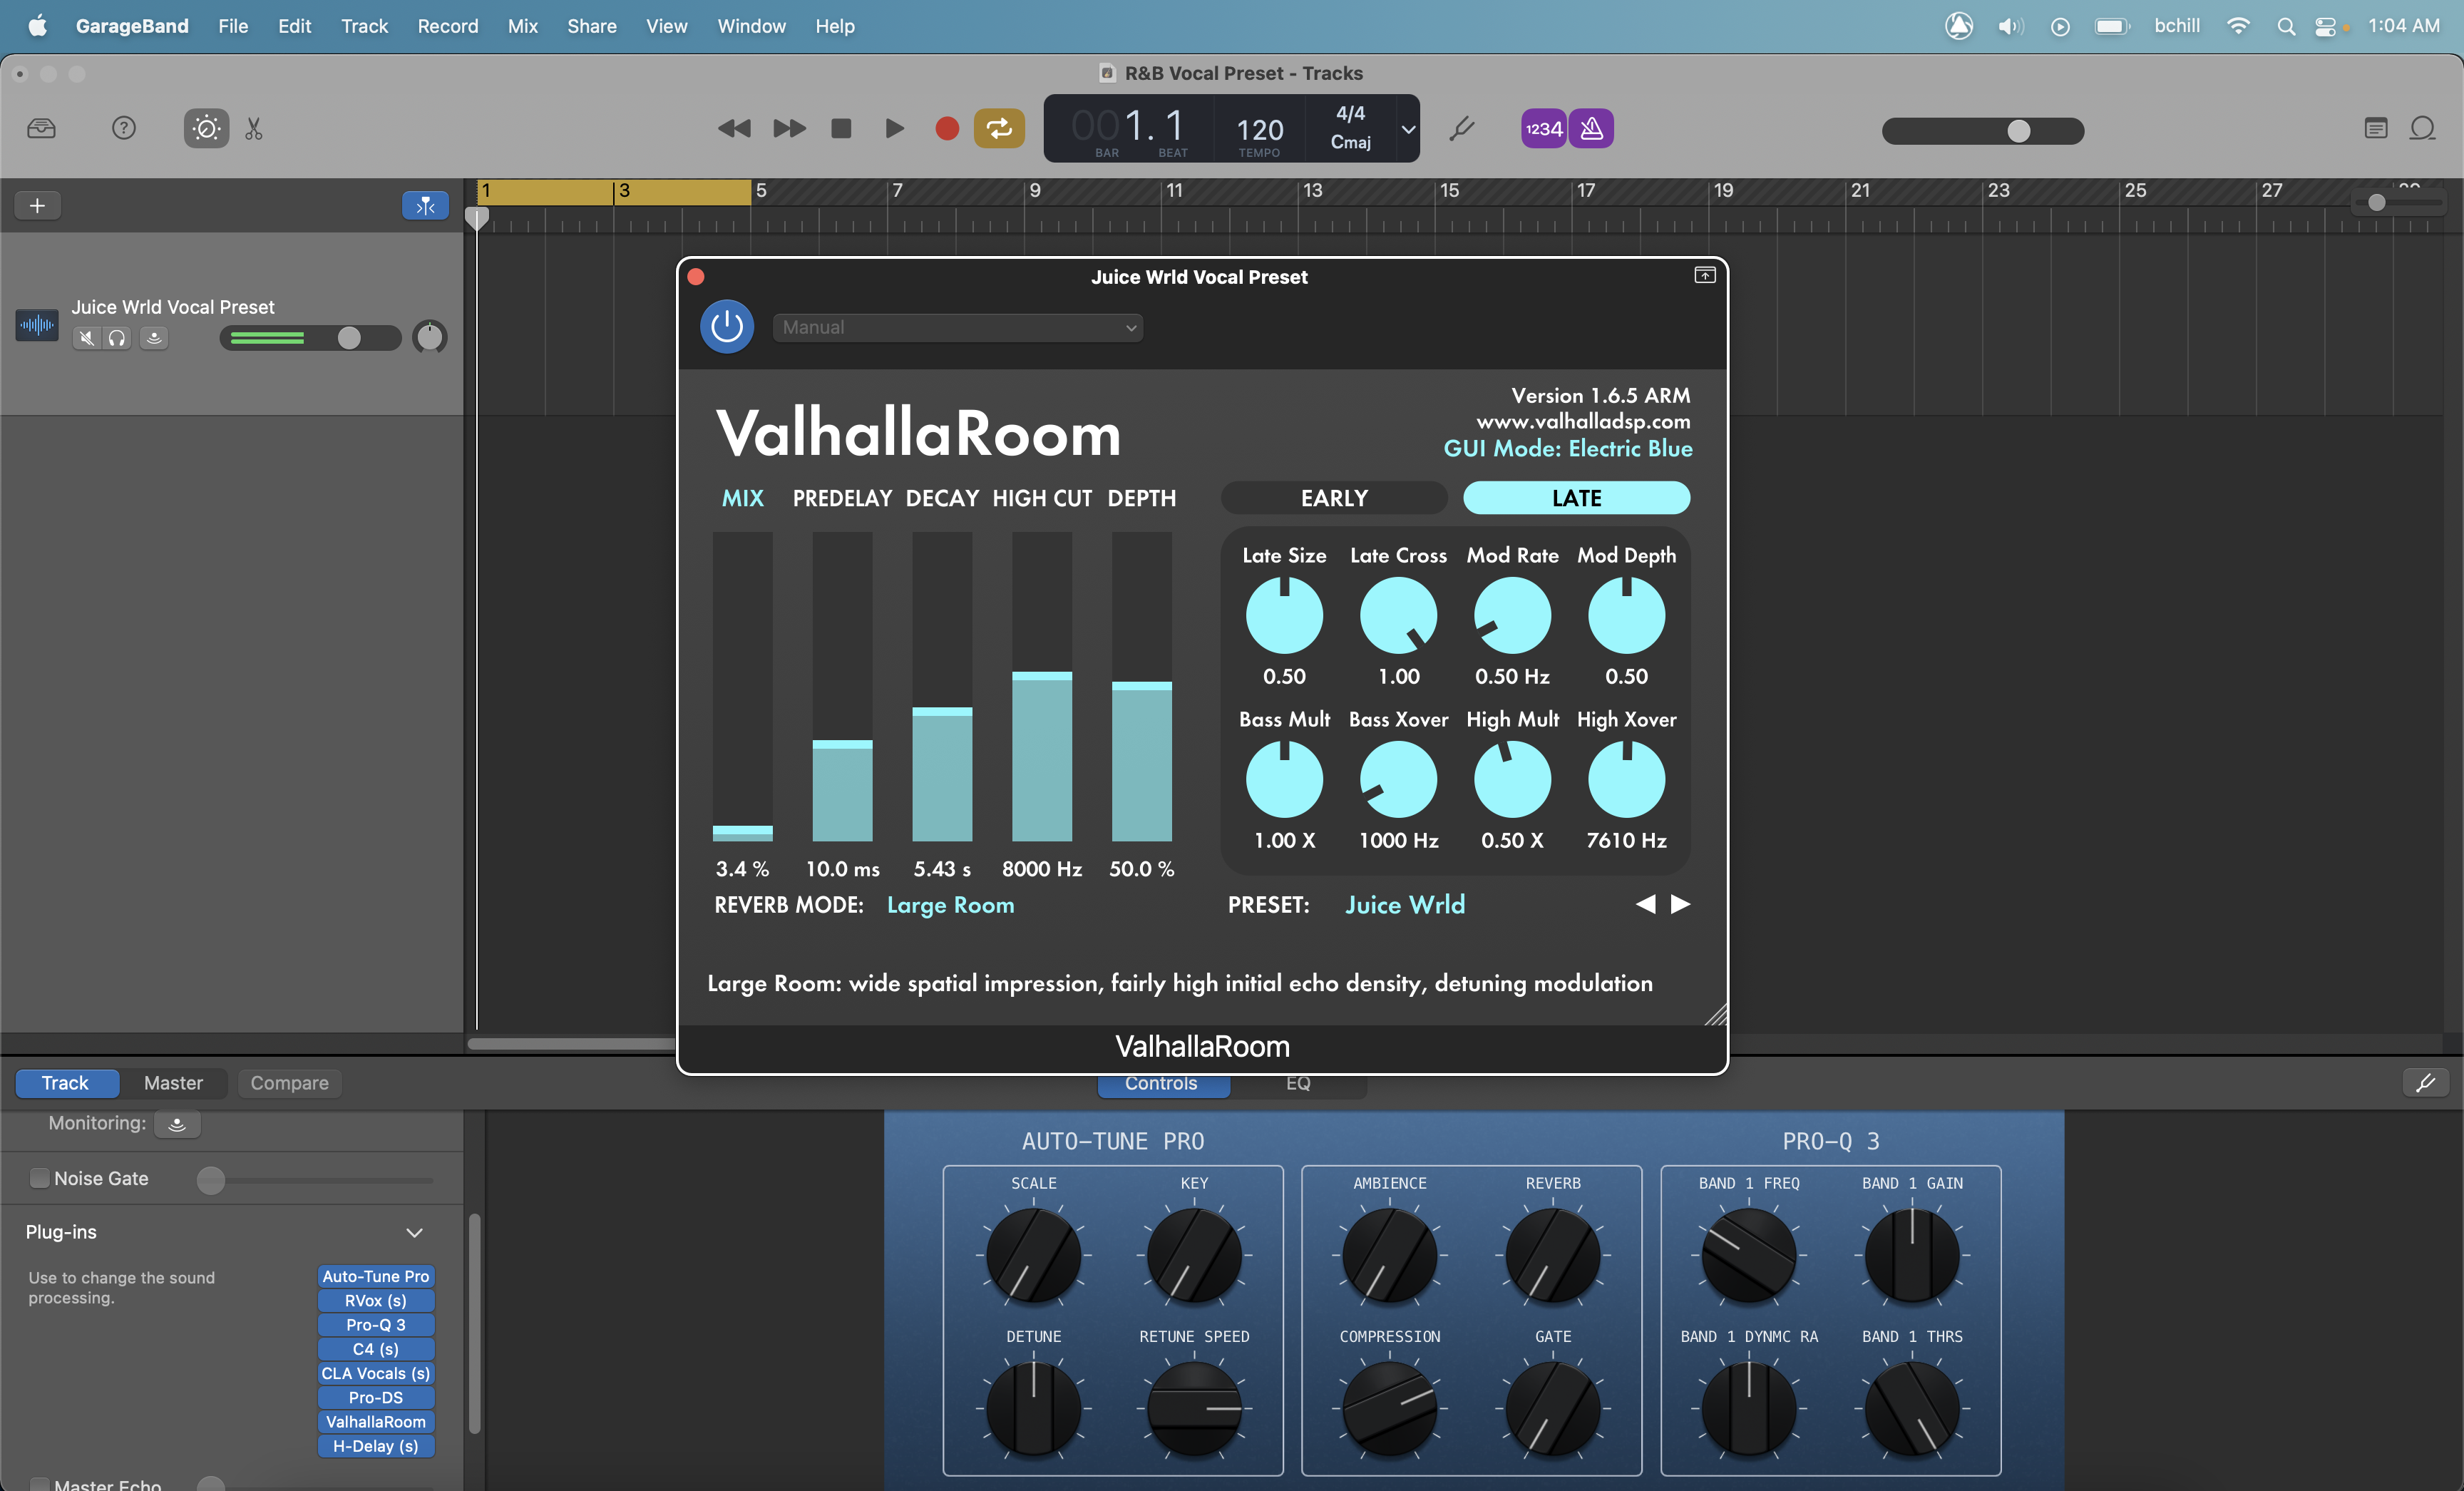
Preset Vocal de Juice Wrld para GarageBand

Tipo: Preset Vocal
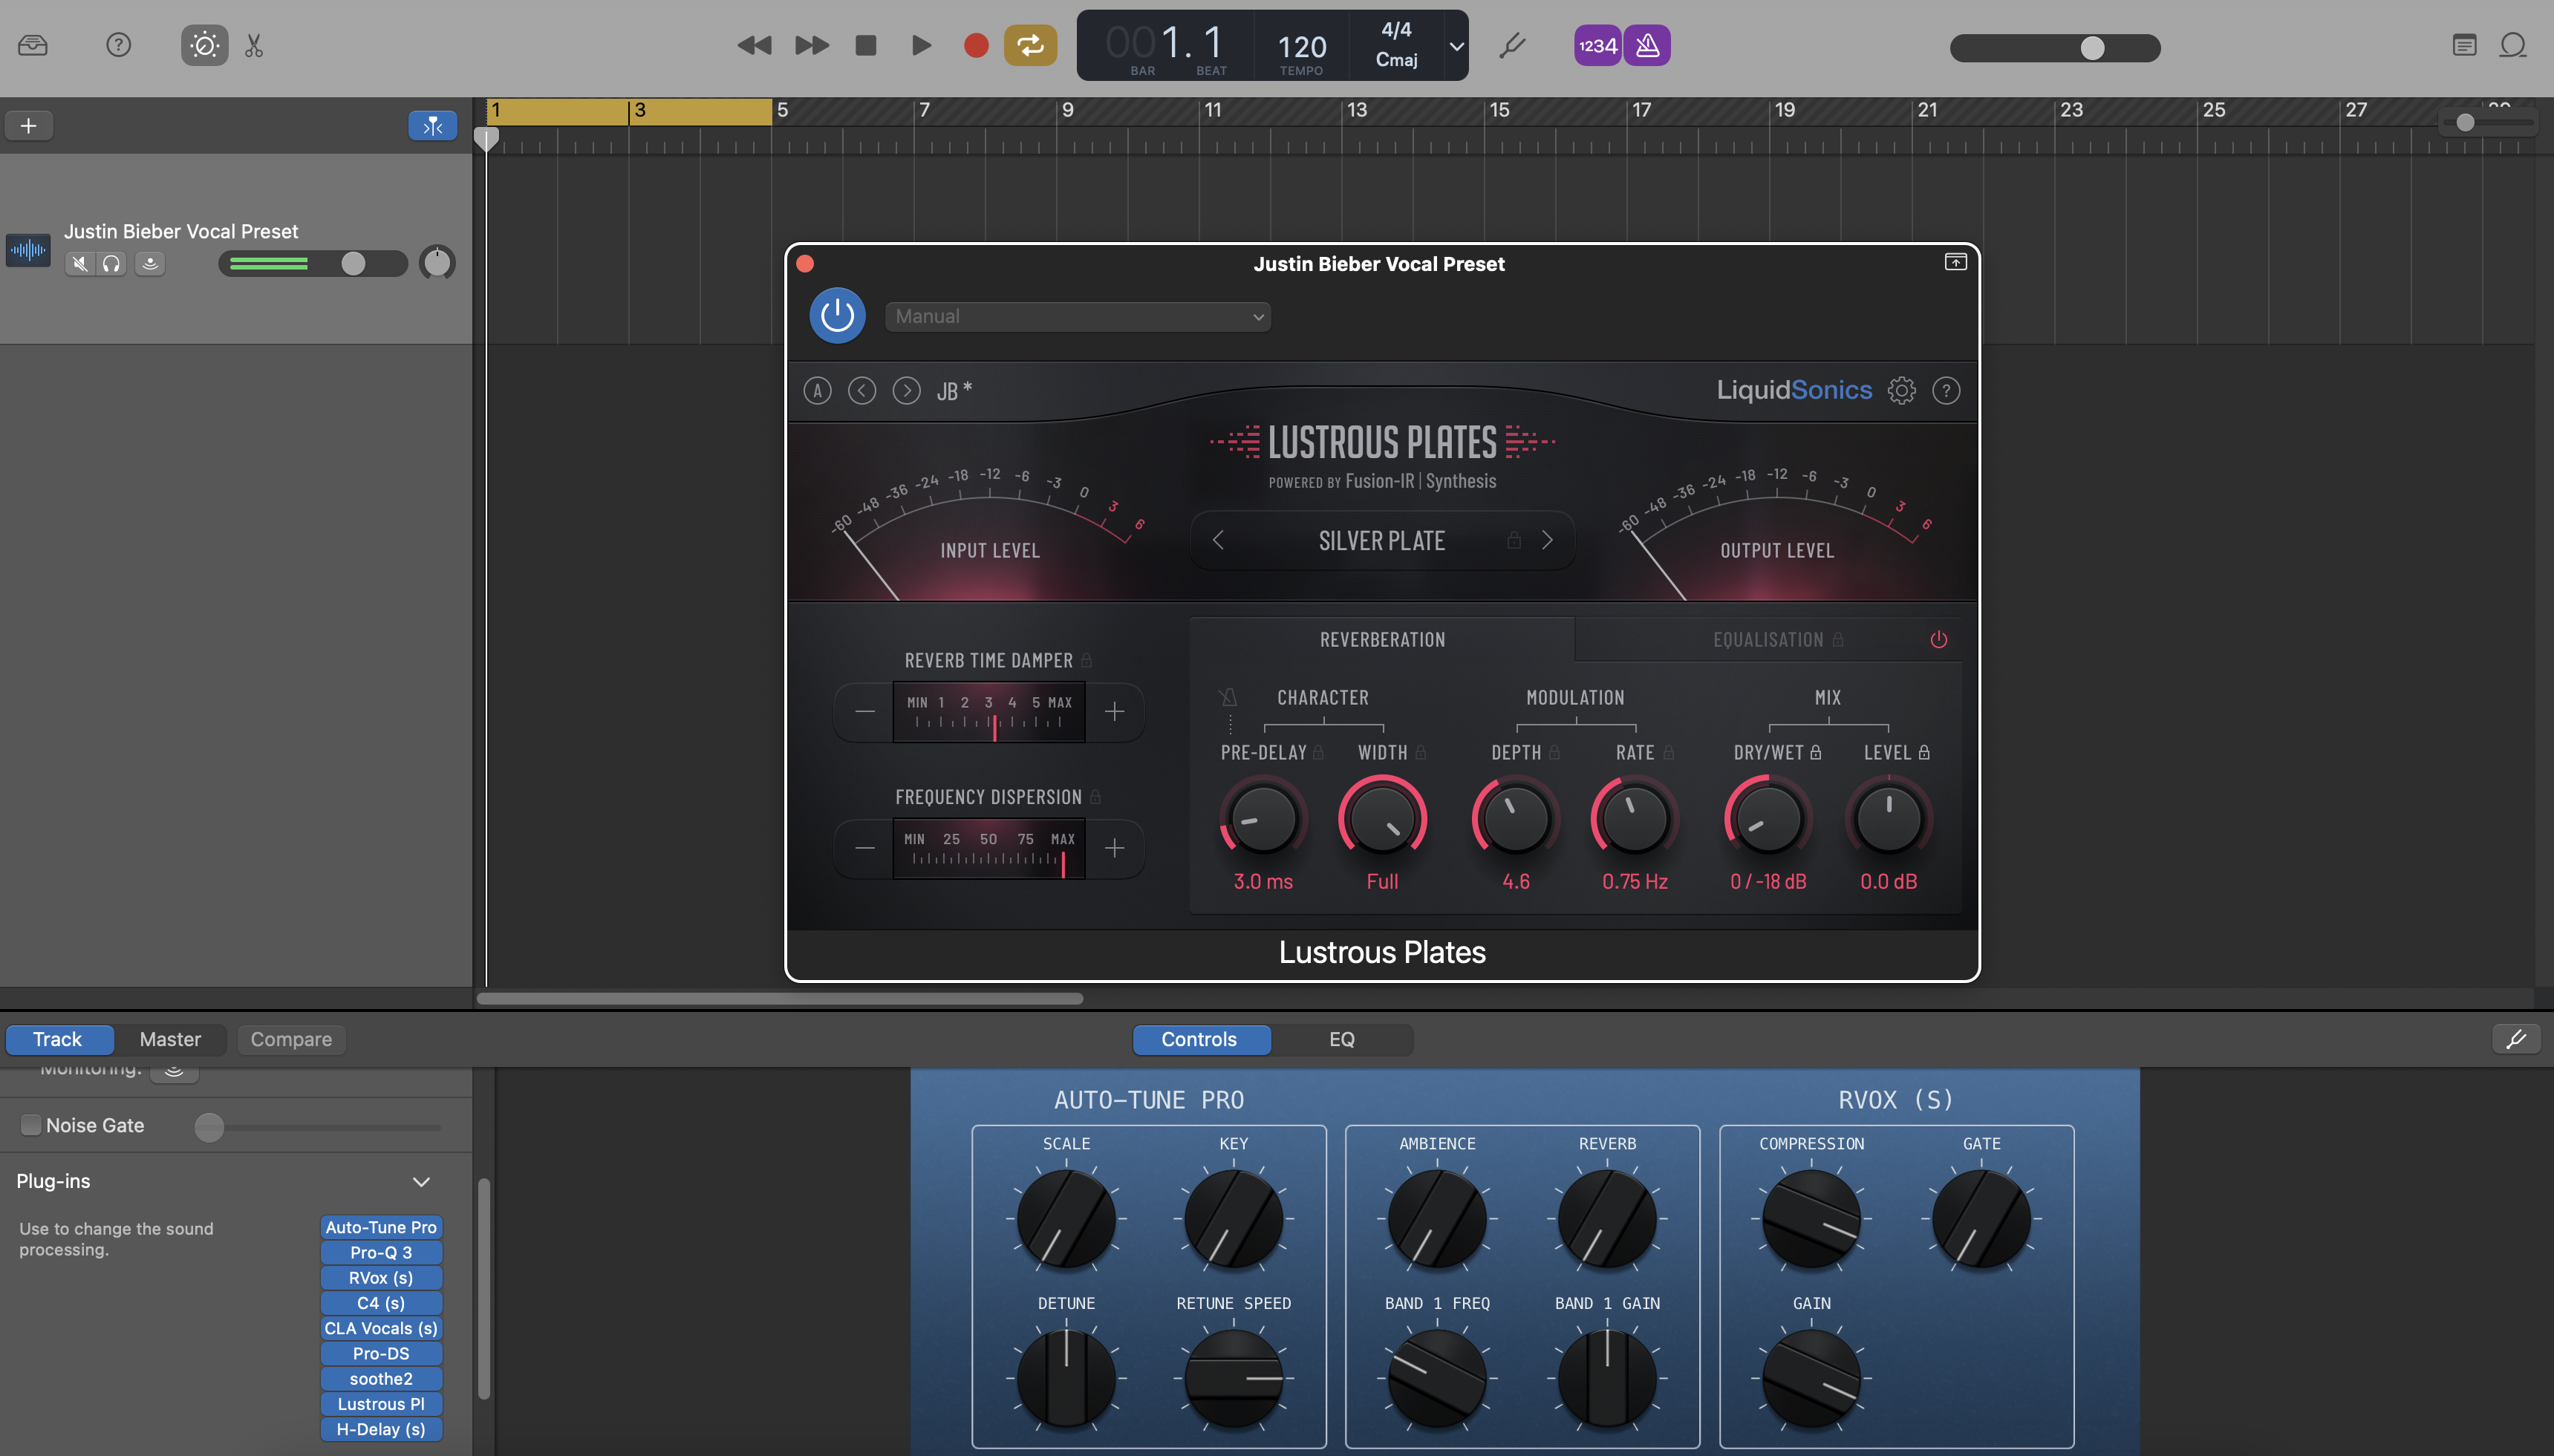
Preset Vocal de Justin Bieber para GarageBand
Tipo: Preset Vocal
Preset Vocal de Lil Baby para GarageBand
Tipo: Preset Vocal
Preset Vocal de NBA YoungBoy para GarageBand
Tipo: Preset Vocal
Preset Vocal R&B para GarageBand
Tipo: Preset Vocal
Preset de Rap Vocal para GarageBand
Tipo: Preset Vocal
Preset Vocal de The Kid Laroi para GarageBand
Tipo: Preset Vocal
Preset Vocal de The Weeknd para GarageBand
Tipo: Preset Vocal
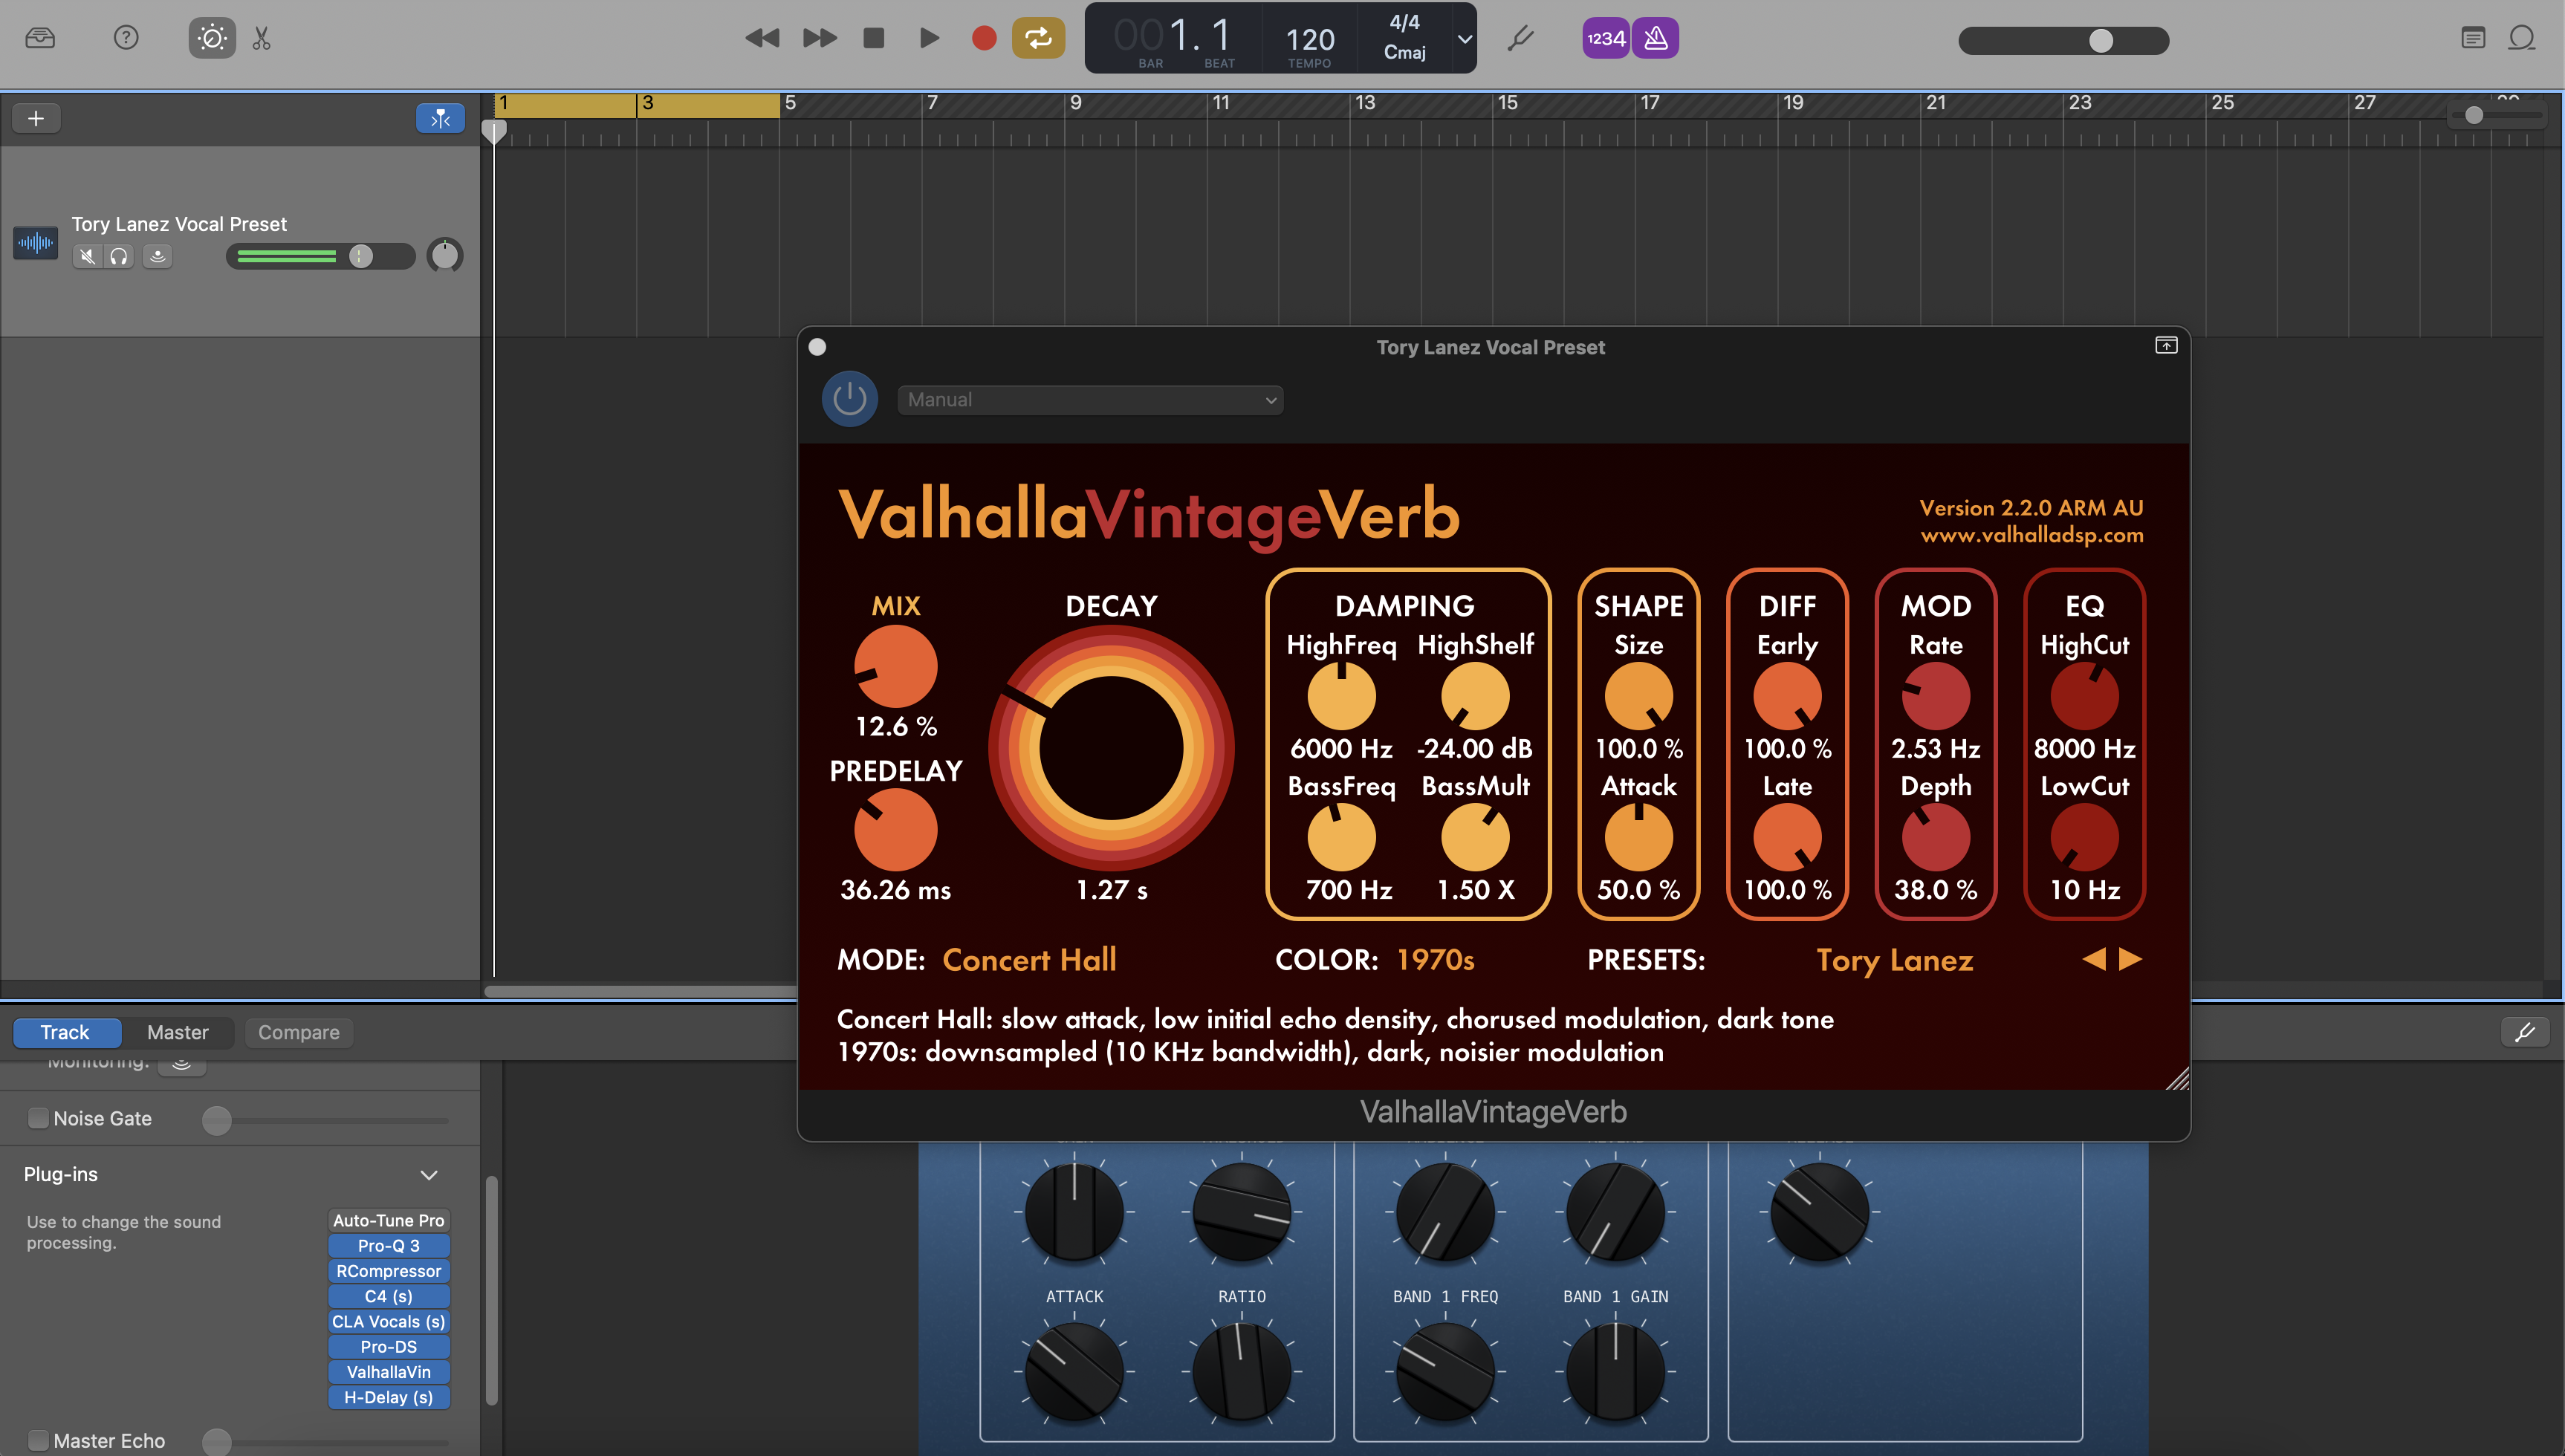
Preset Vocal de Tory Lanez para GarageBand
Preguntas frecuentes
¿Qué son los ajustes preestablecidos de voz en GarageBand?
¿Qué son los ajustes preestablecidos de voz en GarageBand?
Los preajustes vocales de GarageBand son puntos de partida vocales ya preparados que te ayudan a cargar una cadena de señal más pulida más rápido dentro de GarageBand.
Son especialmente útiles para artistas que desean una cadena de grabación más limpia sin tener que pasar a una estación de trabajo de audio digital (DAW) más complicada de inmediato.
¿Estos productos de GarageBand son preajustes de una sola pista, cadenas guardadas o plantillas completas de grabación?
¿Estos productos de GarageBand son preajustes de una sola pista, cadenas guardadas o plantillas completas de grabación?
Dependiendo del producto, esta colección puede incluir configuraciones de procesamiento vocal específicas o flujos de trabajo más amplios tipo plantilla.
La página del producto debe dejar claro si el artículo está pensado como una cadena vocal rápida o como un punto de partida más completo para la sesión.
¿Qué obtengo después de comprar un preset o plantilla vocal de GarageBand?
¿Qué obtengo después de comprar un preset o plantilla vocal de GarageBand?
Recibes el formato de archivo digital descrito en la página del producto, junto con las instrucciones incluidas para integrarlo correctamente en el flujo de trabajo de GarageBand.
Esto te ayuda a pasar de la compra a la configuración de la sesión sin tener que adivinar cómo se debe usar el archivo.
¿Cuánto tiempo tarda en llegarme los archivos de GarageBand después de la compra?
¿Cuánto tiempo tarda en llegarme los archivos de GarageBand después de la compra?
Los productos de ajustes preestablecidos y plantillas de GarageBand se entregan de forma digital, por lo que el acceso suele ser inmediato después de la compra.
La mayoría de los compradores deberían poder descargar los archivos de inmediato desde el proceso de pedido.
¿Necesito algún complemento adicional para usar estos ajustes preestablecidos de GarageBand?
¿Necesito algún complemento adicional para usar estos ajustes preestablecidos de GarageBand?
Algunos productos están diseñados para mantenerse dentro del conjunto de herramientas nativas de GarageBand, mientras que otros pueden involucrar plugins externos si así lo indica la página del producto.
Si quieres la configuración más sencilla, las opciones estilo predeterminadas son el mejor lugar para comenzar.
¿Estos ajustes preestablecidos de GarageBand funcionan solo en Mac o también en iPhone y iPad?
¿Estos ajustes preestablecidos de GarageBand funcionan solo en Mac o también en iPhone y iPad?
La mejor opción suele ser el flujo de trabajo en Mac porque el manejo de archivos y la edición detallada son más fáciles allí.
Algunas ideas y cadenas aún pueden ayudar en iPhone o iPad, pero la experiencia de configuración más limpia generalmente proviene de la versión de escritorio.
¿Cómo instalo los ajustes preestablecidos o plantillas vocales de GarageBand?
¿Cómo instalo los ajustes preestablecidos o plantillas vocales de GarageBand?
El proceso normal es cargar el archivo en la pista o flujo de trabajo del proyecto de GarageBand, confirmar la ruta de entrada vocal y luego ajustar los niveles hasta que la cadena responda correctamente.
Una vez que funcione, guarda una versión personal para que las sesiones futuras se abran aún más rápido.
¿Son estos ajustes preestablecidos de GarageBand adecuados para principiantes?
¿Son estos ajustes preestablecidos de GarageBand adecuados para principiantes?
Sí. Los usuarios de GarageBand a menudo quieren algo simple, rápido y claro, y es precisamente ahí donde un preset bien diseñado ayuda más.
Sigues aprendiendo de la cadena, pero evitas la frustración de construir todo desde cero.
¿Puedo ajustar los preajustes para que se adapten mejor a mi voz o configuración de grabación?
¿Puedo ajustar los preajustes para que se adapten mejor a mi voz o configuración de grabación?
Sí. Incluso en un DAW más sencillo como GarageBand, aún debes ajustar los niveles, el balance tonal y el ambiente según la voz y la sala.
Un preset debería acelerar el proceso, no limitarte a un sonido exacto.
¿Qué hace que estos sean mejores que los ajustes preestablecidos de voz predeterminados de GarageBand?
¿Qué hace que estos sean mejores que los ajustes preestablecidos de voz predeterminados de GarageBand?
Las opciones integradas de GarageBand son útiles para demos rápidas, pero los productos BCHILL MIX están diseñados para ofrecerte un punto de partida más deliberado y enfocado en el artista.
Eso significa menos prueba y error al azar y un camino más rápido hacia una voz que se sienta más limpia, fuerte y terminada.

Construye Tu Propia Cesta


Transforma tu sesión en segundos
Configuración instantánea de sesión con nuestras plantillas de grabación y preajustes vocales listos para usar.


Créditos de la Industria

Westside Boogie

Shontelle

Jarren Benton

DJ Tunez

Vory

Caskey

Rittz

Nia Riley

Eugy

Q Parker
Escucha nuestro trabajo
R&B
Antes
Después
Rap
Antes
Después
Pop
Antes
Después
Alma
Antes
Después
Roca
Antes
Después
Latín
Antes
Después
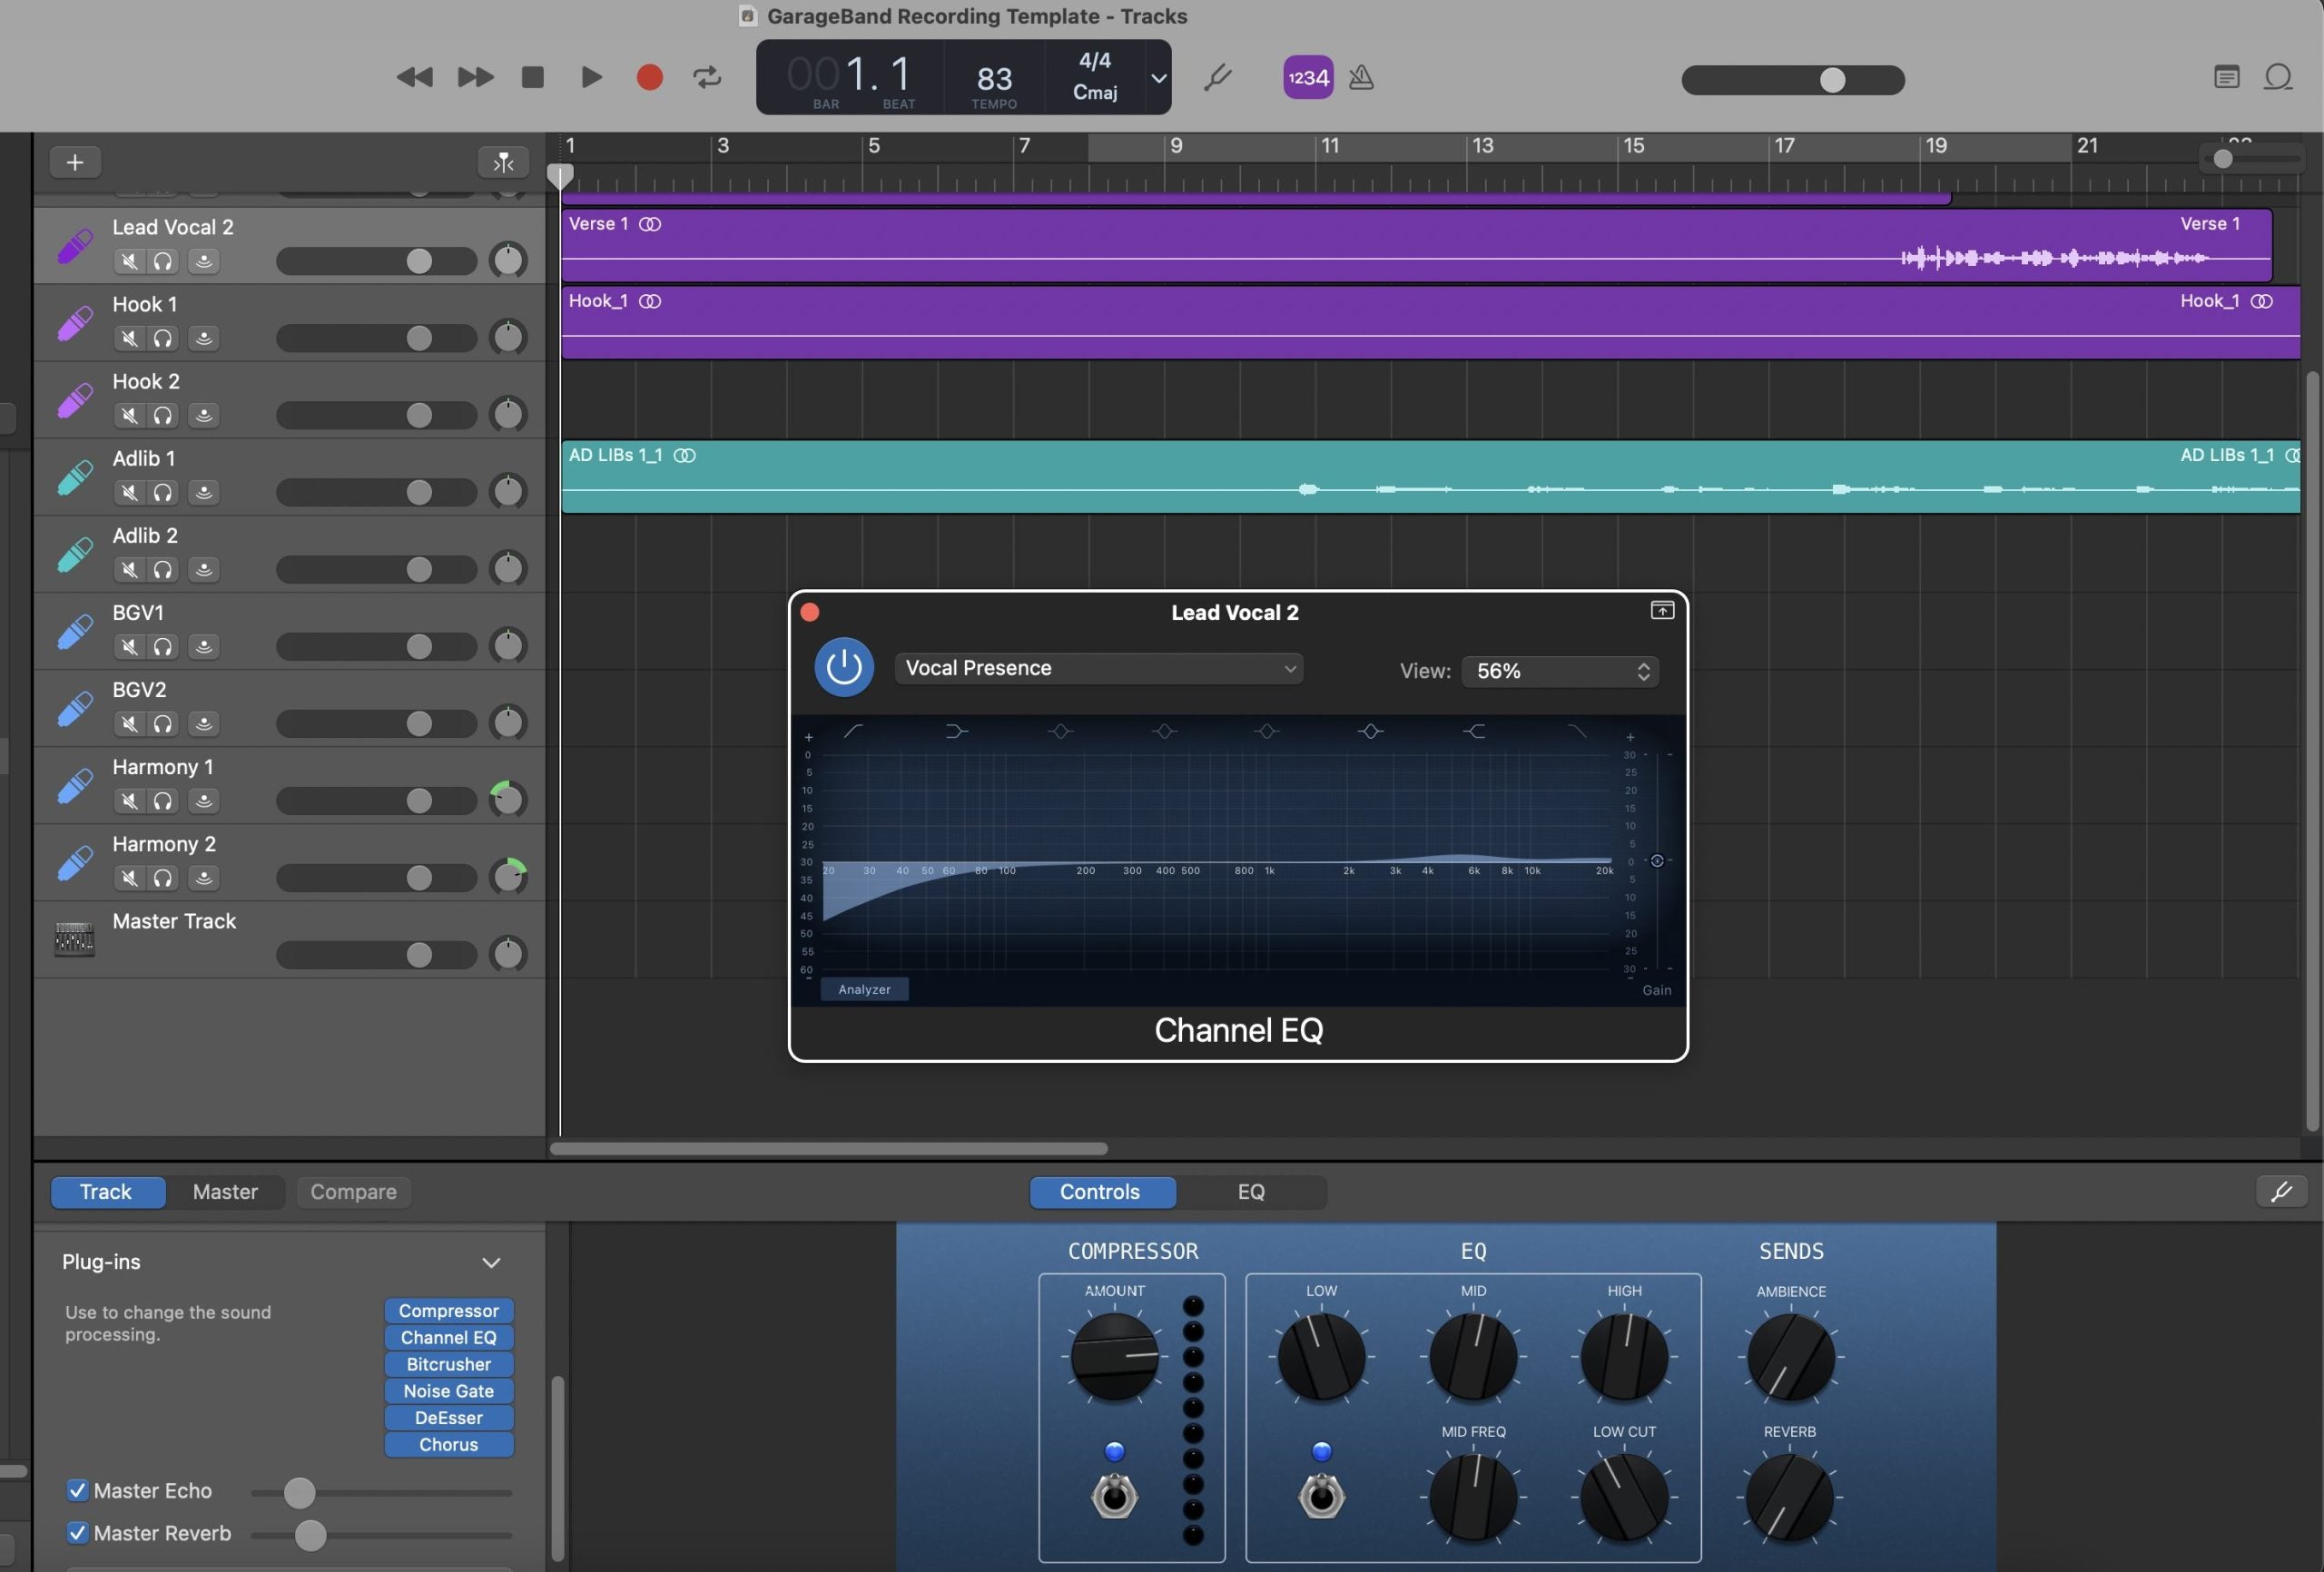
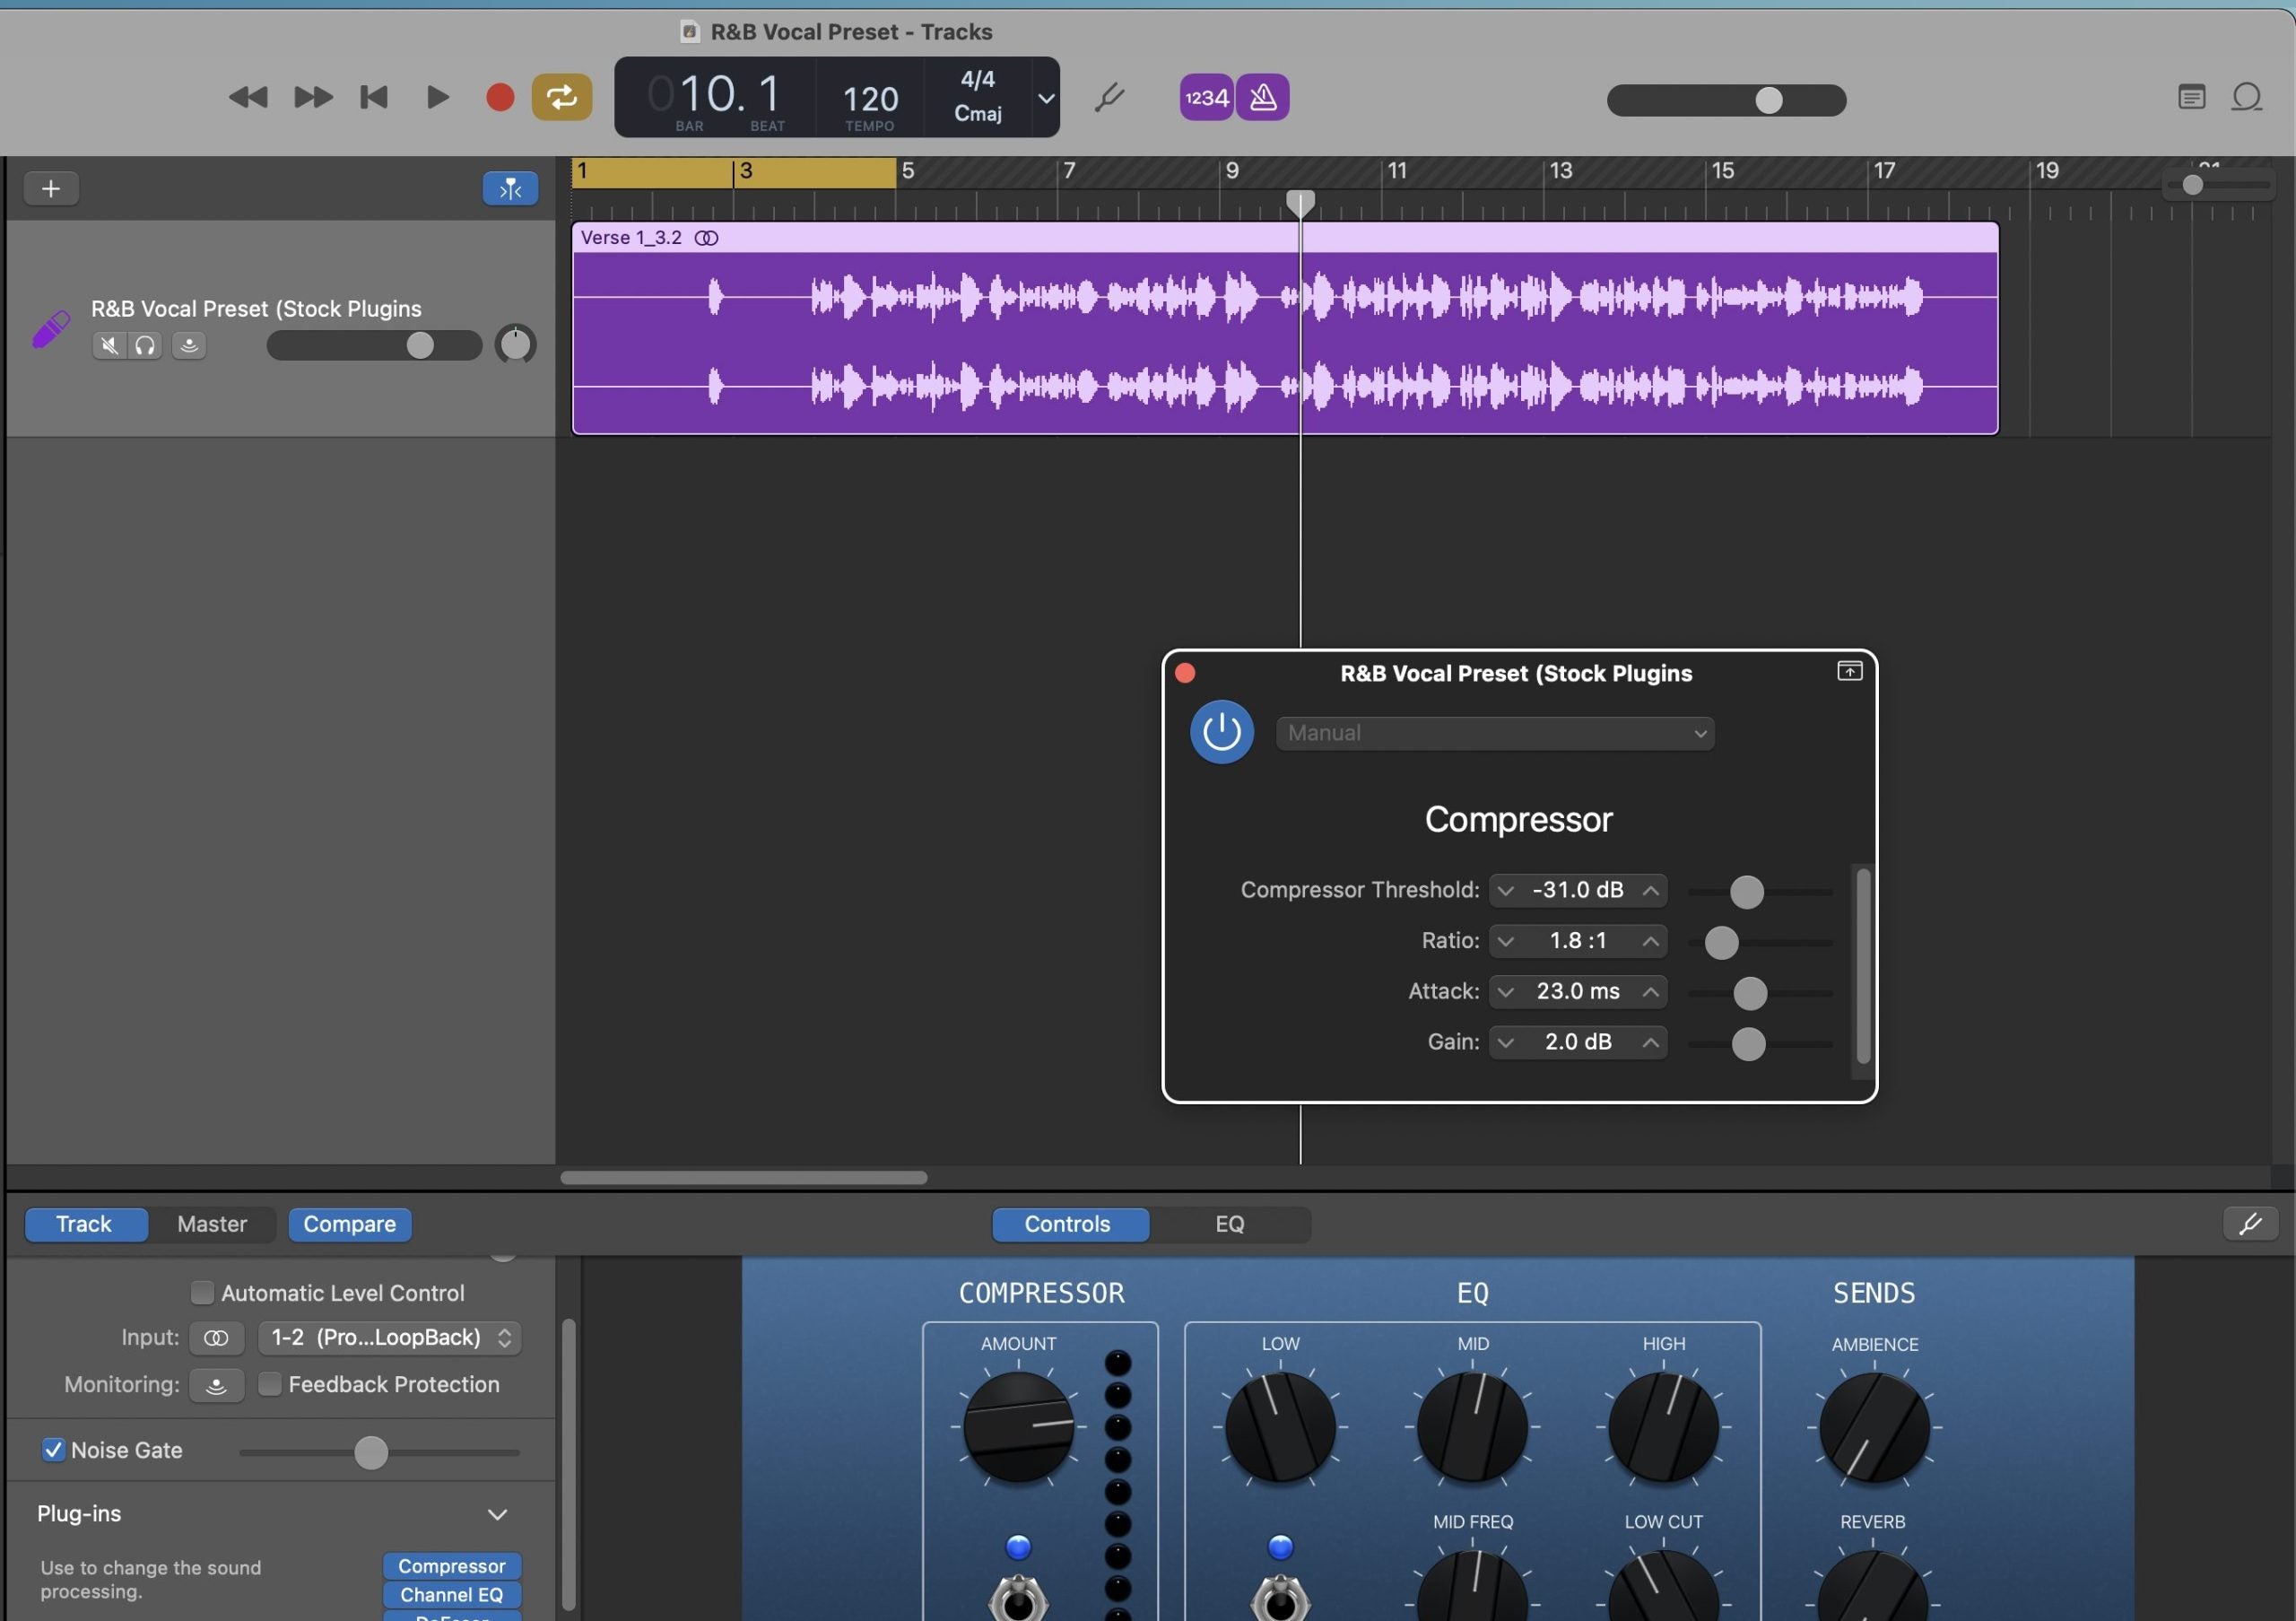
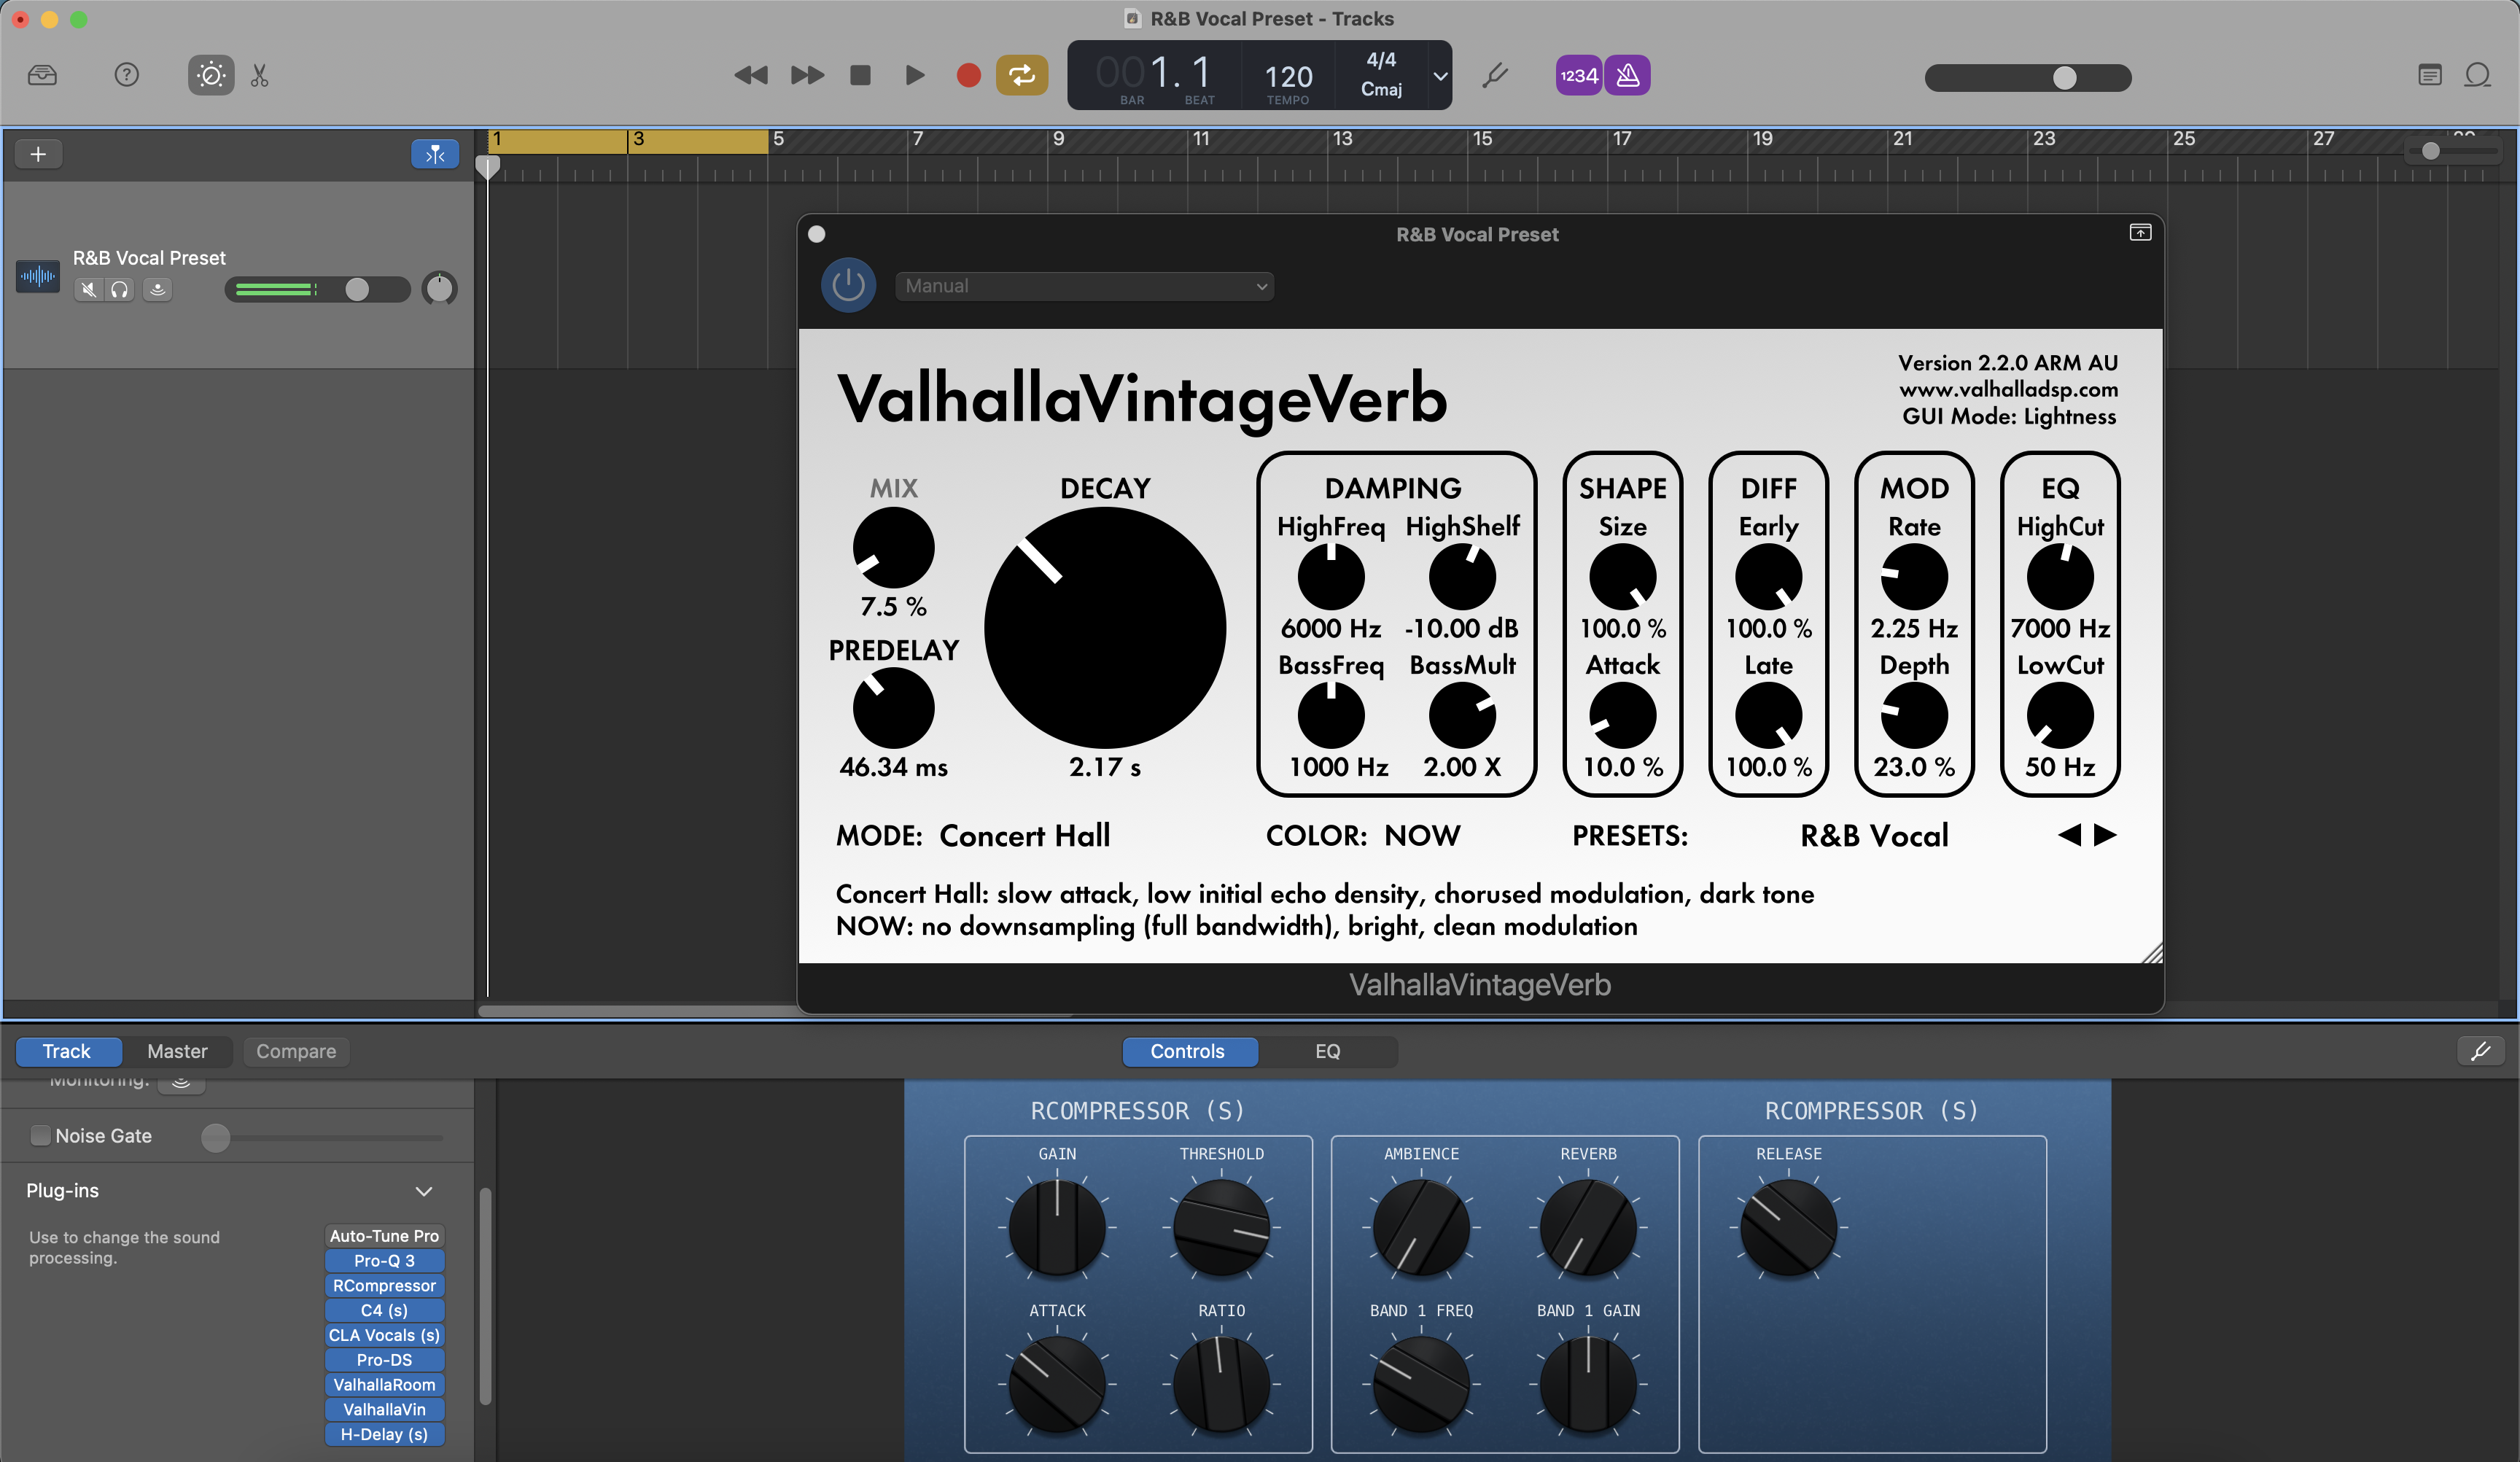
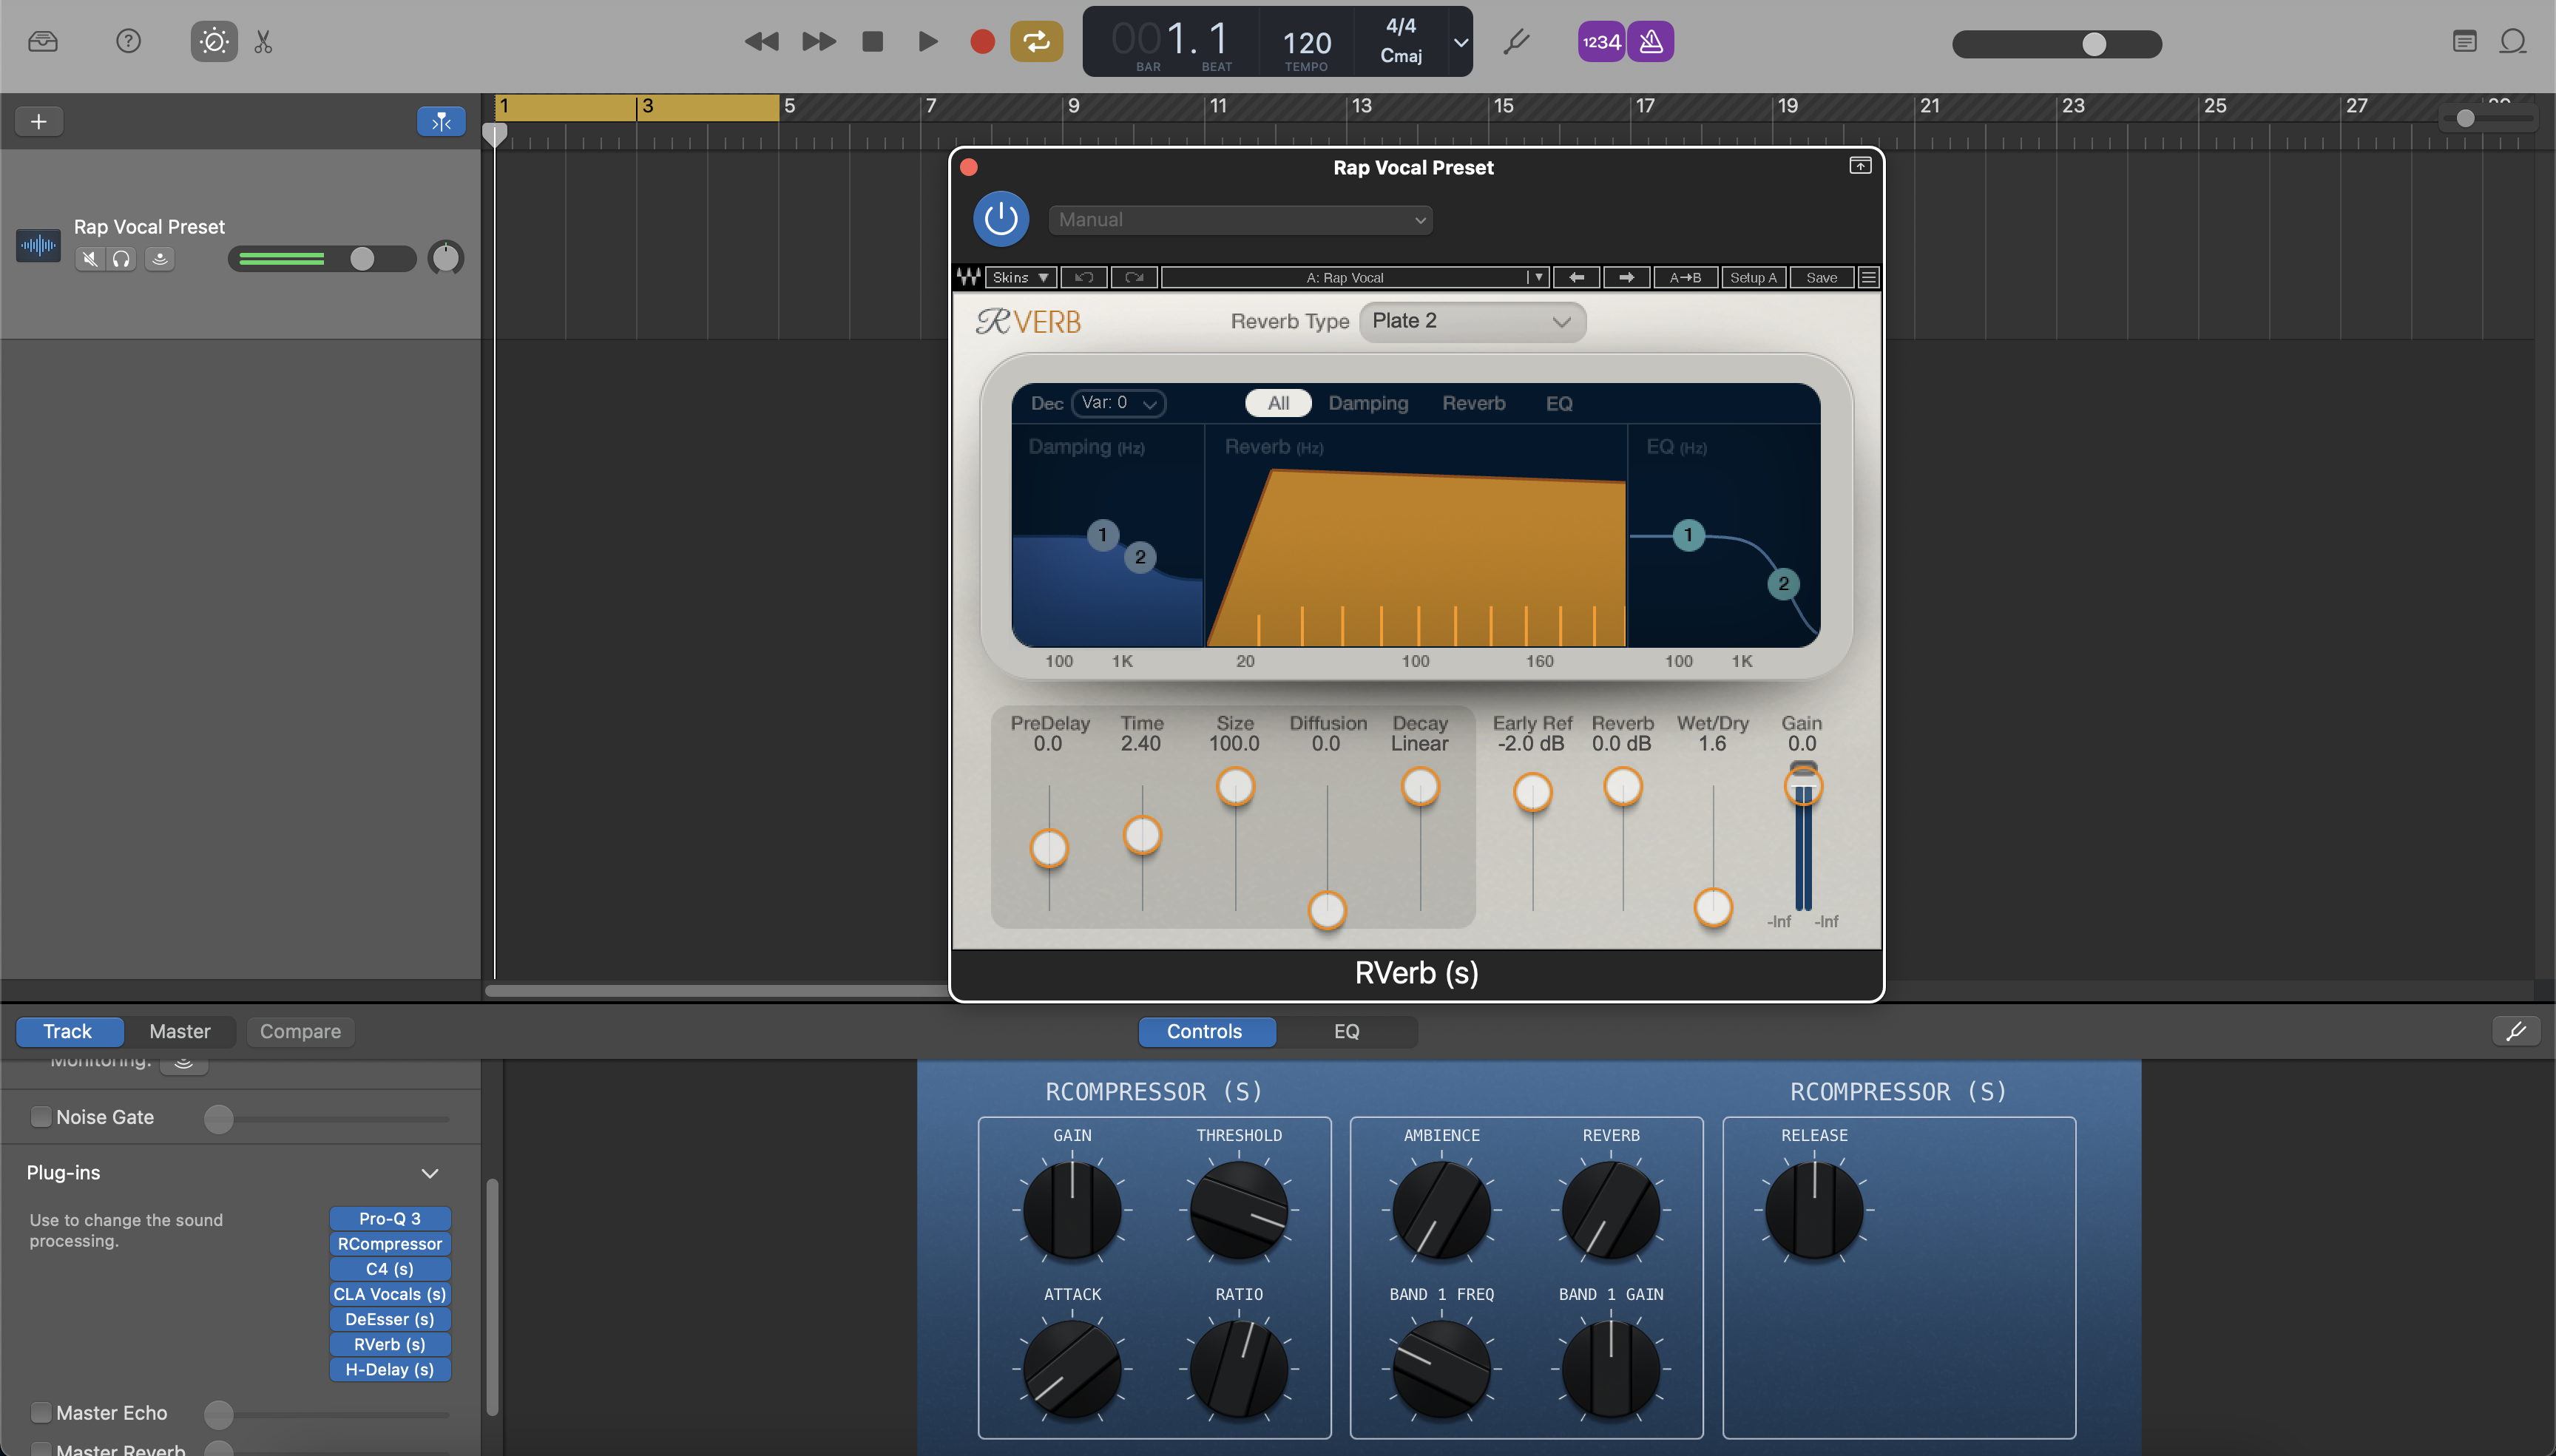
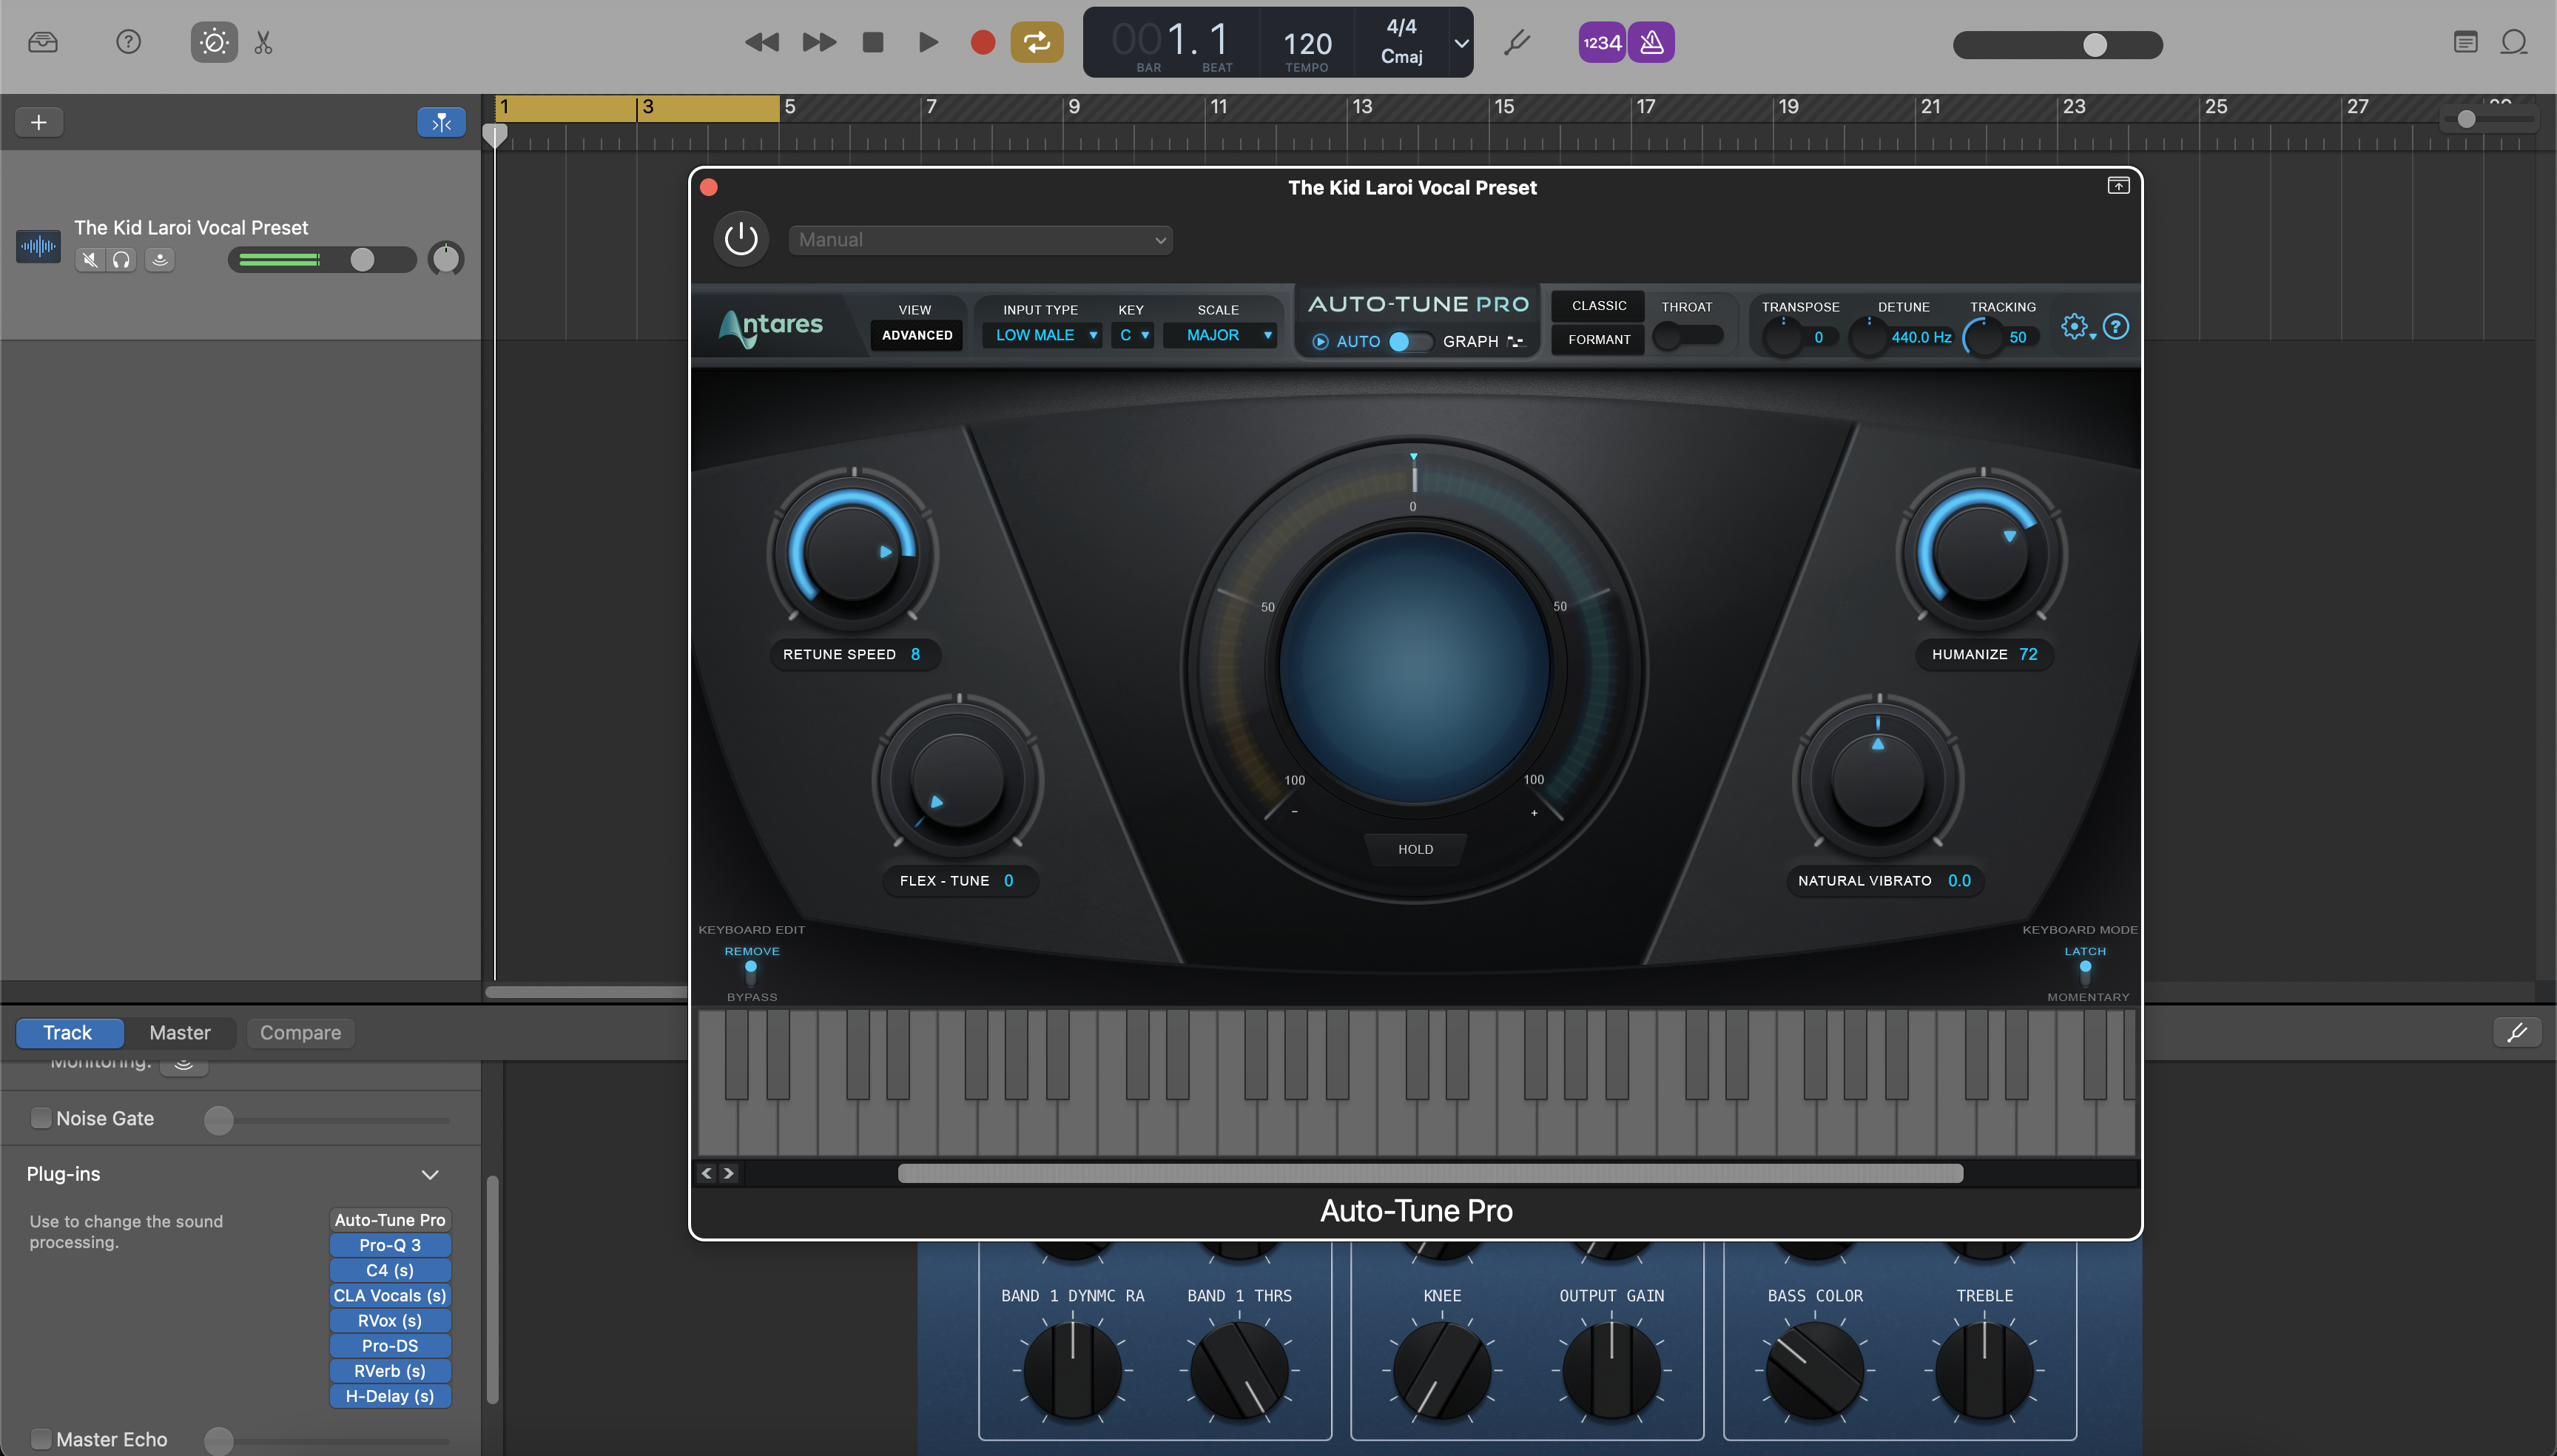
Preajustes Vocales de GarageBand: Explicación y Funciones
Introducción a los Presets Vocales para GarageBand
Si grabas o mezclas voces en GarageBand (Mac o iOS), un preset bien construido te ofrece un tono vocal moderno y repetible sin reconstruir la misma cadena en cada sesión. Un preset carga una ruta de efectos equilibrada—EQ para moldear el tono, compresión para controlar el nivel, de-essing para suavizar las “s” y ambiente con buen gusto—para que captures ideas rápido y mantengas tu sonido consistente desde la demo hasta el lanzamiento. En BCHILL MIX, nuestro objetivo son cadenas confiables que funcionen en auriculares, teléfonos y monitores de estudio, manteniendo la latencia lo suficientemente baja para grabar cómodamente.
Esta guía explica qué es un preset vocal en GarageBand, cuándo es más útil, cómo instalarlo y ajustarlo en Mac y iOS, y consejos enfocados en estilos para rap, R&B, pop, cantautor y géneros con afinación intensiva. También verás cómo plantillas de sesión simples (diseños de proyecto que guardas una vez) complementan los presets cuando quieres un flujo de trabajo más rápido y organizado. Explora el conjunto completo aquí: Presets Vocales para GarageBand.
¿Qué es un preset vocal en GarageBand?
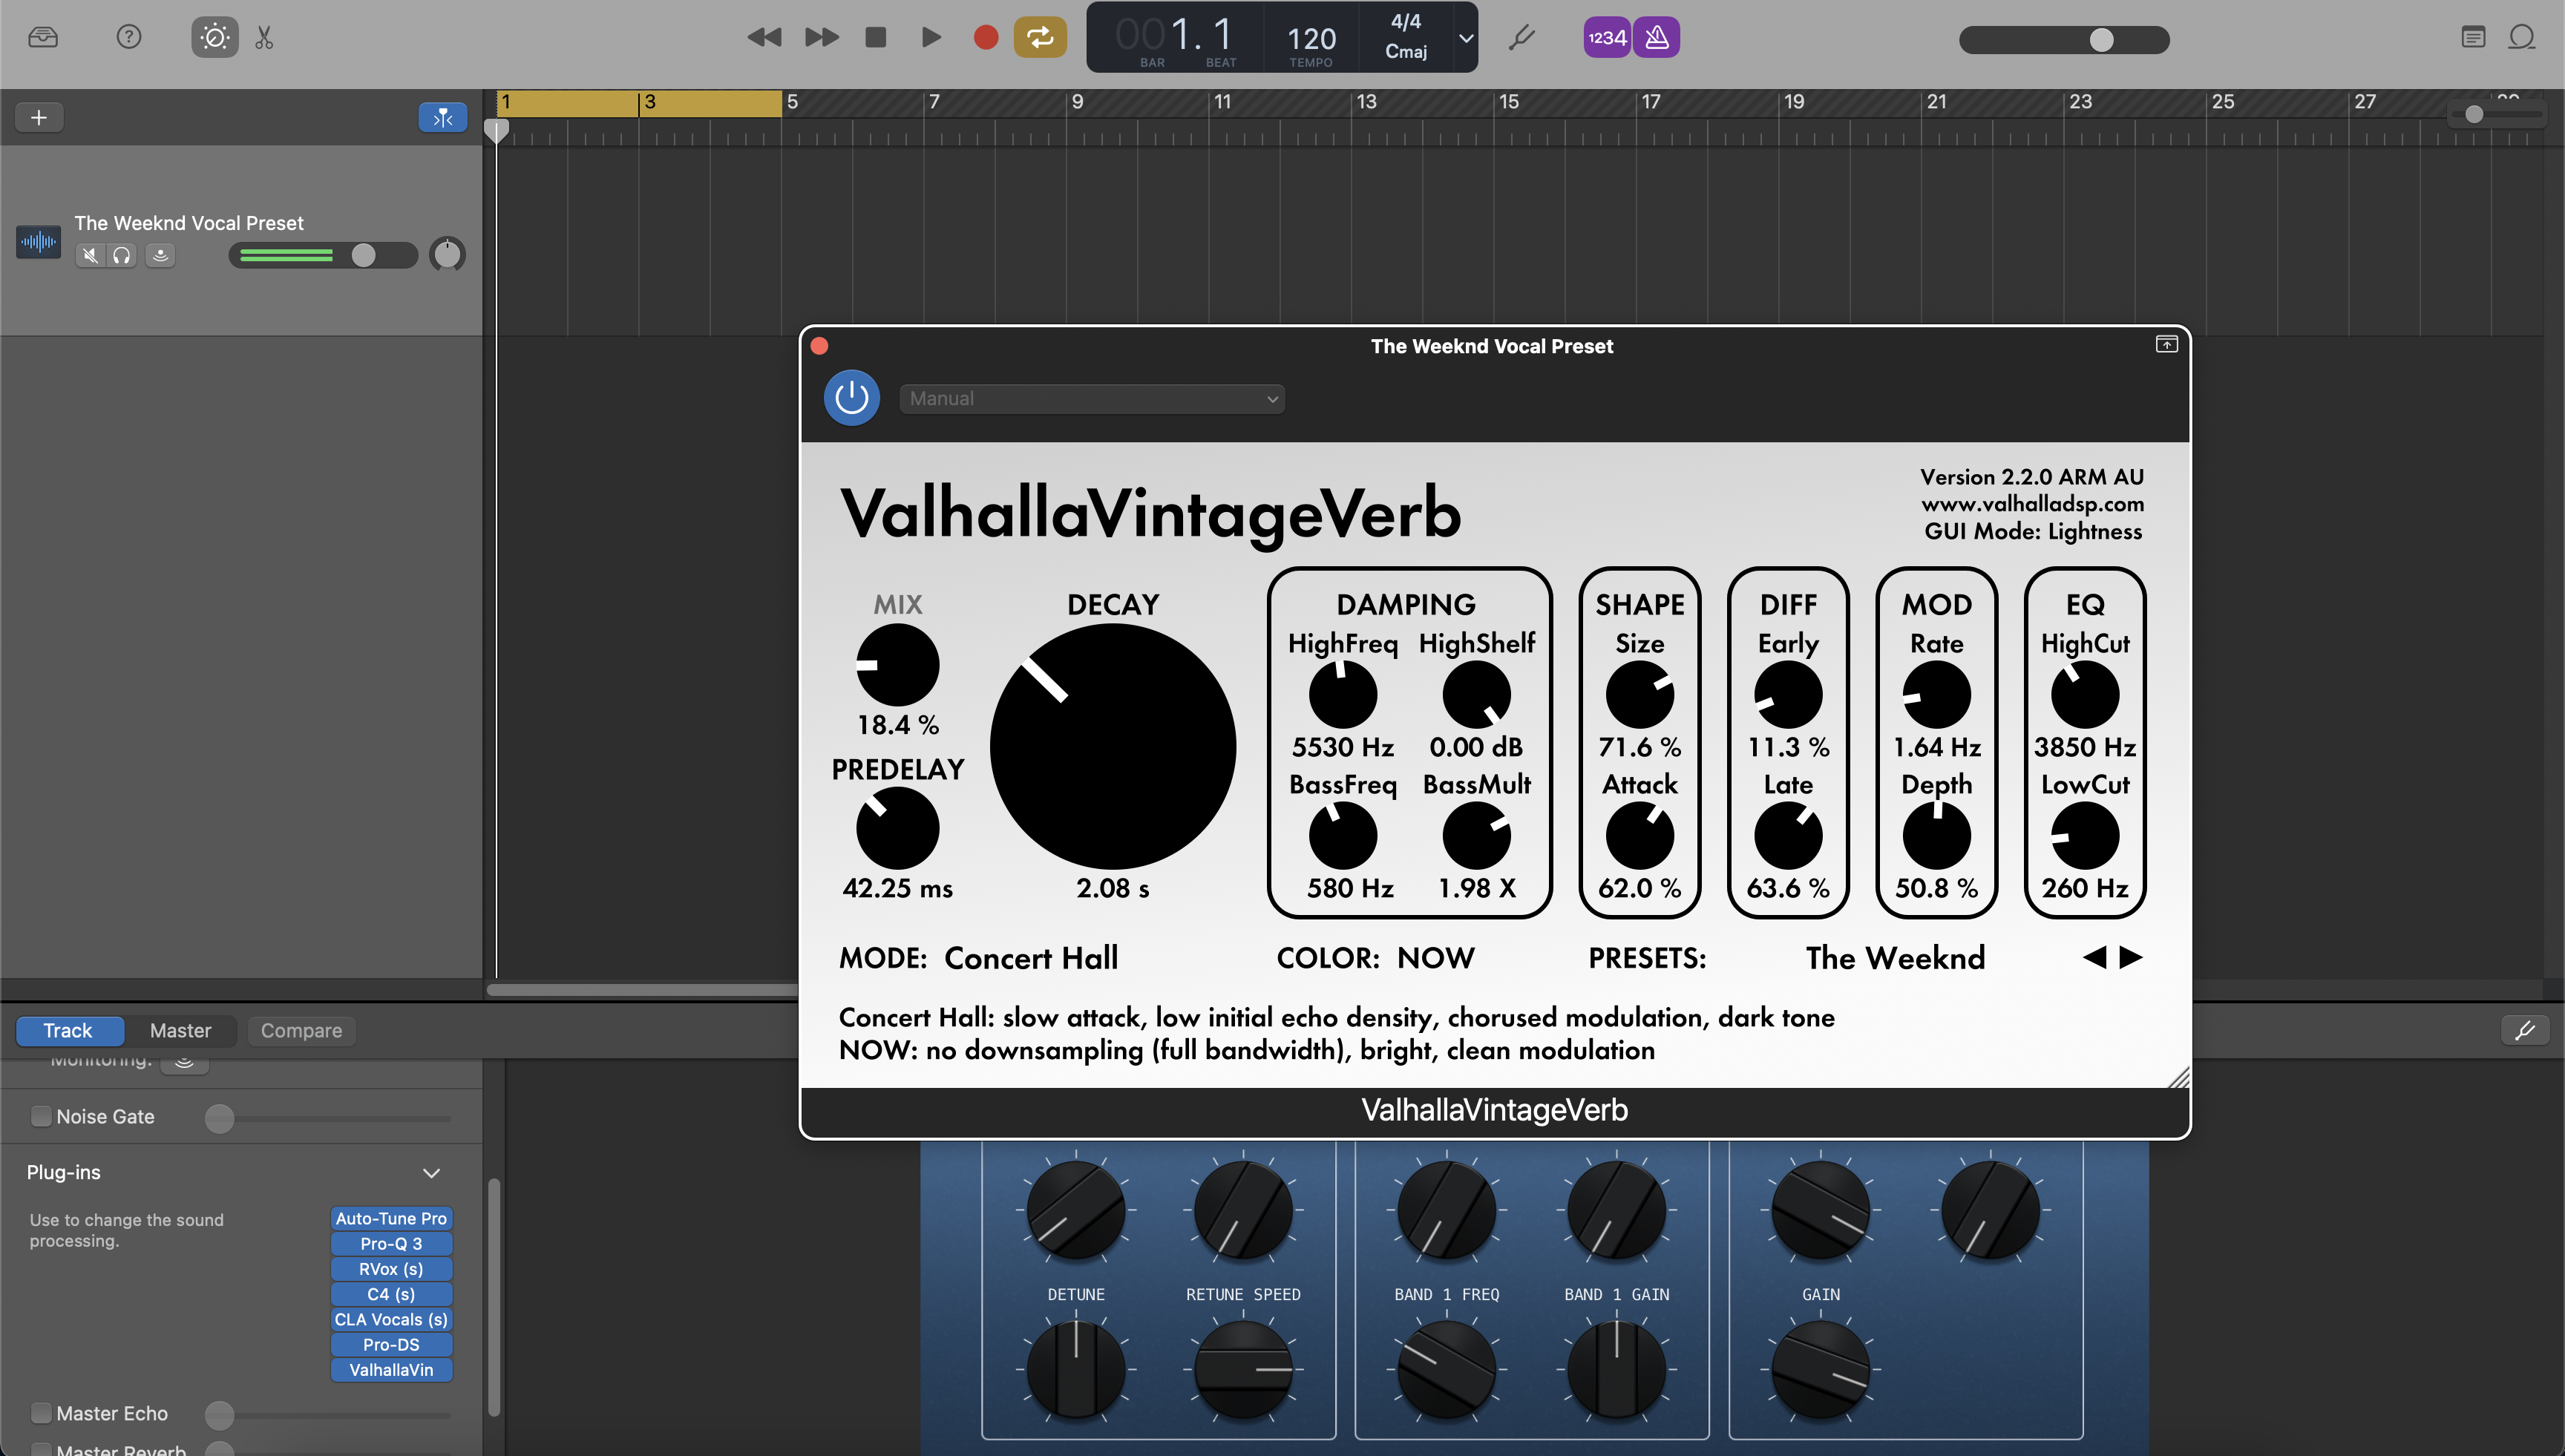
En GarageBand, un preset vocal es una cadena de plug-ins guardada en una pista vocal (o bus) con ajustes iniciales sensatos que ajustas para tu voz, micrófono y canción. Una cadena “inicial” equilibrada suele incluir:
- Filtro pasa-altos + ecualizador quirúrgico pequeño para eliminar ruidos graves y suavizar asperezas.
- Dos compresores ligeros en serie para un nivel estable sin bombeo evidente.
- De-esser colocado antes de cualquier ecualizador de agudos “aire” para que las consonantes se mantengan suaves.
- Saturación/excitador opcional para presencia y carácter.
- Delay sincronizado con el tempo + reverberación corta de placa/sala para un espacio que apoye la letra.
En Mac, cargarás la cadena en Controles Inteligentes y gestionarás los plug-ins por pista. En iPhone/iPad, trabajarás en la pestaña Plug-ins y EQ. De cualquier forma, el objetivo es una ganancia predecible y un sonido limpio y moderno que puedas ajustar en segundos en lugar de reinventar tu configuración en cada sesión. Para una visión más amplia de GarageBand en Mac, consulta la guía de usuario de Apple (enlace abajo) después de pegar este artículo.
Por qué usar presets (beneficios y cuándo ayudan)
- Velocidad: Abre, elige un preset, presiona grabar—no más calentamientos de plug-ins de 20 minutos.
- Consistencia: Una cadena calibrada mantiene el tono alineado en sencillos, EPs y series de contenido.
- Enfoque creativo: Dedica tiempo al rendimiento, dobles/improvisaciones y arreglo—no a la configuración técnica.
- Traducción: Las cadenas están diseñadas para mantenerse inteligibles en teléfonos/auriculares así como en monitores.
- Baja fricción: Menos decisiones en el momento—muy útil en laptops o iOS.
Grandes casos de uso: sesiones rápidas de escritura, colaboraciones remotas, reels/shorts, singles semanales, locuciones/podcasts o cualquier flujo de trabajo donde quieras pasar de la idea a la toma en minutos.
Estándar vs. Premium en GarageBand (Lo que Realmente Necesitas)
Cadenas solo estándar usan plugins integrados como Channel EQ, Compresor, De-Esser, Noise Gate y los efectos estándar de Delay/Reverb. Son portátiles, amigables con la CPU y funcionan en cualquier Mac o dispositivo iOS con GarageBand—perfectos para colaboración y setups económicos.
Cadenas premium añaden Audio Units de terceros selectos si ya los posees y quieres color extra (EQ dinámico, saturación especializada, afinación avanzada). En iOS, la disponibilidad de plugins AUv3 varía según el dispositivo y la versión de la app. Muchos artistas mantienen ambos: una cadena estándar para grabar en cualquier lugar y una cadena premium para pulir en casa.
Selección rápida: ¿nuevo en presets? Comienza con una cadena limpia de “voces claras”. ¿Conoces tu estilo? Carga una cadena ajustada al estilo (rap, R&B, pop) y ajusta los umbrales/envíos para tu voz. Para explorar opciones, consulta nuestros Presets Vocales para GarageBand o la colección más amplia de Presets Vocales.
Instalación y Inicio Rápido (Mac + iOS)
A. GarageBand para Mac
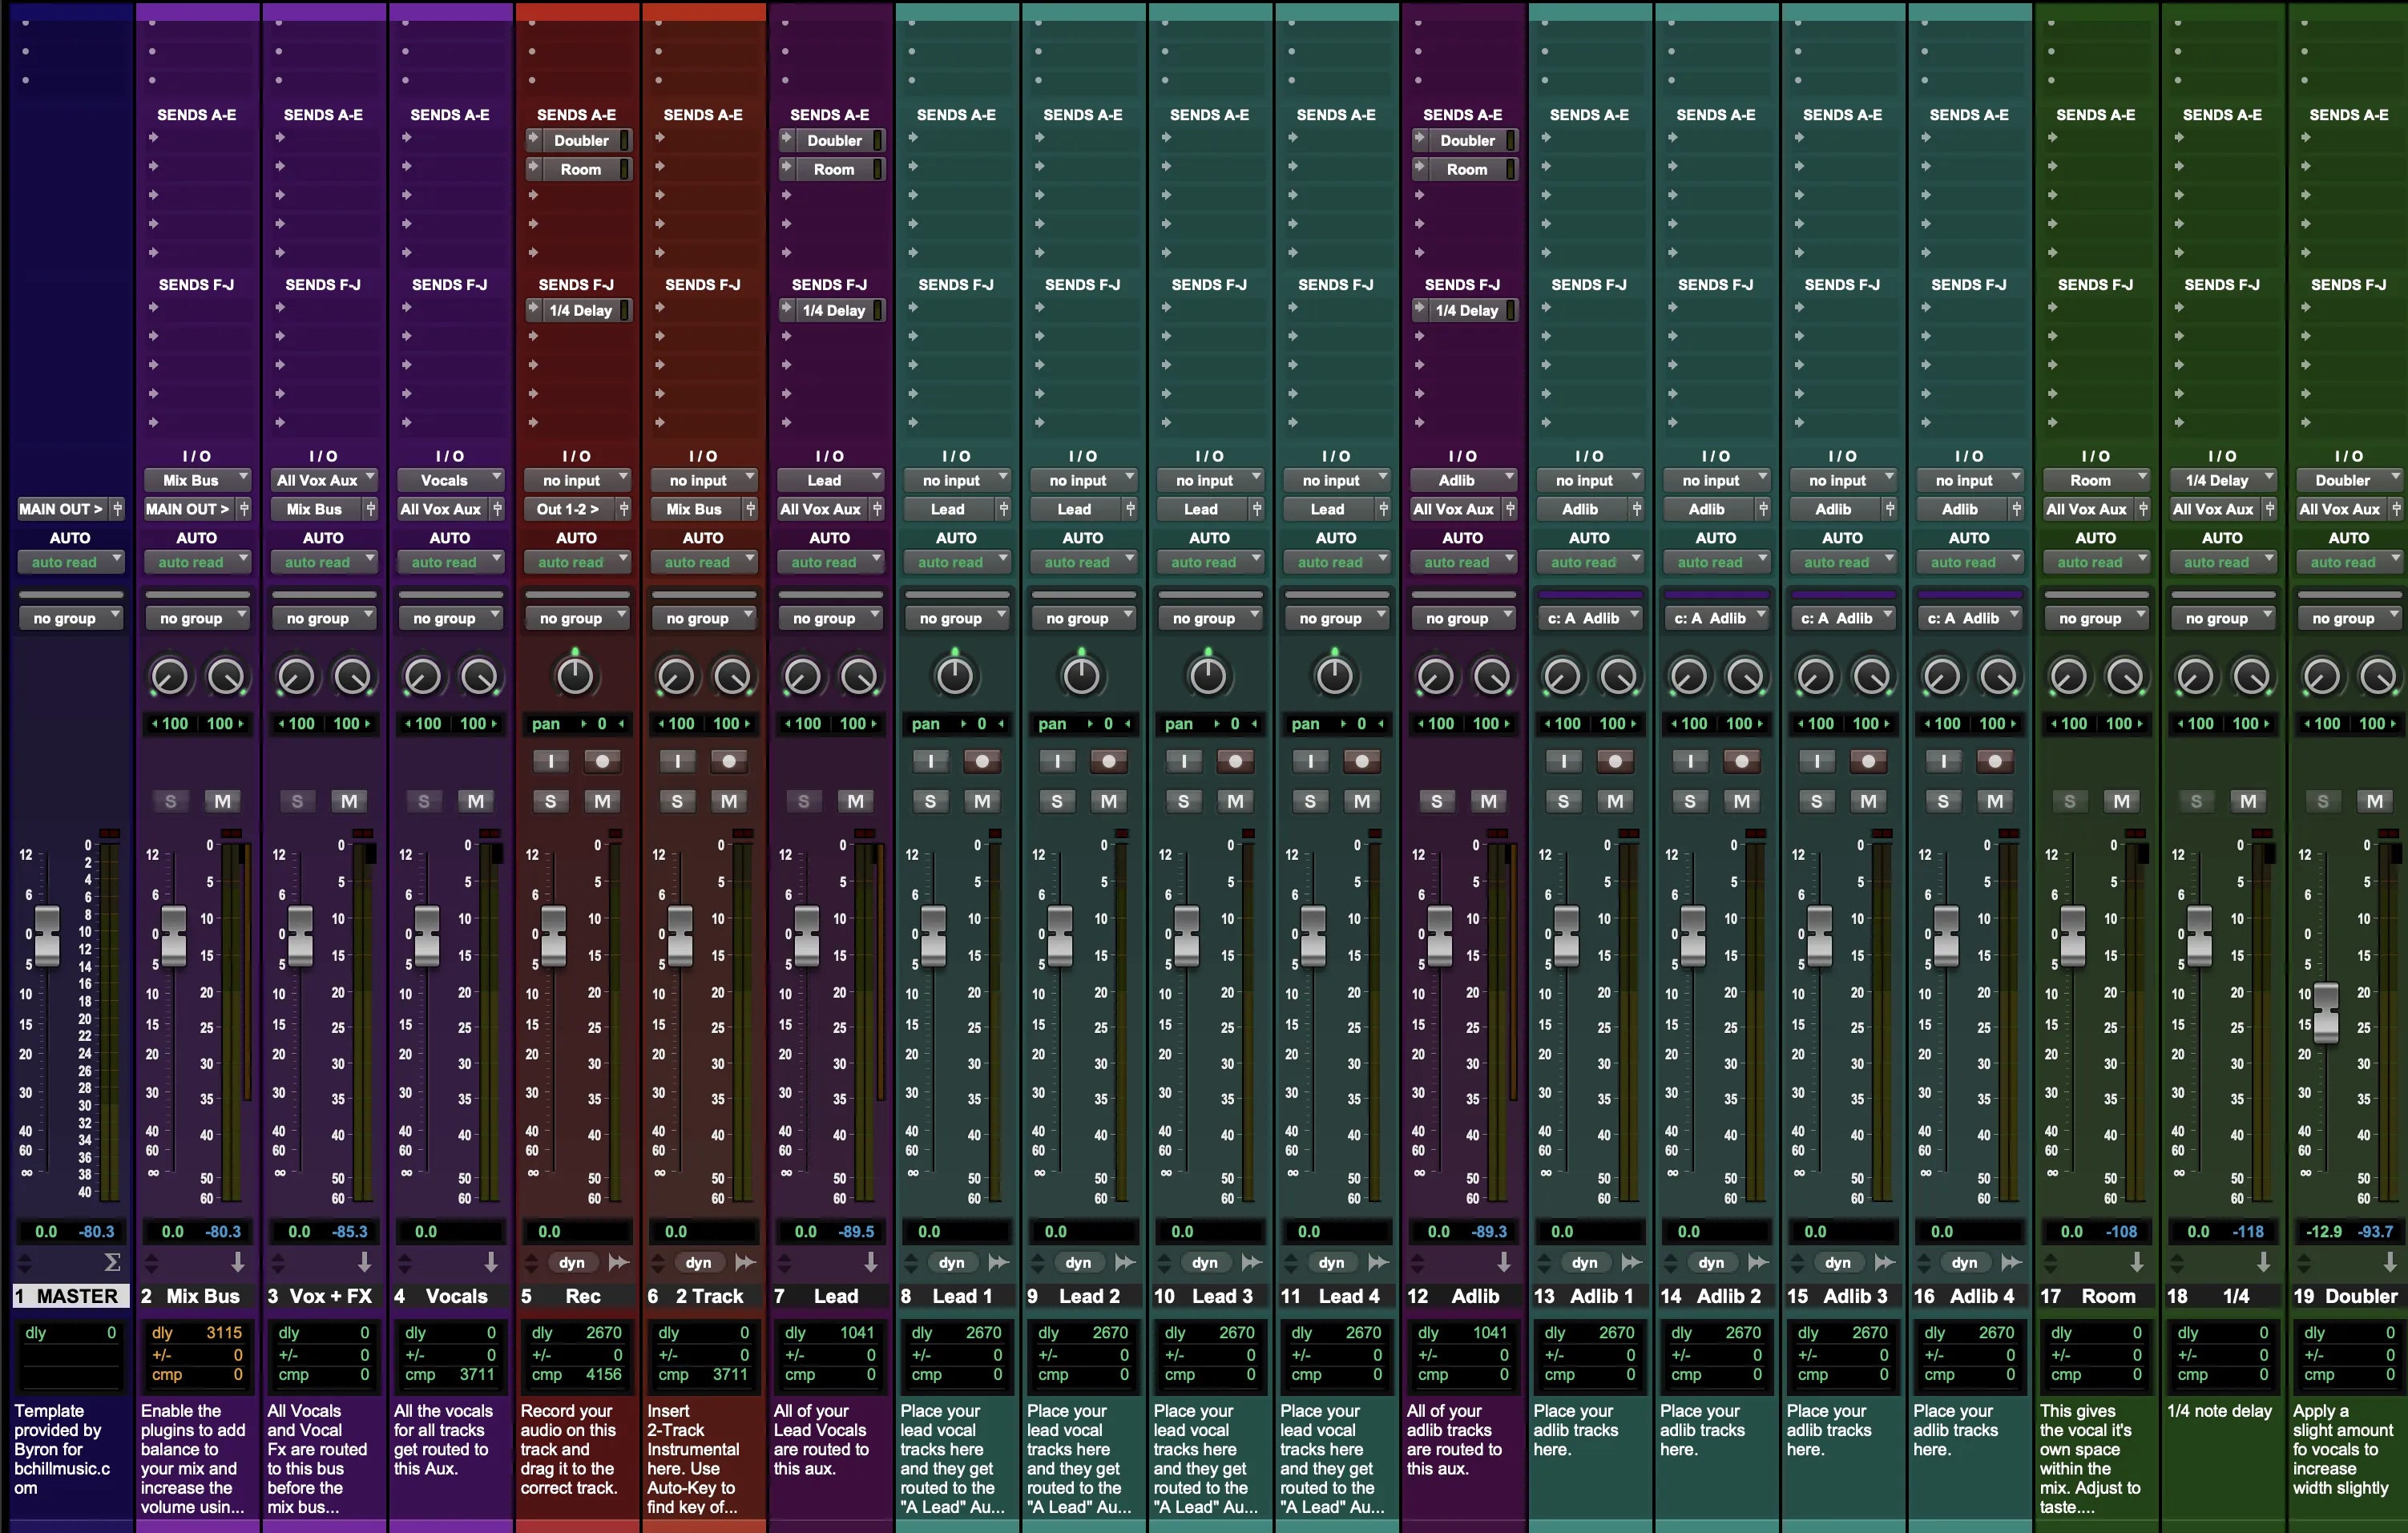
- Crea y nombra pistas. Añade una nueva pista de Audio para Lead, además de pistas para Dobles, Armonías y Ad-libs. Asígnales colores y, si te gusta el control agrupado, enrútalas a un Bus Vocal simple.
- Configura la entrada y la monitorización. Selecciona la entrada de tu interfaz en la pista Lead. Graba una frase de prueba corta y ajusta el preamplificador para que los picos estén seguros por debajo del recorte. Si la monitorización se siente lenta, mantén la cadena de grabación sencilla (EQ → compresión ligera → de-ess) y añade el pulido en la reproducción. Consulta la guía de GarageBand para Mac de Apple después de terminar aquí.
- Carga la cadena preestablecida. Abre Controles Inteligentes, añade EQ → Compresor → De-Esser → Saturación opcional → envíos a Delay/Reverb. Mantén los insertos mayormente secos durante la grabación; confía en los envíos para el espacio para que la latencia y la dicción se mantengan limpias.
- Ajusta umbrales y envíos. Apunta a unos pocos dB de reducción de ganancia limpia en las líneas más fuertes sin bombeo. Si aclaras, revisa el de-esser para que las “s” sigan suaves. Usa delays pequeños, sincronizados al tempo, y una placa corta; automatiza los envíos para los hooks.
- Guarda tu configuración. Almacena la cadena como un preset/parche de usuario y guarda una plantilla de proyecto para que cada sesión se abra con enrutamiento, margen y colores consistentes.
B. GarageBand para iPhone/iPad
- Añade una pista de grabadora de audio. Abre Plug-ins y EQ e inserta EQ → Compresor → De-Esser → Delay/Reverb. Graba con una cadena ligera para comodidad; expándela durante la mezcla.
- Configura nivel y tonalidad. Graba una prueba rápida y ajusta la entrada para que los picos no saturen. Si usas estilos con afinación avanzada, configura la tonalidad/escala de la canción y luego aplica el efecto Extreme Tuning de GarageBand con buen gusto.
- Guarda tu sonido personalizado. Una vez que tu cadena esté ajustada, guárdala como un sonido personalizado para que esté disponible en futuros proyectos en tu dispositivo.
Notas sobre ganancia (ambos): graba con margen saludable; evita luces rojas en la interfaz—el clipping no se puede arreglar. Si la ganancia de compensación sube demasiado los niveles, recorta la salida del clip o efecto en lugar de saturar el siguiente procesador. Mantén los picos de la mezcla en bruto sensatos para no perseguir la sonoridad mientras grabas.
Recetas de estilo y soluciones rápidas (Rap, R&B, Pop, Cantautor/Podcast, Afinación intensiva)
Rap Lead (punch moderno): Dos compresores ligeros en serie mantienen la dinámica ajustada sin matar los transitorios; enfoca la inteligibilidad en los medios altos; añade un slap corto o una pequeña placa para energía sin lavado. Eleva los coros automatizando un poco más el envío de delay en lugar de subir los inserts húmedos.
Rap Melódico / Trap: Agudos brillantes pero suaves; un toque de saturación antes del de-ess para mordida; ad-libs con un pasa altos un poco más alto y un poco más de de-ess para mantener las capas ordenadas. Amplía los hooks aumentando ligeramente la retroalimentación del delay y añadiendo pre-delay en la placa.
R&B / Soul: Ataque/liberación suave, estantería de aire suave, ambiente más amplio. Si los realces añaden siseo, reduce el brillo o añade un segundo de-ess más suave. Usa filtros pasa altos en los fondos y retrasos estéreo lentos que se sitúen detrás del lead para que la letra permanezca al frente.
Pop: Agudos pulidos con de-esser cuidadoso, delays sincronizados al tempo para espacio rítmico y una sala muy corta para “pegamento”. Toma decisiones con volumen igualado para que “más fuerte” no sesgue las comparaciones A/B. En arreglos densos, esculpe 2–4 kHz para que las palabras sigan siendo inteligibles.
Cantautor / Podcast (voz clara): Prioriza la inteligibilidad y el control de ruido. Compresión transparente, de-esser moderado y un toque de ambiente corto si lo seco suena antinatural. La técnica gana: distancia constante al micrófono, filtro anti-pop, habitación silenciosa.
Estilos con mucho afinado (ganchos e hyperpop): Ajusta la clave/escala correcta antes de aplicar afinación. Comienza moderado para un tono natural; sube más deliberadamente para el efecto robótico. Después de iluminar, revisa la sibilancia y el de-esser para mantener la claridad.
Soluciones comunes:
- “S/t” ásperas: reduce ligeramente el estante de agudos y/o suaviza el umbral del de-esser para que actúe solo en las sibilantes.
- Capas embarradas: pasa un filtro pasa-altos en dobles/armonías por encima de la voz principal y usa un poco más de de-esser en las capas.
- Demasiado espacio: comienza con envíos bajos; automatiza en los ganchos en lugar de mantener reverb/delay alto todo el tiempo.
- Latencia durante la grabación: graba con una cadena ligera; añade realzadores en la reproducción; en Mac, cierra apps en segundo plano y mantén la interfaz/monitorización directa activada cuando esté disponible.
- Voces enterradas en el ritmo: controla los instrumentos que compiten alrededor de 2–5 kHz o sube el bus vocal unos ~1 dB en los coros.
Presets vs. Plantillas de Grabación (Flujo de trabajo que escala)
Los presets vocales moldean el tono y la dinámica en una pista o bus. Las plantillas de grabación te ofrecen todo el diseño de la sesión—pistas pre-nombradas (Principal, Dobles, Armonías, Ad-libs), codificación por colores, enrutamiento simple de buses, lo básico de mezcla de auriculares y envíos listos—para que puedas pasar de la idea a la toma en segundos y mantener sesiones grandes organizadas.
- Abre tu plantilla para garantizar que el margen de cabeza, los medidores y el enrutamiento sean consistentes de canción en canción.
- Carga una cadena de presets que coincida con el estilo, luego guarda tu versión ajustada como tu punto de partida “voz”.
Si alternas entre Mac e iOS, mantén tus ajustes consistentes: reutiliza las mismas variantes “Claro / Neutro / Brillante” y usa una cadena ligera en móvil. Cuando quieras un conjunto más amplio de herramientas más allá de GarageBand, explora nuestro set completo de cadenas cross-DAW aquí: Presets Vocales.
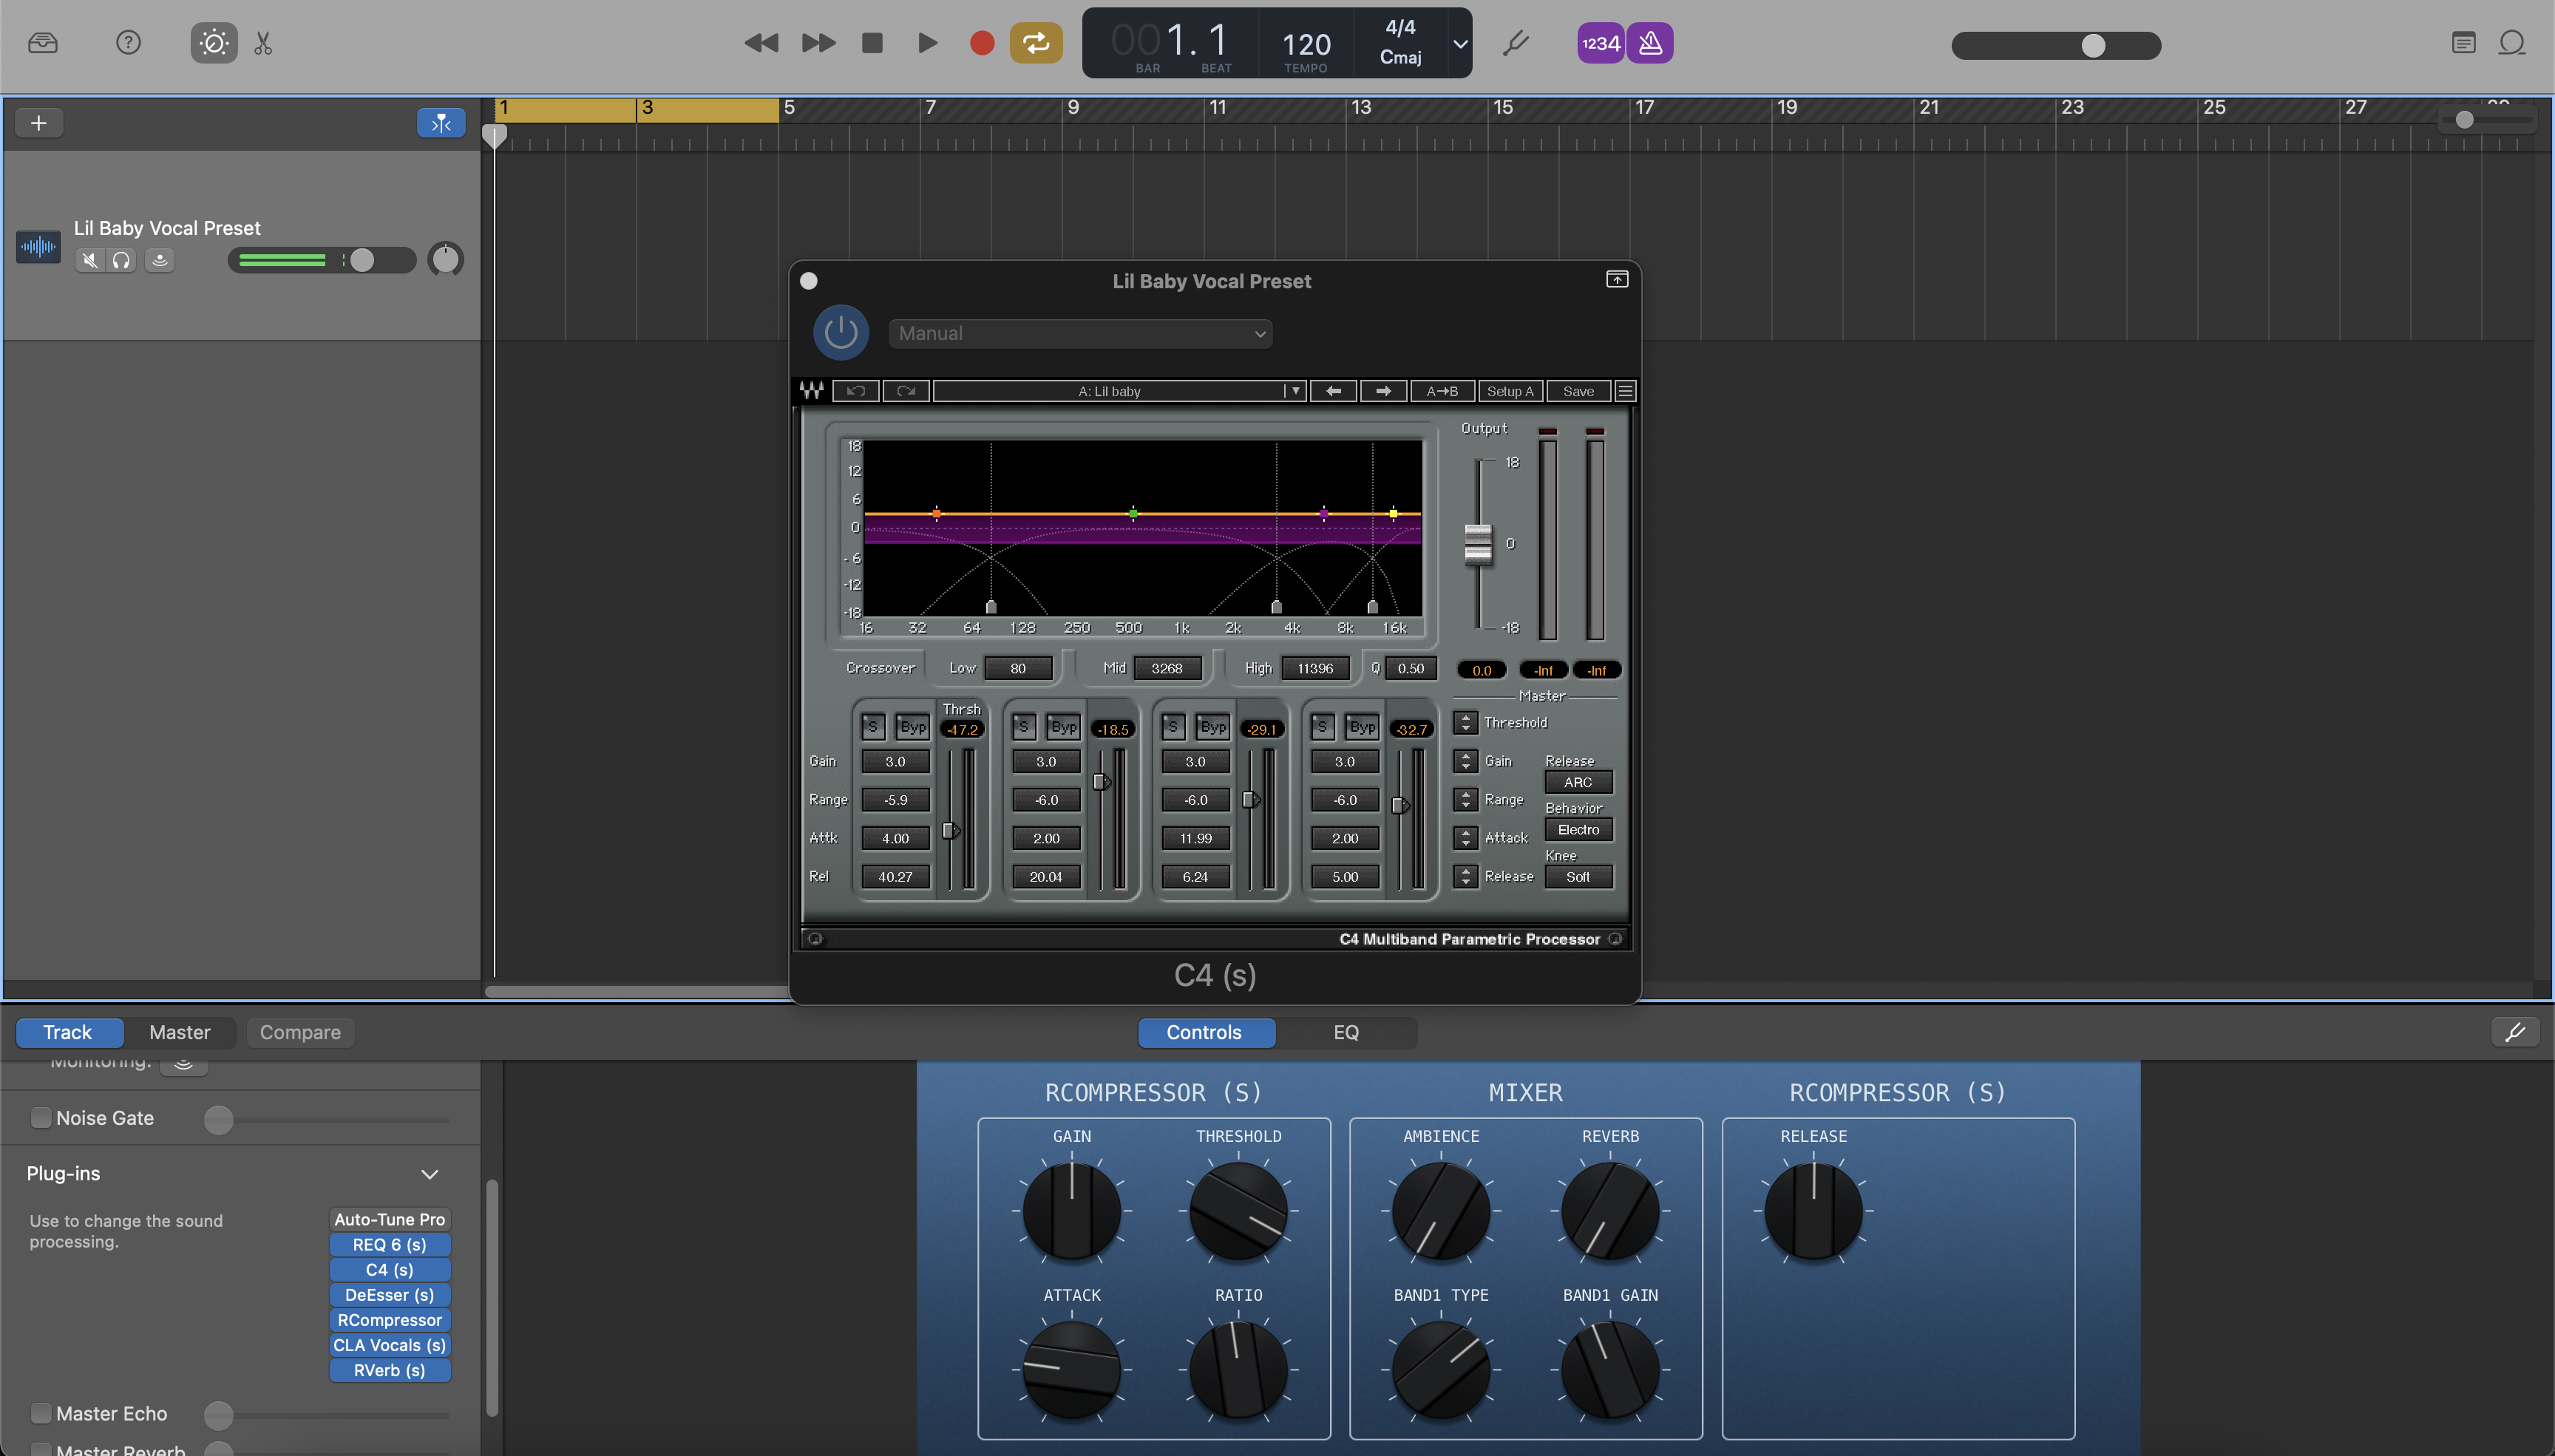
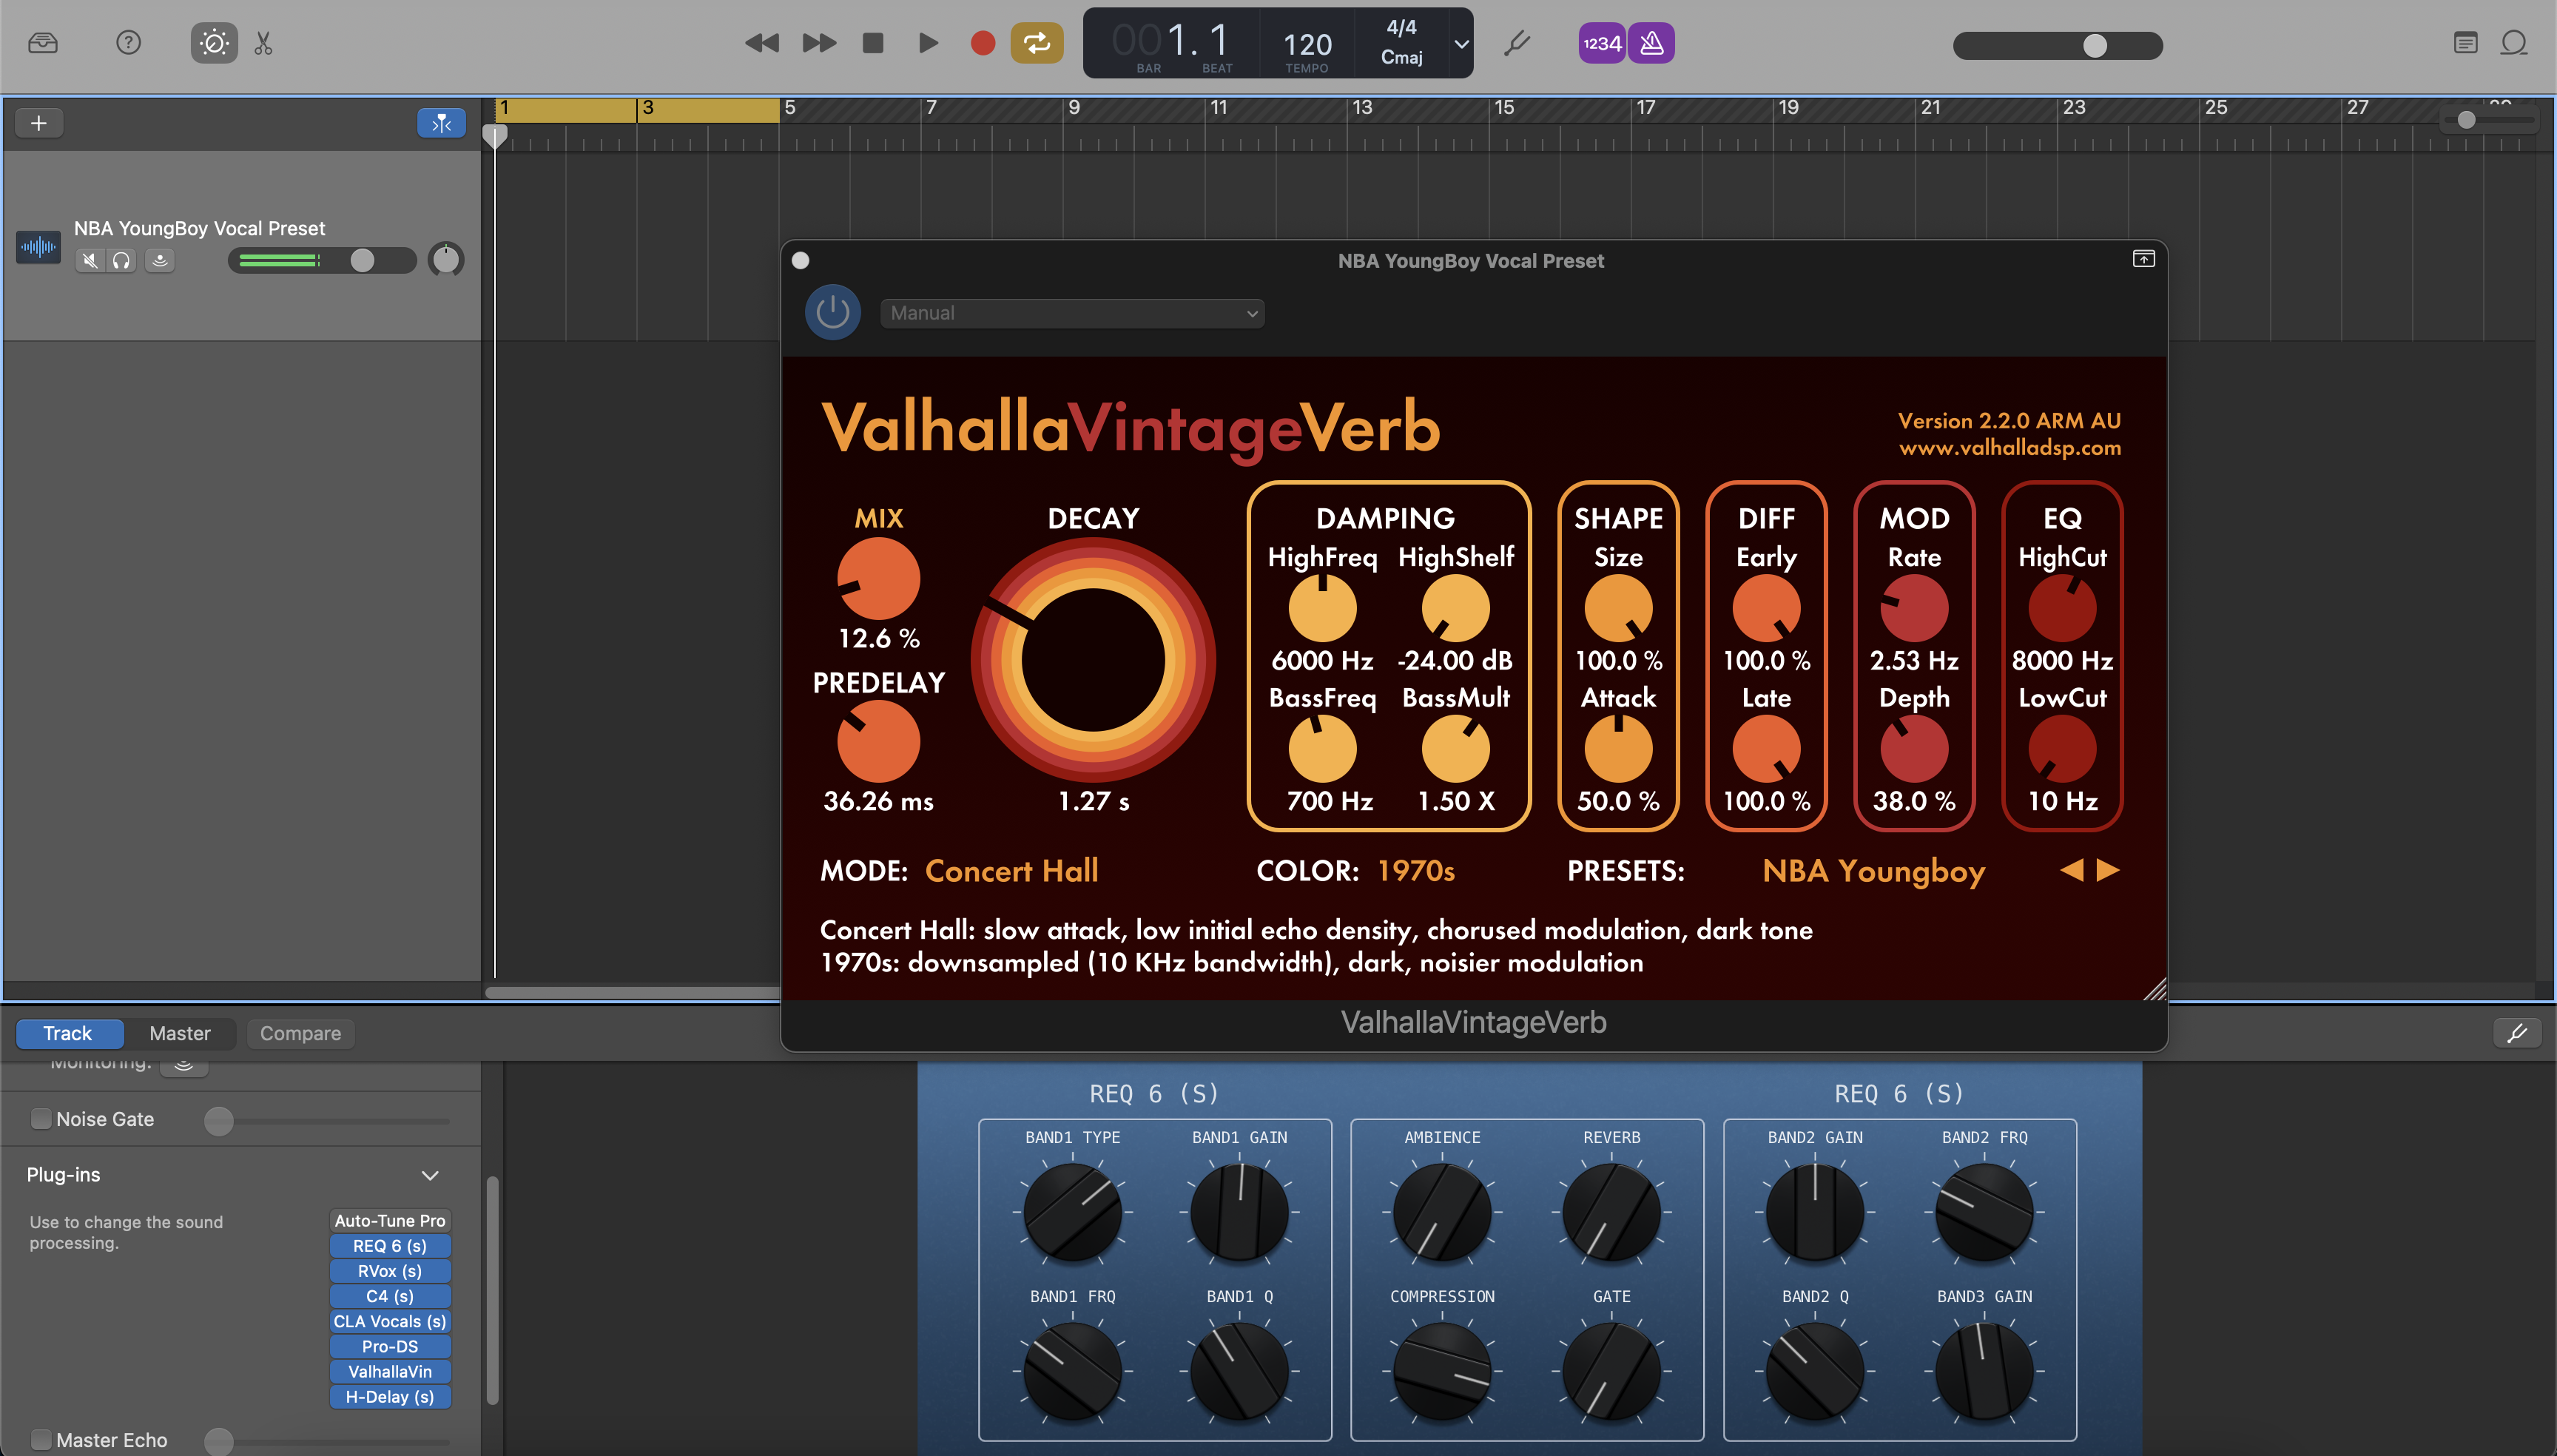
Guía Visual: Ejemplos de Cadena Vocal en GarageBand
Ve cómo nuestra cadena vocal de GarageBand se carga en pistas Lead, Doubles y Bus. Estas capturas de pantalla muestran configuraciones iniciales para rap, R&B, pop y voz clara; ajusta los umbrales y envíos para adaptarlos a tu micrófono y sala.